So I thought I’d go through something incredibly elaborate

and for the fun of it.

I’ve been playing with the latest release of dynamips (0.2.10), and very excitingly it can build for x86_64 OS X!  So I thought I’d build up a good sized network, much like what I first was exposed to when I started doing cisco networking back in the 1990’s.

Sadly I didn’t hold onto any IOS from back then, so I’m using something much newer, 12.2.  Back then I actually had some IGS stuff with version 9, and bunch of stuff on version 10 & 11.  For the most part I was lucky to use a 7513 as my wan core router, a 7200 for an access router, and 5500’s as my core route/switch fabric with ATM.  It was … very complicated for the day.

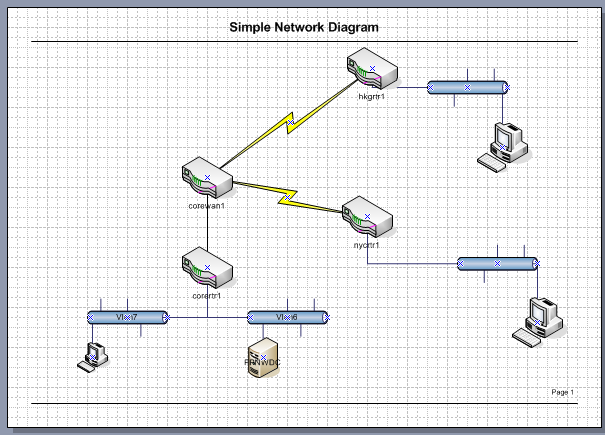
To get the ball rolling, I thought I would build out a core site, with a user & server VLAN (voip was a dream back then), and two sites connected via frame relay.  The protocols I most care about will be IPX/SPX and TCP/IP.  I was thinking of porting back the UDP patches for Qemu to version 0.90 so I could run Netware 3.12 in the mix, but honestly it is just easier to use the Netware file & print services for NT 4.0.

So along with the dynamips program, I’m using the obsolete (and easier to configure IMHO) dynagen program.

I’ve fed it a configuration like this:

autostart = False

[localhost]

[[7200]]
image = C7200-JS.BIN
npe = npe-400
ram = 160
idlepc = 0x60529c84
disk0 = 0
mmap = False
ghostios = True

[[ROUTER corertr1]]
model = 7200
slot1 = PA-8E
F0/0 = coresw1 1
E1/0 = coresw1 3
E1/1 = coresw1 8

[[ROUTER corewan1]]
model = 7200
slot1 = PA-8T
F0/0 = coresw1 2
s1/0 = F1 1
configuration = ”

[[ROUTER nycrtr1]]
model = 7200
slot1 = PA-4T+
f0/0 = nycsw1 1
s1/0 = F1 2
configuration = ”

[[ROUTER hkgrtr1]]
model = 7200
slot1 = PA-4T+
f0/0 = hkgsw1 1
s1/0 = F1 3
configuration = ”

#Frame relay switch
[[FRSW F1]]
1:102 = 2:201
1:103 = 3:301

#Core ethernet
#vlan 5 WAN
#vlan 6 server
# 4 FPNW-DC 138.1.1.10
#vlan 7 workstation
[[ethsw coresw1]]
1 = access 5
2 = access 5
3 = access 6
4 = access 6 NIO_udp:41300:127.0.0.1:51300
5 = access 6 NIO_udp:41301:127.0.0.1:51301
6 = access 6 NIO_udp:41302:127.0.0.1:51302
7 = access 6 NIO_udp:41303:127.0.0.1:51303
8 = access 7
9 = access 7 NIO_udp:41304:127.0.0.1:51304

[[ethsw nycsw1]]
1 = access 1
2 = access 1 NIO_udp:41305:127.0.0.1:51305

[[ethsw hkgsw1]]
1 = access 1
2 = access 1 NIO_udp:41306:127.0.0.1:51306

Screen Shot 2013-09-18 at 10.21.03 PM

Or something like this

Ok, now this may look complicated, but in all reality it really isn’t.  It is always a good thing to keep track of what network addresses you are going to use, so here is my chart:


Description IPX IP Mask
CORE
FA0/0 Wan Interconnect C0000001 138.1.0.5 255.255.255.0
Eth1/0 Server C0010001 138.1.1.1 255.255.255.0
Eth1/1 User C0010002 138.1.10.1 255.255.255.0
WAN
Fa0/0 Wan Interconnect C0000001 138.1.0.6 255.255.255.0
S1/0.102 New York PVC A0000001 135.0.0.5 255.255.255.252
S1/0.103 Hong Kong PVC A0000002 135.0.0.1 255.255.255.252
New York
Fa0/0 User C10000001 136.2.0.1 255.255.255.0
S1/0.201 Core PVC 201 A0000001 135.0.0.6 255.255.255.252
Hong Kong
Fa0/0 User C20000001 136.1.0.1 255.255.255.0
S1/0.301 Core PVC 301 A0000002 135.0.0.2 255.255.255.252

For simplicities sake for the routers & IOS I’m using 7200’s everywhere.  The 7200 is a good router with plenty of slots, so it fits my needs just fine.  I suppose I could track down a 2600 or 1700 IOS image, and use them for the access sites, but for now it doesn’t matter.  Mostly because of the ghostios image option where the same memory map can be shared between routers, and of course my Mac Pro has 16GB of RAM.

Now the exciting part of this configuration is that I can easily connect in Qemu 1.6.0 processes to this configuration, allowing me to test the network out in its entirety.  Even better thanks to it being UDP, I can reboot and restart the Qemu or router processes at will.

Naturally like any test scenario, I should spell out some goals, along with some applications that I hope to be able to run.  So to start, a simple setup with an NT 4.0 server with the FPNW services setup.  To run Qemu to attach to the first port on the server VLAN in the core switch I start Qemu like this:

./qemu/qemu-system-i386 -cpu pentium -L ./qemu/pc-bios/ -m 64 -hda FPNW-DC.vmdk -net nic,model=pcnet -net nic,model=ne2k_isa -net socket,udp=localhost:41300,localaddr=0.0.0.0:51300

And from there by changing the UDP numbers I can easily jump VLANs.  Fun.  The major thing is that each additional instance of Qemu will need a unique MAC address, so additional instances should be run like this…

./qemu/qemu-system-i386 -L ./qemu/pc-bios/ -m 16 -net nic,model=pcnet,macaddr=00:11:22:33:44:55 -net socket,udp=localhost:41304,localaddr=0.0.0.0:51304  -fda nwclient-pcnet.vfd

So maybe I should launch into some big diatribe on cisco routers, networking and the rest of the fun stuff.  And maybe I will.

I think the next article will be an anchor page for various topics of what I’m going to get into, and from there evolve my network from the mid 90’s before the internet craze into something far more modern.  And of course a page going over the scope of what I hope to create.

TTPod restricted ip address…

So my wife loves this Chinese application TTPod, which lets you listen to music.  And oh joy last night it suddenly stops working because of an error of “invalid ip address”.

Well it seems that the application will now only fully work in China.  Even though we are in a SAR (Hong Kong) it isn’t good enough it would seem.

I haven’t used Pandora in ages, and I thought I’d try that to get the same thing.

So for people who like this kind of thing, (esp my wife who just must have facebook while we are in China) I use OverPlay which has VPN endpoints in numerous countries, and supports things like OpenVPN & PPTP which is perfect for devices like iPhone & Android Phones.  So I can still get my BBC & CBC Fix, along with access to my Hulu subscription while abroad.

I swear that IP restrictions are so retarded, all they do is make you funnel traffic to get around them, and punish expats.

rtl8139 drivers..

I don’t know why but looking for working rtl8139 drivers for OS/2 and Windows NT 4.0 has proven to be more difficult than it should have been…

But what I’ve found is that the file “oem-8139(500).zip” on realtek‘s site basically contains everything! (well old stuff).

C:.
├───BROM
├───CLIENT32
├───DMI
│ ├───95LOADER
│ ├───NTLOADER
│ ├───WINEXE
│ └───WINSYS
├───FREEBSD
├───LINUX
├───MACOS
├───MACOSX
├───MSLANMAN.DOS
│ └───DRIVERS
│ ├───ETHERNET
│ │ └───RTL8139
│ └───NIF
├───MSLANMAN.OS2
│ └───DRIVERS
│ ├───ETHERNET
│ │ └───RTL8139
│ └───NIF
├───NDIS2DOS
├───NDIS2OS2
├───NT351
├───NWCLIENT
│ ├───DOS
│ └───OS2
├───NWSERVER
│ ├───311
│ ├───312
│ ├───40
│ ├───41X
│ └───42_5X
├───RTOS
├───RTSPKT
├───SCO
│ ├───4.X
│ ├───5.X
│ └───TXT
├───TXT
│ ├───GENERAL
│ ├───IBM
│ ├───MS
│ ├───NETWARE
│ ├───OTHERS
│ └───UNIX
├───UW7
├───W95OSR2
├───WFW311
├───WIN2000
├───WIN95A
├───WIN98
├───WINDIAG
├───WINME
├───WINNT4
└───WINXP

I don’t know if the link will last, but click here, and look for “OEM disk for users and manufacturers (LAN Card)”

Qemu 0.15.1 patched

I went ahead and slapped together a bunch of favorite patches to Qemu that I seemed to not have put in all together… so here we go the i386 version…..

  • AdLib! enabled
  • NE2000 set to 0x320 IRQ 10
  • GNS udp
  • control+alt+d to do a CAD
  • control+alt+r to reset
  • ISA Cirrus VGA adapter (CLGD5426)

I’ve also found for Windows 95, that if you set the graphics one notch off of full acceleration  that the mouse pointer will ‘work’ …

Of all the testing Iv’e done so far, it’s just been with Windows 95, the soundblaster/adlib works along with the networking (NAT) as I installed IE 3.01 for good measure.

For those who are interested, my build is available here, and the patch is here.

The ISA Cirrus VGA is enabled with -vga isacirrus … Enjoy!

Dell UNIX Lives Again!

(please note that this is a guest post from Antoni Sawicki)

Dell UNIX is so ultra rare among rare Unix species that it doesn’t even have a Wikipedia entry. I have been hunting this elusive but important piece of computer history for well over 15 years now. Fortunately thanks to Charles H. Sauer and his excellent blog post I was finally able to lay my hands on disk and tape images and the restoration process begun.

The install tape

The system can be installed from either a tape or network server (presumably NFS). Unfortunately no virtualization software can emulate a tape drive. Hopes for a network install are even slimmer since the required network support floppy disk has been lost and chances of suitable Ethernet driver working in Bochs or Qemu are equal to that of finding the lost floppy disk.

I have decided to try a hard disk image from a readily pre-installed system. The original Dell 486 workstation had a 1GB SCSI hard disk. Unfortunately neither Dell UNIX supports LBA mode nor Qemu/Bochs support the Adaptec 154x controller required by the OS.

As all normal install options have been exhausted, the only option left was to use a second hard disk image as source of cpio archive files. Booting from the two install floppies and attaching two disk images was a snap. The next step was to inject the tape “file” in to a right place on the disk, so it can be read by cpio command. A hard disk in Dell UNIX is pretty much unusable without a valid SysV partition and VTOC. Fortunately dellsetup command does it all for you. Once VTOC was put in place I’ve attached the transfer disk image as a loopback device in my host OS. In couple of iterations I was able to aim the host os dd if=file1 of=/dev/loop0 bs=512 seek=offset at the right place, which you work out using prtvtoc /dev/rdsk/1s0 command. Then cpio -ict < /dev/dsk/1s1 was able to list contents of the emulated tape… with errors…

In my infinite wisdom, for some unknown reason I’ve assumed that LBA addressing is required above 540MB. So to be on a safe side I have made the hard disk images 512 MB. What a mistake it was! I have lost several hours trying to figure out cpio header errors coming from the disk… By pure coincidence, while the tape archive was installing (with errors) I was researching for this very blog article and found that LBA starts at 504 MB… Recreating the hard disk images just few MB smaller took all tape and prior boot problems away!

Once the cpio archive was extracted I have made few final touches taken from the original tape install script. After a reboot Dell UNIX booted perfectly. You can experience this by using the firstboot image file. The final part of installation was injecting the second tape file containing System V PKG file to the transfer disk image and running pkgadd -d /dev/dsk/1s1. This is what’s included on allsoft.img.

Dell Unix at First Boot

Some final notes on running the OS:

  • To enable mouse to work:
    • Qemu just add “-chardev msmouse,id=msmouse -device isa-serial,chardev=msmouse” to the launch arguments.
    • Bochs add to the config file:
      mouse: type=serial, enabled=1 
      com1: enabled=1, mode=mouse
      then you have to kill mousemgr process and prevent from starting by deleting /etc/rc2.d/S25mse
      then edit /usr/lib/X11/Xconfig:
      disable Xqueue
      enable Microsoft Mouse
  • To enable keyboard to work correctly in VirtualBOX start with Num Lock OFF.
  • You can use qemu-img utility to convert the image to VMware vmdk to use in VirtualBox.
  • To run X window type startx

X11 and all its glory

  • To attach it to internet use SLIP as there is no working Ethernet driver.  Contrary to most UNIXen of the time, the command is not slattach, but rather slipattach.  Thankfully it does work the same way.  I have found that running Dell Unix with VirtualBOX, along with Windows NT 4.0 I was able to connect into the Dell Unix VM, and get network access.  Just set the two VM’s up for a named pipe (\\.\pipe\dellunix) and make one of them a server, and start that VM 1st.  The steps to prepare Windows NT have been outlined before.

Telnet via SLIP

Legal disclaimer: Dell UNIX is a commercial software and should not be distributed without manufacturers permission. However as the operating system has been dead for 20 years and with a long tradition from Unix Heritage Society and Bitsavers I’m publishing this in good faith under abandonware category. If Dell or any other copyright holder wishes this software removed, please let me know.

Attached are:

  • firstboot image
  • all (pkg) software installed
  • setup instructions if you wish to install from scratch.

Download:

You may also be interested in my post about a sister System V operating system – Interactive UNIX:

Update: Dell Unix now runs on 86Box with higher resolution and proper networking.

QuakeWorld for DOS updates..

Remember my old Quake port to MS-DOS that included that WatTcp package so that you could play on the internet under glorious MS-DOS?  Well it’s kind of taken a life onto its own, and thanks to the hard work of Frank Sapone, it picked up all kinds of updates including:

Whew isn’t that great?

I’ll have to check to see how much of this I can backport to OS/2

You can download it, and more here.  And in the meantime I’ve put up my server on 68.68.97.224 … Enjoy!

Qemu 0.13 for GNS3

So I’ve been playing with GNS3 here and there and the #1 thing that is annoying is of course how difficult it is to deal with the CAD problem (Control Alt Delete) esp when dealing with anything Windows NT based.  So I’ve taken my SDL keyboard patches, “fixed” the NE2000 (although enabling that is another story) and made my build available here.

Of course the real work, adding in the UDP networking was done on the GNS user forums, but it sure is nice to be able to quickly login to a test Windows 2000 AD setup…  I don’t know if it’ll interest the rest of you but I thought it was pretty neat.

Now what would be really cool would be to take the ‘Ethernet hub’ of GNS3, and make it into a service, alter Qemu to generate a random MAC and make a real distributed network…. Another thing would be a way to take SLIRP and merge it with the NetUDP to make some kind of real world ‘NAT’ type thing.  Although I guess I could always add some extra flags to the Qemu process to include a second NIC and set it up for ‘user’ networking … something like “ -net nic,model=pcnet,vlan=1 -net user,vlan=1” to add an AMD PCNet card that talks to the ‘user’ or NAT networking component…

A super simple network with OS/2 Qemu!

GNS3

Inspired from this video, I have to admit I’m really impressed how GNS3 can now network between dynamips router instances, and Qemu … So I grabbed an old IOS version from a 7200, and fired up Qemu with NT 4.0 and built a super simple network.  Because it won’t let you hotplug cables between hosts, I figured I’d just go ahead and add switches everywhere.  So bottom line is that I setup a super simple network, and I can ping/telnet to the routers from NT.  This could even be used to build more complicated networks, but as always people seem to get more excited about doing ‘pings’ through the network, and overlook actual USER traffic…

GNS3 uses a custom build of Qemu 0.11.0, which I may have to feel the need to modify it for some control-alt-delete fun, along with making sure the ISA NE2000 is on an agreeable port/IRQ.


cloning an IDE Linux machine with netcat

I’ve ran into some weird instance of this old RedHat Linux machine that is starting to die.. The old 30GB disk is clicking rather loudly…!

To make matters worse, the computer is not only in another country but on another continent.  And no the users won’t let me take it down, ship it or let local techs work on it, they want it virtualized, and they want it to be done without taking it down…

All I have to work with is an old Windows 2003 server with a big external USB disk, and I don’t even have administrator privileges on the 2003 server so I can’t install anything ‘fun’ like VMWare, VirtualPC, VirtualBOX or anything else.

So I thought I’d go old school with this and use netcat.

Thankfully there is a win32 version of netcat, and the Linux PC already had it installed.  So it really was trivial I must say knowing what to do once all the bits are in place.  From the Windows machine I just ran:

nc -p 2222 -l |gzip -dc > disk0.raw

And on the Linux PC I ran:

cat /dev/hda | gzip -c | netcat 10.0.1.10 2222

So on the Windows side, netcat will listen on TCP port 2222 and then decompress the stream with gzip and save that into the file disk0.raw.  On the Linux side, it’ll read the harddisk, compress the data with gzip and then using netcat redirect the stream to the Windows host.

It took about 30 minutes, I suppose if the disk wasn’t in a questionable state I’d have cleared out the empty space to speed it along, however I felt that doing a large amount of writing to a questionable disk is just asking for trouble.

Once the transfer was complete I was able to then fire up Qemu 0.15.0, and have it mount the raw disk image, and it worked perfectly!  I added the modules for the AMDPCNet card (pcnet32) and I was able to use the user mode NAT via Qemu, and redirect a local TCP port into the VM’s sshd …. Something like this:

qemu -L pc-bios -m 256 -net nic,model=pcnet -net user -hda disk0.raw -no-reboot -redir tcp:3333::22

And that was that.  Now we have a perfect copy of the machine!