Using Qemu in 2020

So I wanted to dive back into old BSD, and I wanted to use the new native Qemu on OS X. That means having to “learn” the new crazy syntax that has drifted a LOT over the last 10+ years.

I want to run NetBSD 1.0 and tear into the GCC 2.x patches required back in the day

In the old days, I was using Qemu 0.13 and had it working using the following:

qemu.exe -L pc-bios -hda netbsd-1.0.vmdk -net nic,model=ne2k_isa -net user -redir tcp:42323::23 -m 64 -no-reboot  -rtc base=localtime -k en-us

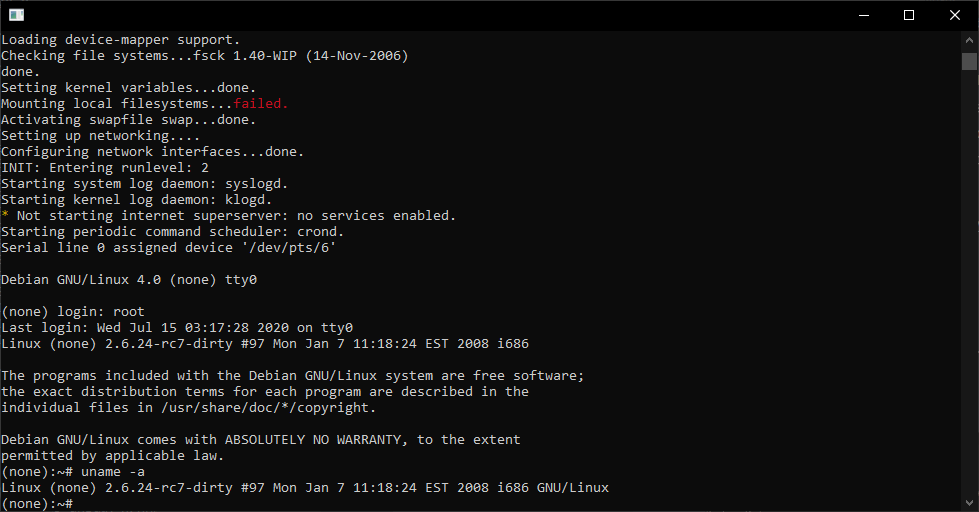
Thankfully I was using VMDK containers, probably as I’m sure I installed it under VMware, with it’s better floppy support, but pulled it back to Qemu to have NE2000 support. Now let’s look at the dmesg to where the source of the problem is, the network card:

NetBSD 1.0 (QEMU) #0: Thu Sep 22 06:45:37 PDT 2016
    [email protected]:/usr/src/sys/arch/i386/compile/QEMU
CPU: Pentium (GenuineIntel 586-class CPU)
real mem  = 67764224
avail mem = 62312448
using 852 buffers containing 3489792 bytes of memory
pc0 at isa0 port 0x60-0x6f irq 1: color
com0 at isa0 port 0x3f8-0x3ff irq 4: ns16550a, working fifo
lpt0 at isa0 port 0x378-0x37f irq 7
wdc0 at isa0 port 0x1f0-0x1f7 irq 14
wd0 at wdc0 drive 0: 1023MB 2080 cyl, 16 head, 63 sec <QEMU HARDDISK>
fdc0 at isa0 port 0x3f0-0x3f7 irq 6 drq 2
fd0 at fdc0 drive 1: density unknown
pci0 at isa0 port 0x0-0x665: configuration mode 1
pci0 bus 0 device 0: identifier 12378086 class 06000002 not configured
pci0 bus 0 device 1: identifier 70008086 class 06010000 not configured
pci0 bus 0 device 2: identifier 11111234 class 03000002 not configured
ed0 at isa0 port 0x320-0x33f irq 10: address 52:54:00:12:34:56, type NE2000 (16-bit)
npx0 at isa0 port 0xf0-0xff: using exception 16
biomask 4040 netmask 412 ttymask 12
changing root device to wd0a

So the important thing here is that the NE2000 is the ed0 device using an IO of 0x320 and IRQ 10. I’m pretty sure back then I cheated, and just recompiled Qemu to remove the default definition that doesn’t work properly with trying to share IRQ 9.

Keeping this in mind, let’s build this for the new Qemu:

qemu-system-i386 -net none -device ne2k_isa,iobase=0x320,irq=10,netdev=ne -netdev user,id=ne,hostfwd=tcp::42323-:23 -drive file=netbsd-1.0.vmdk,if=ide,index=0,media=disk,cache=writeback,format=vmdk -rtc base=localtime -k en-us

So the first important thing is to disable any/all defualt NIC’s with the ‘net none’ flag. Next to add in the NE2K_ISA type device manually so I can specify the iobase & irq manually. Note the netdev as this is used to tie in the emulated device, to the backend that will process the packets. The next part is the redirect to have the host listen on port 42323 and redirect them into port 23 of the VM. Again the syntax to redirect ports has drifted significantly. The hostfwd now is bound directly to the netdev user, in this new syntax it allows for multiple NIC’s to be bound to multiple user NAT’s if needed.

-device ne2k_isa,iobase=0x320,irq=10,netdev=ne -netdev user,id=ne,hostfwd=tcp::42323-:23

The next ting is the hard disk, before ‘hda’ worked fine, although like everything else that is subject to change in the future, so dealing with it now, use the drive flag:

-drive file=netbsd-1.0.vmdk,if=ide,index=0,media=disk,cache=writeback,format=vmdk

It could be my personal opinion but the drive syntax, although much longer is easier to work with. The key parts being what interface to use (IDE), and what port/index to plug the device in (0), along with the media type, the cache strategy, along with the encoded format, which is more so important when dealign with RAW devices, as unidentified media will be tagged as raw, however it’ll be mounted read-only unless it is directly specified as above.

For additional fun, the serial port can be set to a MS Mouse port, although I haven’t tested it as of yet.

-serial msmouse

Have fun QEMU’ing!

So yes there was an outage

tickets had to be opened, vendors called, tickets escalated, and all that jazz. I’ve had to tighten some things with cloudflare, so FEED stuff is broken at the moment. I’ll try to turn it on later today.

So yeah, I know I need to move. again…. I’m just not in the mood to do so at the moment. I’m in the middle of a bunch of IRL shit, and just don’t have time at the moment.

Windows 10 on the Raspberry Pi 4

As far as computers go, Raspberry Pi’s are cheap. The latest (and vastly incompatible) Pi4 is no real exception. Now you’d think Microsoft would want to get WoA (Windows on ARM) into as many hands as possible to get people to port apps to the new cpu architecture. But that is not the case.

As of this moment there is no real desktop machines, the only route to go is with the laptops, which are the few models from Lenovo, HP, Acer and Microsoft themselves. Brand new these things are not cheap, and of course people find out quickly enough that the emulation just isn’t quite there (not all that surprising) and of course the lack of native apps doesn’t help. It’s that chicken/egg problem that can only be solved by getting hardware into people’s hands.

Developers!

So getting back to to the Pi, on ETA Prime’s channel I saw this video, which quickly went over how to get Windows 10 up and running in no time flat.

On the Discord look for the #download-links and look for build 0.2.1 After you extract it, the image should be about 10GB

10,100,932,608 build 0.2.1.img

With a MD5 checksum of: aad51a0e02ba947d24d543ff8ed612b0

Use etcher to write the image to the SD. It took me about 5 minutes to do so. No bigge. I unplugged the SD/IDE/USB adapter thing I’m using, plugged it back in, and used Windows disk manager to expand the partition to take up the rest of the disk. It’s not terribly complicated to setup.

SSD Flashed
Right click and select Extend
The default option will consume the entire disk

After that slap in the SD to your Pi4 and away you go. Or so I first thought.

Realistically you also need:

  • A USB Hub
  • A USB Ethernet adapter (I have some cheapo no name realtek)
  • A USB audio card
  • A mini HDMI to regular human sized HDMI cables/adapters
  • a 5Amp USB charger for extra power!

As I found out rather quickly that the only peripherals that are working is the USB ports. However the USB controller has some DMA bug where it can’t xfer higher than 3GB which caps the current memory ceiling to 3GB.

Otherwise the Pi will think and reboot a few times, and about 15-30 minutes later (I didn’t time it, I walked out) you’ll be up and running Windows 10 on ARM!

It’s heavily customized in that when Windows boots up it is only consuming about 1GB of RAM. So that gives us just under 2GB for user programs. GREAT! Included is the setup program for the latest beta of Microsoft Edge (with the chromium engine) so at least you can actually hit web sites. However Google doesn’t like it, so if you are going to try to watch anything with DRM it will not work.

While many people complain about STEAM, game compatibility, really what on earth were you expecting? Naturally people will want to know how fast it is, and well… It’s not. Although it does have 4 cores, running at 1.5Ghz, there is barely any cache (well compared to an i7/Xeon), and it’s clearly not a power house of a box. The only real test of a machine like this is going to be native stuff. And speaking of, it’s nice that my previous builds for ARM still work! The sales guy that borrwed the ASUS should be back soon so I can do some side by side comparisons of how slow they are.

In addition to DOSBox, Neko98, and frontvm, I managed to get MAME 0.36 cross compiled and I had to disable the DirectX input and output, as although they do compile they have issues on the Pi4. So it’s GDI all the way. That said, it does run:

This isn’t the port you want, or the platform to play it on. I’m using the command line Visual C++ tools to build this, and MAME 0.37 drifted to being more of a MinGW thing, and I just don’t feel like fighting the build process.

Another point of fun, is that this processor & OS does have x86 compatibility you can take things to the extreme with OTVDM, and run Win16 based programs on Windows 10 for ARM! Not that I would know why you want Excel 3.0, but rest assured, it works fine.

Hit:1 http://ports.ubuntu.com/ubuntu-ports bionic InRelease
Get:2 http://ports.ubuntu.com/ubuntu-ports bionic-updates InRelease [88.7 kB]
Get:3 http://ports.ubuntu.com/ubuntu-ports bionic-backports InRelease [74.6 kB]
Err:1 http://ports.ubuntu.com/ubuntu-ports bionic InRelease
Unknown error executing apt-key

The platform supports WSL, so I went ahead and installed Ubuntu 18 & 20… and both have one apparently known catastrophic failure on the Pi’s. When trying to update packages the updater crashes. The fault is apparently in dirmngr, or the usual Linux bandaid of switching distros. There doesn’t appear to be any ‘fix’ to this, so if anyone knows what to do, I’m all ears. Also don’t enable WSL2, it’ll hang at the bootloader. I ended up having to reflash the disk.

In my quick conclusion, is this the RISC Windows workstation of the future? No, not really. It’s more the $50(+peripherals) tyre kicker edition. It’s a cheap way into the platform, to see what the fuss is all about. This machine feels like a low end i3, the CPU just isn’t there, it’s only a BCM2711 Cortex-A72, so there isn’t all that much to be expected. On the other hand it’s FAR FAR FAR cheaper than something like the Surface X. If you have the hardware it’s worth checking out if you are interested in non x86 Windows. Otherwise you aren’t going to miss much.

UML Linux on WSL2

Since WSL2 runs an actual Linux kernel that means you can run 32bit binaries! And that now means you can run stuff like ancient unmodified UML kernels on Windows! Isn’t that great!

I followed my old posts here & here, to get running or the short version being:

dpkg --add-architecture i386
apt-get update
apt-get upgrade
apt-get install libc6:i386 libncurses5:i386 libstdc++6:i386 slirp

Download a kernel, linux-2.6.24-rc7.bz2 and a root filesystem: Debian-4.0-x86-root_fs.bz2 and get running right away:

./linux-2.6.24-rc7 ubd0=test_fs eth0=slirp mem=512m

And it just worked!