Patching GCC 4.1.2 to build under GCC 8

What started as a spriling out of control build of SLiRP for User Model Linux (UML) I had so many issues with GCC 8, I figured I’d try v4 where I recall it building easily. Well that was. Fun.

Anywas I’m using Linux (Debian 10.5), and the build tools currently has me running GCC 8.3.0. Anyways a straight build introduces this fun:

../.././gcc/toplev.c: At top level:
../.././gcc/toplev.c:524:1: error: redefinition of ‘floor_log2’
 floor_log2 (unsigned HOST_WIDE_INT x)
 ^~~~~~~~~~
In file included from ../.././gcc/toplev.c:59:
../.././gcc/toplev.h:175:1: note: previous definition of ‘floor_log2’ was here
 floor_log2 (unsigned HOST_WIDE_INT x)
 ^~~~~~~~~~
../.././gcc/toplev.c:559:1: error: redefinition of ‘exact_log2’
 exact_log2 (unsigned HOST_WIDE_INT x)
 ^~~~~~~~~~
In file included from ../.././gcc/toplev.c:59:
../.././gcc/toplev.h:181:1: note: previous definition of ‘exact_log2’ was here
 exact_log2 (unsigned HOST_WIDE_INT x)
 ^~~~~~~~~~
make[2]: *** [Makefile:2064: toplev.o] Error 1
make[2]: Leaving directory '/home/jsteve/src/gcc-4.1.2/host-x86_64-unknown-linux-gnu/gcc'
make[1]: *** [Makefile:3905: all-gcc] Error 2
make[1]: Leaving directory '/home/jsteve/src/gcc-4.1.2'

Ugh isn’t this fun. Well it turns out it’s largely from the confusion from how GCC now handles inline functions.

I’ve uploaded the patch here. It’s not great, I know but I got a working C compiler out of it, however I had to manually place xgcc/cc1/cpp from gcc-4.1.2/host-x86_64-unknown-linux-gnu/gcc

Naturally YMMV as always.

I did see further hints on this ‘gist‘ that also boils down to using GCC in 1989 mode for inlines:

gcc -fgnu89-inline

And also this ‘stack exchange‘ that mentions that toplev also has issues with the same inline issues. Naturally if you just define inline to nothing you’ll end up with two floor_log2 and exact_log2’s from libiberty. And both are different. Fun times ahead!

As for slirp, well I took the version from the Debian source project, and manually applied all the patches and I ended up not only having to manually create some missing headers, but after getting it to build it’d just crash immediately. Bummer.

I rebuilt it as a 32bit exe, and wow it ran just fine. Go figure. For anyone crazy enough to want to build it on it’s own, this patch take slirp-1.0.16 to a ’17’ with all the current Debian patches, and my sad patch, was what I did to get it to compile with GCC 4. Note you will want to save aside the ‘.p files’ which are the headers, as the configure will remove them and either save them as empty files, or files that don’t work. … Well at least they didn’t work for me!

The whole thing started as a ‘oh wow Linux is now in 5.1.0 release’ and I figured the easiest way to check it out was to use UML. I found this page with a quick ‘how to build and roll’ your own UML’s, although the SLiRP config is a bit off in the host, as it should be 10.0.2.15 for the UML kernel.

The new killer feature is UML can mount a directory as a filesystem so you don’t have to mess around like crazy to make disk images. It makes the experience more docker like, which I enjoy.

./linux root=/dev/root rootfstype=hostfs rootflags=/home/jsteve/linux/linux-5.1.17/uml-demo2 rw mem=64M init=/bin/sh

So no I end up running this in the VM to kick off the required mounts and networking.

mount -t proc proc proc/
mount -t sysfs sys sys/
ifconfig eth0 10.0.2.15 netmask 255.255.255.0 broadcast 10.0.2.255
route add default gw 10.0.2.2
ping -c 2 10.0.2.2

Oh one thing worth pointing out is that 5.1.16 breaks 32bit compiles, you have to build 5.1.17 to get a 32bit kernel.

I should touch more on building UML but I’ve already sat on this for a week, and I’m too busy moving (yet again) to a smaller island. Hopefully a more peaceful one.

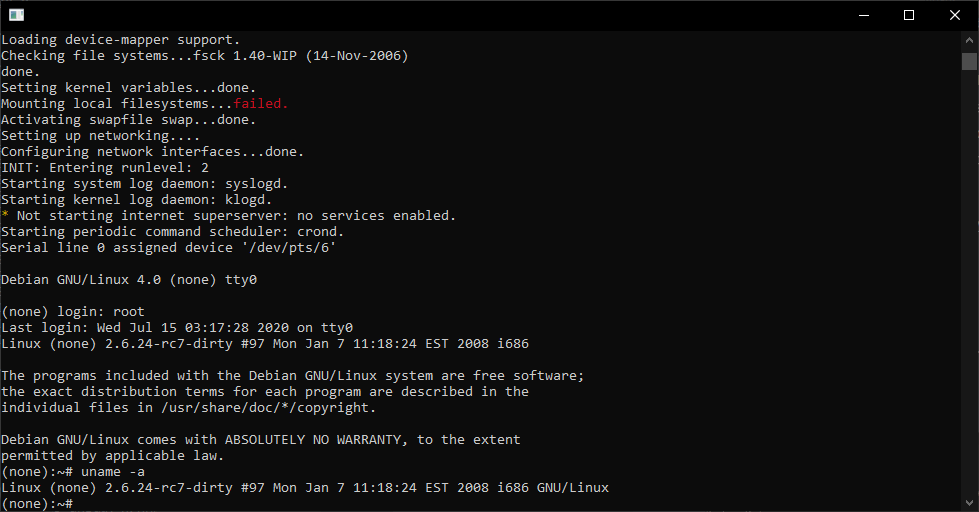
UML Linux on WSL2

Since WSL2 runs an actual Linux kernel that means you can run 32bit binaries! And that now means you can run stuff like ancient unmodified UML kernels on Windows! Isn’t that great!

I followed my old posts here & here, to get running or the short version being:

dpkg --add-architecture i386
apt-get update
apt-get upgrade
apt-get install libc6:i386 libncurses5:i386 libstdc++6:i386 slirp

Download a kernel, linux-2.6.24-rc7.bz2 and a root filesystem: Debian-4.0-x86-root_fs.bz2 and get running right away:

./linux-2.6.24-rc7 ubd0=test_fs eth0=slirp mem=512m

And it just worked!

Adding virtual disks to User Mode Linux

Running out of disk space

Well my good ‘friend’ with their inappropriately provisioned Linux VPS  that runs UML (User Mode Linux) inside of it, ran into an issue where he needed to add a second virtual disk device.

Creating the disk file is no big issue, adding a whopping 1GB is pretty simple!

Using the ‘dd’ command it is trivial to make a 1GB file like this:

dd if=/dev/zero of=node1_swap.ubda bs=1M count=1024

And then just append it to the script that they are using to run the UML:

/virtual/kernel ubda=/virtual/node1.ubda mem=384M eth0=slirp,,/virtual/sl1.sh

to this:

/virtual/kernel ubda=/virtual/node1.ubda ubdb=/virtual/node1_swap.ubda mem=384M eth0=slirp,,/virtual/sl1.sh

Of course the real fun comes from trying to find the devices.  Having to dig around I found that the device major is 98 for the UBD’s and that they incrament by 16, so that the first 3 devices are as follows:

mknod /dev/ubda b 98 0
mknod /dev/ubdb b 98 16
mknod /dev/ubdc b 98 32

Adding to that, you can partition them, and then they break out like this:

mknod /dev/ubda1 b 98 1
mknod /dev/ubda2 b 98 2
mknod /dev/ubda3 b 98 3
mknod /dev/ubdb1 b 98 17
mknod /dev/ubdb2 b 98 18

You get the idea.

With the disk added you can partition the ubd like a normal disk

node1:~# fdisk /dev/ubdb

Command (m for help): p

Disk /dev/ubdb: 1073 MB, 1073741824 bytes
128 heads, 32 sectors/track, 512 cylinders
Units = cylinders of 4096 * 512 = 2097152 bytes

Device Boot Start End Blocks Id System
/dev/ubdb1 1 245 501744 83 Linux
/dev/ubdb2 246 512 546816 82 Linux swap / Solaris

etc etc.  And yes, you can then format, mount and all that.

First let’s setup the swap:

mkswap /dev/ubdb2
swapon /dev/ubdb2

Now let’s format the additional /tmp partition

node1:~# mke2fs /dev/ubdb1
mke2fs 1.40-WIP (14-Nov-2006)
Filesystem label=
OS type: Linux
Block size=1024 (log=0)
Fragment size=1024 (log=0)
125488 inodes, 501744 blocks
25087 blocks (5.00%) reserved for the super user
First data block=1
Maximum filesystem blocks=67633152
62 block groups
8192 blocks per group, 8192 fragments per group
2024 inodes per group
Superblock backups stored on blocks:
8193, 24577, 40961, 57345, 73729, 204801, 221185, 401409

Writing inode tables: done
Writing superblocks and filesystem accounting information: done

This filesystem will be automatically checked every 24 mounts or
180 days, whichever comes first. Use tune2fs -c or -i to override.

Now adding the following to the /etc/fstab so it’ll automatically mount the /tmp directory and add the swap:

/dev/ubdb1 /tmp ext2 defaults 0 0
/dev/ubdb2 none swap defaults 0 0

Now he’s got a dedicated swap partition, and a separate /tmp filesystem.

User Mode Linux revisited (UML) aka SLiRP networking

So my uh ‘friend’ that got into trouble when he found out that his ‘dedicated’ machine turned out to be a VM which he couldn’t launch nested KVM VM’s, and instead found that User Mode Linux (UML), would allow them to run their touchy ancient Linux application in a psudo VM/Container.  Well they finally bit the bullet and decided to move to something better.

And by better, it was cheaper.  And why was it cheaper?  Because it is even a more restricted VM.

Great.

So naturally the panic call was made, because TUN/TAP networking was not permitted in this new VM.  So what to do.

Well, keeping in mind how Qemu gets around this problem, it binds in a copy of SLiRP.  And it turns out that UML can actually call SLiRP directly!  So cool we have an ‘out’.  First things first, we need SLiRP on the host machine.  I’m old, so that means I build it from source.That means I’m downloading slirp-1.0.16.tar.gz, along with the 1.0.17 patch.  I’m not sure if I need to go into how to extract source, patch, running configure and compiling.

One thing of note is that you really really really want to set the “FULL_BOLT” option either in the Makefile, or in config.h

With SLiRP built, I just copy it into /usr/local/bin .. I’m sure there is packages and stuff out there, but heh I’m old.

OK next up I make a small script to call SLiRP, in this case, I’m going to redirect port 80 directly into the VM.  And for a test port 2323 which then goes into port 23 (why not ssh? .. sigh don’t go there).

So my script looks like this:

#!/bin/sh
/usr/local/bin/slirp “redir 80 80” “redir 23 2323”

Pretty simple right?  I’m using a script as there will be more than one VM, so relying on .slirprc isn’t a solution for me.

./linux-2.6.24-rc7 ubd0=junk.ubda eth0=slirp,,/virtual/sl.sh

And away we go!

Inside the VM we can configure it with the usual SLiRP config:

ifconfig eth0 10.0.2.15 255.255.255.0
route add default gw 10.0.2.2

And now we can access the internal http server!

Add in some magic to /etc/resolv.conf such as:

nameserver 10.0.2.3

and it’ll automatically use whatever the host is configured to do.

User Mode Linux

UML

UML

Well back in the day, before the hardware visualization craze of the 2000’s back in the dark days of 1999, there was UML, or better known as User Mode Linux.  Sadly the freshmeat announcement is all but lost, but sourceforge is still with us so we have the archives.

UML, simply put is a Linux kernel that has been modified to run in user space.  So to the OS, it is just another usermode program.  Because it runs in user space, there is no kernel dependencies, or special hardware required, as UML is just a user program.  Much in the way Qemu emulates a full machine, UML instead is the kernel process running with paravirtualized drivers so it should give overall a better/faster experience than hosting via Qemu.  Keeping in mind that VMware was a 1.0 launch product in may of 1999, and Bochs was back from 1994.

So what happened to UML?  The market was just too young to understand the power of hosted virtual machines, although there were some at the time.  Overall the market was in the idea of large servers that could ‘share’ thousands of websites, and most people didn’t either want to run root in their own little world, or didn’t even know there were other options besides getting an entire physical box.  I used to rent some UML VM out from a Canadian outfit back when I’d stream audio out on shoutcast, as I found my crappy connection at home couldn’t handle more than 5 listeners, but I could stream to the UML instance, and have it advertise out on shoutcast, and handle the 20-30 users I’d get back then.  Now that we live in the gated walled world of corporate hosting, I don’t think most people would even imagine going through the hell of building their own hosting infrastructure.

So it’s 2016, who cares today?

Well this… ‘friend’ of a ‘friend’ bought what they thought was a dedicated machine in a one year contract.  Except it turned out to be a KVM VM, with ‘dedicated’ processors to the instance.  Ouch.  They also got a bunch of ip addresses, but the idea of being able to run their web servers in VMs, along with an OpenVPN concentrator seemed to become an impossibility.  Obviously user mode Qemu is an option but it would be far too slow.  So I figured this would be a good time to use something from the past, UML.

So the ‘base’ host is running Debian 8.1.  So the first thing to do is to install the 2 neeed packages for networking, the bridge & uml utilities.

apt-get install bridge-utils uml-utilities
apt-get install libc6:i386 libncurses5:i386 libstdc++6:i386

And with that in place I want to run 32bit UML kernels, which means I need the 32bit ‘runtime’ so the Debian way to enable 32bit exe’s is:

dpkg –add-architecture i386
apt-get update
apt-get upgrade
apt-get install libc6:i386 libncurses5:i386 libstdc++6:i386

One thing to keep in mind about UML, or x86 Linux in general is that you cannot mix a 64bit kernel with a 32bit userland, the 64 bit kernel can run 32bit executables and libraries, but it really needs a full 64bit userland.  So from the UML page, to get going I went with the kernel linux-2.6.24-rc7.bz2 and an ancient copy of Debian 4.0 I found here.

For anyone interested in more ‘modern’ kernels and filesystems, be sure to check out uml.devloop.org.uk & fs.devloop.org.uk.

Ok, now we want to add a bridge interface for this type of setup.  The idea is that the UML’s will have ONLY an internal connection to the bridge, as the base machine owns all the physical addresses.

So it being Debian we modify the /etc/network/interfaces file to add:

auto br0
iface br0 inet static
address 10.13.0.1
netmask 255.255.255.0
network 10.13.0.0
broadcast 10.13.0.255
bridge_fd 9
bridge_hello 2
bridge_maxage 12
bridge_stp off
pre-up brctl addbr br0
post-down brctl delbr br0

The choice of 10.13.0.0/24 is 100% up to you.  You can use any RFC 1918 address without any issues.  Now I put this stuff in a script to fire up a UML host that will create my tap0 interface, bring it up, add it to the bridge, and fire up the UML.  On termination it’ll remove the tap from the bridge, and delete the interface.

tunctl -t tap0
ifconfig tap0 0.0.0.0 promisc up
brctl addif br0 tap0
./linux-2.6.24-rc7 ubda=test_fs eth0=tuntap,tap0 mem=512M
brctl delif br0 tap0
tunctl -d tap0

And once UML has booted up, a simple ifconfig can bring up the network, and I should be able to ping the bridge address

Debian GNU/Linux comes with ABSOLUTELY NO WARRANTY, to the extent
permitted by applicable law.
(none):~# ifconfig eth0 10.13.0.10 netmask 255.255.255.0
(none):~# ping 10.13.0.1
PING 10.13.0.1 (10.13.0.1) 56(84) bytes of data.
64 bytes from 10.13.0.1: icmp_seq=1 ttl=64 time=0.043 ms
64 bytes from 10.13.0.1: icmp_seq=2 ttl=64 time=0.067 ms

You get the idea.

Because I’m running some ancient debian root filesystem, I had to set the /etc/apt/sources to include the official archive to at least install things like ssh.

deb http://archive.debian.org/debian etch main

But that is pretty much that.

Now for the real fun part, putting it on the internet!  I’ve found that this is a simple way to redirect in port 80 on the registered address I want to use, and it allows the UML instance to NAT out the same address.

/sbin/iptables -t nat -A POSTROUTING -s 10.13.0.10/32 -o eth0 -j SNAT –to 1.2.3.4
/sbin/iptables -t nat -A PREROUTING -i eth0 -p tcp –dport 80 -d 1.2.3.4 -j DNAT –to 10.13.0.10:80
/sbin/iptables -t nat -A POSTROUTING -s 10.13.0.10/32 -o eth0:0 -j MASQUERADE

Remember that you’ll also need to enable ipv4 forwarding for this to work!  You’ll need to run:

sysctl -w net.ipv4.ip_forward=1

or add it to /etc/rc.local
And with all that done, the 32bit web server is now talking. It’s not what everyone was hoping for, but at least it’s a solution.

As an update, for those who don’t have the option of TUN/TAP bridging, there is always SLiRP, as covered here.