In some weird twist almost all the old NetBSD source code is gone. again

I don’t know what is up, but it even was such a perplexing loss that even bitsavers is now saving NetBSD.

bitsavers doesn’t normally image files from active sites, but when archive.netbsd.org was down for an extended period of time and no mirrors were found, having at least the NetBSD iso files mirrored worldwide seemed like a prudent thing to do. This is a massive storage and bandwidth burden we’ve taken on, please be considerate towards us and our mirrors. For example, people trying to run 10’s of rsyncs in parallel will be banned.

aek 20231002

It reminds me back to the work of trying to revive NetBSD 0.8, and that fun adventure, then it all showed up. I saved it and moved on, but now it seems to be my turn to save the past again.

I know its a terrible URL but here it is : My old NetBSD archive

Highlights include:

I was interested in running the first public VAX versions, and 1.1 didn’t run on VAX so it didn’t interest me. Sorry.

Otherwise, you’re welcome

Torbjörn Granlund’s Excellent resource on running free OS’s on Qemu

Ever get tired of x86 on x86?  yeah me too.

How to solve that problem?

Simple, grab QEMU, and jump off into all those cool RISC processors of the 1990’s that were going to save us all from the WINTEL hegemony!

Lots of instructions, samples, images, and hints here:

https://gmplib.org/~tege/qemu.html

It’s really more comprehensive than I’ve sat down to do, so yeah it’s awesome!

Supported platforms include:

mips32,mips64,sparc32,sparc64,ppc32,ppc64,arm32,arm64,s390x,alpha

NetBSD 1.0 i386

It had just hit me that I’d never actually installed NetBSD 1.0

So here we go!  For whatever reason Qemu and NetBSD 1.0 see the floppy as a 1.2 MB, so I had to make 1.2 MB images.  For anyone feeling like shuffling a whole lot of floppies here you go!

For everyone else, here is a pre-installed VMDK + Qemu all set to run (for Windows).

I’ve setup the networking, so you can telnet into the VM, and of course access outside, but remember with SLiRP, things like FTP & NFS aren’t going to work.

NetBSD 1.0 on Qemu

NetBSD 1.0 on Qemu

NetBSD 6.1.5 Sparc64 on Qemu

Yes, really!

I thought I’d try it for the heck of it, and it’s working enough to go multiuser, but it has some issues with hitting the disk & network pretty hard.  But it does let you install!

I just started it up like this:

qemu-system-sparc64.exe -cdrom NetBSD-6.1.5-sparc64.iso -net nic,model=ne2k_pci -net user -boot c -hda netbsd-615-sparc64.raw -nographic -serial mon:telnet:127.0.0.1:23,server,wait -m 2048 -boot d

And in no time I was booting up!

OpenBIOS for Sparc64
Configuration device id QEMU version 1 machine id 0
kernel cmdline
CPUs: 1 x SUNW,UltraSPARC-IIi
UUID: 00000000-0000-0000-0000-000000000000
Welcome to OpenBIOS v1.1 built on Nov 15 2014 12:59
Type ‘help’ for detailed information
Trying cdrom:f…
Not a bootable ELF image
Not a bootable a.out image

Loading FCode image…
Loaded 7478 bytes
entry point is 0x4000
NetBSD IEEE 1275 Multi-FS Bootblock
Version $NetBSD: bootblk.fth,v 1.13 2010/06/24 00:54:12 eeh Exp $
..
Jumping to entry point 0000000000100000 for type 0000000000000001…
switching to new context: entry point 0x100000 stack 0x00000000ffe8aa09
>> NetBSD/sparc64 OpenFirmware Boot, Revision 1.16
=0x8870a0
Loading netbsd: 8072208+553056+339856 [601032+393301]=0x9cd528
Unimplemented service set-symbol-lookup ([2] — [0])

Unexpected client interface exception: -1
Copyright (c) 1996, 1997, 1998, 1999, 2000, 2001, 2002, 2003, 2004, 2005,
2006, 2007, 2008, 2009, 2010, 2011, 2012
The NetBSD Foundation, Inc. All rights reserved.
Copyright (c) 1982, 1986, 1989, 1991, 1993
The Regents of the University of California. All rights reserved.

NetBSD 6.1.5 (GENERIC)
total memory = 2048 MB
avail memory = 1997 MB
mainbus0 (root): OpenBiosTeam,OpenBIOS: hostid 80123456
cpu0 at mainbus0: SUNW,UltraSPARC-IIi @ 100 MHz, UPA id 0
cpu0: 256K instruction (64 b/l), 16K data (32 b/l), 256K external (64 b/l)
psycho0 at mainbus0
psycho0: SUNW,sabre: impl 0, version 0: ign 7c0 bus range 0 to 2; PCI bus 0
pci0 at psycho0
ppb0 at pci0 dev 1 function 0: Sun Microsystems Simba PCI Bridge (rev. 0x11)
pci1 at ppb0 bus 1
ppb1 at pci0 dev 1 function 1: Sun Microsystems Simba PCI Bridge (rev. 0x11)
pci2 at ppb1 bus 2
genfb0 at pci0 dev 2 function 0: unmatched vendor 0x1234 product 0x1111 (rev. 0x02)
ebus0 at pci0 dev 3 function 0
ebus0: Sun Microsystems PCIO Ebus2, revision 0x01
fdthree at ebus0 addr 0-ffffffff not configured
com0 at ebus0 addr 3f8-3ff ipl 2b: ns16550a, working fifo
com0: console
kb_ps2 at ebus0 addr 60-67 not configured
ne0 at pci0 dev 4 function 0: Realtek 8029 Ethernet
ne0: Ethernet address 52:54:00:12:34:56
ne0: 10base2, 10baseT, 10baseT-FDX, auto, default [0x40 0x40] 10baseT-FDX
ne0: interrupting at ivec 3010
cmdide0 at pci0 dev 5 function 0: CMD Technology PCI0646 (rev. 0x07)
cmdide0: primary channel configured to native-PCI mode
cmdide0: using ivec 14 for native-PCI interrupt
atabus0 at cmdide0 channel 0
cmdide0: secondary channel configured to native-PCI mode
atabus1 at cmdide0 channel 1
NULL phandle
Unexpected client interface exception: -1
pcons at mainbus0 not configured
No counter-timer — using %tick at 100MHz as system clock.
wd0 at atabus0 drive 0
wd0: <QEMU HARDDISK>
wd0: 2048 MB, 4161 cyl, 16 head, 63 sec, 512 bytes/sect x 4194304 sectors
atapibus0 at atabus1: 2 targets
cd0 at atapibus0 drive 0: <QEMU DVD-ROM, QM00003, 2.2.50> cdrom removable
wd0: no disk label
wd0: no disk label
FATAL: boot device not found, check your firmware settings!
root device: cd0c
dump device (default cd0b):
file system (default generic):
root on cd0c dumps on cd0b
root file system type: cd9660
WARNING: no TOD clock present
WARNING: using default initial time
warning: no /dev/console
init path (default /sbin/init):
init: trying /sbin/init
Created tmpfs /dev (622592 byte, 1184 inodes)
init: kernel security level changed from 0 to 1

You are using a serial console, we do not know your terminal emulation.
Please select one, typical values are:

vt100
ansi
xterm

Terminal type (just hit ENTER for ‘vt220’): xterm

NetBSD/sparc64 6.1.5

This menu-driven tool is designed to help you install NetBSD to a hard disk,
or upgrade an existing NetBSD system, with a minimum of work.
In the following menus type the reference letter (a, b, c, …) to select an
item, or type CTRL+N/CTRL+P to select the next/previous item.
The arrow keys and Page-up/Page-down may also work.
Activate the current selection from the menu by typing the enter key.

┌─────────────────────────────────────────────┐
│>a: Installation messages in English │
│ b: Installation auf Deutsch │
│ c: Mensajes de instalacion en castellano │
│ d: Messages d’installation en français │
│ e: Komunikaty instalacyjne w jezyku polskim │
└─────────────────────────────────────────────┘

Wow, how’s that for cool?

A few notes though, if you use a VMDK disk access is dreadfully slow during the install, raw disk images are MUCH MUCH faster (36Kb/sec vs 3+MB/sec).  The kernel cannot figure out the root disk, so you have to tell it on every boot.  When installing it’s cd0c, when booting off the harddisk it’s wd0a. The e1000 adapter causes the kernel to go crazy, and on bootup the system indexes the man pages, which seems to kill the machine.

makemandb

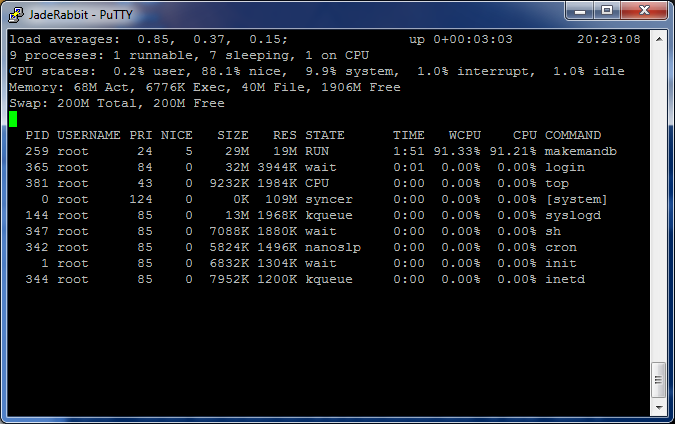
makemandb indexing like crazy

As you can see this is what happens when you hit the disk too hard..

# dd if=/dev/wd0c of=/dev/null bs=1m
^Ccmdide0:0:0: lost interrupt
type: ata tc_bcount: 2048 tc_skip: 0
463+0 records in
463+0 records out
485490688 bytes transferred in 59.701 secs (8132036 bytes/sec)

and if you don’t incur the rage of the disk controller it’s the same speed:

# dd if=/dev/wd0c of=/dev/null bs=1m count=10
10+0 records in
10+0 records out
10485760 bytes transferred in 1.217 secs (8616072 bytes/sec)

But yeah, I can’t complain!


NetBSD 0.8 archive found!

Although I haven’t gone through this yet, I need to get some different video cables, and perhaps a monitor for my Mac Pro which has my VMWare stuff on it. Although at the same time as a past cube owner, I’m really digging the new Mac Pro design. I guess it all comes down to me finding a job in HK.

The best part about this, is that it was located by a READER. As much as I try to do everything myself, believe it or not, user contributions go a long long way. And I am greatly appreciative of it. I do need to setup my exchange server..

Anyways for the two or three people who dig this kind of thing, here is the old NetBSD 0.8 archive dump.

Enjoy!

NetBSD 1.0 on the Amiga

NetBSD's old logo

NetBSD’s old logo

So while I was on the path of running some ancient Linux on the UAE Amiga 3000 emulator but without any real luck.  So for the heck of it I figured I’d give NetBSD a whirl.  Much like Linux, the first platform other than the i386 to get some mainstream love.

While 4.4 BSD had been adding support for the m68k via the HP 9000-300 series based workstations, the Amiga was something that was sold retail, and could be put in the hands of hackers, rather than lab rats..

So yeah, NetBSD started to integrate Amiga patches as of NetBSD 0.9 as it says from the install notes:

This version is strictly for the kernel hackers among you, there’s no sense in `normal’ users trying to install it, possibly killing their other partitions, facing kernel panics and not knowing what to do. Please keep that in mind, if you feel like going on…

So maybe I’ll try to bring it back to life some time now that I can at least run NetBSD 1.0 .. Or maybe I’m getting ahead of myself.

Installing NetBSD 1.0 on the Amiga is somewhat straight forward, providing you are doing this from a new Amiga.. First just create a small-ish (15MB? lol) partition for AmigaDOS, and make sure it is bootable.  The work partition should be big enough to hold the compressed packages of NetBSD, I went with 60MB, while NetBSD 1.0 is a mere 15MB, well compressed of course.  After that you’ll want to create a ‘root’ partition of say 65MB, a 32MB swap partition and a giant /usr partition.  I created a 384MB virtual hard disk, so my remainder is 209MB which is more than enough.  From there you have to make sure that they are not set to auto mount, and edit the filesystem type to be the following:

root partition  : 0x4e425207
swap partition  : 0x4e425301
other partitions: 0x4e425507

Where the ‘other’ is of course the /usr partition.  Then with that in hand it is a simple matter of loading the boot loader from within AmigaDOS.  The one weird thing I found is that while this part goes all fine,  later on under NetBSD you can only mount AmigaDOS partitions read only, so how do you get a new kernel back onto the Amiga side?  I suppose a working network, and a 2nd machine.. Which would make sure, and of course NetBSD was built with the idea that everyone was collaborating over the internet so people would have net access.

So basically from within AmigaDOS you kick off the bootloader, kernel, and shove in a ‘root filesystem‘ diskette.  Next thing you know we are going through the install where it’ll pick up the partition tags, format the disk, and go ahead  and install..  Again another ‘trick’ is the partitioning scheme where NetBSD maps in the AmigaDOS partitions into NetBSD space.  My install looks like this form the NetBSD side:

NetBSD slices

NetBSD slices

It may not seem too obvious but back here the ‘a’ partition is the root, ‘d’ is the AmigaDOS operating system partition while ‘e’ is the work partition where our install was saved. From there it really is NetBSD and it just acts like any other NetBSD.  So of course I could prattle endlessly about this, how historic it is that NetBSD on the Amiga shows that the older hp300 port could not only be adapted to new platforms, but even eventually extended to support the 68040 processor which had a different and incompatible MMU.

For those of you are are impatient, you too can run NetBSD 1.0!  You can find a pre-installed image here. And just use the prior exe & config from the WinUAE beta that included MMU support.  Just alter the config so that it picks up the NetBSD disk.

NetBSD 1.0

NetBSD 1.0

The only catch I’ve seen so far is that trying to bring up the ethernet adapter hangs the system.  Sadly I don’t have any fix for this as of yet…. (edit: yes beta 4 and beyond work fine!)

NetBSD 6.0 released!

yay

  • SMP support for Xen domU kernels, initial suspend/resume support for Xen domU, PCI pass-through support for Xen3, and addition of the balloon driver.
  • Major rework of MIPS port adding support for SMP and 64-bit (O32, N32, N64 ABIs are supported) processors, DSP v2 ASE extension, various NetLogic/RMI processor models, Loongson family processors, and new SoC boards.
  • Improved SMP on PowerPC port and added support for Book E Freescale MPC85xx (e500 core) processors.
  • ARM has gained support for Cortex-A8 processors, various new SoCs, and initial support for Raspberry Pi. Full support for Raspberry Pi and major ARM improvements to come in a future NetBSD release.
  • time_t is now a 64-bit quantity on all NetBSD ports. This means that the NetBSD world no longer ends in 2037.

Interesting they addressed the 2038 issue… And more SMP support…

NetBSD 1.2 for the MicroVAX II package…

Well looking around on my sourceforge page, it hit me that I never did do a NetBSD 1.2 MicroVAX II package, so I thought I’d slap one together.  I basically just followed my install notes, and added in some stuff that I’d built earlier.

So for those who care, here you go!

From the package’s readme:

Welcome to this minimal version of NetBSD 1.2 for the MicroVAX II.

Getting started
:::::::::::::::

just fire up the emulator like this:

vax.exe run.ini

—–8<—–8<—–8<—–8<—–8<—–8<

C:\netbsd1.2\test>vax.exe run.ini

VAX simulator V3.8-1
run.ini> set idle OLDVMS
Non-existent device
TS: creating new file
Loading boot code from ka655x.bin

?[c
KA655-B V5.3, VMB 2.7
Performing normal system tests.
40..39..38..37..36..35..34..33..32..31..30..29..28..27..26..25..
24..23..22..21..20..19..18..17..16..15..14..13..12..11..10..09..
08..07..06..05..04..03..
Tests completed.
>>>
—–8<—–8<—–8<—–8<—–8<—–8<

You’ll be booted up to the boot rom. next we have to boot from the
hard disk. NetBSD’s bootblocks were very fragile back then so
it won’t autoboot. I never did tear into it to see why it won’t boot
so you’ll have to do it the old fasioned way.
>>>b/3 dua0
(BOOT/R5:3 DUA0

2..
-DUA0
1..0..
howto 0x3, bdev 0x11, booting…done. (11108+33996)

Nboot
:ra(0,0)netbsd
—–8<—–8<—–8<—–8<—–8<—–8<

Once you’ve booted the kernel, it’ll probe out the hardware, then
it’ll ask where the root disk is (ra0a).

—–8<—–8<—–8<—–8<—–8<—–8<
zs0: timeout waiting for TS_SSR
tmscp0 at uba0 csr 174500 vec 760, ipl 15
tms0 at tmscp0 slave 0
qe0 at uba0 csr 174440 vec 754 ipl 15
qe0: delqa, hardware address 08:00:2b:aa:bb:cc
dz0 at uba0 csr 160100 vec 304 ipl 15
root device?
—–8<—–8<—–8<—–8<—–8<—–8<

Armed with this information you can simply hit enter as it’ll want
to drop to single user mode, then hit contrl+d and it’ll resume booting
into multiuser mode.

—–8<—–8<—–8<—–8<—–8<—–8<
root device? ra0a
?Enter pathname of shell or RETURN for sh:
#
—–8<—–8<—–8<—–8<—–8<—–8<
remember it’s enter then control+d

—–8<—–8<—–8<—–8<—–8<—–8<
#^D setting tty flags
starting network
add host amnesiac.my.domain: gateway localhost
add net default: gateway 10.0.2.2
starting rpc daemons: portmap.
starting system logger, time daemon.
checking for core dump…
savecore: no core dump
checking quotas: done.
building databases…
clearing /tmp
standard daemons: update cron.
starting network daemons: routed printer inetd.
creating runtime link editor directory cache.
starting local daemons:.
Tue May 5 08:29:22 PDT 1998
May 5 08:29:22 amnesiac init: kernel security level changed from 0 to 1

NetBSD/vax (amnesiac.my.domain) (console)

login:
—–8<—–8<—–8<—–8<—–8<—–8<
And there we go, NetBSD is all booted. The network is configured, you
may wish to change the /etc/resolv.conf if you so wish.
USING NETBSD
::::::::::::

Once the system is booted up into multiuser mode, TCP/IP is enabled and
you can now telnet into your system, by connecting to the localhost on
port 42323.

telnet localhost 42323

will connect you, and you’ll get the login prompt:

—–8<—–8<—–8<—–8<—–8<—–8<
NetBSD/vax (amnesiac.my.domain) (ttyp0)

login:
—–8<—–8<—–8<—–8<—–8<—–8<

There is no root password, so you can just login as root, and away you
go. I prefer to telnet in so I get a working terminal as the console
doesn’t do any VT100 emulation, its more of a dumb TTY. Outside of the
default programs in NetBSD the following programs have been installed
into the image:
* bash-2.0
* dungeon-2.5.6
* ircii-4.4
* lynx-2.8.2
* GNUmake-3.75
* pine-3.87
* screen-3.7.1
* unzip552

This should at least make using the system somewhat tollerable.

FAQ
:::
Q:When I hit backspace I get ^H ‘s!!!
A:stty erase <backspace>

In unix they used keyboards with delete keys instead of backspaces… Oh the horrors.
SHUTTING DOWN
:::::::::::::

This should be simple, login as root and just issue the following command:

reboot

And you’ll get halted to the SIMH prompt from there you can just quit.

NetBSD 1.2 MicroVAX II