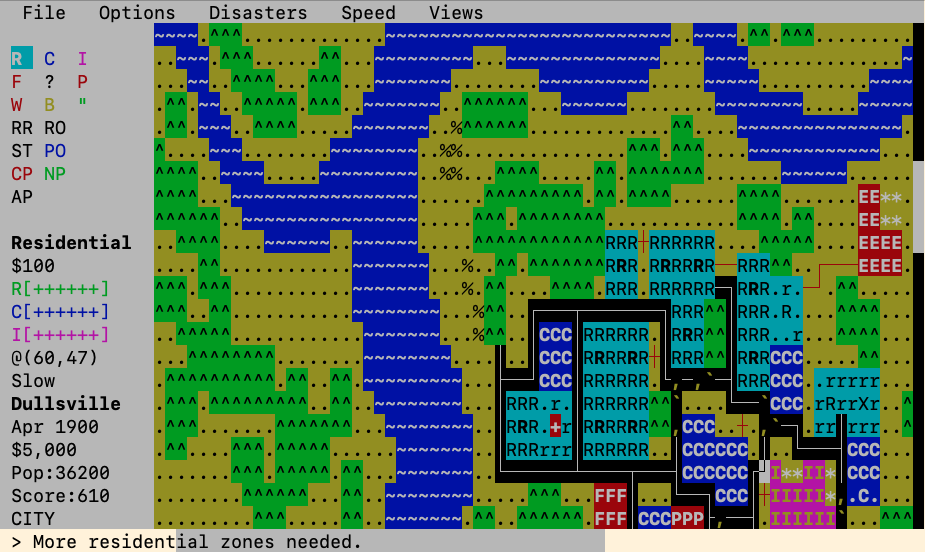
In the past I did some and some more work on SimCity/Micropolis to bring it to vintage computing. This old DUX SimCity / Micropolis works remarkably well, but because of the TCL/TK and X11 UI, platform availability is quite limited. I have previously also ported Micropolis to Windows NT (RISC) as WinTown.
But thats not enough! I wanted to run SimCity on a vintage Unix without dependency on X11 and TCL/TK. The game graphics (basically a map) is quite simplistic and structured. I was wondering if text mode rendering would work. Quite a while ago I winged up a quick ncurses based map/city viewer and it was quite promising! Fast forward to today… Behold TTY City!
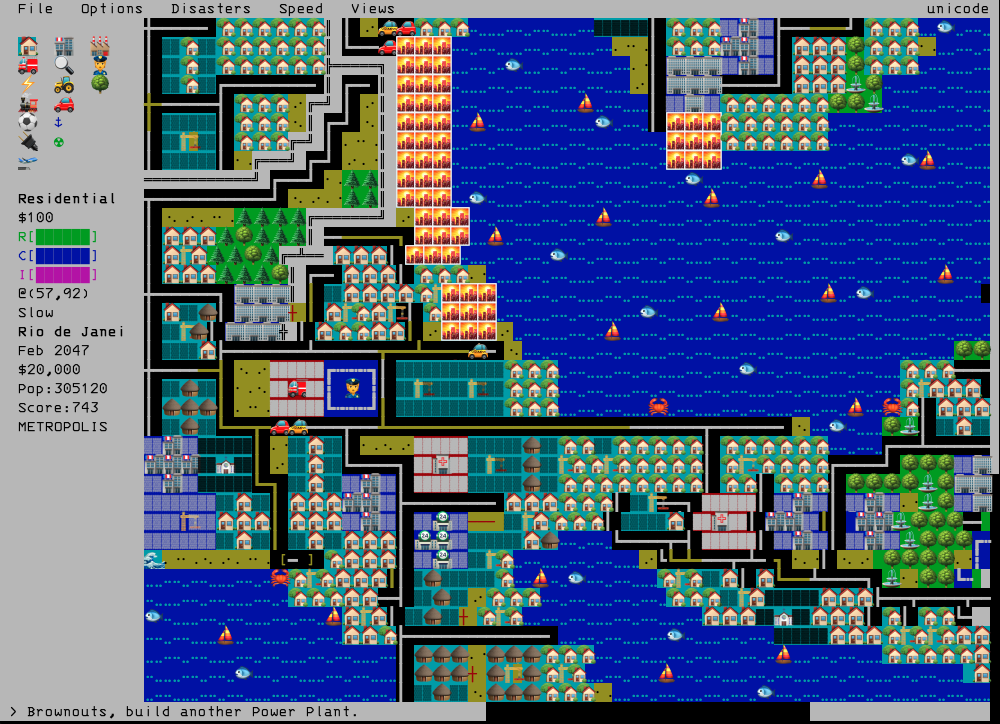
The game is quite usable and playable. In a modern terminal it even supports mouse with panig and simple animations. Earthquakes look pretty cool!
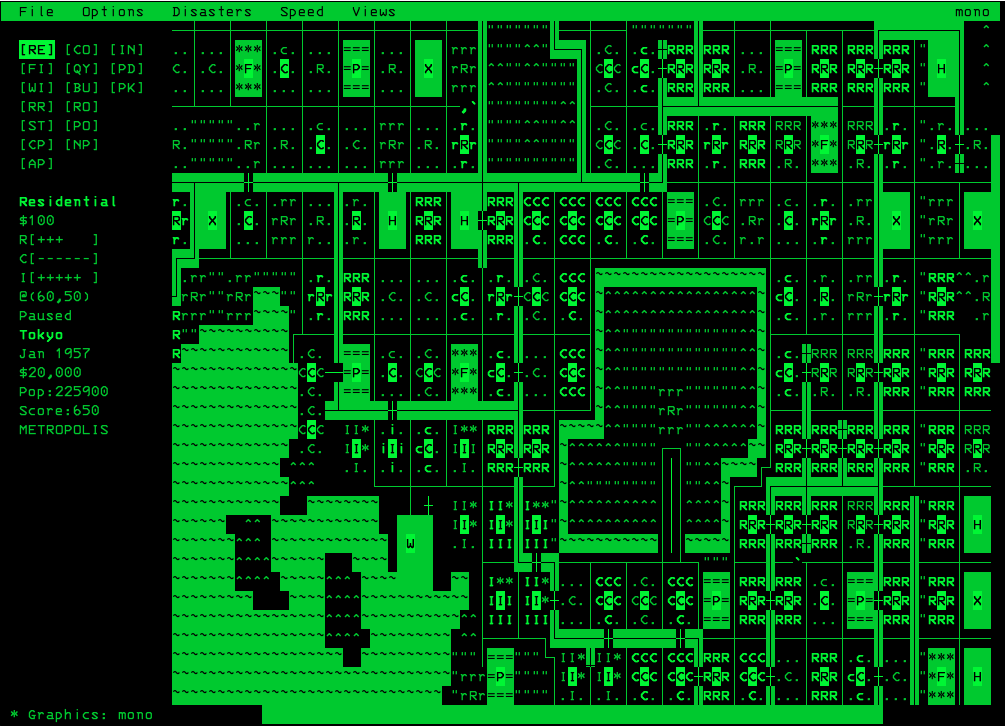
The monochrome terminals are little more difficult, but I’d say is playable.
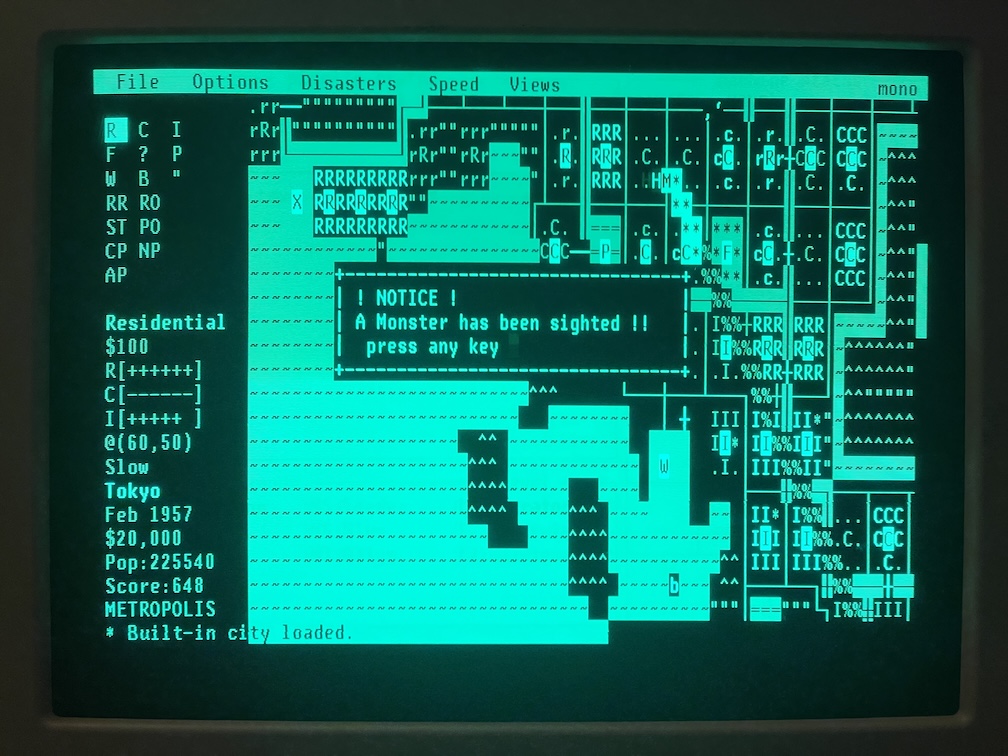
Here is a picture from an actual DEC VT420! Not bad!
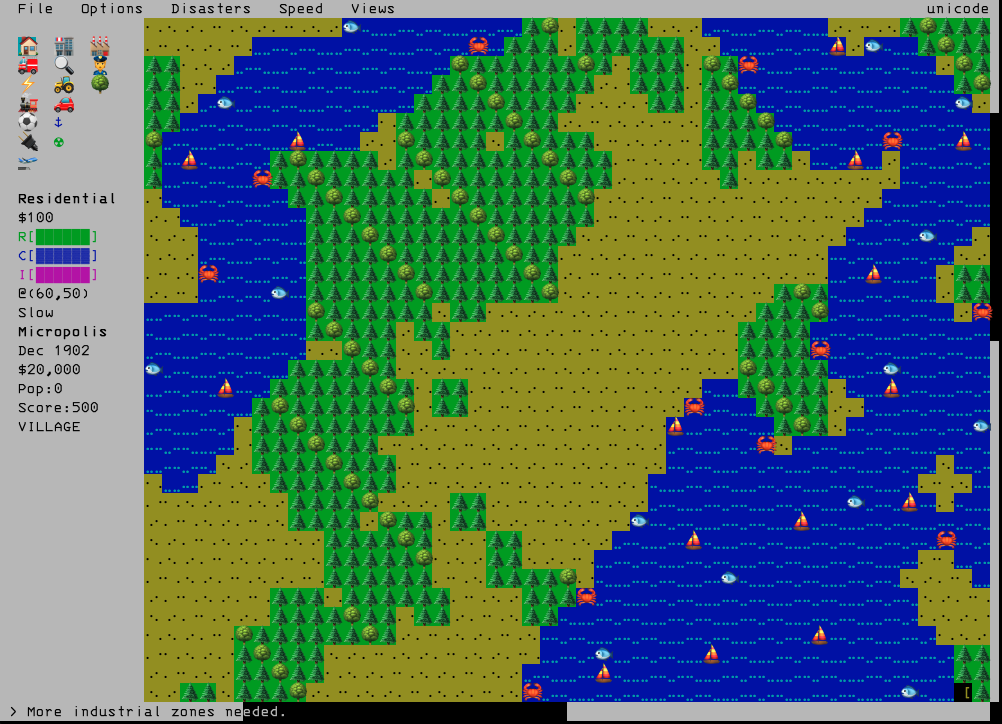
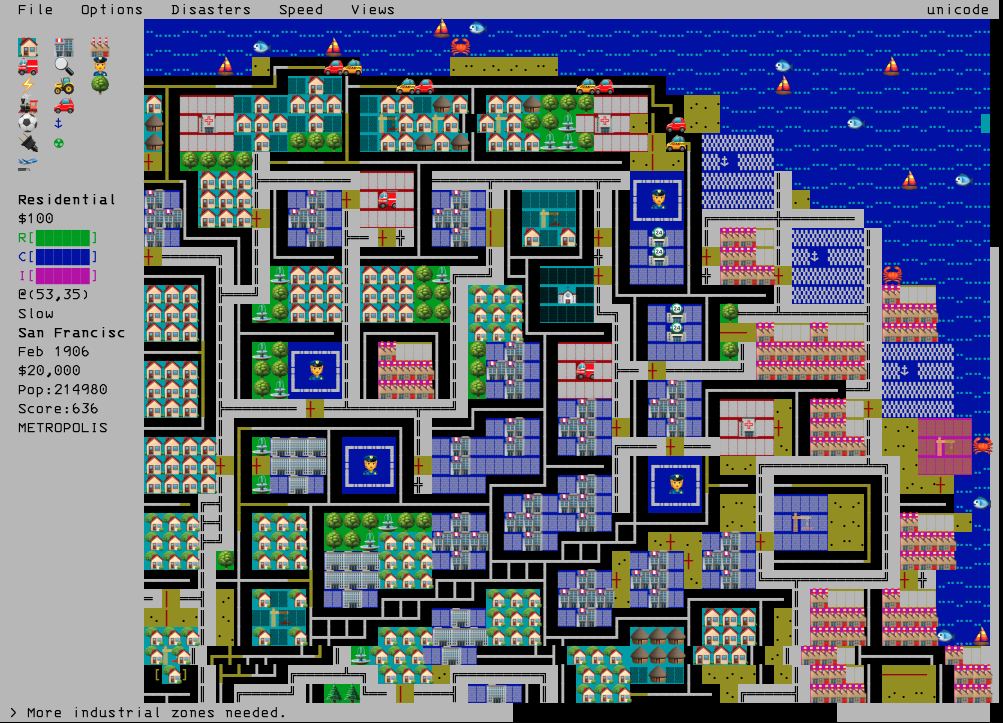
When perfecting the letters and characters, I had this idea… what if modern terminal amenities could be used… like Unicode Emojis perhaps? After all you can have these 🌲🌳🌴🌵 and these 🏠🏡🏢🏭 in rendered in a terminal❗
Behold Unicode Emoji Terminal SimCIty!
Available from: https://github.com/tenox7/ttycity – there are no releases or packages yet, as it’s work in progress but expect it to be available for most modern and vintage operating systems!
It worked quite good but I did not particularly like some of the Firefox/Mozilla foundation controversies and policies. Started looking for alternatives, but the situation was quite grim. Ladybird Browser is still in active development. Chrome exterminated Ad Blockers. Brave was overbloated with crapware.
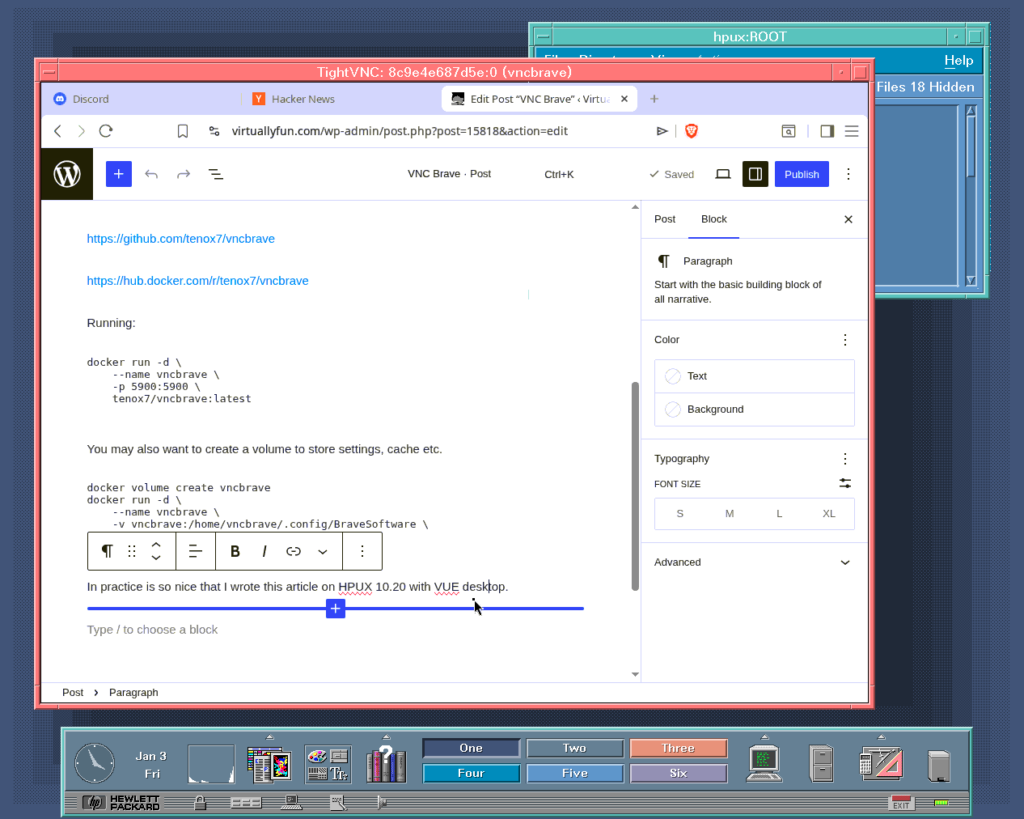
TIL Brave has released “Origin” version which is minimal and void of all the garbage, but has fully functional Ad Block. Normally Origin asks for a one time license purchase, however Linux version is free. Since Docker is Linux… a perfect fit for the use case! VNCBRAVE was born.
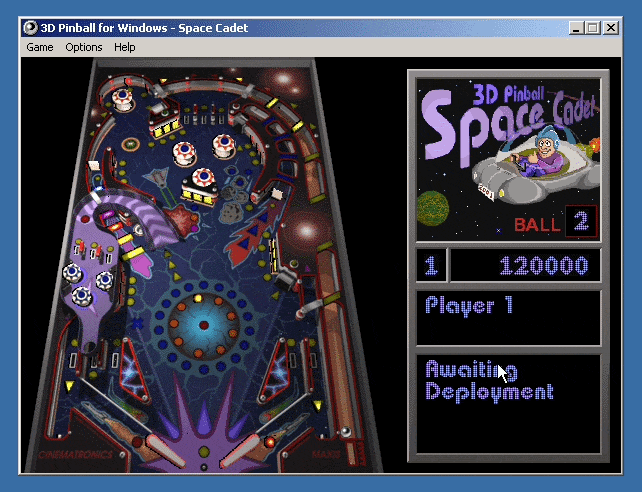
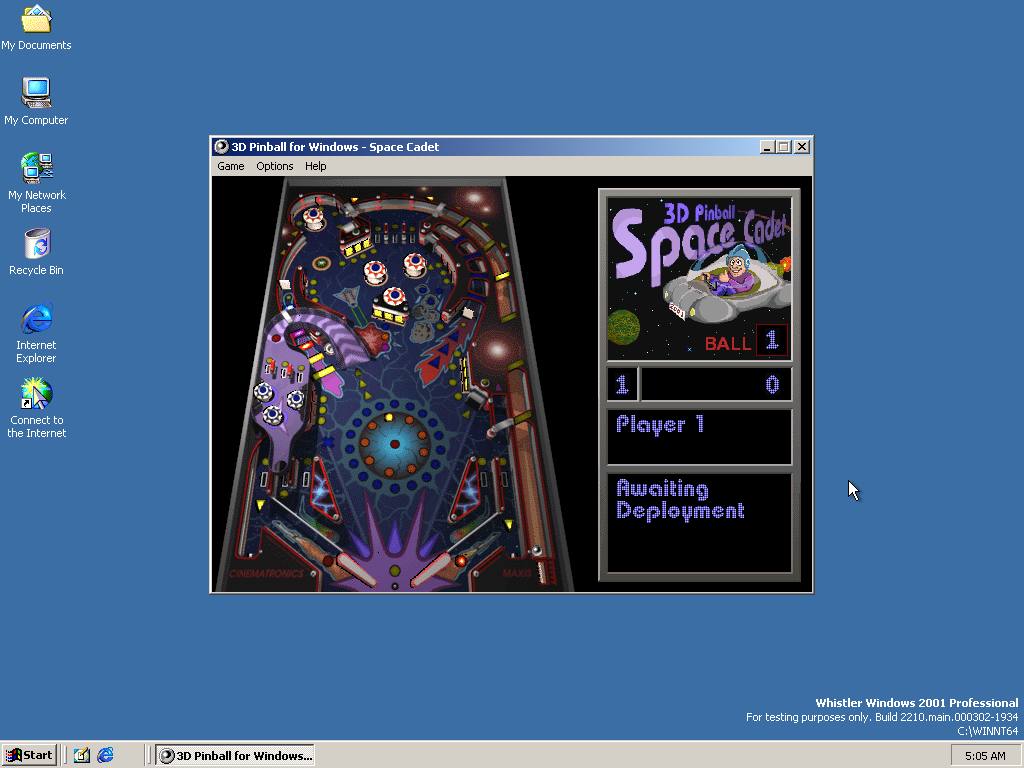
One of the most popular OS built-in games is no doubt Pinball, known by its full name 3D Pinball for Windows – Space Cadet. It started out as Full Tilt! Pinball, developed by Cinematronics and published by Maxis. It offered 3 tables, and one of them, Space Cadet, was licensed to Microsoft to be included in Microsoft Plus! 95 and, later, built into the Windows operating system.
Windows XP was the last version of Windows to include Pinball, and Raymond Chen explained why it didn’t make it to Windows Vista on his blog. The reason was it had a collision detector bug when it was compiled for 64-bit Windows, which caused the ball to pass through various objects – falling off the screen through the plunger instead of being launched, for instance. The bug rendered the game unplayable, and Raymond and his colleague were unable to find a fix in a reasonable amount of time, so he removed it. At least that’s the story we were told, for about a decade.
In 2021, NCommander launched a series of investigations to challenge that, testing Pinball on various 64-bit (IA-64 and AMD64) builds of Windows XP and pre-release Vista. He found that the 64-bit versions of Pinball were all highly playable, with only very minor glitches, and speculated that the reason for its removal was that the UI did not fit into the Windows Vista design.
Not long after NCommander published his video, Raymond followed up with a post that filled in some gaps in the story and shed more light on the bug. He said it was the 64-bit Alpha AXP version of Pinball that had the extremely bad collision detection bug. This claim had been unverifiable for the past 5 years, for the following reasons:
No 64-bit Windows was ever released for the Alpha AXP – Compaq killed Windows NT support before NT was ported to 64-bit
One 64-bit Alpha AXP NT build was leaked in 2023, but the included Pinball does not work, as it segfaults immediately upon running
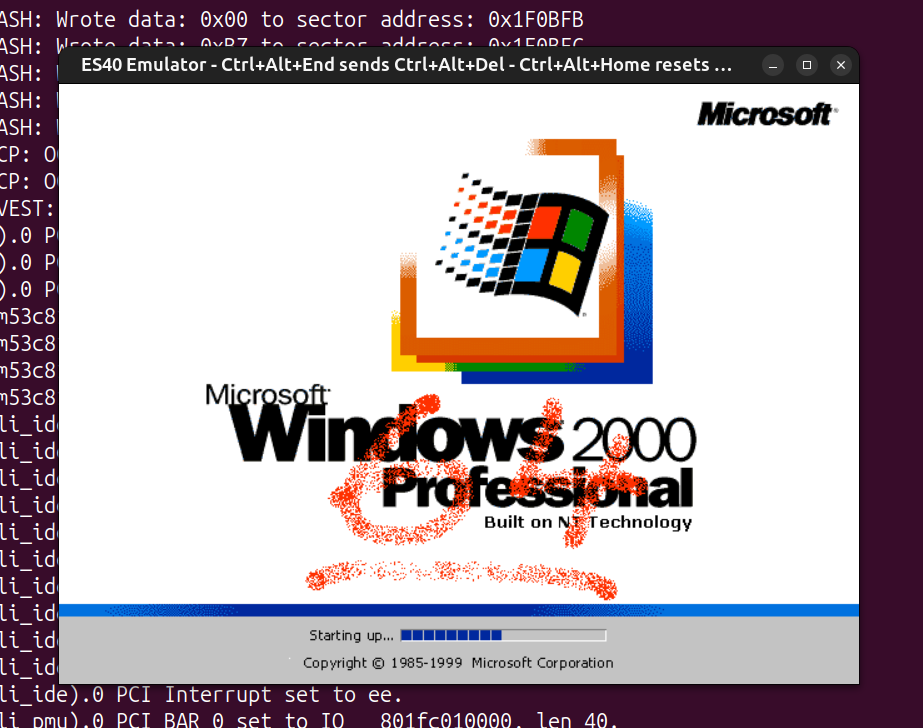
I’ve had an interest in the DEC Alpha for quite some time now, mainly out of my love for DEC architectures and my love for UNIX. VAX is the direct successor of PDP-11, and Alpha is the direct successor of VAX. Earlier, some Alpha emulation breakthroughs dropped, and I was pinged by a few friends that NT 4.0 could now run on a fork of the ES40 emulator, as well as on QEMU. I never thought Alpha NT would ever run under emulation, because unlike the familiar Tru64, Linux and the BSDs, NT uses its own custom PALcode and depends on ARC (Advanced RISC Computing) instead of SRM. Of course, people noted that the emulators couldn’t run the holy grail of Alpha NT – Windows (XP?) build 2210, because its kernel would panic with a memory management error in QEMU, or wouldn’t detect the keyboard and bug out in ES40. A few trips to hell in the symbol-less NT kernel and a few MMU emulation fixes later, I was able to patch up both QEMU and ES40 to boot that only surviving 64-bit build of Alpha NT.
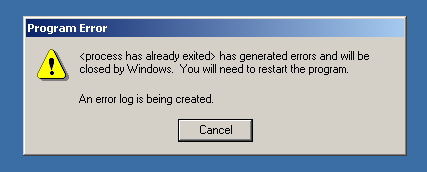
After torturing my brain debugging a symbol-less NT kernel without a kernel debugger, I thought I’d give fixing Pinball a go, to make things worthwhile. One of the benefits of debugging a userland process is that, while there’s still no debugger, there is Dr. Watson, which takes core dumps and performs simple post-mortems. Something is better than nothing, as people would say.
Running Pinball gives the classic crash symptom immediately, with no graphics drawn:
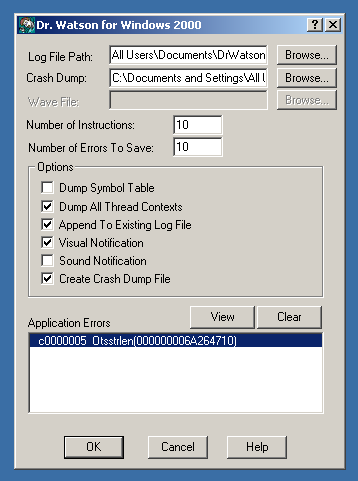
Dr. Watson concludes that it died of a segfault:
It gave a nice dump of registers at the time of the fault:
Ok, so it died inside RegisterClassA, a critical Win32 API function. That API function couldn’t have been the culprit, because if it were bugged, no GUI Win32 program would run at all. This means the only possible source of the error is its sole argument – a pointer to a WNDCLASSA struct. Needless to say, the pointer itself was valid, otherwise the API would’ve detected the invalid argument, or the segfault would’ve happened a lot sooner.
From the stack trace, the return address of RegisterClassA was 0x100F914, inside the function splash_screen. A quick disassembly of the instructions preceding that address shows a WNDCLASSA structure being built with the following layout:
Right off the bat, I noticed something wrong – the field alignment. It is a general requirement that fields be aligned to their size, as in 8-bit fields should be byte-aligned, 16-bit fields should be 16-bit (2-byte) aligned, 32-bit fields should be 32-bit (4-byte) aligned, and 64-bit fields should be 64-bit (8-byte) aligned. If you look at the offsets of the fields above, the 32-bit ones are indeed 4-byte aligned, but the 64-bit ones are not. At the start, we have a 32-bit style field followed by a 64-bit lpfnWndProc, and to satisfy the alignment requirements, a 4-byte padding should be inserted between style and lpfnWndProc to ensure that lpfnWndProc starts on an 8-byte boundary. RegisterClassA was expecting this padding, but Pinball lacked it, so it read data from the wrong offset and crashed.
To fix this, I simply bumped the offset of each field after style up by 4 bytes.
But that was not sufficient – Pinball calls RegisterClassA in 4 different places – Sound_Init, splash_screen, WinMain and WaveMixStartup. I’d already patched the one in splash_screen, so I started going through the rest one by one.
The ones in Sound_Init and WinMain were identical to the one in splash_screen, but for some strange reason the one in WaveMixStartup already had the correct alignment:
I can’t think of why the same struct would be aligned differently within the same binary, unless they came from different objects compiled with different flags or something.
Anyway, with the WNDCLASSA struct alignment fixed in 3 of the 4 places, I ran Pinball again. This time it created the fullscreen window and attempted to draw the splash screen before dying of another segfault:
Crash log shows that the segfault happened deep in the Win32 audio system, while calling auxSetVolume:
Indeed, it was an invalid pointer! As you can see, it’s identical to the pointer in a2, but with the entire top 32 bits zeroed. It must’ve been truncated by a bug somewhere, either in the audio subsystem or in Pinball itself.
I spent some time and pinned down the DLL responsible for the fault – mciseq.dll, and did some tracing. The truncation of a0 happened when a2 was moved into a0:
50306150 ZAPNOT a2,#15,a0
ZAPNOT is an interesting instruction – it takes a source register, a bitmask and a destination register, and it “zaps” (zeros) the bytes whose corresponding bit in the bitmask is 0. In this case, the bitmask is 15, which is 00001111 in binary. From this we can work out that the ZAPNOT instruction at 0x50306150 zeros the upper 4 bytes of a2, when it is copied into a0. This perfectly explains why, at the time of the fault, a0 contained a truncated version of the pointer in a2.
Of course, 0x50306150 was not the only place where it truncated 64-bit pointers, I found 6 truncations of the exact same type in mciseq.dll. I have not the slightest clue why it decided to truncate pointers. If I had to guess, maybe they had pointer → integer → pointer casts for whatever reason, and that integer type was 32-bit. With all 6 truncations patched out, we have some Pinball for ourselves:
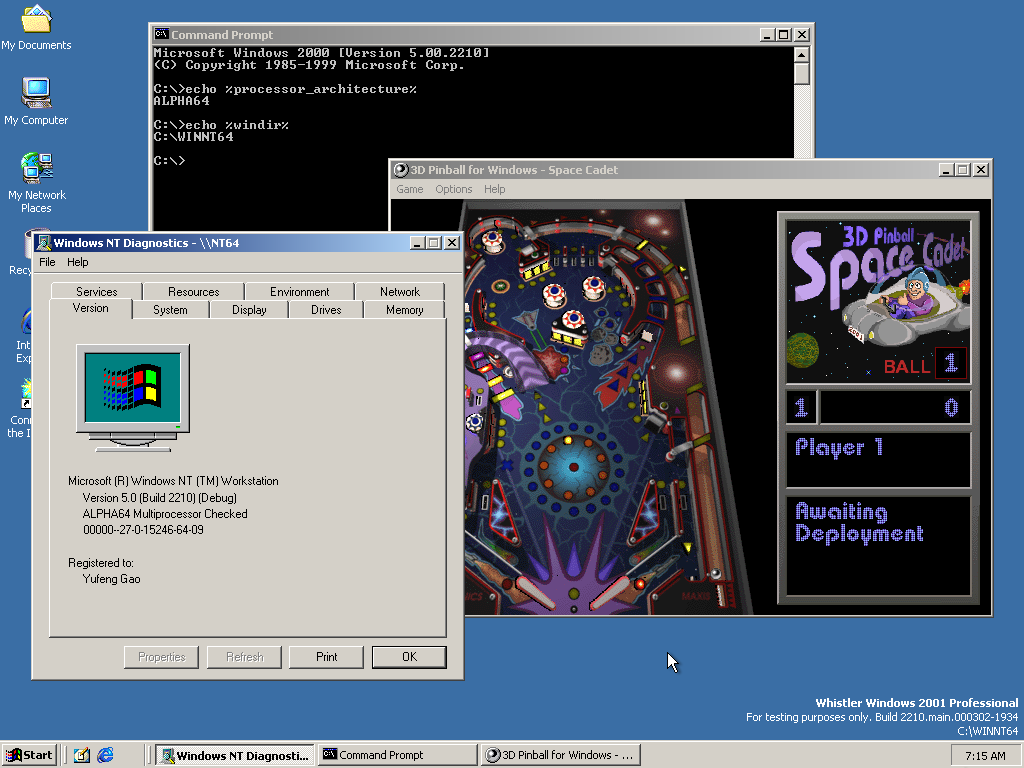
Here’s proof that Pinball is indeed running on a 64-bit build of Alpha NT:
To make Pinball work on your NT build 2210 install, replace %ProgramFiles%\Windows NT\Pinball\pinball.exe and %windir%\system32\mciseq.dll with the following:
You could also patch the installation files and burn them to a new CD if you want Pinball to work out of the box on fresh installs – simply copy these files to the AXP64 directory of the install disc:
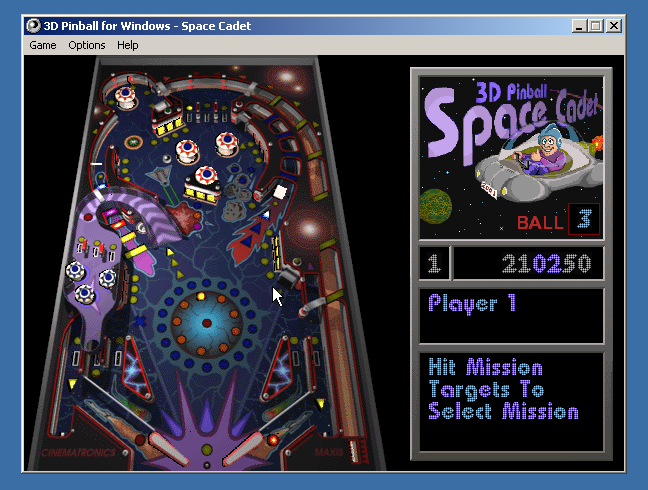
Now I’m going to disappoint you with the fact that I did not find the collision detector bug Raymond talked about. With the struct alignment and pointer truncation issues patched, the game now works flawlessly. Ok, I’m not sure if it’s actually flawless, but I never saw any glitches in the few games I played. At the very least, the ball does not fall through the plunger, can be launched and bounces around the table just fine.
Below are the 2 reasons I could think of for not seeing the collision detector bug:
The bug was introduced after build 2210. Build 2210 has Pinball installed by default and predates Windows XP by almost a year and a half, so it almost certainly predates Raymond removing it. In this build, Pinball doesn’t even run by default, so there’s no way they could’ve tested it and seen the bug. They probably only started testing Pinball later, after they fixed the struct alignment and pointer truncation issues.
The bug only manifests in free/release builds, not in checked/debug builds. Maybe it only shows up when the code is compiled with the more aggressive optimisation used by release builds – something that happens quite often when code has undefined behaviour or the compiler has bugs. This is less plausible, however, as I’m sure Raymond would’ve used debug builds when he attempted to debug it, and discovered any differences between debug and retail builds.
Of course, only Raymond himself could shed more light on this topic. It was fun (read: painful) debugging Pinball, as well as the NT kernel to fix the emulators – too much fun (read: pain) that I will never do it again.
Some trivia about me and pinball:
I spent a fair chunk of my kindergarten and pre-school days playing the various games my dad installed on our Windows XP home computer, however, there was one game that I never quite figured out how to play – Pinball. It came bundled with the OS, and the splash screen scared me every time I tried to open it up.
The flipper looked like a pistol to my 3-year-old self, and the overall darkness of the splash screen just injected fear into me. I would open the game, close my eyes, count to 20, then open my eyes again, to skip past the splash screen.
The first time I actually played a full game of pinball was on the first day of this year, when a friend of mine took me to an arcade. After playing pinball in real life, the Pinball game finally started to make sense.
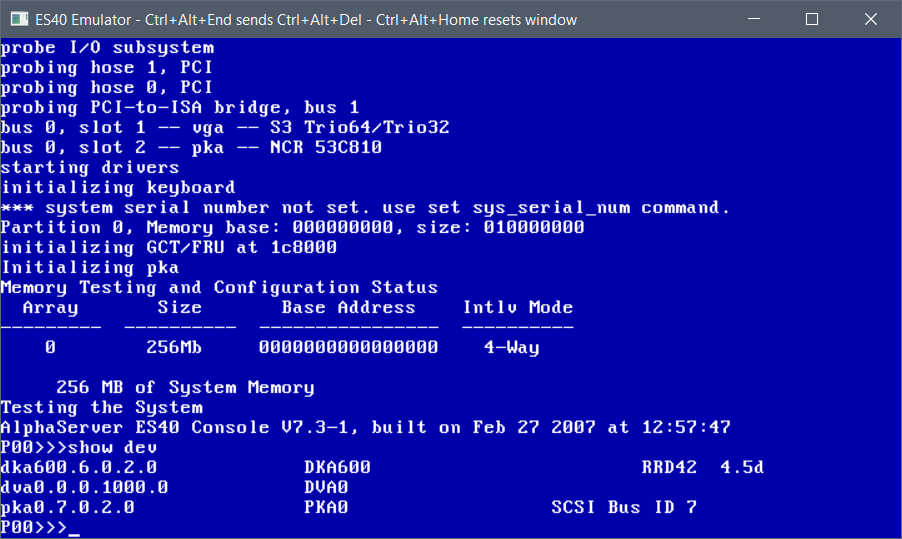
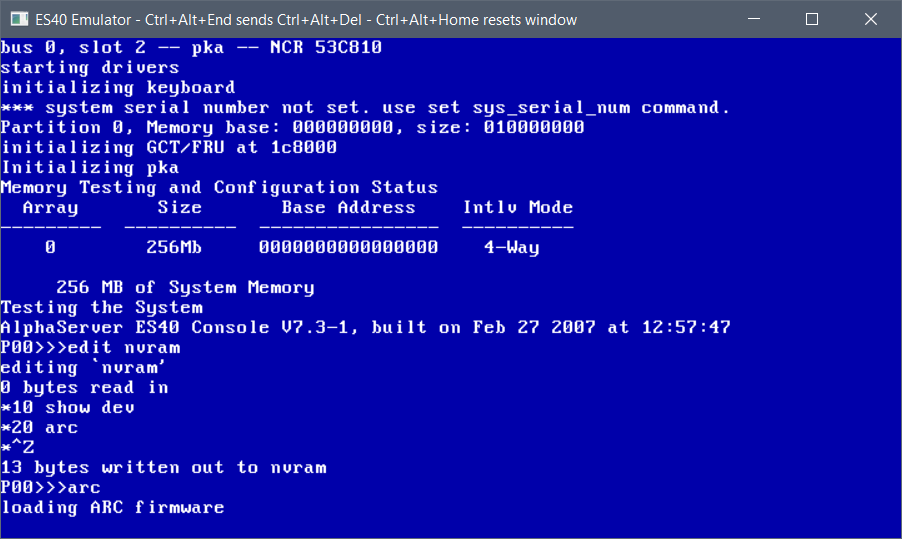
Since this will no doubt come up, let’s make this a separate post. I’ve put the files up on archive.org (arc programmed/bare programmed) but here are the steps to program your own flash, just like you’ve gotten a fresh machine!
First up, you need the ‘v73.iso’ and not much else. VGA is fun to make it all graphical. First look for your CD-ROM drive, the RRD42 in this case, I’ve put mine on SCSI id 6, so it’s the DKA600
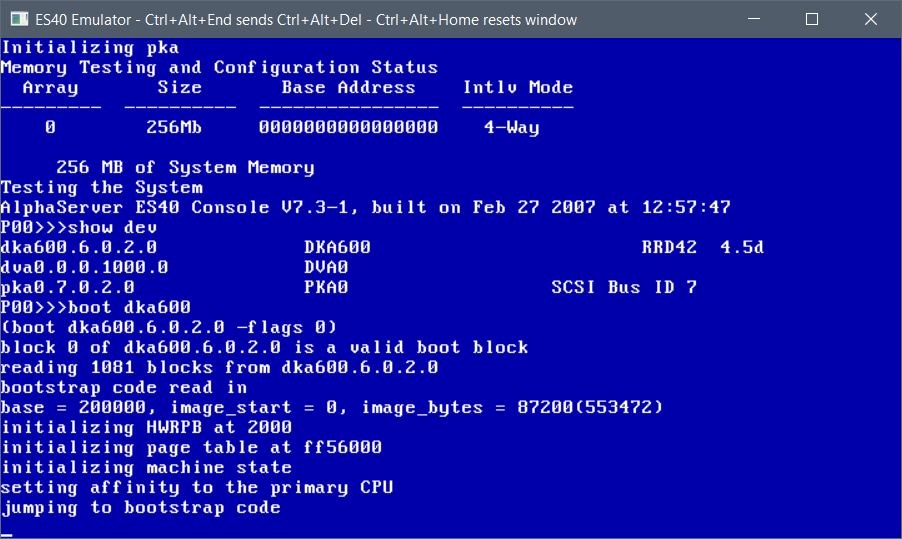
So, it’s a simple ‘boot dka600’ to get the process started
It’ll take a few seconds to boot up to the menu
hit control+c and you’ll get the menu
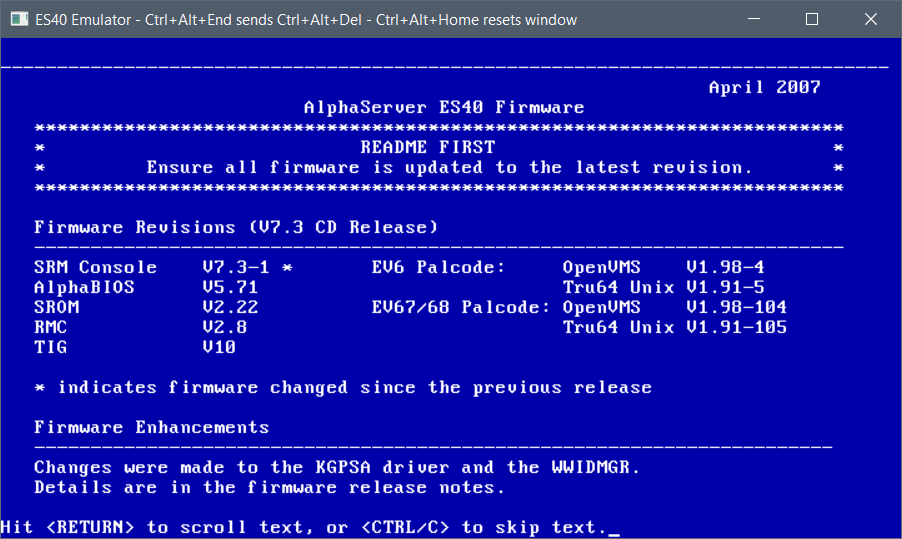
It’ll detect our machine, so you can hit enter to boot the default option
This will take a hot minute as the SRM likes to re-load itself between things
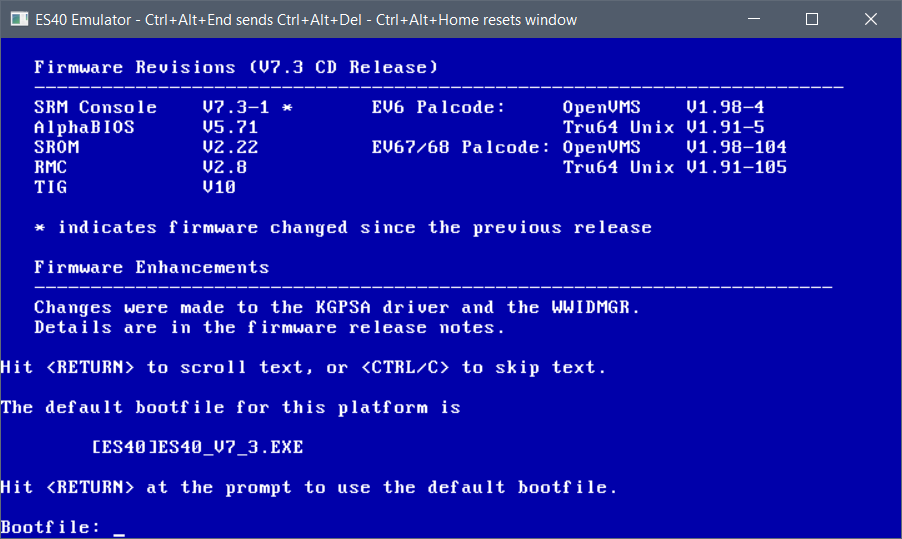
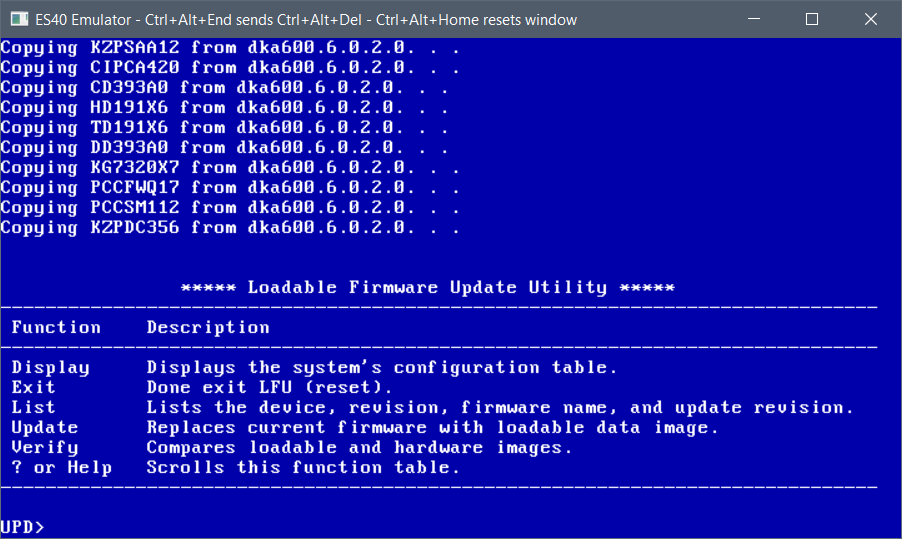
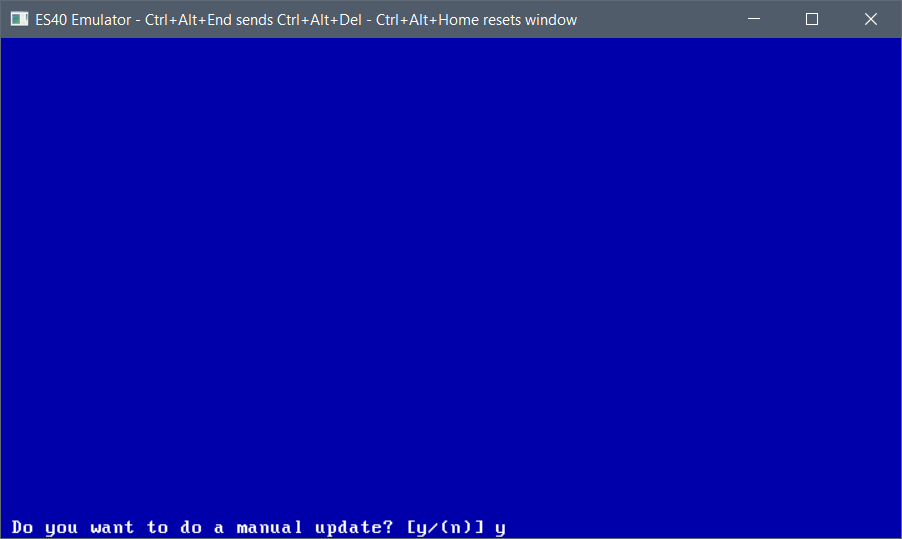
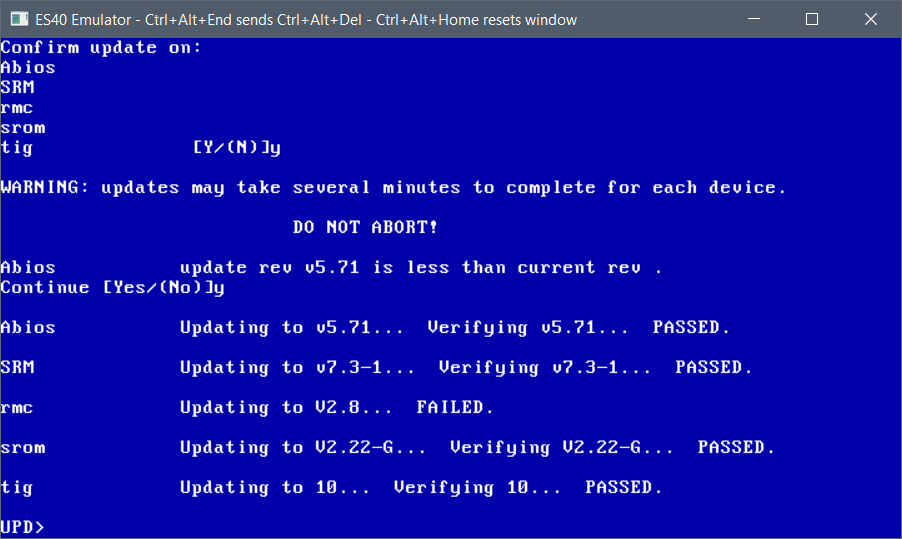
Now I know you think we would just go ahead and hit update, but oddly enough it won’t program the TIG, so we exit from here:
and choose the manual update process
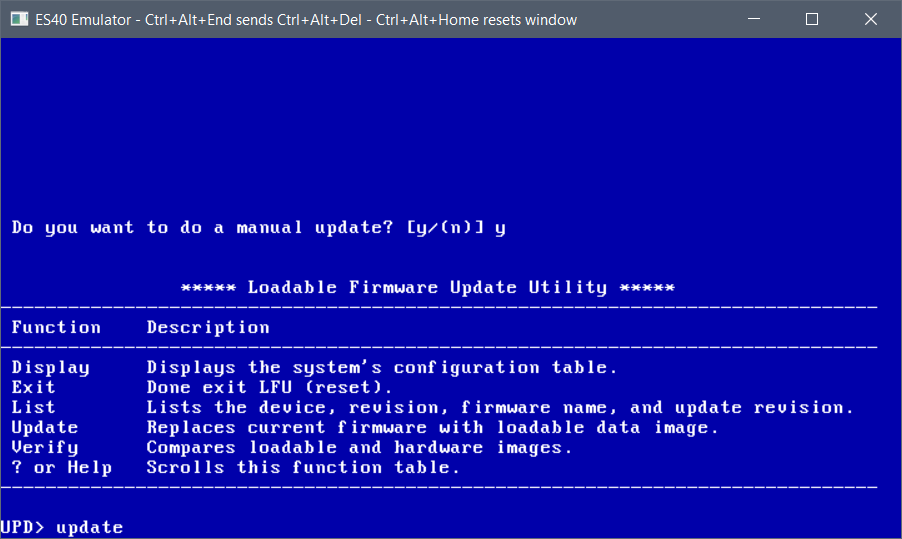
And now we can run the update.
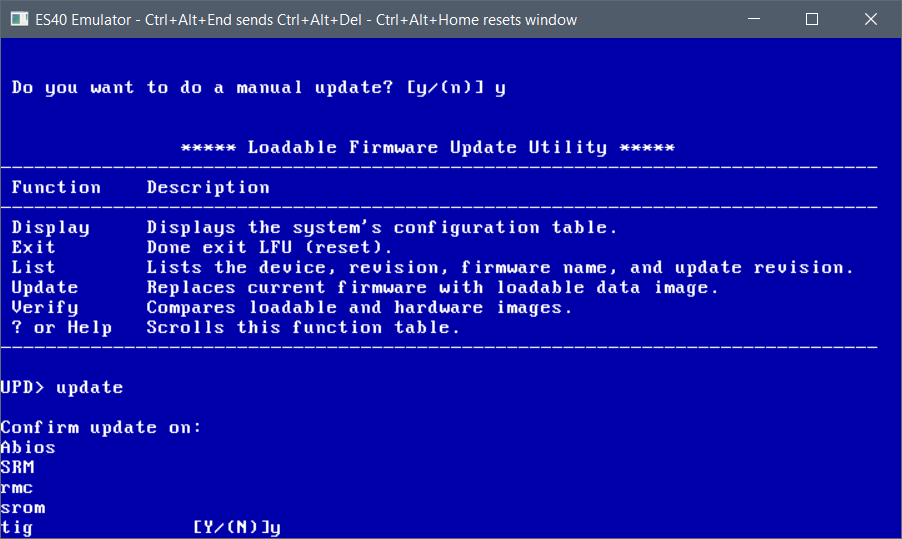
Basically we update them all!
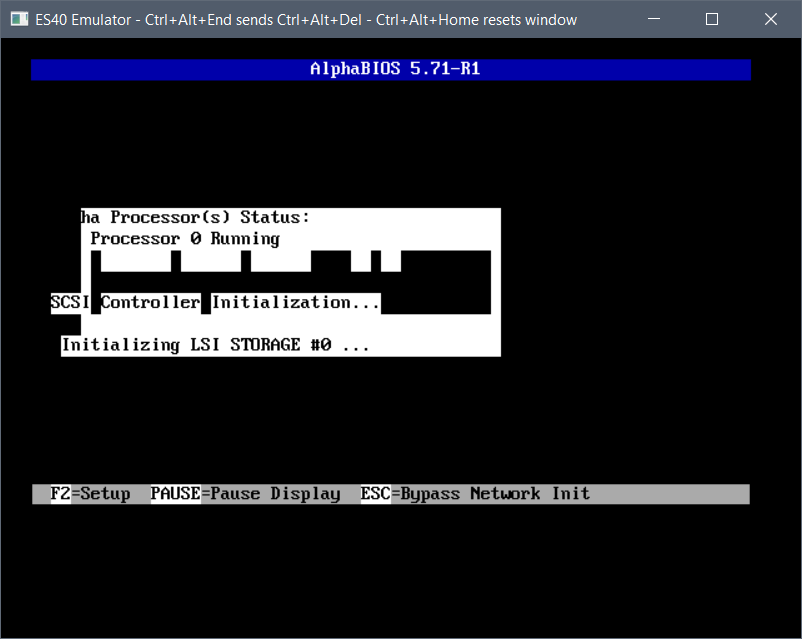
And keep going. For all us Windows NT on Alpha fans, the ABIOS has to be programmed in. It’s a compressed image, so the machine will still boot SRM then we have to load ARC. It’s just the way the ES40 is.
This will take a few minutes, just hang in there.
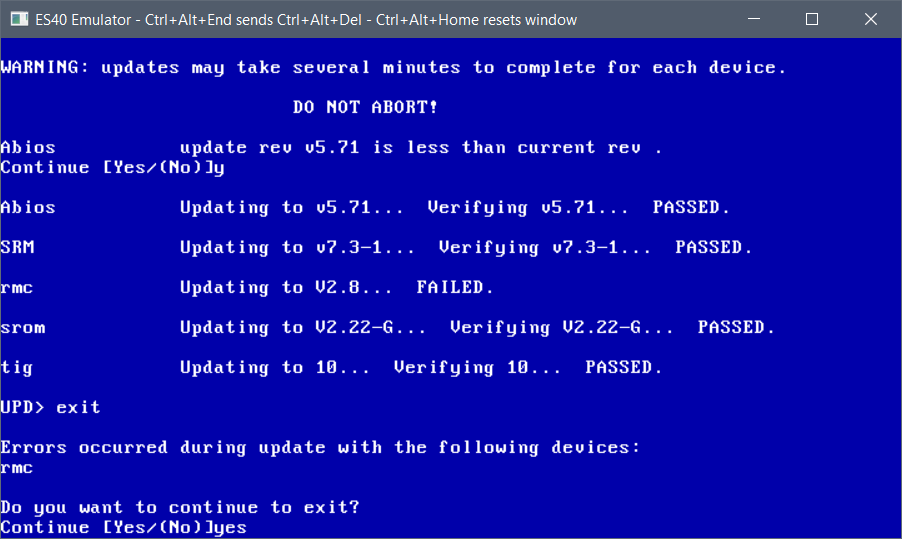
rmc always fails for me but it’s fine.
at this point we can exit, and we’ve programmed our flash.
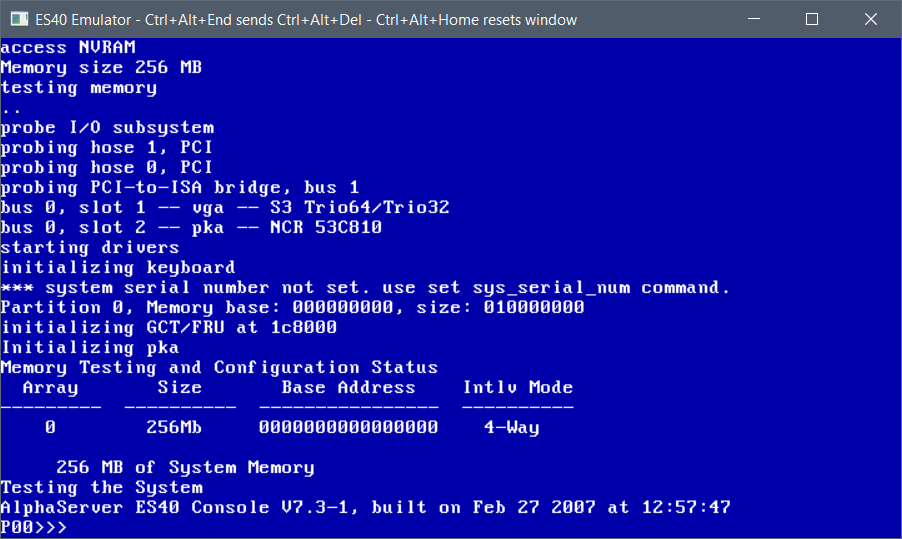
The emulator will reboot, and we will be sent back to the SRM prompt.
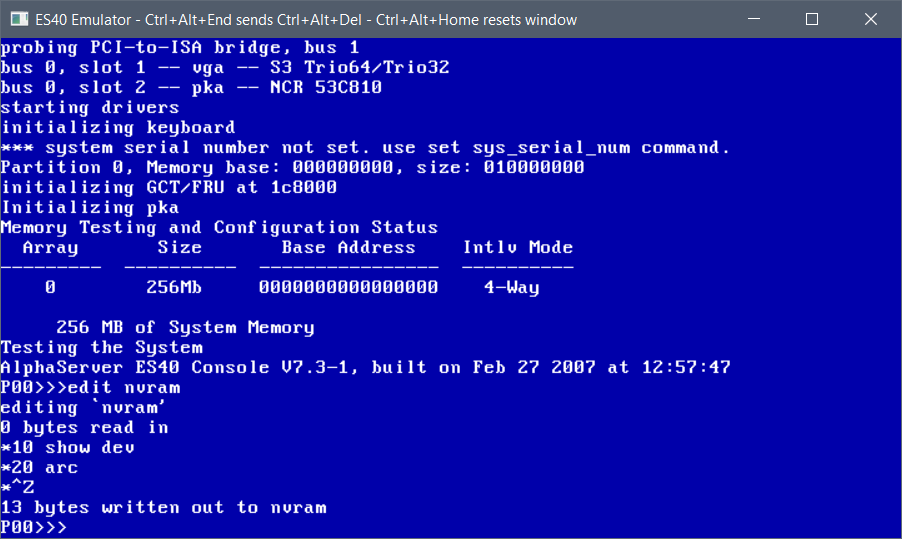
For those of us who want to run Windows NT we can now edit the NVRAM so it always auto-starts ARC, so it doesn’t require manual intervention.
simply type in:
edit nvram
10 show dev
20 arc
Then you can exit this mode with a Control+Z (some machines/emulators require Alt+Z)
now it’ll show the devices and auto-start arc.
You can test-drive ARC now by simply typing in ‘arc’
And this will load up ARC.
You’ll see the VGA bios re-initialized, and then the boot logo
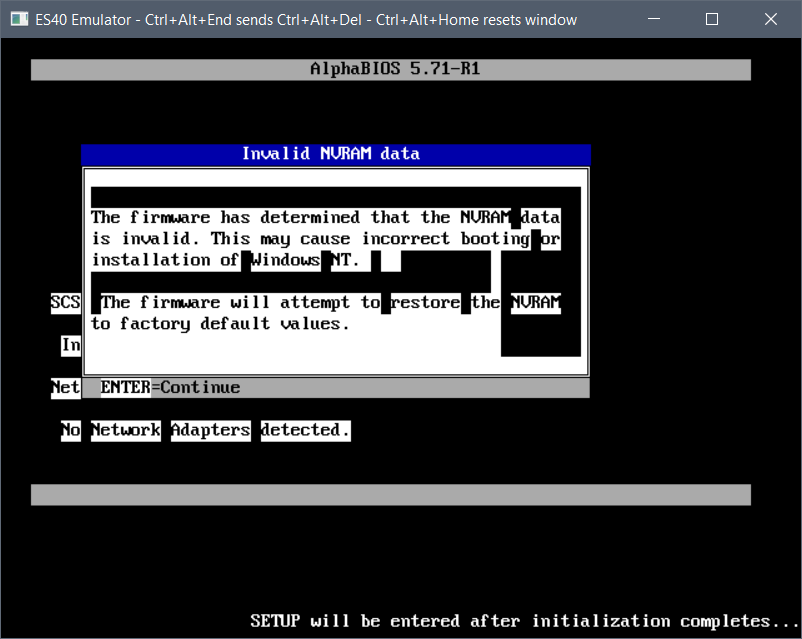
as of yet, the memory test wipes out the video ram so it’ll blank the screen. this is normal.
Hit the space bar to exit the memory test
Then press F2 to enter setup. This will take a minute or so.
it really does take a few minutes the first time.
Because the nvram is fresh it’ll reboot. so hit space again to skip the memory test and f2 to enter setup
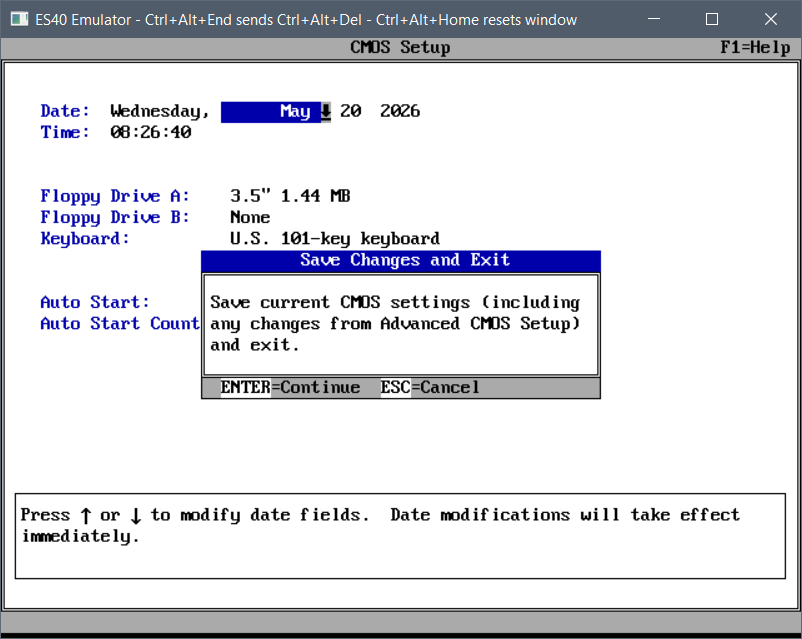
arrow key down to the CMOS setup
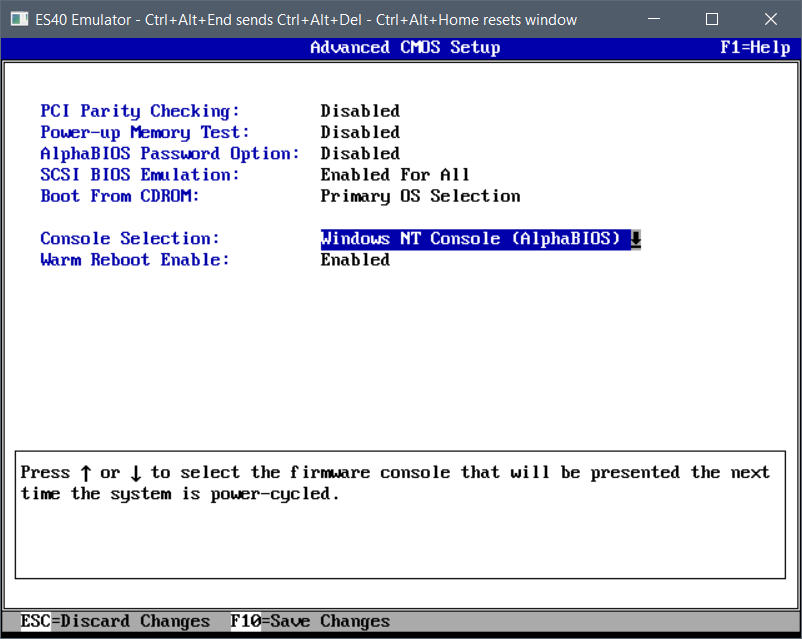
and F6 to enter advanced setup
In the advanced menu, hit tab to advance to a selection and arrow keys to change them
And then Press F10 to save the changes.
Now we’ve fully programmed the flash and set ARC to autoboot!
This is one of these “note to myself” and hopefully it will help someone else as the internets and robots are not very helpful.
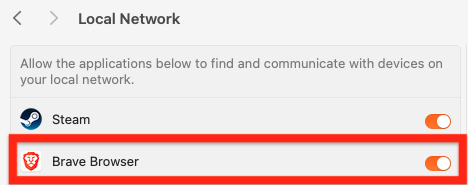
Problem: on a Mac, Brave Browser will not connect to anything on the LAN. 192.168.x.x, 10.x.x.x, etc. Maybe with exception of the router / default gateway.
You tried everything, disabling shields, changing https/ssl/tls options, flags, advanced network settings. Nothing helps. The internet and AI tells you this is how Brave is, secure by default nonsense, nothing can be done about it. Well BS. This is how to actually fix it:
System Settings → Privacy & Security → Local Network → “Brave Browser ON”.
Thats it! After you toggle it, Brave will be able to connect to anything on the LAN, even without HTTPS if you allow it.
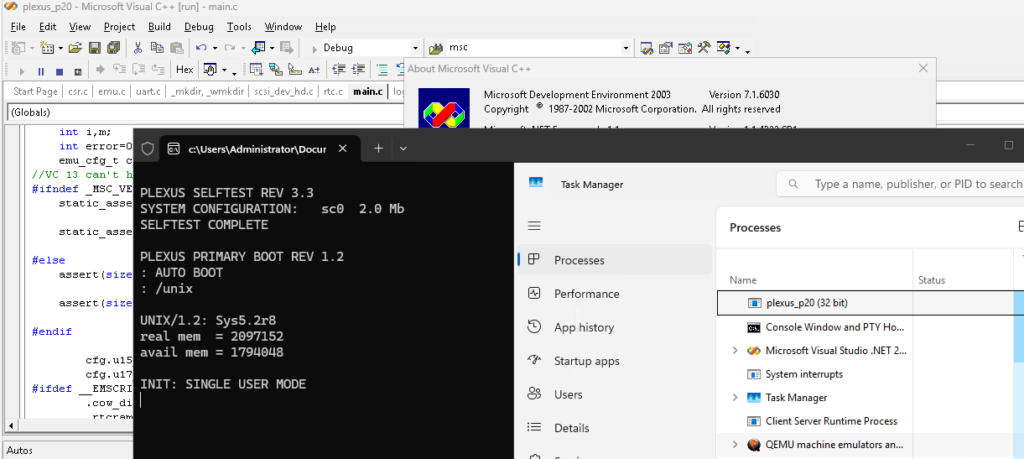
I had thought about trying to take a look at the SCSI handling as the system uses one of those funky MFM disk shims with a SCSI ‘like’ interface bus.. It has an interesting layout with the first block to explain the disk to the controller and the system, along with the disk partitions/slice layout. Very early 1980’s stuff.
Anyways despite all these years, I’m kinda terrible with Xcode, so I thought using Visual Studio to debug would be the way to go. And whoa… I had a copy of 2010 handy as I was having internet issues, and yeah it’s more C89 than C99.
And then there was this fun thing while trying to do an optimised build:
Thankfully you can simply turn off optimizations in the various parts of the source that crash.The Plexus neither has and I think pre-dates the 68881/68882 so the FPU emulation really doesn’t matter, just simply add
pragma optimize("", off)
at the start of the file, and turn it back on at the end. Yay!
Visual C++ 2003!
So yeah that was pretty fun.
Oh I should add there is a WASM version, so the ultimate for tourists, you don’t even have to install anything! Super cool!
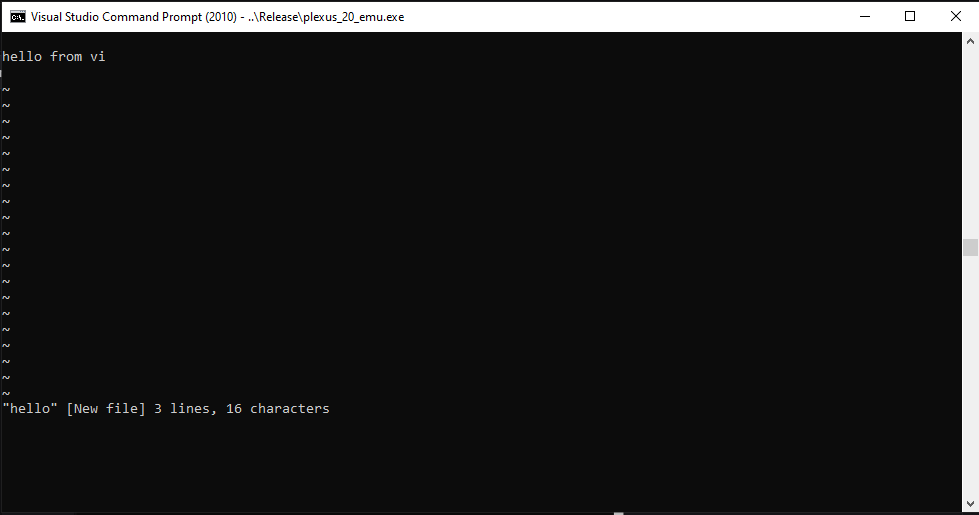
I thought I’d try to make a slight improvement since I expect people to use old machines, so I amputated ansicon, and drive it directly! So, no DLL injection or anything else weird, to try to prevent antivirus software from freaking out.
It’s enough for vi to work at least!
Although I should probably detect Windows 10, since it has the ability to detect and drive ANSI codes on it’s own.
Anyways for anyone wanting to check it out on Windows here is the repo with the first release:
Oh C compiler is installed, and I believe Fortran as well! The ‘catch’ is there currently is no good way to move data into the VM. Pasting into the console gets dropped chars, and it’s just impossible. uuencode to the system OUT however works great.
Well this is going to be a seemingly pointless post but you know I love stuff like this. I’d already gotten GCC 1.40 to run on the Windows NT 1991December Pre-Release, but that’s all Win32, what about the much vaunted POSIX subsystem?
Well what is it? Basically it’s just enough of the UNIX/POSIX standard to check a box that gave Windows NT an in for US Government contracts that required a POSIX checkbox. And nothing else more. It’s basically agreed that it’s just enough to run ‘vi’ and that’s basically it.
But surely we can probably do more with this?
The first fun part is that setting up the environment is basically UNDOCUMENTED. It was a nightmare back. then, as you need to setup a termcap environment that again is not mentioned. The only hint is is an old KB article Q108581, which sets out the vauge guide. I do know that back in the day I did have vi running, but I can’t remember how I did it exactly but wow.
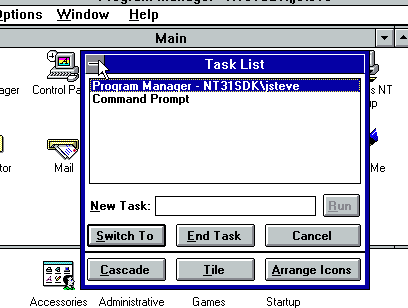
The first thing you need to do, naturally is install Windows NT 3.1. I did have access to this fun CD back in the day, it’s a combination Windows NT 3.1 Workstation +SDK CD-ROM. This way you not only get the operating system, but you also now have the C compiler, libraries and headers. Once setup, there is even a POSIX sample program. Great? Well, no. Because this doesn’t include the OS environment, there is no previous ‘vi’ either. Very sad. Naturally you need another CD to install, which of course back in the day if you were going to use or support Windows NT, you’d naturally run out or order the Windows NT Resource Kit. These were absolutely required back in the day as the ‘task manager’ only at best would show you named windows, it doesn’t show you the actual processes, making managing NT a nightmare without pviewer. (process viewer), among others.
Windows NT Task List
On the Resource Kit is not only a tiny ‘userland’ but also it includes Elvis a vi clone, along with a much needed ‘cc’ wrapper that will let you invoke the SDK C compiler as if it’s the Unix cc C compiler command.
Elvis was written by Steve Kirkendall, back in the day, and even on Linux back in the day, I was using Elvis as well. Remember ‘real’ vi was tied to needing a 32v / BSD source license so it wasn’t free.
/* Author:
 *      Steve Kirkendall
 *      14407 SW Teal Blvd. #C
 *      Beaverton, OR 97005
 *      [email protected]
 */
It’s just how things were back then.
To make things weird, I installed Windows NT onto a HPFS partition, because I wanted long file names, but I didn’t want to have a case preserving filesystem, as these old things have so much UPPERCASE/lowercase naming conflicts, because YES as a feature of NTFS & POSIX it really does support Mixed case naming. And I don’t feel like dealing with it, and it’s 1993, and HPFS is still a popular filesystem for us OS/2 users.
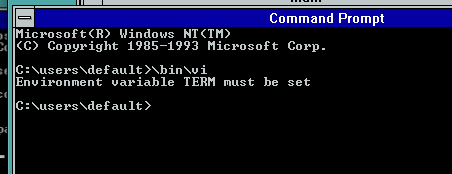
Okay, so you’ve installed both the SDK & the resource kit, surely you can just run vi?
No. No you cannot. Remember you need that TERM variable and termcap library!
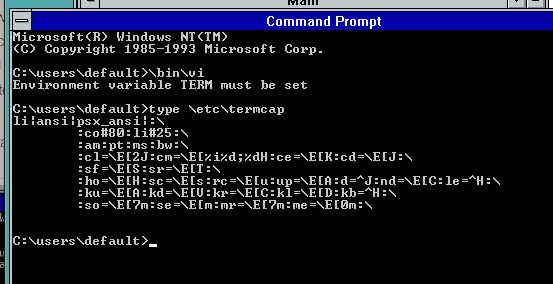
Now to save you the hassle you’ll go back and check Q108581 and you’ll see this example:
copy paste and and, yeah IT DOESNT WORK. Like something being passed endlessly through a photocopier, it got mangled in usenet (maybe where I found it?) , and yeah you need to ‘fix’ it up as it should look more like this.
Note that the leading ‘tab’ actually matters and there should be NO empty spaces at the tail backslash! If that tab or ending \ is padded or wrong it just plain will not work. I wasted so much time before realizing the craziness of this setup.
Okay.
Thinking that’s enough you have to keep reading, as the POSIX environment has no idea what c: is, or how to set variables, so you need to specify the full NT path, not the Win32 path
To save the adventure some time this is what I end up just putting into a CMD file so I can just click and go!
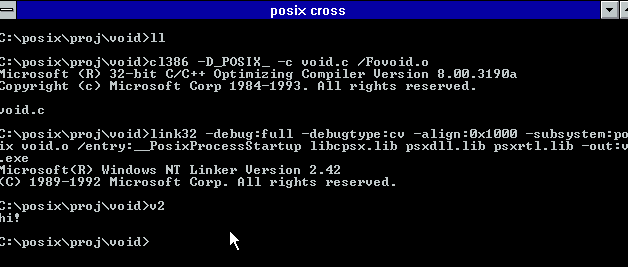
Now with a corrected environment for POSIX and a termcap file, now we can actually run VI/Elvis!
Elvis running correctly on the POSIX subsystem
This is what success looks like!
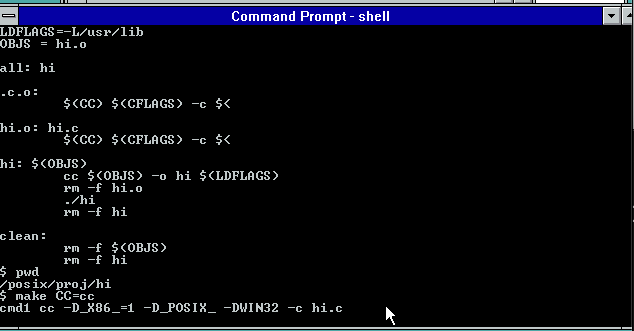
Now I know what you’re thinking okay, were setup now, we can just build something simple like say a hello world style program right? I made a simple Makefile, and let’s go ahead and try to invoke the ‘cc’ compiler wrapper:
And it just hangs, doing nothing. As it turns out that the ‘cc’ wrapper uses a file for IPC to talk between POSIX & WIN32. Remember they are separate personalities on the NTOKS kernel, and they cannot directly communicate with eachother.
I don’t know why they didn’t use a named pipe, maybe POSIX cannot write to them? Maybe when they were writing the POSIX subsystem, named pipes weren’t working yet? It’s hard to say, and the early NT 3.1 pre-releases don’t included the POSIX, or OS/2 subsystem. Actually they don’t even have the NTVDM/MS-DOS/WoW either.
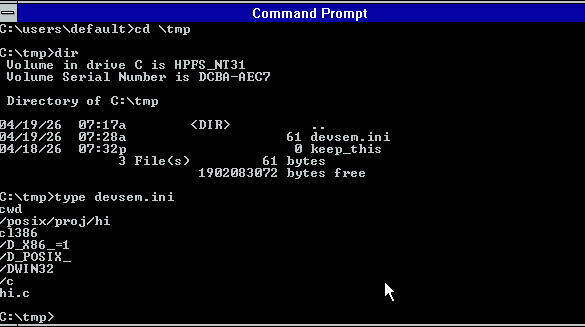
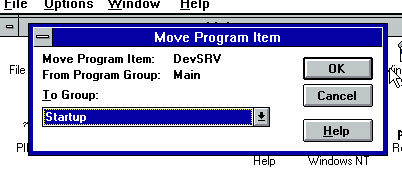
So you need to run something called ‘devsrv’ which is a Win32 program that looks for c:\tmp\ for devsem.ini file telling it what Win32 program to run and how. For example, in this case it looks like this:
Now if you think you can just blindly run devrv, you’ll 99% of the time be in for a bad time as you need to initialize a working Win32->POSIX cross environment. Me being, me I just put this into another CMD file:
I’ve already started to place headers & libraries into a more ‘UNIX’ like path structure with /usr/include & /usr/lib although by default the MSFT scripts expect things to live in the SDK world. But I do have goals of running GCC and dealing with weird paths isn’t my goal as the less I have to fight, the better.
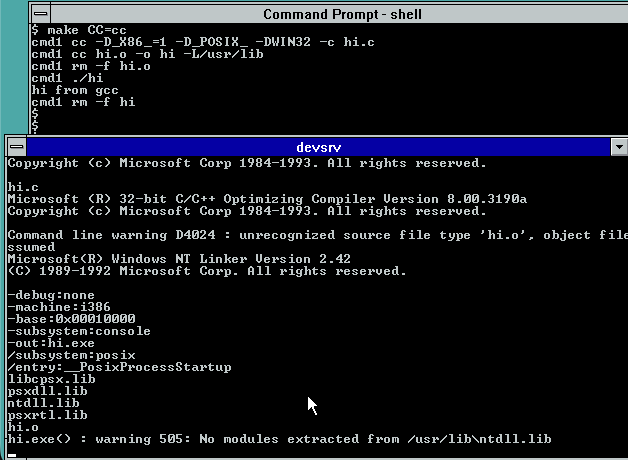
Compiling ‘hi’ from within the POSIX subsystem
Now with devsrv running it cannot call the C compiler, and the linker. It will fail at first as it’s expecting to link against NTDLL.LIB as in the Pre-release/Beta days there was a ‘ntdll’ you had to link against. It isn’t there in the RTM Windows NT, so it’s kind of clear that although POSIX shipped it was basically abandonded during the development cycle, and nobody expected anyone to actually do anthying with it. Or at best find the KB article and maybe run vi.
Or you could just fix & rebuild the linker proxy, ld.c and remove the offending line:
So now I can build things from the Win32 side of life, like the LD proxy, or even ‘cross compile’ a simple enough hello world from Win32:
See wasn’t that fun?!
Since I already have a version of GCC-1.40 building with the Microsoft C compiler this seemed like a great leg up on building a POSIX version. And naturally to make it more complete building bison-1.16 is also required. Since I have Bison building on normal Win32, this wasn’t much of a problem. The weird hurdle came in the C Preprocessor where I found out that POSIX is missing some seemingly vital stuff like fstat!
int
file_size_and_mode (fd, mode_pointer, size_pointer)
     int fd;
     int *mode_pointer;
     long int *size_pointer;
{
#if 0
//this is missing from posix
  struct stat sbuf;

  if (fstat (fd, &sbuf) < 0) return (-1);
  if (mode_pointer) *mode_pointer = sbuf.st_mode;
  if (size_pointer) *size_pointer = sbuf.st_size;
#endif
  return 0;
}
Also, for some reason I can’t link any real programs that call unlink, I have to proxy that to a stub file that has no includes, define unlink as Xunlink, then link against that stube and it all links fine. I know WTF?! I don’t get it ether. But I wanted to build stuff so these are… tradeoffs that I made to just short-cut the whole thing. Maybe I’ll go back and look and try to figure it out. As I see in the POSIX util source mutiple things call fstat, so maybe it’s happier when linked from Win32?
To complete the round trip, since we already know the Link386 from the SDK and early Visual C++ will happily accept Xenix OMF files, I can use the GNU Assembler that targets Xenix, and then get a round tripped GCC on POSIX NT!
GCC running on POSIX NT!
And there we have it!
Installing it for the BRAVE
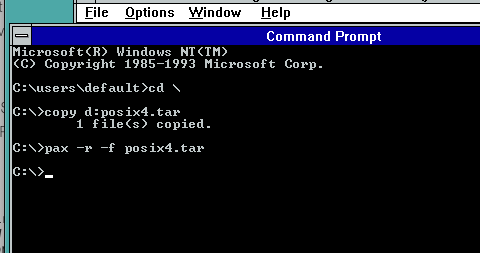
I’ve gone ahead and uploaded my working directories to archive.org here: POSIX-4.
I guess I could have found my old zip/unzip for NT 3.1 but I didn’t I stuck to PAX which surprisingly is in NT 3.1. It’s not quite as friendly as TAR but you can copy posix4.tar to the C: drive and just extract it with ‘pax -r -f posix4.tar’
I should note for some reason trying to extract it from my tranfer disk, causes a BLUESCREEN in the HPFS device driver on NT 3.1… Bummer.
extracting my posix all in one package
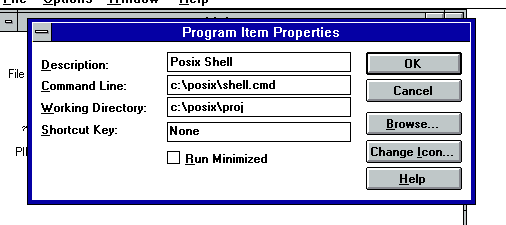
Once all the files are unpacked the first thing I do is make a Program Item on Program Manager for the Posix shell. All the hard work is done, you just have to path it to c:\posix\shell.cmd
This is how I setup mine, so YMMV
Shell Program Item
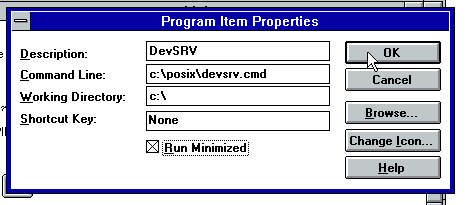
And the last part is the DEVSRV. This is how I setup mine, with the emphasis on running minimized. It does and can crash from time to time so I wouldn’t try to wrap it as a service or anything that creative.
DevSRV Program Item
And then I move mine to the startup items, so that way, every time I login, I now have the devsrv all ready for my POSIX experiments!
Now you can just logoff/log back in, and you are ready for some POSIX GCC adventures.
It’s a shame that back then I just was totally unaware of that Xenix OMF GAS version. I pretty much had given up on Xenix 386 back then, as I never could find the developer’s kit, as they had gatekept people off the platform. Linux is where all the excitement was, as not only did it have GCC, but you also had full source. Even if I’d had access to GCC on Xenix, with no libc no headers it wasn’t going to go very far.
Credit to Microsoft though, they did learn with that $3,000 OS/2 SDK, that if you paywall the low end developers away, nobody writes for your platform. Although Microsoft did lose their way on this when they stopped QuickC, forcing new users to pay for the full thing. They didn’t realize how much territory they ceded by charging for the C compiler to GCC until it was too late, as all ‘starving university’ kids are GNU kids now (Yes I know CLANG is where it’s at today, thats’s Apple’s lesson I guess in there). By the time they did free as in beer limited “Visual C++ Toolkit 2003” it was already far too late.
The POSIX subsystem was never going to be all that useful, as it was pretty clear if NT became a competent UNIX, nobody would write Win32 server software. But considering one of the best features to be added to Windows 10/Server 2016 was the WSL subsystem, we already crossed that bridge.
Addendum
I thought it’d be ‘fun’ to do this from Citrix as it easily allows me to map drives making life MUCH easier, but nothing worked. I went thorugh installing NT 3.5 it’s SDK and Visual C++ 2 and noticed that nothing ran on that either. Maybe it’s Qemu?
So I just jumped forward to NT 4.0, because why not??
make on NT 4.0 POSIX
Turns out it doesn’t work either.
Well sure vi does work, but the whole ‘cc’ cross thing is just plain deprecated after 3.1… It’s like whatever attempt at POSIX being useable was fully given up on. The only other interesting thing on the NT 3.5 resource kit, is that it does mention GCC being part of the kit, but obviously that never happened. Politics I suppose.
So now I really remember why I never really bothered with the environment, as it basically became unusable by Windows NT 3.5
Running at home!
I’ve gone ahead, and uploaded the source to github, and included a binary release. So you can try this on your own Windows NT 3.1 machine, or try the fight with NT 3.5 or higher and go through the fight yourself.
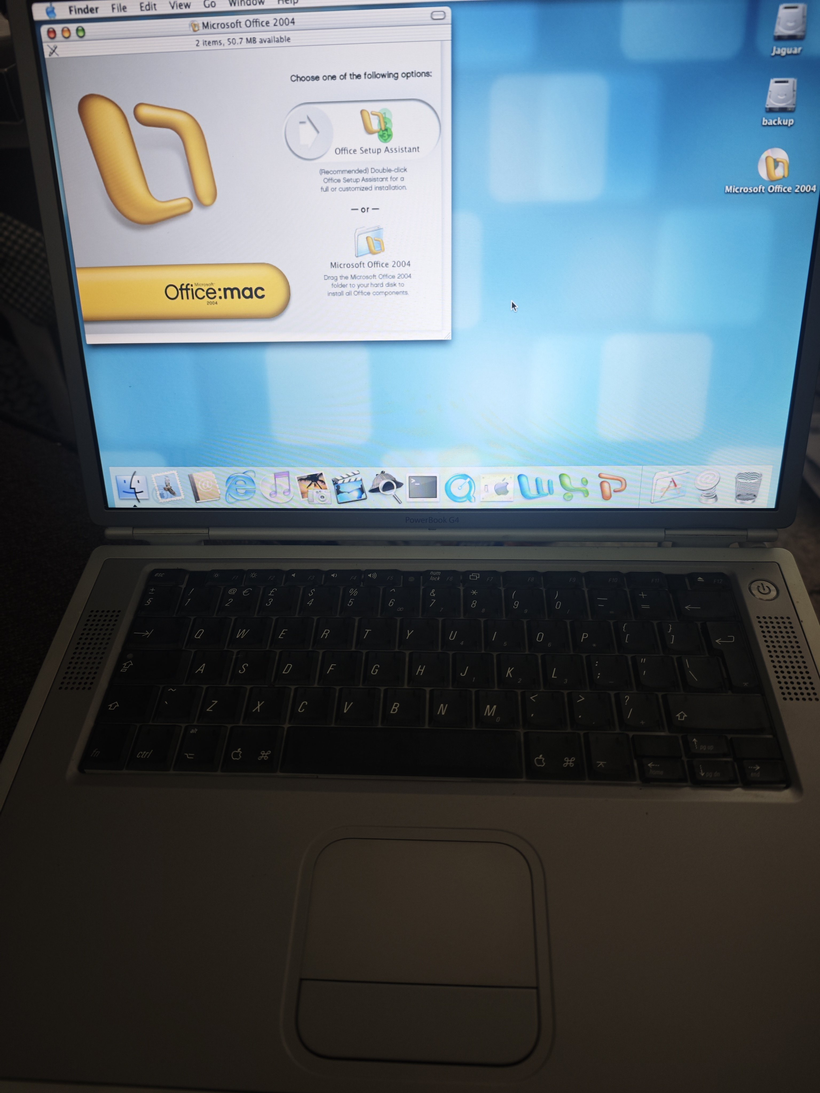
PowerBook G4 Titanium running OS X 10.2 & Microsoft Office 2004
This honestly should have been much easier.
Or maybe I’ve just forgotten how absolutely hostile early OS X could be.
The mistake begins
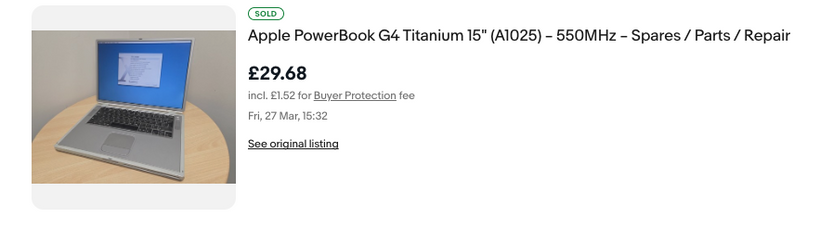
It started, as these things always do, with someone mentioning the PowerBook G4 Titanium. One quick eBay search later and, well £30 later I owned one.
“They got me.”
It showed up absurdly fast (Sunday delivery? really?), in surprisingly good condition, and I already had a charger. So naturally, the sensible thing to do was…
Install Tiger. Which worked. Immediately. Of course it did.
But that wasn’t good enough
Tiger is fine. Great, even.
But it’s not Jaguar.
10.2 was always my favorite early OS X, that weird in-between era where it still felt experimental but usable. And according to basically everything online, early Titanium PowerBooks should run it.
So I grabbed a cheap “reproduction” 10.2 CD set.
And this is where everything went wrong.
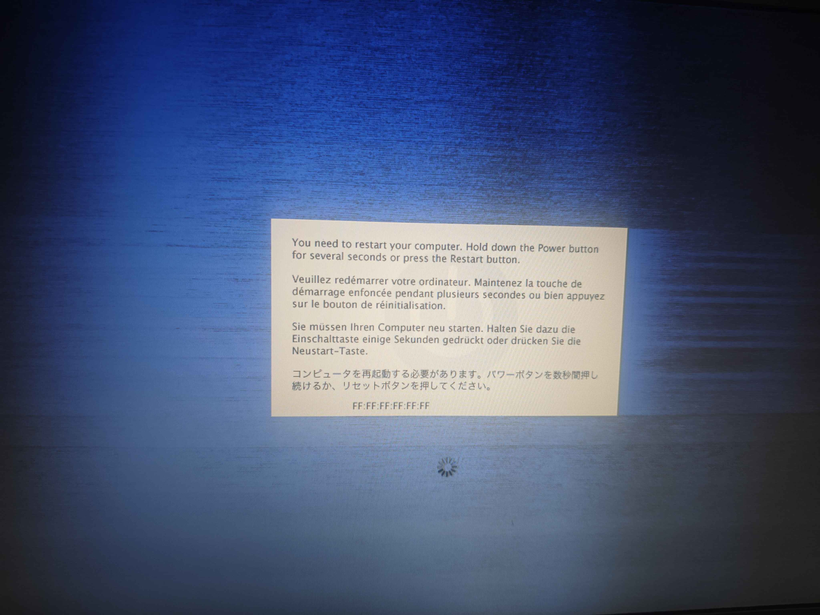
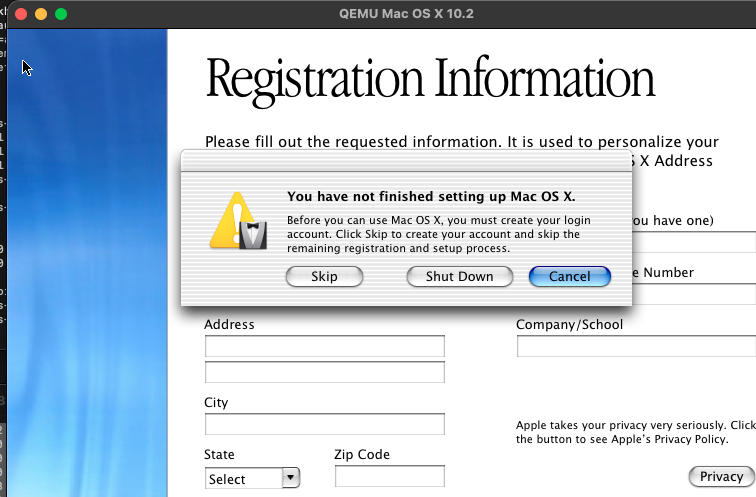
Kernel panic
Not a great start.
At first glance it looks like some kind of network address corruption, but in reality it’s just the kernel screaming because something is very wrong at a hardware level.
Time to go verbose.
Welcome back to Open Firmware
You can’t just hold C and Cmd+V like a normal person.
No, this is 2002.
So into Open Firmware we go:
boot cd:,\\:tbxi -v
Now we get actual output… and a much clearer failure.
Kernel panic in the FireWire driver
FireWire: the red herring
The panic traces back to:
com.apple.driver.AppleFWOHCI
Ah yes — FireWire.
Because of course it is.
So the obvious thing to do is disable it from Open Firmware:
dev /pci@f4000000/firewire
" disabled" encode-string " status" property
And… it works.
Kind of.
The system gets further. No panic. Progress!
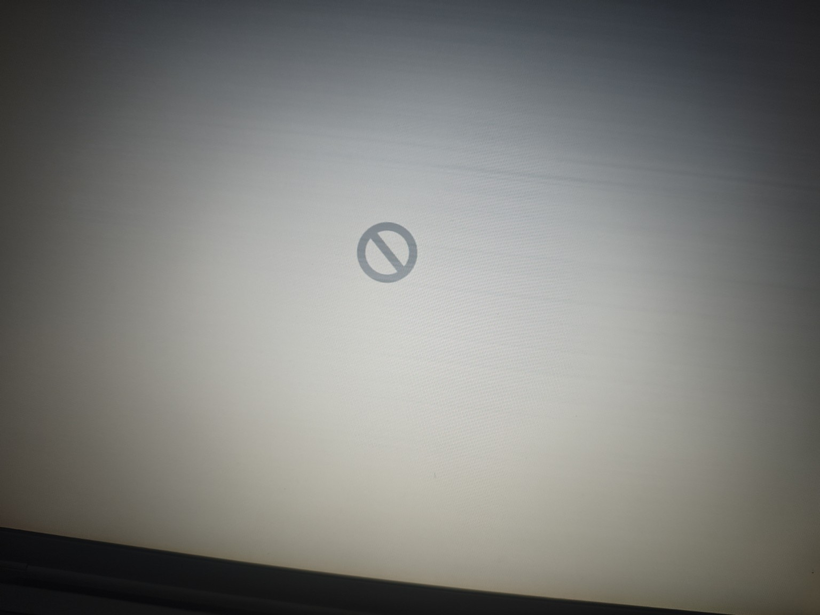
The ‘stop sign’ meaning this OS isn’t supported on this Mac
And then: the stop sign
Instead of a crash, we now get a 🚫
The classic “this OS is not supported on this Mac” symbol.
Which is when it finally clicks:
This machine is a PowerBook3,5 (867MHz) And 10.2.0 predates it
So no, this was never going to work.
The FireWire panic wasn’t the root problem; it was just the first thing new enough hardware broke.
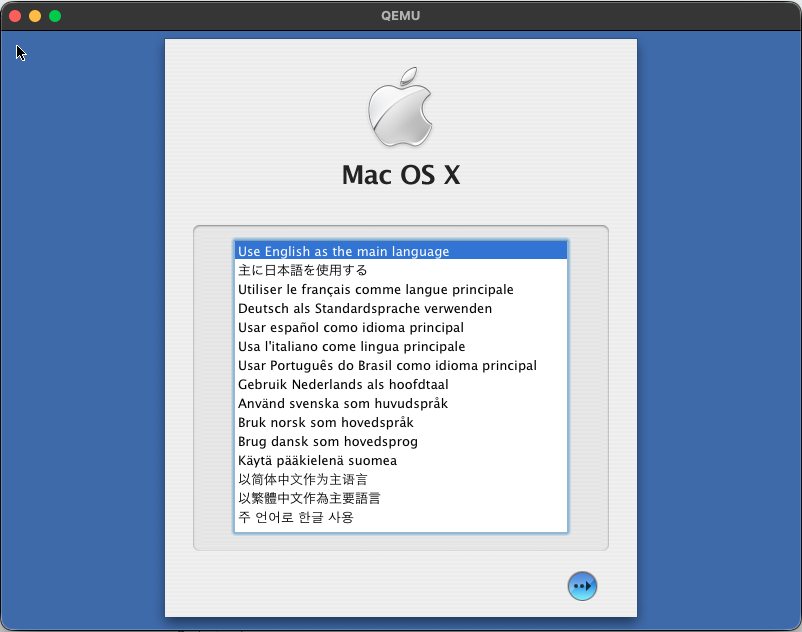
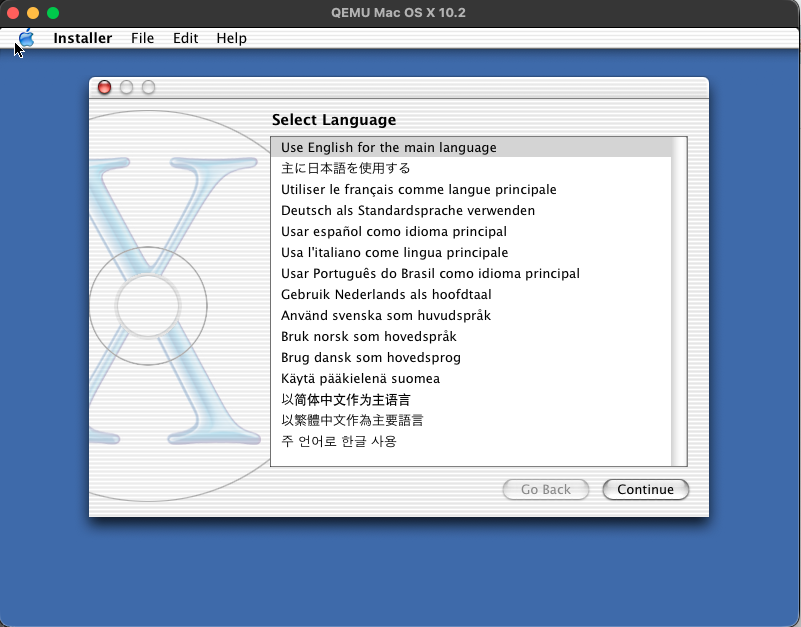
First off is to get ISO images. I actually started this process with the Tiger I already have in hand. To grab an ISO under macOS 26 it’s a simple command:
And in a minute or so on my mac mini running “QEMU emulator version 10.1.2” from homebrew I was up and running. yay. I don’t need or care about audio/networking as this is just to get a PowerPC OS up and running, using the media I have in hand. Bring up the disk util, partition the VMDK, the install the OS. You’ve probably seen/done it a dozen times so nothing to really see here.
Once my 10.2 reproduction media arrive, I went through the hardware boot to only find out that 10.2.0 just won’t run on my PowerBook G4. This is where we use the emulation route. Could I simply grab an ISO using hdiutil?
NO
Of course not. Why would it work? It comes down to the older versions of OS X being very MacOS 9 style disks, which hdiutil simply will not grab. You end up with meaningless data. What about ‘dd’ on /dev/disk4? /dev/rdisk4? did you set bs=2048? YES YES YES… none worked.
So back in homebrew I got the cdrutils from Joerg Schilling which gives me the readcd command, which finally let me grab the ISO’s
% file OSX_Jaguar_10.2-disc1.iso
OSX_Jaguar_10.2-disc1.iso: Apple Driver Map, blocksize 2048, blockcount 331264, devtype 1, devid 1, driver count 4, contains[@0x200]: Apple Partition Map, map block count 10, start block 1, block count 63, name Apple, type Apple_partition_map, valid, allocated, in use, readable, contains[@0x400]: Apple Partition Map, map block count 10, start block 64, block count 56, name Macintosh, type Apple_Driver43, boot arguments ptDR, valid, allocated, in use, has boot info, readable, writable, pic boot code, real driver, chain driver, contains[@0x600]: Apple Partition Map, map block count 10, start block 120, block count 140, name Macintosh, type Apple_Driver43_CD, boot arguments CDrv, valid, allocated, in use, has boot info, readable, writable, pic boot code, real driver, chain driver, contains[@0x800]: Apple Partition Map, map block count 10, start block 0, block count 0, type Apple_Void, contains[@0xA00]: Apple Partition Map, map block count 10, start block 260, block count 56, name Macintosh, type Apple_Driver_ATAPI, boot arguments ptDR, valid, allocated, in use, has boot info, readable, writable, pic boot code, real driver, chain driver, contains[@0xC00]: Apple Partition Map, map block count 10, start block 316, block count 140, name Macintosh, type Apple_Driver_ATAPI, boot arguments ATPI, valid, allocated, in use, has boot info, readable, writable, pic boot code, real driver, chain driver, contains[@0xE00]: Apple Partition Map, map block count 10, start block 456, block count 512, name Patch Partition, type Apple_Patches, valid, contains[@0x1000]: Apple Partition Map, map block count 10, start block 0, block count 0, type Apple_Void
As you can see it’s a lot of partitions, and various bits that it’s expecting. Kind of annoying that the system utils cannot grab these kinds of images, but in the end we got there.
Naturally, Jaguar has to be run differently as it’s just more tied to older hardware:
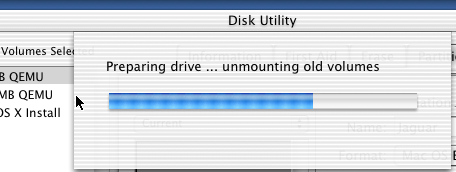
The next catch is that the diskutil just hangs partitioning the hard disk. I’ve no idea why.
It just currently hangs forever on 10.2
So, the solution is to boot back into Tiger, add a second disk, partition it there, and then use that disk in the Jaguar boot. After that it installs just fine. I enabled the sound and network just to setup NTP so at least my image isn’t too stuck in 2002.
Oh, one trick I found out decades too late, is that you can cloverQ the named registration, so you don’t have to make up bogus phone numbers and a semi valid mailing address. I didn’t know is that, it’ll just kick you to the account creation screen, and you are good to go!
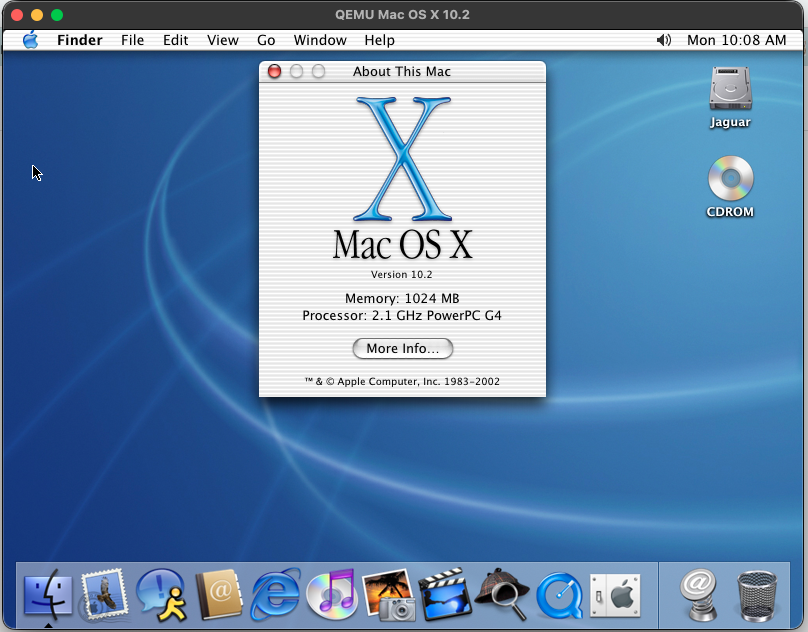
OS X 10.2.0 installed into QEMU
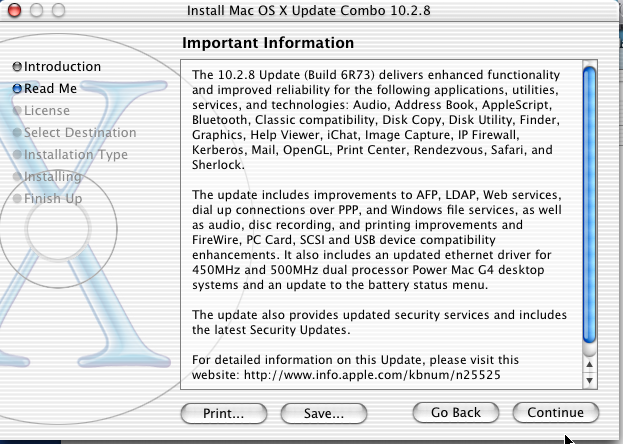
After that it’s just a matter of running the 10.2.8 combination patch, to bring the VM up to 10.2.8
10.2.8 Combo update
From there the final hurdel is to create a RAW disk image to transfer the Tiger diskutil ‘disk image’ to. This way you can easily mount the RAW image by renaming the extension to .dmg and OS X (thankfully) still supprots HFS+ so you can simply use finder or ‘cp’ to copy off the compressed disk image onto a USB drive, and now we are ready to image the PowerBook using our updated OS X Jaguar!
The USB betrayal
Naturally, the Tiger installer refused to mount USB.
Because of course it did.
The final workaround
So instead:
Repartition internal disk
small staging partition (~4GB)
main target partition (remainder of the disk)
Install Tiger (again)
Copy 10.2.8.dmg to staging partition
Boot Tiger installer
Use Disk Utility → Restore image onto main partition
And finally…
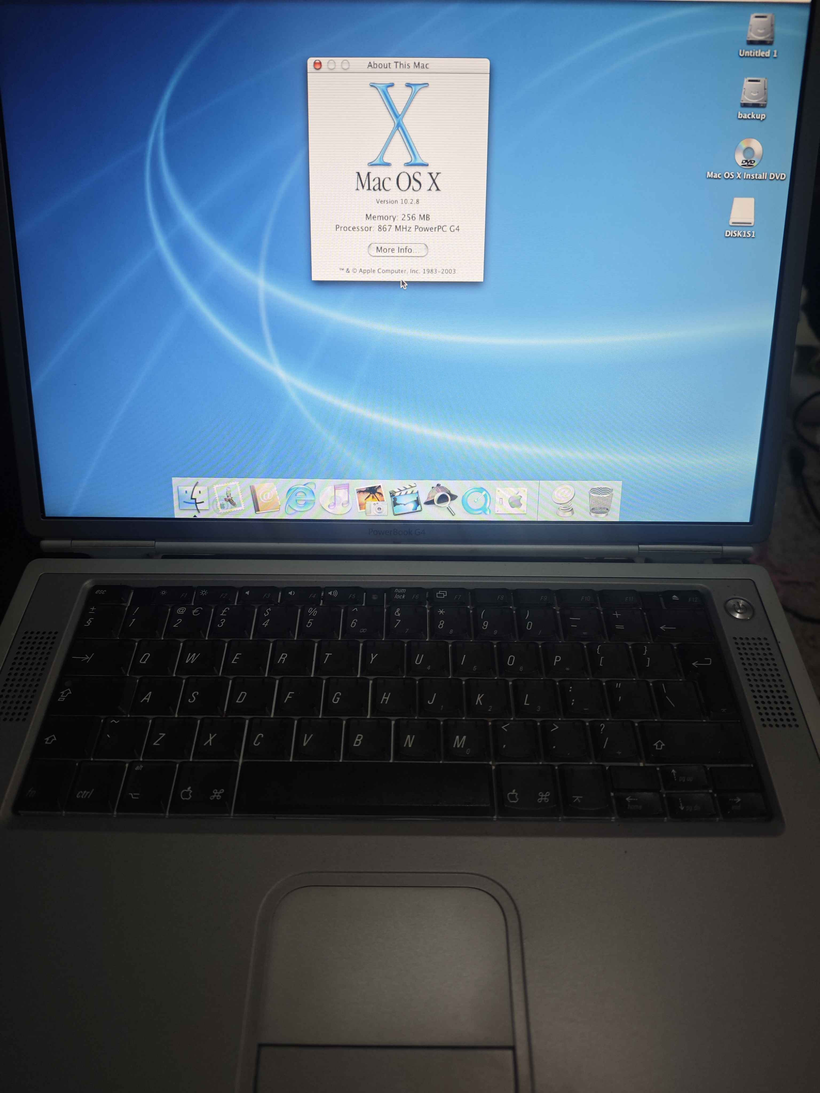
10.2.8 running on the PowerBook G4
Success
Jaguar 10.2.8.
On a machine that absolutely refused to run 10.2.0.
With Office 2004, because why not.
Lessons learned
Early OS X is tightly hardware-bound, not just “older”
Kernel panics are often symptoms, not causes
FireWire was innocent (this time)
USB support in installers was… optimistic
And most importantly:
Just because you can reconstruct a historically accurate install pipeline via emulation and disk imaging… doesn’t mean you should.
The obvious solution (that I ignored)
A single FireWire cable.
Target Disk Mode.
Done in 20 minutes, by using my B&W G3 PowerMac that is currently running Windows NT, but it wouldn’t matter as I could just hold option and select the FireWire target disk to boot to/from as it’ll happily boot/install 10.2.0 without a hitch. It being a G3 makes no difference as the same kernel works on G3/G4 processors.
But where’s the fun in that?
For those brave enough to get to the end of the post, I uploaded all my Jaguar images onto archive.org. I’m sure it’s been preserved before, but since I was in the mood, I also uploaded Office 2004.
(This is a guest post by Antoni Sawicki aka Tenox)
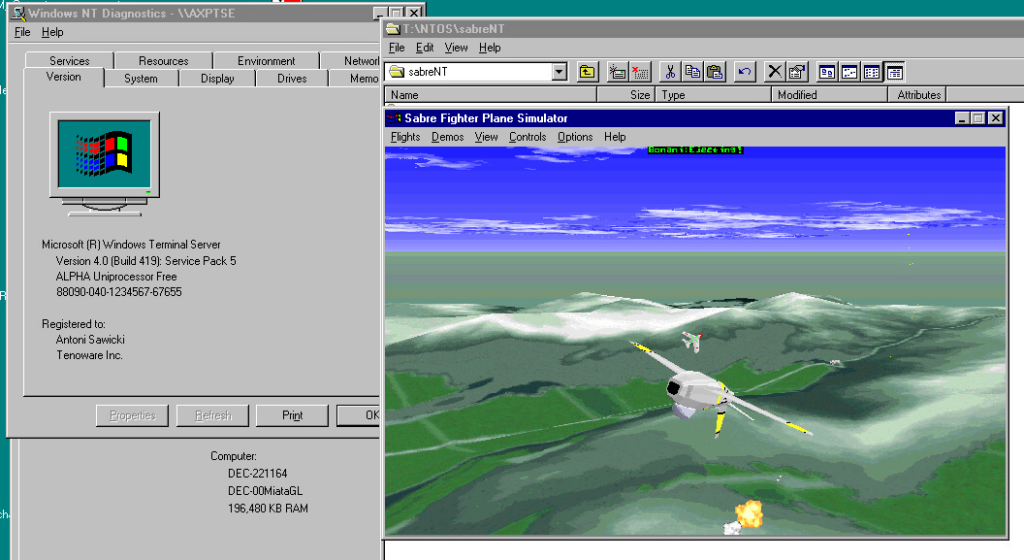
SABRE is a little known flight / fighter combat simulator set around F-86 and MiG-15 jet fighters and Korean War. Developed by Dan Hammer and originally hosted at sabre.cobite.com. It was available for Linux and Windows. While GPL the Windows source code was not widely available for download, but Dan eventually released it on his website. Someone put it on github. There has been an Alpha AXP version floating around. But no MIPS, PowerPC, Itanium or ARM.
I got to work and with help of robots was able to downgrade VS2008 code to compile on VS4 and got it built for Alpha AXP, MIPS and PowerPC! It’s surprisingly fast and high FPS even on slowest machines! Great game for your NTii!
SABRE Fighter Plane Simulator running on Alpha AXP Windows NT 4.0
(This is a guest post by Antoni Sawicki aka Tenox)
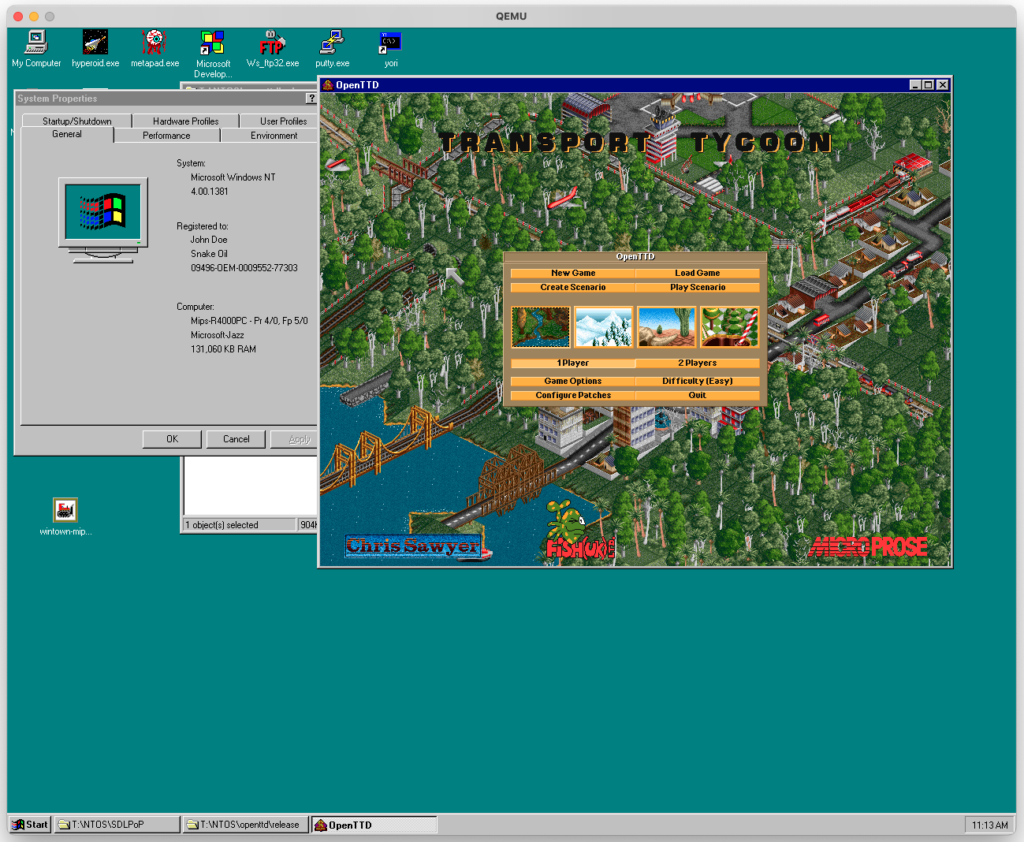
A couple of years ago 1984 aka Nitton Åttiofyra ported OpenTTD to Alpha AXP Windows NT. This was a monumental work and we’re extremely grateful for this!
However I was not fully satisfied with this, as I could not run it on MIPS or PowerPC. This port required Visual Studio 6.0, which is not available for either of these platforms. Downgrading the code to compile with older visual C was quite a lot of work for which I did not have time.
Fortunately now we have a tireless army of robots to perform code rewrites. With help of LLM I got it to build on Visual C 4.0. Now available for all NT RISC platforms!