Oh sure I’ve done this ages ago, getting GCC 1.40 to compile with old Microsoft C compilers, and then target Win32, it’s not that ‘special’. But I thought I’d try to get them to build with MASM so I could just distribute this with an assembler. Spelling out the joke of some assembly required.
Although I wasn’t going to target/host OS/2 I was ideally going straight to Win32, the MASM 6.11 assembler couldn’t assemble the MSVC 1.0 / MSC/386 8.0 compiler’s assembly output, I needed to use the MASM 7 from Visual C++ 2003; namely:
Microsoft (R) Macro Assembler Version 7.10.3077 Copyright (C) Microsoft Corporation. All rights reserved.
MASM 6.11 was having issues with pushing OFFSET’s ie:
push OFFSET _obstack
when they were defined as:
COMM _obstack:BYTE:024H
Chat GPT to the rescue knowing that later MASM’s will just handle it just fine. And it was right! I know AI gets a bad rep, but surprisingly (or not when you think about what it’s been trained on), it’s got some great insight to some old things like seemingly common software tools, and old environments.
I didn’t bother trying to use Microsoft C/386 6.0 & MASM386 5.1 to see if it’ll handle CC1, as that seems to be a bit extreme. and I wanted this to run on semi modern Win32 stuff. More so that there isn’t a 64bit SMP aware OS/2 with a modern web browser. Kind of sad to be honese, but it’s 2026, and here we are.
I as always stick to the Xenix GAS port that outputs 386 OMF objects that earlier linker’s can happily auto-convert to coff and use on Win32. One day I feel I should ask why they were cross compiling NT/i386 from OS/2 1.21 instead of using Xenix?! Must have been some fundamental NTOS/2 thing I suppose.
Long story there was that the Xenix GAS emits an ancient 386 OMF format that for unknown reaons the older Microsoft Linkers happily accept and auto convert into COFF, the file format of the future (Future being 1988). I guess for better. or worse we never got NT/ELF. Oh and speaking of further weird, the IBM version of their LINK386 doesn’t like the Xenix 386 OMF. Bummer.
One thing I found out is that the MASM v7 doesn’t output COFF by default, rather it’s 386 OMF! you need to add the /coff flag to force it to be more Win32 friendly. Kind of unexpected behaviour.
I tried to make this simple as, clone the repo and run ‘build.cmd’ it’ll link up GCC and then build the test programs, and clean up after itself.
I’d tried to emit assembly for the Xenix GAS, but for some reason it’s struggling with floating point. I’m not sure, I tried using chat gpt to debug but it get’s confused on how this whole bizzare tool chain is working. I guess I can’t blame it.
Sorry it’s been a while, been feeling ‘life’ lately. I had some i7 project as a kicker for a retro Windows 10 build thing to do but watchign the RAM crissis unfold and well life… I just got feeling like it’s so irrelevant who’d care. That and it’s insane watching $1.11 worth of DDR3 RAM now selling for $30++ …. and more and more chip manufacturers are exiting. So it felt like maybe go back and do more with less. Even a low end machine can assemble this in seconds!
I had originally planned on doing this for the 4th of July, but something happened along the way. I had forgotten that this is 1995, not 2024, and things were a little bit different back then.
Back in the early days of the internet, when Al Gore himself had single handedly created it out of the dirt, The idea of address space exhaustion didn’t loom overhead as it did in the late 00s. And in those days getting public addresses was a formality. It was a given that not only would the servers all have public TCP/IP addresses, but so would the clients. Protocols like FTP would open ports not only from client to server, but also server to client. This was also the case for RealAudio. Life was good.
The problem with trying to build anything with this amazing technology is that while I do have a public address for the server, it’s almost a given that YOU are not directly connected to the internet. Almost everyone these days uses some kind of router that’ll implement Network Address Translation (NAT), allowing for countless machines to sit behind a single registered address, and map their connections in and out behind one address. For protocols like FTP, they have to be built to watch and dynamically add these ports. FTP is popular, RealAudio is not. So, the likelihood of anyone actually being able to connect to a RealAudio 1.0 server is pretty much nil.
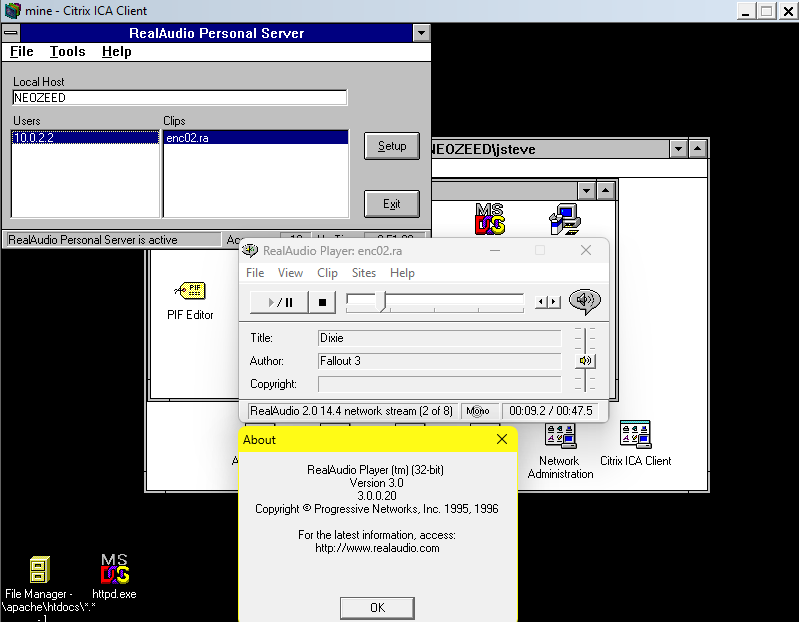
RealAudio Player v3 connected to a v1 server
The software is pretty easy to find on archive.org, (mirrored). Since it’s very audio centric, I decided to install the server onto a Citrix 1.8 server using Qemu 0.9. I had gone with this, as the software is hybrid 16bit/32bit and I need a working sound card, and I figured the Citrix virtual stuff is good enough.
First thing first, you need some audio to convert. Thankfully in modern terms ripping or converting is trivial unlike the bad old days. First off, I needed a copy of the Enclave radio, and I found that too on archive.org. The files are all in mp3 format, but the RealAudio encoder wants to work with wav files. The quickest way I could think of was to use ffmpeg.
ffmpeg -i Enclave Radio - Battle Hymn of the Republic.mp3 -ar 11025 -ab 8k -ac 1 enc01.wav
This converts the mp3 into an 11Khz mono wav file. It’s something the encoder can work with. Another nice thing about Citrix is how robust it can use your local drives, cutting out the whole part of moving data in & out of the VM.
One thing about how RealAudio works is that first there is the ability to load up a .ram or playlist file. In this case, I took the ‘enclave playlist’ from Fallout 3, and made a simple playlist as enclave.ram:
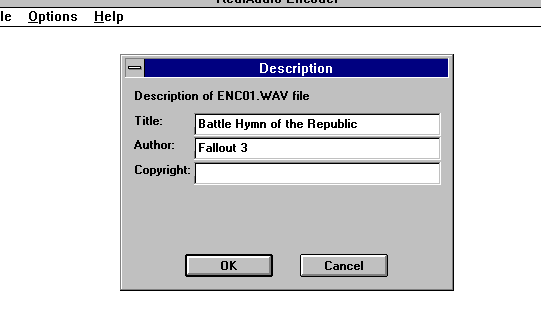
The encoder allows for some metadata to be set. Nothing too big.
Name & Author
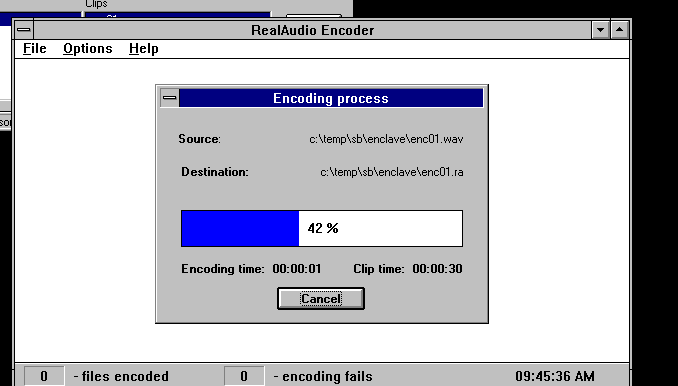
And then it thankfully takes my i7 seconds to convert this, even under emulation, using a shared drive. And import option to deselect is to enable playback in real-time, as it’ll never work as it cannot imagine a world in which the processor is substantially faster than the encoder.
Converting the 8 files took a few minutes, and then I had my RealAudio 1.0 data.
The playlist should be served via HTTP, and I had just elected to use an old hacked up Apache to run on NT 3.1. As it only has to serve some simple files.
The scene is all set, the RealAudio player pulls the playlist from Apache, then it connects on TCP port 7070 of the RealAudio server to identify itself and get the file metadata. Then the RealAudio server then opens a random UDP port to the client and sends the stream, as the client updates the server via UDP of how the stream is working. And this is where it all breaks down, as there is not going to be any nice way to handle this UDP connection from the server to the client.
Well, this was disappointing.
In a fit of rage, I then tried to see if ffmpeg could convert the real audio into FLAC so you could hear the incredible drop in quality, and as luck would have it, YES it can! To concatenate them, I used a simple list file:
And thanks to ‘modern’ web standards, you can now listen to this monstrosity!
Enclave Real Audio 1 converted to Flac & concatenated.
This takes about 10MB of WAV audio derived from 8MB of MP3’s, and converted down to 472kb worth of RealAudio. Converting that back to a 4.4MB FLAC file.
To keep in mind what network ports are needed at a minimum it’s the following:
TCP 1494 * Citrix
TCP 7070 * RealAudio
UDP 7070 * RealAudio (statistics?)
TCP 80 * Apache
And of course, it seems to limit the RealAudio server to the client in the 7000-7999 range but that is just my limited observation. This works find at home on a LAN where the server is using SLiRP as the host TCP/UDP ports appear accessible from 10.0.2.2, while giving the server a free-standing IP also works better, but again it needs that 1:1 conversation greatly limiting it in today’s world.
Also, as pointless as it sounds, you can play the real audio files from the Citrix server for extra audio loss.
Personally, things could have gone a lot better on the 3rd of July, I thought I’d escaped but got notified on the 5th they forgot about me. Oh well Happy 4th for everyone else.
Time goes on, and things are lost, and it’d come up somewhere about actually building Linux from Windows, so I thought I’d show it off.
The one thing is that modern machines are just so fast, that it’s almost hard to believe that a 386DX 16 with 4MB of ram would struggle for seemingly hours, what an i7 can churn out in mere seconds.
Time sure flies!
It’s my usual ‘DO IT LIVE’ style, I tried to clean up the audio, but I lost the steps… One day I’ll try to script & build a PowerPoint so it’s more cohesive.
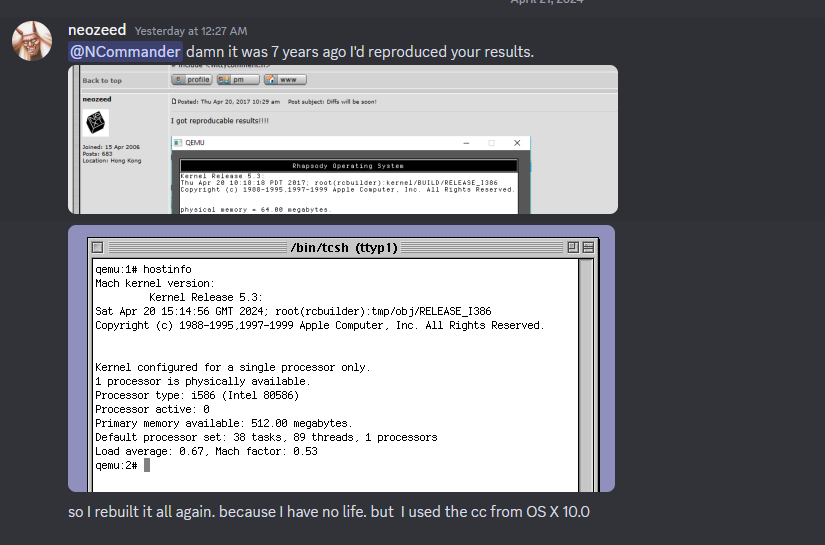
It’s hard to believe it’s been 7 years ago since I reproduced Ncommander‘s adventure in building the Mach kernel from Darwin 0.1 sources that had been found years ago. At one point we’d managed to build enough of Darwin to do a dump/restore onto a new disk image, and have a mostly built Darwin system save for a hand full of files.
Time goes on by, and memories fade, and I thought it’d be worth going over the adventure, yet again. Just as it was true back then, I thought I’d reproduce the same setup that I’d been using back then. Qemu was a new and exciting thing back then, and
the Disk driver is VERY picky and honestly ancient Qemu is a pretty solid option to emulate NeXTSTEP/OPENSTEP/Rhapsody with some patches to both 0.8 & 0.9 by Michael Engel, which change a nested interrupt and add support for a busmouse, as the PS/2 mouse doesn’t work for some unknown reason. I know many are scared of old Qemu, but the disk support is pretty solid and the CPU recompilation is very fast, so having to rely on MinGW v3 isn’t so terrible.
While I had hid away a lot of these resources on archive.org, I thought it was best to just go back to the oldest post I had where I had painfully documented how to compile Qemu and get it working with NeXTSTEP, back on BSDnexus. I’m so glad I took the time so long ago to not only write it down, and add screenshots, but also tag the version numbers. Software drift, especially free software can be so difficult to pin down, and it’s nice to be able to return to a known good value. I went ahead and placed the recreated toolchain over on archive.org.
Rhapsody is a weird OS, in that NeXT had kind of given up on the OS market after their NeXT RISC Workstation had basically died with the 88k, and even their early abandoned PowerPC 601 aka MC98000/98601 port. Apple had left a few of the changelogs, in the source code. It’s very interesting stuff! I guess to go off on my own tangent NeXT was just too early, the cube with it’s Unix & magnetic optical media and great audio DSP capabilities was just too ahead of the curve. What the cube couldn’t pull off in 1988, the iMac and OS X sure did in 2001.
I also added UDP support to this Qemu so I could use the HecnetNT bridge trick giving me the ability to telnet/ftp into the VM greatly reducing my pain. Back in the day I had used NFS and the network slirp redirection. But I like having direct access so much more!
Rhapsody throws up yet another fun ‘road block’ in that the mouse buttons map backwards for some reason. It’s a trivial fix in the source code, but I made it a runtime option in case I needed or wanted to run NeXTSTEP. And it was a good thing, as I did need to find the NXLock.h file for building one part of Darwin.
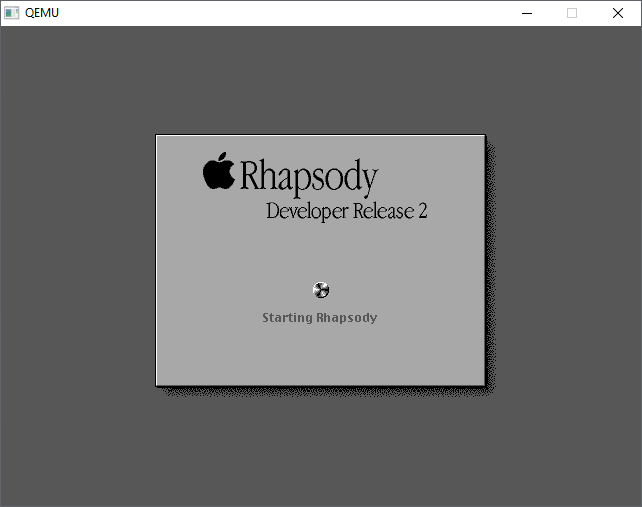
When building Darwin, I started with the last x86 version of NeXTSTEP that was available, and that was Apple ”Rhapsody” / Titan1U x86 Developer Release 2. My thinking at the time and still is that the closer you can get your build to whatever they were using as ‘current’ the easier this will be.
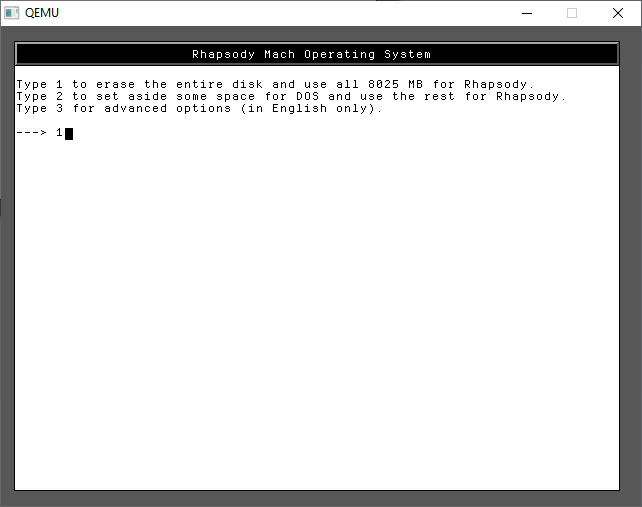
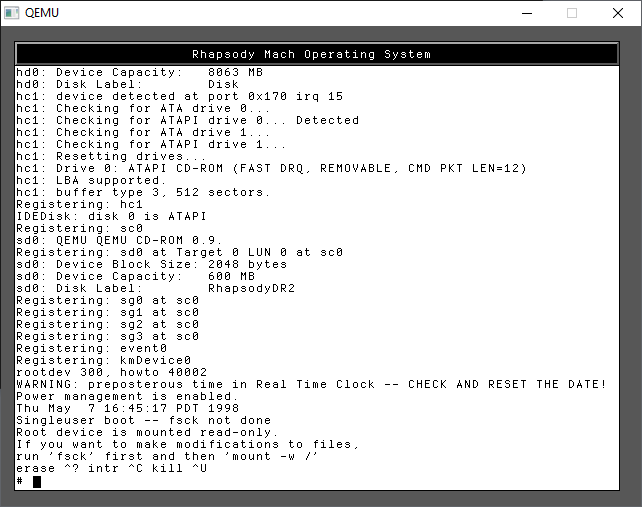
Rhapsody can support an 8GB disk, so let’s go with that. This always has an issue with people that try much larger, and just fail, so for my sake and yours let’s just go with 8.
You may be wondering, why only use 128MB of RAM? Well there is a bug in the shipping Rhapsody kernel that prevents booting on machines with more than 192? MB of RAM. Naturally, once we are to the point of building our own kernels this won’t be a problem but for now we are limited.
The bootloader will give us a few seconds to do anything fancy, I just hit -v so I always have the verbose boot.
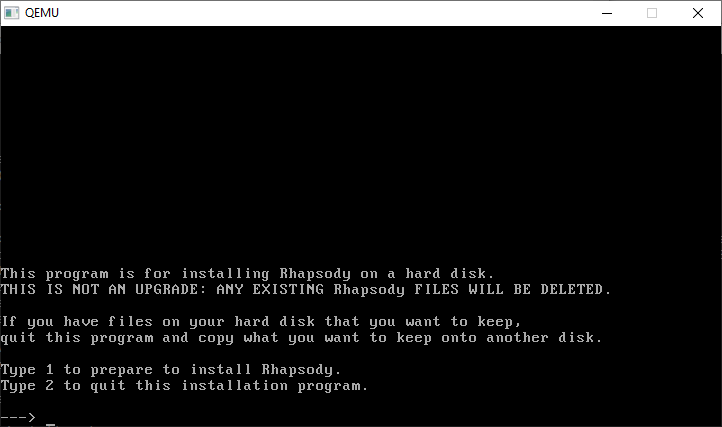
From here it’s just a few options to go thru the installer
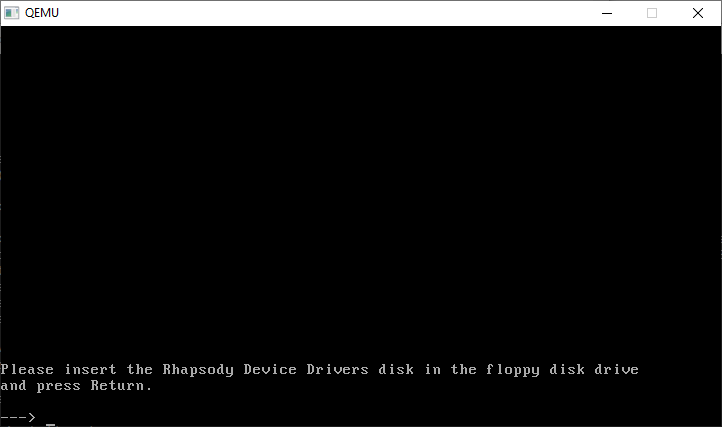
And a disk change is required
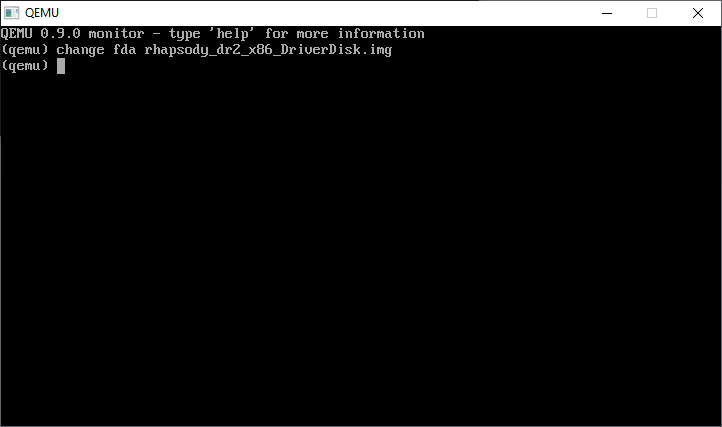
CONTROL+ALT+2 will bring up the monitor prompt, where we can change the disk
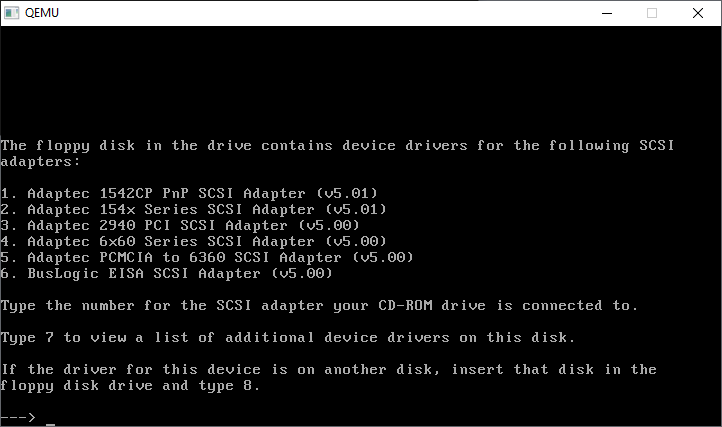
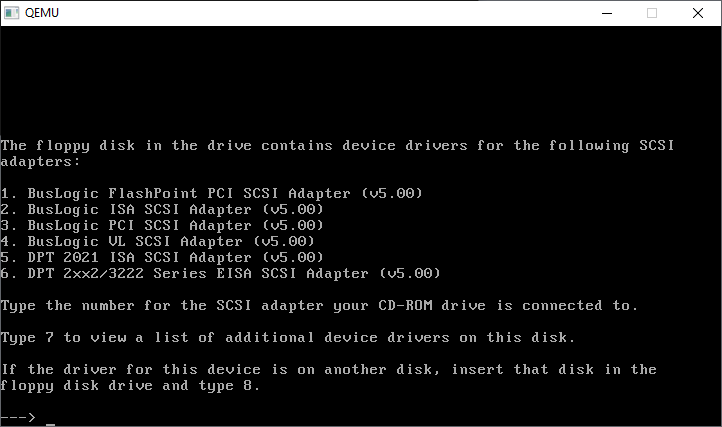
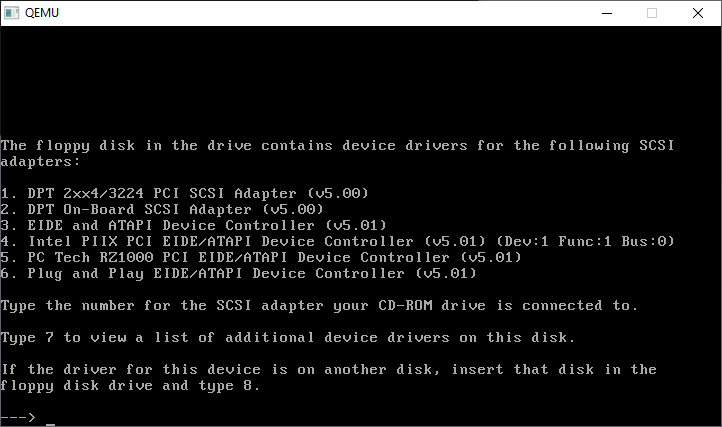
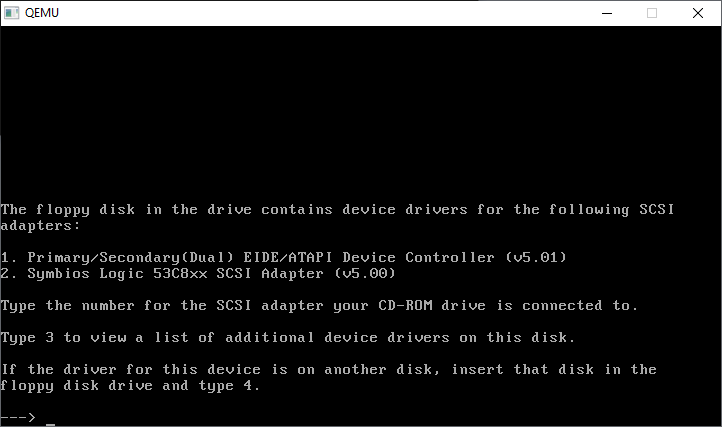
CONTROL+ALT+1 will return us to the console. Now we have to go through all the SCSI cards, and kind of compatible IDE cards
Further..
Further still…
And how select the Primary/Secondary(DUAL) EIDE/ATAPI Device Controller (v5.01)
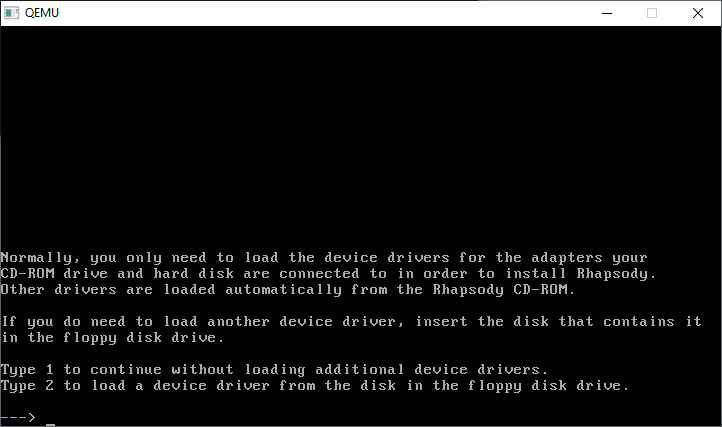
We only need the one driver, so we’re good to go!
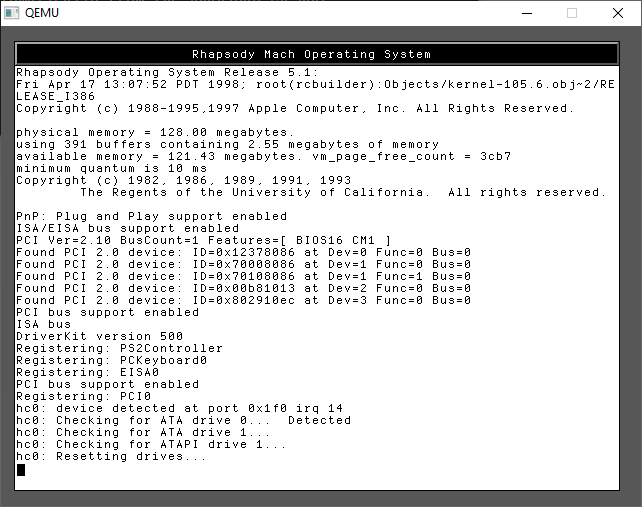
Continuing onwards will now start the kernel, along with a change to graphical mode. Just like a NeXT!
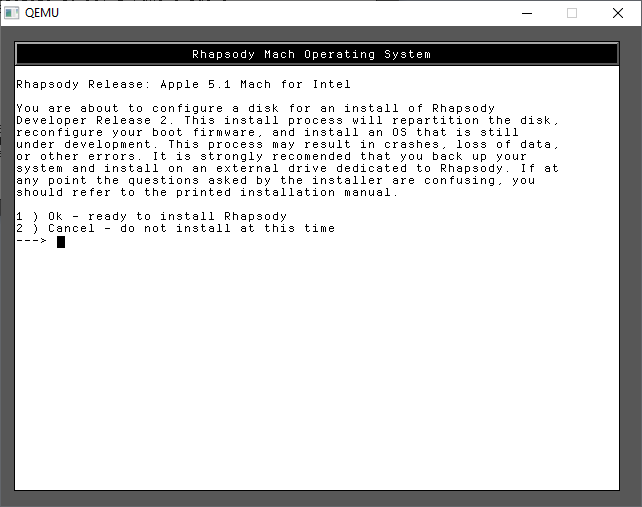
Now we can confirm again we want to install
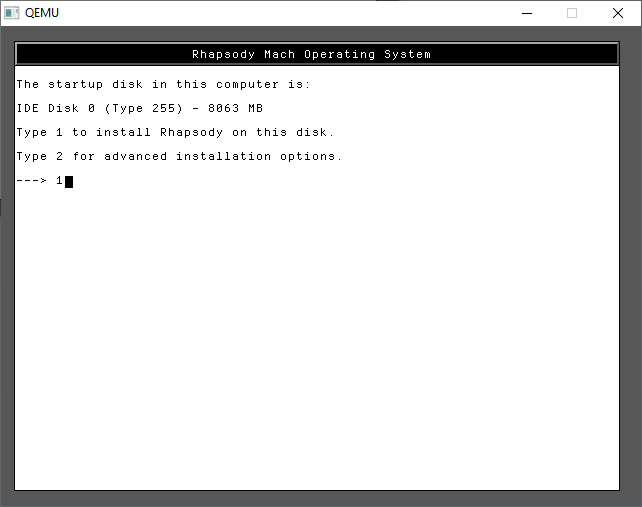
As you can see there is our hard disk!
In the future we don’t need to dual boot so, just give it the entire disk.
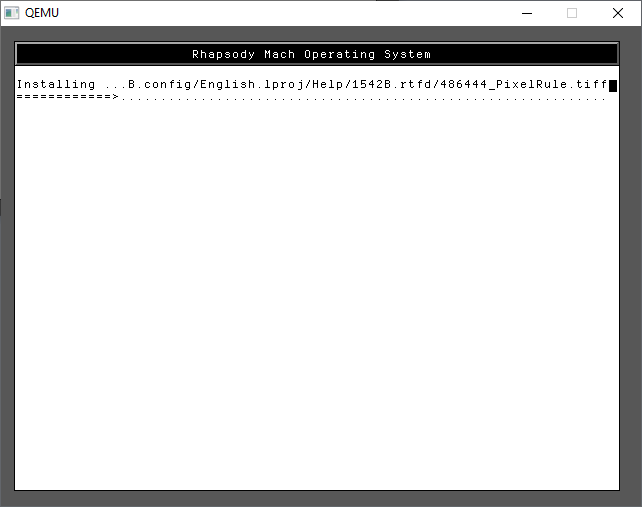
A few more 1’s and we are finally installing!
Trust me it’s fast on Qemu!
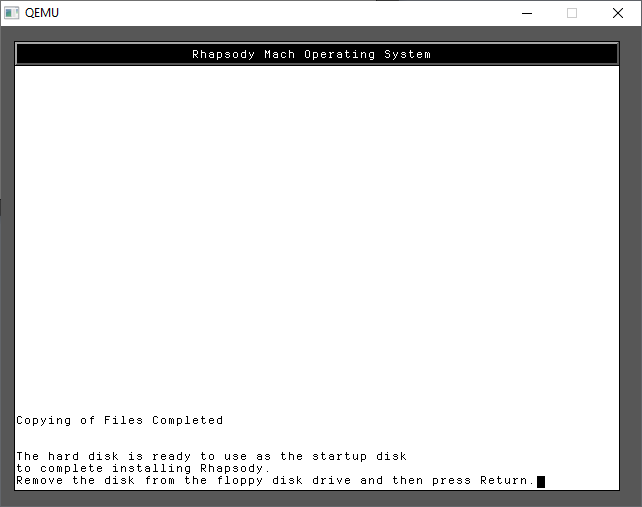
And just like that, we’ve completed the first part of the install.
You can use CONTROL+ALT+2 to toggle back to the monitor and type in
eject fda
to eject the floppy, then it’s CONTROL+ALT+1 to return to the display and have it reboot. Qemu won’t try to boot to the hard disk, and with no disk in the drive, it’ll hang at the BIOS. Now is a good time to close Qemu and backup the hard disk. Mostly because I hate repeating this stuff.
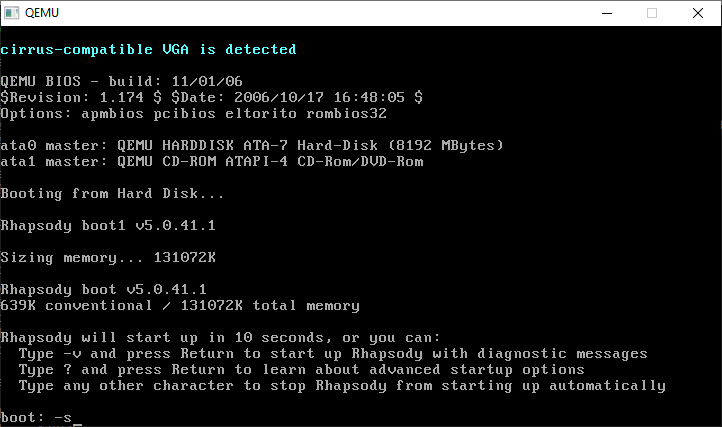
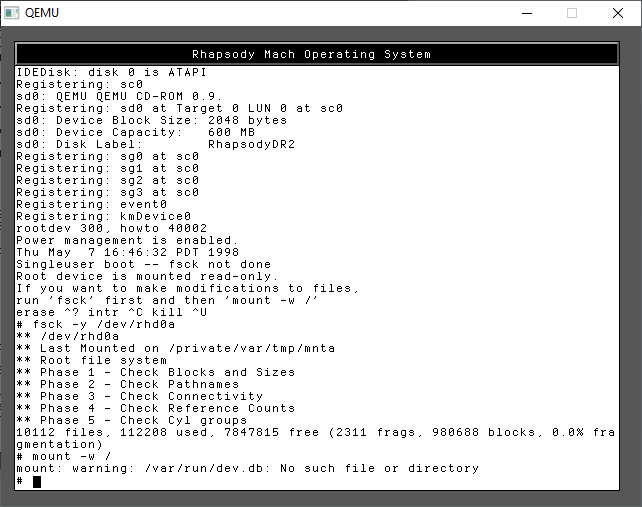
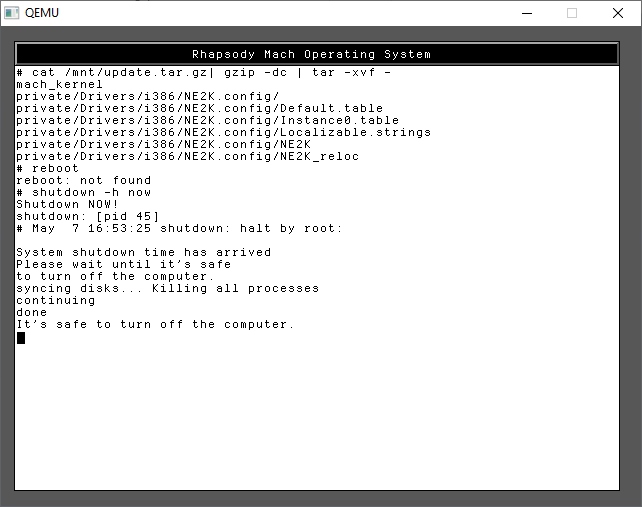
Type in -s for SINGLE USER MODE. This is where a lot of Unix problems got solved in the old days
It’s a little tricky as this does involve typing. As instructed we need to check the hard disk prior to mounting it read/write
run the commands:
fsck -y /dev/rhd0a
mount -w /
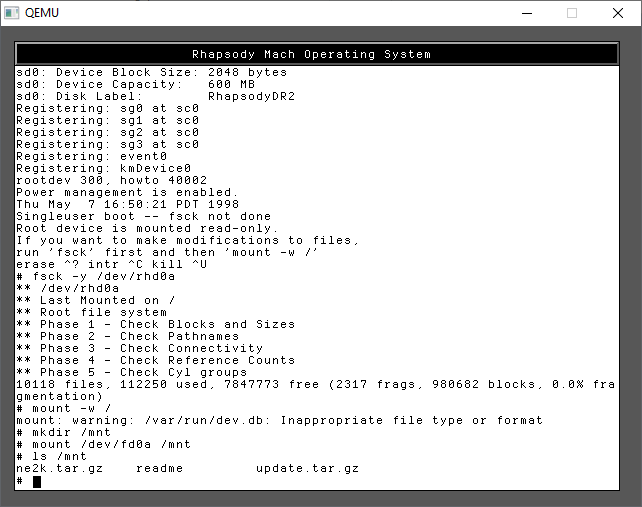
Now we can mount the floppy disk
mkdir /mnt
mount /dev/fd0a /mnt
ls /mnt
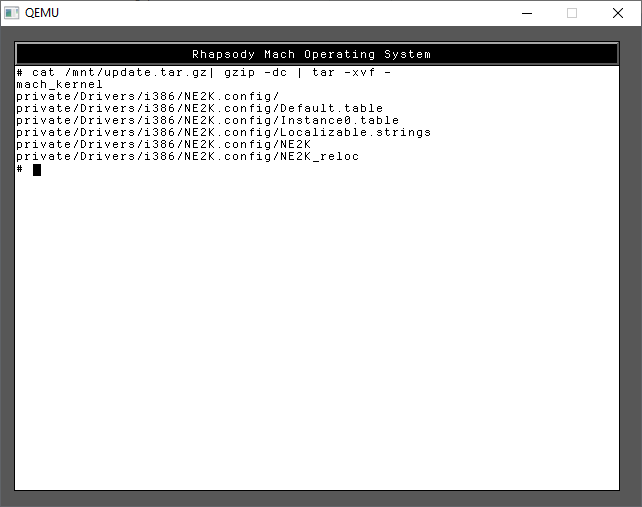
I’ve included both the kernel & NE2000 driver in one file, and JUST the NE2000 driver in the other. For my sake I use the first one, update.tar.gz as I wanted to use the newer kernel ASAP. tar -zxvf didn’t want to run, so I did a rather awkward version to achieve the same thing.
cat /mnt/update.tar.gz | gzip -dc | tar -xvf -
With the files in place, you can now shut down the system with a simple
shutdown -h now
Once more again, I’d shut down the emulator, and backup the hard disk. If anything goes wrong you can restore your backups at any phase, at least saving some time!
Next is the graphical install. In this case I use the hecnet bridge to give full access, you can setup with the slirp driver with a simple “-net user” but it doesn’t matter at the moment Since I opted for the newer kernel, I can take advantage of the 512MB RAM.
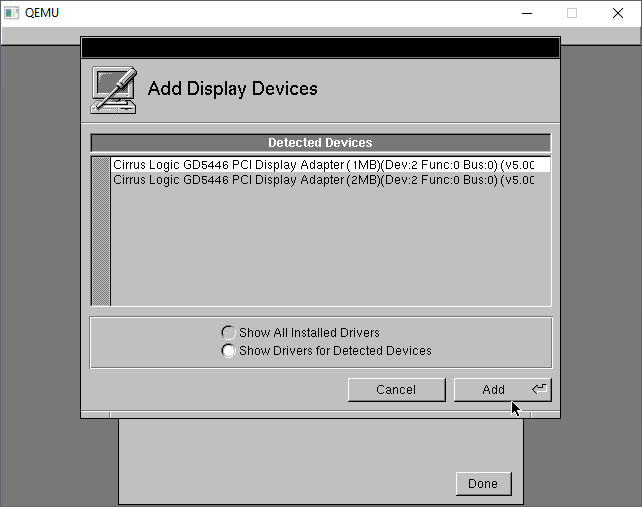
Now we have to setup the hardware. It should be somewhat straight forward, first we start with the monitor. The mouse should be working although I find that I have to move slowly. Sorry it tracks weird on real hardware too.
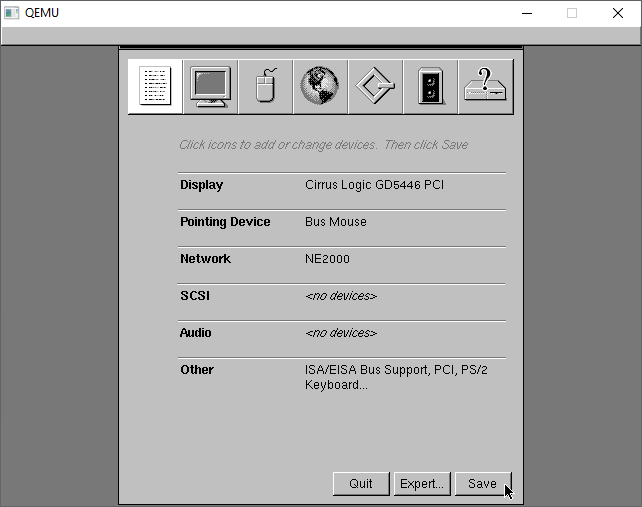
The Cirrus Logic GD5446 should be detected automatically, I just go with the default 1MB
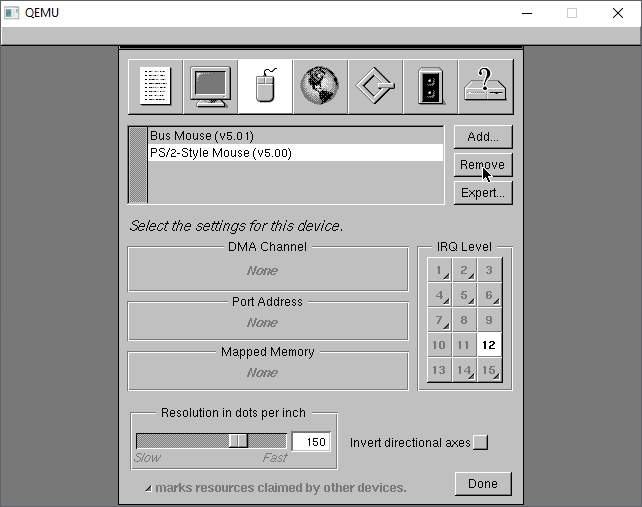
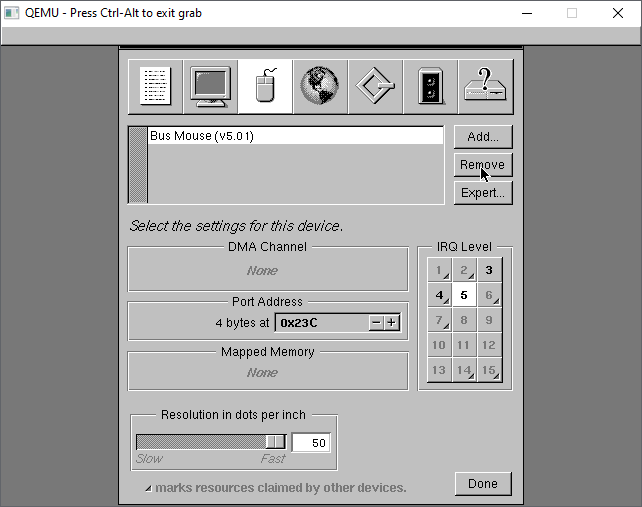
Next under the mice, select the PS/2 mouse and remove it
This leaves us with the Bus Mouse driver.
Under the network tab, the NE2000 should be automatically detected.
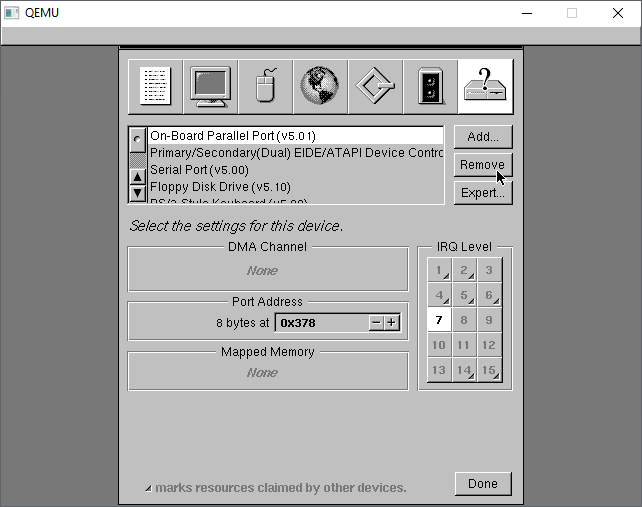
On the last tab, I make a habit of removing the Parallel port freeing IRQ 7, in case I wanted it for something else.
Back to the summary, we now have Cirrus Logic video, NE2k networking, with no SCSI, no Audio.
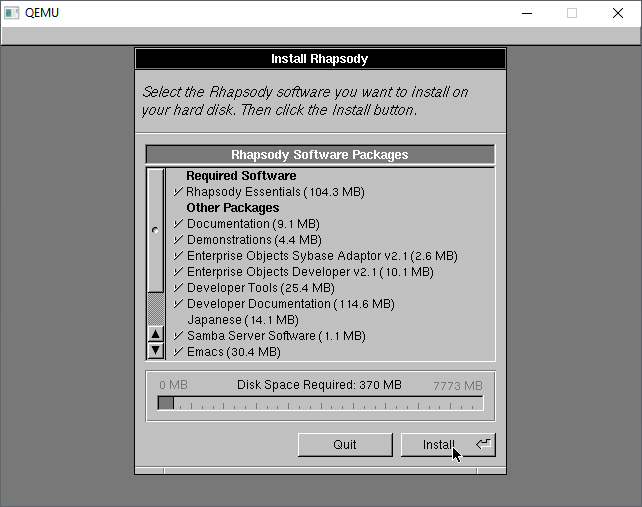
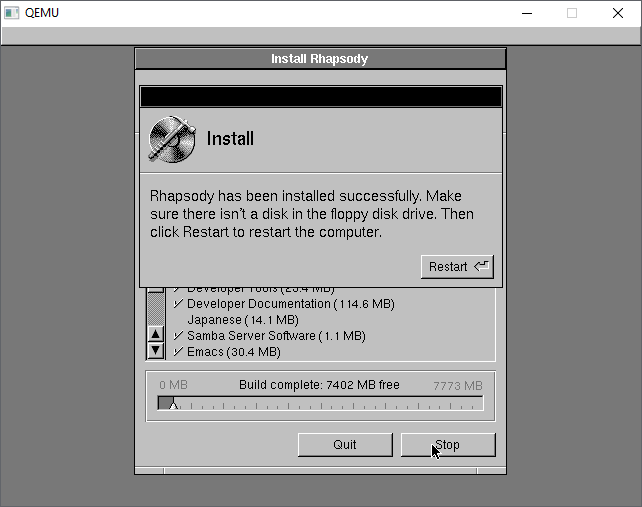
With the config saved, now we can just install as is. I un-installed Japanese, but it doesn’t matter. You absolutely need the Development Tools, so may as well go with eveything.
The installation only takes a few minutes and we are ready to reboot
The kernel will now shut down.
Once more again this is a great time to make another backup of the hard disk. At this point this is a great backup to save, as we’ve installed the OS, and selected drivers, in the next reboot we’ll be personalizing the operating system.
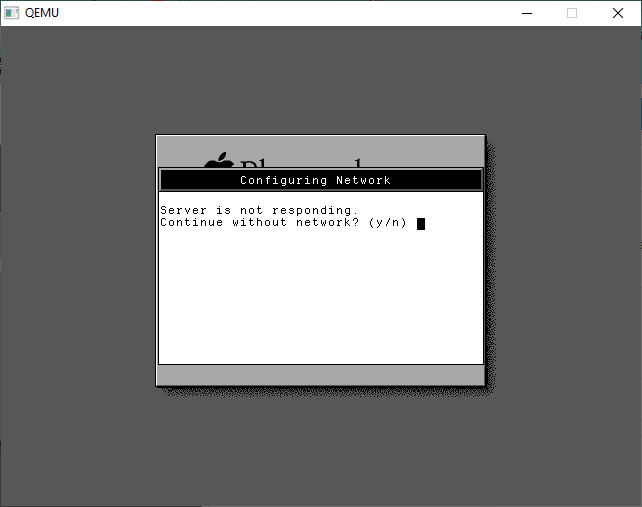
We can re-run the last config once the disk has been saved. We’ll be greeted with a message that the Server isn’t responding. Answer YES to continue without networking.
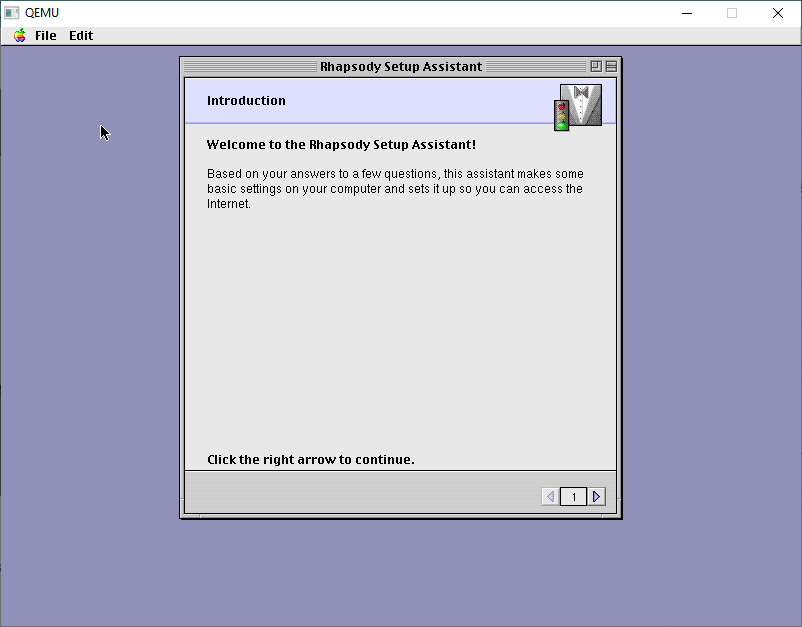
From here we are in the Setup Assistant, taking a nod from MacOS 8
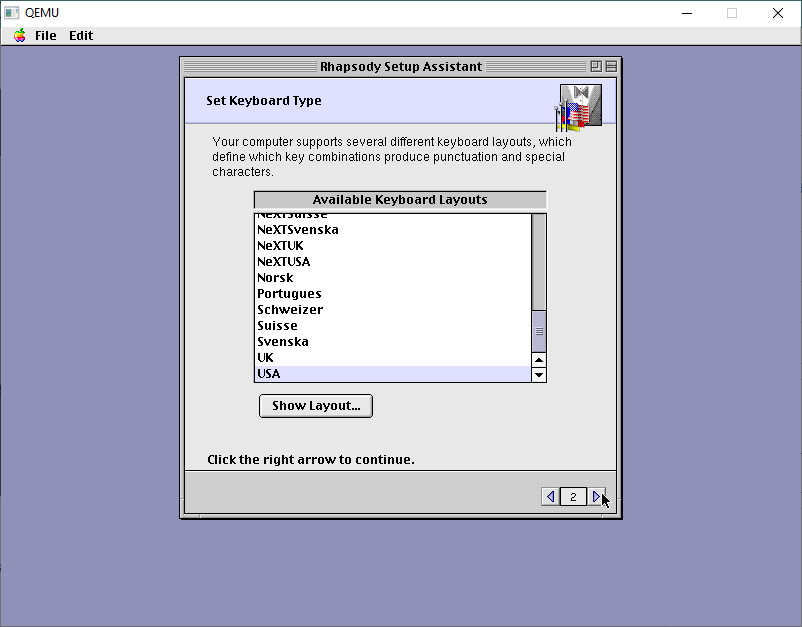
I use USA keyboards. The best keyboards! I touch type so I don’t have to deal with weird layouts.
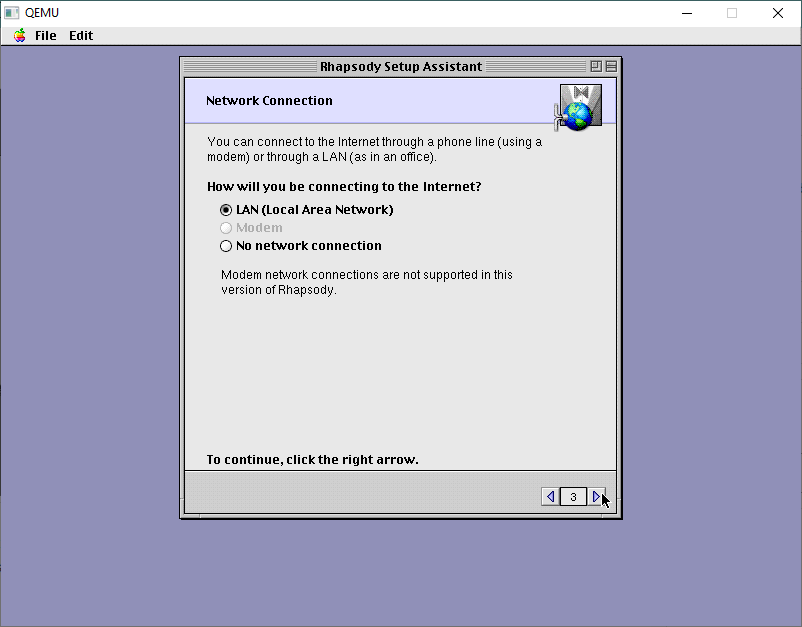
Specify for a LAN connection
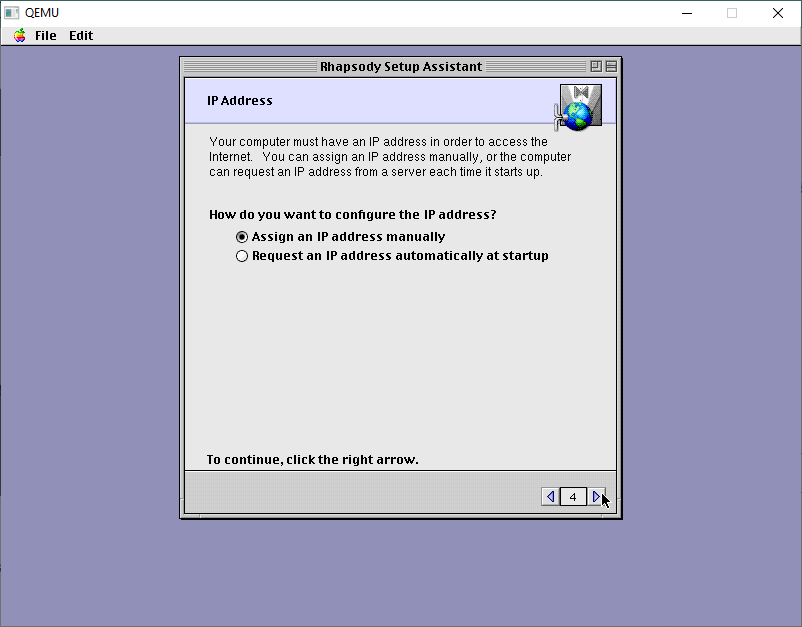
There is no DHCP support so specify a manual IP address.
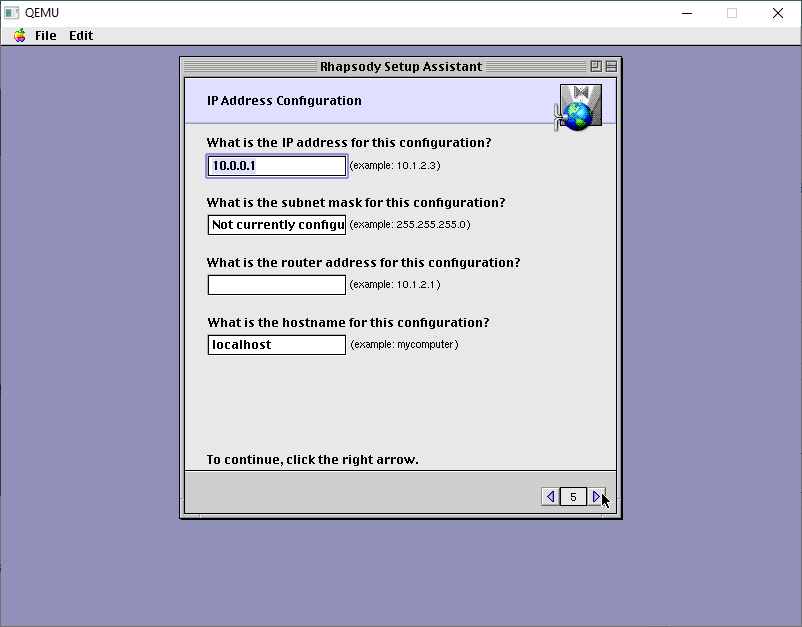
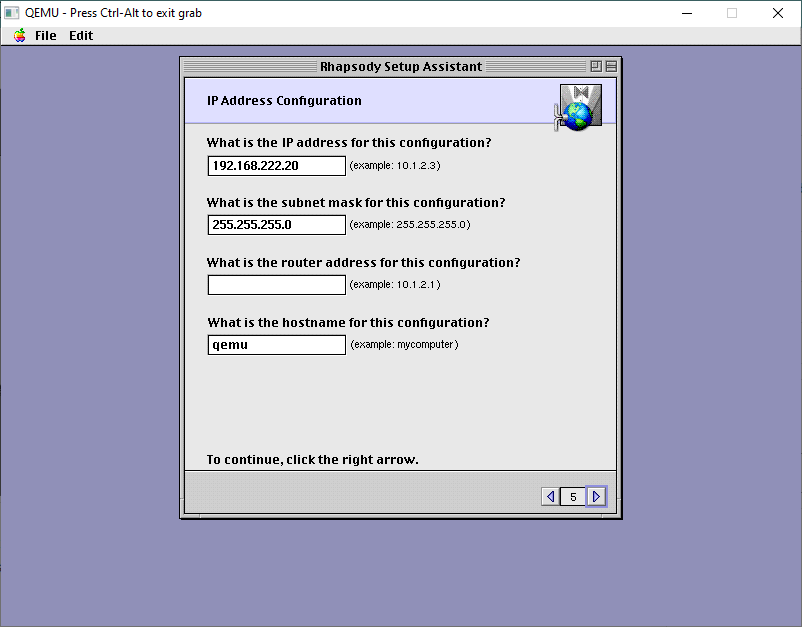
The default stuff is just wrong.
On my LAN this is good enough. DONT add a router. It’ll just confuse it.
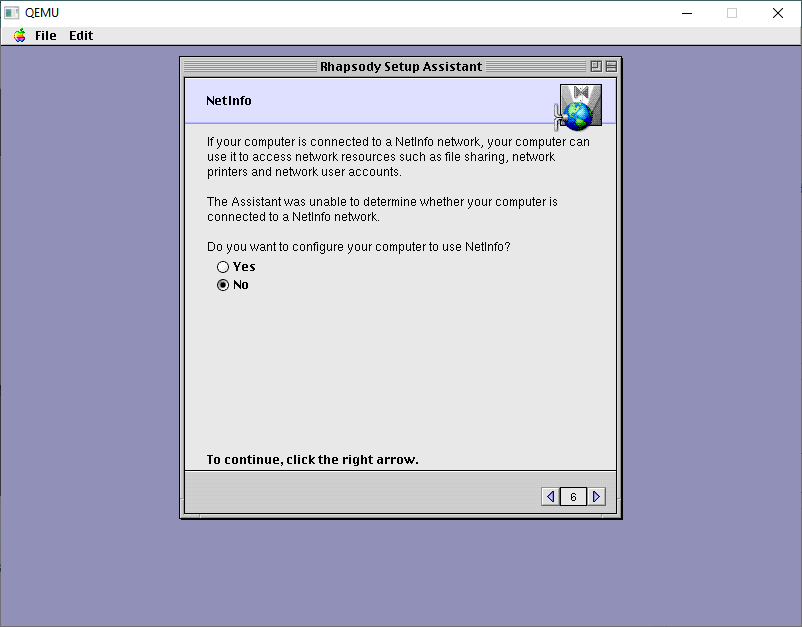
We don’t have or want NetInfo. This would be the server to give out IP addresses, and authentication. We don’t need it!
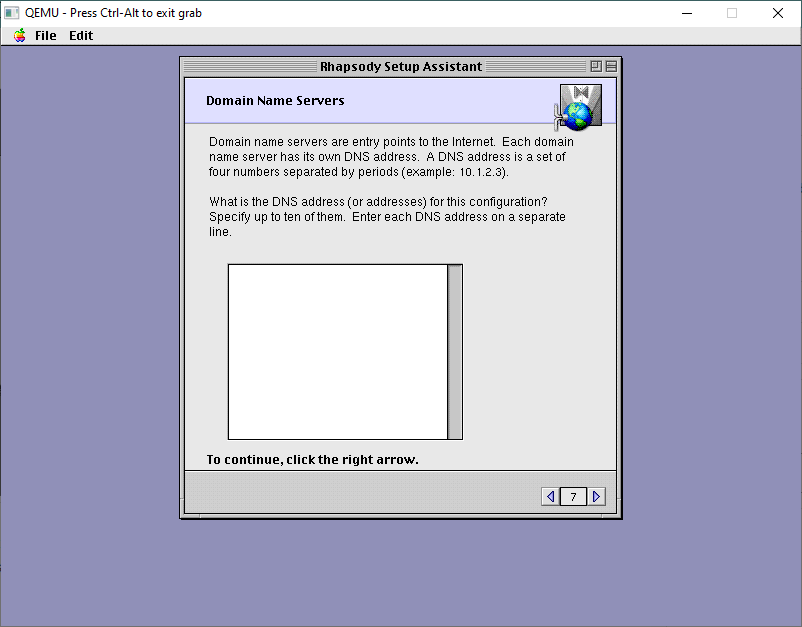
Leave the DNS servers blank
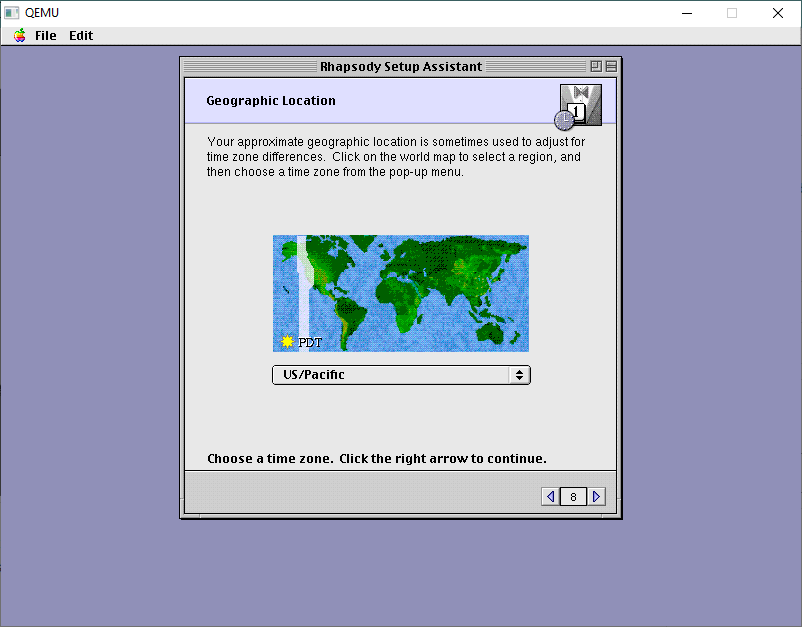
You can setup any location, it doesn’t matter.
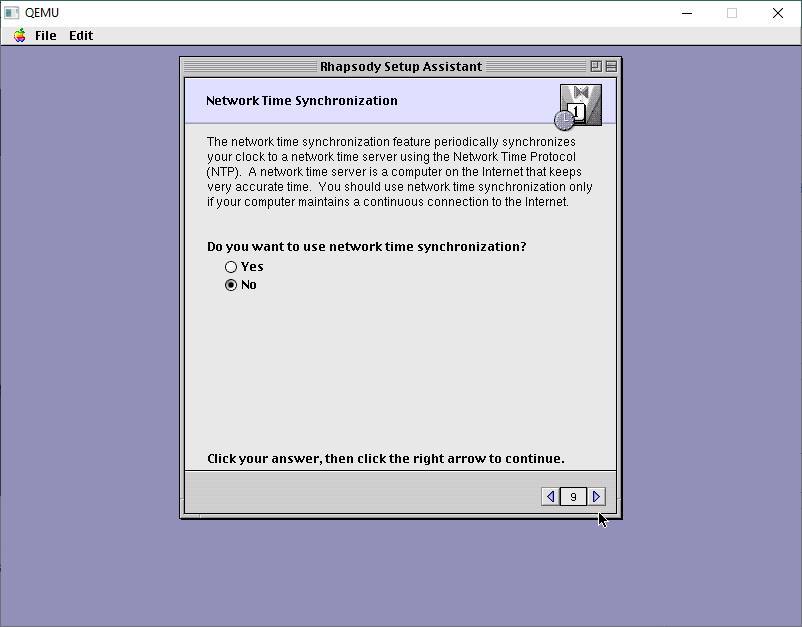
Likewise, with NTP, turn it off.
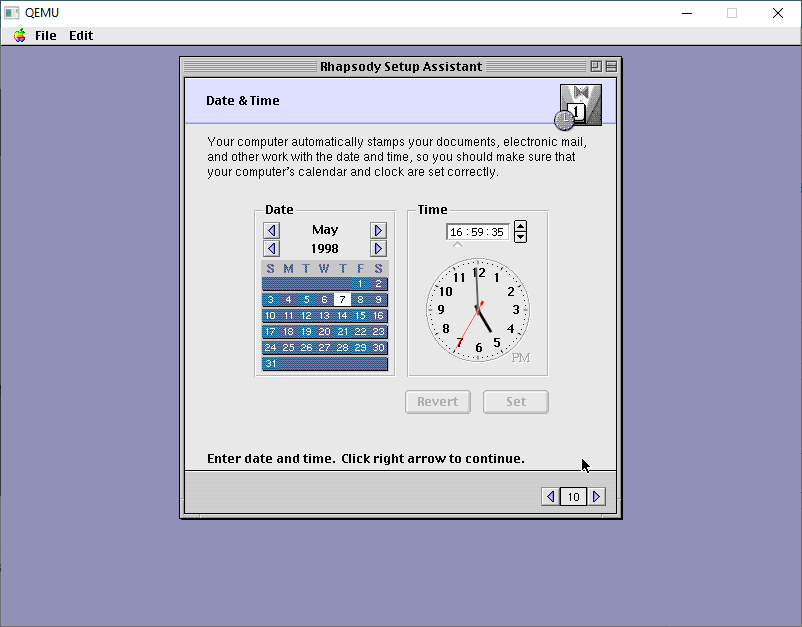
We will then get the option to set the date/time manually. The default time is far too old and it’ll break stuff.
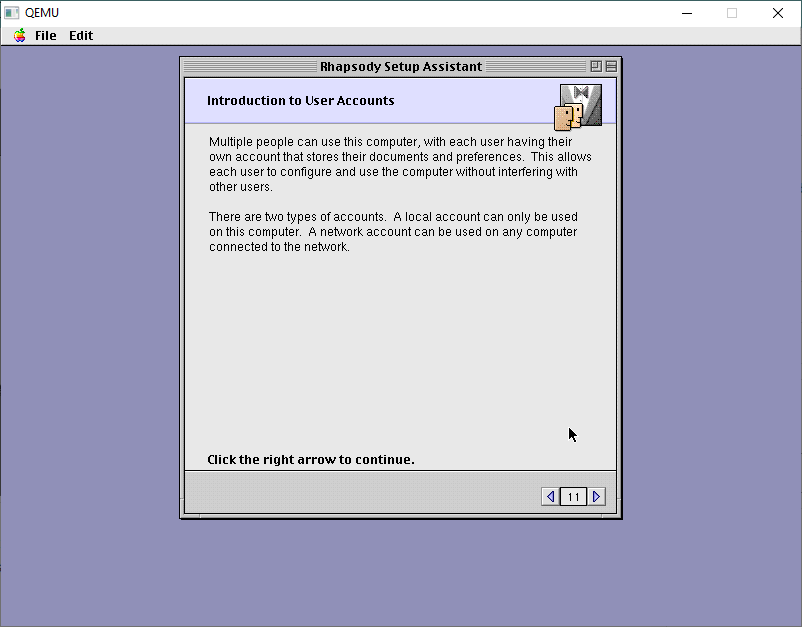
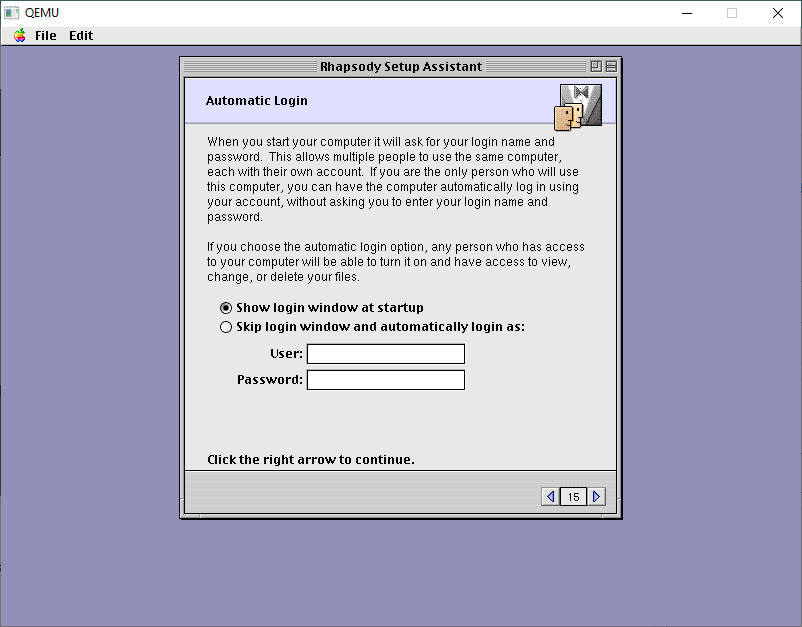
Next up is user accounts.
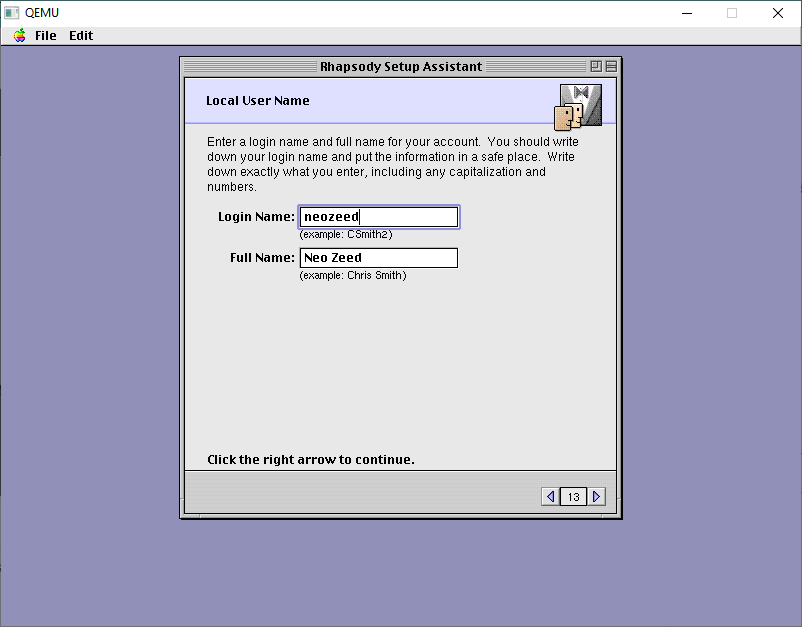
I always make local accounts.
Come up with some creative name
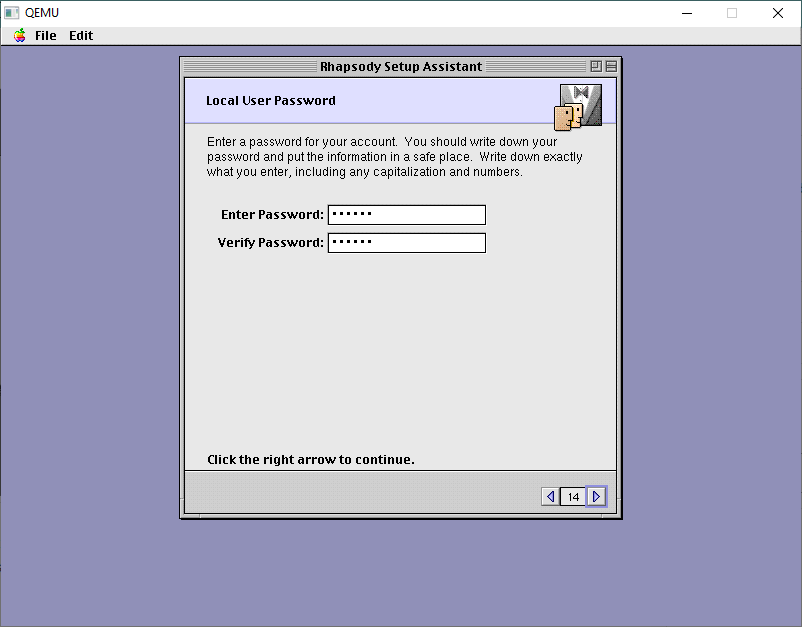
and a password
I don’t have it doing any automatic login. You can if you want, it’s all up to you, this one doesn’t matter.
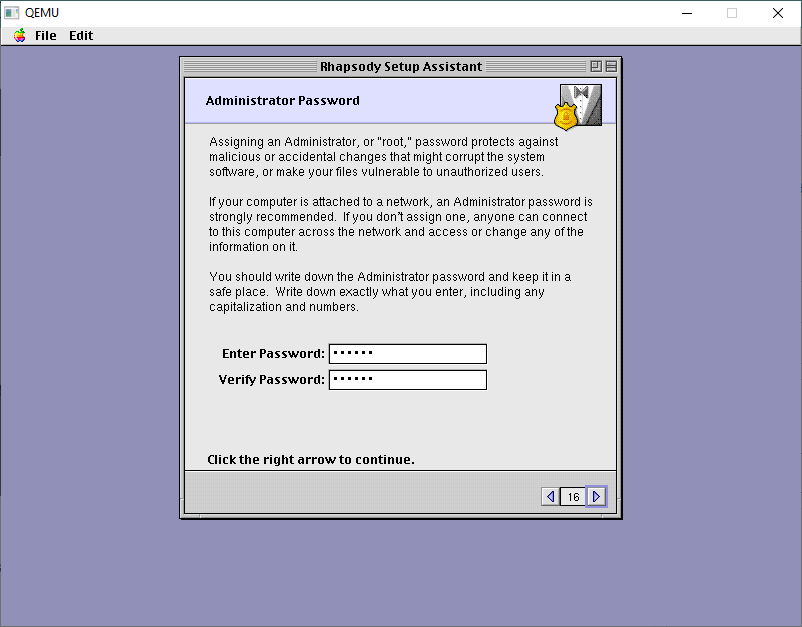
Next is an Administrator password
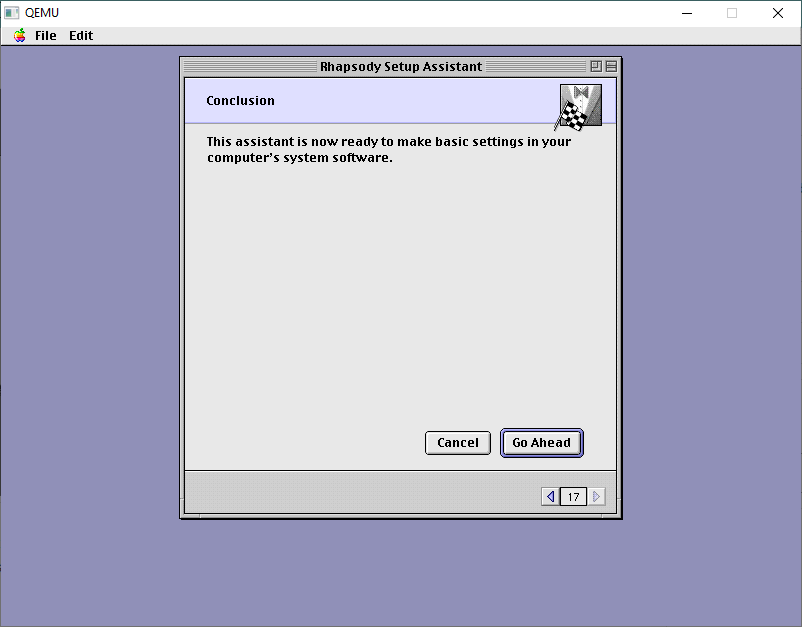
And now we can apply our changes.
It takes seconds!
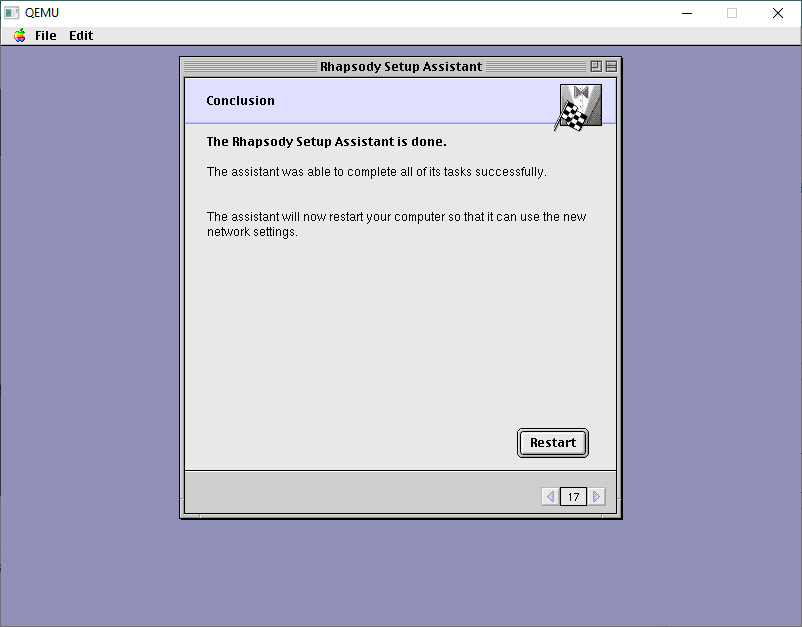
And now we’ere done. You may want yet another backup as this is tedious!
With the final configured backup in hand, now we can boot back one more time, and now we’re in SVGA mode!
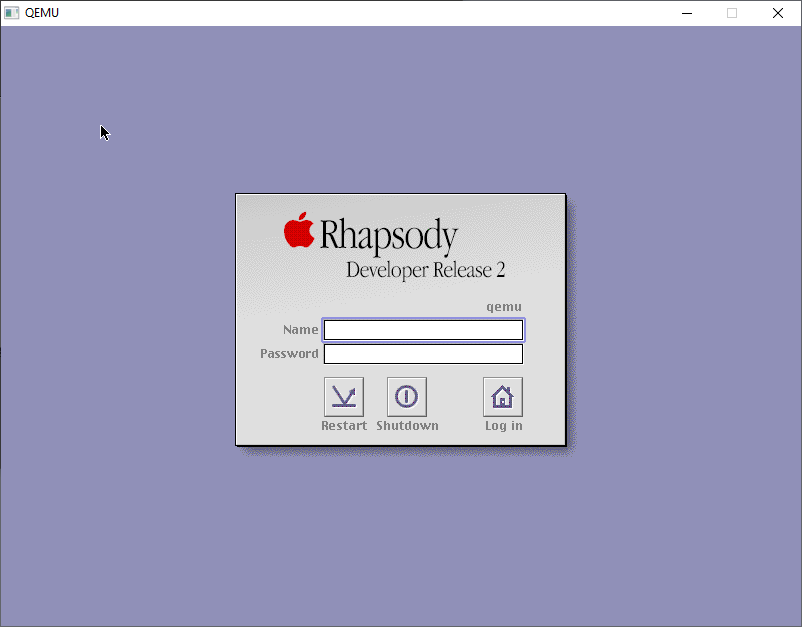
Rhapsody DR2 Login Screen
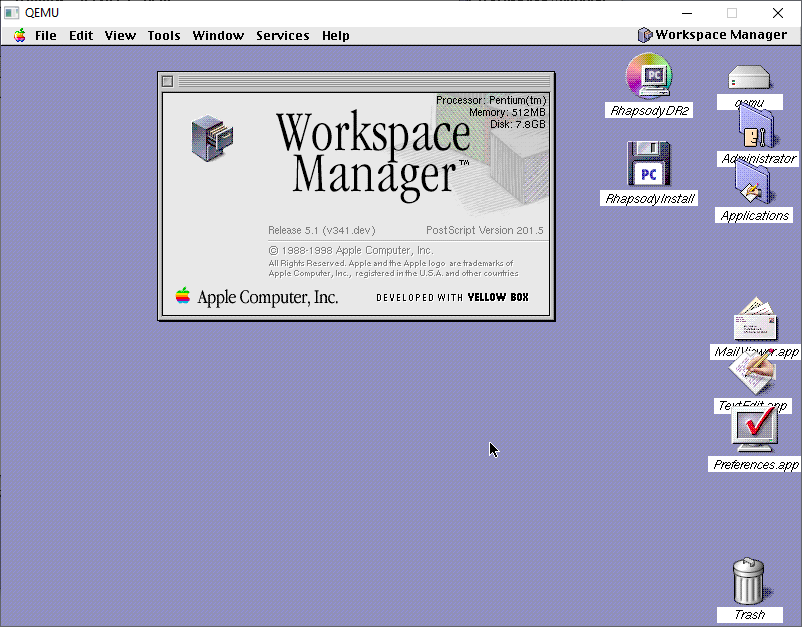
Logging in as root will give me the desktop
Desktop
And there we are, all installed.
For anyone brave enough to have read all of this, but wants the quick and easy version, it’s up on archive.org!
In part two I’ll pick up with the source CD-ROM I’ve prepared, so we can start compiling Darwin!
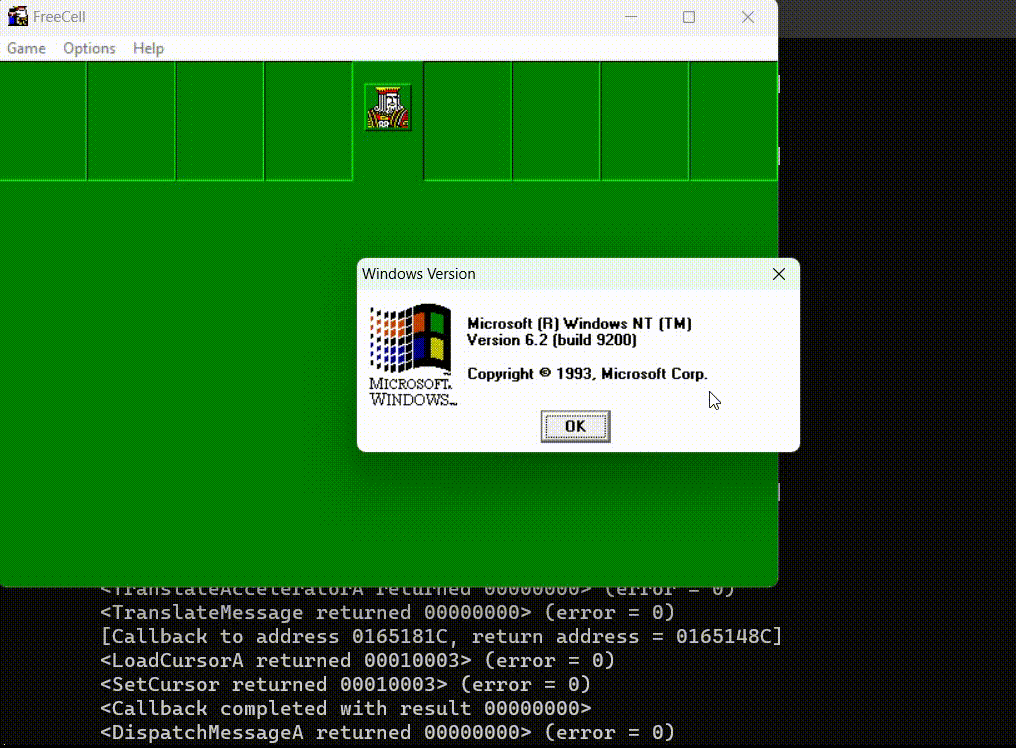
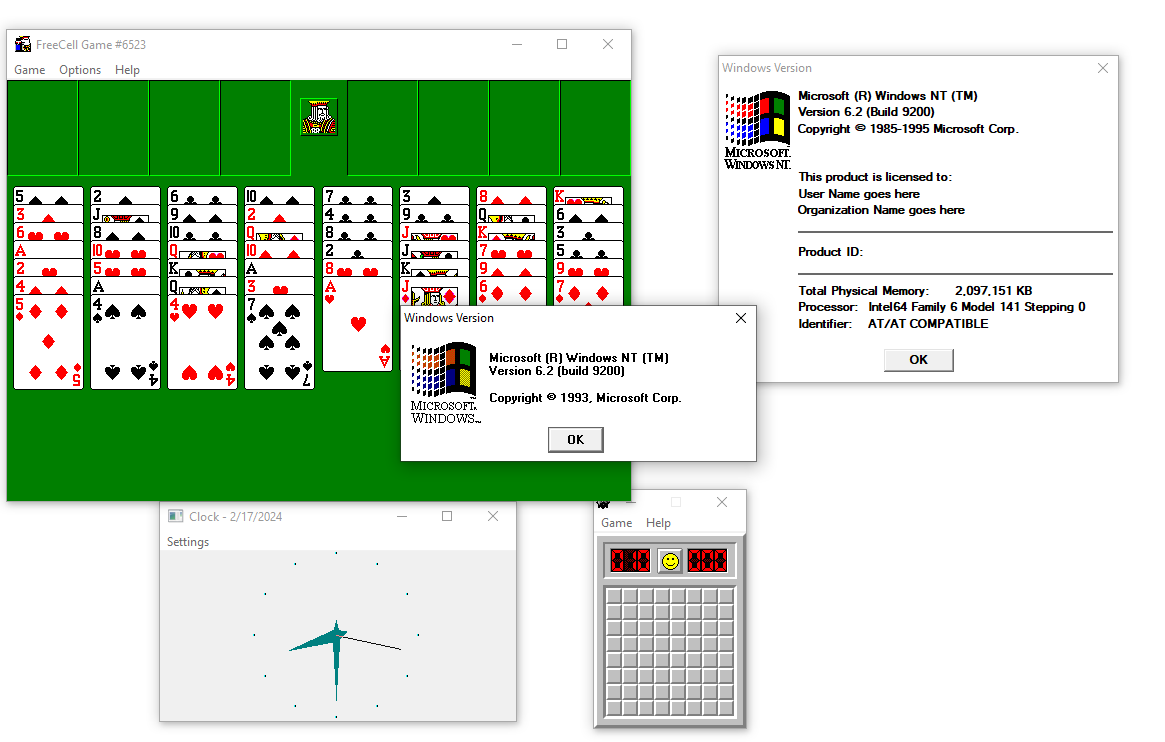
Hello, everyone. This is a continuation of my previous blogpost on EmuWoW (formerly win32emu) found here, but to summarize, I’m the 18-year-old developer behind a project that allows running applications compiled for the MIPS/Alpha version of Windows NT on standard x86 PCs through emulation, but without requiring a full system emulator. Since that last post, the project has made some substantial strides.
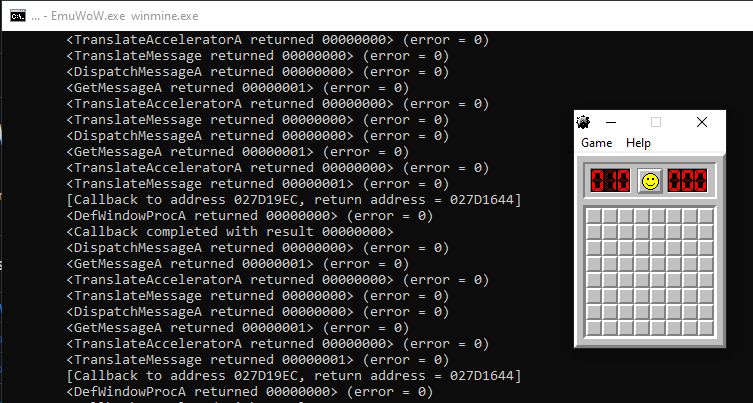
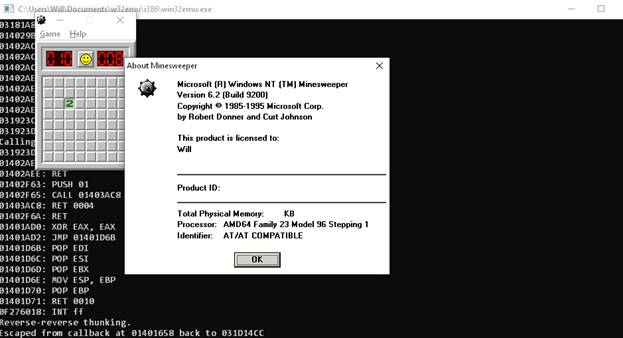
Since then, I’ve adapted the MIPS emulator from MAME, which is both more accurate and faster than my own (writing my own was a fun exercise but to the end of running applications, borrowing an emulator was a better decision). This alone enabled WinMine to function, which can be seen below.
Winmine for MIPS!
Around the same time, another VirtuallyFun member named x86matthew entered the scene. His prior credits include a similar project, for Win16. He was inspired by the initial win32emu blog post, created his own similar project called WoWMIPS, which quickly started running a few simple apps, such as WinMine, Solitaire, and Notepad. Be sure to check out WoWMIPS – MIPS Emulator for Windows, Part 1: Introduction, and parts 2,3,4,5,6!
This had actually been what I was hoping for from the beginning; I always saw win32emu as a proof of concept for a smarter person (either myself in the future or someone else altogether) to come back later and do it better, and this is a massive undertaking for a single individual. What makes x86matthew’s WoWMIPS so incredible is its clean design. For one, there’s no thunk DLLs required. When an application tries to import a DLL, the host x86 DLL is first loaded, and then any attempts to get the address of an exported procedure from it are then redirected to an auto-generated stub of MIPS code which invokes the emulator to call the function. In other words, the thunk DLLs are generated at load time. Additionally, there’s no window procedure thunks required either. Instead, MIPS code pages are marked as non-executable, causing an access violation when Windows attempts to call them. Using an exception handler implemented via Windows XP’s Vectored Exception Handling feature, one can detect this and then invoke the emulator to execute the callback. Storing the CPU state in thread-local-storage allowed proper support for multithreading. I duplicated these design choices into EmuWoW, and the results largely speak for themselves. Unlike WoWMIPS (at time of writing), EmuWoW is still capable of loading MIPS DLLs (and will prefer to do so if possible), however.
Various MIPS Windows NT applications running
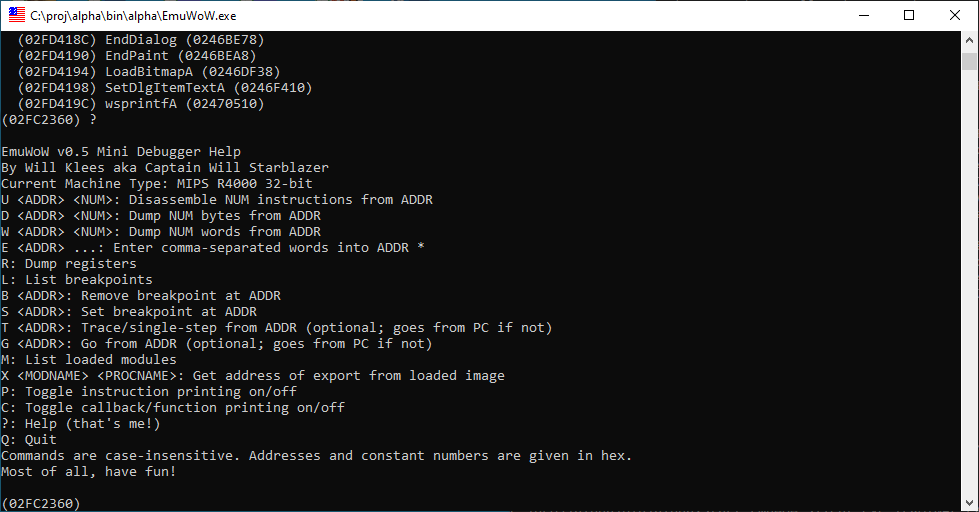
To aid the process of fixing faults in the emulator, I hacked up a quick, minimal debugger into EmuWoW. First of all, there’s a “crash screen” which will indicate the type of error and dump registers and the current instruction if there’s a fault, and a running disassembly can be printed as you go, but most crucially, there’s a limited degree of interactive debugging functionality.
The built in debugger to EmuWow
The main capabilities contained herein are dumping registers and memory to the screen, disassembling regions of memory, listing loaded modules, getting import entry points, setting breakpoints, and single-stepping, along with printing functions. It’s no gdb (especially for the lack of PDB symbol support), but it’s something.
MIPS is all well and good, however, but we can already emulate Windows NT for MIPS. MIPS is a fairly clean, simple architecture, often used for teaching, and short of weirdness like delay slots, is dead simple to emulate. And it fits the bill for what I’m trying to do here – a RISC architecture Microsoft abandoned, fixed-length 32-bit instructions, the works. However, adding support for the DEC Alpha AXP will finally get this project to where it was intended to be from the beginning, and I hope for it to eventually be able to run the Visual C++ compiler toolchain under EmuWoW. Being able to compile (and even test!) Alpha apps on readily available modern PCs will be a game-changer, and I intentionally wrote EmuWoW to be CPU-agnostic, so adding rudimentary support for the Alpha wasn’t difficult. Like with MIPS, I lifted the emulator from MAME. This admittedly did pose some challenges, due to MAME’s use of C++ features such as
Classes (which I had to substitute for passing pointers to structs)
Templates (which I had to substitute for macros)
Function-style casts (which I had to change into C-style casts)
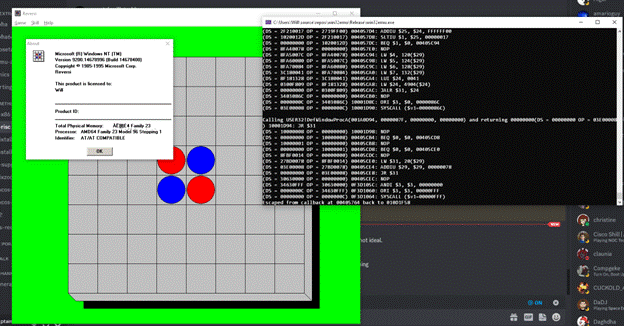
There was a lot of weirdness in how Alpha function calls, but it was my misunderstanding of the calling convention, and when to consider values to be 32-bit vs 64-bit posed a modest issue, but I got it to the point where some very simple DEC Alpha programs started to run, though many of them have various issues.
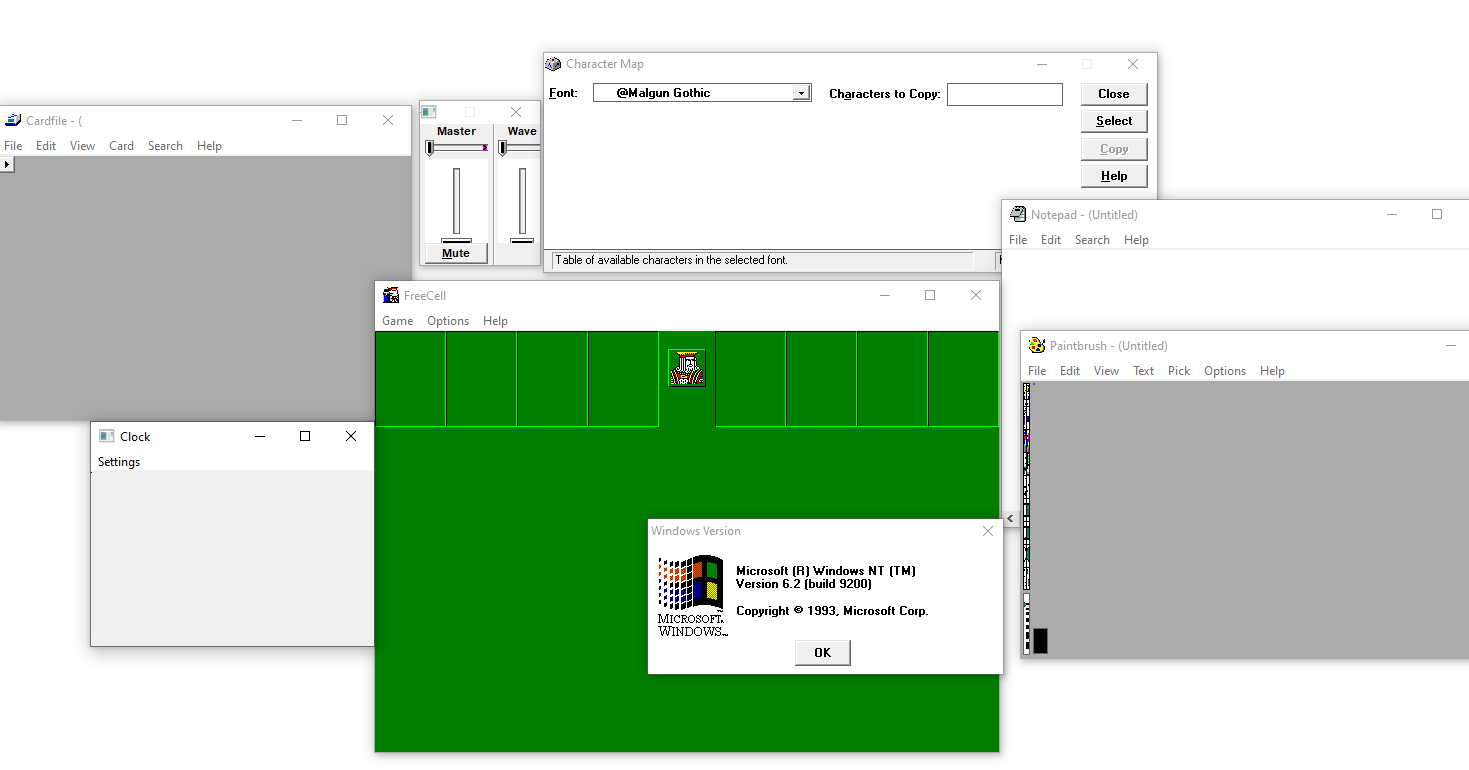
Various Dec Alpha Windows NT applications running
This is the first time this has ever been possible; emulation of AXP NT programs on standard PCs has just become possible now. I’m hoping to see EmuWoW continue to evolve, and I welcome contributions, whether that be improving support for the CPUs I already have, adding support for another (such as PowerPC) or anything else. To take a look at the code, go to github.com/bhty/emuwow and to download EmuWoW and try it out for yourself, click here.
Sydney’s idea of what Visual C++ for OS/2 should look like
No, it’s not a typo.
This is a long-winded post, but the short version is that I found a working combination to get the C compiler from Visual Studio 2003 targeting OS/2.
Once I’d learned how C compilers are a collection of programs working in concert, I’d always wanted to force Microsoft C to work in that fashion, however it is born to be a compiler that integrates everything but linking. There has been a “/Fa” or output assembly option, but I’ve never gotten it to do anything useful. I’m not that much into assembly but it seemed insurmountable.
But for some reason this time things were different.
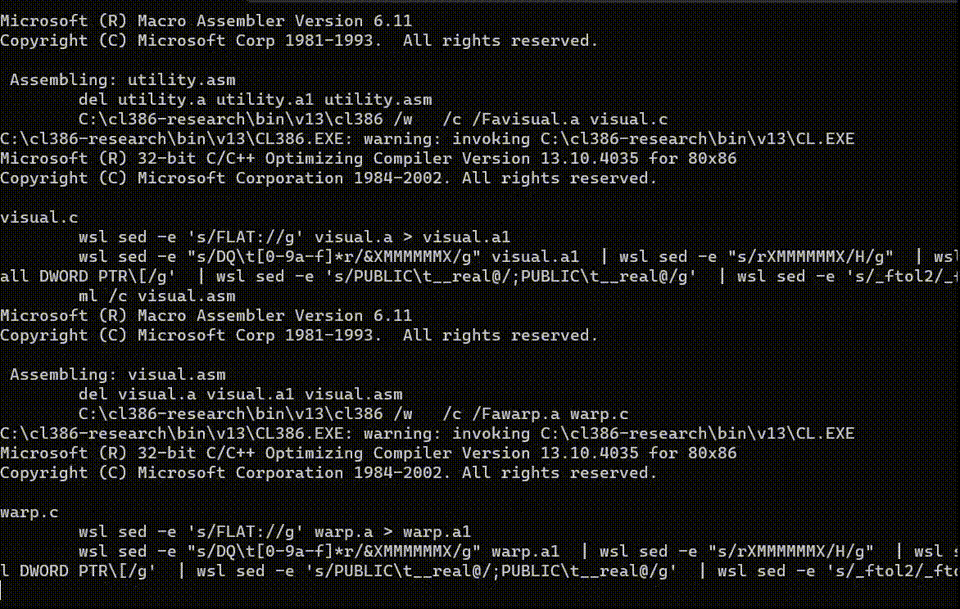
This time I used:
Microsoft (R) Macro Assembler Version 6.11
After the great divorce and the rise of Windows NT, Microsoft had shifted from the OMF format to COFF. However somewhere buried in their old tools it still supports it, namely MASM. For example, if I try to run LINK386 (the OS/2 Linker) against output from Visual C++ 2003 I get his
However if I output to assembly and then have MASM assemble that, and try the linker, I’m bombarded with errors like this:
warp.obj(warp.asm) :  error L2025: __real@4059000000000000 : symbol defined more than once
warp.obj(warp.asm) :  error L2029: '__ftol2' : unresolved external
If I was smart I’d have given up, there is pages and pages of this stuff. But I’m not smart, so instead I decided to something different, and use SED, the stream editor, and try to patch out the errors.
The ftol2 call is for newer CPU’s and any OS/2 library won’t have it. But instead of binary editing symbols we can replace the ftol2 with ftol with this simple line:
sed -e 's/_ftol2/_ftol/g'
For some reason Visual C++ likes to make all it’s reals “public” meaning there can only be one, but yet there is so many. Why not comment them all out?
sed -e 's/PUBLIC\t__real@/;PUBLIC\t__real@/g'
And there are various other annoying things, but again they can be all patched out. Just as the older Windows 1991 Pre-release compilers also have weird syntax that MASM doesn’t understand.
astro.asm(59): error A2138: invalid data initializer
which goes into how Microsoft C used to initialize floating point constants:
This one was a little hard for me as I’m not a sed expert, but I did figure out how to mark the section, and then to replace it
sed -e "s/DQ\t[0-9a-f]r/&XMMMMMMX/g" $.a1 | sed -e "s/rXMMMMMMX/H/g"
And so on. At the moment my ‘mangle’ script is now this:
.c.obj:
        $(CC) $(INC) $(OPT) $(DEBUG) /c /Fa$*.a $*.c
        wsl sed -e 's/FLAT://g' $*.a > $*.a1
        wsl sed -e "s/DQ\t[0-9a-f]*r/&XMMMMMMX/g" $*.a1 \
        | wsl sed -e "s/rXMMMMMMX/H/g" \
        | wsl sed -e 's/call \t\[/call DWORD PTR\[/g' \
        | wsl sed -e 's/PUBLIC\t__real@/;PUBLIC\t__real@/g' \
        | wsl sed -e 's/_ftol2/_ftol/g' > $*.asm
        ml /c $*.asm
        del $*.a $*.a1 $*.asm
This allows me to plug it into a Makefile, so I only have to edit it in one place.
Not surprisingly, this allows the LINK from Visual C++ 1.0 to link the MASM generated object files and get a native Win32 executable. Even from the oldest compiler I have from the Microsoft OS/2 2.00 Beta 2 SDK from 1989!
But now that we have the C compilers being able to output to something we can edit and force into a Win32, there is a few more things and suddenly:
        C:\cl386-research\bin\13.10.6030\cl386 /u /w /G3 /O  /c /Faphoon.a phoon.c
C:\cl386-research\bin\13.10.6030\CL386.EXE: warning: invoking C:\cl386-research\bin\13.10.6030\CL.EXE
Microsoft (R) 32-bit C/C++ Optimizing Compiler Version 13.10.6030 for 80x86
Copyright (C) Microsoft Corporation 1984-2002. All rights reserved.

phoon.c
        wsl sed -e 's/FLAT://g' phoon.a > phoon.a1
        wsl sed -e "s/DQ\t[0-9a-f]*r/&XMMMMMMX/g" phoon.a1  | wsl sed -e "s/rXMMMMMMX/H/g"  | wsl sed -e 's/call \t\[/call DWORD PTR\[/g'  | wsl sed -e 's/PUBLIC\t__real@/;PUBLIC\t__real@/g'  | wsl sed -e 's/_ftol2/_ftol/g' > phoon.asm
        ml /c phoon.asm
Microsoft (R) Macro Assembler Version 6.11
Copyright (C) Microsoft Corp 1981-1993.  All rights reserved.

 Assembling: phoon.asm
        del phoon.a phoon.a1 phoon.asm
        msdos286 run286 C:\cl386-research\bin\ddk12\LINK386.EXE @phoon.lnk

Operating System/2 Linear Executable Linker
Version 2.01.012 Nov 02 1993
Copyright (C) IBM Corporation 1988-1993.
Copyright (C) Microsoft Corp. 1988-1993.
 All rights reserved.

Object Modules [.obj]: astro.obj date_p.obj phoon.obj
Run File [astro.exe]: phoon2 /NOE /NOI /NOD:OLDNAMES
List File [nul.map]: nul.map
Libraries [.lib]: ..\..\lib2\libc.lib +
Libraries [.lib]: ..\..\lib2\os2386.lib
Definitions File [nul.def]: nul.def;
LINK386 :  warning L4071: application type not specified; assuming WINDOWCOMPAT
I know it’s a bit of a word salad, but the key thing here is that using Visual C++ 2003’s compiler (version 13.10.6030), and outputting to assembly that we can edit, we can then use MASM to build objects that surprisingly LINK386 version 2.01.012 will link with. I suspect this has to do with device drivers, and probably the majority of the OS/2 operating system.
Anways, we’ve done the incredible, using the same object files, we made both a Win32 application, and an OS/2 application!
phoon-13.10.6030.exe: PE32 executable (console) Intel 80386, for MS Windows
phoon2.exe: MS-DOS executable, LX for OS/2 (console) i80386
Phoon compiled by Visual C++ 2003 on OS/2 2.00
Incidentally Happy CNY!
Obviously, this is VERY cool stuff.
I know the next question is do we have to rely on a 16bit linker? How about Watcom?
C:\cl386-research\proj\trek>wlink @trek.wlk
WATCOM Linker Version 10.0
Copyright by WATCOM International Corp. 1985, 1994. All rights reserved.
WATCOM is a trademark of WATCOM International Corp.
loading object files
searching libraries
Warning(1008): cannot open LIBC.lib : No such file or directory
Warning(1008): cannot open OLDNAMES.lib : No such file or directory
creating an OS/2 32-bit executable
Ignore the warnings and YESwe can Link from something much newer & 32bit! In this example I linked the old TREK game, also built with Visual C++ 2003. The response file looks lke:
It’s probably needing additional stack space, maybe some other stuff, or resources, maybe how to flag it’s windowing compatible.
TREK built by Visual C++ 2003, and Linked using Watcom C/C++ 10.0
How do I get started, if I dare?! First download and unpack cl386-research-v2. Ideally on the root of your C: drive, because why not?
run the ‘env’ command to set your environment up. Its pretty complicated but in the proj directly there is currently:
*NOTE that I do use SED scripts, I have it set to use Linux in the WSL package. I tried some Win32 sed but it didn’t work. So you need WSL or a working sed!
and it’ll compile populate a floppy and launch the emulator
Its all good fun.
Read the Makefiles to configure a compiler, how to run it, and if you need to mangle the assembly. The 32bit new stuff needs to be mangled, the older stuff almost always works with just compile.
# Version 6.00.054      1989
# https://archive.org/details/os-2-cd-rom_202401
PLATFORM = ddksrc
In this case it’ll select the platform from the ‘ddksdk’ release. The next is if the compiler is OS/2 based or native win32. Basically 73g / windows 95 & below are native Win32.
In the above example we comment out the dos extended cross
# dos exteded cross
CC =  $(EMU) $(DOSX) $(CL386ROOT)\$(PLATFORM)\cl386
# native CC
# CC =  $(CL386ROOT)\$(PLATFORM)\cl386
Next is the mangle strategy. In this case it’s an ancient OS/2 (like) compile so try un commenting the ‘just compile’ line
# must include ONLY ONE strategey..
# for OS/2 it must have been assembled my MASM 6.11

include ..\-justcompile.mak
#include ..\-mangleassembly.mak
#include ..\-plainassembly.mak
save the makefile, and run
nmake os2
You can just close the emulator as after each run it’ll unpack a hard disk image, so nothing will be lost. or saved. It’s just for testing. You may need to periodically clean the floppy drive, as that is the only way to transfer stuff in and out of the VM.
What versions of CL386 have I found? Well, it’s quite a few, although I know I’m missing quite a few.
== c386 ============================
Microsoft C 5 386 Compiler

Microsoft C 5.2 286/386 Compiler -- Driver

@(#)C Compiler Apr 19 1990 11:48:30

Copyright (c) Microsoft Corp
1984-1989. All rights reserved.
  (press <return> to continue)
Microsoft 386 C Compiler. Version 1.00.075
Quick C Compiler Version 2.00.000
1.00.075

== ddk12 ============================

C 6.00 (Alpha) Aug 24 1990 19:12:31

Copyright (c) Microsoft Corp
1984-1989. All rights reserved.
  (press <return> to continue)
Microsoft 386 C Compiler. Version 6.00.054
Quick C Compiler Version 2.00.000
6.00.054

== ddk20 ============================

C 6.00 (Alpha) Aug 16 1990 23:04:06

Copyright (c) Microsoft Corp
1984-1989. All rights reserved.
  (press <return> to continue)
Microsoft 386 C Compiler. Version 6.00.054
Quick C Compiler Version 2.00.000
6.00.054

== ddksrc ============================

C 6.00 (Alpha) Aug 24 1990 19:21:49

Copyright (c) Microsoft Corp
1984-1989. All rights reserved.
  (press <return> to continue)
Microsoft 386 C Compiler. Version 6.00.054
Quick C Compiler Version 2.00.000
6.00.054

== nt-sep ============================

@(#)C Compiler 6.00 Feb 06 1991 17:15:19
@(#)C Compiler 6.00 May 13 1991 23:54:12
@(#)C Compiler 6.00 Jun 03 1991 15:16:22


Copyright (c) Microsoft Corp
1984-1991. All rights reserved.
  (press <return> to continue)
Microsoft 386 C Compiler. Version 6.00.077
Quick C Compiler Version 2.00.000
6.00.077

== nt-oct ============================

@(#)C Compiler 6.00 Jun 03 1991 15:16:22
@(#)C Compiler 6.00 Jun 13 1991 22:07:23
@(#)C Compiler 6.00 Oct 10 1991 00:42:24

Copyright (c) Microsoft Corp
1984-1991. All rights reserved.
  (press <return> to continue)
Microsoft 386 C Compiler. Version 6.00.080
Quick C Compiler Version 2.00.000
6.00.080

== nt-dec ============================
@(#)C Compiler 6.00 Jun 03 1991 15:16:22
@(#)C Compiler 6.00 Jun 13 1991 22:07:23
@(#)C Compiler 6.00 Oct 10 1991 00:42:24

Copyright (c) Microsoft Corp
1984-1991. All rights reserved.
  (press <return> to continue)
Microsoft 386 C Compiler. Version 6.00.081
Quick C Compiler Version 2.00.000
6.00.081

== 73g  ============================
1984-1993. All rights reserved.
Copyright (c) Microsoft Corp
8.00.3200
32-bit C/C++ Optimizing Compiler Version
Microsoft (R)


== msvc32s ============================

Microsoft 8.00.0000 - Copyright (C) 1986-1993 Microsoft Corp.
Microsoft 8.00.0000 - Copyright (C) 1986-1993 Microsoft Corp.
@(#) Microsoft C/C++ 32 bits x86 Compiler Version 8.00.XXXX

8.00.000

== 13.10.6030 ============================

Microsoft (R) C/C++ Compiler Version 13.10.6030
From my install of Visual Studio 2003 Enterprise
As you can see many of these earlier OS/2 compilers report the same versions but are in fact different builds on the inside. I suspect Microsoft had to support one version, and an Alpha version of version 6 is as good as it got. I would have imagined there were internal 32bit versions of 6 or 7, but I haven’t seen them.
Compiling and running TREK
Hopefully this gives some idea of how I tried to made a probably too modular build system to try all kinds of different compilers. I might have to see if it’s possible to run the tools from the 1992 versions of Windows NT in this setup, perhaps they are interesting as well.
One thing in my porting GCC to OS/2 experience is that the usability of the C compilers from 1991 were dramatically better than what Microsoft had given IBM at the time of the divorce. No doubt the upcoming NTOS/2 project was placing a bigger demand on the tools team.
If anyone has any access to other ‘cl386’ compilers, or early OS/2 2.00 stuff, please let me know! I’d love to do build/tests and see if my idea of distributing objects ‘just works’!
Because I hate myself, I tried to get the Microsoft OS/2 Beta 2 SDK’s C compiler building simple stuff for text mode NT. Because, why not?!
Since the object files won’t link, we have to go in with assembly. And that of course doesn’t directly assemble, but it just needs a little hand holding:
Microsoft (R) Program Maintenance Utility   Version 1.40
Copyright (c) Microsoft Corp 1988-93. All rights reserved.

        cl386 /Ih /Ox /Zi /c /Fadhyrst.a dhyrst.c
Microsoft (R) Microsoft 386 C Compiler. Version 1.00.075
Copyright (c) Microsoft Corp 1984-1989. All rights reserved.

dhyrst.c
        wsl sed -e 's/FLAT://g' dhyrst.a > dhyrst.a1
        wsl sed -e "s/DQ\t[0-9a-f]*r/&XMMMMMMX/g" dhyrst.a1  | wsl sed -e "s/rXMMMMMMX/H/g" > dhyrst.asm
        ml /c dhyrst.asm
Microsoft (R) Macro Assembler Version 6.11
Copyright (C) Microsoft Corp 1981-1993.  All rights reserved.

 Assembling: dhyrst.asm
        del dhyrst.a dhyrst.a1 dhyrst.asm
        link -debug:full -out:dhyrst.exe dhyrst.obj libc.lib
Microsoft (R) 32-Bit Executable Linker Version 1.00
Copyright (C) Microsoft Corp 1992-93. All rights reserved.
I use sed to remove the FLAT: directives which makes everything upset. Also there is some weird confusion on how to pad float constants and encode them.
MASM 6.11 is very update with this. I just padded it with more zeros, but it just hung. I suspect DQ isn’t the right size? I’m not 386 MASM junkie. I’m at least getting the assembler to shut-up but it doesn’t work right. I’ll have to look more into it.
Xenix 386 also includes an earlier version of Microsoft C / 386, and it formats the float like this:
So I had thought maybe if I replace the ‘r’ with a ‘H’ that might be enough? The only annoying thing about the Xenix compiler is that it was K&R so I spent a few minutes porting phoon to K&R, dumped the assembly and came up with this sed string to find the pattern, mark it, and replace it (Im not that good at this stuff)
wsl sed -e "s/DQ\t[0-9a-f]r/&XMMMMMMX/g" $.a1 \
| wsl sed -e "s/rXMMMMMMX/H/g" > $*.asm
While it compiles with no issues, and runs, it just hangs. I tried the transplanted Xenix assembly and it just hangs as well. Clearly there is something to do with how to use floats.
I then looked at whetstone, and after building it noticed this is the output compiling with Visual C++ 8.0
Great they look nothing alike. So something it totally broken. I guess the real question is, does it even work on OS/2?
Since I should post the NMAKE Makefile so I can remember how it can do custom steps so I can edit the intermediary files. Isn’t C fun?!
INC = /Ih
OPT = /Ox
DEBUG = /Zi
CC = cl386

OBJ = dhyrst.obj

.c.obj:
	$(CC) $(INC) $(OPT) $(DEBUG) /c /Fa$*.a $*.c
	wsl sed -e 's/FLAT://g' $*.a > $*.a1
	wsl sed -e "s/DQ\t[0-9a-f]*r/&XMMMMMMX/g" $*.a1 \
	| wsl sed -e "s/rXMMMMMMX/H/g" > $*.asm
	ml /c $*.asm
	del $*.a $*.a1 $*.asm

dhyrst.exe: $(OBJ)
        link -debug:full -out:dhyrst.exe $(OBJ) libc.lib

clean:
        del $(OBJ)
        del dhyrst.exe
        del *.asm *.a *.a1
As you can see, I’m using /Ox or maximum speed! So how does it compare?
Dhrystone(1.1) time for 180000000 passes = 20
This machine benchmarks at 9000000 dhrystones/second
And for the heck of it, how does Visual C++ 1.0’s performance compare?
Dhrystone(1.1) time for 180000000 passes = 7
This machine benchmarks at 25714285 dhrystones/second
That’s right the 1989 compiler is 35% the speed of the 1993 compiler. wow. Also it turns out that MASM 6.11 actually can (mostly) assemble the output of this ancient compiler. It’s nice when something kind of work. I can also add that the Infocom ’87 interpreter works as well.
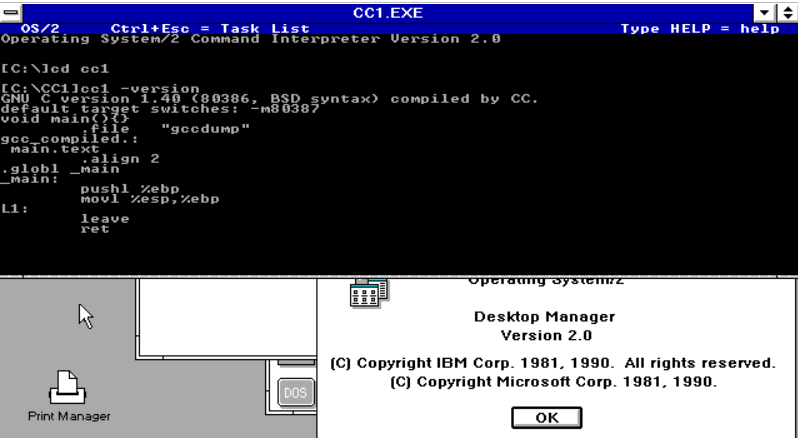
This is going to be a bit convoluted but here goes.. GCC isn’t a monolithic compiler, instead it’s various parts are separate programs. This lets us tackle it one part at a time. And/Or bypass a lot of it until I want to tackle it.
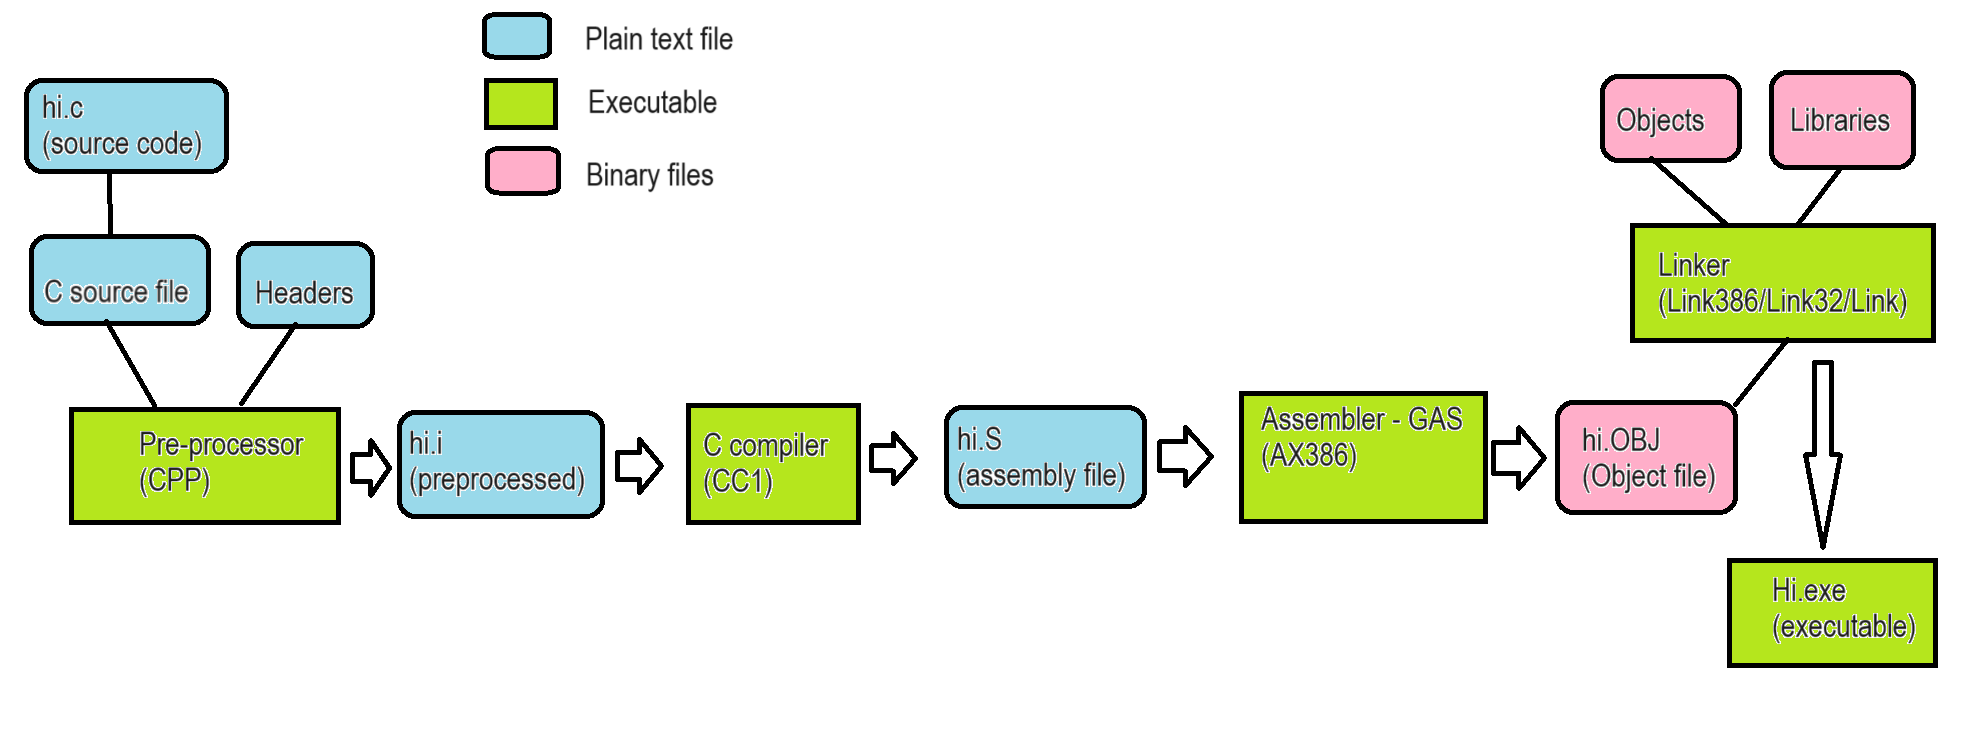
Flow of GCC
I’m sure many people have explained this far better than I ever could but in C you write source files (obviously), the pre-processor reads those and ‘header’ files that describe interfaces to libraries, other objects, various macros and definitions (magical numbers) and the pre-processor will read those files, and do simple macro expansion and test insert/replacements to generate a single .i file at the end of it’s run.
The C compiler (cc1) now reads that single .i file and translates it into native assembly. This allows for ‘mid/high level’ aspects of C to be machine independent (portable) but now will be written into a very system dependant assembly file, the single .S file. One thing of note is that so far everything is text files. You can edit the assembly file as you would any document, or even further ‘process’ it if needed/wanted.
The assembler ax386 (GAS) will then read the single assembly file and write a a binary object file hi.OBJ. There typically isn’t all that much to be said about assemblers although fancier ones allow for really strong Macro capabilities like Microsoft MASM.
From here on, it’s all binary objects!
The linker then takes your object files, and links them together with other system objects and system libraries into an executable, in this case. Linkers can build all kinds of other things, but for now we’re just pretending its static C compilation like it’s the 1970’s.
At it’s heart GCC processes text files.
The first part in this insane experiment, is to build GCC 1.40 with Microsoft Visual C++ 1.0. Surprisingly it didn’t take an insane amount of messing with stuff, and I got an executable! But everything it compiled failed to assemble. Looking at this fragment, even if you don’t know i386 assembly you might spot the error:
main:
        pushl %ebp
        a b,c
        pushl %esi
        pushl %ebx
Yeah, it’s the “a b,c” part. Those are NOT valid i386 opcodes!
Just because it compiled didn’t mean it actually worked.
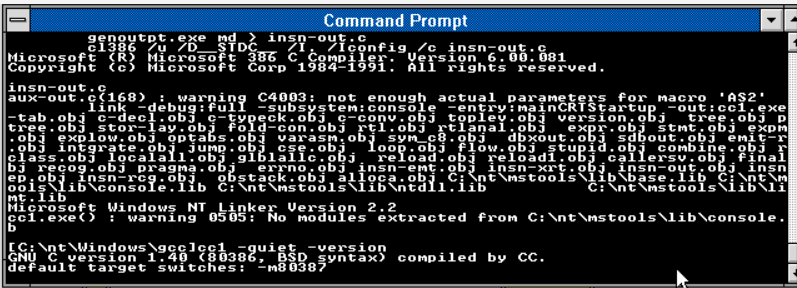
I used MinGW to build the same source, same Makefile, and I got a working executable. Annoyed I started compiling random files with Microsoft C, and finally found the file that broke it all, it turned out to be insn-output.c needing to be compiled with the “/D__STDC__” flags. A quick modification of the Makefile and now I have a working CC1!
Okay, great, it’s well known back in the early dangerous ages of the 1980’s/1990’s that everyone wasn’t running Linux, nor were binary distributions of GCC that far spread, rather I think to re-enforce the source was available it was expected that you’d use your system compiler. Systems like DJGPP/EMX take the path of binding a.out object files into something that MS-DOS can run via a dos extender, or the bind utility to allow you to run the a.out on OS/2. What I wan’t to do is verify that in fact Windows NT was a viable host for GCC back in the public pre-releases of 1991.
I’m sticking with the December build 239 version as it has working floating point. Something that GCC has intrinsic support of, and I don’t feel like trying to work out emulation.
The next step is to try to build it with the family mode-OS/2 version of the C compiler, which of course lead to the real issue of this 16bit hosted cross compiler:
        cl386 /u /Od /Ic:\MSVC32S\C386\INCLUDE /I. /Iconfig /c combine.c
Microsoft (R) Microsoft 386 C Compiler. Version 1.00.075
Copyright (c) Microsoft Corp 1984-1989. All rights reserved.

combine.c
combine.c(1734) : fatal error C1002: compiler is out of heap space in Pass 2
NMAKE : fatal error U1077: 'C:\WINDOWS\system32\cmd.exe' : return code '0x2'
Stop.
Very frustrating. I tried mixing and matching from Visual C++ 1.0 & this old compiler, and while it did compile, it doesn’t run. does it mean anything?!
GCC 1.40 compiled by Microsoft 386 C Compiler. Version 1.00.075
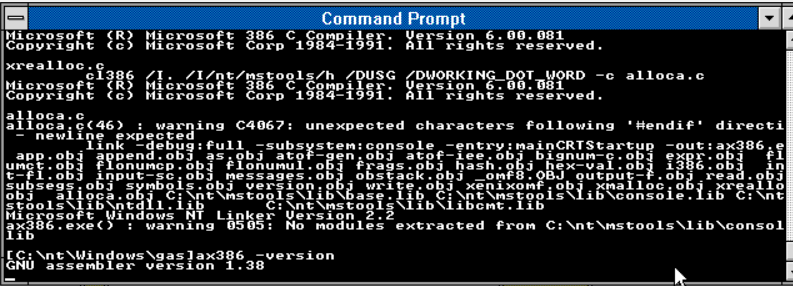
I should point out that this should be an expected working configuration as GCC does build on Xenix using the 32bit Microsoft C 5.1/386 compiler. Furthered again that Xenix and these 1991 versions of NT use the same 32bit OMF object format. And expanding on the Xenixnt experiment using the Xenix’ified GAS assembler with old Visual C++ includes & libraries to produce a possible retro-early port of GCC to NT, the next move is to bulid GAS on NT.
Xenix GAS 1.38 compiled by by Microsoft 386 C Compiler. Version 1.00.075
GAS gave me some weird issues with ctype.h where it runs fine with the one from Visual C++ 1.0 but the OS/2 & NT pre-release both fail. However the old Pre-release compiler cannot deal with the much newer ctype include file. So after much hammering I amputated whatever was bothering it, and it’s just enough to build & run. Great!
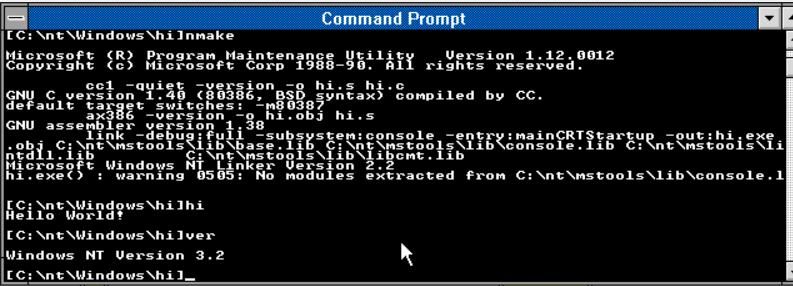
Going back to the phases, I used a simple hello world program:
void main() {
 printf("Hello World!\n");
}
While not being a good program, it doesn’t include stdio.h, nor does it return anything. It’s terrible. But in this case it allows me to be lazy and sidestep the pre-processor cpp.exe. This way I can just directly run it through cc1 and get my assembler file hi.S
Next I pass it to ax386 (GAS) and get the resulting object file hi.OBJ
And finally link it with link.exe in this case.
Hello World from GCC 1.40 on NT!
And with all the drama I’ve now compiled a simple hello world program on Windows NT.
If it were 1991, I would hollow out gcc.c so it doesn’t use signals or forks to invoke the needed phases, and of course build the pre-processor. In addition, libgcc needs to be compiled to allow for floating point operations to work correctly. None of which is impossible, although I’m not sure it’s all that needed as it isn’t 1991.
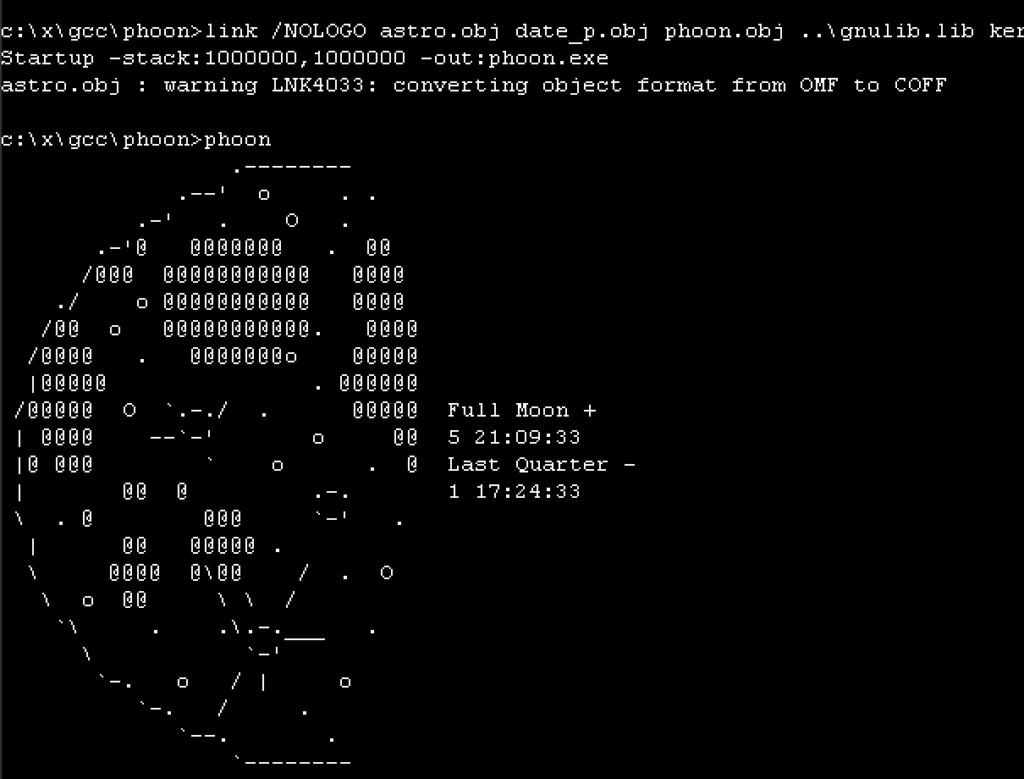
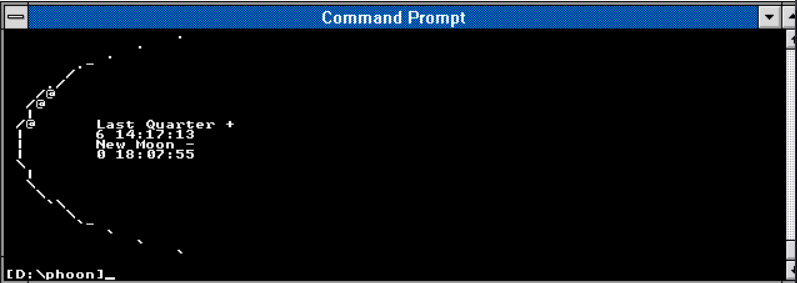
phoon
With a little bit more work, I got the floating point support to compile, which relies on both a working ‘native’ compiler, and a working GCC to compile the 2nd half. I usually use phoon, or Phases of the Moon, to test floating point, and as you can see, it’s working!
I’m not sure if there was a 32bit version of Microsoft C/386 available for Microsoft OS/2 2.00 betas. Also, I don’t know if the Microsoft link386 for OS/2 can also link Xenix 386 object files? Would it have been possible to bootstrap GCC/GAS on Microsoft OS/2 2.00? I really don’t know, and as of this writing no versions of the old Microsoft OS/2 2.00 betas have surfaced.
** update from the future, turns out that I found a way to convince the cl386 compilers from the NT Pre-Releases in 1991 to re-build an existing GCC that was built for NT. The catch is the linker, LINK386 of course, as the format was constantly changing. However the object files are fine, and I was able to just copy them over on diskette and re-link the compiler. It even ran. It’s not tested at all, so it turns out the 1989 compiler wasn’t good enough, but the 1991 was.
GCC 1.40 on OS/2 2.00 beta 6.123
It’s interesting to me to see that even before GCC 2.6, that vintage versions from 1991 would compile and run directly on Windows NT.
It’s not mine, rather it’s Asianometry‘s. It’s a nice overview of the rise of Unix. I’d recommend checking it out, it’s pretty good. And of course, as I’m referenced!
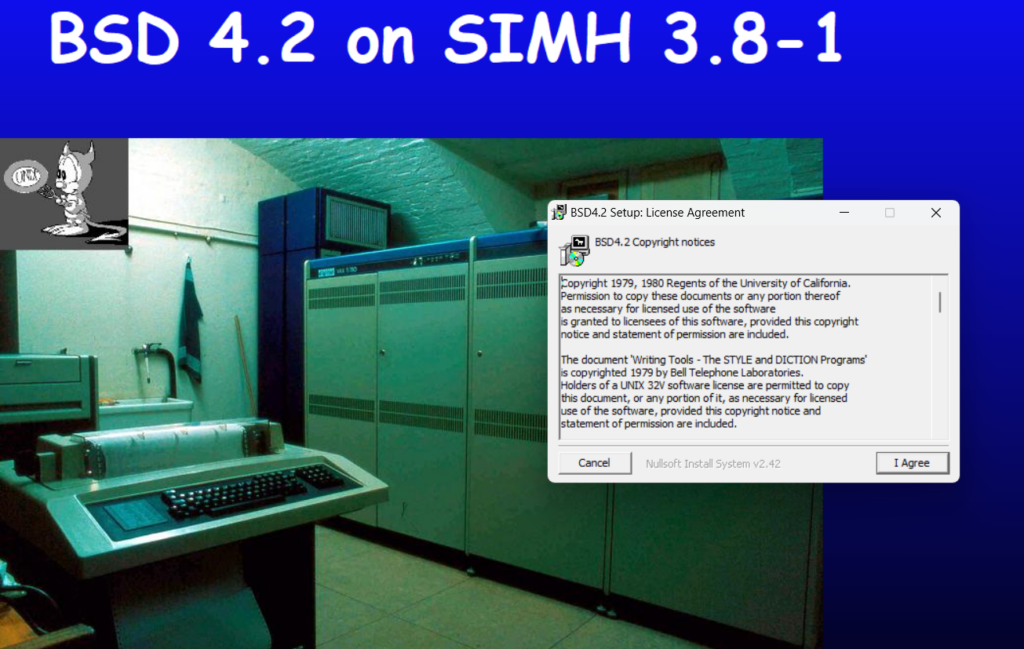
Years ago I had tried to make these old OS’s accessible to the masses with a simple windows installer where you could click & run these ancient artifacts. Say 4.2BSD.
Installing should be pretty straight forward, I just put the license as a click through and accept defaults.
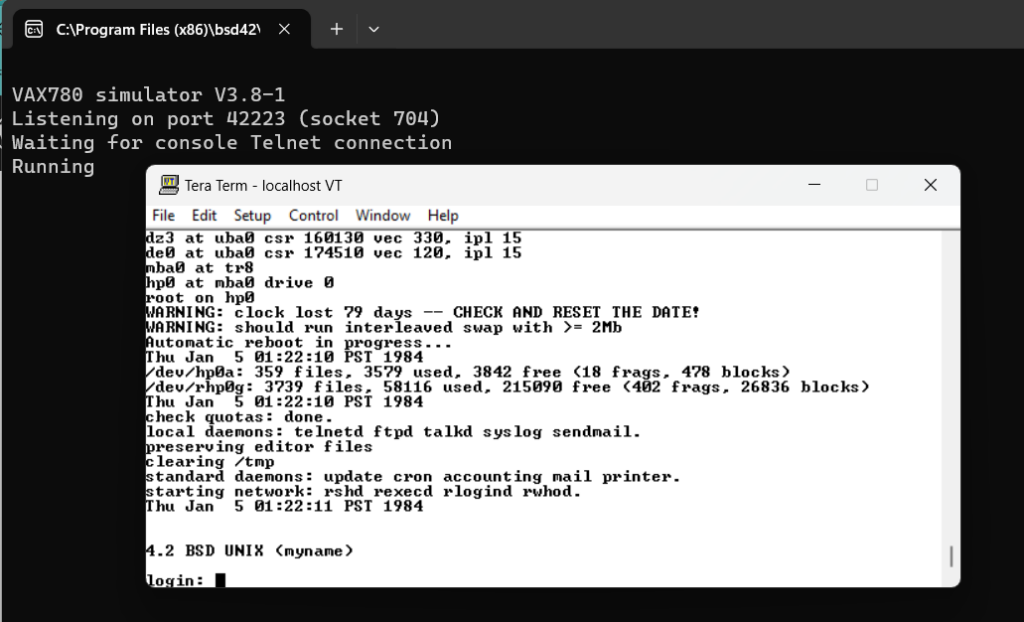
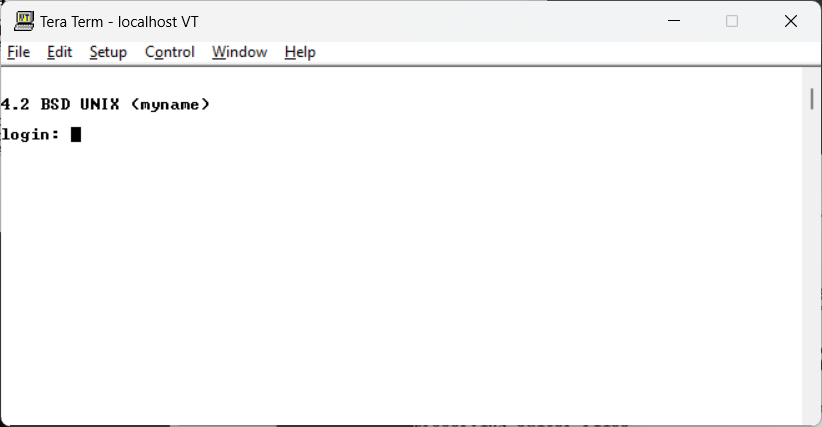
Starting BSD via ‘RUN BSD42’ and the emulator will fire up, and being up a console program (Tera Term) giving you the console access. Windows will probably warn you that it requested network access. This will allow you to access the VAX over the network, including being able to telnet into the VAX via ‘Attach a PTY’ which will spawn another Tera Term, prompting you to login.
telnettting into the VAX
You can login as root, there is no password, and now you are up and running your virtual VAX with 4.2BSD!
All the items
I converted many of the old documents into PDF’s so you may want to start with the Beginners guide to Unix. I thought this was a great way to bring a complex system to the masses, but I’m not sure if I succeded.
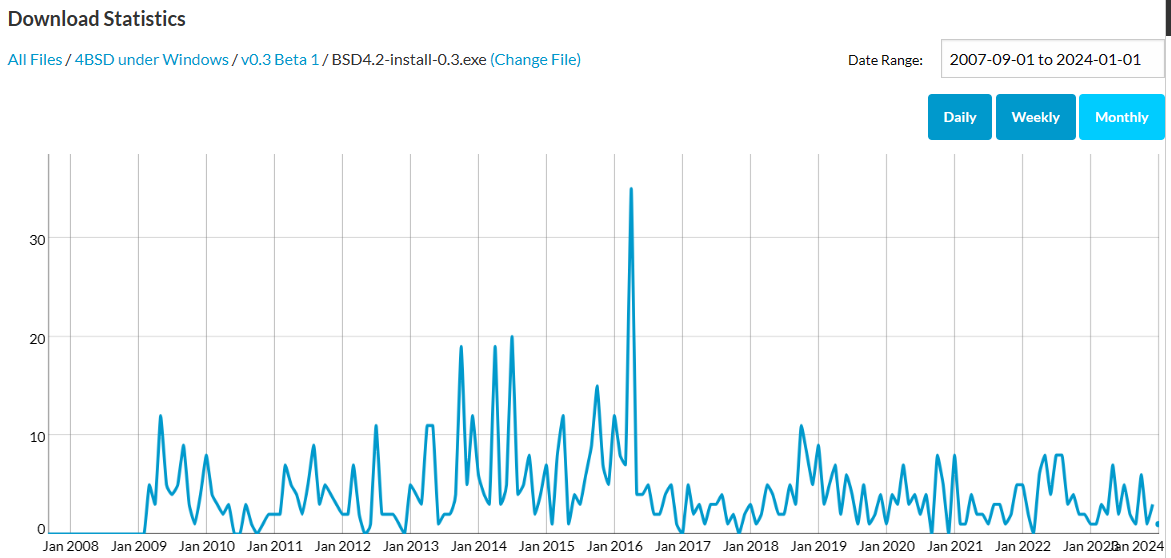
776 downloads
As it sits now, since 2007 it’s had 776 downloads. I’d never really gotten any feedback so I’d hoped it got at least a few people launched into the bewildering world of ancient Unix. Of course I tried to make many more packages but I’d been unsure if any of them went anywhere. It’s why I found these videos so interesting as at least the image artifacts got used for something!
But in the off hand, maybe this can encourage some Unix curious into a larger world.
When the AXP64 build tools for Windows 2000 were discovered back in May 2023, there was a crucial problem. Not only was it difficult to test the compiled applications since you needed an exotic and rare DEC Alpha machine running a leaked version of Windows, it was also difficult to even compile the programs, since you needed the same DEC Alpha machine to run the compiler; there was no cross-compiler.
As a result, I began writing a program conceptually similar to WOW64 on Itanium (or WX86, or FX-32), only in reverse, to allow RISC Win32 programs to run on x86.
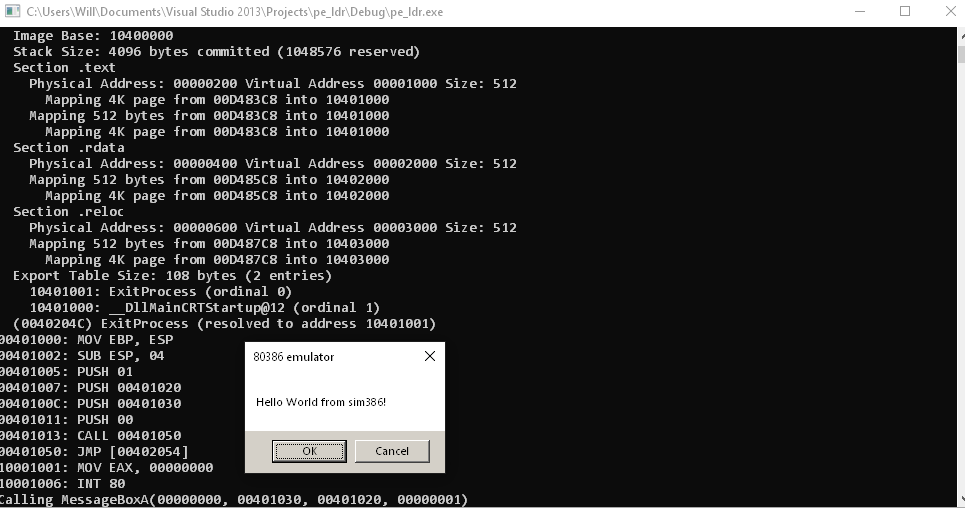
The PE/COFF file format is surprisingly simple once you get the hang of it, so loading a basic Win32 EXE that I assembled with NASM was pretty simple – just map the appropriate sections to the appropriate areas, fix up import tables, and start executing.
To start, I wrote a basic 386 emulator core. To complement it, I wrote my own set of Windows NT system DLLs (USER32, KERNEL32, GDI32) that execute inside of the emulator and then use an interrupt to signal a system call which is trapped by the emulator and thunked up to execute the API call on the host.
For example, up above, you can see that the emulated app calls MessageBoxA inside of the emulated USER32, which puts 0 in EAX (the API call number for MessageBoxA) and then does the syscall interrupt (int 0x80 in my case), which causes the emulator to grab the arguments off of the stack and call MessageBoxA.
To ease communication between the host’s Win32 environment and the emulated Win32 environment, I ran the emulated CPU inside of the host’s memory space, which means that to run applications written for a 32-bit version of Windows NT, you need a 32-bit version of win32emu (or a 64-bit version with /LARGEADDRESSAWARE:NO passed to the linker) to avoid pointer truncation issues, to prevent Windows from mapping memory addresses inaccessible by the emulated CPU.
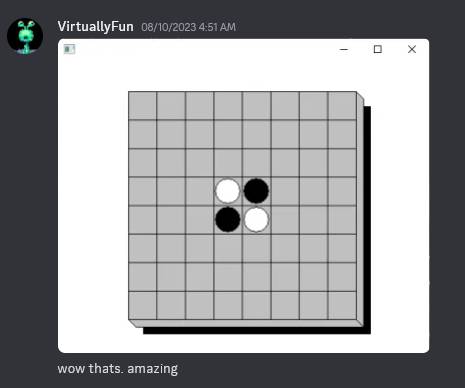
To get “real” apps working, a lot of single-stepping through the CRT was required, but eventually I did get Reversi – one of the basic Win32 SDK samples – to work, albeit with some bugs at first. Calling a window procedure essentially requires a thunk in reverse, so I inserted a thunk window procedure on the host side that calls the emulated window procedure and returns the result.
It’s amazing, it’s reversi!
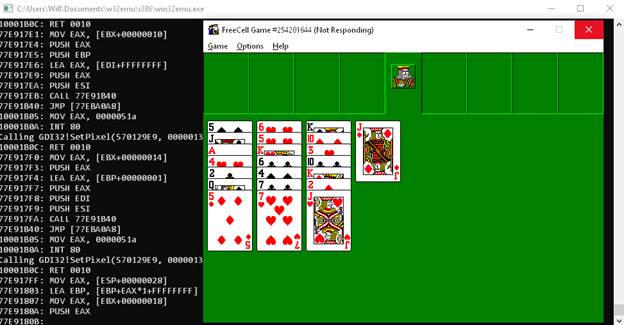
After this, I got to work on getting more complicated applications to work. Several failed due to lack of floating-point support, some failed due to unsupported DLLs, but I was able to get FreeCell and WinMine to work (with some bugs) after adding SHELL32. I was able to run the real SHELL32.DLL from Windows NT 3.51 under this environment.
FreecellMinesweeper
One might wonder why I put all this work into running x86 programs on x86, but the reason is that there’s the most information about, and I’m most proficient with, Windows on the 386. Not only does Windows on other CPUs use other CPUs, but also there’s different calling conventions and a lot of other stuff I didn’t want to mess with at first. But this was at least a proof-of-concept to build a framework where I could swap the CPU core for an emulator for MIPS or PPC or Alpha or whatever I wanted and get stuff running.
Astute readers might be wondering why I didn’t take the approach taken by WOW64. For those who don’t know, most system DLLs on WOW64 are the same as those in 32-bit Windows, the only ones that are different are ones with system call stubs that call down to the kernel (NTDLL, GDI32, and USER32, the first of which calls to NTOSKRNL and the latter two calling to WIN32K.SYS). WOW64 instead calls a function with a system call dispatch number, which does essentially the same thing. The reason for this is that the system call numbers are undocumented and change between versions of Windows. WOW64, being an integrated component of Windows, can stay up to date. If I took this approach, I’d either have to stay locked to one emulated set of DLLs (i.e. from NT 4.0) and use their system call numbers on the emulated side, or write my own emulated DLLs and stick to a fixed set of numbers, but either way I’d somehow have to map them to whatever syscall numbers are being used on the host.
As I went on, I should probably also mention that what I said earlier about loading Win32 apps being easy was wrong. Loading a PE image is pretty straightforward, but once you get into populating the TEB and PEB (many of whose fields are undocumented), it quickly gets gnarly, and my PEB emulation is incomplete.
Adding MIPS support wasn’t too much of a hassle, since the MIPS ISA (ignoring delay slots, which gave me no shortage of trouble) is pretty clean and writing an emulator wasn’t difficult. The VirtuallyFun Discord pointed me to Embedded Visual C++ 4.0, which was invaluable to me during development, since it included a MIPS assembler and disassembler, which I haven’t seen elsewhere. After writing a set of MIPS thunk DLLs and doing some more debugging, I finally got Reversi working.
There’s still some DLL relocation/rebasing issues, but Reversi is finally working in this homebrewed WOW!
I’d encourage someone to write a CPU module for the DEC Alpha AXP (or even PowerPC if anyone for some reason wants that). The API isn’t too complicated, and the i386 emulator is available for reference to see how the CPU emulator interfaces with the Win32 thunking side. An Alpha backend for the thunk compiler can definitely be written without too much trouble. Obviously, the AXP presents the challenge that fewer people are familiar with its instruction set than MIPS or 386, but this approach does free one from having to emulate all of the intricate hardware connections in actual Alpha applications while still running applications designed for it, and I’ve heard the Alpha is actually quite nice and clean. MAME’s Digital Alpha core could be a good place to start, but it’ll need some adaptation to work in this codebase. Remember that while being a 64-bit CPU with 64-bit registers and operations, the Alpha still runs Windows with 32-bit pointers, so it should run in a 32-bit address space (i.e. pass /LARGEADDRESSAWARE:NO to the linker).
Theoretically, recompiling the application to support the full address space should enable emulation of AXP64 applications, since the Alpha’s 64-bit pointers will allow it to address the host’s 64-bit address space, but I’m not sure if my emulator is totally 64-bit clean, or if the AXP64’s calling convention is materially different from that on the AXP32 in such a way that would require substantial changes. In either case, most of the code should still be transferable.
I also want to get more “useful” applications running, like development tools (i.e. the MSVC command line utilities – CL, MAKE, LINK, etc.) and CMD. Most of that probably involves implementing more thunks and potentially fixing CPU bugs.
This project is obviously still in a quite early stage, but I’m hoping to see it grow and become something useful for those in the hobby.