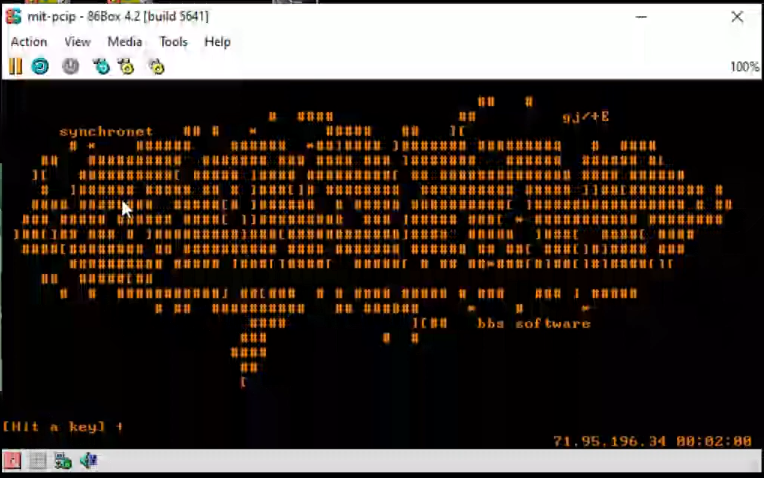
In this video I’ll be covering the circa 1985 MIT PC/IP stack running on 86box trying to connect to a user mode network library, SLiRP. After that fails I’ll show how to break the stack apart so we can use WireShark to inspect the traffic, then how to replace the direct connection to SLiRP by using Dynamips to emulate a cisco 7200 router.
Caution it’s all command line!
I’ll cover adding a loop back adapter, installing WireShark, how to find the GUID’s of the interfaces, how to configure a HecNET bridge, and set it up to relay to a stand-alone version of SLiRP, then how to setup a virtual cisco router to do NAT, and also forward to SLiRP, along with taking network captures to show what is really going on!
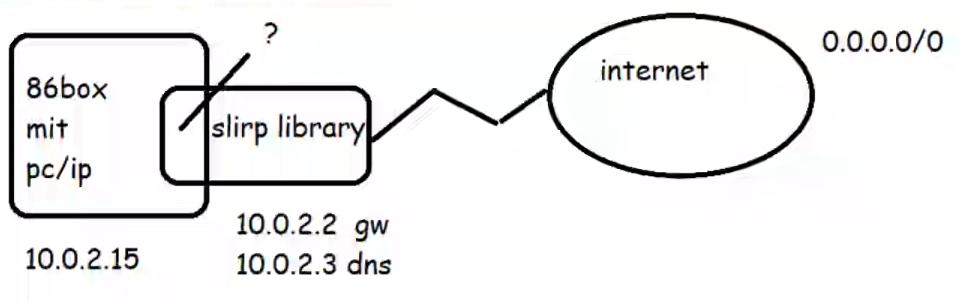
In 86box, you have the ability to use the SLiRP library directly from the emulator. Which is all find and good, but sadly it gives you no visibility when things go wrong. And with MIT PC/IP things go wrong. Looking at the data through Wireshark sure would be nice, but how to we get it into there?
Well the simplest way is to just break it apart.
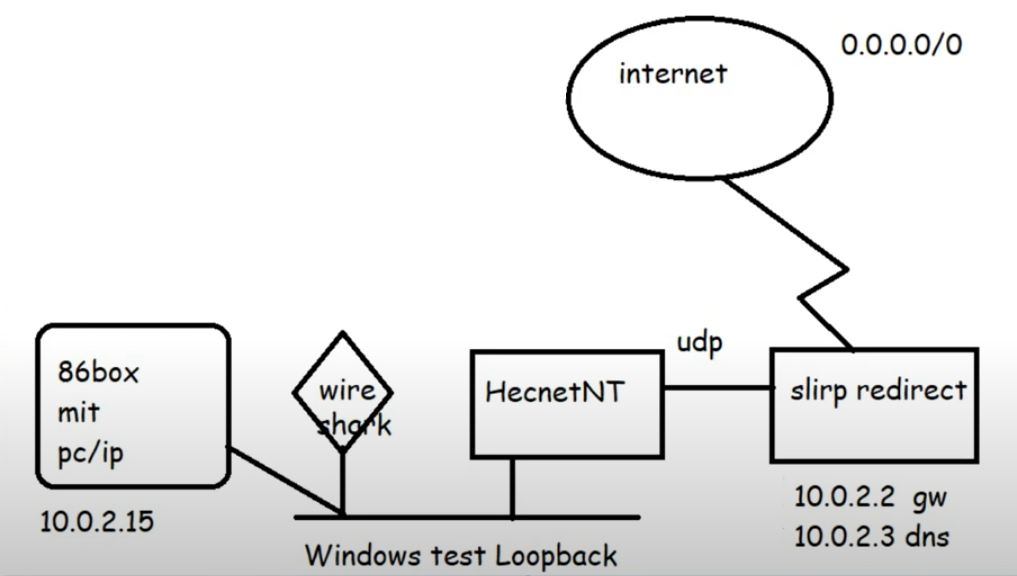
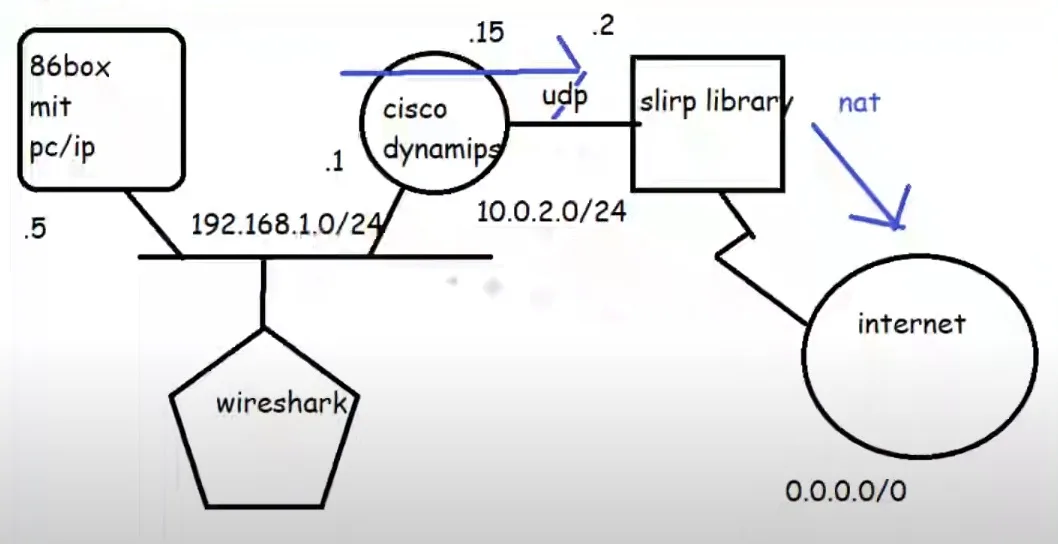
Broken apart into it’s components
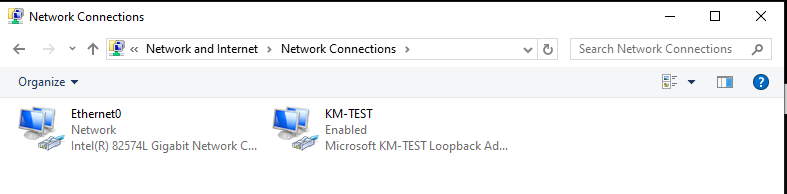
Adding in a KM TEST loopback adapter to Windows now gives us a private network we can now attach programs to via the pcap API. Hecnet is a l2 bridge that can inspect and look for l3 traffic and then forward it via udp to another program. In this case I had made a version of SLiRP that will communicate via UDP, perfect for stuff like this!
One thing to keep in mind is that the ‘GUIDS’ of the network interfaces are unique to each system, the ethlist program will show you which is which. It’s also why renaming interfaces only helps you when dealing with old libpcap stuff!
Rename stuff so it makes sense! Otherwise, everything is Ethernet
Becomes:
C:\hecnet>ethlist.exe
Network devices:
  Number       NAME                                     (Description)
  0  \Device\NPF_{E7EB72FA-7850-4864-B721-2A3B38737214} (KM-TEST)
  1  \Device\NPF_{649448CA-969D-486E-AAC8-99F1993C701A} (Ethernet0)
Press Enter to continue...

C:\hecnet>
With this information in hand, creating the bridge configuration is quite simple:
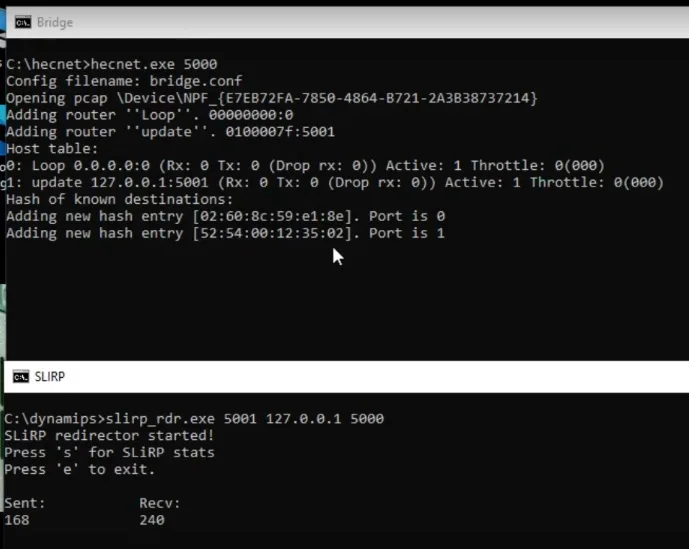
The bridge is for an uncompressed normal bridge connection between the KM TEST loopback interface and a UDP connection listening on port 5001 on localhost. Of note it’ll be forwarding TCP/IP related packets. Since we want the bridge to listen on UDP port 5000 we simply run it like this:
hecnet.exe 5000
Running the SLiRP redirector is just a simple matter of telling it which port to listen on, and where to forward traffic. In this case we’ll listen on port 5001 and forward traffic to 5000 on the localhost
slirp_rdr.exe 5001 127.0.0.1 5000
Thankfully, it’s that simple!
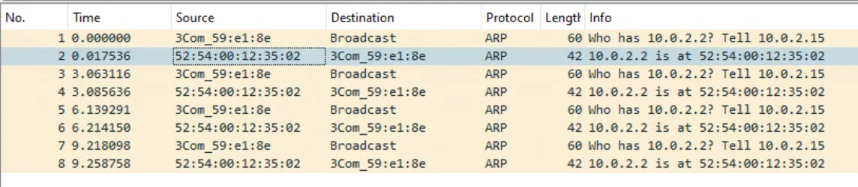
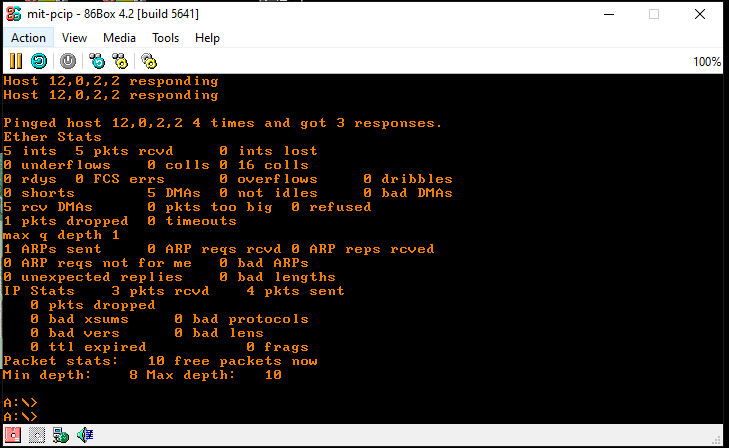
Running a ping fails (yet again) but this time we can see that they are doing ARP but for some reason PC/IP does not acknowledge the SLiRP library.
Just to verify, the HecnetNT bridge does see the source and destination address, and the SLiRP does indicate traffic in and out as expected.
Clearly the fault is on the PC/IP side, and most likely because it’s so old.
I then decided to build another network, this time using Dynamips to add in a virtual router.
Adding in a router
This complicates things as I’m not sure how to control the internal routing of the SLiRP library so the router has to NAT the PC/IP traffic to SLiRP, which in turn ‘NATs’ it to the internet. But rest assured double NAT (or even more) is quite common these days.
Configuring the router is somewhat straight forward, we are going to use pcap to listen on the KM TEST loopack, replacing the HecnetNT bridge. But it’s going to talk to the SLiRP redirector in the same manner:
set loopback=\Device\NPF_{E7EB72FA-7850-4864-B721-2A3B38737214}
set IOS=..\c7200-is-mz.19991126.bin
set NPE=npe-100
set RAM=64 -X

@attrib *.* -r
..\dynamips.exe -P 7200 %IOS%  ^
-m %RAM% ^
-t %NPE%  ^
-p 0:C7200-IO-FE ^
-p 1:PA-4E  ^
-s1:0:gen_eth:%loopback% ^
-s1:1:udp:5000:127.0.0.1:5001
This creates a basic 7200 router with a 4 port ethernet card, with one port connected to the KM TEST loopback, and the other connected to the SLiRP library.
Configuration of the router is not very complicated either:
!
no ip domain-lookup
!
interface Ethernet1/0
 ip address 192.168.1.1 255.255.255.0
 no ip directed-broadcast
 ip nat inside
!
interface Ethernet1/1
 ip address 10.0.2.15 255.255.255.0
 no ip directed-broadcast
 ip nat outside
!
ip default-gateway 10.0.2.2
ip nat inside source list 1 interface Ethernet1/1 overload
ip classless
ip route 0.0.0.0 0.0.0.0 10.0.2.2
no ip http server
!
access-list 1 permit 192.168.1.0 0.0.0.255
!
This defines our default route for both the routing table, and the management engine to the SLiRP library, defines the NAT inside/outside interfaces along with specifying the ‘overload’ address will be the 10.0.2.15 NAT’ing the PC/IP traffic behind the usual SLiRP user address.
Pinging the SLiRP gateway
This allows us to ping SLiRP, and get the expected response.
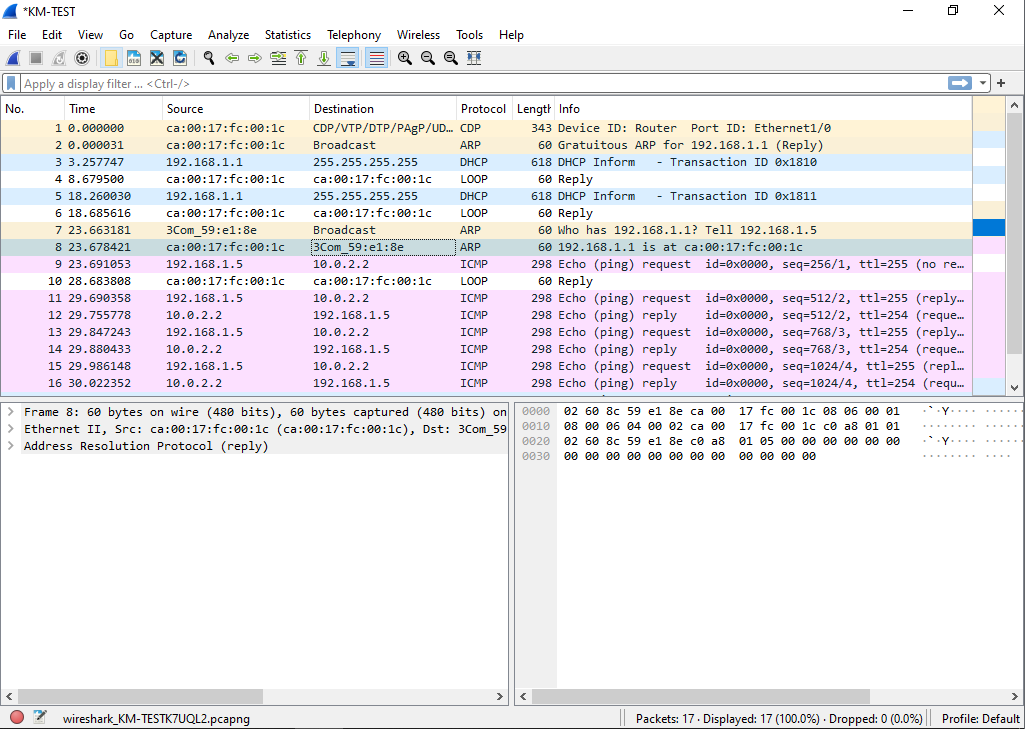
Working ARP/ICMP with cisco router
Checking the capture, we can see that yes ARP is working as expected, and the ping works without any issues.
On the router we can see the NAT translation.
Router#show ip nat translations
Pro Inside global      Inside local       Outside local      Outside global
tcp 10.0.2.15:4376     192.168.1.5:4376   71.95.196.34:23    71.95.196.34:23
Router#
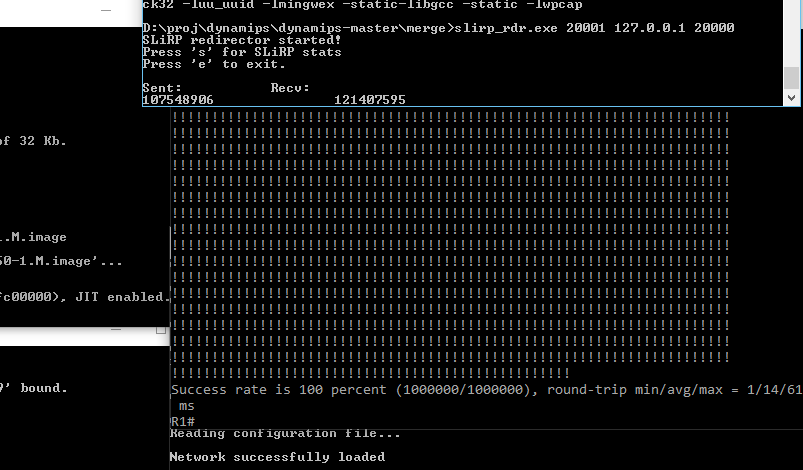
And we can also check the SLiRP redirector for information on the current session.
SLiRP redirector started!
Press 's' for SLiRP stats
Press 'e' to exit.

Sent:           Recv:
stats!          4859

Proto[state]     Sock     Local Address, Port  Remote Address, Port RecvQ SendQ
tcp[ESTABLISHED]  632         10.0.2.15  4376    71.95.196.34    23     0   600
tcp[REDIRECT]     616         10.0.2.15    23        10.0.2.2 42323     0     0
Plus, we also have the Wireshark capture going showing the start of the TCP conversation
TCP connected!Connected to VERT
So now we’ve connected to the internet and by breaking the process appart we can now inspect what is going on, and made modifications like adding a cisco router.
I figured that this may be something that other people may be interested in, as you can build far more complex virtual networks this way!
There is a LOT going on in this image, and I’ll try to explain it, but yeah “it’s complicated”.
SNA networking & Hercules has always been a goal for a lot of people, including me as we always wanted to setup some SNA server of some kind. Especially on RISC platforms, as there is only so much fun on SQL server.
Okay I know the practical among you will say, doesn’t it support telnet 3270? Isn’t that good enough? Yes for day to day mundane stuff, absolutely. But I’m not all that interested in that, I wan’t to have the whole ancient network, and I wan’t it self contained and on my desk! Or on a laptop, as I see fit.
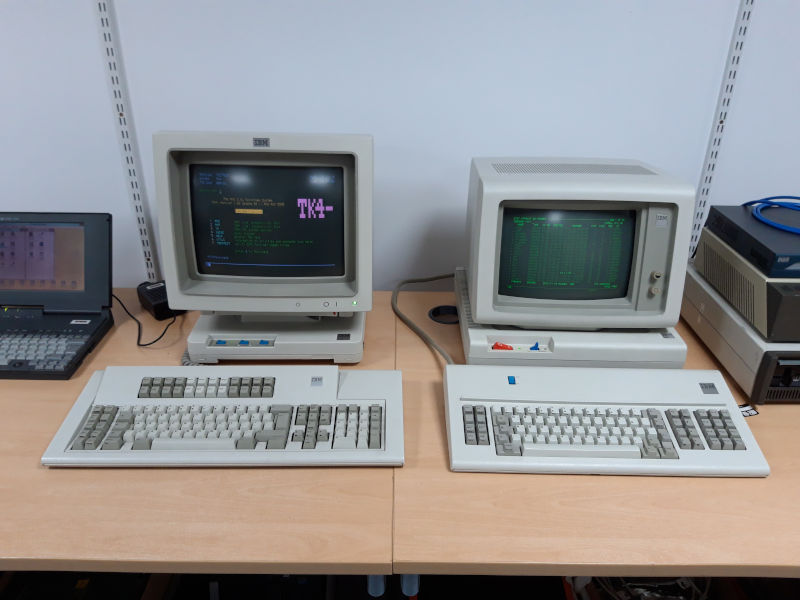
What started this whole adventure was a simple image from 9track.net, showing that being able to connect physical devices to Hercules was indeed possible!
This is a physical IBM 3178 & 3179 terminals talking to TK4- , a MVS3.8j pre-configured system!
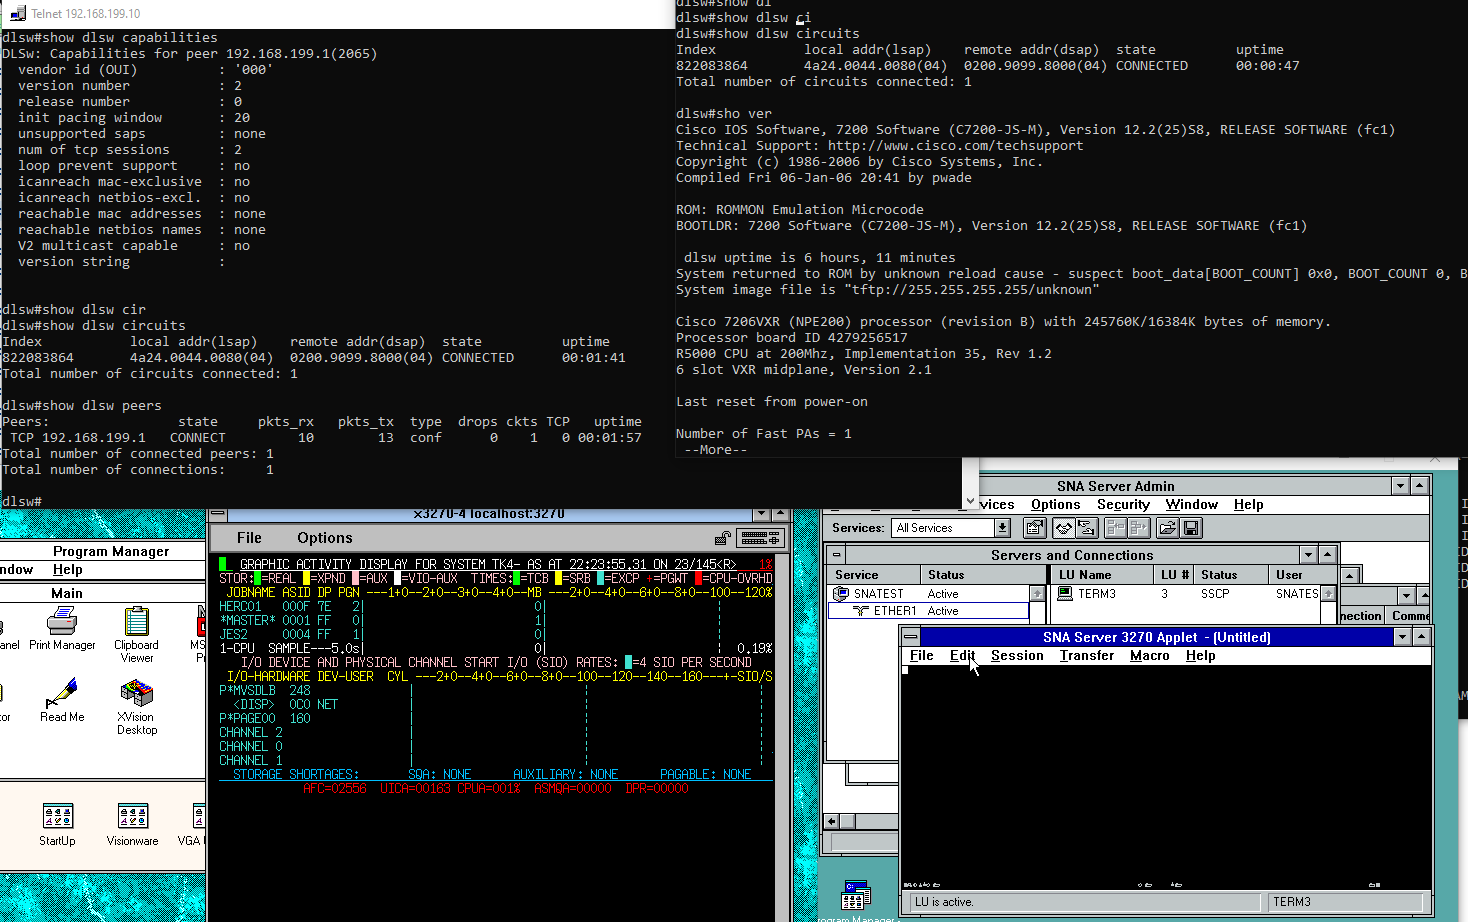
The magic that makes this all possible, is a cisco router, running enterprise IOS, with dlsw support.
My setup is going to be inspired by this setup, but not exactly 100% But this is what I’m going to use on Windows 10
Dynamips for the cisco router, running JS-M 12.2(25)S8
Qemu 0.90 with PCAP running Windows NT 3.51 Server along with SNA Server 2.1
I had originally wanted to run the NT server on VMware but for some reason it just hangs trying to initialise the NT kernel. I didn’t bother trying to troubleshoot it, I just jumped to Qemu. Even service pack 5 didn’t help. VMware left me with the virtual network that will NAT if needed, and of course let me telnet to the Dynamips program. The SNA traffic is isolated to the MS Loopback adapter, which will let pcap programs talk to each other.
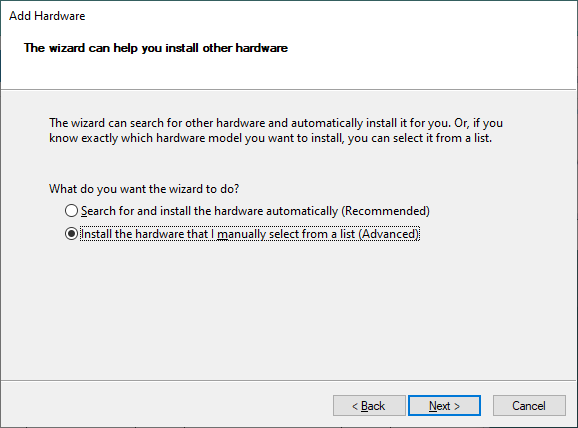
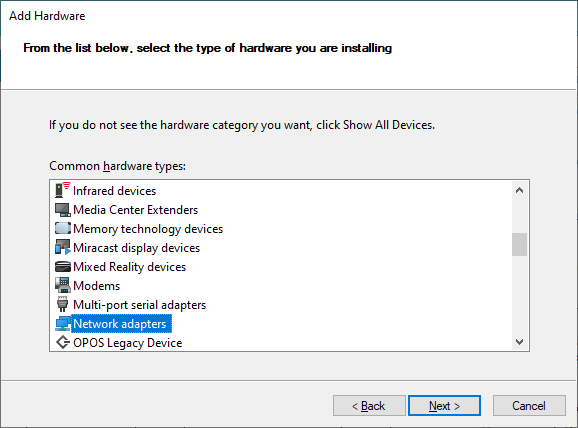
The first thing I did was run ‘hdwwiz’ on Windows 10, and added in the KM-TEST loopback adapter
We know what we want, so go to the manuall selection
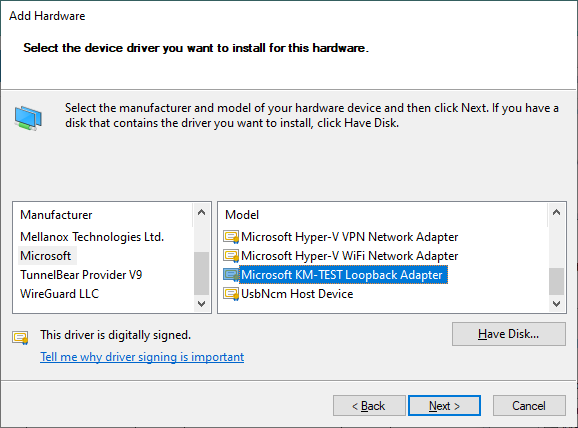
Network adapters
And select the KM-TEST Loopback Adapter
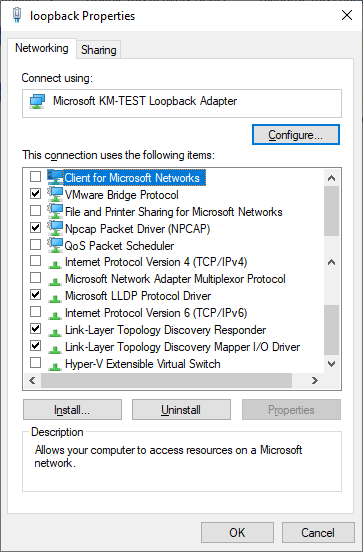
Next I changed the protocols available on the loopback, as I don’t want my Windows 10 host interfering with the SNA network at all.
So the next thing to do is to get your network GUID’s. ethlist.exe from the Dynamips download will get you that:
C:\dynamips>ethlist.exe
Network devices:
  Number       NAME                                     (Description)
  0  \Device\NPF_{3DF0EC5D-7FBE-46DF-ACF8-EF5D8679A473} (loopback)
  1  \Device\NPF_{D9FBD118-B9DF-4C3C-BD9E-07A0E34D8F75} (Local Area Connection* 8)
  2  \Device\NPF_{F5057901-6A30-413A-80E4-4765DA794B7C} (Local Area Connection* 7)
  3  \Device\NPF_{E3D3EC8D-29C3-4B70-B01C-600D3F9ED1D6} (Local Area Connection* 6)
  4  \Device\NPF_{82EEDBC1-899D-416F-BD51-3DBE2287257F} (VMware Network Adapter VMnet8)
  5  \Device\NPF_{3BC364F4-5A15-405D-926C-C594383F0323} (VMware Network Adapter VMnet1)
  6  \Device\NPF_{DDF1FA94-7488-414F-A41A-EC88C1FB0DE4} (Ethernet)
  7  \Device\NPF_{E7CA8F40-4639-410D-B5CA-F402FE69AF5D} (Ethernet 2)
I want the cisco router to have two interfaces, one with TCP/IP for me to be able to telnet into it (maybe other management as well?!) and the other one for the SNA traffic.
Setting up Dynamips
As mentioned above I’m going to use the VMnet1 for TCP/IP to the router, and the loopback adapter for SNA traffic. To try to make things a little easier to read I setup a small batch file that let’s me plug in variables to Dynamips:
set loopback=\Device\NPF_{3DF0EC5D-7FBE-46DF-ACF8-EF5D8679A473}
set vmnet1=\Device\NPF_{3BC364F4-5A15-405D-926C-C594383F0323}
set IOS=c7200-js-mz.122-25.S8.bin
set NPE=npe-200
..\dynamips.exe -P 7200 %IOS%  ^
-t %NPE%  ^
-p 0:C7200-IO-FE ^
-s0:0:gen_eth:%vmnet1% ^
-p 1:PA-4E  ^
-s1:0:gen_eth:%loopback% ^
-p2:PA-4T+
The caret symbol will break up lines on NT, much like the ampersand will on Unix. And this let’s me use clear variables for the networks, IOS & NPE type so it’s nowhere near as complicated to edit.
This will create a cisco 7200 with an NPE-200, with the following cards:
So all my TCP/IP in this example will be using 192.168.199.0/24
As mentioned on the 9track page, all the magic happens on the cisco router. I’ve made a few changes as I may want to try the SDLC in the future to perhaps some other experiment if I can find an emulator that’ll drive it over serial, but for now let’s just get to the config:
!
version 12.2
service timestamps debug uptime
service timestamps log uptime
no service password-encryption
!
hostname dlsw
!
boot-start-marker
boot-end-marker
!
enable password cisco
!
ip subnet-zero
!
!
no ip domain-lookup
!
ip cef
no mpls traffic-eng auto-bw timers frequency 0
call rsvp-sync
!
!
!
!
!
!
!
source-bridge ring-group 1
dlsw local-peer peer-id 192.168.199.10
dlsw remote-peer 0 tcp 192.168.199.1
dlsw mac-addr 4000.1020.0100 remote-peer ip-address 192.168.199.1
dlsw udp-disable
dlsw transparent switch-support
!
interface FastEthernet0/0
 ip address 192.168.199.10 255.255.255.0
 duplex half
 no clns route-cache
!
interface Ethernet1/0
 no ip address
 duplex half
 no clns route-cache
 dlsw transparent redundancy-enable 5555.5555.5000
 dlsw transparent map local-mac 4000.1020.0100  remote-mac 4000.0999.0100
!
interface Ethernet1/1
 no ip address
 shutdown
 duplex half
 no clns route-cache
!
interface Ethernet1/2
 no ip address
 shutdown
 duplex half
 no clns route-cache
!
interface Ethernet1/3
 no ip address
 shutdown
 duplex half
 no clns route-cache
!
interface Serial2/0
 no ip address
 encapsulation sdlc
 no keepalive
 serial restart-delay 0
 clockrate 64000
 no clns route-cache
 sdlc role primary
 sdlc vmac 4000.0999.0100
 sdlc address C1
 sdlc xid C1 01700019
 sdlc partner 4000.1020.1000 C1
 sdlc dlsw C1
!
interface Serial2/1
 no ip address
 shutdown
 serial restart-delay 0
 no clns route-cache
!
interface Serial2/2
 no ip address
 shutdown
 serial restart-delay 0
 no clns route-cache
!
interface Serial2/3
 no ip address
 shutdown
 serial restart-delay 0
 no clns route-cache
!
ip classless
!
no ip http server
!
!
!
!
!
!
control-plane
!
!
dial-peer cor custom
!
!
!
!
gatekeeper
 shutdown
!
!
line con 0
 session-timeout 35791
 stopbits 1
line aux 0
 stopbits 1
line vty 0 4
 password cisco
 login
!
!
end
This sets up the router so I can telnet to it from my desktop at 192.168.199.10, and allows it to talk to the base Windows machine on 192.168.199.1
All the magical MAC addresses come from 9track.net, as he wrote the dlsw hooks, so I just copied that. There is probably a great deal that could be cleaned up, but once I saw the two talking I kind of froze what I was doing.
With that much in place I then jumped to WSL,and built the emulator from github. I cloned it, and renamed that to herc-dlsw. At least for me this was pretty straightforward. The Hercules fork will build with Visual Studio as well, but I knew I was going to need some kind of tn3270 emulator, and I wanted to use x3270, and I had just recently bought this discounted copy of XVision, so of course I wanted to use that.
Despite this catastrophic defect that wasn’t disclosed in the auction.
I downloaded and extracted the TK4- latest distro on WSL. I just created a ‘herc’ directory in my home to house the tk4- release. The next thing to do is overlay your dlsw enabled exe’s and libraries.
cd ~/herc-dlsw/.libs
mkdir x
cp * x
cd x
rm *.o *.lai
cp *.so $HOME/herc/hercules/linux/64/lib/hercules
cp *.la $HOME/herc/hercules/linux/64/lib/hercules
rm *.so *.la
cp * $HOME/herc/hercules/linux/64
Now with the binaries in place, I do need to setup the Xvision VM so I can receive the X11. Of course there is so many other ways to do this, but this is mine:
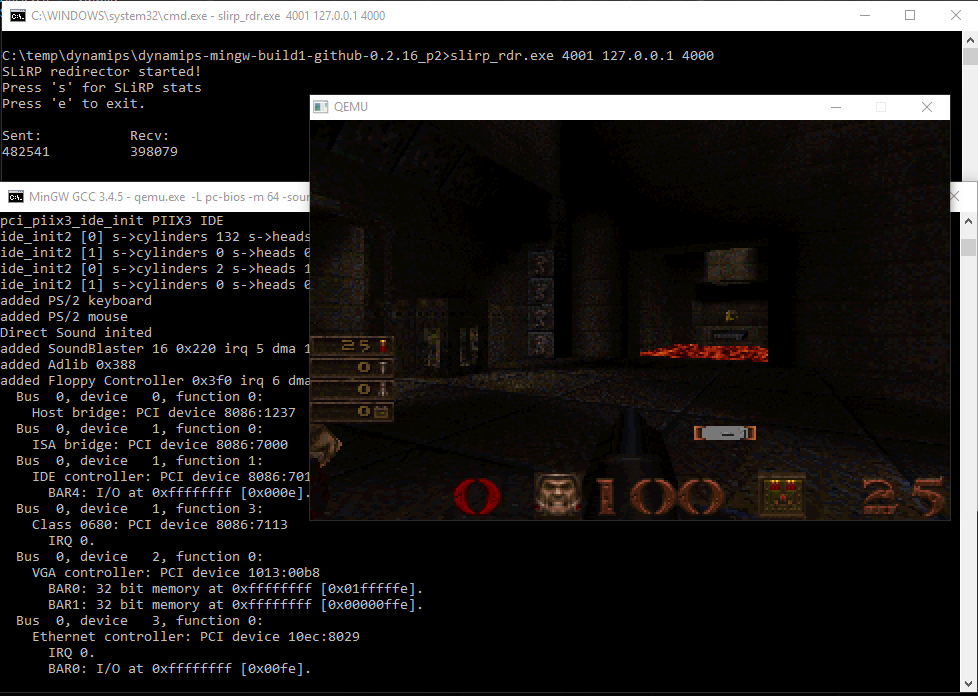
The important thing is that tcp port 6000 is redirected inwards, and that I’m using the NE2000 card, which on my weird fork will print out the hardware config, so I know how to find the nic.
added SLIRP
adding a [GenuineIntelC♣] family 5 model 4 stepping 3 CPU
added 64 megabytes of RAM
trying to load video rom pc-bios/vgabios-cirrus.bin
added parallel port 0x378 7
added NE2000(isa) 0x320 10
pci_piix3_ide_init PIIX3 IDE
ide_init2 [0] s->cylinders 203 s->heads 16 s->sectors 63
ide_init2 [1] s->cylinders 0 s->heads 0 s->sectors 0
ide_init2 [0] s->cylinders 2 s->heads 16 s->sectors 63
ide_init2 [1] s->cylinders 0 s->heads 0 s->sectors 0
added PS/2 keyboard
ps2.c added PS/2 mouse handler
added Floppy Controller 0x3f0 irq 6 dma 2
installing PS/2 mouse in CMOS
  Bus  0, device   0, function 0:
    Host bridge: PCI device 8086:1237
  Bus  0, device   1, function 0:
    ISA bridge: PCI device 8086:7000
  Bus  0, device   1, function 1:
    IDE controller: PCI device 8086:7010
      BAR4: I/O at 0xffffffff [0x000e].
  Bus  0, device   1, function 3:
    Class 0680: PCI device 8086:7113
      IRQ 0.
  Bus  0, device   2, function 0:
    VGA controller: PCI device 1013:00b8
      BAR0: 32 bit memory at 0xffffffff [0x01fffffe].
      BAR1: 32 bit memory at 0xffffffff [0x00000ffe].
And in this case it’s 0x320 IRQ 10. XVision being it’s own level of disappointment, I’ll have to cover it further, and later but suffice to say it at least catches the x3270 so I can get onto the console.
Setting up Hercules
Editing conf/tk4-_default.cnf is pretty easy as it’s on Linux and you can use VI.
First get MVS up and running. You have to run the ‘console_mode’ script to see what is going on.
cd herc/unattended
./set_console_mode
cd ..
./mvs
It’s not all that difficult XVision is using SLiRP, so it’s listening on all my IP addresses so I just do a simple
export DISPLAY=192.168.1.72:0
nohup x3270 &
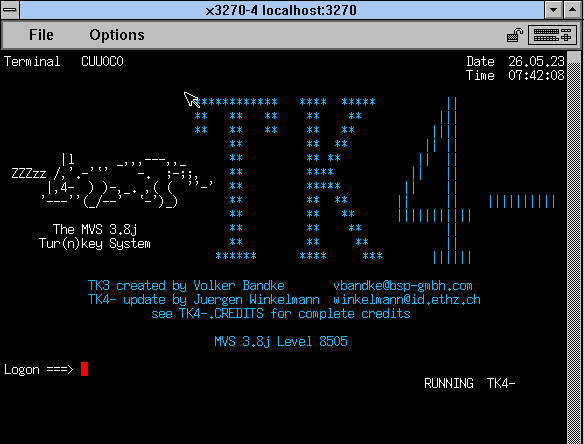
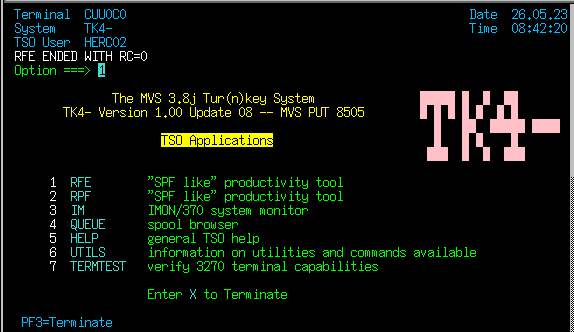
And the emulator will pop up in Qemu. Just connect to localhost:3270 and you’ll be greeted by the login pannel:
Credentials are HERC01 / CUL8TR
I would HIGHLY recommend following the tutorial to get used to submitting a simple COBOL program. It walks through the key concepts of locating a file, and viewing it on MVS. Something that up until yesterday was out of my league.
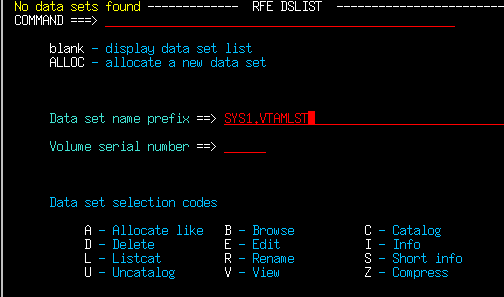
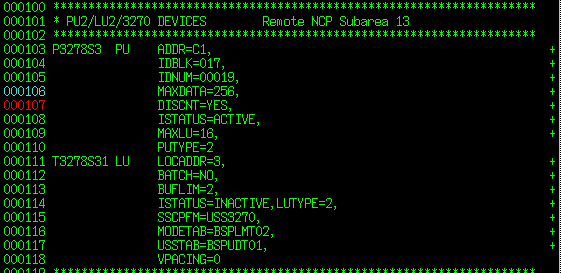
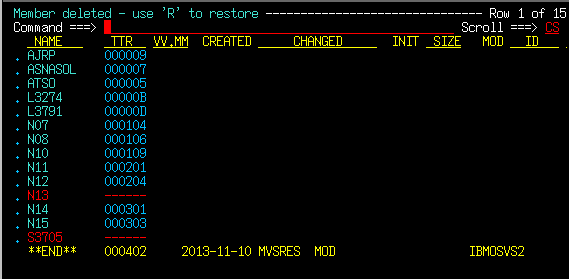
We need to edit the file S3705 on SYS1.VTAMLST
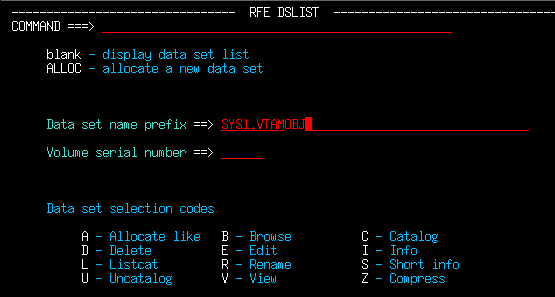
Basically it’s 1,3,4 from the main pannel:
or RFE, Utilities, DSLIST
Type in the Volume name, then tab over to the left of the volume and put in V to view
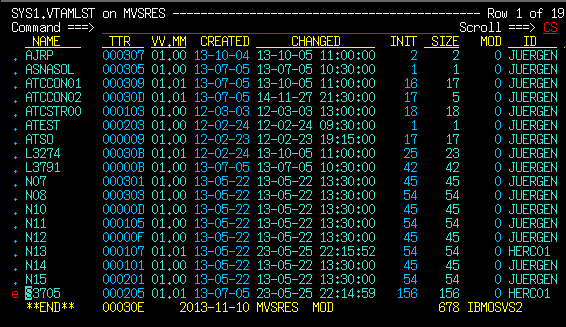
Now we will get a list of all the files. We want to edit S3705, so you can tab/arrow down, but sure to put an `E’ next to it, then hit enter so we can edit the file
F7/F8 will page down/page up as needed. As mentioned we are interested in Subarea 13, PU type 2.
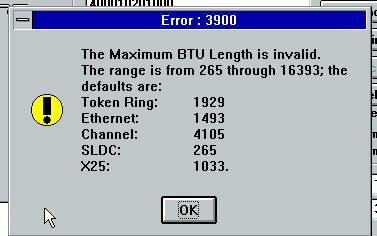
The line we are changing is the MAXDATA or MTU size for this unit. Since we are doing dlsw, or an emulated serial link, we need to knock it down to 256. Notice all the plus signs on the right hand? THOSE ARE IMPORTANT! Not only do they need to exist, but they also have to be on the far right.
For those wondering the MTU sizes on the client side by media type are as follows: And notice that the host size is different, as this takes in account of packet headers.
Making sure to overtype the 3780, to a 256, and ensuring the + sign hasn’t moved you can hit enter, cursor to the top and type in SAVE.
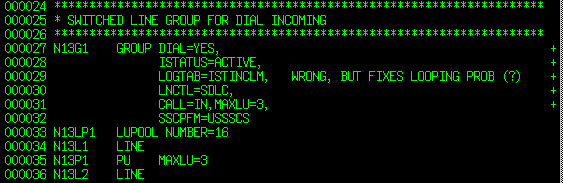
We can then edit the N13 file, changing line 35 to have MAXLU=3
Hopefully this clears up editing VTAM files.
As mentioned the easiest way to regen the system is to delete the old object files. So hit f3 a few times and get back to the dataset list
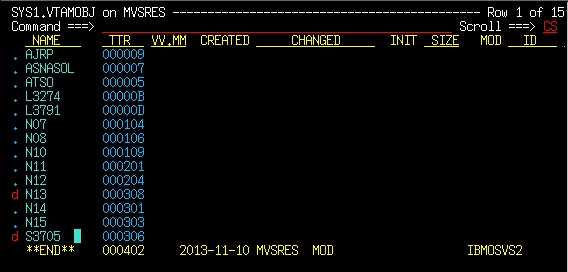
This time we want the VTAMOBJ set. Go and ‘V’iew it like last time and we will get the list of files:
Now we are going to put a ‘d’ next to N13 and S3705. This will flag them for deletion. Hit enter!
The files are now gone! On the next boot they will be rebuilt.
I just hit F3 a bunch of times and it’ll drop to some TSO shell
From here you can shutdown the system. It’ll take a few minutes, but you can start it up again just the same way you brought it up. Remember to attach your console.
Setting up SNA Server
Just like Dynamips, I setup a batch file, as the default one is just far too long to read:
@echo you need to figure out your nic name..
@echo something like
@echo \Device\NPF_{XXXXXXXX-XXXX-XXXX-XXXX-XXXXXXXXXXXX}
set loopback=\Device\NPF_{3DF0EC5D-7FBE-46DF-ACF8-EF5D8679A473}
set vmnet1=\Device\NPF_{3BC364F4-5A15-405D-926C-C594383F0323}
qemu -m 64 -L pc-bios ^
-hda SBS15.vmdk ^
-soundhw sb16,adlib ^
-net nic,model=pcnet,macaddr=52:24:00:22:00:01 ^
-net pcap,devicename=%loopback% ^
%1 %2 %3 %4 %5 %6
This will setup a small machine with 64MB of ram, a single AMD PCNet adapter on the loopback interface. I installed Windows NT 3.51 from the Small Business Server 1.5 setup. I don’t know why VMware + NT 3.51 didn’t get along, maybe it’s my Erying, Or maybe it just plain doesn’t work, I’m not sure, and far too impatient to troubleshoot it.
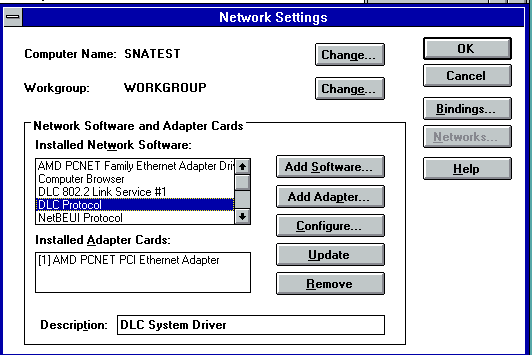
It’s very important that you do add the DLC Protocol during setup. It’s in the ‘Add Software’ part. I kept my NT very simple with only NetBEUI and DLC protocols. At the moment I’m not that interested in actually networking the NT, and if I was, I would add a second NIC, just like what I did for Dynamips.
Setting up NT isn’t that interesting, but SNA server is. I did use the 2.11 on the Back Office CD, but for completeness sake of testing I tried the oldest one I could find, and 2.1 beta from June, Build 2.1.0.216.
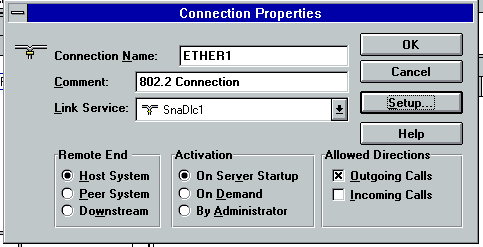
I left the network name & control point name blank as I just want terminal, I’m not even going to think that LU6.2 applications on such an ancient version of MVS was even possible.
This is pretty much default, the Link service basically sets itself up as we only have the one NIC.
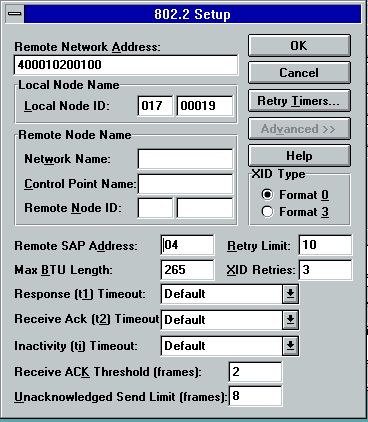
Take note of the remote network address. 400010200100 which came from above the address we directly point to the dlsw. Also it’s form the 9track blog.
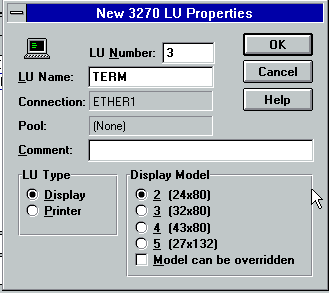
Insert a 3270 LU for us to try to talk to Hercules.
I’m pretty sure it was hard coded to be a model 2.
I turned off the ability for the model to be overwitten.
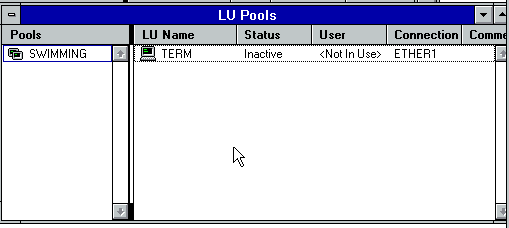
Create a pool, I called it swimming, because of ‘reasons’. I made it a type 2 pool and added the terminal to it.
Next I added the EVERYONE user, and gave them access to the SWIMMING pool
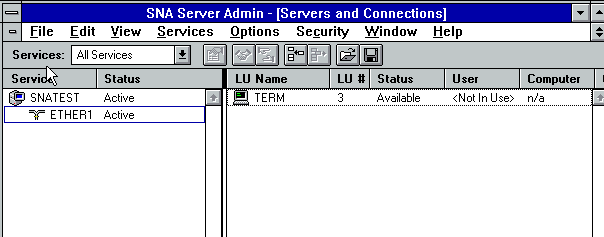
Finally we are ready to save the config, and do the hand holding and start up. If the stars aligned you will see them go ACTIVE/ACTIVE and the terminal will go Available.
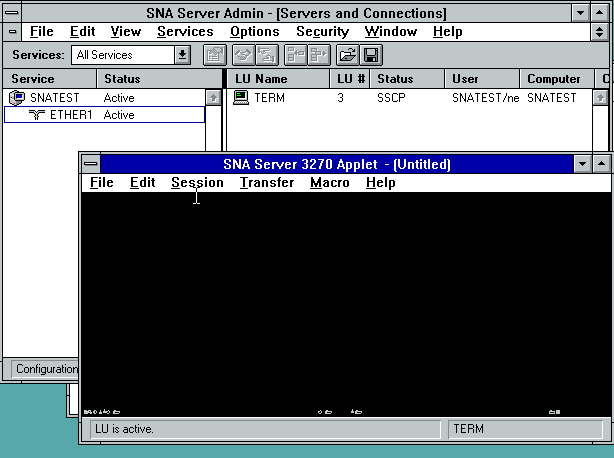
Sadly the terminal won’t go live, it’s stuck in SSCP.
And this is as far as I can go. I have to think that with either something far older protocol wise for the PC, such as IBM Personal Communications/3270 for Windows V2.0 (v4 didnt work either), or a far newer Mainframe software version would support whatever it is SNA server wants to give us the crazy dream of running SNA self contained.
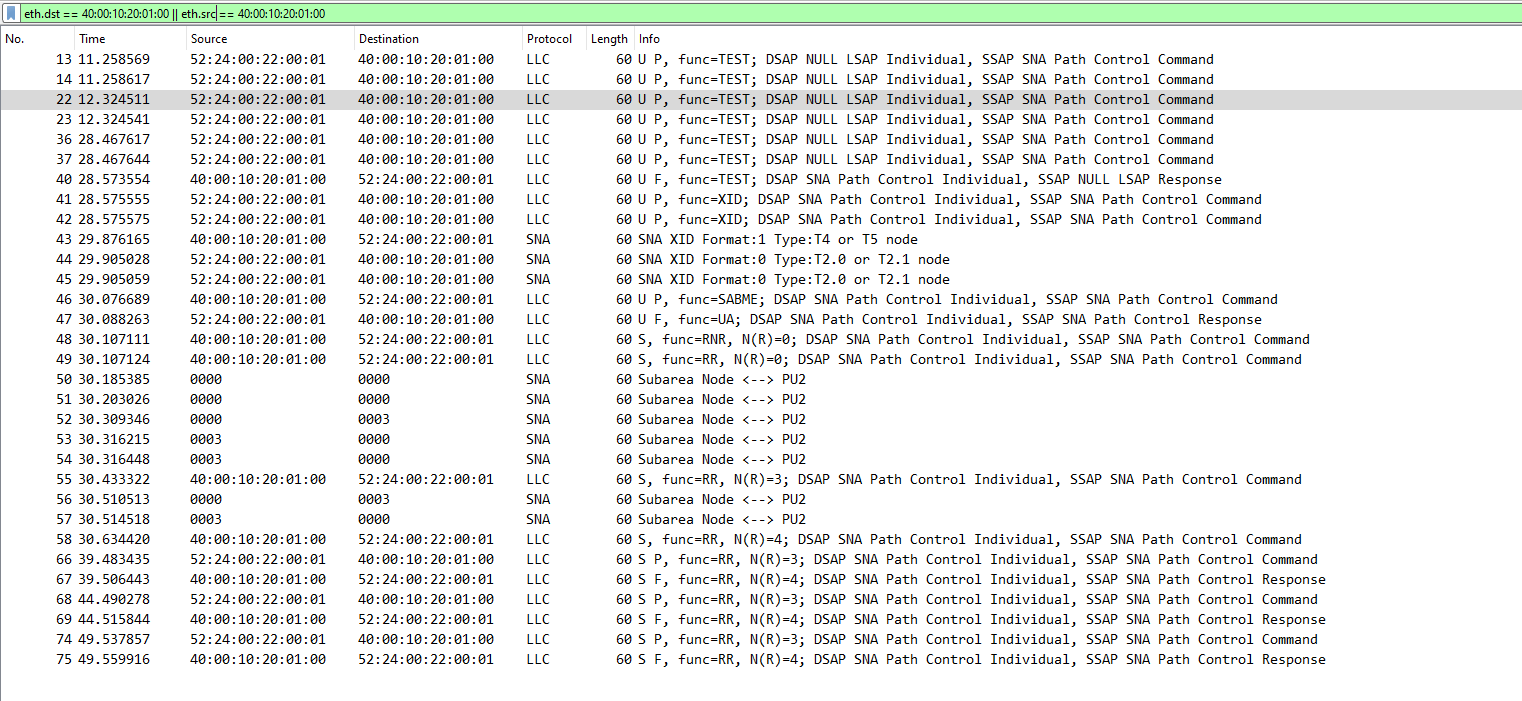
Running Wireshark on the loopback network I see this message:
UNSUPPORTED FUNCTION
Sadly this is as far as I can take you. I do want to give a special thanks to Vinatron & blackbit for trying to troubleshoot this with me. Best we can figure is that TK4- is just too old.
Troubleshooting
From the cisco router try dlsw commands like this:
dlsw>sho dlsw circuits
Index           local addr(lsap)    remote addr(dsap)  state          uptime
2281701660      4a24.0044.0080(04)  0200.9099.8000(04) CONNECTED      00:02:23
Total number of circuits connected: 1
This does show the connection. Notice that ‘show bridge’ will show nothing in this config.
Be sure to check peers as well:
dlsw>show dlsw peers
Peers:                state     pkts_rx   pkts_tx  type  drops ckts TCP   uptime
 TCP 192.168.199.1   CONNECT         10        13  conf      0    1   0 00:05:07
Total number of connected peers: 1
Total number of connections:     1
Make sure your interfaces are ‘up/up’ and passing traffic
FastEthernet0/0 is up, line protocol is up
  Hardware is DEC21140, address is ca00.48f4.0000 (bia ca00.48f4.0000)
  Internet address is 192.168.199.10/24
  MTU 1500 bytes, BW 100000 Kbit, DLY 100 usec,
     reliability 255/255, txload 1/255, rxload 1/255
  Encapsulation ARPA, loopback not set
  Keepalive set (10 sec)
  Half-duplex, 100Mb/s, 100BaseTX/FX
  ARP type: ARPA, ARP Timeout 04:00:00
  Last input 00:00:00, output 00:00:00, output hang never
  Last clearing of "show interface" counters never
  Input queue: 0/75/0/0 (size/max/drops/flushes); Total output drops: 0
  Queueing strategy: fifo
  Output queue: 0/40 (size/max)
  5 minute input rate 1000 bits/sec, 2 packets/sec
  5 minute output rate 2000 bits/sec, 2 packets/sec
     12768 packets input, 1439279 bytes
     Received 3609 broadcasts (0 IP multicast)
     0 runts, 0 giants, 0 throttles
     0 input errors, 0 CRC, 0 frame, 0 overrun, 0 ignored
     0 watchdog
     0 input packets with dribble condition detected
     9999 packets output, 1037736 bytes, 0 underruns
     0 output errors, 0 collisions, 1 interface resets
     0 babbles, 0 late collision, 0 deferred
     0 lost carrier, 0 no carrier
     0 output buffer failures, 0 output buffers swapped out
dlsw>show int eth1/0
Ethernet1/0 is up, line protocol is up
  Hardware is AmdP2, address is ca00.48f4.001c (bia ca00.48f4.001c)
  MTU 1500 bytes, BW 10000 Kbit, DLY 1000 usec,
     reliability 255/255, txload 1/255, rxload 1/255
  Encapsulation ARPA, loopback not set
  Keepalive set (10 sec)
  ARP type: ARPA, ARP Timeout 04:00:00
  Last input 00:00:02, output 00:00:02, output hang never
  Last clearing of "show interface" counters never
  Input queue: 0/75/0/0 (size/max/drops/flushes); Total output drops: 0
  Queueing strategy: fifo
  Output queue: 0/40 (size/max)
  5 minute input rate 0 bits/sec, 0 packets/sec
  5 minute output rate 0 bits/sec, 0 packets/sec
     52426 packets input, 5148287 bytes, 0 no buffer
     Received 12336 broadcasts (0 IP multicast)
     0 runts, 0 giants, 0 throttles
     0 input errors, 0 CRC, 0 frame, 0 overrun, 0 ignored
     0 input packets with dribble condition detected
     36383 packets output, 2465490 bytes, 0 underruns
     0 output errors, 0 collisions, 3 interface resets
     0 babbles, 0 late collision, 0 deferred
     0 lost carrier, 0 no carrier
     0 output buffer failures, 0 output buffers swapped out
dlsw>
And of course check WireShark to see if there is any handshake:
And of course check the Hercules logs to make sure your VTAM rebuilt, look for ERROR or anything related to S3705 or N13.
Yes, I know it’s kinda pointless as it’s horribly out of date, but I’m still having fun. Anyways now it’ll integrate with dynamips!
So yeah, in this example, instead of the usual “-net user” and the built in SLiRP stack, this uses UDP to talk to a stand-alone SLiRP stack. This will let you plug your Qemu into virtual Ethernet switches/hubs and interfaces of virtual routers. Even mixing and matching connections to different emulators that use UDP to exchange packets.
In this case I have a VMDK loaded with a NE2K-PCI driver, and QuakeWorld for MS-DOS. I also made the MPU401 external although it’s hanging on a secondary flag…
Continuing from my TACACS adventure, I also thought it would be nice to capture syslogs, and save them. Oddly enough this is a big business, with even low end products like Kiwi Syslog server costing some $295 USD!
Well that’s too much for me, so I figured that the most wide spread at the time must have been the 4.3BSD syslogd, so I’ll start with that.
Just as before this was a pretty straight forward port, I had to remove all the /dev/kmem and UNIX socket stuff, as they obviously don’t exist on Windows. Â Just as the same, you can’t “write to users” to send messages, so by default output is a file. Â I suppose I could use the net send functionality to pop up a message, but I find it just as annoying today as it was then.
At any rate in no time I was able to setup a simple config file, and then get my router to turn on full logging & enable full debugging to get a continuous stream of messages. Â The only ‘gotcha’ is that this sylogd wants to be able to do reverse lookups, so you really ought to have a DNS with reverse entries, or a good hosts file.
As you can see, running it in debug mode tells me what is going on. Â And the log.txt file contains a nicely formatted log file, just the way that it was done on BSD:
I’m sure it’s full of other bugs, but all I tested was that I could log to a file, and it’s doing that much just fine. Â If you feel so inclined you can download & compile it, the source is: syslogd_win32.c
So, in my fun and excitement I was putting together a ‘cisco’ network using dynamips that spans a few sites across the world. Â I’m using ancient copies of NT for some servers, although I plan on adding in some 386BSD, SunOS SPARC, and maybe even 68010 based, along with other stuff.
I have the routers running fine, but I felt like adding some kind of external authentication service, and TACACS certainly fits the bill! Â And to be all vintage as usual, I’m not going to use TACACS+ as it’s simply too new, and too big. Â So first things first, I need a copy of the source to TACACS as I’m certainly not going to write my own! Â I found this directory on ftp.funet.fi which has a bunch of old cisco related material, and sure enough there is a tacacsd.c
Even better it’s from 1989 which suits my need for something positively ancient, and simple enough to be a single C file.
/*
 * TACACS daemon suitable for using on Un*x systems.
 *
 * Janruary 1989, Greg Satz
 *
 * Copyright (c) 1989 by cisco Systems, Inc.
 * All rights reserved.
 */
Porting it to run on Winsock, really wasn’t all that hard, I had it running as a standalone program within a few minutes, however there is no password file in NT, so as a simple test, I had simply short circutied the username lookup to always suceeded, along with a password compare.
Since I have VMWare Player installed on my machine, I can use the VMNet 8 connection to talk to my host computer. Â The hard part of course is trying to figure out which NIC is which, but dynamips -e will give you a list like this:
Cisco Router Simulation Platform (version 0.2.16-experimental(merge uppc smips)Build-1-x86/MinGW stable)
Copyright (c) 2005-2011 Christophe Fillot.
Build date: Dec 15 2016 04:20:41

Pcap version [WinPcap version 4.1.3 (packet.dll version 4.1.0.2980), based on libpcap version 1.0 branch 1_0_rel0b (20091008)]
Network device list:

   \Device\NPF_{D3DF08C4-7A33-4FE2-9351-000153705A30} : VMware Virtual Ethernet Adapter
   \Device\NPF_{3FB194EF-F3A4-45F2-AFAB-A4ABA98E8FF7} : Qualcomm Atheros Ar81xx series PCI-E Ethernet Controller
   \Device\NPF_{C46B48B8-74E1-4938-9BFE-E407949A7940} : Microsoft
   \Device\NPF_{F72C65CD-C6BC-44FE-9019-C5057DB1D9AB} : VMware Virtual Ethernet Adapter
   \Device\NPF_{CE75B9C1-8189-4C8F-8EF6-6CEB0C6D0329} : Microsoft
   \Device\NPF_{737A8B62-9A87-4739-9CC2-BF05CDC315D0} : Microsoft
And with that information, we are good to go! Â Since I’m doing a simple test here, I don’t need anything other than a single ethernet to talk to my host, so here is a VERY simple cli to run dynamips:
Cisco Router Simulation Platform (version 0.2.16-experimental(merge uppc smips)Build-1-x86/MinGW stable)
Copyright (c) 2005-2011 Christophe Fillot.
Build date: Dec 15 2016 04:20:41

Pcap version [WinPcap version 4.1.3 (packet.dll version 4.1.0.2980), based on libpcap version 1.0 branch 1_0_rel0b (20091008)]
Idle PC set to 0x604f1da0.
IOS image file: ..\c7200-is-mz.19991126.bin

ILT: loaded table "mips64j" from cache.
ILT: loaded table "mips64e" from cache.
ILT: loaded table "ppc32j" from cache.
ILT: loaded table "ppc32e" from cache.
vtty_term_init
CPU0: carved JIT exec zone of 64 Mb into 2048 pages of 32 Kb.
C7200 instance 'default' (id 0):
  VM Status  : 0
  RAM size   : 256 Mb
  IOMEM size : 0 Mb
  NVRAM size : 128 Kb
  NPE model  : npe-200
  Midplane   : vxr
  IOS image  : ..\c7200-is-mz.19991126.bin

Loading ELF file '..\c7200-is-mz.19991126.bin'...
ELF entry point: 0x80008000

C7200 'default': starting simulation (CPU0 PC=0xffffffffbfc00000), JIT enabled.
mips64_test.s ROMMON emulation microcode.

mips64_test.s Launching IOS image at 0x80008000...
Self decompressing the image : ####()## [OK]

              Restricted Rights Legend

Use, duplication, or disclosure by the Government is
subject to restrictions as set forth in subparagraph
(c) of the Commercial Computer Software - Restricted
Rights clause at FAR sec. 52.227-19 and subparagraph
(c) (1) (ii) of the Rights in Technical Data and Computer
Software clause at DFARS sec. 252.227-7013.

           cisco Systems, Inc.
           170 West Tasman Drive
           San Jose, California 95134-1706


Cisco Internetwork Operating System Software
IOS (tm) 7200 Software (C7200-IS-M), Experimental Version 12.0(20000110:181554) [otroan-thanksgiving-rel 175]
Copyright (c) 1986-2000 by cisco Systems, Inc.
Compiled Thu 20-Jan-00 15:07 by otroan
Image text-base: 0x60008900, data-base: 0x613D0000

cisco 7206VXR (NPE200) processor with 253952K/8192K bytes of memory.
R5000 CPU at 200Mhz, Implementation 35, Rev 1.2
6 slot VXR midplane, Version 2.1

Last reset from power-on
Bridging software.
X.25 software, Version 3.0.0.
1 FastEthernet/IEEE 802.3 interface(s)
125K bytes of non-volatile configuration memory.
4096K bytes of packet SRAM memory.

65536K bytes of ATA PCMCIA card at slot 0 (Sector size 512 bytes).
8192K bytes of Flash internal SIMM (Sector size 256K).

         --- System Configuration Dialog ---

Would you like to enter the initial configuration dialog? [yes/no]: no


Press RETURN to get started!
Next I need to take note of how VMWare & Windows have configured my VMNet8 adapter, and configure the router accordingly:
So Im using 192.168.254.1/24 so let’s setup the router. Â Let’s give it a .10 for the heck of it. Â Also I’m going to turn off DNS name resolution for the moment.
00:00:02: %DEC21140-3-DUPLEX_SPEED: FastEthernet0/0 doesn't support the configured duplexand speed combination
00:00:02: %DEC21140-3-DUPLEX_SPEED: FastEthernet0/0 doesn't support the configured duplexand speed combination
00:00:02: %DEC21140-3-DUPLEX_SPEED: FastEthernet0/0 doesn't support the configured duplexand speed combination
00:00:32: %LINK-5-CHANGED: Interface FastEthernet0/0, changed state to administratively down
00:00:32: %SYS-5-RESTART: System restarted --
Cisco Internetwork Operating Sys
Router>
Router>tem Software
IOS (tm) 7200 Software (C7200-IS-M), Experimental Version 12.0(20000110:181554) [otroan-thanksgiving-rel 175]
Copyright (c) 1986-2000 by cisco Systems, Inc.
Compiled Thu 20-Jan-00 15:07 by otroan
00:00:33: %LINEPROTO-5-UPDOWN: Line protocol on Interface FastEthernet0/0, changed state to down
Router>ena
Router#config t
Enter configuration commands, one per line.  End with CNTL/Z.
Router(config)#int fa0/0
Router(config-if)#ip address 192.168.254.10 255.255.255.0
Router(config-if)#no shut
Router(config-if)#exit
Router(config)#ip route 0.0.0.0 0.0.0.0 192.168.254.1
00:01:29: %DEC21140-3-DUPLEX_SPEED: FastEthernet0/0 doesn't support the configured duplexand speed combination
00:01:31: %LINK-3-UPDOWN: Interface FastEthernet0/0, changed state to up
00:01:32: %LINEPROTO-5-UPDOWN: Line protocol on Interface FastEthernet0/0, changed state to up
Router(config)#no ip domain-lookup
Router(config)#exit
Router#wr
Building configuration...
[OK]
Router#
00:01:39: %SYS-5-CONFIG_I: Configured from console by console
And if everything is going well, I can now ping from Windows!
Microsoft Windows [Version 10.0.14393]
(c) 2016 Microsoft Corporation. All rights reserved.

C:\Users\neozeed>ping 192.168.254.10

Pinging 192.168.254.10 with 32 bytes of data:
Reply from 192.168.254.10: bytes=32 time=54ms TTL=255
Reply from 192.168.254.10: bytes=32 time=31ms TTL=255
Reply from 192.168.254.10: bytes=32 time=31ms TTL=255
Reply from 192.168.254.10: bytes=32 time=31ms TTL=255

Ping statistics for 192.168.254.10:
    Packets: Sent = 4, Received = 4, Lost = 0 (0% loss),
Approximate round trip times in milli-seconds:
    Minimum = 31ms, Maximum = 54ms, Average = 36ms

C:\Users\neozeed>
Awesome! Â Pinging from the cisco however fails.
Router#ping 192.168.254.1

Type escape sequence to abort.
Sending 5, 100-byte ICMP Echos to 192.168.254.1, timeout is 2 seconds:
.....
Success rate is 0 percent (0/5)
This fails as Windows by default has it’s firewall on, which then blocks all incoming traffic. However to see that the ICMP would have succeded, you can look at the arp table, and the .1 address should have been learned:
Router#show arp
Protocol  Address          Age (min)  Hardware Addr   Type   Interface
Internet  192.168.254.1           0   0050.56c0.0008  ARPA   FastEthernet0/0
Internet  192.168.254.10          -   ca00.3730.0000  ARPA   FastEthernet0/0
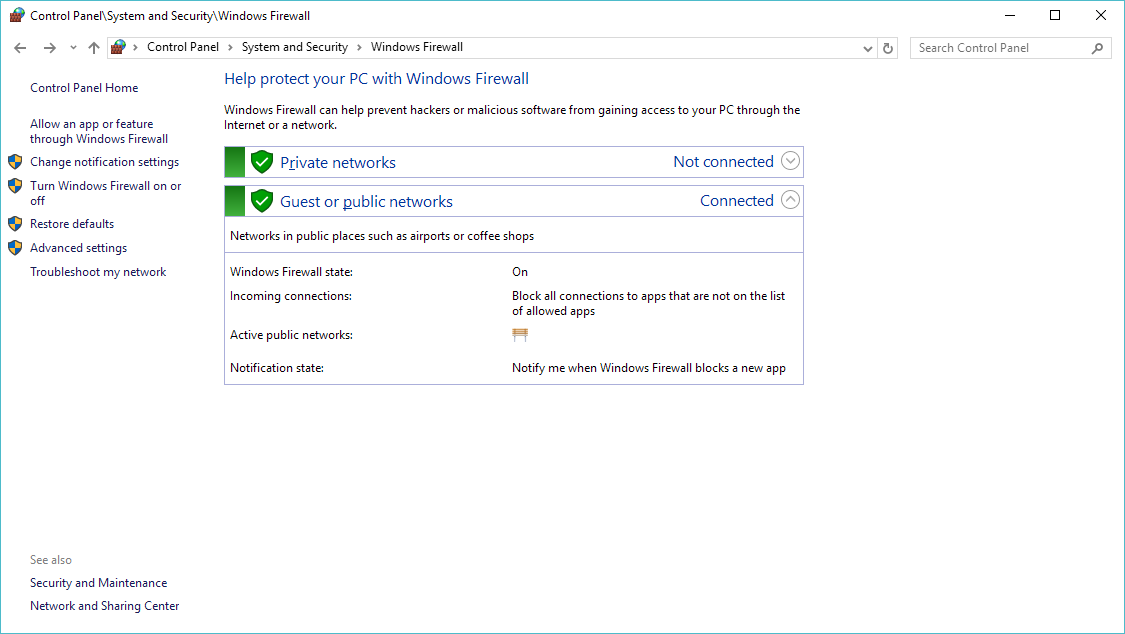
We can either diable the firewall, or we can add a rule to permit ICMP. To do either you need to go to the firewall control panel in Windows. Â In this quick example, I’m going to build a rule using the firewall control pannel.
So hit the advanced settings to the left.
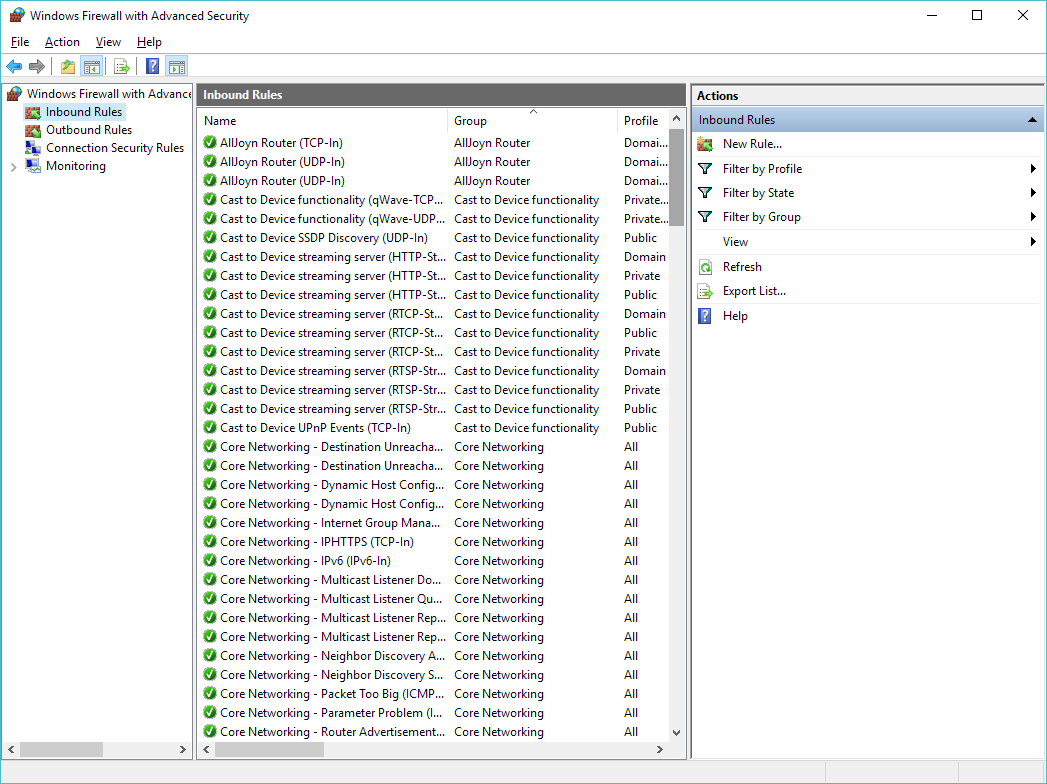
Click on the ‘Inbound Rules’, and now we are going to create a new rule.
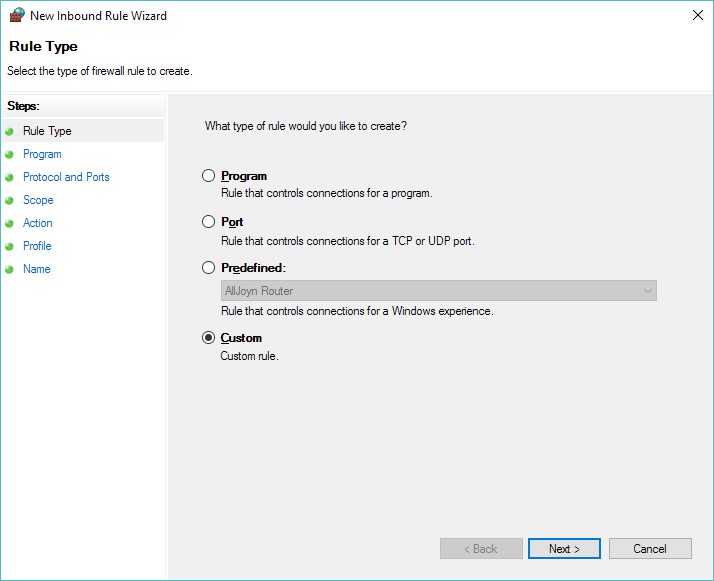
Select a Custom Rule
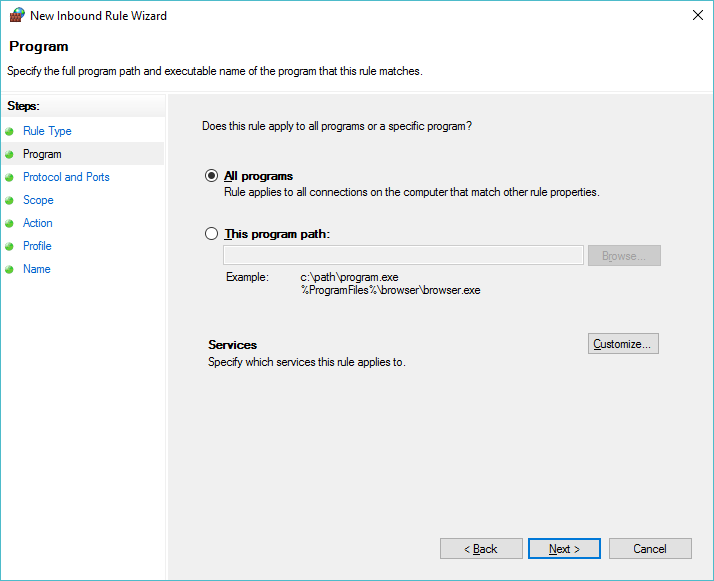
Allow ‘All Programs’
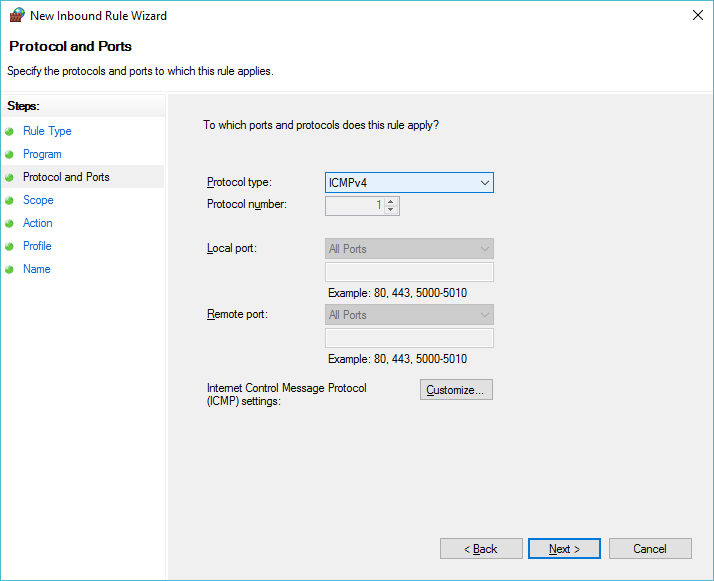
Then set the protocol to ICMPv4
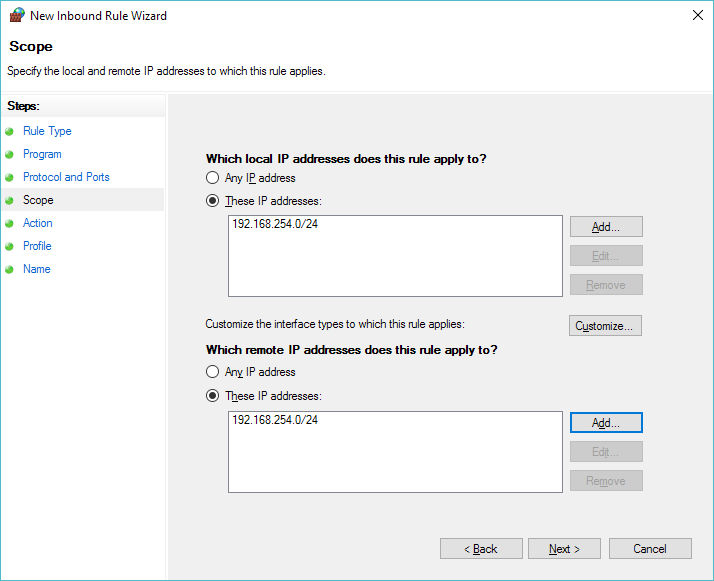
Now we can select the scope of the rule, in this case we are going to allow the 192.168.254.0/24 network to pass icmp traffic to us. Â Add it as a source and destination.
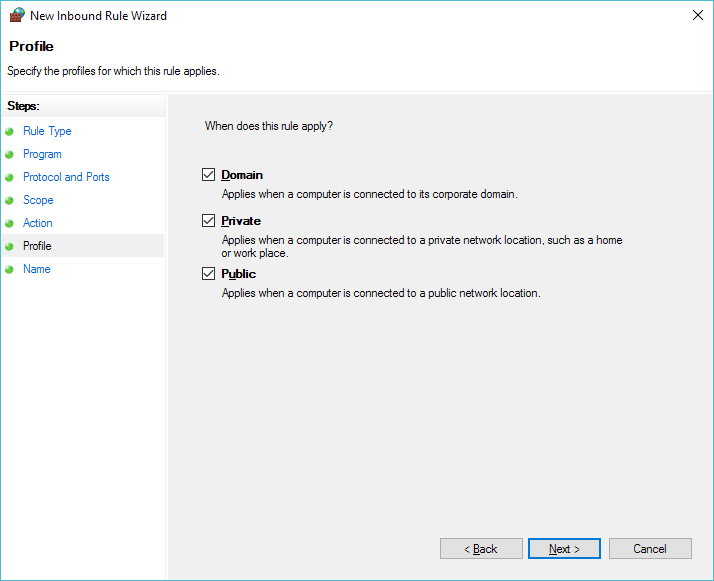
In this quick example I’m applying it everywhere.  I suppose a better  setup would be to make sure the VMNet 8 adapter is a ‘Private’ network, and ONLY apply this to the Private domain.
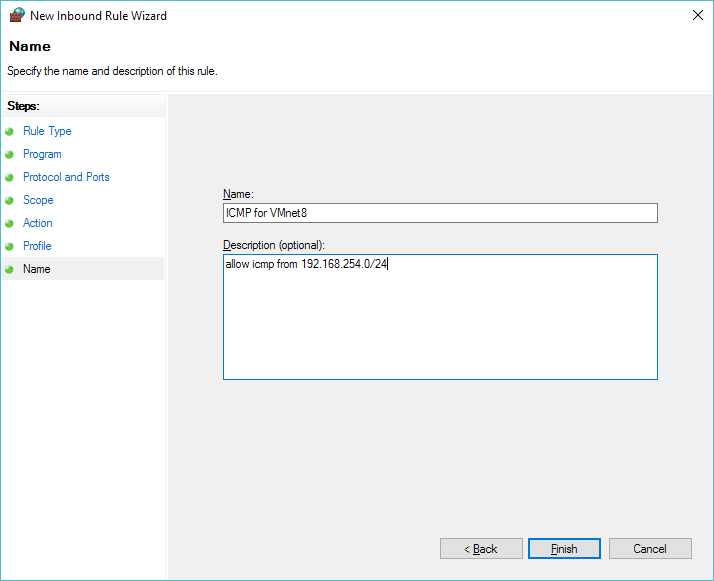
Then give it a name, something like ‘ICMP for VMnet8’
Router#ping 192.168.254.1

Type escape sequence to abort.
Sending 5, 100-byte ICMP Echos to 192.168.254.1, timeout is 2 seconds:
!!!!!
Success rate is 100 percent (5/5), round-trip min/avg/max = 20/30/36 ms
And now we can ping!
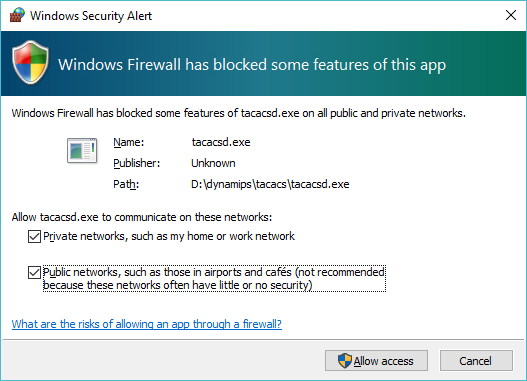
Now for the fun, I go ahead and compile my hacked up tacacsd.c, and run it, and then permit it to run on all networks:
And now I can configure the router to use TACACS. Â Keep in mind, once gain that this is *NOT* TACACS+ so this is done a little differently. Â I’m going to simply set TACACS for telnet connections.
Router#config t
Enter configuration commands, one per line.  End with CNTL/Z.
Router(config)#tacacs-server host 192.168.254.1
Router(config)#line vty 0 4
Router(config-line)#login tacacs
Router(config-line)#exit
Router(config)#enable password 0 cisco
Router(config)#exit
Router#wr
Building configuration...
[OK]
Router#
00:01:28: %SYS-5-CONFIG_I: Configured from console by console
And now I’m ready to test!
User Access Verification

Username: user
Password:
Router>who
    Line       User       Host(s)              Idle       Location
   0 con 0                idle                 00:01:11
*  2 vty 0     user       idle                 00:00:00 192.168.254.1

  Interface  User      Mode                     Idle Peer Address

Router>
As you can see I logged in as ‘user’ … and keep in mind my TACACS simply permits anything. As for what tacacsd runs by default:
D:\dynamips\tacacs>tacacsd.exe
server starting
using port 12544
validation request from 192.168.254.10
query for user (pw->pw_gecos) accepted
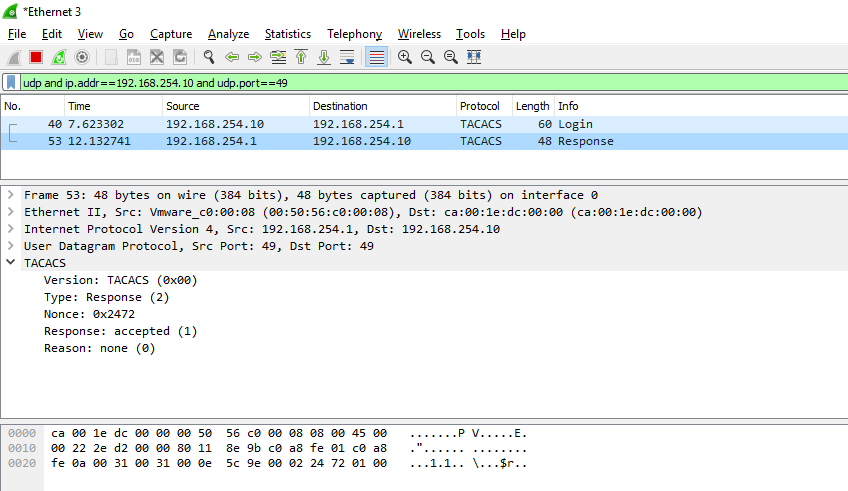
It’s not exciting, but as you can see it is attempting to look through the gecos to verify the user, but in this case I just allow anything.  And besides just granting anyone the ability to login, let’s take a look on the wire:
WireShark capture of TACACS traffic
As you can see the username & password go over the wire in plain text. Â Even the response is simple enough to decode:
Access granted!
Needless to say this is something that you would NEVER EVER EVER run in a real network.  Of course a system that sits on telnet is vulnerable anyways, but I suppose a TACACS server that lets anyone log in, makes either a VERY trusting network, or a good honeypot.  Against my better judgement, here is tacacsd_win32.c Naturally it could be easily made to verify passwords against pretty much anything.
Since there has been an update over on the github project, I thought this was a good time to take my existing port, and basically dump it, and make it integrate a lot better. Â So this time I did a lot of #ifdef’ing and the code should still compile on UNIX like systems.
I need to go through all the reboot/reload scenarios an try to either find out why it crashes, or just comment out dangerous paths.
So yes there is a good chance on a reload it’ll crash right now.
I also had issues with the new vty code, so I’m still using the old file from an ancient version of dynamips that I seem to have massaged well enough to behave for a primative console at the command prompt.
I put it on Sourceforge, because I’m rebellious like that.
Now what were the obstacles? Â Well for starters not having a full libc certainly hurts things. Â Things like a malloc. Â And without getting fancy with the memory map I did the lamest cheat ever, which is a 1MB static array I just handed out with a fake malloc (no free, I didn’t bother to track chunks), and you know it works enough.
Also I need to read files, and I need to look more into the hardware to see how to do that. Â There seems to be plenty of hooks for NVRAM, but the ROMMON substitute doesn’t seem to support them. Â Also there is no ROMMON hook for reading from the console! Â The MIPS cilo is more ROMMON dependent, while the PowerPC c1700 talks to the uart directly so this is a PowerPC thing for right now.
I also learned something exciting about ld, which is how it can absorb binary images into objects, that you can link and access directly into your program! Â No more having to convert it to hex, make these insane headders that CPP may or may not bomb over. Â No you can make them objects right away!
In this example I read the file planetfa.dat as BINARY, and encapsulate it in an object file called planetfa.o . It’ll now have a symbol name of _binary_planetfa_dat_start for where the image begins, _binary_planetfa_dat_size will tell me how big it is in memory, and _binary_planetfa_dat_end will mark the end of this ‘file’ in memory.
Now in the old days when it was a file I could access it like this:
But that won’t work. Â So now instead of calling fopen/fclose (which don’t exist in CILO), I set a counter to what my current offset is, change the ‘fseek’ to just set the global counter to where it should be, and when I fread I just memcpy:
Pcap version [WinPcap version 4.1.3 (packet.dll version 4.1.0.2980), based on libpcap version 1.0 branch 1_0_rel0b (20091008)]
Unsure if this file (c1700_i0_rommon_vars) needs to be in binary mode
Virtual RAM size set to 4 MB.
IOS image file: ciscoload.bin
ILT: loaded table “mips64j” from cache.
ILT: loaded table “mips64e” from cache.
ILT: loaded table “ppc32j” from cache.
ILT: loaded table “ppc32e” from cache.
vtty_term_init
CPU0: carved JIT exec zone of 64 Mb into 2048 pages of 32 Kb.
C1700 instance ‘default’ (id 0):
VM Status : 0
RAM size : 4 Mb
NVRAM size : 32 Kb
IOS image : ciscoload.bin
Launching IOS image at 0x8000d9c8…
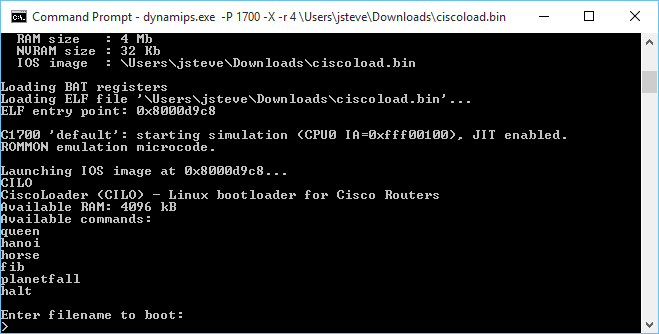
CILO
CiscoLoader (CILO) – Linux bootloader for Cisco Routers
Available RAM: 4096 kB
Available commands:
queen
hanoi
horse
fib
planetfall
halt
Enter filename to boot:
malloc 64512 offset is 0 offset is now 64522
malloc 38912 offset is 64522 offset is now 103444
PLANETFALL
Infocom interactive fiction – a science fiction story
Copyright (c) 1983 by Infocom, Inc. All rights reserved.
PLANETFALL is a trademark of Infocom, Inc.
Release 37 / Serial number 851003
Another routine day of drudgery aboard the Stellar Patrol Ship Feinstein. This
morning’s assignment for a certain lowly Ensign Seventh Class: scrubbing the
filthy metal deck at the port end of Level Nine. With your Patrol-issue
self-contained multi-purpose all-weather scrub brush you shine the floor with a
diligence born of the knowledge that at any moment dreaded Ensign First Class
Blather, the bane of your shipboard existence, could appear.
Deck Nine
This is a featureless corridor similar to every other corridor on the ship. It
curves away to starboard, and a gangway leads up. To port is the entrance to
one of the ship’s primary escape pods. The pod bulkhead is closed.
Deck Nine Score: 0/4451
PLANETFALL
Infocom interactive fiction – a science fiction story
Copyright (c) 1983 by Infocom, Inc. All rights reserved.
PLANETFALL is a trademark of Infocom, Inc.
Release 37 / Serial number 851003
While I don’t want to write an OS for this, it is almost tempting. Â Or go the other route, and add in some non router based hardware… Like audio hardware, or a framebuffer.
Does anyone have a 1700 to test to see if any of this works? Â Or a 7200?! 😀
Launching IOS image at 0x8000cba0…
CIL
Error: Unable to find any valid flash! Aborting load.
Awesome!
Building this was a lot more fun. I thought I could sidestep building a Linux to PowerPC ELF cross compiler, but as it turns out, to bootstrap libgcc, you really need a compiler that can do this. But with the steps basically down, it was trivial to whip up.
Although I did keep on hitting this error with the Win32 tools that “-mstrict-align” is not supported, while trying to build the startup and libgcc sources using the MinGW targeted compiler through wine. But once I had a native Linux to PowerPC toolchain in place, not only could I build the Windows based compiler, but I can also use the flag -mstrict-align on Windows without it complaining. So lesson learned, have a cross compiler built to the final target to make life easier when building a Canadian cross.
As always, building the binutils package was a snap, just run:
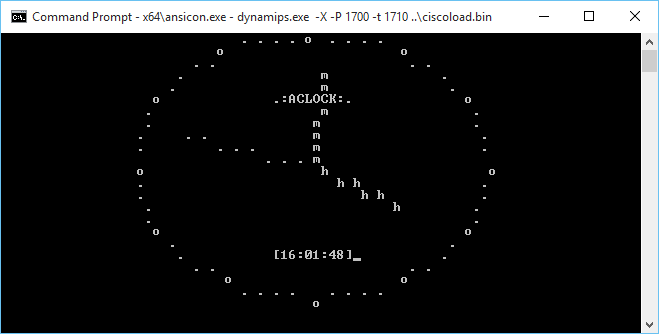
As a minor addendum, The 1700 can run stuff that is far more complicated than the MIPS. I’m not sure why I get so many TLB violations for doing something more complicated but I (poorly) ported aclock to run on the cisco 1700!
Aclock on the cisco 1700 via Dynamips
The Dynamips ROMMON emulator doesn’t provide the keyboard input function call so it can’t read from the keyboard. Also it can’t read the clock, so I have it running 250,000 dhrystones between clock ticks. Although I think that is far too many, maybe 125,000 would be more like it but it runs on the PowerPC. While on the MIPS I get nothing but this:
*** TLB (Load/Fetch) Exception ***
PC = 0x80008964, Cause = 0x00008008, Status Reg = 0x00408103
Oh well. Maybe it’s a stack problem I guess I’ll have to break down and do a memory map and write a malloc if I want to go down this road. Although back in 1999 this would be incredible but today I don’t think anyone would run anything but IOS on their cisco hardware.
I’ve tried to build a cross compiler on MinGW32 before, and despite there being obvious steps on how to do it, I’ve never gotten it to work. Now I’ve built cross compilers before so it’s not like I don’t have any clue on what I’m doing, but the problem is that Windows isn’t UNIX, and I don’t want to use Cygwin.
So that enters another fun possibility known as the Canadian Cross, which is using a machine in the middle to build a compiler. As we all know, Linux is great for building and running GNU software, so a Linux machine to build my cross compiler would be the best. Now the whole point of this is that I wanted to build a MIPS program to run on Dynamips. And through a LOT of googling, I managed to find this program called CILO the cisco Linux loader. Now as far as I can tell the people trying to port Linux the the MIPS based cisco routers (3600 and 7200) never succeed, but they did manage to leave this bootloader behind. And compiling it was very tricky as they gave no hints on what to use. So with a lot of trial and error I found that binutils 2.18 is the minimal version that will work as the code depends on being able to do register aliasing which isn’t present in previous versions. Also according to this, they were using gcc 4.1.2 in their Linux port. So with some luck I did mange to get CILO to build with a cross compiler on Linux. Which was pretty awesome to see Dynamips run a C program!
But that doesn’t help me on the Windows side.
Now the first thing that I’d normally do is install the default MinGW cross tools, but because I need ancient binutils and GCC support as newer versions not only won’t work for what I want, but won’t build older versions I tried to keep things in step. This meant on Linux I first had to build a Linux to Windows cross compiler using binutils version 2.25.1 and GCC version 4.1.2 . Configuring and building binutils was a snap with:
I thought I could just use a new mingwrt and w32api but that proved disastrous as the newer libs gave me this fun error on trying to link a Win32 execuatable:
undefined reference to `___chkstk_ms’
And googling that around the consensus is that your binutils, and gcc is too old, and upgrade, granpa! But I want old software so I naturally have to just use older versions, and for gcc 4.1.2 I wanted:
mingwrt-3.18-mingw32-dev.tar.gz
w32api-3.15-1.mingw32-dev.tar.lzma
Now I could build and link and test my Linux to Windows toolchain!
Now for the crazy part.
First I need a binutils, so I configured binutils 2.18 like this:
The fun part of course is that during the build, gcc will want to run the cross compiler and dump it’s host machine bit types by running ‘xgcc -dumpspecs’. Well thankfully via wine, Linux can run Win32 execuatables so I saved myself a few minutes by not having to copy over the partial compiler, and run the command, and transfer the results back.
So with a bit more hand holding on the build I finally got it to finish compiling by linking /bin/true to fix-headers . What a mission. Now I excitedly transfered my build to my Windows host, and setup some environment variables and built the hello world cisco application, and, it worked! (well crashes the same way as the pre-built one, but it does say:
Launching IOS image at 0x80008000…
Hello World!
Image returned to ROM.
Reset in progress…
Which is pretty cool!
I tried to merge in a make utility but that turned out to be kind of screwed up, so I just copied the cross steps from Linux, and now I can build cilo on Windows!
Launching IOS image at 0x8000d2e4…
CIL
Error: Unable to find any valid flash! Aborting load.
Image returned to ROM.
Reset in progress…
It may not look like much, but It is running the program! Dynamips is missing a bunch of hardware, like flash. Or I found out the ability to read from the console using the promlib. But it can print to it at least.
So for those who want to give it a try, here is my MIPS-ELF tool-chain for Win32, that includes the cisco loader!
So over in my work on porting Dynamips to MinGW, I’ve created a version of SLiRP that sends and receives data over UDP. Â In retrospect, something I should have done a long time ago, as it makes troubleshooting it easier as now if it were to crash it’s a stand alone program, so it won’t crash the emulator.
The good news is that I’ve been able to copy files into the virtual router using HTTP. Â I’ve even been able to access my OS/2 machine over FTP and load a file!
In addition, a 7200 with idle performs MUCH better than a 1700 without idle. Â There is something up with ptask, and only dispatching packets every so often. Â I’m guessing it’s done that way for a reason.
Also one other cool IOS trick I learned today is that you can redirect to a file resource! Say you want that ‘show tech-support’ as a file on the disk? No problem!
show tech-support | redirect disk0:tech.txt
And of course the newer versions of IOS have a ‘do’ command that you can run from config mode to execute user commands.
R1(config)#do who
Line User Host(s) Idle Location
* 0 con 0 idle 00:00:00
2 vty 0 idle 15:24:11 10.0.2.2
3 vty 1 idle 14:59:56 10.0.2.2
4 vty 2 idle 13:43:44 10.0.2.2
5 vty 3 idle 11:23:44 10.0.2.2
This will listen on port 20001, and send traffic to 127.0.0.1 on port 20000. Â Easy right?
Manually interfacing from the hypervisor can be the ‘fun’ part. Â I haven’t tested with any of the tools, as I don’t know if they will let you leave something ‘listening’ that isn’t connected. For my tests I end up building something with their UI, then loading up my hypervisor that logs, and seeing what it is actually doing so I can inject stuff like this:
This creates a udp nio, and attaches it onto the virtual etherswitch S1, and puts it on VLAN 1. Â As you can see it listens on UDP port 20000, which is where slirp_rdr is setup to send it’s data to, and it’ll send to 20001 where slirp_rdr is listening.
I’ve hard coded port 42323 to telnet into 10.0.2.15. Â As always SLiRP is hard coded to have the following ip address schema:
Gateway 10.0.2.2
DNS 10.0.2.3
Netmask 255.255.255.0
Be sure to set your router to 10.0.2.15/24 for this to work, and add 10.0.2.2 as your default gateway.
The ONLY address that will respond to ping is 10.0.2.2 . Â This is just the way SLiRP is. Â HTTP and TCP based stuff works best, things like PPTP will not. Â It’s really hit and miss, but the cool thing is that it doesn’t require any device drivers, it’s all user mode code!