How not to write a web scraping engine

Seriously, the sad thing is that they wasted all their time, and bandwidth. The good thing is that PHP7 is far better at this, than PHP5. I know it’s not hipster neaveaux but PHP7 is really awesome stuff.

I didn’t wake up to a million messages about being down, rather a look at what was going on showed me this:

Obviously something is up.

I checked Cloudflare:

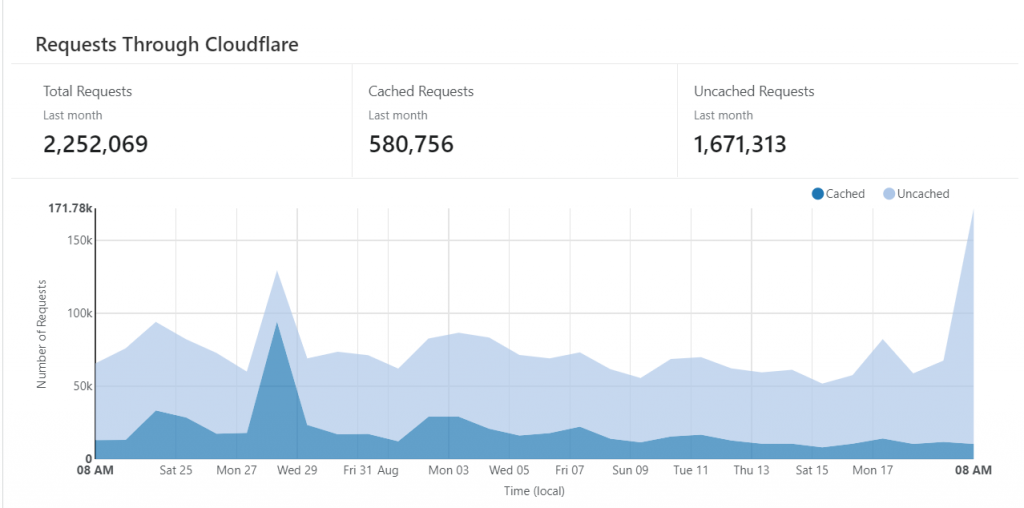
All those hits, and no change in user traffic. So I’m not popular.

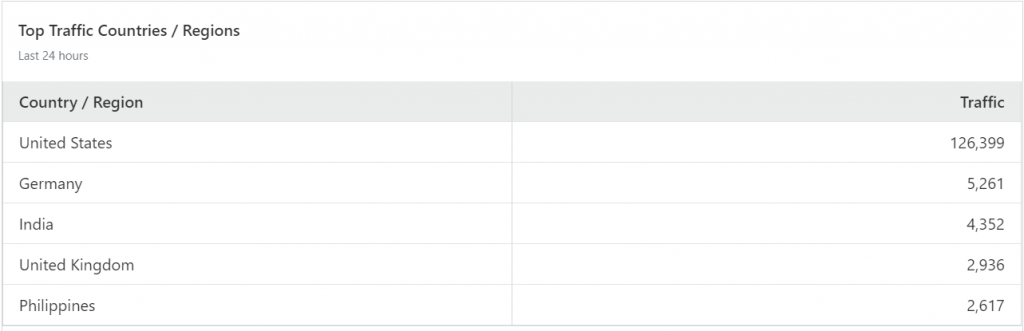
And it’s all from the United States. Going back to WordPress I can see it’s mostly from one user!

A look through the 30MB log, and it’s a broken site scrape

174.127.114.00 - - [20/Aug/2020:20:43:39 -0400] "GET /wordpress/category/windows-nt-4-0/%5C'https://virtuallyfun.com/wordpress/2020/03/17/philip-pembertons-3b1-emulator-moved/%5C' HTTP/1.1" 301 - "https://virtuallyfun.com/wordpress/category/windows-nt-4-0/" "Mozilla/5.0 (Windows NT 10.0; Win64; x64) AppleWebKit/537.36 (KHTML, like Gecko) Chrome/68.0.3440.106 Safari/537.36"
174.127.114.00 - - [20/Aug/2020:20:43:40 -0400] "GET /wordpress/category/windows-nt-4-0/%5Chttps:/virtuallyfun.com/wordpress/2020/03/17/philip-pembertons-3b1-emulator-moved/%5C HTTP/1.1" 404 32750 "https://virtuallyfun.com/wordpress/category/windows-nt-4-0/" "Mozilla/5.0 (Windows NT 10.0; Win64; x64) AppleWebKit/537.36 (KHTML, like Gecko) Chrome/68.0.3440.106 Safari/537.36"
174.127.114.00 - - [20/Aug/2020:20:43:40 -0400] "GET /wordpress/category/windows-nt-4-0/%5C'https://virtuallyfun.com/wordpress/2020/03/12/the-price-of-commodore-64s-is-getting-out-of-control/%5C' HTTP/1.1" 301 - "https://virtuallyfun.com/wordpress/category/windows-nt-4-0/" "Mozilla/5.0 (Windows NT 10.0; Win64; x64) AppleWebKit/537.36 (KHTML, like Gecko) Chrome/68.0.3440.106 Safari/537.36"
174.127.114.00 - - [20/Aug/2020:20:43:41 -0400] "GET /wordpress/category/windows-nt-4-0/%5Chttps:/virtuallyfun.com/wordpress/2020/03/12/the-price-of-commodore-64s-is-getting-out-of-control/%5C HTTP/1.1" 404 32752 "https://virtuallyfun.com/wordpress/category/windows-nt-4-0/" "Mozilla/5.0 (Windows NT 10.0; Win64; x64) AppleWebKit/537.36 (KHTML, like Gecko) Chrome/68.0.3440.106 Safari/537.36"
174.127.114.00 - - [20/Aug/2020:20:43:41 -0400] "GET /wordpress/category/windows-nt-4-0/%5C'https://virtuallyfun.com/wordpress/2020/03/08/thanks-to-lgr-i-just-found-out-about-simcity-for-palm-pilots-was-a-thing/%5C' HTTP/1.1" 301 - "https://virtuallyfun.com/wordpress/category/windows-nt-4-0/" "Mozilla/5.0 (Windows NT 10.0; Win64; x64) AppleWebKit/537.36 (KHTML, like Gecko) Chrome/68.0.3440.106 Safari/537.36"
174.127.114.00 - - [20/Aug/2020:20:43:42 -0400] "GET /wordpress/category/windows-nt-4-0/%5Chttps:/virtuallyfun.com/wordpress/2020/03/08/thanks-to-lgr-i-just-found-out-about-simcity-for-palm-pilots-was-a-thing/%5C HTTP/1.1" 404 32751 "https://virtuallyfun.com/wordpress/category/windows-nt-4-0/" "Mozilla/5.0 (Windows NT 10.0; Win64; x64) AppleWebKit/537.36 (KHTML, like Gecko) Chrome/68.0.3440.106 Safari/537.36"

This is just terrible you are quoting the link to the link, having slashes going every which way. What the heck!? Don’t be a jerk, pace the thing, why are you trying to DOS it? While my hosting is clearly not robust, why can’t you wait a few seconds between each query? Also look at the output and URL’s it’s sending it’ll never work!

Oh and speaking of WTF:

[Sat Aug 15 02:54:16.376342 2020] [:error] [pid 2176618:tid 46981722752768] [client 5.188.84.35:0] [client 5.188.84.35] ModSecurity: Access denied with code 403 (phase 2). Match of "rbl nxdomain.v2.rbl.imunify.com." against "TX:rbl_ip" required. [file "/etc/apache2/conf.d/modsec_vendor_configs/imunify360-full-apache/001_i360_1_generic.conf"] [line "18"] [id "77140164"] [msg "Infectors: PHP Injection Low value||MVN:TX:rbl_ip||T:APACHE||MV:02-54.5.188.84.35||PC:74973||SC:/home/virtuall/public_html/wp-comments-post.php"] [severity "WARNING"] [maturity "1"] [accuracy "7"] [tag "service_o"] [tag "service_i360"] [hostname "virtuallyfun.com"] [uri "/wp-comments-post.php"] [unique_id "XzeGmAmHABK5lhefvTgiWQAAAQI"], referer: https://virtuallyfun.com/wordpress/2019/07/25/c-beams-glitter-in-the-dark-near-the-tannhauser-gate/#comment-217724/<br>
[Sat Aug 15 00:59:09.378579 2020] [:error] [pid 2121712:tid 46981729056512] [client 5.188.84.25:0] [client 5.188.84.25] ModSecurity: Access denied with code 403 (phase 2). Match of "rbl nxdomain.v2.rbl.imunify.com." against "TX:rbl_ip" required. [file "/etc/apache2/conf.d/modsec_vendor_configs/imunify360-full-apache/001_i360_1_generic.conf"] [line "18"] [id "77140164"] [msg "Infectors: PHP Injection Low value||MVN:TX:rbl_ip||T:APACHE||MV:00-59.5.188.84.25||PC:71624||SC:/home/virtuall/public_html/wp-comments-post.php"] [severity "WARNING"] [maturity "1"] [accuracy "7"] [tag "service_o"] [tag "service_i360"] [hostname "virtuallyfun.com"] [uri "/wp-comments-post.php"] [unique_id "XzdrnVSmjfAxcRCyCxt4rAAAAIU"], referer: https://virtuallyfun.com/wordpress/2019/07/25/c-beams-glitter-in-the-dark-near-the-tannhauser-gate/#comment-217724/

There is no comment on that page. There never was. Look I know it sucks he’s dead, but there is nothing you or me can do about it.

Reviving 20 year old web forum software

(This is a guest post by xorhash.)

What makes you nostalgic? I don’t know about you, but for me, it’s definitely early 2000s web forums. Names like vBulletin, UltimateBB, phpBB, YaBB, IkonBoard, … bring a smile to my face. Thus, I figured it would be time to revisit the oldest vBulletin I could get my hands on. As it turns out, vBulletin used to offer “vBulletin Lite” back in the year 2000, which is a version of vBulletin 1.x stripped down so much, it almost stops being vBulletin.

Because they hid it behind a form, the web archive didn’t quite catch it, but I managed to find a different copy online, which seems pristine enough at least: vbulletinlite101.zip

So that’s just a bunch of code. I could just get a period-appropriate Red Hat 9 installation going, but that’d be boring. How much work could it possibly be to get this to run? In hindsight: just about six hours. Please allow me to say that the code is of rather questionable quality. Do not expose this to the Internet. Without even trying, I found at least two SQL injections. Every SQL injection immediately leads to code execution under PHP as well since the templates are interpreted using eval(). And so I set out on my quest to port this to a modern OS.

SoftwareOriginal RequirementMy Version
Operating System“different flavours of UNIX, as well as Windows NT/98”Ubuntu 19.04
InterpreterPHP 3.0.9PHP 7.2.19
DatabaseMySQL 3.22MariaDB 10.3.13

The details of this are rather boring, so allow me to point out some highlights and discoveries made while digging through the code:

  • 50 reply limit: Threads were limited to 50 replies. There was no pagination. Any replies beyond that would just replace the most recent post. I’m not sure if this was an attempt at preventing server and client load from excessively large pages or an attempt to “encourage” people to actually buy vBulletin.
  • No accounts: Unlike vBulletin 1.x, there were no accounts. All posts would just have a username field and an optional field for an e-mail address; even if provided, the e-mail address does not get verified.
  • No thread/post management: There’s no way to conveniently delete threads or posts, leaving the forums completely defenseless against spam. I suspect this was by design, so that nobody would stick with vBulletin Lite.
  • Icon plagiarism: The icons for the “search” and “home” buttons are actually taken from Internet Explorer 4. For comparison, here are the buttons in Internet Explorer:
Internet Explorer 4 search button Internet Explorer 4 home button
  • Questionable security: vBulletin Lite was not a pinnacle of secure and defensive coding. Though some efforts were made (e. g. using addslashes(), which is nowadays considered inappropriate, but was all that what was available at the time in PHP 3), they were not thorough and overlooked spots. When encountering a database error, the actual SQL query and error details would be shown in an HTML comment on the error page, greatly helping attackers build their SQL injection even without source code available. The admin control panel password is stored in plaintext: on the server as well as in the cookie that persists an admin session. I’m also not sold on using eval() for interpreting templates from the database.
  • Filenames ending in .php3: Back then, it was common for PHP scripts to have a filename ending in .php3, though I couldn’t find the exact reason why this used to be common practice (possibly to allow PHP/FI 2.0 and PHP 3.0 to co-exist, maybe?). Nowadays, everything’s normally just a .php file.
  • register_globals was very much a thing: The PHP (anti-)feature register_globals caused request parameters and cookies to be turned into global variables in the script, e. g. https://www.php.example/test.php?x=1 would set $x to 1. vBulletin Lite relied on register_globals existing and working. PHP removed it in version 5.4, so a lot of request handling needed to be changed for vBulletin Lite to work at all.
  • MySQL has implicit defaults: Apparently, if strict mode is not enabled, MySQL has implicit defaults for various data types. vBulletin Lite relied on this behavior, much to my surprise. I’m not sure who thought this was a good feature, but it sure surprised me.
  • Password caching until exactly 2020: When successfully logging into the admin control panel, a cookie “controlpassword” is set. It is hardcoded to expire at the beginning of 2020—next year. I’m glad I didn’t have to try and debug that subtle issue. My patch makes it so that the cookie expires at the start of the next year.
  • A typo in the admin control panel: In admin/forum.php, deletion of a forum should bring the list of forums again. However, due to a typo (“modfiy” instead of “modify”), the page instead stays blank. I also took the liberty to fix this obvious bug.
  • Feature remnants: vBulletin Lite kind of looks like a rushjob; I’d love to find out if that’s true. There are leftovers of various features, which manifest themselves in stray variables being referenced but never set. For example, the e-mail field in the template for the newthread.php page actually references $password, which nothing else ever reads or sets. Similarly, forumdisplay.php references a $datecut variable, which I assume regular vBulletin 1.x would use to prune old threads by date (to save space on the database?).
  • Ampersands in HTML: vBulletin had literal ampersands (&) in the templates, namely in links. Firefox complains about this nowadays and expects &amp; even in <a href>, but I didn’t want to touch that because I’m afraid I might break an old browser by changing this behavior.

As mentioned above, I made a patch for vBulletin Lite 1.0.1 to make it work with modern versions of PHP and MySQL: vbulletinlite101-2019.diff
Applying it requires some preparation (renaming the files from .php3 to .php and adjusting the names of included files ahead of time); after that, it should apply cleanly:

$ for i in *.php3; do mv $i $(basename $i .php3).php; done
$ cd admin && for i in *.php3; do mv $i $(basename $i .php3).php; done
$ cd .. && find . -name "*.php" -exec sed -i 's/php3/php/g' {} \;
$ patch -p1 < PATH_TO_PATCH.diff

vBulletin Lite had a mechanism that would send e-mail a configurable address about SQL errors. I ended up disabling that in db_mysql.php, spilling the error onto the page and kept that behavior in the patch to make debugging easier (since this has no business running in production anymore anyway). See the areas marked with TODO if you want to undo that after all.

I used the new ?? syntax introduced in PHP 7, so this patch may not immediately work with PHP 5, though the worst grunt work has already been taken care of.

And for those who want to give it a kick, I put one up on vbulletin.virtuallyfun.com.


The website that used to host vBulletin Lite notes that “vBulletin Lite may be modified for your own use only. Under no circumstances may any modified vBulletin Lite code be distributed”.

I hope that separating this into a pristine archive and a patch—with no functional changes—is good enough. Should this still not be enough for the rightsholders (currently MH Sub I, LLC dba vBulletin), takedown requests will of course be honored.

More pointless site updates…

Debian 9… time flies.  Also moved from MySQL to MariaDB version: 10.1

Oh and from PHP v5 to PHP v7.

I guess if you can read this, then it’s still working….

Looks like the MariaDB migration had some weird and under-performing defaults.  So I found this my.cnf to at least pick up some new defaults.  I don’t see any my-huge.cnf on this Debian install so yeah…

PHP 5.4 is now obsolete on Debian

While doing an update, I got this fun message:


php5 (5.4.45-0+deb7u2) wheezy-security; urgency=medium

* PHP 5.4 has reached end-of-life on 14 Sep 2015 and as a result there
will be no more new upstream releases. The security support of PHP
5.4 in Debian will be best effort only and you are strongly advised
to upgrade to latest stable Debian release that includes PHP 5.6 that
will reach end of security support on 28 Aug 2017.

-- OndÃ…ej Surý <[email protected]> Sun, 04 Oct 2015 17:05:37 +0200

Time to upgrade!

After a bit of digging around here is how I did it.  I’m moving from PHP 5.4 to PHP 5.6


# php --version
PHP 5.4.45-0+deb7u2 (cli) (built: Oct 17 2015 09:01:48)
Copyright (c) 1997-2014 The PHP Group
Zend Engine v2.4.0, Copyright (c) 1998-2014 Zend Technologies

Ok, so here is the version I’m starting with on Debian 7.9 (Wheezy). During this process, I’m using unsigned packages so get used to this fine message, and packages being held back, unless I manually install them:


Reading package lists... Done
W: GPG error: http://packages.dotdeb.org wheezy Release: The following signatures couldn't be verified because the public key is not available: NO_PUBKEY E9C74FEEA2098A6E
W: GPG error: http://packages.dotdeb.org wheezy-php56-zts Release: The following signatures couldn't be verified because the public key is not available: NO_PUBKEY E9C74FEEA2098A6E
Reading package lists... Done
Building dependency tree
Reading state information... Done
0 upgraded, 0 newly installed, 0 to remove and 0 not upgraded.

But if you can read this, then it worked!

First add these to the /etc/apt/sources.lst file:

deb http://packages.dotdeb.org wheezy all
deb-src http://packages.dotdeb.org wheezy all
deb http://packages.dotdeb.org wheezy-php56-zts all
deb-src http://packages.dotdeb.org wheezy-php56-zts all

Then we can run the usual apt-get update / apt-get upgrade shuffle.

On my first run I got this fun output:


The following packages have been kept back:
libapache2-mod-php5 libmysqlclient18 mysql-server php-pear php5 php5-cli
php5-common php5-gd php5-mysql
The following packages will be upgraded:
mysql-common
1 upgraded, 0 newly installed, 0 to remove and 9 not upgraded

So I went ahead and updated mysql-common.  And during that upgrade I got the new message:


WARNING: The following packages cannot be authenticated!
mysql-common
Install these packages without verification [y/N]? y

So yes these packages are all unsigned. 🙁

After this, I ran:


# apt-get install php5

And got the following scary looking output


The following extra packages will be installed:
libapache2-mod-php5 libt1-5 libvpx1 php5-cli php5-common php5-gd php5-mysql
Suggested packages:
php5-user-cache
Recommended packages:
php5-readline
The following NEW packages will be installed:
libt1-5 libvpx1
The following packages will be upgraded:
libapache2-mod-php5 php5 php5-cli php5-common php5-gd php5-mysql
6 upgraded, 2 newly installed, 0 to remove and 3 not upgraded.
Need to get 7,659 kB of archives.
After this operation, 5,220 kB of additional disk space will be used.
Do you want to continue [Y/n]? y
WARNING: The following packages cannot be authenticated!
php5-mysql php5-cli php5-gd libapache2-mod-php5 php5-common php5
Install these packages without verification [y/N]? y

And then finally, after another apt-get update / apt-get upgrade I finally get this output:


The following packages have been kept back:
libmysqlclient18 mysql-server
0 upgraded, 0 newly installed, 0 to remove and 2 not upgraded.

So just update the held back packages and get it over with.


apt-get install libmysqlclient18 mysql-server

Ugh, it isn’t pretty.  But now we are on the newer train of PHP!


# php --version
PHP 5.6.14-1~dotdeb+zts+7.1 (cli) (built: Oct 2 2015 03:39:20)
Copyright (c) 1997-2015 The PHP Group
Zend Engine v2.6.0, Copyright (c) 1998-2015 Zend Technologies
with Zend OPcache v7.0.6-dev, Copyright (c) 1999-2015, by Zend Technologies

Hopefully things continue to work.

Mirroring Wikipedia

So I had an internet outage, and was thinking if I was trapped on my proverbial desert island what would I want with me?

Well wikipedia would be nice!

So I started with this extreme tech article by Sebastian Anthony, although it has since drifted out of date on a few things.

But it is enough to get you started.

I downloaded my XML dump from Brazil like he mentions.  The files I got were:

  • enwiki-20140304-pages-articles.xml.bz2 10G
  • enwiki-20140304-all-titles-in-ns0.gz 58MB
  • enwiki-20140304-interwiki.sql.gz 728Kb
  • enwiki-20140304-redirect.sql.gz 91MB
  • enwiki-20140304-protected_titles.sql.gz 887Kb

The pages-articles.xml is required.  I added in the others in the hopes of fixing some formatting issues.  I re-compressed it from 10GB using Bzip2 to 8.4GB with 7zip.  It’s still massive, but when you are on a ‘slow’ connection every saved GB matters.

Since I already have apache/php/mysql running on my Debian box, I can’t help you with a virgin install.  I would say it’s pretty much like every other LAMP install.

Although I did *NOT* install phpmyadmin.  I’ve seen too many holes in it, and I prefer the command line anyways.

First I connect to my database instance:

mysql -uroot -pMYBADPASSWORD

And then execute the following:

create database wikimirror;
create user ‘wikimirror’@’localhost’ IDENTIFIED BY ‘MYOTHERPASSWORD’;
GRANT ALL PRIVILEGES ON wikimirror.* TO ‘wikimirror’@’localhost’ WITH GRANT OPTION;
show grants for ‘wikimirror’@’localhost’;

This creates the database, adds the user and grants them permission.

Downloading and setting up mediawiki 1.22.5 is pretty straight forward.  There is one big caveat I found though.  InnoDB is incredibly slow for loading the database. I spent a good 30 minutes trying to find a good solution before going back to MyISAM with utf8 support.

With the empty site created, I do a quick backup incase I want to purge what I have.

/usr/bin/mysqldump -uwikimirror -pw1k1p3d1a wikimirror > /usr/local/wikipedia/wikimedia-1.22.5-empty.sql

This way I can quickly revert as constantly re-installing mediawiki is… a pain.  And it gets repetitive which is good for introducing errors, so it’s far easier to dump the database/user and re-create them, and reload the empty database.

When I was using InnoDB, I was getting a mere 163 inserts a second. That means it would take about 24 hours to import the entire database!!  Which simply is not good enough for someone as impatient as me.  As of this latest dump there are 14,313,024 records that need to be inserted, which would take the better part of forever to do.

So let’s make some changes to the MySQL server config.  Naturally backup your existing /etc/mysql/my.cnf to something else, then I added the following bits:

 key_buffer = 1024M
max_allowed_packet = 384M
query_cache_limit = 18M
query_cache_size = 128M

I should add that I have a lot of system RAM available.  And that my box is running Debian 7.1 x64_86.

Next you’ll want a slightly modified import program,  I used the one from Michael Tsikerdekis’s site, but I did modify it to run the ‘precommit’ portion on it’s own.  I did this because I didn’t want to decompress the massive XML file on the filesystem.  I may have the space but it just seems silly.

With the script ready we can import!  Remember to restart the mysql server, and make sure it’s running correctly.  Then you can run:

bzcat enwiki-20140304-pages-articles.xml.bz2 | perl ./mwimport2 | mysql -f -u wikimirror -pMYOTHERBADPASSWORD  –default-character-set=utf8 wikimirror

And then you’ll see the progress flying by.  While it is loading you should be able to hit a random page, and get back some wikipedia looking data.  If you get an error well obviously something is wrong…

With my slight moddifications I was getting about 1000 inserts a second, which gave me…

 14313024 pages (1041.174/s),  14313024 revisions (1041.174/s) in 13747 seconds

Which ran in just under four hours.  Not too bad!

With the load all done, I shut down mysql, and then copy back the first config.  For the fun of it I did add in the following for day to day usage:

 key_buffer = 512M
max_allowed_packet = 128M
query_cache_limit = 18M
query_cache_size = 128M

I should add that the ‘default’ small config was enough for me to withstand over 16,000 hits a day when I got listed on reddit.  So it’s not bad for small-ish databases (my wordpress is about 250MB) that see a lot of action, but wikipedia is about 41GB.

Now for the weird stuff.  There is numerous weird errors that’ll appear on the pages.  I’ve tracked the majority down to lua scripting now being enabled on the template pages of wikipedia.  So you need to enable lua on your server, and setup the lua extensions.

The two that just had to be enabled to get things looking half right are:

With this done right, you’ll see Lua as part of installed software on the version page:

mediawiki installed softwareAnd under installed extensions:

wikimedia installed extensions

I did need to put the following in the LocalSettings.php file, but it’s in the installation bits for the extensions:

$wgLuaExternalInterpreter = “/usr/bin/lua5.1″;
require_once(“$IP/extensions/Lua/Lua.php”);
$wgScribuntoEngineConf[‘luastandalone’][‘luaPath’] = ‘/usr/bin/lua5.1′;
require_once( “$IP/extensions/Scribunto/Scribunto.php” );

Now when I load a page it still has some missing bits, but it’s looking much better.

The Amiga page...

The Amiga page…

Now I know the XOWA people have a torrent setup for about 75GB worth of images.  I just have to figure out how to get those and parse them into my wikipedia mirror.

I hope this will prove useful for someone in the future.  But if it looks too daunting, just use the XOWA.  Another solution is WP-MIRROR, although it can apparently take several days to load.

ownCloud

So I was reading through a friends blog (wintellect!) and I came across this page about ownCloud…  Well I thought this was very interesting as I’ve pulled a lot of my external email mess inside (on my own Exchange 5.5 server on MS Virtual Server 2005!) .. So I like this whole idea.

I’ve got this VPS that has a few extra gigs of space, and it’d be SUPER convenient to map some drives for backups, or even back it up by copying some files..  It’s a simple AMP program setup, so I had it up and running in a few seconds.  The ‘hard’ part was mapping the drive from Vista.  Naturally it came down to reading the instructions, namely:

  1. in Services, enable the Webclient service (might be enabled already)
  2. in the Registry, change HKEY_LOCAL_MACHINE\SYSTEM\CurrentControlSet\Services\WebClient\Parameters\BasicAuthLevel from 1 to 2
  3. go to My Computer → Mount Network Drive
And that is about the size of it.

Installing mediawiki on WAMP

Building on our WAMP installation, we are now going to install mediawiki.

The first thing I’d recommend to do is to move the contents of c:\wamp\www into another directory… I just shoved the terminal thing into c:\wamp\terminal .

Now mediawiki is the software that powers wikipedia. It’s a great collaboration platform, it has built in revision control, and best of all it’s free.

It’s also VERY simple to setup, well compared to other web content platforms.

The current version is 1.16, which can be downloaded here. As things change, you may be best served by just visiting the main download site.

Since most ‘AMP’ servers are Linux based, we’ll have to get gzip & tar to extract mediawiki. It’s very easy though.

Simply type this in to extract mediawiki

C:\temp>dir
Volume in drive C has no label.
Volume Serial Number is FC55-C2F4

Directory of C:\temp

12/28/2010 08:15 PM DIR .
12/28/2010 08:15 PM DIR ..
12/28/2010 08:13 PM 49,152 gzip.exe
112/28/2010 08:15 PM 12,647,934 mediawiki-1.16.0.tar.gz
12/28/2010 08:13 PM 114,688 tar.exe
3 File(s) 12,811,774 bytes
2 Dir(s) 7,073,234,944 bytes free

C:\temp>gzip -dc mediawiki-1.16.0.tar.gz| tar -xf –

C:\temp>

Ok, now with mediawiki extracted we just move the contents of c:\temp\mediawiki-1.16.0 into c:\wamp\www

Now before we go on, we are going to set a password for the MySQL process. In the off chance someone is following this on a server to deploy on the internet, it’d be crazy to leave it with no password.

So left click on the WAMP system tray icon, go to MySQL, and bring up the MySQL Console.

media1

Just hit enter for the password as there isn’t one.

Next follow this SQL statement to set the password for the root user to password. Or select your own better password.

mysql> use mysql;
Database changed
mysql> update user set password=PASSWORD(“password”) where User=’root’;
Query OK, 3 rows affected (0.05 sec)
Rows matched: 3 Changed: 3 Warnings: 0

Now restart the mysql service, by clicking on the system tray icon, then mysql, service then ‘restart service’. If you don’t do this the password change will not take effect!

With that out of the way, it’s time to configure mediawiki. Simply open up a web browser to the following location:

http://localhost

And you should see something like this:

media2

Click the setup link, and let’s walk through the options…

First is the wikiname. I’m just going to call mine ‘test wiki’. Put in your own contact email, so that mediawiki will email YOU if anything is going on… I left the language in English, and left the license alone. The next important thing to do is to select a Admin username, and password. This is all up to you. Just remember that the Username is CaSe SeNsItIvE!!!

Leave the caching off.

The next section is for the email notifications, I just left those as default.

The final thing to configure is the database.

Since we are going to keep this simple, just set the DB username to root, and put in the password you configured earlier in the MySQL Console. Next check the ‘superuser account’ box, and specify root and the password again.

You can now click the Install MediaWiki button!

You’ll see some information printed on the page, and if everything goes according to plan, you’ll get the message:

Installation successful! Move the config/LocalSettings.php file to the parent directory, then follow this link to your wiki.

You should change file permissions for LocalSettings.php as required to prevent other users on the server reading passwords and altering configuration data

So simply copy the file c:\wamp\www\config\LocalSettings.php to c:\wamp\www\

then simply click the following link to be taken to your personal wiki:

http://localhost/index.php

media4

And that should take care of it!

WAMP server 2.1

Due to a request, I figured I’d document out the joys of installing WAMP, flashterm & the flash policy server, mediawiki in a multipart article. So to start, we’ll build the foundation which is the WAMP package which the other two will rely on.

So what is WAMP, well it’s Windows Apache Mysql & PHP. If you’ve ever heard of LAMP, this is the Windows version. And I’m happy to say that PHP applications seem to be pretty portable, allowing you to freely move data & applications to & from Linux/BSD/Solaris/Windows. Or that’s been my experience.

The first thing you’ll need to do is install the WAMP package. Luckily for us, the WampServer project has packaged the whole thing up into a nice windows installer. And the new version (2.1c) even includes x64 bulids!

So for the 32bit crowd you can download WAMP here.

And for the x64 64bit crowd, download WAMP here.

I’m currently using an aging HP machine as my server so I’m using Windows Server 2003 along with the 32bit version. WAMP works best when it’s just installed with the defaults.

The first thing I do is I install the SMTP service that comes with Windows. I leave IIS off as it’s kind of silly to have two web servers, unless you are doing it for some planned reason (say Virtual Server which needs IIS and uses port 1024). If you do have IIS make sure the ‘default’ website is turned off.

All that has to be done with the SMTP server is configure it to allow 127.0.0.1 to relay emails.. As it’s nice to get notifications that could be built in with whatever PHP application you go with.

SMTP1

Now run the installer, and I’ll try to walk through the steps.

wamp1

Hit next

wamp2

Accept the GPL License.

wamp3

Let it install in the default directory, it makes things easier.

wamp4

I like both set, you may not, but it’s easier to launch.

wamp5

Verify the install settings.

wamp6

Now WAMP will copy files and install.

wamp7

Then WAMP will want to know the default browser, honestly IE is just fine.

wamp8

Next WAMP will want to know what SMTP server to use… This is kind of important, and why I installed the default MS SMTP server as a lot of things that do registration, or email alerts, well work better with an email server…

wamp9

With the install completed let it launch WAMP.

wamp10

Once the WAMP server is installed it’ll be stopped and offline.

wamp11

Left click on the WAMP tray tool, and have it start all the services.

wamp12

Then left click again on the WAMP tray tool, and now you can start it up and take it online…

wamp13

If everything has gone right your WAMP tray tool will look like this!

Now open up a web browser, and go to http://localhost/

If everything has gone right, you should see this:

wamp14

Congratulations! You’ve successfully installed the WAMP server!