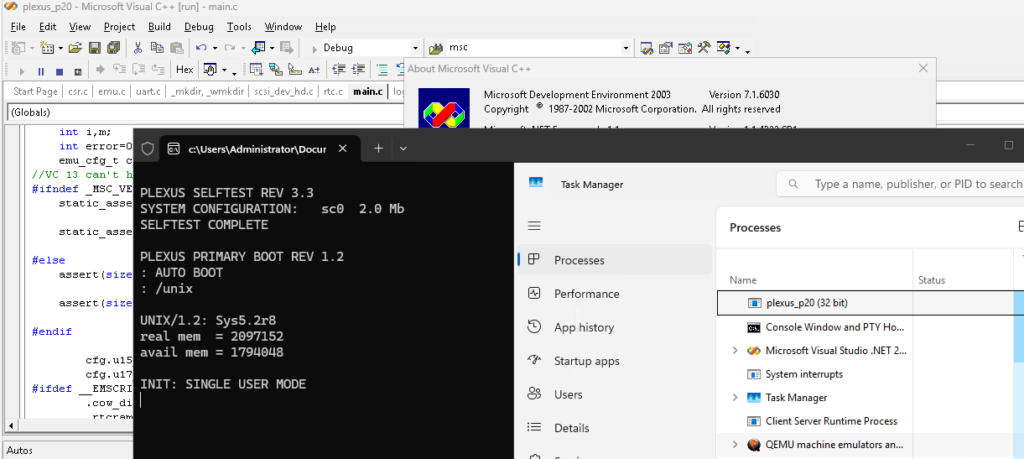
I had thought about trying to take a look at the SCSI handling as the system uses one of those funky MFM disk shims with a SCSI ‘like’ interface bus.. It has an interesting layout with the first block to explain the disk to the controller and the system, along with the disk partitions/slice layout. Very early 1980’s stuff.
Anyways despite all these years, I’m kinda terrible with Xcode, so I thought using Visual Studio to debug would be the way to go. And whoa… I had a copy of 2010 handy as I was having internet issues, and yeah it’s more C89 than C99.
And then there was this fun thing while trying to do an optimised build:
Thankfully you can simply turn off optimizations in the various parts of the source that crash.The Plexus neither has and I think pre-dates the 68881/68882 so the FPU emulation really doesn’t matter, just simply add
pragma optimize("", off)
at the start of the file, and turn it back on at the end. Yay!
Visual C++ 2003!
So yeah that was pretty fun.
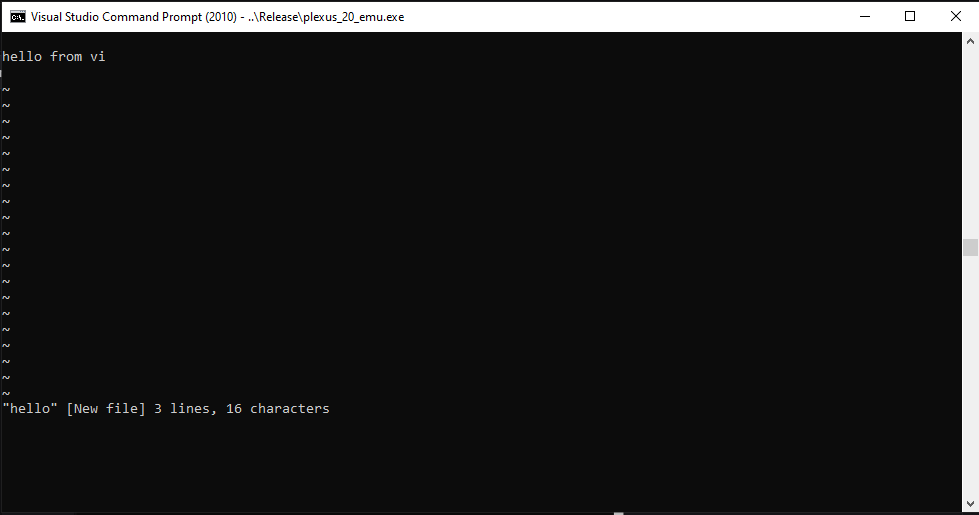
Oh I should add there is a WASM version, so the ultimate for tourists, you don’t even have to install anything! Super cool!
I thought I’d try to make a slight improvement since I expect people to use old machines, so I amputated ansicon, and drive it directly! So, no DLL injection or anything else weird, to try to prevent antivirus software from freaking out.
It’s enough for vi to work at least!
Although I should probably detect Windows 10, since it has the ability to detect and drive ANSI codes on it’s own.
Anyways for anyone wanting to check it out on Windows here is the repo with the first release:
Oh C compiler is installed, and I believe Fortran as well! The ‘catch’ is there currently is no good way to move data into the VM. Pasting into the console gets dropped chars, and it’s just impossible. uuencode to the system OUT however works great.
(This is a guest post by Antoni Sawicki aka Tenox)
Definitely not the first person doing this. In fact this has been quite widely documented, in particular by astr0baby and openpa.net. Just my personal observations and tweaks.
I installed mostly the defaults, removed Java spyware and Web based management.
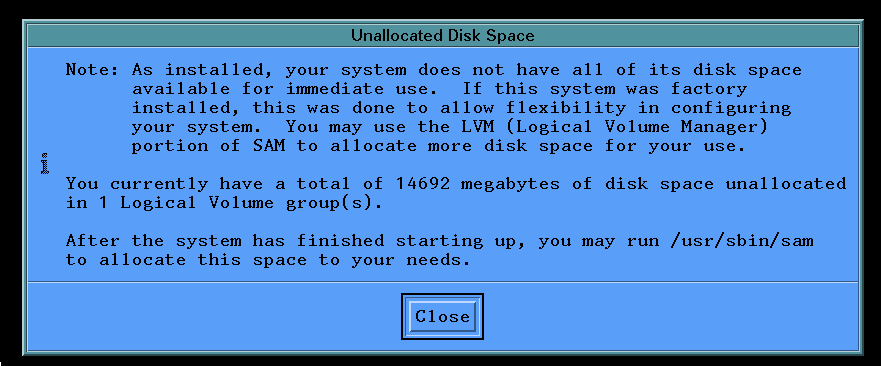
I recommend using advanced mode and editing File Systems to your desired size or just leaving /stand and / and deleting everything else. Otherwise, if you do defaults, you will be facing resizing them in single user mode later.
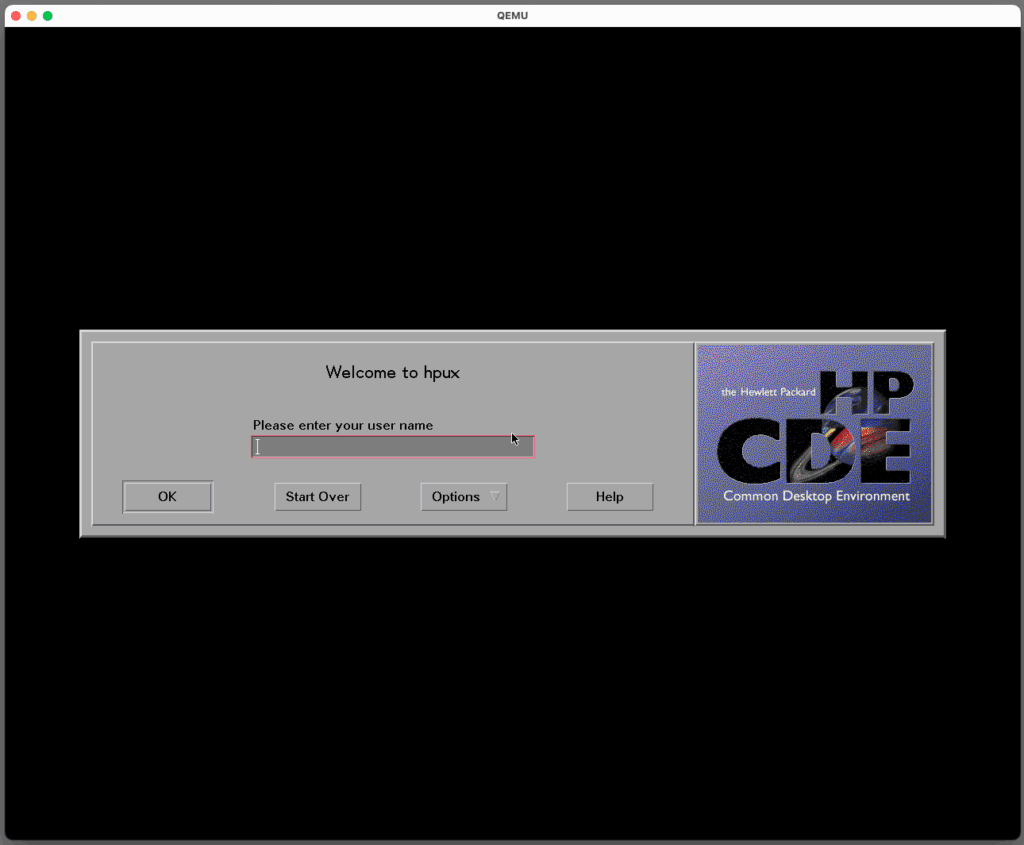
Forget any serial console, telnet stdio or forwarding X over SSH nonsense. Graphical console now works fully end to end without any issues, except for nsswitch.conf.
When trying to login via CDE you will get an error about unable to start desktop messaging system. Login either via text console or failsafe session. Copy /etc/nsswitch.files to /etc/nsswitch.conf. Also make sure that your hostname can resolve via /etc/hosts.
Once this is done you should be able to login via CDE:
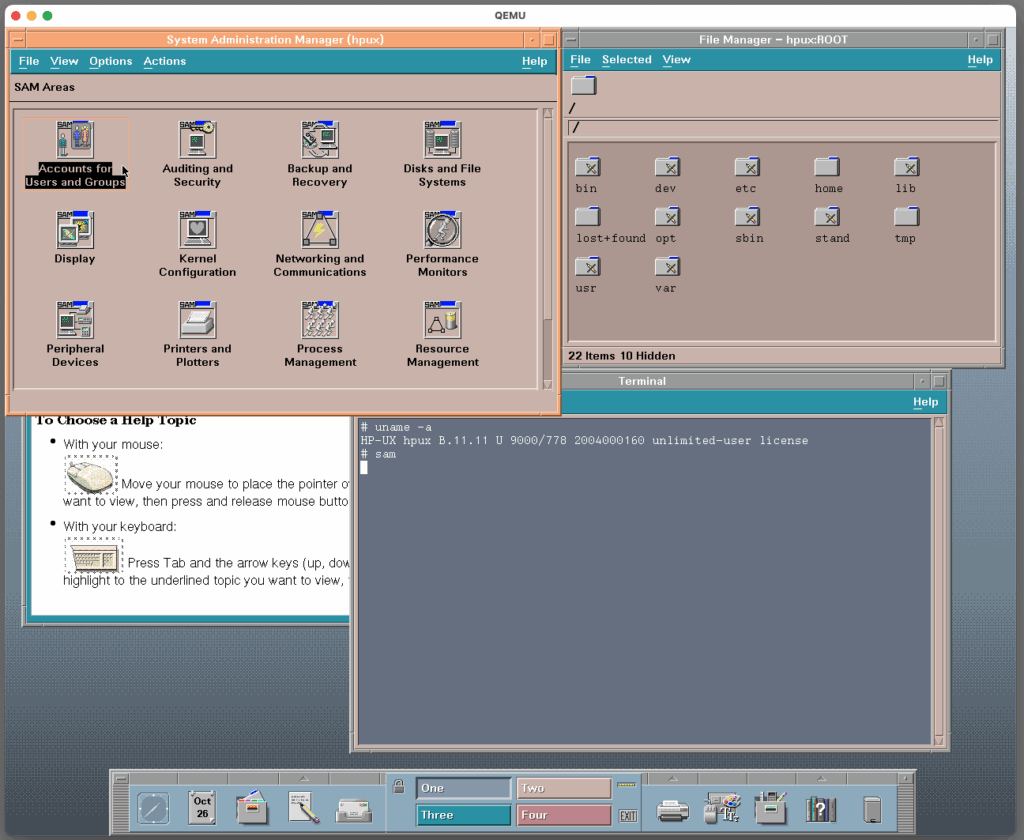
If you left filesystem defaults, you will be facing this:
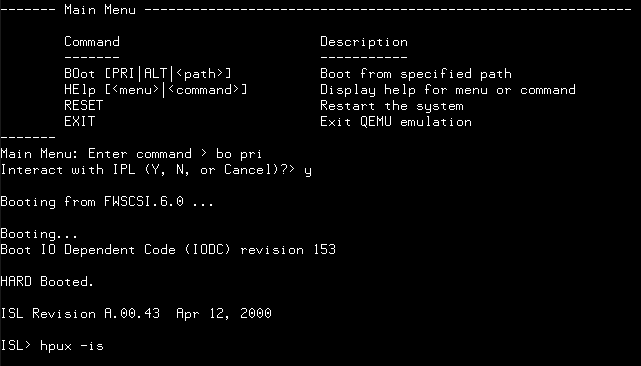
To fix this, add -boot menu=on to qemu parameters, run boot pri then answer yes to interact with IPL and then type hpux -is.
This will land you in single user mode where you can extend volumes like so:
But ideally this should be done ahead of time during install in File Systems tabs (advanced mode).
I like to disable some slow starting and unnecessary services on startup, to do so go to /etc/rc.config.d and edit bunch of files changing value from =1 to =0. I typically disable SNMP, CIM and Mailserver, Webadmin, Diagnostics, EMS, nettl, icod, etc at minimum. Also some stubborn services need to be disabled by renaming or removing them from /sbin/rcX.d …
Software Install
Note that this emulates PA-RISC 1.1 (32bit) and software built for PA-RISC 2.0 (64bit) will not work. Very little software is marked which platform is it for, so your mileage will vary. You will encounter errors and crashes. To avoid confusion check the binary with file(1) utility.
I have a bunch of handy tools like bash/gmake/gzip/gtar/ncftp bundled up here. There is GCC 4.0.2 here as a depot and here as a tarball. I also installed a bunch of tools and enhancements from Soft Pack and Apps cdroms.
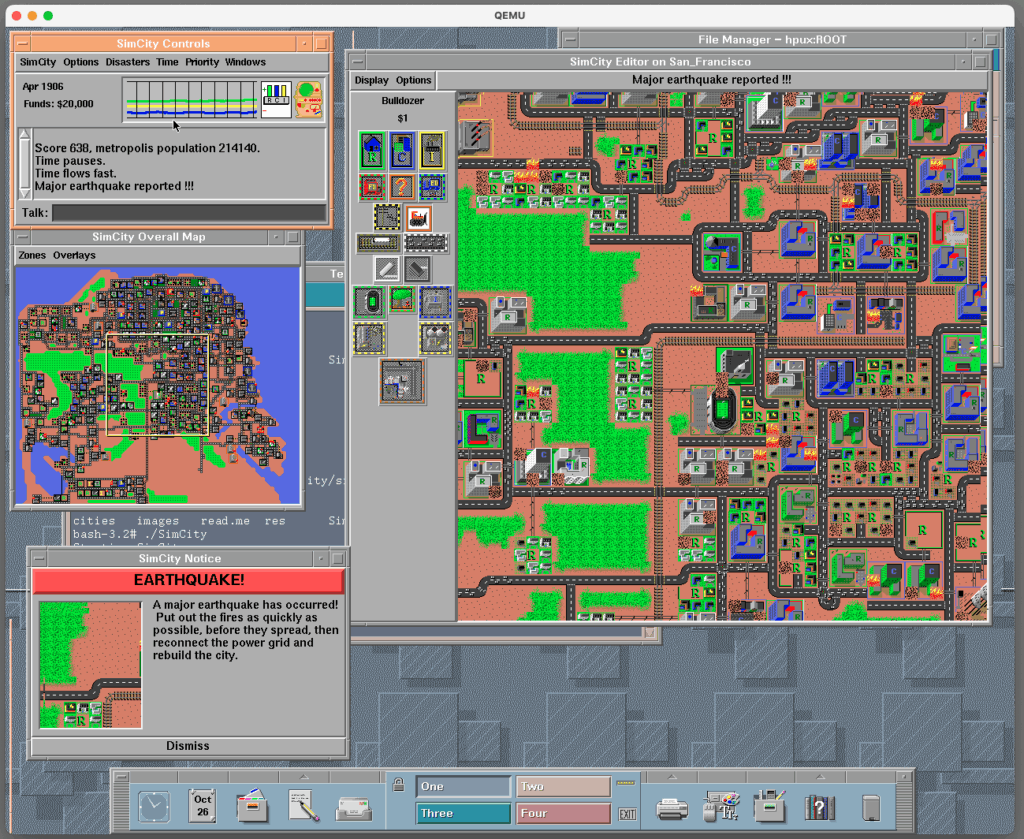
Most importantly SimCity!
More games can be found here. However this emulated HP-UX doesn’t have working OpenGL so don’t expect much.
Finally, to shut down the os:
reboot -h
The ready to run image is available here. It works with QEMU 10.1. It has bash & gcc pre-installed. Login as root/root.
(This is a guest post by Antoni Sawicki aka tenox)
TL;DR RCPD plays nicely with NAT, re-implemented as a stand alone daemon, from scratch, without ined, r-daemons. Fully open, no security or authentication. Docker friendly.
I often find myself needing to copy a file or two, in or out of an emulated system with some weird networking setup like qemu net user, SLiRP, NAT, etc. Or from/to a physical machine, but having server running in a Docker container, sometimes on a Mac, which has even weirder network contraptions.
Most of the old file transfer protocols like FTP have tendency to open a reverse connection from the server back to the client, which doesn’t play very well with NAT. Even TFTP (who would have thought!) requires nf_conntrack, STUN, proxies, connection helpers, punching holes, UPnP and other nonsense. While they can be individually worked out, it’s rather not universal. Vintage OS SSH/SCP is either non existent or ciphers are too old to play well with modern SSH server. NFS is mostly OK but it has it’s own quirks and you can’t run it in a Docker container. I seen people doing shit like this. I’m also guilty of using Kermit to transfer files over network from time to time. Overall quite frustrating situation.
It turns out that the rcp protocol is very easy on NAT, as it uses just a single, outgoing TCP connection. Not only it worked in all my use cases, but also Berkeley r-commands are ubiquitous on pretty much all vintage OSes that I work with. From Unix, VMS to Windows NT. There are ports to OS/2, DOS and everything else. A recent practical example was how Neozeed and I copied a VBScript in to Windows 2000 64bit install.
The server side however is somewhat of a challenge. It has been obsolete for quite some time now. For starters, R-daemons require inetd, which is mostly not a thing on modern Unix. Then there are actual rshd/rexec/rlogin/rcpd daemons. I spent several hours trying to hack netkit-rsh and rsh-redone to play nicely in Docker, without good results. Even if it could be done, there still are /etc/hosts.equiv, ~/.rhosts and other bullshit “security” contraptions to deal with.
Annoyed with all this nonsense decided to write RCPD from scratch. Docker friendly, fully open, no security or authentication of any kind. I also didn’t want remote shell (rsh/rlogin/rexec), just the file copy part. The original rcpd was using rshd under the hood. This is now completely eliminated and the shell stuff is synthetically generated to satisfy the protocol.
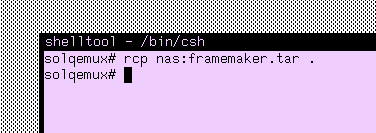
Now if I want to copy a file in to a vintage system I can simply do this:
That’s it. It just works™ with net user and Docker on a Mac vmnet.
The best part that the whole thing has been written and debugged entirely by Claude!
It’s not mine, rather it’s Asianometry‘s. It’s a nice overview of the rise of Unix. I’d recommend checking it out, it’s pretty good. And of course, as I’m referenced!
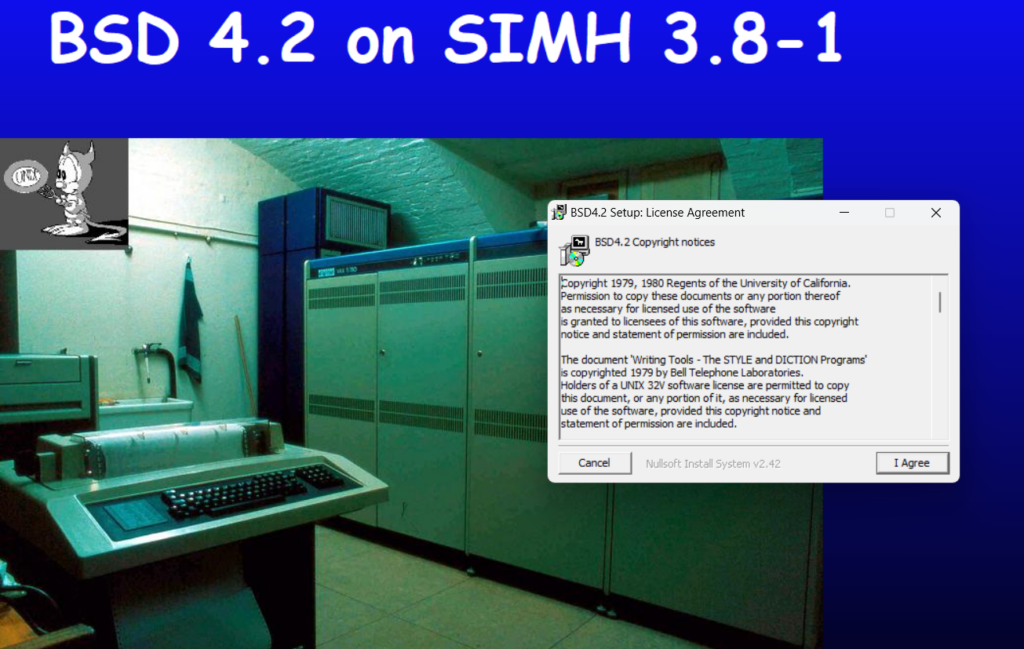
Years ago I had tried to make these old OS’s accessible to the masses with a simple windows installer where you could click & run these ancient artifacts. Say 4.2BSD.
Installing should be pretty straight forward, I just put the license as a click through and accept defaults.
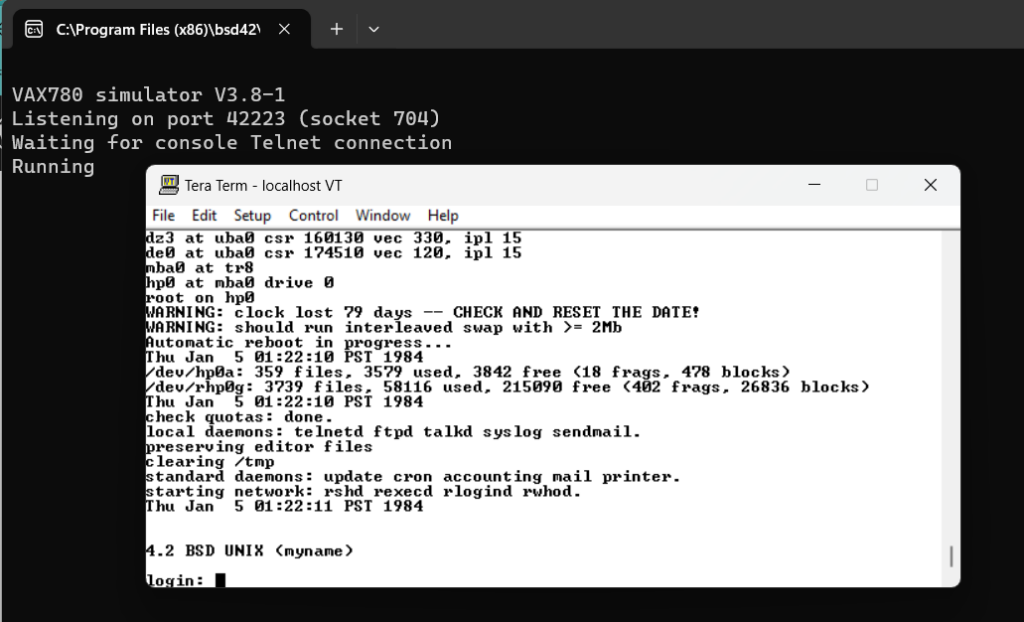
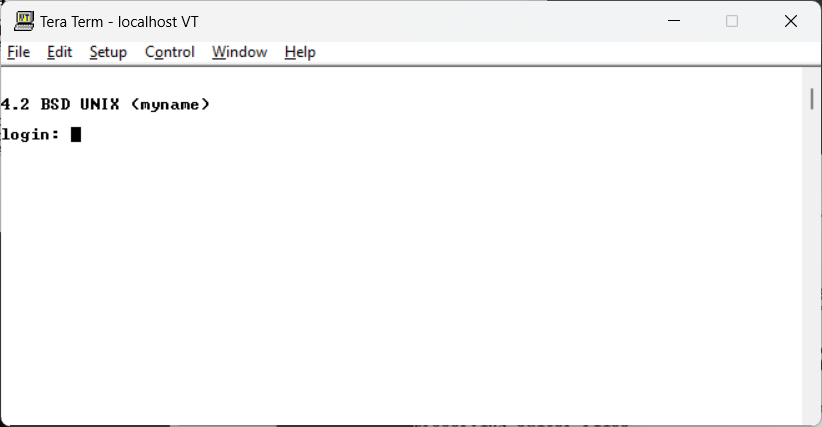
Starting BSD via ‘RUN BSD42’ and the emulator will fire up, and being up a console program (Tera Term) giving you the console access. Windows will probably warn you that it requested network access. This will allow you to access the VAX over the network, including being able to telnet into the VAX via ‘Attach a PTY’ which will spawn another Tera Term, prompting you to login.
telnettting into the VAX
You can login as root, there is no password, and now you are up and running your virtual VAX with 4.2BSD!
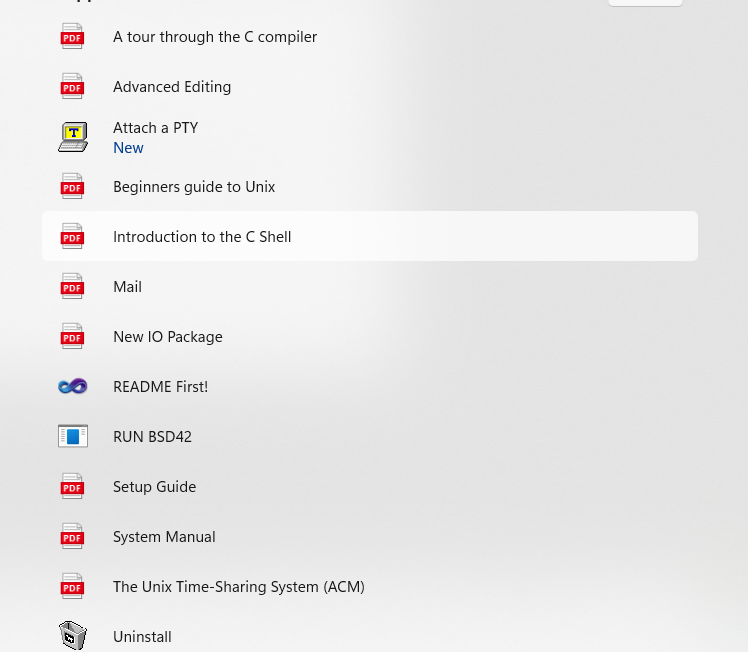
All the items
I converted many of the old documents into PDF’s so you may want to start with the Beginners guide to Unix. I thought this was a great way to bring a complex system to the masses, but I’m not sure if I succeded.
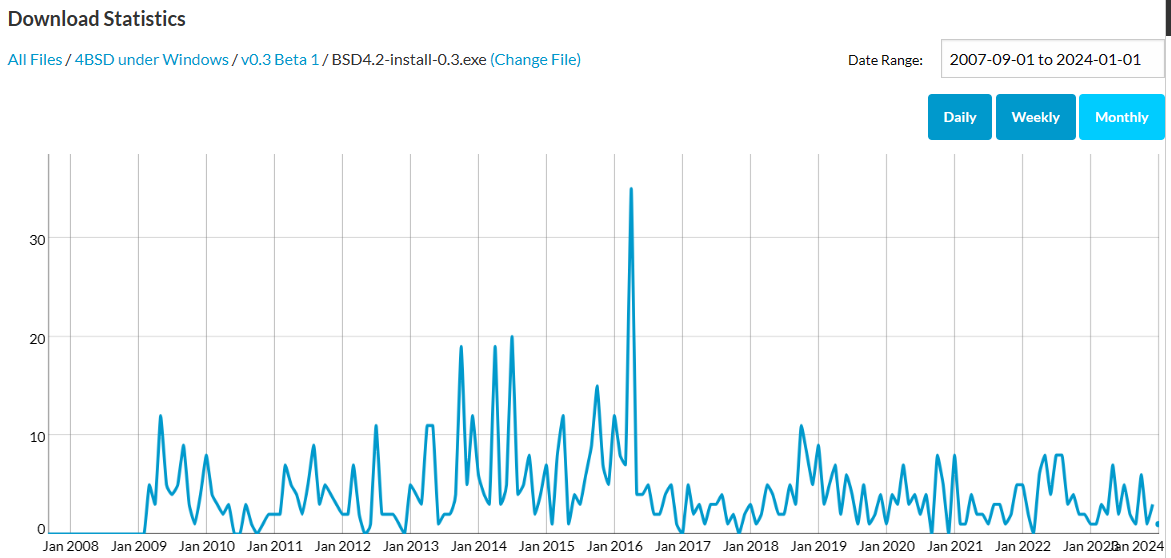
776 downloads
As it sits now, since 2007 it’s had 776 downloads. I’d never really gotten any feedback so I’d hoped it got at least a few people launched into the bewildering world of ancient Unix. Of course I tried to make many more packages but I’d been unsure if any of them went anywhere. It’s why I found these videos so interesting as at least the image artifacts got used for something!
But in the off hand, maybe this can encourage some Unix curious into a larger world.
Sometimes there is a great seemingly timeless resource on the internet, and you pull from it from time to time, make giant compilations, but never really reach out to the creator, or just archive the entire thing.
Then the unspeakable happens and it just up’s and disappears.
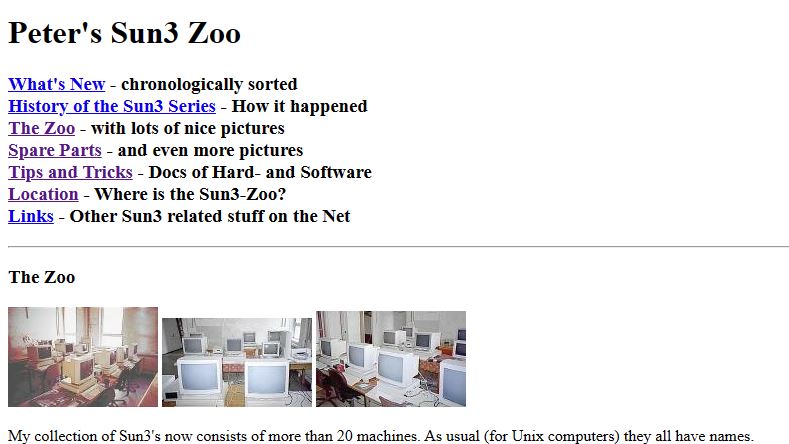
I never reached out to Peter Koch, to even thank him for preserving so much, or to apologise for not preserving his site, for some reason it felt like someone else would have done a better job. But then sometimes you find out you were that one person, and you didn’t do it, so you didn’t do it.
I don’t know the story, but it seems Peter did know that it was coming to and end.
May 01 2010 – Ending
Dear friends!
I have to give up my collection.
So if you’re interested in some pieces or know someone who might, please send me an e-mail.
So I’ll put in a call for help for the world at wide? Did anyone save anything more comprehensive than what was in archive.org, or what was in the ‘Titor Special‘?
In the meantime, the site has a new owner, and it’s been restored.
(This is a guest post by Antoni Sawicki aka Tenox)
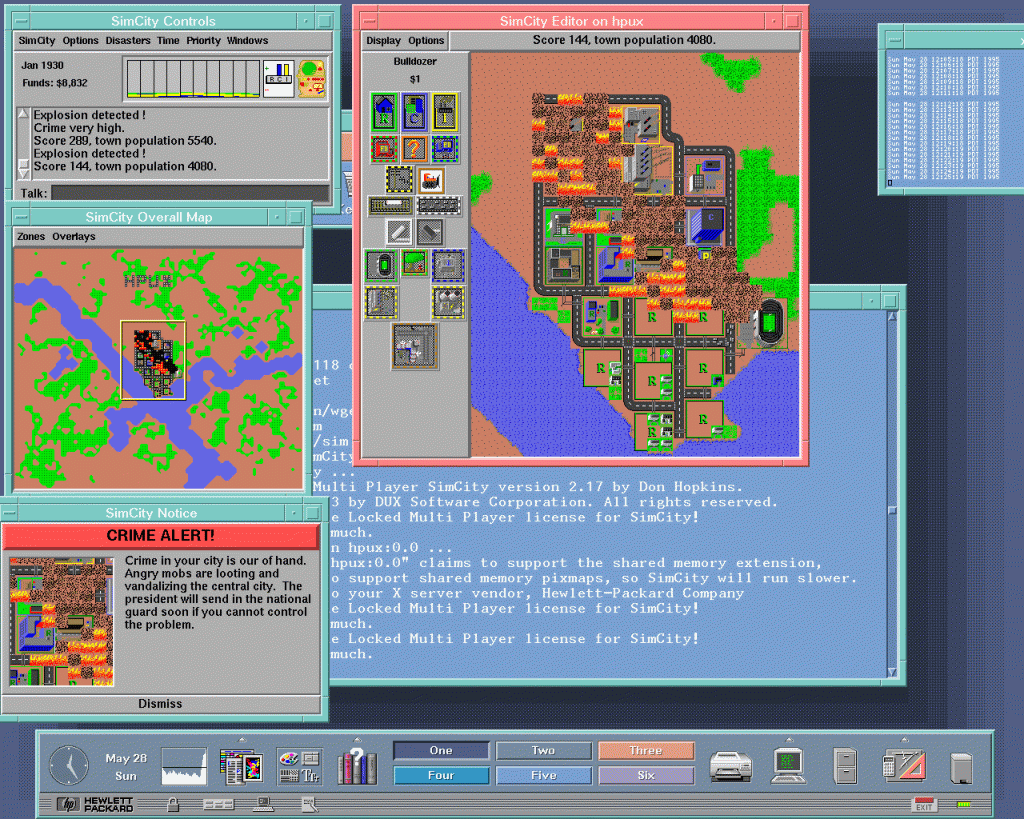
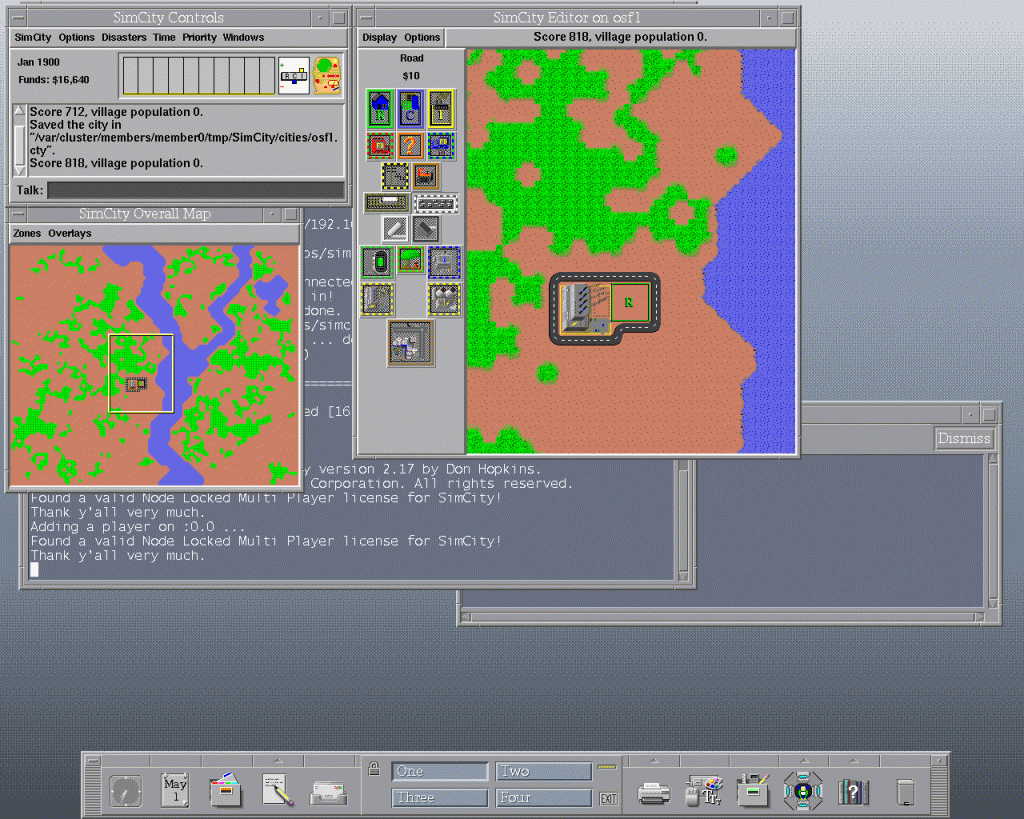
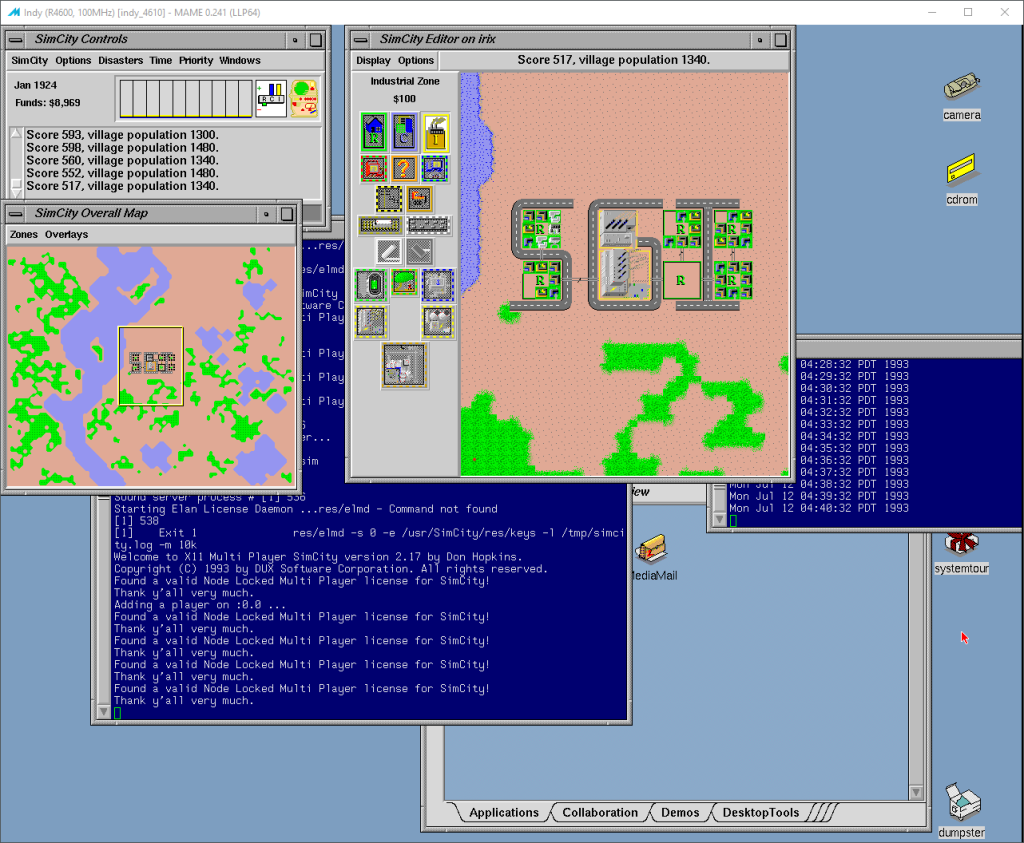
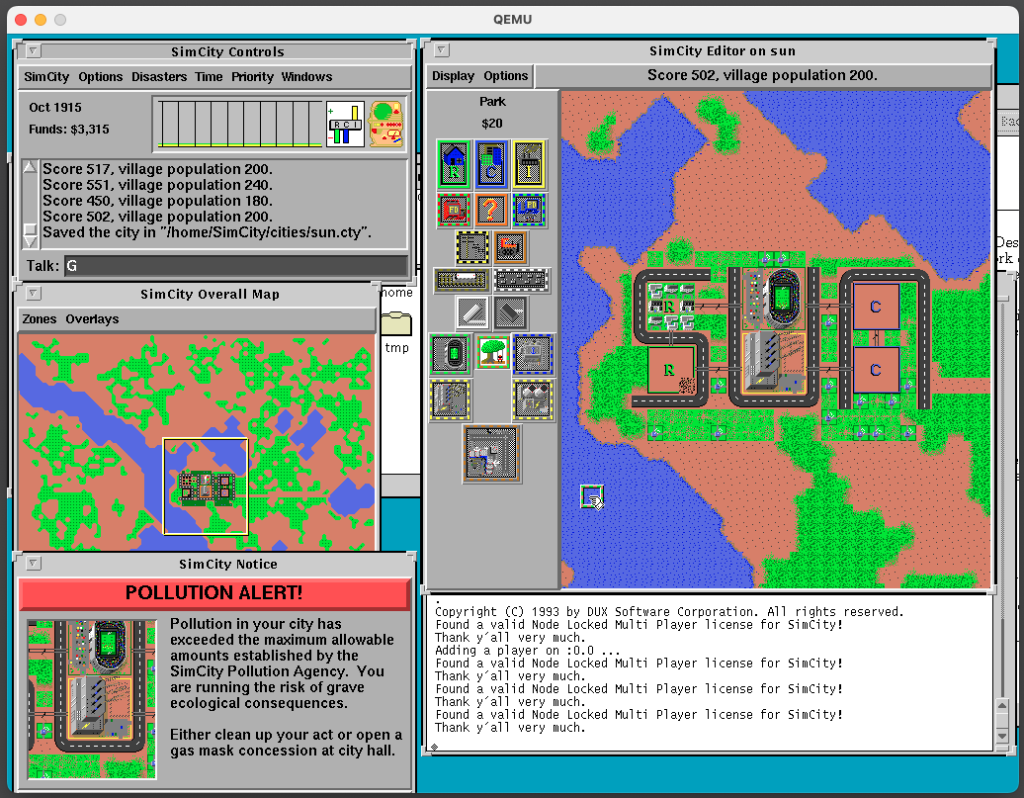
In early 90s DUX Software ported SimCity to classic UNIX. They provided downloadable demo versions for SunOS, Solaris,HP-UX, SGI IRIX, OSF/1, Digital Unix,OpenDesktop, UnixWare, Linux and BSD.
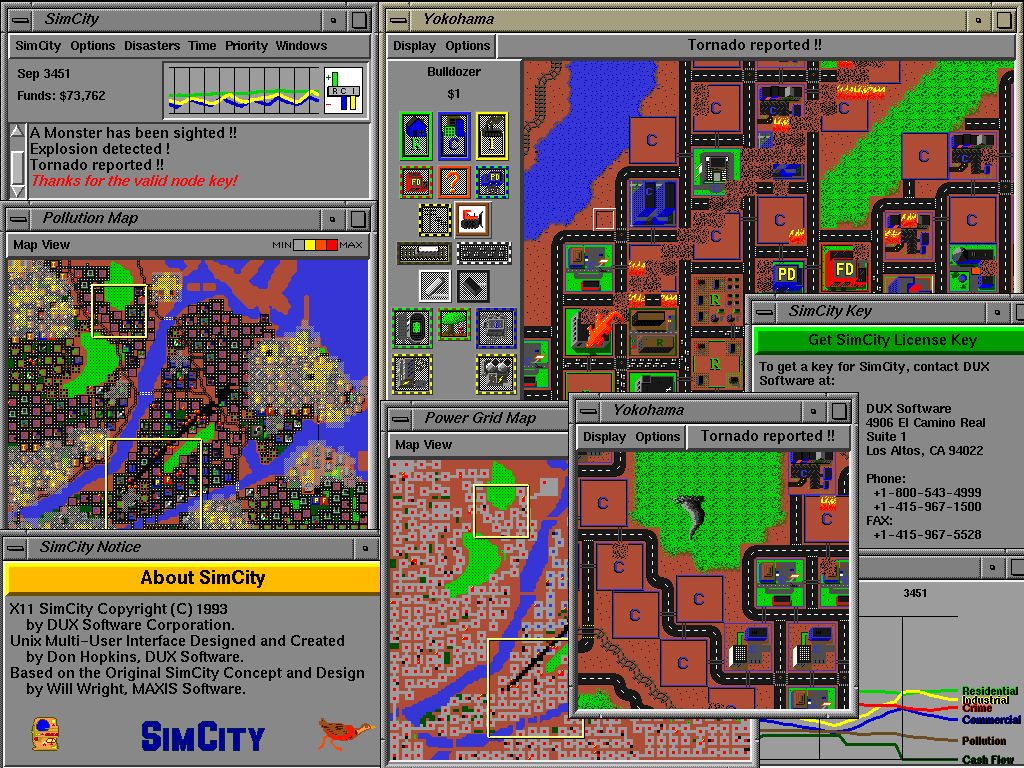
SimCity SGI IRIX screenshot from DUX website
In the winter break wave of nostalgia I wanted to play SimCity on my vintage HPUX workstation. Unfortunately the 5 minute demo just wouldn’t cut it. Back in 1993 you could simply purchase a license key and unlock the demo to a full version. However even if I could find an old license code, these keys were “Host ID” locked, so you could not easily use it on a different machine anyway.
In 2008 SimCity Classic has been open sourced under a new name Micropolis for the OLPC project. This was truly epic endeavor, many thanks to everyone involved. Unfortunately for vintage computer enthusiasts, the source code been updated to compile on a modern Linux, before it was released to the public. It will no longer build on any old Unix system. Typically, when a developer decides to free up their obsolete version, they just toss out some licenses codes. Sadly this time no one ever bothered.
The only option left was to bypass the license checking code. Fortunately, modern binary analysis tools make patching old apps relatively straightforward. In just minutes I was able to get the game started in a full multiplayer mode. A few hours later I got it patched on all the vintage Unix platforms!
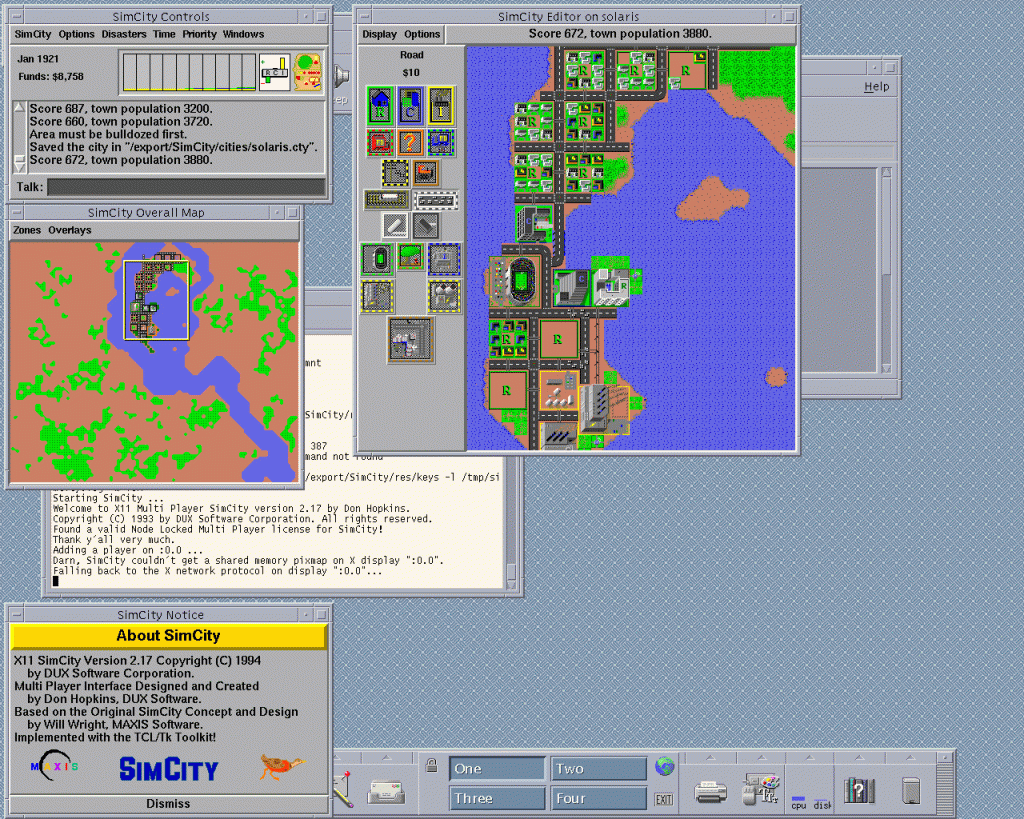
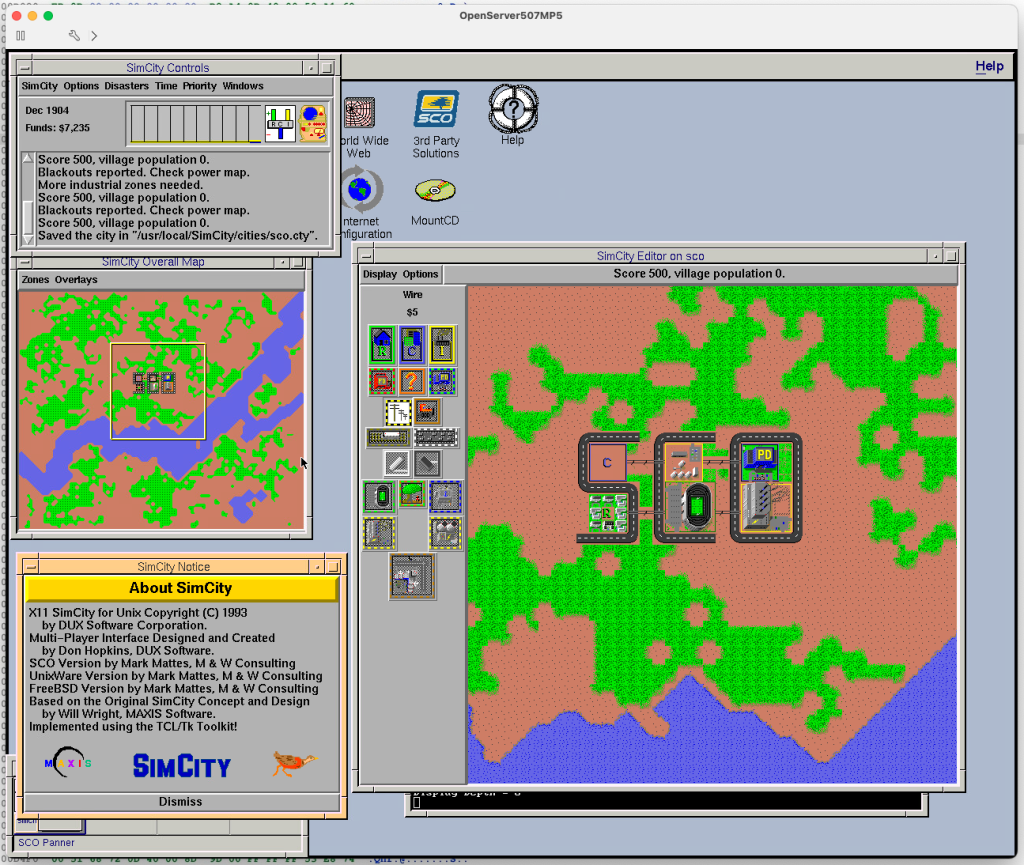
SimCity on Solaris 7 (also works on 8 and 9)SimCity on HP-UX 9 (doesn’t work on 10 or 11 due to TCL/TK issues)SimCity on OSF/1 aka Digital Unix aka Tru64SimCity on IRIX 5.3 on MAME (doesn’t work on never IRIX due to COFF binary)SimCity on SunOS 4.1.4 on QEMU SimCity on SCO OpenServer / OpenDesktop (ODT)
UPDATE: patched IRIX as well! Special thanks to Mr^Burns for providing a preinstalled IRIX 5.3 MAME image!
UPDATE: patched SunOS version as well. Special thanks to Daghdha for preinstalled SunOS 4.1.4 QEMU image!
UPDATE: patched SCO Unix/ODT version as well.
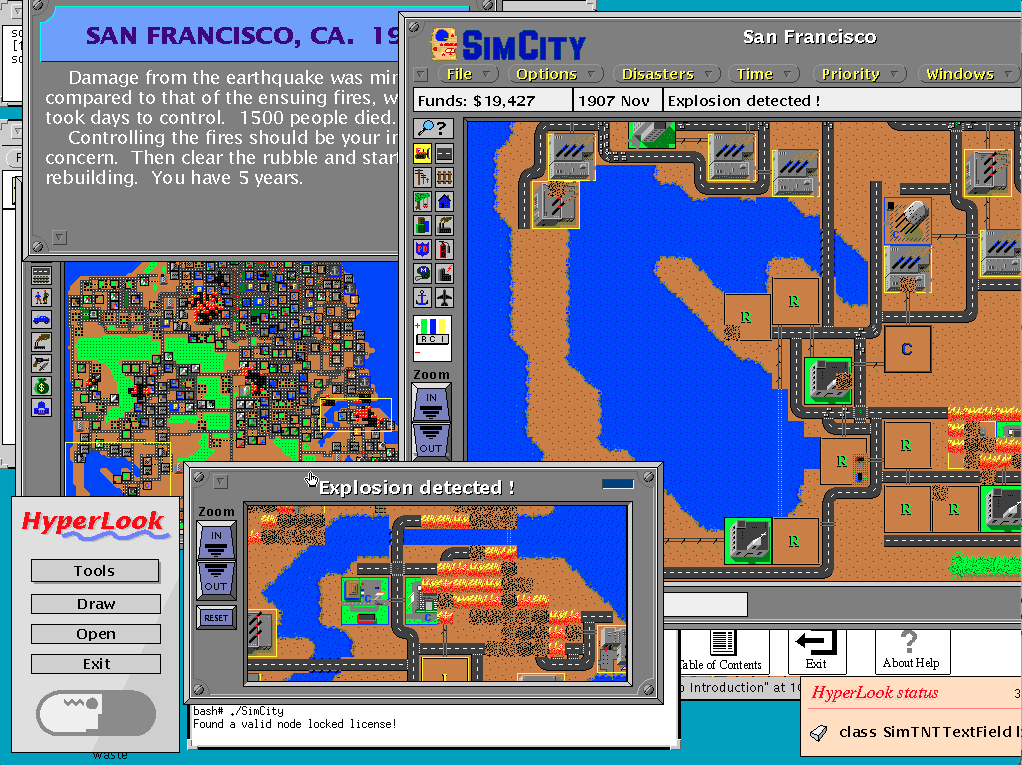
UPDATE: patched the legendary SunOS HyperLook Edition!
SimCity HyperLook Edition
You can download the demo versions and patches here. Happy gaming on your vintage Unix Workstation!
If you just want to try the game without bothering with an ancient unix, you can simply sudo apt install micropolis && micropolis on a modern Linux – it’s identical except for multiplayer.
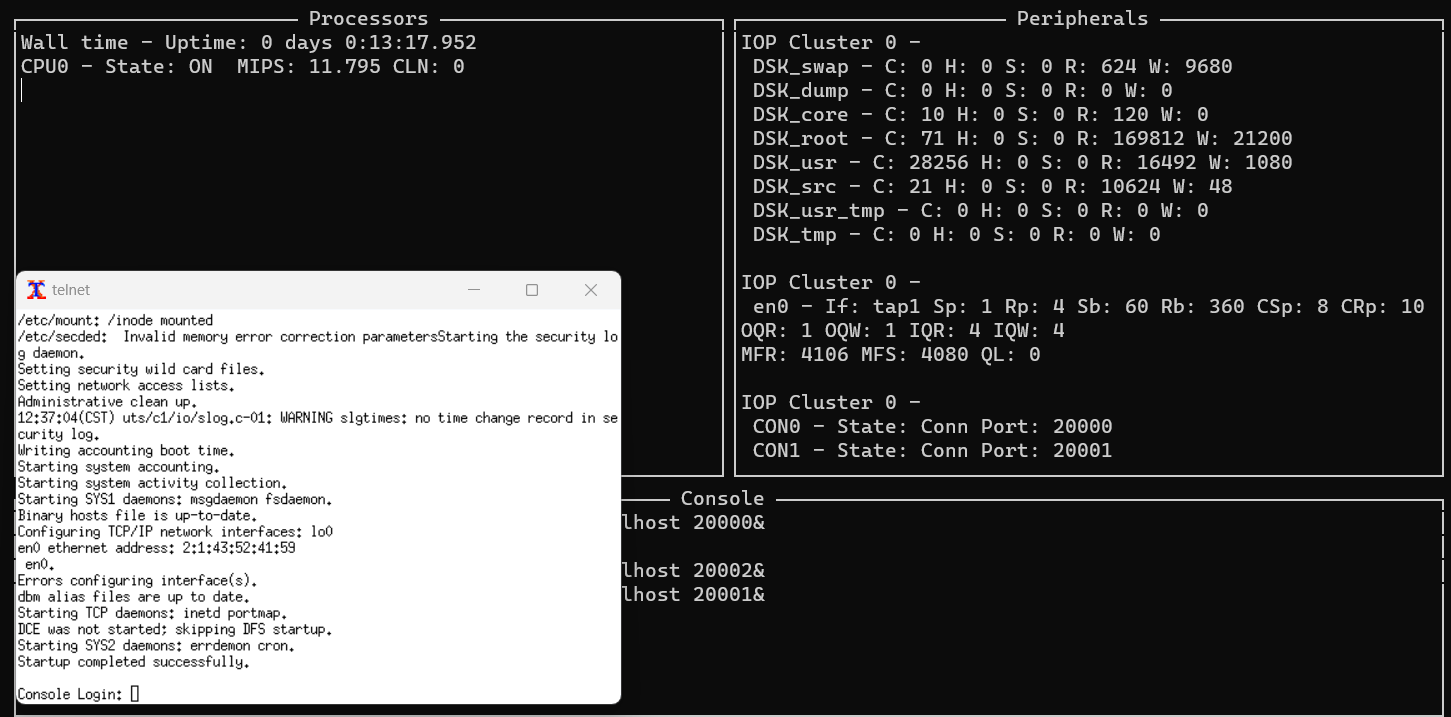
So over on Modular Circuits, Andras had posted a promising ‘UNICOS Update‘ which had detailed that 2 CD-ROM’s of Unicos had surfaced on archive.org cray-cd1 & cray-cd2. Along with posting the updated source to github, so I had no choice to replicate the experiment!
First the install is INSANELY slow. It requires you to setup a Linux (or unix) machine with rsh. Surprisingly there is a rsh-server package for Ubuntu 22.04. Basically it boils down to following the instructions. Although with WSLv2 I ended up making the bridge manually with:
brctl addbr craybr
ip tuntap add mode tap tap1
ifconfig tap1 up
brctl addif craybr tap1
ifconfig craybr 172.16.0.1 netmask 255.255.255.0
It’s coded in the example configs to use tap1, but there you go. It’s a pretty straightfoward install but the decompression on the cray side takes the installation hours. As an experiment I changed the commands from rcp to remsh to gzip -dc the files locally on my PC, which had the benefit of of being much faster, and not taking up space.
I went ahead and uploaded both of my installs for anyone wanting to play OS tourist enough to check out UNICOS but not wanting to sit through the install.
The C compiler is.. ancient. and very touchy. You’ll need to add /usr/gen/bin to the path, and explicitly add the path for the linker like this:
/usr/gen/bin/cc zap.c -L/usr/gen/lib
Although the breakage is.. pretty epic. I had pretty much no luck bringing over any of my favorites. There should be a much better / modernish C compiler and Fortran compiler, although I’m not sure if it’s on these CD-ROM’s or I’m just massively ignorant of UNICOS, because I never got a chance to be anywhere near a legit supercomputer.
(This is a guest post by Antoni Sawicki aka Tenox)
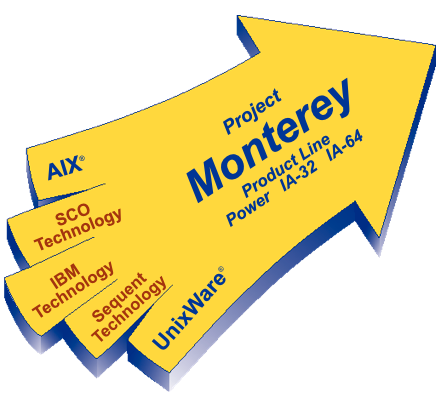
Project Monterey was an attempt to unify the fragmented Unix market of the 90s in to a single, cross vendor Unix OS that would run on the upcoming Intel Itanium (and others) CPU. The main collaborators were: IBM, who brought its AIX, SCO brought UnixWare, HP was supposed to bring parts of HP-UX and SequentDYNIX/ptx. Ironically the project shared fate of the Itanium processor – it totally failed. In the end Linux took spot of the “single Unix OS”. IBM donated pieces of AIX to Linux instead and the main legacy of Project Monterey was the famous SCO vs IBM lawsuit.
A little known fact, IBM did however produce AIX version for the Itanium architecture! According to Wikipedia, some 30+ licenses were sold in 2001-2002. For years a dedicated group of individuals were trying to locate a copy of the legendary OS. As time passed it seemed that the OS was lost forever.
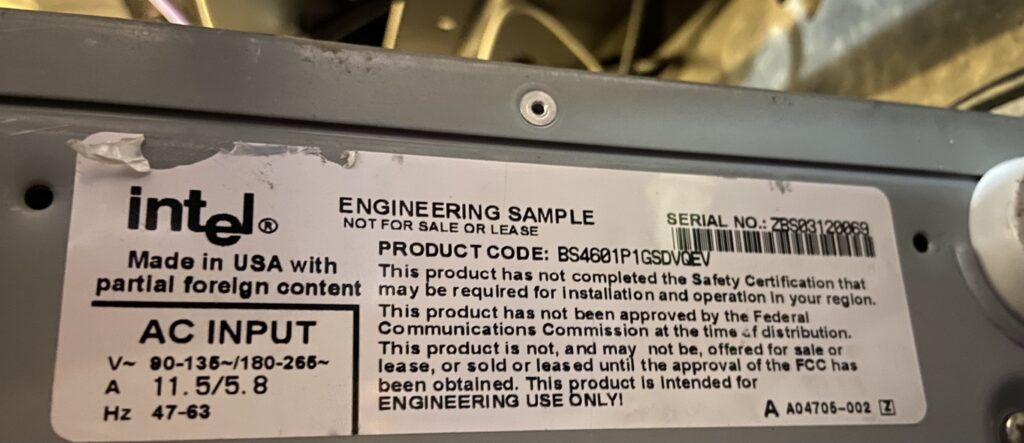
…until some 21 years later friends of NCommander checked in with a set of AIX5L IA64 CDROMS! The CDs have now been dumped and you can download them here. Unfortunately downloading will not get you any closer to actually running this. As of today no publicly available virtualization or emulation platform can boot this. Yes we tried Simics, looked at QEMU IA64 and XEN/KVM for IA64, etc. The OS will not boot on modern Itanium 2 (McKinley) CPUs, only the early “pre-release” Itanium 1 aka Merced. The only emulator allegedly capable of doing so was the super elusive unobtanium called Intel SoftSDV.
It’s currently speculated that AIX5L IA64 will work on and only on so called Intel Software Development Vehicle (SDV) sometimes referred to as Intel Engineering Sample. You can see the original system overview here.
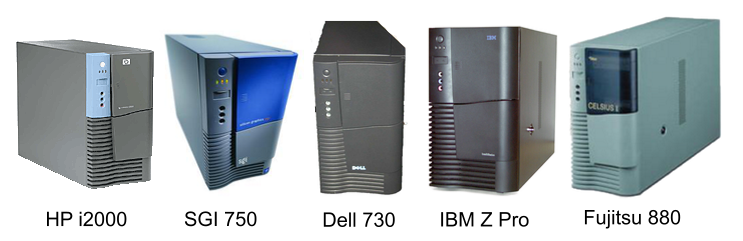
Later SDV was sold under several OEM branded versions: IBM IntelliStation Z Pro 6894, HP i2000 Workstation, SGI 750, Dell Precision Workstation 730 and Fujitsu-Siemens Celsius 880. They all look alike because all of them were in fact produced by Intel.
Intel Itanium Software Development Vehicle Lineup
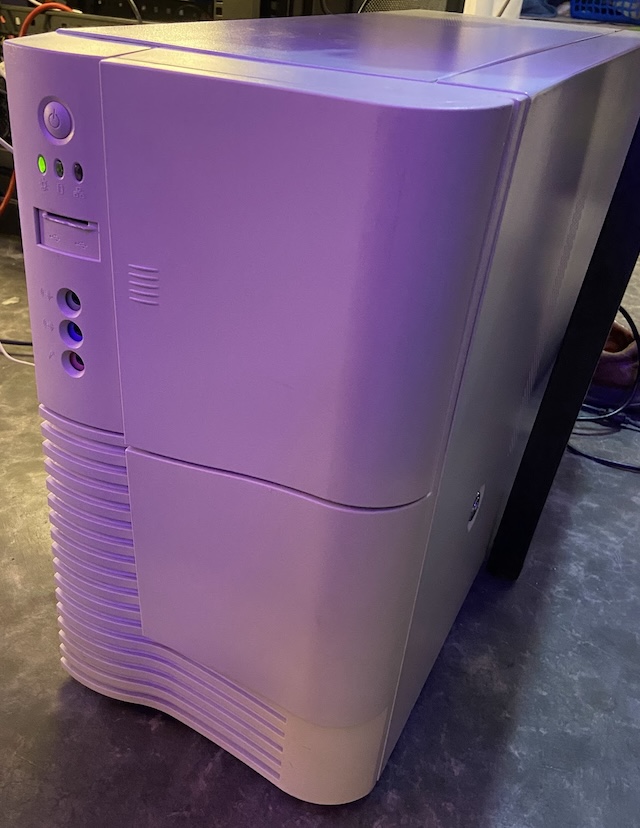
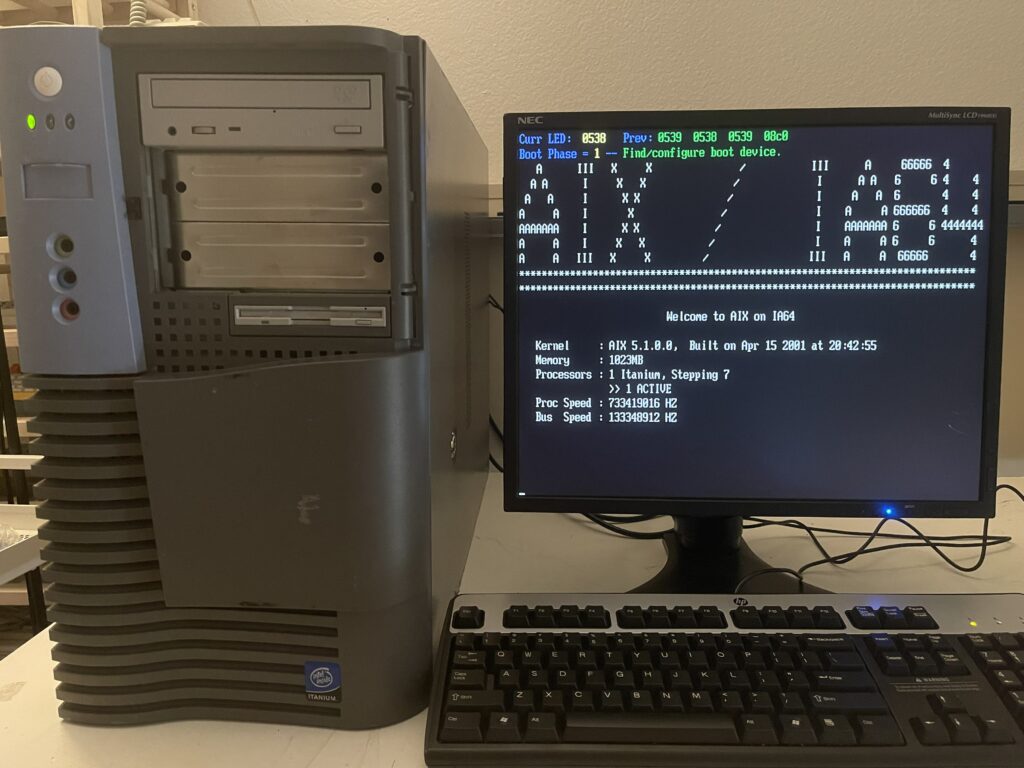
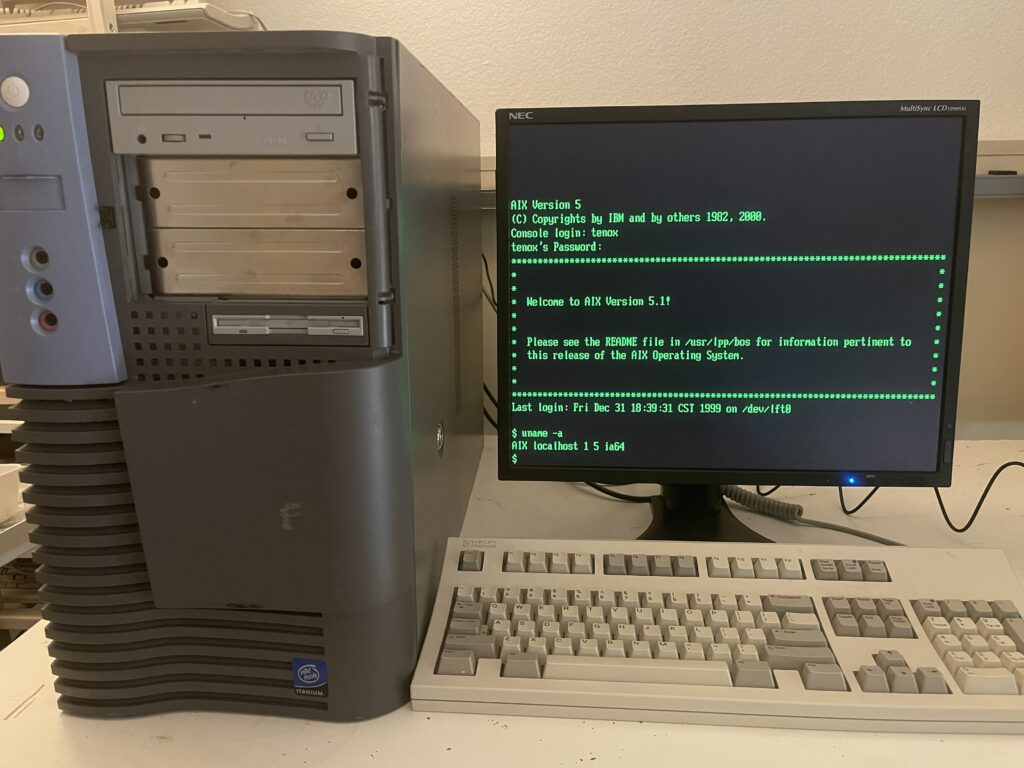
The IBM Z pro is probably most suitable for running AIX. Finding one of these is no easy task. Luckily I was able to score a working HP i2000. Surprisingly AIX IA64 booted on a first try. The install went smoothly and I was able to log in!
AIX 5L IA64 on HP i2000 Workstation – boot loaderAIX 5L IA64 on HP i2000 Workstation – logged in
The OS feels like a standard AIX 5L. Nothing particularly special about it, except that it runs on Itanium. This RedBook outlines differences between the Power and IA64 versions. A few most interesting facts are that: Itanium AIX uses ELF object files. There is a new device driver model called UDI (Uniform Device Interface) with it’s own DDK. It came from SCO UnixWare. Also according early adopters guide, AIX5L IA64 introduces JFS2 file system.
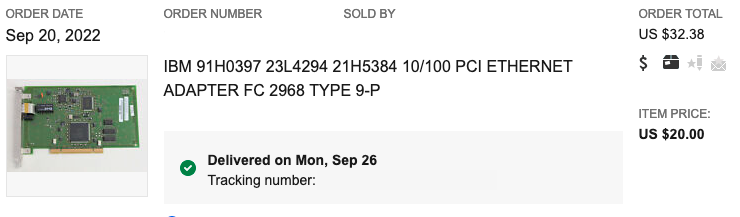
Initially I was not able to get the onboard NIC working. AIX5L IA64 supports only two network cards:
The AIX Itanium Early Adopters Release Notes mentions a few other cards but I do not see drivers for these in the OS. The doc mentions Extended Hardware Drivers CD which we don’t have.
Luckily again I was able to find a working NIC on eBay!
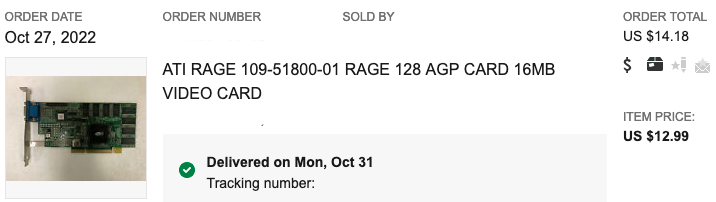
The system comes with X11 and CDE but so far I was not able to get any GPU working beyond basic text mode. I tried many different video cards from that era but there simply doesn’t appear to be any driver in the OS except for basic VGA / LFT. I think the key to getting video working is the previously mentioned extended hardware drivers cd.
Finally, if you want to read more I have found some interesting pieces on ibmfiles and various mirrors here and here.
Update: Thanks to efforts of TRN we now have a working GCC and ports of lots of apps!
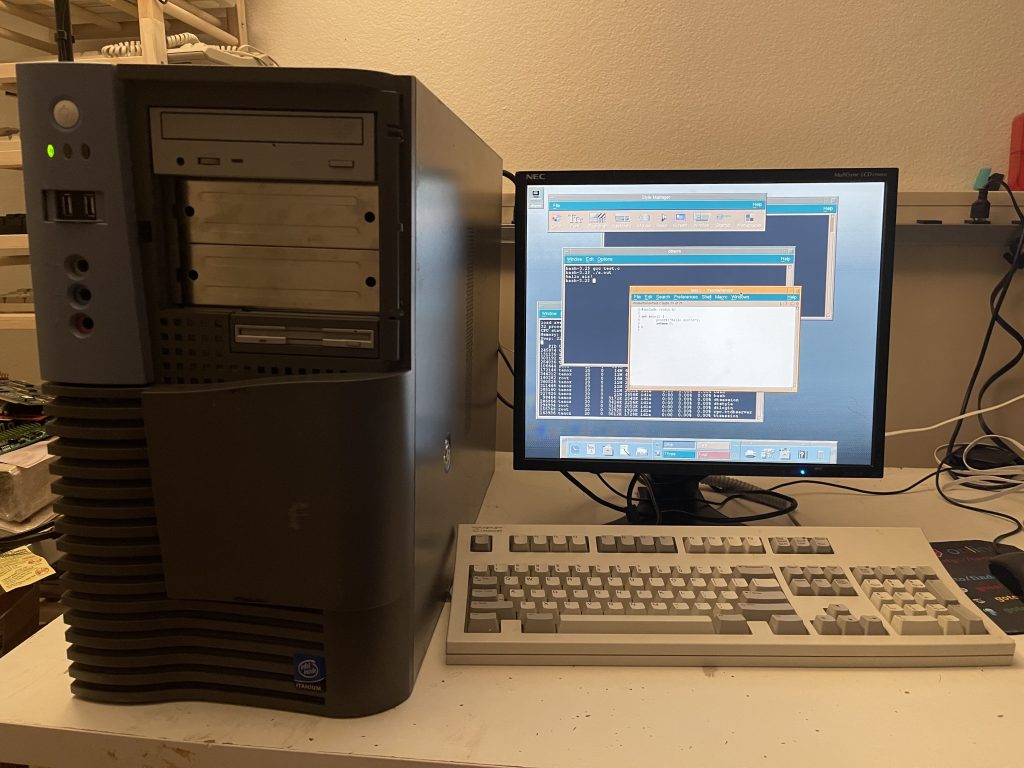
Update 2: After going through a pile of video cards I now have local X11 and CDE!
AIX IA64 local X11 with CDE
This was the lucky winner:
Update 3: SimCity is now available for AIX IA64! You will also need other stuff mentioned here.
Well this is a bit ambiguous. As Im waking up to check emails I get this notice:
Congratulations! Ancient UNIX/BSD emulation on Windows has just been recognized with the following awards by SourceForge:
Community Choice SourceForge Favorite
These honors are awarded only to select projects that have reached significant milestones in terms of downloads and user engagement from the SourceForge community.
This is a big achievement, as your project has qualified for these awards out of over 500,000 open source projects on SourceForge. SourceForge sees nearly 30 million users per month looking for, and developing, open source software. These award badges will now appear on your project page, and the award assets can be found in your project admin section.
Since I’ve been dealing with XHomer a lot lately in order to get the two dumped VENIX/PRO versions to work, I noticed that the XHomer documentation mentions a thing called “maintenance mode” and the DEC Pro port of 2.9BSD, so I was interested.
After doing a bit of searching around I found some install notes on www.frijid.net from real hardware, so I decided to adapt these notes for XHomer and install it. TL;DR – I did it, here I’m explaining all this stuff.
Step 1 – Acquiring XHomer
XHomer is a DEC Pro 350 emulator that can run P/OS, Venix, 2.9BSD and possibly RT-11, but I didn’t get to installing the last one yet. There is a statically linked binary but, since I’m a Gentoo Linux person (but I didn’t use Gentoo for this particular install)and prefer compiling everything I can, I grabbed the source code (https://xhomer.isani.org/xhomer/xhomer-9-16-06.tgz) and quickly compiled it on my Linux box. It was pretty simple, just install a development toolchain (build-essential on Debian based systems), the libX11 development package (libx11-dev on Debian based systems) and the XShm extension which is included in libxext-dev on Debian based systems. During make it spit out a bunch of warnings but I got a working xhomer binary. Also it kind of messes the xterm settings a bit after being closed, so I’d recommend running it in a separate xterm window. Since there’s no install target in the Makefile I just copied the xhomer binary to /usr/bin, and that was it. From here on, I will assume that the XHomer binary is called xhomer and is somewhere in your PATH, if not just modify the way I run XHomer.
Step 2 – Acquiring the distribution
Thanks to the people at the same www.frijid.net site I mentioned earlier, I was able to easily piece together a distribution set. Since we don’t really rely on how many physical floppies we have with an emulator, I grabbed the recommended root disk set and the 15 disk usr set with the source code, although we won’t be compiling the kernel in this post. Maybe next one? We’ll see.
The site with the floppies is http://www.frijid.net/download/pro350/bsd/raw/ and here’s what I used for my install:
The 3 disk usr set in box#2/ doesn’t include the source, so I didn’t grab it. The maintenance disks are all the same, so I just grabbed the one in box#0/. The 6 disk root set in box#0/ does include some extra dev files and something that appear to be leftovers from the development DEC Pro, but it’s missing /bin/ed and /bin/passwd, so I suggest using the 5 disk set instead.
There is also box#2/procomm.img which was labeled as containing “PRO/COMM terminal emulation” but when I mounted it to install, there was only an empty lost+found directory. Perhaps the original disk had gone bad over the years or someone accidentally reformatted it? We may never know.
Step 3 – XHomer configuration & serial port preparation
Since the maintenance (install) floppy uses a serial terminal interface over the printer port and XHomer only allows us to send its output over serial, I had to do some searching again since most PCs nowadays don’t have a serial port to use. Thanks to cantoni over at StackOverflow I managed to find instructions for using socat in order to generate a pty, which actually worked for me. At first you need to install socat (bruh) and then run “socat -d -d pty,raw,echo=0 pty,raw,echo=0”. Something like this will be printed out on the terminal:
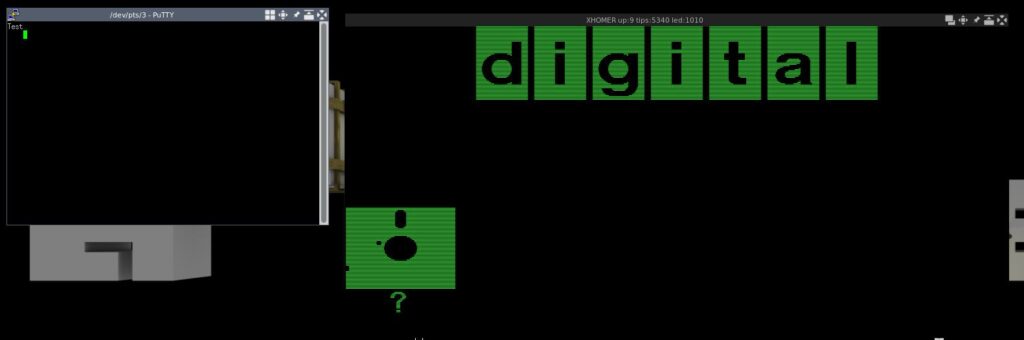
Then we do a quick test. I use putty to connect to the pty’s output, in my case it’s /dev/pts/3. Just use the default settings for serial connection with speed 9600 and the device as /dev/pts/3. If everything goes well, you will get a blank putty terminal window. Don’t panic, the fact it’s blank is normal.
Let’s test if our serial port works. Echo something in the pty’s input, in my case it’s /dev/pts/4. For example, “echo “Test” > /dev/pts/4″. If the word “Test” appears on the screen, congratulations, you have successfully set up the pty to a point where BSD will happily talk to it when we set up the connection later. !! DO NOT CLOSE THE PUTTY WINDOW AT ANY POINT DURING THE INSTALL UNTIL WE NO LONGER NEED IT (at the initial hd boot) !!
Now we configure XHomer. At first, let’s make a disk image. BSD only supports RD51 or RD50, we’ll use RD51 as it’s slightly bigger. If you get the hard disk wrong, BSD will silently hang at boot. Here’s the command to make a 10MB RD51 disk image for use with XHomer:
dd if=/dev/zero of=29bsd.rd bs=10027008 count=1
Let’s make the XHomer config file. Note that everything after the symbol | including the symbol itself does not need to be inputed, it’s just my notes.
screen = window | make the emulator window mode
window_position = 0, 0
window_scale = 2
full_scale = 3
screen_gamma = 10
pcm = on
framebuffers = 0
serial0 = /dev/pts/4 | change to your needs, pty input
la50 = null
la50_dpi = 300
kb = lk201
ptr = serial0 | DO NOT CHANGE, we'll replace it later when we no longer need serial
com = null
rd_dir = ./
rx_dir = ./
rd0 = 29bsd.rd, 4, 306, 16 | change if not using suggested disk
force_year = 99 | fix y2k bugs by forcing year to 1999
maint_mode = on | DO NOT CHANGE, bsd install uses maintenance mode for terminal
int_throttle = off | random workarounds for clocks or older linux systems, we don't need this on new stuff
nine_workaround = off
libc_workaround = off
lp_workaround = off
Save the file as xhomer.cfg.
Now run the xhomer binary. If everything goes right, you should have something like this on your screen:
If you didn’t run the test documented above or changed the string, the “Test” string will not be in the terminal or will be some other text, this is all okay.
Step 4 – BSD install
In order to feed floppies to XHomer, you have to use the XHomer control menu. In order to get to it, press Ctrl+F1 when the emulator window has focus. The two floppy drives we need are rx0: and rx1:, these are equivalents of A: and B: in DOS. Insert the maintenance0.img disk in rx0. If all goes okay, the floppy disk picture should disappear from the display window, leaving just the DIGITAL logo. The putty window should then display something like this:
40Boot
:
(all following input is in the terminal unless otherwise stated)
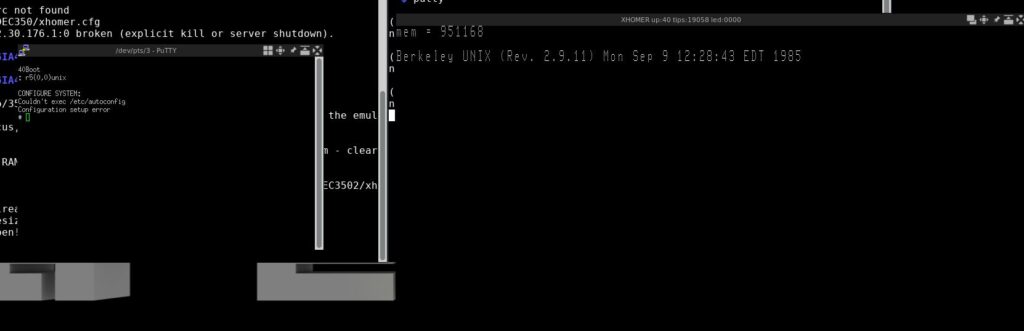
If all is okay, congratulations, you have booted from the installation diskette. Now type the following in the putty window after the : symbol:
r5(0,0)rdfmt
Then, if you inserted an RD51 10MB disk in the emulator as suggested, type 0 when asked for drive type. If you inserted the 5MB RD50 instead, type 1. If you don’t know the exact disk sizes and types, refer to the XHomer documentation, specifically the Emulated Hard Disk part. The formatting shouldn’t take long, then it will dump you back in the 40Boot prompt. Now you need to boot the UNIX kernel, type this in the putty window:
r5(0,0)unix
If everything goes okay, you should have something like this now:
If you get a boot hang instead (like me), restart both XHomer and putty, connect putty back to the pty, then in XHome insert the maintenance0 floppy back and boot the UNIX kernel again. DO NOT FORMAT THE DRIVE AGAIN!!
Install time!
At first, create the root filesystem by running:
/etc/mkfs /dev/rrd0a 2240
Then insert the root1 disk in the 2nd floppy drive (rx1) and restore the root filesystem dump from the 5 root set floppies:
restor rf /dev/rr51 /dev/rrd0a
When it says “Last chance before scribbling on /dev/rrd0a.” just press Enter. When it says “Mount volume N”, just insert the right floppy and press Enter. Volume number == floppy number in this case.
After the “end of tape” message, verify the rootfs:
/etc/fsck /dev/rrd0a
If it succeeds, create the usr filesystem by running:
/etc/mkfs /dev/rrd0c 6528
Then insert the usr+k00 disk in the 2nd floppy drive (rx1) and restore the usr filesystem dump from the 16 usr set floppies:
restor rf /dev/rr51 /dev/rrd0c
When it says “Last chance before scribbling on /dev/rrd0c.” just press Enter. When it says “Mount volume N”, just insert the right floppy and press Enter. Floppy number == volume number – 1 in this case.
After the “end of tape” message, verify the usr fs:
/etc/fsck /dev/rrd0c
(all following input is in on the Pro display unless otherwise stated)
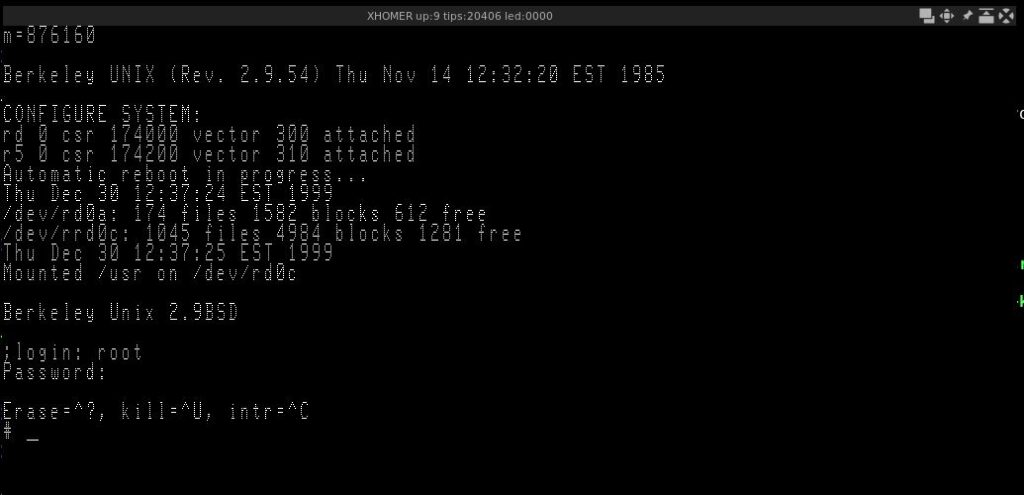
If everything is okay, run sync two times and shut down the emulator. Restart it with only the maintenance floppy in rx0, then type this in the terminal (NOT the Pro display):
rd(0,64)unix
This should boot up Berkeley UNIX (BSD). We’re not done yet, but it’s close.
Type the following to install the hard disk bootblock:
dd if=/rdboot of=/dev/rrd0h count=17
If everything goes okay, set the root password:
passwd root
Congratulations, you have successfully installed 2.9BSD. Here are the cleanup and hdboot prep stuff:
Bring the OS to single user mode:
shutdown +1
(you can close putty now)
Then run sync two times and shut down the emulator.
Step 5 – Booting the OS
In order to boot the OS, you need to do the following:
Open the xhomer.cfg file;
Remove the serial0 = line;
Change the ptr = serial0 line to ptr = null;
Change the maint_mode = on to maint_mode = off.
Then save, after running XHomer you should be able to just log in.
Congratulations, you have successfully installed 2.9BSD for the DEC Pro 350! Sadly it’s pretty unstable, and due to emulation issues in XHomer vi completely crashes BSD, but there’s always ed 😉
Appendix A – Transferring Files
In order to transfer the files (up to 400KB per file) you will need some additional utilities. Here’s a guide on how to install them:
(the following steps are done on the Linux host side)
Run XHomer and attach the generated rx2f.c.dsk to rx0
(the following steps are done on the BSD side)
Grab the file from the floppy:
dd if=/dev/r50 of=rx2f.c skip=18 bs=1 count=891
Compile the utility:
cc -o rx2f rx2f.c
You’re now ready to transfer files.
Short file transfer handbook:
Run f2rx FILE on the host box, FILE being the file to use;
Insert FILE.dsk into rx0 on XHomer;
Run rx2f on the BSD side.
Appendix B – Init: no more children issue workaround
On some hosts, programs from the install floppy may randomly die with the “no more children” message. A workaround is to disable RTC mode and enable IOTRACE mode in the XHomer Makefile and recompile, leading to a much more slower (due to accurate timing) and working XHomer. After the installation, you can revert to normal settings and it should work, as the programs installed on the hard drive to not appear to suffer from the same issue.
Appendix C – Sequels
Possibly coming soon to VirtuallyFun:
Undocumented Madness 2 – Big hard drives on 2.9BSD XHomer Undocumented Madness 3 – Custom Kernel on 2.9BSD XHomer