(This is a guest post by Antoni Sawicki aka Tenox)
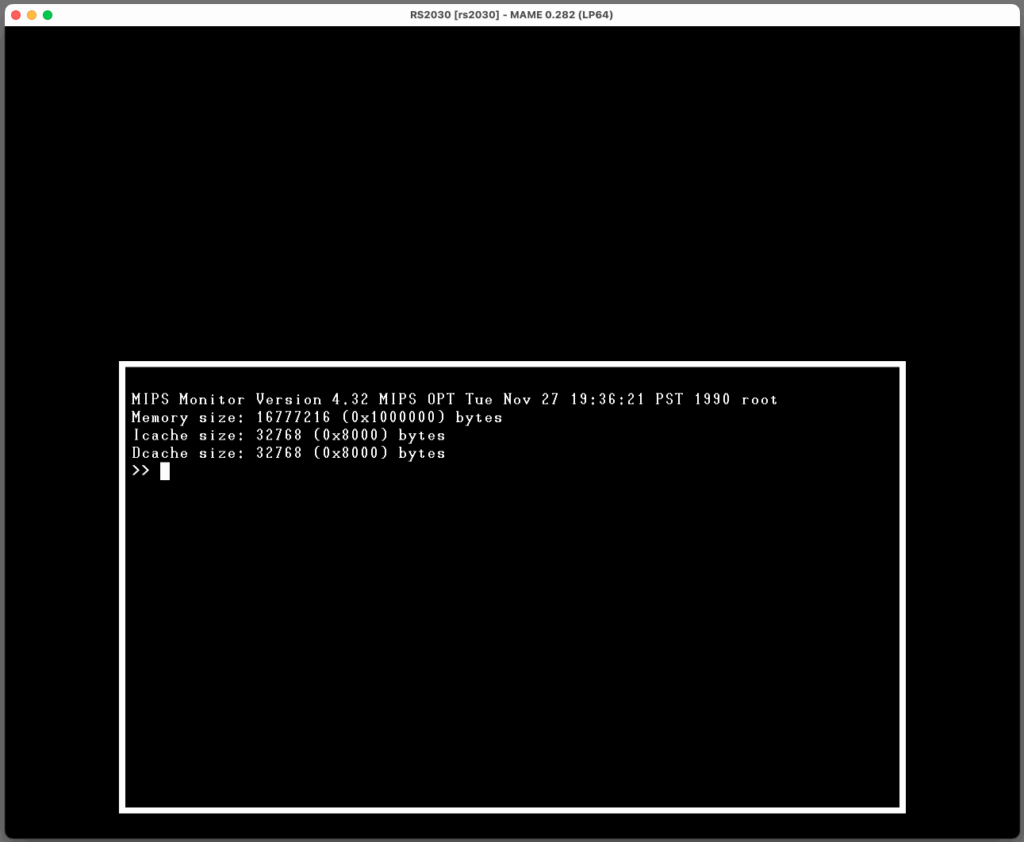
This is a very lazy post. I didn’t do anything here… I don’t exactly remember where it came from but I had this HDD dump of a pre-installed RISC/os 4.52 for MIPS Systems RC2030 lying around. It might have came from bitsavers and/or here? I was recently contacted by Enrique Tejeda Canobbio who managed to convert the image into a chd format and boot it up on MAME which has MIPS support!
MIPS Systems RC2030 on MAME
It turns out the disk image had some non trivial password set for the root account, but with help of hashcat and a decent GPU we got it cracked in 20 minutes or so. Here for your viewing pleasure is the fully working OS:
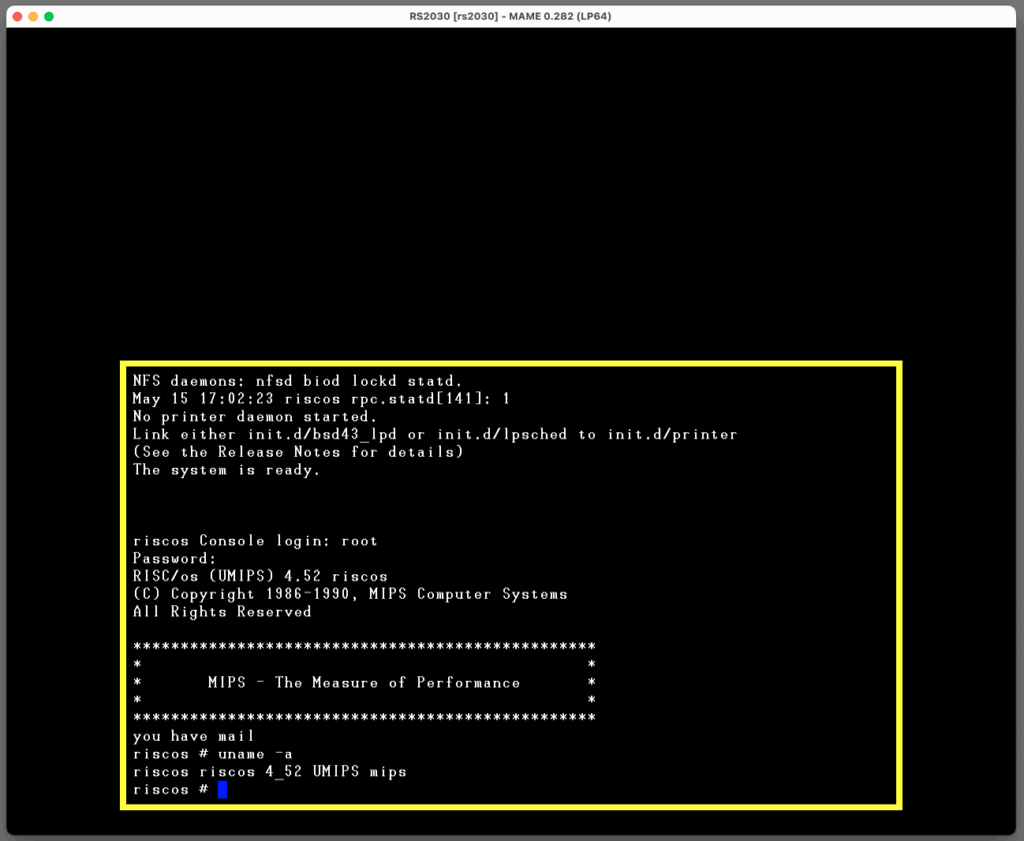
MIPS RISC/os 4.52 running on RS2030 on MAME
The system comes with a working C compiler and there are known some ports of various applications, also X11R5. I will post an update once I add some more stuff to the base image. For now just wanted to get this out in to the wild!
Download from here! Login root/root. The root password for the original image is Wivvle1!
Please post comments or ping me on Discord if you get networking or X11 working!
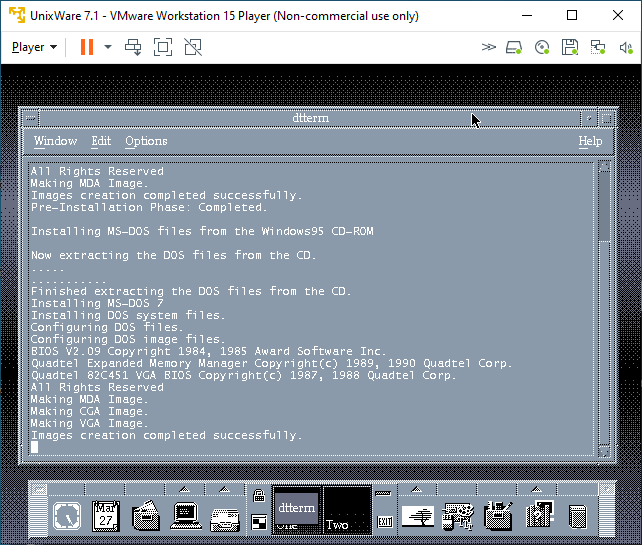
The UnixWare 7.1.1 install program has a date & time Y2k problem. And this always ends in whatever licensing you give it to install will expire and be nullified. Luckily this time while re-installing on VMware I saw if you defer the license on install, It’ll grant you a temporary eval license. It’s not going to matter as it’ll immediately expire, but it get’s us past the install.
Qemu however let’s you rev up the time machine and specify a starting time
-rtc base=1999-09-29T15:00:00
As simple as that. I found for installing with Qemu 8.0 (Latest win32) binary it worked well enough like this:
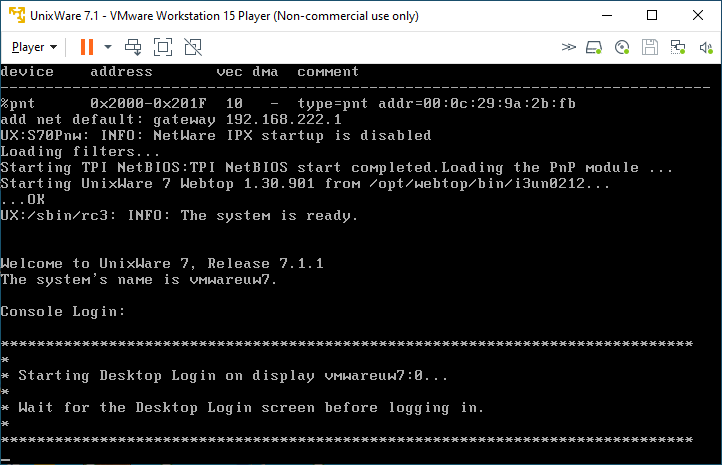
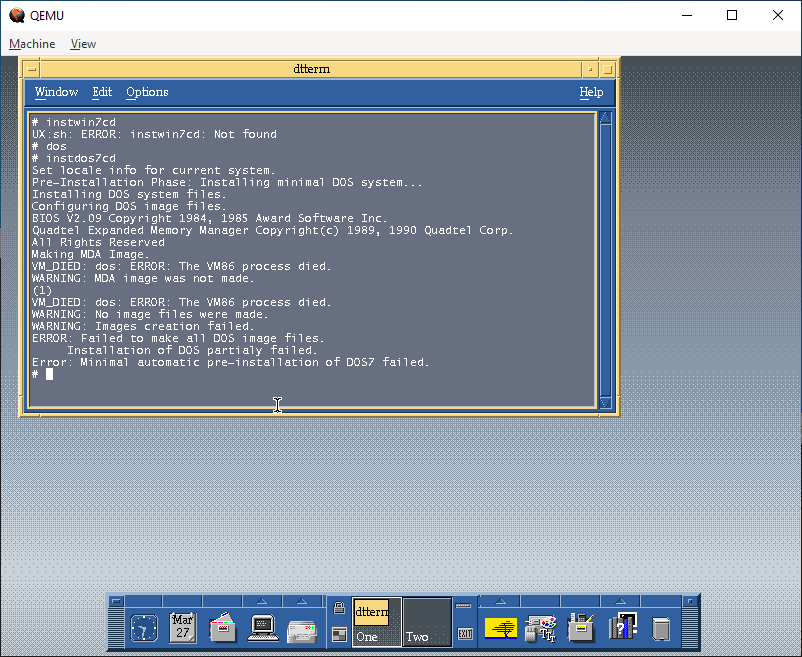
Installation in a stock boring VM goes fine, there is built in support for the AMD PCnet driver, so things ‘just work’. And then on the VMware reboot it never launches X11.
Starting Desktop works fine on Qemu
Under Qemu, I’m greeted by CDE and the login page. On VMware however…
Starting Desktop never starts
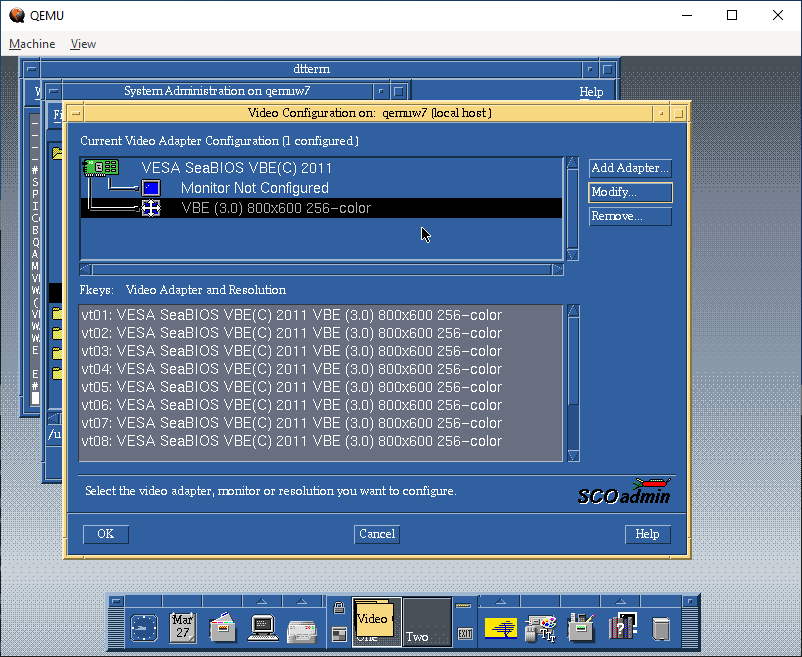
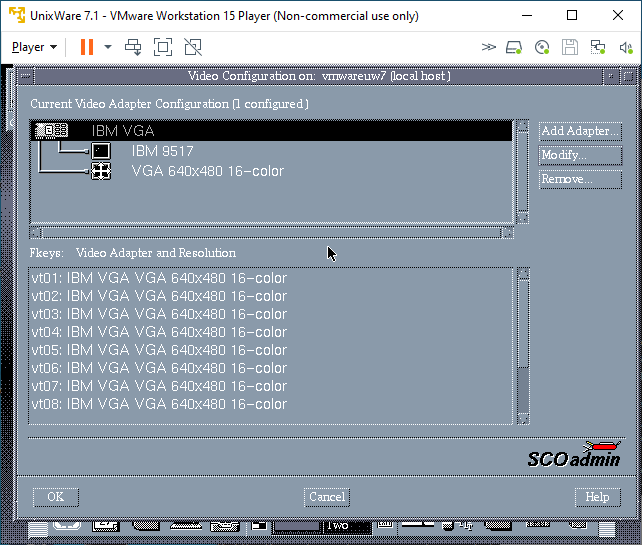
I know t his used to work on VMware, but there is some regression in the VESA video driver. The fix was to use scoadmin and knock the video settings down to stock VGA. Luckily I have an X server running on Windows, so I could just export the display and set it up.
Video Configuration on Qemu
Whereas I had to set VMware to VGA:
Video Configuration on VMware
And one more reboot, and I was at least given a graphical console:
Now able to login to VMware graphically
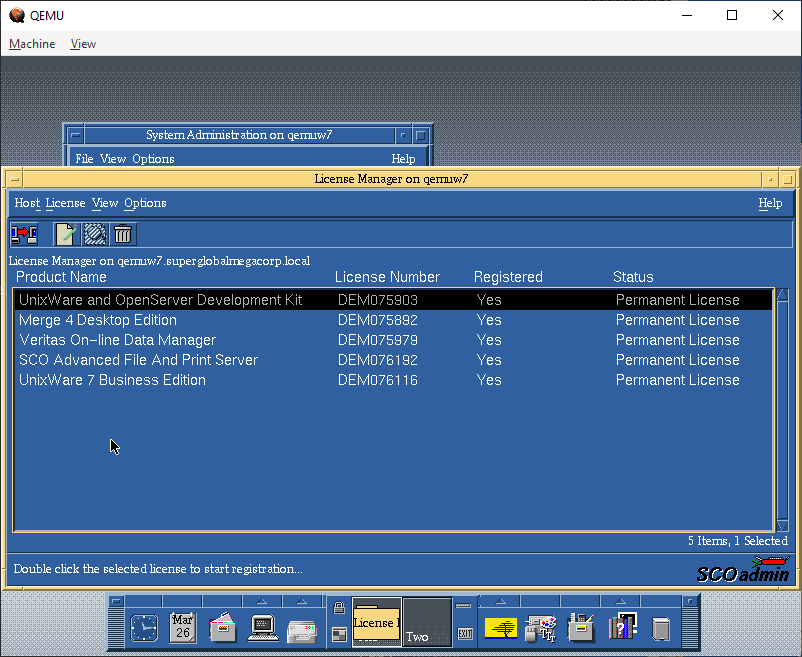
Inputting the licenses
Being a commercial Unix from back in the day, it relies on License Numbers, and activation codes to actually use the software. I have the box, so I have codes so yay me. Post install, I could remove the expired licenses, and then input the ones that were in the box.
These are 5 user licenses, just enough to show off the system, I suppose: The advanced features of the day are nothing special these days, but it’s nice to have the PCC derived compiler, if not to compile GCC but more so for SYSV code from back in the day.
Networking
Networking for VMware is straightforward, I use the NAT interface VMnet8 that is installed by default, selecting a valid Tcp/IP address on the interface range gives me not only full internet access, but also allows me to easily telnet into the VM.
I had been using the user mode SLiRP code for ages, but after all the MIT PC/IP fun, I was thinking I bet modern Qemu supports UDP transport for network traffic, and that it’d just integrate with HecnetNT just fine. And it does!
Configuring the HetnetNT bridge was simple, as always make sure you have Wireshark/pcapng installed and simply run ethlist to get the list of interfaces:
D:\qemu>ethlist.exe
Network devices:
  Number       NAME                                     (Description)
  0  \Device\NPF_{E79F6278-3E7E-4547-955A-2080A0473AD6} (Local Area Connection* 8)
  1  \Device\NPF_{1D960E08-2A3A-43F7-BAD6-21FCB466717B} (Local Area Connection* 7)
  2  \Device\NPF_{98053A85-B049-45A0-AC33-961E2C136FCA} (Local Area Connection* 6)
  3  \Device\NPF_{BFA868ED-E508-4436-B085-EC815C4C544C} (LoopBack)
  4  \Device\NPF_{C75EAF23-0FA3-433B-B271-9CB0F5EB92D0} (VMware Network Adapter VMnet8)
  5  \Device\NPF_{B615DE21-AEC3-4347-916C-332AC4A4DA70} (VMware Network Adapter VMnet1)
  6  \Device\NPF_{82E5A370-6D3D-40AD-A9D5-C4E0E0C50F0D} (Ethernet)
And then create a simple bridge.conf file with the VMnet8 adapter and the UDP pariing to talk to Qemu:
Then launch the bridge program listening on port 5001:
D:\qemu>hecnet.exe 5001
Config filename: bridge.conf
Adding router ''update''. 0100007f:5000
Opening pcap \Device\NPF_{C75EAF23-0FA3-433B-B271-9CB0F5EB92D0}
Adding router ''vmnet8''. 00000000:0
Host table:
0: update 127.0.0.1:5000 (Rx: 0 Tx: 0 (Drop rx: 0)) Active: 1 Throttle: 0(000)
1: vmnet8 0.0.0.0:0 (Rx: 0 Tx: 0 (Drop rx: 0)) Active: 1 Throttle: 0(000)
Hash of known destinations:
Adding new hash entry [52:54:00:12:34:56]. Port is 0
Adding new hash entry [00:50:56:c0:00:08]. Port is 1
Adding new hash entry [00:50:56:f1:dd:d0]. Port is 1
Adding new hash entry [00:0c:29:9a:2b:fb]. Port is 1
It’s a little bit more involved to setup as we have to link the 2 programs via UDP, but I can say it’s totally worth it.
“It just works!” – Sydney
I can now easily FTP files into Qemu, and of course telnet as much as I want to. I don’t see why NFS wouldn’t work either.
Which brings us to the bigger elephant in the room, which one is ‘worth the squeeze’?!
I thought it’d be fun to do a totally unfair CPU intensive thing like building GCC. I would do a quick stage 3 compile blindly running this:
./configure --host=i386-sysv4 --target=i386-sysv4 --prefix=/usr/local/gcc-2.5.8
make
make stage1
make CC="stage1/xgcc -Bstage1/" CFLAGS="-g -O"
make stage2
make CC="stage2/xgcc -Bstage2/" CFLAGS="-g -O"
make stage3
make CC="stage3/xgcc -Bstage3/" CFLAGS="-g -O"
This way we can just look at the timestamps between completed releases. It does build C++ & ObjectiveC as well, and compared to machines from 1999 this is amazing!
-rwxr-xr-x 1 neozeed other 3495688 Mar 29 12:42 ./cc1
-rwxr-xr-x 1 neozeed other 2646888 Mar 29 12:37 ./stage1/cc1
-rwxr-xr-x 1 neozeed other 3495720 Mar 29 12:39 ./stage2/cc1
-rwxr-xr-x 1 neozeed other 3495688 Mar 29 12:40 ./stage3/cc1
Qemu timing
-rwxr-xr-x    1 neozeed  other       3884076 Mar 28 20:12 ./cc1

-rwxr-xr-x    1 neozeed  other       2647116 Mar 28 20:11 ./stage1/cc1

-rwxr-xr-x    1 neozeed  other       3884124 Mar 28 20:11 ./stage2/cc1

-rwxr-xr-x    1 neozeed  other       3884076 Mar 28 20:12 ./stage3/cc1
VMware timing
As you can see VMware is substantially faster when it comes to computation. This shouldn’t come to anyone as any surprise. And this isn’t a fair competition, but it does show that you can stage GCC on Qemu just fine, so that’s actually great!
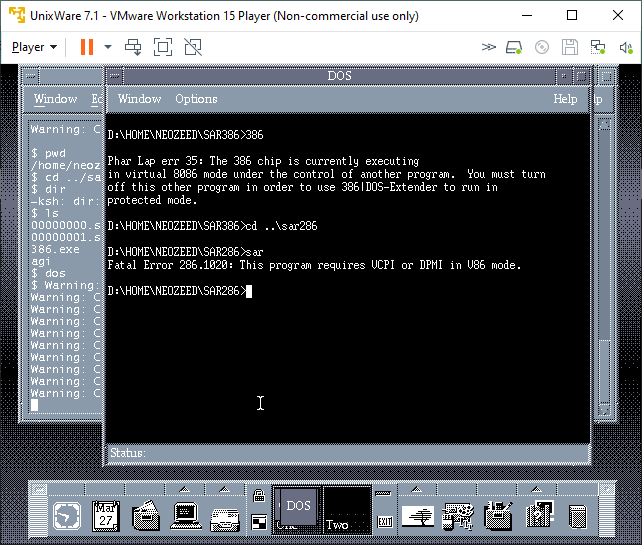
Now let’s mix in some more nonsense, I have a Merge license so let’s try it! First off it really wants Windows 95 from CD-ROM. It will not accept anything else. I have a hacked-up copy of the floppy version of Windows 95 on CD-ROM, and it accepted that just fine, it appears to search through.CAB files looking for files to setup it’s preferred environment. I’m not all that familiar with the whole thing as PC’s are cheap, and virtual machines are even cheaper!
Merge setup on VMware
After the setup completed, I thought I’d try my Sarien 286/386 ports.
no DPMI for Merge
Sadly, neither worked. Maybe it’d have better luck with Windows 95 actually installed. I wanted some high colours so I went over to Qemu and found out that it cannot run Merge.
No Merge!
The error lies in a missing opcode 000000FF. Maybe it’s invalid to trigger an exception to call between DOS and the supervisor?
unknown opcode 000000FF
Either way it doesn’t matter, it doesn’t work. I did get feedback that it does run under KVM.
I don’t know why I didn’t think about doing the HecnetNT bridge earlier as it gives things far more flexibility for tapping into networks, or even being transported. I guess I should look at other transport mechanisms besides UDP since it’s 1:1. Also, it might be worth dropping the protocol restrictive filters to allow everything on the wire to flow.
(this is a guest post by Antoni Sawicki aka Tenox)
As part of nerdy new year celebrations I got Fujitsu Siemens Nixdorf Informationssysteme SINIX-Z running on 86Box. This was possible thanks to Plamen and Vlad!.
SINIX-Z 5.42 on 86Box
Update: got X11 going:
Mosaic browser on Sinix 5.42 on 86Box
Also C compiler:
Also networking… apparently you have to manually connect it.
So over on Modular Circuits, Andras had posted a promising ‘UNICOS Update‘ which had detailed that 2 CD-ROM’s of Unicos had surfaced on archive.org cray-cd1 & cray-cd2. Along with posting the updated source to github, so I had no choice to replicate the experiment!
First the install is INSANELY slow. It requires you to setup a Linux (or unix) machine with rsh. Surprisingly there is a rsh-server package for Ubuntu 22.04. Basically it boils down to following the instructions. Although with WSLv2 I ended up making the bridge manually with:
brctl addbr craybr
ip tuntap add mode tap tap1
ifconfig tap1 up
brctl addif craybr tap1
ifconfig craybr 172.16.0.1 netmask 255.255.255.0
It’s coded in the example configs to use tap1, but there you go. It’s a pretty straightfoward install but the decompression on the cray side takes the installation hours. As an experiment I changed the commands from rcp to remsh to gzip -dc the files locally on my PC, which had the benefit of of being much faster, and not taking up space.
I went ahead and uploaded both of my installs for anyone wanting to play OS tourist enough to check out UNICOS but not wanting to sit through the install.
The C compiler is.. ancient. and very touchy. You’ll need to add /usr/gen/bin to the path, and explicitly add the path for the linker like this:
/usr/gen/bin/cc zap.c -L/usr/gen/lib
Although the breakage is.. pretty epic. I had pretty much no luck bringing over any of my favorites. There should be a much better / modernish C compiler and Fortran compiler, although I’m not sure if it’s on these CD-ROM’s or I’m just massively ignorant of UNICOS, because I never got a chance to be anywhere near a legit supercomputer.
(This is a guest post by Antoni Sawicki aka Tenox)
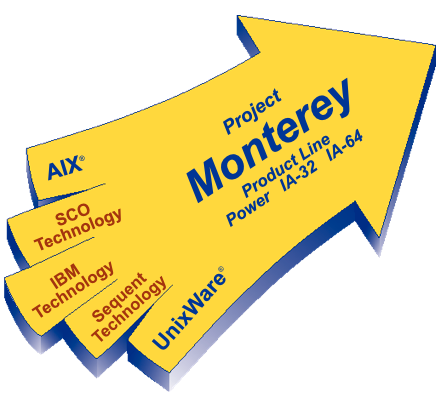
Project Monterey was an attempt to unify the fragmented Unix market of the 90s in to a single, cross vendor Unix OS that would run on the upcoming Intel Itanium (and others) CPU. The main collaborators were: IBM, who brought its AIX, SCO brought UnixWare, HP was supposed to bring parts of HP-UX and SequentDYNIX/ptx. Ironically the project shared fate of the Itanium processor – it totally failed. In the end Linux took spot of the “single Unix OS”. IBM donated pieces of AIX to Linux instead and the main legacy of Project Monterey was the famous SCO vs IBM lawsuit.
A little known fact, IBM did however produce AIX version for the Itanium architecture! According to Wikipedia, some 30+ licenses were sold in 2001-2002. For years a dedicated group of individuals were trying to locate a copy of the legendary OS. As time passed it seemed that the OS was lost forever.
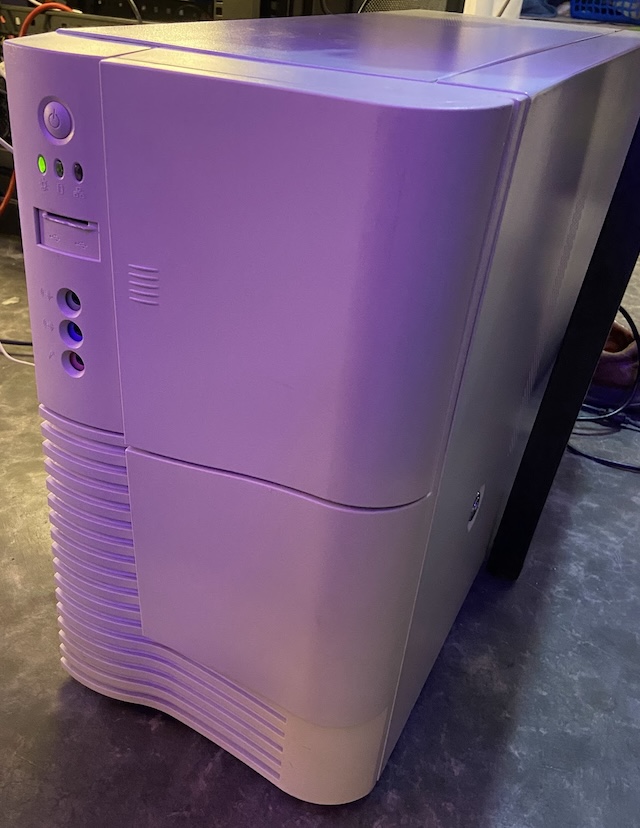
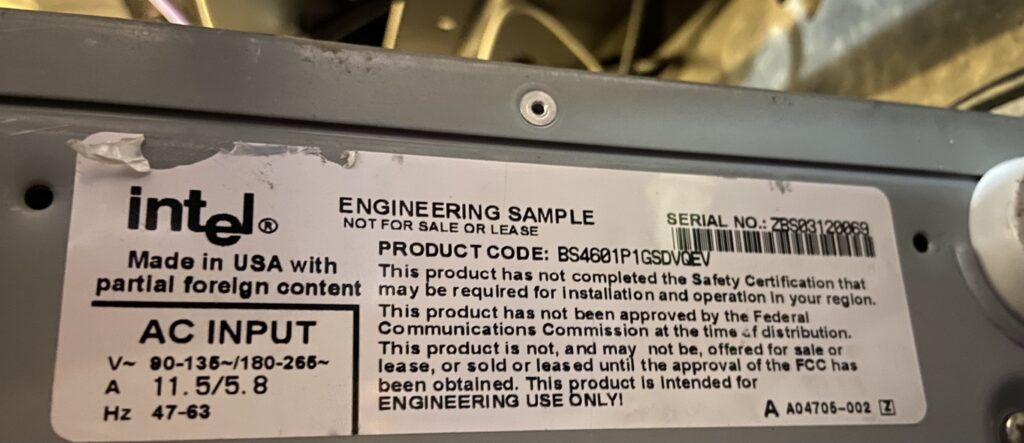
…until some 21 years later friends of NCommander checked in with a set of AIX5L IA64 CDROMS! The CDs have now been dumped and you can download them here. Unfortunately downloading will not get you any closer to actually running this. As of today no publicly available virtualization or emulation platform can boot this. Yes we tried Simics, looked at QEMU IA64 and XEN/KVM for IA64, etc. The OS will not boot on modern Itanium 2 (McKinley) CPUs, only the early “pre-release” Itanium 1 aka Merced. The only emulator allegedly capable of doing so was the super elusive unobtanium called Intel SoftSDV.
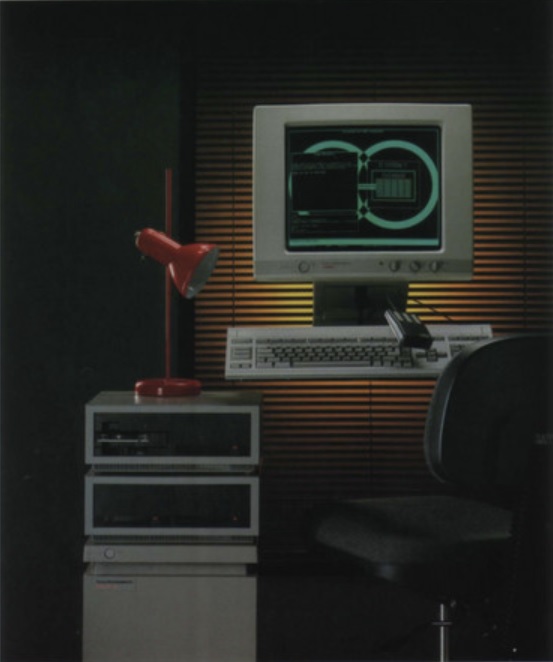
It’s currently speculated that AIX5L IA64 will work on and only on so called Intel Software Development Vehicle (SDV) sometimes referred to as Intel Engineering Sample. You can see the original system overview here.
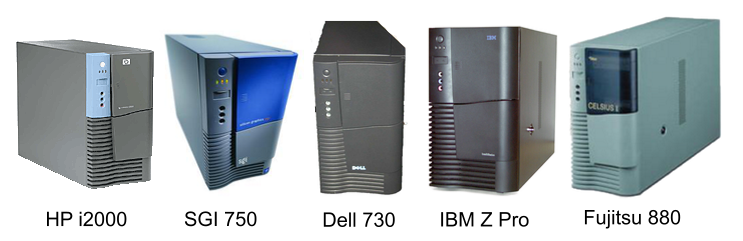
Later SDV was sold under several OEM branded versions: IBM IntelliStation Z Pro 6894, HP i2000 Workstation, SGI 750, Dell Precision Workstation 730 and Fujitsu-Siemens Celsius 880. They all look alike because all of them were in fact produced by Intel.
Intel Itanium Software Development Vehicle Lineup
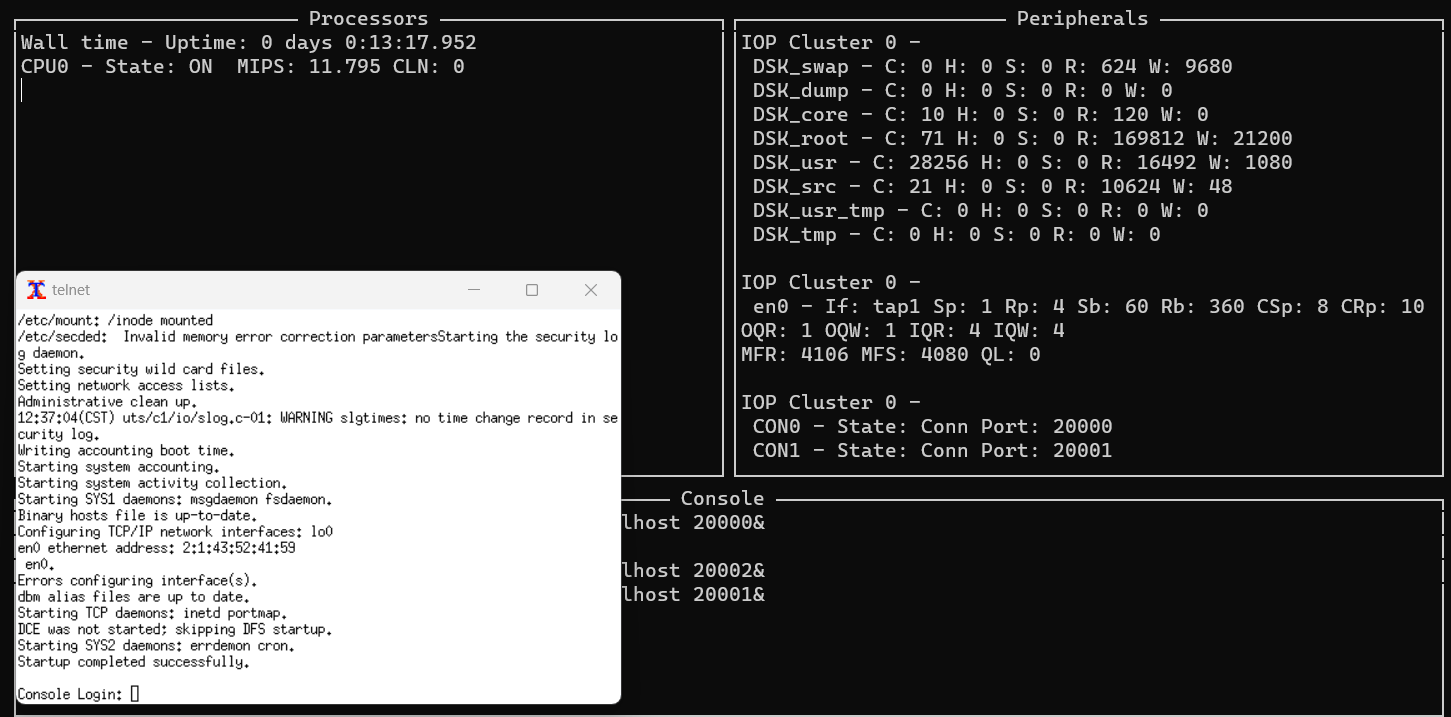
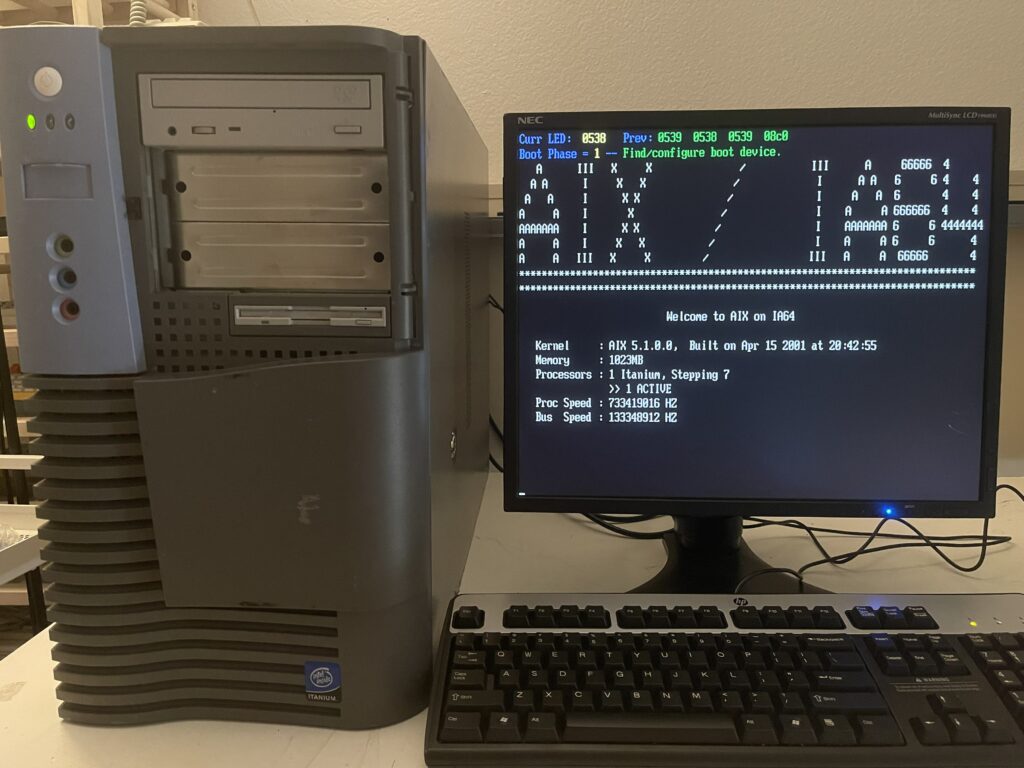
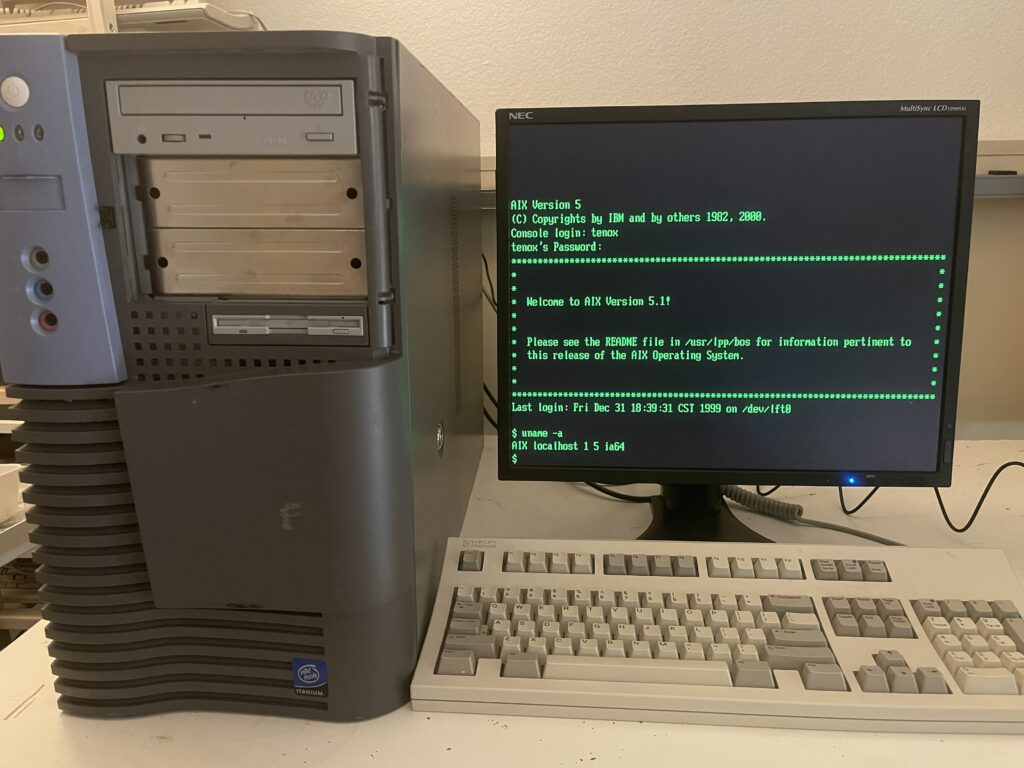
The IBM Z pro is probably most suitable for running AIX. Finding one of these is no easy task. Luckily I was able to score a working HP i2000. Surprisingly AIX IA64 booted on a first try. The install went smoothly and I was able to log in!
AIX 5L IA64 on HP i2000 Workstation – boot loaderAIX 5L IA64 on HP i2000 Workstation – logged in
The OS feels like a standard AIX 5L. Nothing particularly special about it, except that it runs on Itanium. This RedBook outlines differences between the Power and IA64 versions. A few most interesting facts are that: Itanium AIX uses ELF object files. There is a new device driver model called UDI (Uniform Device Interface) with it’s own DDK. It came from SCO UnixWare. Also according early adopters guide, AIX5L IA64 introduces JFS2 file system.
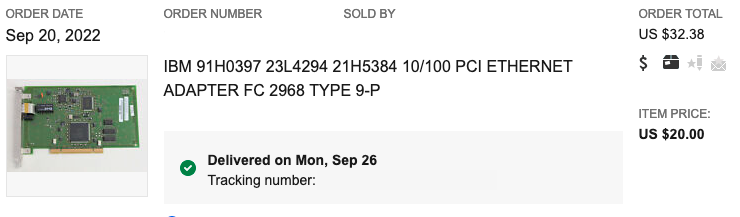
Initially I was not able to get the onboard NIC working. AIX5L IA64 supports only two network cards:
The AIX Itanium Early Adopters Release Notes mentions a few other cards but I do not see drivers for these in the OS. The doc mentions Extended Hardware Drivers CD which we don’t have.
Luckily again I was able to find a working NIC on eBay!
The system comes with X11 and CDE but so far I was not able to get any GPU working beyond basic text mode. I tried many different video cards from that era but there simply doesn’t appear to be any driver in the OS except for basic VGA / LFT. I think the key to getting video working is the previously mentioned extended hardware drivers cd.
Finally, if you want to read more I have found some interesting pieces on ibmfiles and various mirrors here and here.
Update: Thanks to efforts of TRN we now have a working GCC and ports of lots of apps!
Update 2: After going through a pile of video cards I now have local X11 and CDE!
AIX IA64 local X11 with CDE
This was the lucky winner:
Update 3: SimCity is now available for AIX IA64! You will also need other stuff mentioned here.
So this started out as a weird thing that killed a day for me. I thought it was a little fun to look at but, ultimately I proved that I could extract files, but not from the requested image.
So let’s get into some more details, my failure, and well it’s been raised into another chance for some luck/fast knowledgeable hacker to get a payout to extract a single file.
As mentioned above the computer is the Texas Instruments S1500, the disk image was dumped on bitsavers years ago as s1505_cp3540/s1505_cp3540.dd.gz. As you may guess it’s a raw ‘dd’ of a disk.
Now looking at a few sources namely unix-ag the OS in question is TI System V, an AT&T SVR3.2 derivate. Running strings does reveal ‘SysVr3TCPID’ And this appears to be the Unix Version Banner:
(c)Copyright 1993 Hewlett-Packard Company,  All Rights Reserved.
(c)Copyright 1986-1992 Texas Instruments Incorporated,  All Rights Reserved.
(c)Copyright 1984-1988 AT&T, All Rights Reserved.
(c)Copyright 1979, 1980, 1983, 1985-1990 The Regents of the Univ. of California
(c)Copyright 1980, 1984, 1986 Unix System Laboratories, Inc.
(c)Copyright 1990 Motorola, Inc.
(c)Copyright 1989-1990 The Santa Cruz Operation. All Rights Reserved.
                         RESTRICTED RIGHTS LEGEND
Use, duplication, or disclosure by the U.S. Government is subject to
restrictions as set forth in sub-paragraph (c)(1)(ii) of the Rights in
Technical Data and Computer Software clause in DFARS 252.227-7013.
                         Hewlett-Packard Company
                         3000 Hanover Street
                         Palo Alto, CA 94304 U.S.A.
Rights for non-DOD U.S. Government Departments and Agencies are as set
forth in FAR 52.227-19(c)(1,2).
Along with further extraneous info like:
TI Sys V
V/68-1.0
3.3.2
MC680X0
Hewlett-Packard 9000 Series 1500
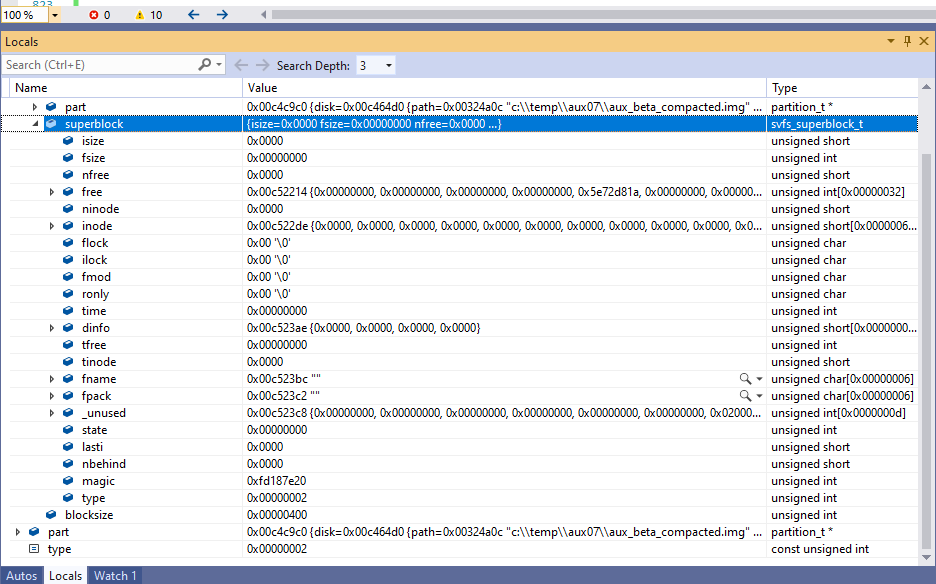
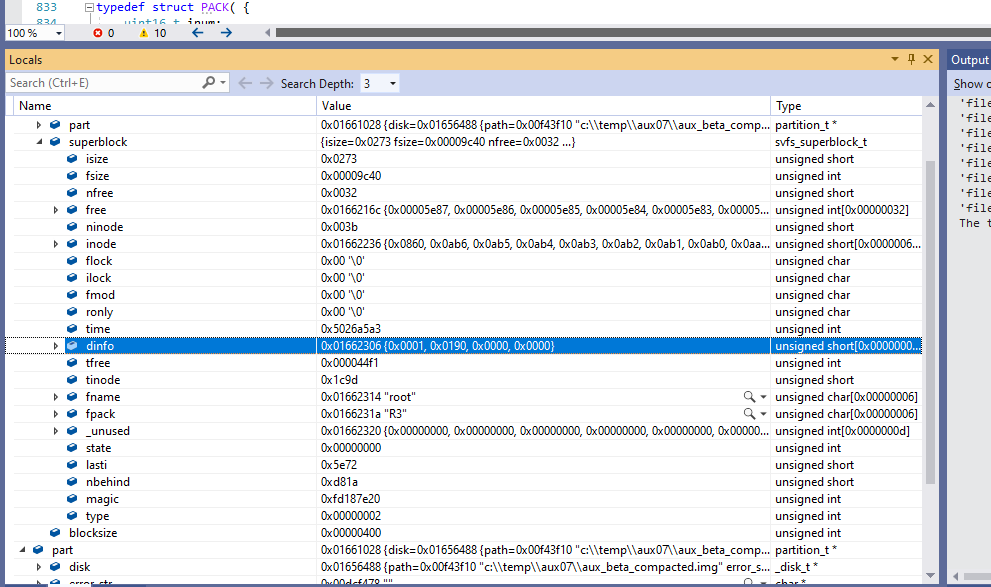
Fantastic. Well digging around you’ll eventually find that SYSV filesystems have a magic number, and it’s 0xfd187320
So a simple search through the raw filesystem reveals some:
And this fits the bill, as the next 32bit ‘word’ is the version, in this case 2 to indicate 1024k blocks ,and improvement added to SYSVr2. One thing is that the struct to read a super block is 512bytes (or is it always?), and the magic number is near the end, so from the above offsets, subtract 496 (decimal!) and you can get the start and sizes of each filesystem. Fantastic!
Speaking of SYSVr2, Do you know what is another SYSVr2? A/UX.
Shoebill was panned for not emulating the full Macintosh, rather it reads the kernel directly from the filesystem, and boots into it. That means Shoebill can read UFS/SYSV. Great start?
So I took the filesystem code from Shoebill, hacked it enough to let me build on Visual Studio, and point it to a raw filesystem and take a look. I put it here: filesystem.c
Now I’m impatient so it still needs a legit Apple A/UX virtual disk. Granted we don’t need it, but it made it easier to let the existing code fiddle with apple partitions, but when it comes time to read SYSV blocks, I closed the file handle and swapped things around. And that lead to this:
As you can see there is a LOT of zeros. However the magic & type align.
Meanwhile here is what an A/UX SYSV filesystem looks like. Notice far less zeros.
Additionally I was able to get another 68k based SYSV Unix disk, and yeah not all zeros. Also yes, using the Shoebill code it extracted files just fine.
However using my approach on the filesytem I always only get a directory with 2 enteries the ‘. ..’. I modified the source to just count inodes and write them to disk. And use inode 2 is just a tiny file. No doubt with all the zeros the disk is either very corrupted (backup superblocks?! where?! how?!) or the kernel implicitly knows these things, or finds them somewhere else.
I’ve been authorized to give a bounty of $200 USD to be able to extract arbitrary files from the 1505 disk image. I thought I’d give it a shot, but I don’t get how the super block aligns but the data doesn’t. Unless there is some other insane padding thing for a 1k superblock? The more I think about it, it’s probably likely as I know at some point I was skipping 3 blocks from an offset to get to a superblock, and 3 is just a weird number. 1 block header, 2 block superblock makes more sense.
Additionally this table may prove useful, especially for the ‘skip 3’ or pad to 1k:
Tape and disk utility is in progress...

26 partitions, 12-longword descriptors:
     Name    Start    Length   User  Comments
1  * LABL vl 0        2        FFFF
2  * PTBL pt 2        3        FFFF
3    SAVE sb 5        3        FFFF
4    FMT  fp 8        9        FFFF
5    TZON tz 17       296      FFFF
6  * unx1 lb 313      1024     0002  TI Sys V 3.3.2
7  * unx1 lb 313      1024     000A  TI Sys V 3.3.2
8  * unx1 lb 313      1024     0013  TI Sys V 3.3.2
9  * unx1 lb 313      1024     0014  TI Sys V 3.3.2
10   unx2 lb 1337     1024     0002  TI Sys V 3.3.2
11   unx2 lb 1337     1024     000A  TI Sys V 3.3.2
12   unx2 lb 1337     1024     0013  TI Sys V 3.3.2
13   unx2 lb 1337     1024     0014  TI Sys V 3.3.2
14   unx3 lb 2361     1024     0002  TI Sys V 3.3.2
15   unx3 lb 2361     1024     000A  TI Sys V 3.3.2
16   unx3 lb 2361     1024     0013  TI Sys V 3.3.2
17   unx3 lb 2361     1024     0014  TI Sys V 3.3.2
18 * cfg1 cb 3385     17       FFFF  TI Sys V 3.3.2
19   cfg2 cb 3402     17       FFFF  TI Sys V 3.3.2
20   cfg3 cb 3419     17       FFFF  TI Sys V 3.3.2
21 * root fb 3436     12288    FC02  TI Sys V 3.3.2
22   usr  fb 15724    32768    FC02  TI Sys V 3.3.2
23   jdis an 48492    2        FFFF  multi-volume file system anchor
24   pipe fb 48494    1024     FC02  pipe file system partition
25 * swap pb 49518    32768    0002
26   prt1 fb 82286    448972   FC02  part of jdis multi-volume
Did you know there is almost nothing left to document that this poor machine even existed?
I’m being a bit unfair as far as Alpha’s go it’s rough to get going but wow it’s GREAT! For starters it’s a Quadra 800 so System 7.1 through 8.1 will work. Also this has full 68040 capabilities so yes that means MMU and YES A/UX (and NetBSD!) will run
As always you can find more on emaculation, the best source for news and info on emulating the Mac.
Many of my Shoebill/Cockatrice III images didn’t work at all. Some at least were picked up as blank disks. I had less luck with freshly created raw/vmdk or qcow2 disks. Not sure at all. My minimal 7 2gb disk worked fine as a donor, and even converting to a vmdk was fine. Sooo YMMV. But hey it’s an Alpha and YES IT CAN WORK.
Another plus is that the idle loop works fine so it won’t burn 100% of your CPU. This could possibly be a great gopher server!? Time will tell.
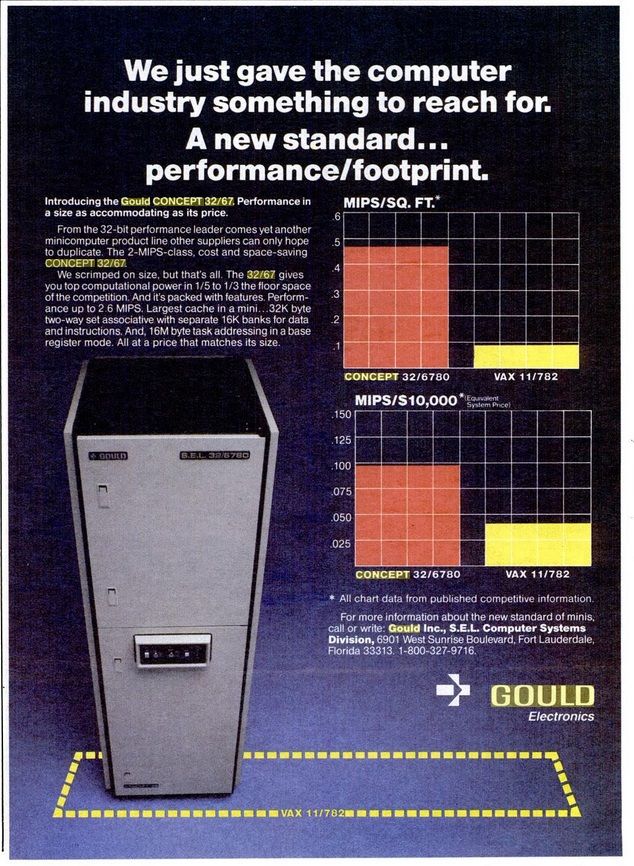
Despite Gould’s location being a few minutes drive from where I first arrived in America, I never had any idea they existed, were making their own exciting machines, or were even a Unix VAR. At a time during the Unix wars one was left to choose SYSV or BSD, but Gould had gone another direction with UTX with a ‘why not both’ approach. Truly an 80’s miracle of Unix.
Even better he’s included tape images, and working INI files which I was able to make into a working system! (after some help with a tape bug)
Boot
File is COFF format
-> section (.bss) size (177960) clearing at (0xcbc18)
-> section (.text) size (724800) loading at (0x1200)
-> section (.data) size (105176) loading at (0xb2140)

Start 0x1200

UTX/32 2.1B (exp) #0: Mon Apr 10 19:46:05 GMT 1989
    bsln@fenix:/usr.POWERNODE/src/src/sys/obj

V6 CPUIPU(P) configuration (IPU not present)
top of system = 0x400000
real mem = 8388608
End of kernel map 0x218464
avail memory = 7356416
using 256 buffers containing 262144 bytes of memory
using 256 mirror buffer headers
ioi: channel iop0 at 7e00 online
ioi: channel dc0 at 800 online
ioi: channel dc1 at c00 not present, dci cc=2
ioi: channel dc2 at 400 not present, dci cc=2
ioi: channel tc0 at 1000 online
ioi: channel en0 at e00 online
 -- CHECK AND RESET THE DATE!
swapping on the b partition
dmmax 512 mbswap 3576
dumplo 11776
Checking root filesystem
Check commented out, uncomment once you have edited /etc/fstab!
Automatic reboot in progress...
Mon Aug 30 05:35:46 CDT 2021
/etc/fsck -p /dev/rdk0d
/etc/fsck -p /dev/rdk0e
/etc/fsck -p /dev/rdk0f
File systems OK

Mon Aug 30 05:36:06 CDT 2021
Mounting file systems
/dev/dk0d mounted on /usr.POWERNODE
/dev/dk0e mounted on /home
/dev/dk0f mounted on /usr/local
Initializing loopback
Starting line printer daemon
Starting standard daemons: update cron.
Adding swap partitions
Standard setup functions
Invoke local rc file
Entering /etc/rc.local
dumpdirectory: No such file or directory
Starting Syslog Daemon
Starting local daemons: inetd.
Starting NFS/RPC daemons: portmap sund.
Mounting NFS filesystems
Leaving /etc/rc.local
Starting mail
Checking aliases file
Preserving editor files
Clearing /tmp - does not remove directories
Clearing pseudo terminals
Leaving rc
Mon Aug 30 05:36:07 CDT 2021


GOULD UTX/32 2.1B (noname) (console)

login:
It’s very BSD feeling on the boot and in the /usr directory there is 5bin 5lib
Sadly transferring stuff by just pasting on the console reveals that there is some IO issues in the simulator:
syncing disks... done

dumping to dev 101, offset 11776
ioi: channel dc0 at 800 online
dump succeeded
As a matter of fact doing anything too fast can/will panic the simulator. That goes for Ethernet and additional serial ports.
Interesting highlights of the platform:
Produced by hard-params version 4.1, CWI, Amsterdam
Compiler does not claim to be ANSI C

Char = 8 bits, signed
Short=16 int=32 long=32 float=32 double=64 bits
Char pointers = 32 bits
Int pointers = 32 bits

Alignments used for char=1 short=2 int=4 long=4
Character order:
    short: AB
    int:   ABCD
    long:  ABCD
Obvious issues with the platform is a lack of GCC. The PCC compiler while standard for early 80’s non PDP-11/VAX machines is a bit lacking as the years went on. I was unable to build gzip due to the following error:
# gmake
cc  -o gzip gzip.o zip.o deflate.o trees.o bits.o unzip.o inflate.o util.o crypt.o lzw.o unlzw.o unpack.o unlzh.o getopt.o
ld: warning: near subsegments too big for static base spanning
ld: gzip.o:
        no base for reloc of memref instruction at .nbtext+0x18 relative to symbol _progname
ld:
        1221 more 'no base ' errors
gmake: *** [gzip] Error 4
Sadly I don’t find much on Altavista other than this & this. It only offers this terse comment:
The constraints on address space on a Gould are quite severe.
Bummer. Additionally neither Hack 1.0/1.03 or PDP-11 Hack will build either. Surprisingly bash-1.14.7, make-3.75 and ircii-2.5 compiled. Obviously with no networking IRC is kind of pointless.
It’s an interesting time capsule of life outside of AT&T/CSRG or SUN, going in a different direction. It seems like a larger lost opportunity to take their ‘it runs both’ approach software and not have it available on different platforms. Granted for a hardware company once the software leaves the compelling reason to buy the hardware evaporates. Hello NeXT.
If anyone wants to try to re-create it, download and build the SEL32 emulator from github, and I put my vague instructions here.
Or for like minded OS tourists, you can give it a spin here: UTX32_2.1B.7z. I included a ‘9346-UTX-blank.disk’ file which is already prepared if you don’t want to go through the 15 questions to prep a disk. Likewise I made a ‘9346-UTX-biga-blank.disk’ image which is just a single large ‘a’ partition as it’s trivial to just add a bunch of big disks these days.
Full 32bit Unix machines from Ft Lauderdale! Who knew?
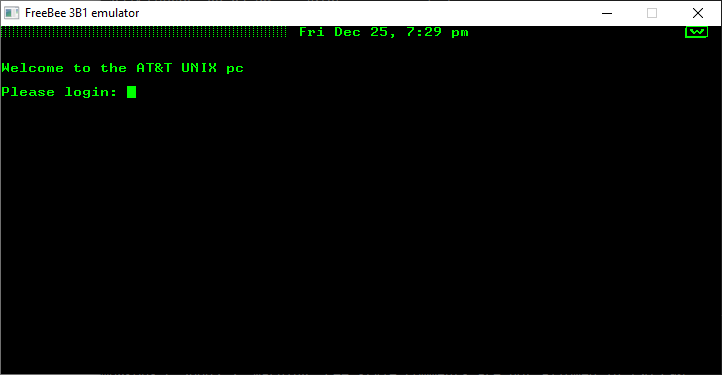
Again super thanks to shadyjesse for finding and fixing the larger issues, and philpem for his great emulator, freebee!
So 1970’s
I have to say, having never played with an AT&T Unix PC, it’s kind neat with this windowing non X11 UI. Although even in emulation it’s incredibly slow. But such was the Unix microprocessor revolution of the era, it’s crazy to think the mighty SUN-2 is also on the same level of performance, although SUN would at least go the way of the 68020 before giving up on the 68k for SPARC.
Even though the 68000 lacked the ability to recover from bus faults, allowing a better path to UNIX with the 68010, OEM’s still brought their own MMU technology to flesh it out, leading to divergent systems. Not that it mattered all that much for AT&T as they started to establish themselves as the new defacto go to UNIX vendor they quickly abandoned the market leaving the Unix PC, and 3B2’s to die off. While so many like to think that the ‘Unix’ business is booming, it really only boomed once AT&T exited the market until Linux had started to gain enough mindshare post 1.0… Which also included 68000 support, although aimed for the the stronger 68030/68040’s.
Anyways I’m sure you didn’t come here for my ramblings about the 68000 instead you want an easy to run package to click and GO!
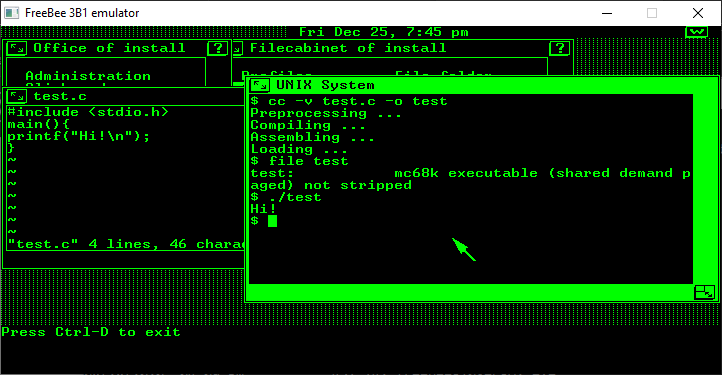
There are two executables, for normies, tourists, and people only wanting to witness the fun it doesn’t matter which one you use. For anyone wanting to install the 3B1 Unix, you’ll want “freebee-10sec-O2.exe”. Since the 3B1 uses a non standard format, if you want to use FAT 360kb disks from a PC emulator then you’ll need “freebee-9sec-O2.exe”. Isn’t compatibility great?
It’s been a while since I played with Philip Pemberton’s excellent emulator, however the source code has been moved to github…
As a nice bonus it’s been updated to build against the newer source drops of Karl Stenerud’s Musashi.
The Makefile is so nice it chains in c files from sub-directories to build, which unfortunately it doesn’t work so well with the latest Musashi. Like a bull charging into the China shop I just smashed together a build script, and got a working exe:
And it’s so nice to see it actually boot up.
Things like the C compiler still break, apparently the 6100 had an actual physical memory buffer for IPC? It’s all so confusing.
Not that mine is all that great but my crap fork is here: