No, really..
And I thought the Windows/386 video was bad…

No, really..
And I thought the Windows/386 video was bad…
Happy 30th Birthday MIDI
MIDI (Musical Instrument Digital Interface) turns 30 today.  I remember actively listening to midi file versions of songs I liked in the days before Napster but apparently I never really appreciated the technology for what it was.“MIDI belongs to a Paleolithic era of computer interface design. Nevertheless, it’s still used in every major recording studio, by almost every electronic musician working today, and aspects of its design have directly influenced the evolution of several musical genres.”
From theverge.com.
I remember the first time I saw a MIDI deck, was back in high-school (whoa step into the time machine) when this kid, Adam, was showing off the latest in awesomeness, Wing Commander!  Which was an awesome spectacle on a VGA equipped 386 DX along with a brand new MIDI deck.  Prior to then, the only PC’s I’d seen had glorious CGA graphics, and utilized the PC speaker as a glorified beeper.  At that point I’d given up on buying an Amiga as my parents didn’t like the idea of me spending $599 on an Amiga 500, but PC’s you could buy in pieces and of course under the radar of obsessive parents.
But going back to MIDI, for a while in the late 80’s and early 90’s MIDI files were traded like crazy much like MP3’s in the 2000’s. Â And the one card that started to bring MIDI sound to the masses was the good old Adlib!
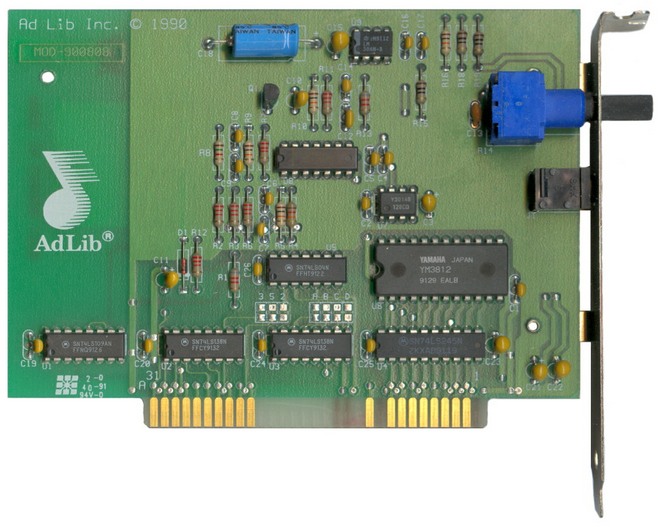
AdLib!
The Adlib was a simple enough looking card which integrated the Yamaha  YM3812 to a PC.  It wasn’t capable of wave synthesis, instead it could play simple instruments.  But hey it was a massive upgrade from simple beeps & chirps of the IBM PC Speaker.
That was until I finally assembled my 286 PC, and then found the game Mean  Streets, the first in the Tex Murphy series.
What made this game special was that it used its “real sound” technology to quickly pulse the pc speaker so it could play basic wav files. Â It was an amazing thing to witness at the time, when a 286 with CGA graphics could make some basic sounds, and play a quick bit of into music!
Even better, is that there were Amiga MOD players that could output via the PC speaker, and even with the release of Windows 3.1 there was a pc speaker wav driver.
But back to MIDI, for me anyways the best player was the midi player bundled with Windows 3.1 as at least you could kind of multitask, and listen to something while doing something else. Â It really is funny to imagine a time before CD-ROMs being common place, and needing some kind of massive super computer to playback a MP3 in realtime! Â Then again back then odds are if you were using a computer and wanted to listen to music you either would turn on the radio, or break out a tape deck!
Hello World!
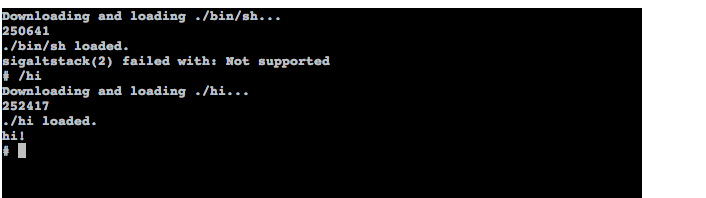
The Javascript MIPS emulator.. So after snagging the source, and all went well building the binutils, gcc, then gcc again, the libc. All seemed well except I couldn’t work out exactly what goes where…
So after a bunch of messing around I managed to get it run.. Â kind of. Â I think the php file that proxies the filesystem is broken as I get something like this from the now broken main js page..
function genroot(p){var dir=new Directory(p);function genbin(p){var dir=new Directory(p);dir.children["=listusers"]=remoteFile("./bin/listusers","http://codu.org/jsmips/server/dir.php?f=.%2Fbin%2Flistusers");dir.children["=apropos"]=remoteFile("./bin/apropos","http://codu.org/jsmips/server/dir.php?f=.%2Fbin%2Fapropos");dir.children["=banner"]=remoteFile("./bin/banner","http://codu.org/jsmips/server/dir.php?f=.%2Fbin%2Fbanner");
And yet I get this kind of output:
{error: false, type: ‘d’, cont: [“dtextc.dat+”,”hi+”,”var/”,”hi.c+”,”source/”,”bin/”,”dungn27s.zip+”,”dungeon+”,”./”, “../”]}
Which.. isn’t right enough. Â I’m not sure what is up with dir.php ..
Oh well, I was able to build a simple hello world type program, but anything that hopes to pull data off the drive won’t work.  If anyone thinks they can do better my archive of all the bits is here (48MB), and the ‘runnable’ version is here .. hi is about as much fun as it’ll get.
http://vpsland.superglobalmegacorp.com/janus3/#dungeon
You can now easily download the scriptable Amiga emulator, and even better inject your own ADF’s and whatnot. Naturally you’ll want the AROS ROM’s one & two. You can even download my ADF.
It may take a minute to boot, but you should get something like this:
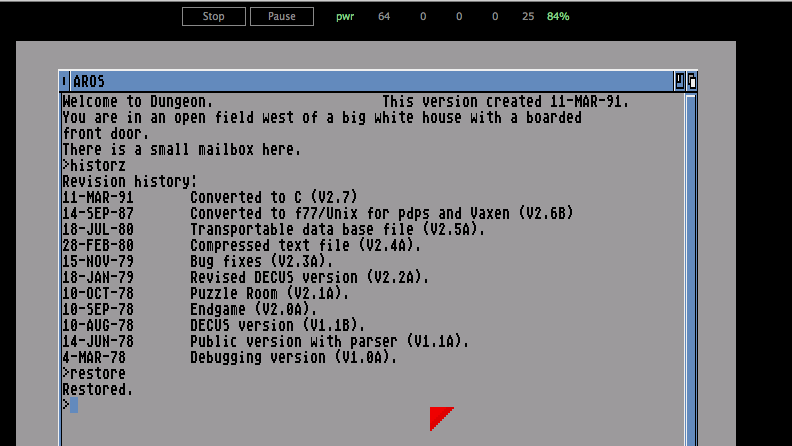
Dungeon for Amiga
This is a bootable diskette with the version of Dungeon I built using DICE.

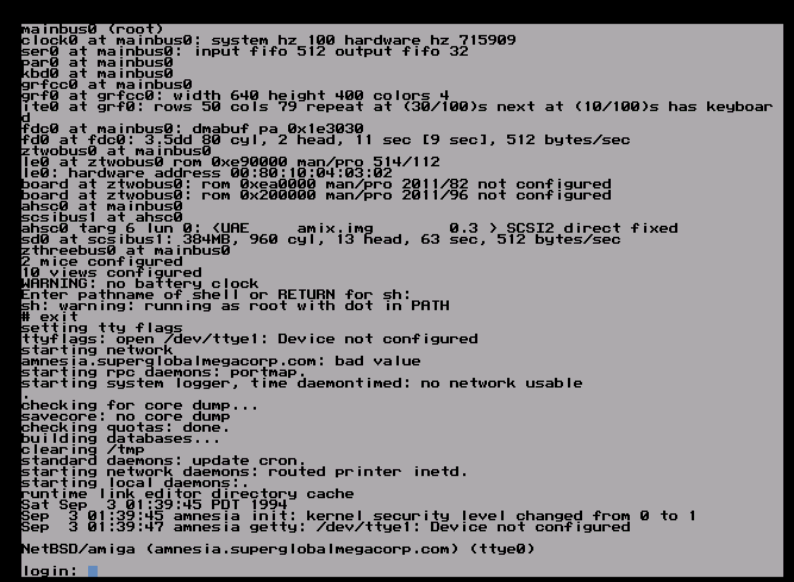
NetBSD’s old logo
So while I was on the path of running some ancient Linux on the UAE Amiga 3000 emulator but without any real luck. Â So for the heck of it I figured I’d give NetBSD a whirl. Â Much like Linux, the first platform other than the i386 to get some mainstream love.
While 4.4 BSD had been adding support for the m68k via the HP 9000-300 series based workstations, the Amiga was something that was sold retail, and could be put in the hands of hackers, rather than lab rats..
So yeah, NetBSD started to integrate Amiga patches as of NetBSD 0.9 as it says from the install notes:
This version is strictly for the kernel hackers among you, there’s no sense in `normal’ users trying to install it, possibly killing their other partitions, facing kernel panics and not knowing what to do. Please keep that in mind, if you feel like going on…
So maybe I’ll try to bring it back to life some time now that I can at least run NetBSD 1.0 .. Or maybe I’m getting ahead of myself.
Installing NetBSD 1.0 on the Amiga is somewhat straight forward, providing you are doing this from a new Amiga.. First just create a small-ish (15MB? lol) partition for AmigaDOS, and make sure it is bootable. Â The work partition should be big enough to hold the compressed packages of NetBSD, I went with 60MB, while NetBSD 1.0 is a mere 15MB, well compressed of course. Â After that you’ll want to create a ‘root’ partition of say 65MB, a 32MB swap partition and a giant /usr partition. Â I created a 384MB virtual hard disk, so my remainder is 209MB which is more than enough. Â From there you have to make sure that they are not set to auto mount, and edit the filesystem type to be the following:
root partition  : 0x4e425207
swap partition  : 0x4e425301
other partitions: 0x4e425507
Where the ‘other’ is of course the /usr partition.  Then with that in hand it is a simple matter of loading the boot loader from within AmigaDOS.  The one weird thing I found is that while this part goes all fine,  later on under NetBSD you can only mount AmigaDOS partitions read only, so how do you get a new kernel back onto the Amiga side?  I suppose a working network, and a 2nd machine.. Which would make sure, and of course NetBSD was built with the idea that everyone was collaborating over the internet so people would have net access.
So basically from within AmigaDOS you kick off the bootloader, kernel, and shove in a ‘root filesystem‘ diskette.  Next thing you know we are going through the install where it’ll pick up the partition tags, format the disk, and go ahead  and install..  Again another ‘trick’ is the partitioning scheme where NetBSD maps in the AmigaDOS partitions into NetBSD space.  My install looks like this form the NetBSD side:
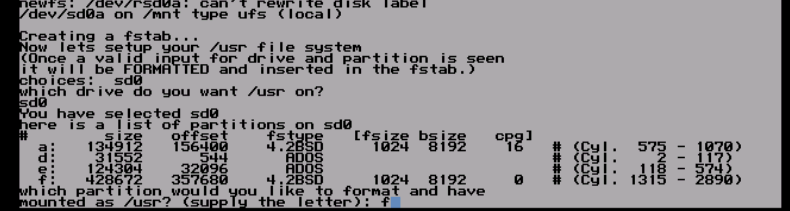
NetBSD slices
It may not seem too obvious but back here the ‘a’ partition is the root, ‘d’ is the AmigaDOS operating system partition while ‘e’ is the work partition where our install was saved. From there it really is NetBSD and it just acts like any other NetBSD. Â So of course I could prattle endlessly about this, how historic it is that NetBSD on the Amiga shows that the older hp300 port could not only be adapted to new platforms, but even eventually extended to support the 68040 processor which had a different and incompatible MMU.
For those of you are are impatient, you too can run NetBSD 1.0! Â You can find a pre-installed image here. And just use the prior exe & config from the WinUAE beta that included MMU support. Â Just alter the config so that it picks up the NetBSD disk.
NetBSD 1.0
The only catch I’ve seen so far is that trying to bring up the ethernet adapter hangs the system. Â Sadly I don’t have any fix for this as of yet…. (edit: yes beta 4 and beyond work fine!)

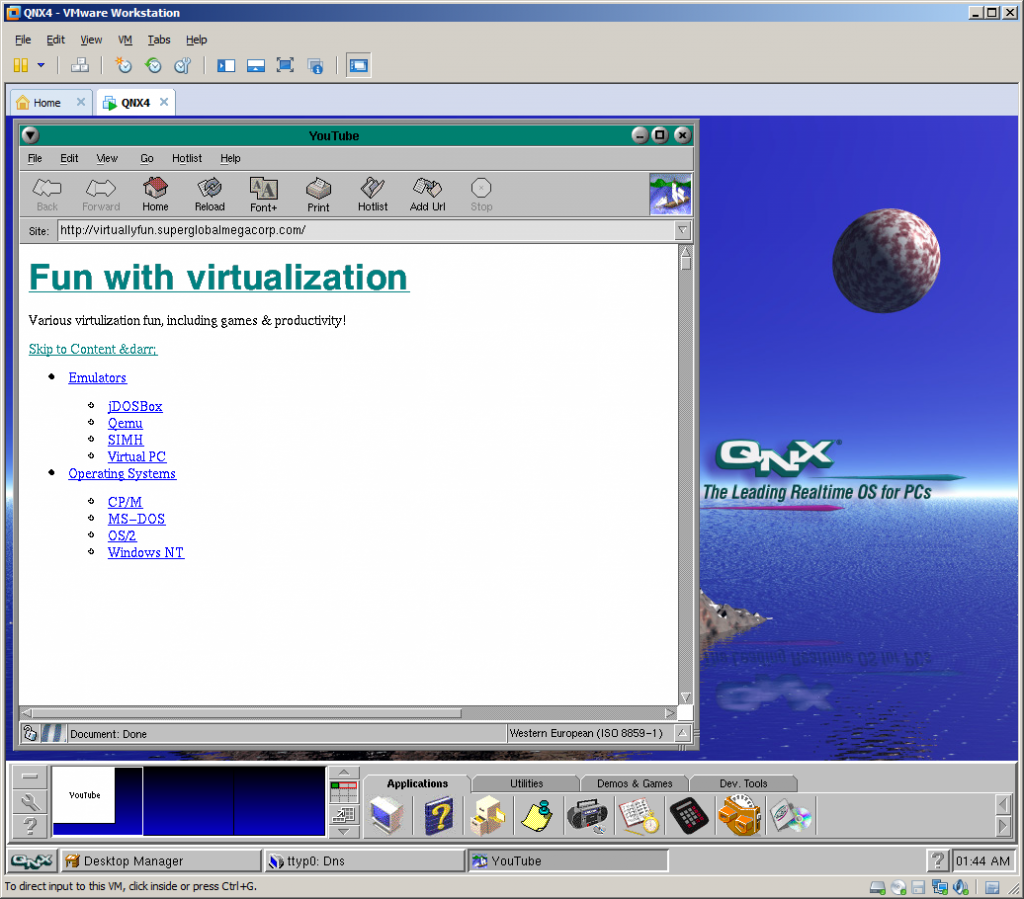
I thought it was cool, but a French Amiga fan site, linked me and sent a bunch of traffic, amigaimpact.org. Â Now I know what you are saying, I can’t read French! .. Well it is 2013, and google translate doesn’t do such a bad job of mangling les Francais..
Something like this. Â I know, despite all the French I took in school, I’m lucky enough if I can get directions, or order food…
ATARIÂ US files for Chapter-11. Atari Consumer Electronics Division, the Jaguar & ST people pretty much died off in 1996, while the arcade people prospered on.. Or so it would seem.
The company has a valuation of just 25.4 MM Euros… But is it enough for 2600 legacy game lore? Â I don’t think missle command nostalga is really worth that much. Â The last big hit of theirs, was publishing rollercoaster tycoon..
Even looking through the highstreet today, anything Atari was in the bargin bin, the problem being that 30 year old games just don’t hold anyone’s interest for more than a few minutes today.. Their catalog is just.. old.
Oh well, it is chapter 11, which means ATARI gets time to pay creditors, take on new debt, and do a reorganization.  They may pull through this, although the world is a much different place than 1972, only time will tell.
(This is a guest post by Antoni Sawicki aka Tenox)
Over the years I have heard a lot of fairy tale stories about the awesome networking capabilities of QNX. There is this particular one about dragging windows across virtual desktop created out of multiple networked PCs. Unfortunately I’ve never got a chance to see it with my own eyes, so I finally decided to take things in to my own hands. I want to see it!
Interestingly QNX 4.25 released in 2011 includes VMware drivers, so the choice of virtualization engine was obvious. You can download QNX4 Product Suite 2011 here
I have created a standard 32bit virtual machine in VMware and booted with QNX4CD.110614.iso. The installation is straight forward, it detects VMware network and graphics cards with no problem. The setup will actually ask you for a QNX Node ID, this will be needed later to create the network. You can simply install few VMs with different Node ID at this point. I wanted to use linked clones so I opted Node ID 1 and changed that later. I’ve enabled to run Photon at boot and went with TCPIP v5.
For simplicity I’m going to run the nodes as DHCP clients. To enable that after first boot:
After that I was able to browse web with Voyager. The little OS is pretty fantastic, but as I’m interested in dragging windows, and the OS is covered nicely elsewhere I’m not going to go through all cool features of a single node. Let’s build a network!
I have shut down the virtual machine and created two linked clones. Powered them up. The two clones were able to ping each other over the virtual LAN. I’ve grabbed MAC addresses of both nodes and created a file /etc/config/netmap with entries for both nodes where one is marked with ID 1 and one with ID 2. The file should be identical on both nodes. You can use telnet or ftp to copy it across. Use netmap -f to reload the file.
In the next step I went to work #2 clone exclusively as I needed to change Node ID. Briefly following steps are required:
The configuration steps are documented in more details in this howto.
Also going back to the .iso install you can just specify the Node ID during setup. Much easier.
Type sin net to display list of nodes and their capabilities. If you issue sin info command you should see Node = 2. If you issue sin -n 1 info you should see Node 1 as the sin command was executed remotely on node 1.
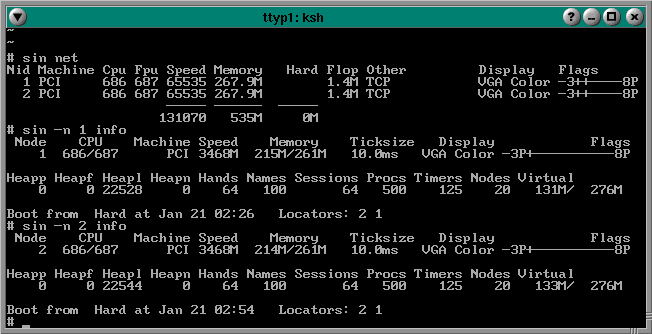
You can list remote file systems like this: ls //<nodeid>/Â for example:Â ls //2/. You can execute remote commands using on -n <nodeid> command, for instance on -n 2 who. Impressive, but still not what I wanted to see.
Let’s have look have look at a feature called Jump Gate. Sounds like Stargate and actually works pretty similar. Jump Gates, Ditto and other features are documented pretty well here.
Note the videos are best viewed in 1080p or “original” quality, full screen.
Impressive, but still not what I wanted to see…
This document sheds a little bit of light how you can extend desktop using phditto. After some experimentation, assuming my screen resolution is 1024×768 I figured this, on node 2 run: phditto -n 1 -x 1024 -w 1024 -h 768 -k. The parameter -x is the horizontal screen extension at offset x, –k is kiosk mode aka full screen. You can enter and exit from kiosk by pressing Ctrl+Alt+K. Here are the results:
(Note that these are two separate VMs talking to each other over the network)
Now this is exactly what I wanted to see! Show me another OS that can do that… Note that not all of the nodes have to be QNX OS. You can extend display by using Phwindows for Microsoft Windows or X11 as well!
Update:Â 4 node network!
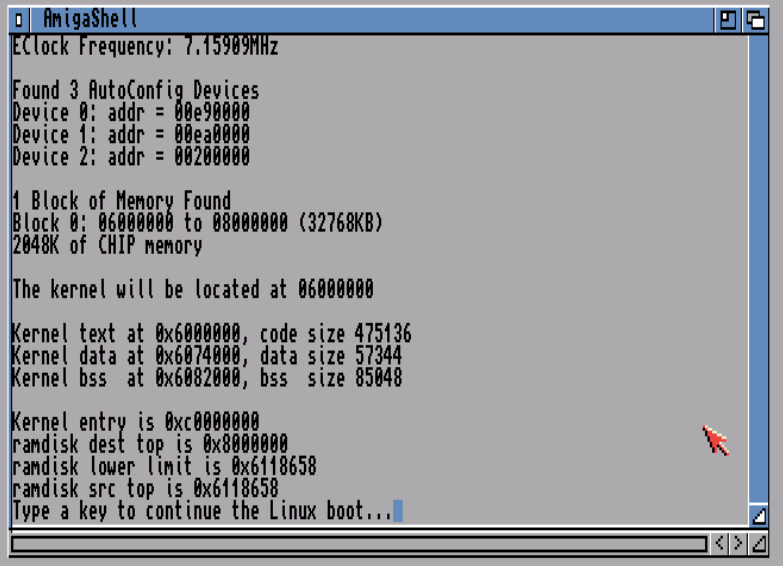
So for some reason I though I would have luck with this super old m68k port of Linux running on UAE, now that it can run AMIX. Â Sadly it cannot.
From what I can tell the 0.06 strain was the first to boot and do something, so this archive that includes 0.7 along with 0.08 & 0.09 is a good find.  While it may not seem that immediately obvious, the m68k port to the Atari ST & Commodore Amiga were the first community port of Linux to a different processor.  At the time Linus was working on a Dec Alpha port from what I recall.
For what it is worth.
Sourceforge has been running ‘project of the month’ for a while now, and  DOSBox won out!  It is the second time they have actually won.  For those of you living in a cave, DOSBox is a fantastic PC emulator geared at emulating not only early PC’s of the 1980’s and early 1990’s but also includes its own MS-DOS like operating system for running ancient video games.  It also has been ported to numerous platforms, including Java, Android, OS X, Linux and of course Win32.
DOSBox is also used by some big companies (steam, gog) for the continued sale of old MS-DOS games. Â Who says old won’t sell?
Anyways there is an interview with the primary authors on the sourceforge page.