A minor update….

OS/2 1.3 on Bochs

OS/2 1.3 on Bochs

OS/2 1.3 does infact run under BOCHS. Here is the catch, like Xenix you currently must make an image of an existing installation, and point Bochs towards it.

Here is the flag that I used:
ata0-master: type=disk, path=”os2-1.3.img”, cylinders=919, heads=16, spt=17

Bochs will complain about the geometry not matching… Just hit the ignore button, and it boots up just fine.

Thanks to Geoff Shearer for trying, since I had figured it wouldn’t even work.

I promise, a quick tour of SLS Linux next time… Where the distro wars all started!

A tale of two kernels.

Back in the early 1990’s Microkernel’s were all the rage. Everywhere you would go you’d hear all about Pink, Taligent, Windows NT, and the grand daddy of them all Mach.

Probably the most well known debate about microkernel vs monolithic kernels was the Tanenbaum vs Torvalds debate that raged on comp.os.minix back in 1992. You can read the entire thing here : ( http://www.oreilly.com/catalog/opensources/book/appa.html ). It was interesting in the sense that even Ken Thompson of UNIX fame even chipped in. Tanenbaums’s major points were that a microkernel is more inherently portable than a monolithic kernel, and that microkernels could be more reliable, and easier to maintain. Of course more than 10 years later we can see that Linux still flourishes, and that outside of Windows NT & OS X no mainstream OS relies on a microkernel. Even OS X treats mach more as a call library than a traditional microkernel, since all of the exe’s in Darwin / OS X are Mach-O format, not COFF/ELF,A.OUT, etc etc.

Mach started out as a project from CMU derived from the UNIX source code, to try to re-invent the lower levels of UNIX into something that would scale easier to multiprocessors, support for threads, and the holy grail of them all, expand it’s portability. Sadly the first few versions of Mach are barred from distribution due to their inclusion of encumbered UNIX source code. However when the university of Utah picked up Mach, and released Mach4 (UK22, info here http://www.cs.utah.edu/flux/mach4/html/Mach4-proj.html ), including full source. Also they provided Lites, a BSD server that can run atop Mach, giving the user a ‘UNIX’ system, as it were.

Lites

Lites

So digging through some network groups, and testing stuff, I finally slapped together the pieces, and built a Mach/Lites system on NetBSD 1.1 . And how does it perform? It’s significantly slower than NetBSD is. You can tell that the amount of context switching involved in Mach as a program makes a call the microkernel, which in turn validates & passes it to the server, which further validates, runs the process, then sends the results back to the kernel, which then passes it back to the program. I’ve heard in a worse case scenario a 500% reduction in speed. You can always read more info on the fine wiki article here ( http://en.wikipedia.org/wiki/Mach_kernel ).

Lots of people will argue that microkernel’s have simply failed, and that it’s simply an example of what seemed like a good idea being pushed too hard once it was found to fail. It a lot of ways it reminds me of ADA.

So for now I’m going to provide a Qemu image of Lites running on Mach 4. unzipping the file will provide you with a lites.cmd file which for windows users you can just run directly. Things to note are:

-The version of Qemu that I’ve bound requires libpcap to be installed.
-Mach4 can only address 16mb of ram, due to DMA issues across the 16mb line.
-I’ve enabled user mode networking so that
-the cmd file sets up local port 23 to be redirected to the VM. This will allow you to telnet in simply by ‘telnet localhost’. You may want to use putty for better terminal handeling
-The included Gcc 2.4.5 is ancient. Outside of building a simple irc client, I wouldn’t expect much.
-The boot process is broken, and it’ll parse through the rc scripts twice. Just let it do it’s thing, and it’ll drop to a login prompt.

Logging into Lites/NetBSD

Logging into Lites/NetBSD

Other than that it behaves just like a NetBSD 1.1 machine.

Notice that grub boots the kernel /Mach.UK22 . When Mach boot’s it’ll load up the files emulator & startup. The ‘emulator’ is the Lites microkernel. Once it’s loaded it’ll start mach_init which just symlinks to /sbin/init and the normal NetBSD bootup will commence.

You can download my image directly here as MachUK22-lites-nat.zip.

Using modern (2022) qemu I run it like this:

qemu-system-i386.exe -hda lites.vmdk -net none -device ne2k_isa,iobase=0x300,irq=5,netdev=ne -netdev user,id=ne,hostfwd=tcp::42323-:23 -serial none -parallel none

Next time we’ll play with SLS Linux.

psim, the PowerPC simulator

Psim is one of those great peices of software that has been long sice forgotten. In every copy of GDB since 4.14 it has been sitting there dormant. What is it? Well it’ll emulate various PowerPC systems to some degree (GXemul & Qemu are better now) but what is cool is the ‘run’ program. Simply put, any system that can run GDB can run powerpc NetBSD statically linked EXE’s! Now isn’t that exciting!

Now I know you’ll want to build your own copy of the ‘run’ program, and then setup a cross compile enviroment so that you, to can produce NetBSD PowerPC executables. I’m assuming that you are not on a PowerPC running NetBSD, since this whole excersize would be… redundant.

For this example I’m using OpenBSD 4.0 on the i386. You will need a real unixy envioment for this. MinGW isn’t good enough, cygwin however is. BSD/Linux will work too.

Ok first let’s start with building the run program. I’m going to download my GDB from ftp://ftp.gnu.org/ .

Gdb 5.3

Unpack it somewhere, and then run the following commadn to configure GDB.

./configure --enable-sim-powerpc --target=powerpc-unknown-eabi --prefix=/usr/local/psim


You will need to replace or update the sim/ppc/emul_netbsd.c program to include system calls up to 300, and make sure that 279 is setup to do_fstat. Otherwise you will be unable to run any programs. This is also a good excersize to see how libraries interact with the simulator so you can add your own native interfaces, for things like OpenGL, SDL….


Now we are ready to build it.. You could use -O0 in your CFLAGS to build it quicker, but it will result in a slower run times.. If you have issues with this you will want to use those flags so it doesnt take forever to be building this thing. Otherwise a simple ‘make;make install’ will suffice.

Next up is binutils. I’m using version 2.17

Binutils 2.17

Again download and unpack this somewhere (/usr/src?) Then run the following to configure your binutils


./configure --target=powerpc-unknown-netbsd --prefix=/usr/local/psim

Since execution time here isn’t as critical as the emulator, and I want to hurry it along I’m going to use the following command to build & install:


make CFLAGS=’-O0 -pipe’ ;make install

On OpenBSD 4.1 the install fails, and I had to manually copy the binutils applications into /usr/local/psim/powerpc-unknown-netbsd-bin

Before you build gcc you will want to populate your directory with headers & libraries from NetBSD 1.4 get the compiler package and copy the usr/lib files to /usr/local/psim/powerpc-unknown-netbsd/lib and the usr/include files to /usr/local/psim/include . I get my includes & lib files from here ( ftp://ftp.netbsd.org/pub/NetBSD/NetBSD-archive/NetBSD-1.4/macppc/binary/sets/comp.tgz )

Gcc 3.3

You may need to do some special tweaking to this source to get it to run correctly
Optionally running make with CFLAGS=-O0 may speed your compliation.

You know the drill by now. Download, unpack and configure as follows:


./configure --target=powerpc-unknown-netbsd --prefix=/usr/local/psim --disable-shared --enable-languages="c" --disable-threads --disable-intl

Now make the compiler as follows. Note that I’m only interested in the C compiler. I haven’t even looked at C++/ObjectiveC…

You will need to add /usr/local/psim/bin into your path, as Gcc 3.3 will expext to be able to call powerpc-unknown-netbsd-ld/ar/ranlib etc while building itself.

export PATH=$PATH:/usr/local/psim/bin

Next I would comment out the following line from gcc/builtins.c

builtins.c:2864:// error (“__builtin_saveregs not supported by this target”);

Now we can build the compiler

make CFLAGS=’-O0 –pipe’

Now before we get all giddy, lets test this thing out!

cd into the gcc directory, and lets make a simple c program… hello world is a good starting place.

use xgcc to compile it, and this will test your c compiler.

#include <stdio.h>
void main(void)
{
printf("hello from PowerPC\n");
}

bash-2.05a$ xgcc hello.c -o hello

hello.c: In function main':hello.c:2: warning: return type ofmain’ is not `int’

bash-2.05a$ file hello

hello: ELF 32-bit MSB executable Version 1

bash-2.05a$ ./hello

bash: ./hello: cannot execute binary file

Ok the executable that we have just created is NOT for our native platform, but for the PowerPC.. So lets kick in the emulator! If you didn’t patch your emul_netbsd.c you’ll get this:


% /usr/local/psim/bin/powerpc-unknown-eabi-psim hello

do_call() os_emul call 279 out-of-range


However if you did, this is what you’ll get!
% /usr/local/psim/bin/powerpc-unknown-eabi-psim hello
hello from PowerPC

On my computer the installation of gcc gets retarded so I manually copy the files to the right places.


cp xgcc to /usr/local/psim/bin/powerpc-unknown-netbsd-gcc

mkdir -p /usr/local/psim/lib/gcc-lib/powerpc-unknown-netbsd/3.3/

cp cc1 /usr/local/psim/lib/gcc-lib/powerpc-unknown-netbsd/3.3/

cp crtsaveres.o /usr/local/psim/lib/gcc-lib/powerpc-unknown-netbsd/3.3/

Building cross compilers is always involved, but hopefully this will help someone.

Running Xenix on qemu

Neither Bochs nor Qemu can boot the Xenix floppy diskettes all the way. Virtual PC & VMWare seemed to have no luck when the kernel transitions to protected mode. While on the way to work I had an idea. What if you had an old hard disk and a machine capapble of installing? Simply imaging the hard disk may be enough, since after that point you don’t need any floppy disks!

So this is what I have to show for the work today:

Freaking awesome, if I do say so myself.

OK, now how to do it? First you need an existing system running Xenix. If you have any plans on migrating an existing installation take note! This will preserve your install, just don’t format! On the Xenix boot screen take note of the geometry of the disk. We will need the geometry for later. Although I did a test boot without it, its a good thing to preserve it.

For virgin users, you will need a small disk to install on. I had a 2.5 GB disk that was too big, and 132MB disk that worked fine. I used a dell pc with 2 ide controllers for this. The longest task honestly was installing Xenix. I think that ran about 20 minutes. Once I was done, shutdown xenix, and put the disk in a machine running Windows (Linux fans can put it in their box, and just dd the Xenix disk into an image). Us poor Windows users don’t have dd. Anyways take not of what disk # it is, as Windows of course will not assign it a drive letter since it does not understand Xenix’s filesystem.

As you can see it’s disk #2 in this computer. Ok now we need to read the disk and write it into a disk image. I couldn’t find a util offhand to do it, so I wrote one real quick. Here is the source code, you’ll need a C compiler on your PC to compile it. I guess I could ‘neaten it up’ some, but for now here you go:

Source code

Executable

Yes I know its horrible, and blogger does a wonderfull job of formatting my program. Anyways compile it & run it. Now you’ll have a disk image of your hard disk!

Now for the fun part, running Xenix! We simply specifiy the hard disk geometry that we got earlier, and pass it the disk image that we created! I’m using an Quantum Pro drive ELS with the following geometry:

919 Cylinders
16 heads
17 bytes/sector

That translates into the following command:

qemu -M isapc -m 16 -hda xenix386-2.3.4.disk -hdachs 919,16,17 -L .


Let the good times roll!

–Update from 2011!

It is *NOW* possible to install Xenix in Qemu 0.14.0. You can read more about it here.

Zork lives on the Altair!

Ok, I can’t sleep so I thought I’d rummage through the dungeon of Zork…

And what better platform to do so than the Altair?

First get your altairz80.exe, out of simh, or just build it yourself…

Then you’ll need a copy of CP/M! (http://www.schorn.ch/cpm/zip/cpm2.zip)

Finally a copy of Zork (http://www.retroarchive.org/cpm/games/zork123_80.zip)

unzip everything into a directory, then run the following

C:\altair>altairz80.exe cpm2

And with any luck you’ll be greeted with the following:

Altair 8800 (Z80) simulator V3.7-1
64K CP/M Version 2.2 (SIMH ALTAIR 8800, BIOS V1.25, 2 HD, 15-Jan-07)
A>

Just like MS-DOS right?. … Not quite. Anyways there is time to tour later, but for now there is dungeons to explore.

The Altair has two floppies (out of eight) and a 8mb hard disk!… So let’s go to the hard disk on I:

I:

changing drives is just like MS-DOS, letter, colon then hit enter. Ok now lets copy in the zork game from the native PC into the emulator. Hat’s off to Peter Schorn for this!

b:read zork1.com
b:read zork1.dat

If all goes well it’ll look like this:

A>I:
I>B:READ ZORK1.COM
READ V-2.21 (03-Dec-06) SIMH Interface V003

Read from “ZORK1.COM” and write to “ZORK1.COM”.
PTR: unit is read only8.5kB written.

I>B:READ ZORK1.DAT
READ V-2.21 (03-Dec-06) SIMH Interface V003

Read from “ZORK1.DAT” and write to “ZORK1.DAT”.
PTR: unit is read only83kB written.

Ok, now with that out of the way, lets enter the Dungeon!

I>zork1
ZORK I: The Great Underground Empire
Copyright (c) 1981, 1982, 1983 Infocom, Inc. All rightsreserved.
ZORK is a registered trademark of Infocom, Inc.
Revision 88 / Serial number 840726
West of House

You are standing in an open field west of a white house, with
a boarded front door.
There is a small mailbox here.

>open mailbox
Opening the small mailbox reveals a leaflet.

>take leaflet
Taken.

>read leaflet

“WELCOME TO ZORK!
ZORK is a game of adventure, danger, and low cunning. In it

you will explore some of the most amazing territory ever seen
by mortals. No computer should be without one!”

>

Ok, now we are playing one of the greatest games ever. Wikipedia has an awesome article on Zork ( http://en.wikipedia.org/wiki/Zork ) And along with ( http://infocom.elsewhere.org/gallery/zork1/zork1.html ) You can party like its 1982.

SIMH 3.71 released!

The ammount of systems that this package contains is simply amazing. It could probably take me a few months to properly review the whole thing, but to get started, I’m going to go with building from source code.

As it ships it’s really meant for UNIX type build enviroments with CLI tools. Now if you really want you can build it from the main site using MinGW (http://www.mingw.org/download.shtml).

I’ve built simh using Microsoft Visual C++ 2005 Express. You can download that here (http://msdn.microsoft.com/vstudio/express/visualc/default.aspx). You’ll also need to install the Platform and integrate it with VC++. Instructions on how to do that can be found here (http://msdn.microsoft.com/vstudio/express/visualc/usingpsdk/ ). If you are on Vista, be sure to install the service packs associated with the Express tools!

With that out of the way, simply download the project file from my site (http://sourceforge.net/projects/simh/files/simh%20source%20code/simh%203.7-3/simh-3.73-vc2005.zip/download), unzip it, and open simh-3.71.sln . I’ve included the runtime for WinPCAP, so this *should* build on your computer. Unless you want to really dive into the source, you can build the release target, and then build the entire solution. On my laptop this takes about 3-5 minutes. Remember that if you want to run your 2005 compiled EXE’s on another computer will need to install the associated runtime on that machine first.

You can download the Microsoft Visual C++ 2005 SP1 Redistributable Packagehere:http://www.microsoft.com/downloads/details.aspx?FamilyID=200b2fd9-ae1a-4a14-984d-389c36f85647&DisplayLang=en

Once it’s completed, just open the release folder, and you’ll see all the emulated systems.

They are:

altair.exe
altairz80.exe
eclipse.exe
nova.exe
h316.exe
hp2100.exe
i1401.exe
i1620.exe
i7094.exe
ibm1130.exe
interdata16.exe
Interdata32.exe
pdp1.exe
pdp10-network.exe
pdp10.exe
pdp11-network.exe
pdp11.exe
pdp18b.exe
pdp8.exe
vax-network.exe
vax.exe vax780-network.exe
vax780.exe
s3.exe

With the -network part to signify that they are capable of networking. You will need to have WinPCAP 4.0 installed on your computer to take advantage of it, however the host computer is unable to communicate with the emulated computer.

WinPCAP can be downloaded here: (http://www.winpcap.org/install/default.htm)

Bit torrenting free software…

I was thinking with some of the larger files on my poor webserver it’d get slamed with too many people on it. Then I noticed that uTorrent supprots a limited tracker server, so I put two and two together, and decided to give it a shot.

I setup a RSS feed of the current torrents here: http://www.vaxenrule.com/vaxenrule.xml . You can subscribe to it, and that way you’ll get the ‘newest’ of the old. Also it’ll allow me to have a few machines at work in various locations througout the world to share the load as it were.

As of this moment, I’m sharing SLS 1.05 & Lites/Mach UK22. I figure something old & something obscure is a good start.

Installing Novell Netware 3.12

Ok, I thought I’d kick this thing off, by installing the most popular NOS (network operating systems) on Qemu.

First I tried the 2.x stuff, and it just crashes on the bootup of the kernel. Which is frustrating, as it required me to shuffle floppies like there was simply no tomorrow. I also have a copy of 4.1, which I’ll do at some other time.

Let’s get to the list of our requirements:

  1. Qemu 0.9.0 I’m going to use the windows pre-compiled version that can be found here: http://www.h7.dion.ne.jp/~qemu-win/
  2. MS-DOS, or I suppose you can you any DOS compatible OS. I haven’t tried DR-DOS, or FreeDOS. For this installation I’m going to be using MS-DOS 6.22 that is available on MSDN.
  3. An IDE cdrom device driver. I’ve had mixed results with various drivers, however I like IDECD.SYS available from: http://www.computercraft.com/cd_drivers/cdromdrivers.shtml
  4. An ISO Image of your Netware 3.12 CD. For the real unfortunate you’ll have the floppy version…
  5. Some way to take your license diskette and make an image of it. I like WinImage. Available here: http://www.winimage.com/winimage.htm

Here is what my directory looks like before I get started.


05/31/1994 06:22a 1,474,560 dos622_1.img
05/31/1994 06:22a 1,474,560 dos622_2.img
05/31/1994 06:22a 1,474,560 dos622_3.img
05/13/2007 01:16p 1,474,560 idecd.vfd
01/26/2004 04:25p 79,321,088 netware312.iso
02/19/2007 12:02a 6,248,207 qemu-0.9.0-windows.zip
05/13/2007 10:42a 1,474,560 SYSTEM_1.IMG
03/08/2007 05:22p 102,400 unzip.exe

Ok, let’s get started! First we are going to unzip the qemu distribution. I’m using Windows 2000 for my host, so I’ve got the commandline unzip from the execellent distribution here: http://unxutils.sourceforge.net/ Ironically it’s zipped, so I’ll provide a copy of unzip at my site here: http://www.vaxenrule.com/Shared%20Documents/unzip.exe

Next cd into the qemu-0.9.0-windows directory. First we need to make two hard disk images. For whatever reason Netware doesn’t detect the MS-DOS disk partition geometry correctly and will destroy your boot hard disk. Since we are running under an emulator, virtual hardware is cheap, so adding a second disk is really no big deal. The MS=DOS hard disk is only to boot up, so it won’t be big at all. I’m going to create a 32 megabyte boot disk, and a 1 gigabyte Netware disk. You can always add more disks, or go with larger disk. Just be forwarned that my Netware didn’t like the MS-DOS disk’s partitioning. This may be a fault of ISADISK, but then it worked fine on its own disk.

qemu-img create -f qcow netware-boot.disk 32M
qemu-img create -f qcow netware-data.disk 1G

Ok now with the disks created it’s time to install MS-DOS. I’m going to assume that you have *some* experence with Qemu, and MS-DOS.

qemu -L . -hda netware-boot.disk -hdb netware-data.disk -M isapc -m 16 -net nic -net none -fda ..\dos622_1.img -boot a

With any luck you’ll be greeted with this image:

netware1

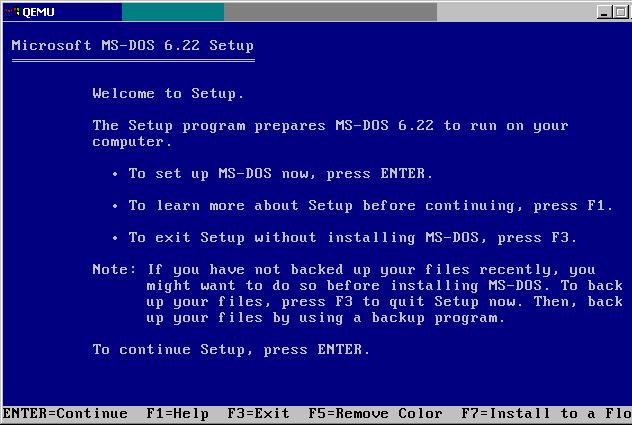
We are going to just accept the defaults (hit enter a few times) which will partition the first disk, and ready it for the MS-DOS install. After enough enters, qemu will reboot, and MS-DOS will format the first disk, and then prompt for disk two. We will want to change disks. This part of qemu can be a little scarry for the uninitated, however its quite simple. Click on the qemu window, then hit CTRL+ALT+2. This will bring you to a window like this:

netware2


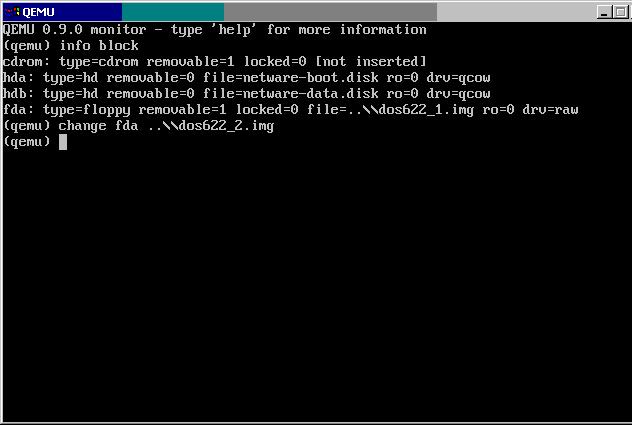
I typed in “info block” to show what disk images were mounted where. Then to change floppy disk images, simply typing in “change fda ..\dos622_2.img”. Pressing CTRL+ALT+1 changes you back to the qemu display, where you can hit Enter to tell the MS-DOS installation program that you have inserted the second disk image. You will need to repeat this for the third disk.

Once MS-DOS is installed it will prompt you to remove disks and press ENTER. You can simply press enter, and qemu will notify you that your disk is not bootable. Close qemu.

Now we are going to boot qemu from the hard disk, and with the idecd.vfd disk image containing IDECD.SYS.

I’m going to start Qemu as follows:

qemu -L . -hda netware-boot.disk -hdb netware-data.disk -M isapc -m 16 -net nic -net none -fda ..\idecd.vfd

Copy the IDECD.SYS device driver from the floppy to the C:\DOS directory (copy a:\idecd.sys c:\dos). Then you will need to edit your config.sys & autoexec.bat to recognize the cdrom.

Append the following line to config.sys using edit

device=c:\dos\idecd.sys /d:cdrom01

And append the following line to your autoexec.bat

mscdex /d:cdrom01

Information on edit can be found on Wikipeida here. Although if you don’t remember MS-DOS edit, you are going to be in a world of pain when we start Netware…

Ok with the configuration files edited, we can close Qemu, and now start it again as follows:

qemu -L . -hda netware-boot.disk -hdb netware-data.disk -M isapc -m 16 -net nic -net none -cdrom ..\netware312.iso -fda ..\system_1.img

During the MS-DOS install the netware data disk may have been formatted by DOS. This is no big deal, but just keep an eye where your CD-ROM drive is drive letter wise.

To start the Netware install, we now need to type in the following:

e:
cd netware.312\english
install

You’ll get some warning about ethernet frame types, which we can ignore for now. Then you’ll be prompted on the install type. We are going to do a new installation, so just hit enter. The MS-DOS partition will be displayed on the primary disk. We can just leave it alone (or we’ll have to start from the beginning!), press enter to retain the current setup.

Next you’ll be prompted for a server name. I’m not going to cover moving data from an existing Netware 3.12 server, so for now I’m just going to call my server “bobo”. I’m going to accpet the preselected internal IPX number. Again if you are migrating you may wish to preserve the exting information. You will next be prompted as to the location of the DOS mode files. Press enter as the defaults should be correct.

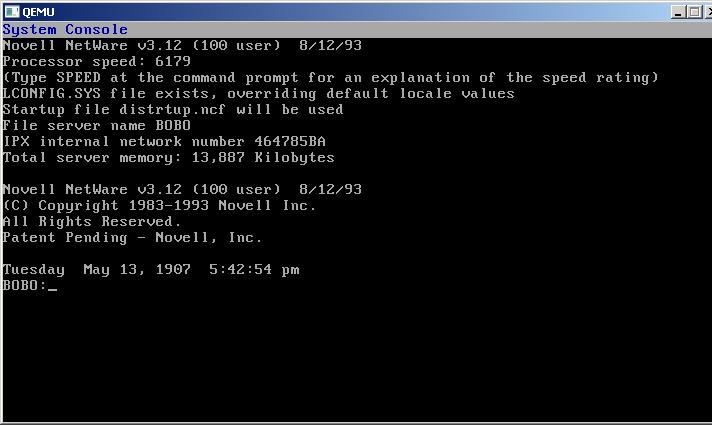
You can press F10, to accept the default locale. Next Netware will ask what naming convention you will wish for your server. If you are going to use ‘modern’ clients on your server you will wan’t the Netware format, otherwise, select the MS-DOS format. Next press enter, as we have no special startup flags. You may allow autoexec.bat to be modified to boot netware directly. The Netware console will now boot up to something like this:

netware3

Next let’s load the disk driver. Type in:

load isadisk

It will prompt for the port & interrupt, just press enter to accept the defaults. With the disk in place, its time to install the Netware files so that we can then setup the networking. Type in the following:

load install

You will be presented with the menu driven install. You will want to setup the partition on the ‘data’ disk. press enter twice, then select the second disk. You’ll need to delete any existing partition, then select create a Netware partiton. You can use the defaults (the entire disk). Pressing escape will confirm the partition creation. Press escape to get back to the root menu, now we can create some volumes. I want a 200MB SYS volume, and the rest of the disk as DATA. Of course you may have other wishes, but this is my install.

Press insert will allow you to create a new volume. Using 4k blocks, about 50,000 of them will allow for an approximate 200MB volume. Pressing escape & enter will create the volume. Next create the DATA volume with the remainder space.

You’ll need to mount the SYS volume by selecting it, and then going down to status, and selecting “Mount Volume”.

With your system volume mounted, we can now copy the rest of the files. Press escape to get back to the root menu, and then select “system options”. From here choose the fist option to copy the system & public files. Since I’m using a CD-ROM, I’m going to press F6 and change the path to:

e:\netware.312\english

Then perss enter. Netware will now start to copy the files. This can take a while. Once the copy is completed, press escape back to the main menu, then exit the installer. I know this seems counter intuitive, but its for a good reason.

Now we will want to load the network card. The default location & type of the network card in Qemu is a NE2000 at 0x300 on interrupt 2/9 (it’s a shared IRQ). Type in the following:

load ne2000

Be sure to select IRQ 2 for the Interrupt Number. Next we will want to select an IPX network number for the card. If you have an existing one, use it, otherwise make one up.

bind ipx ne2000

Then type in the nework name when prompted. I’m using DEADF00D.

Now we can re-load the install program. Go back to System Options, and create the autoexec.ncf file. At the end of this file, you may wish to add “load monitor”. Use the escape & save. Select the default for creating the startup.ncf file. With those two files in place we are now ready!

Exit the install program and then you’ll go back to the server console. Type in down, and the Netware server will shutdown. Then type in exit and you’ll get dumped back to MS-DOS. You can now close Qemu. Now you can re-start Qemu with the following command line:

qemu -L . -hda netware-boot.disk -hdb netware-data.disk -M isapc -m 16 -net nic -net none

Or even save it to a CMD file. You will now have Netware 3.12 installed on a new computer!

I don’t think I need to point out that not only is this exellent for preserving an existing copy of Netware 3.12 (Which was *VERY* expensive in the early 1990’s) But by emulating an older PC we don’t have the same worry when it comes to device drivers. Not to mention the Netware server is now portable to newer computers, by simply copying the data files. I’ll save networking this fileserver for another day.

Welcome!

In this blog, I hope to share some of my experences in the fun world of emulation & virtualization. I have been using emulation software personally since the Commodore Released a PC emulator that could run on the Amiga 500…

The first professional push into emulation was with Connectix’s Virtual PC for Windows. With the advent of really fast CPU’s (400Mhz+), and cheap ram (512Mb) It was possible to run an entire Windows domain setup on a single PC, that would include a domain controller, fileserver, Exchange Server, IIS Server, Windows Terminal Server, and an OpenBSD firewall.

The biggest win in emulation, comes from preserving the cost associated with infastructure. Emulators allow you to preserve your software investments, by allowing you to run your older software, even when the original physical machines & media have long since become unusable. Additionally it’s a great way to get in to big software packages, on the cheap by buying older versions at a massive discount.

Besides when it comes down to it, there is nothing wrong with Exchange 5.5, SQL server 6.5, Windows NT 4.0, even VMS 4.5. Who wan’t the constant headaches of upgrading, when you can keep what you already know?

I’ve put this here to satisfy Gravatar, maybe I should link all my stuff?