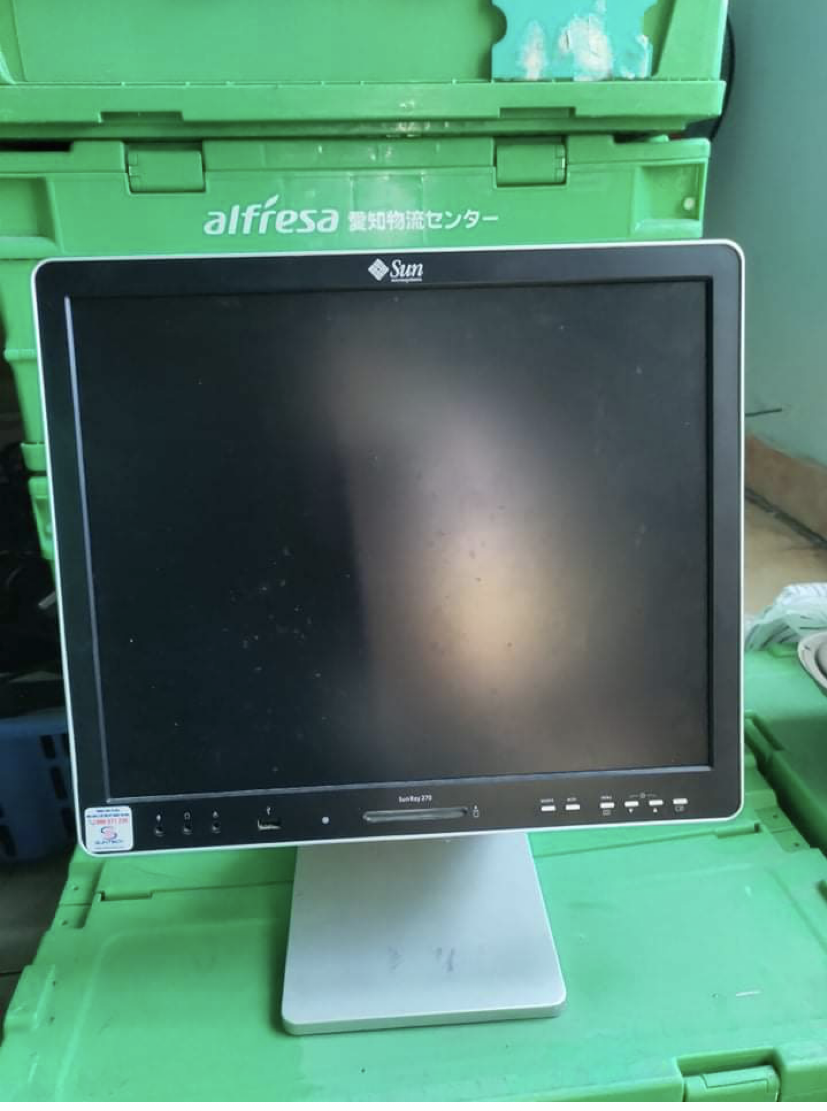
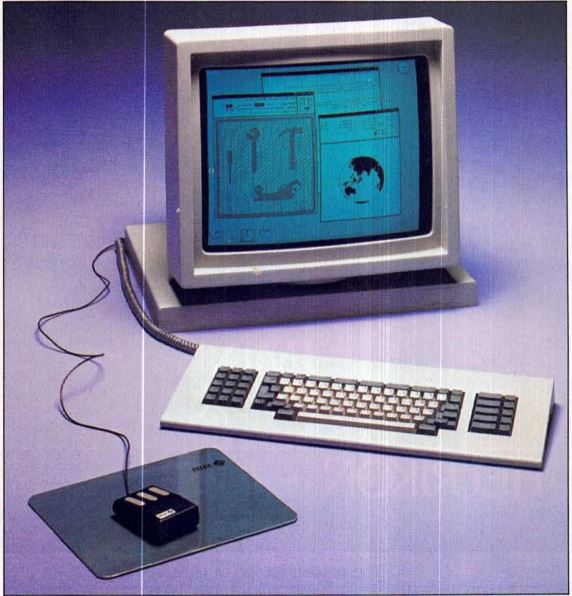
A while back I was looking for a 19in 5:4 screen so I messaged a guy I know that would normally have something like it. When I asked him about it, he said he didn’t have any 19in screens, however, he has this “14in Sun LCD”. I was intrigued so I asked him to send pics of it. Lo and behold, this is what he sent me the next day:
Unfortunately, bad news came. He powered it on and told me it was flickering. Ok fine. These are hard to come by in my country (Vietnam) so I decided to get it anyways. He also cut the price by half, so it was reasonable-ish.
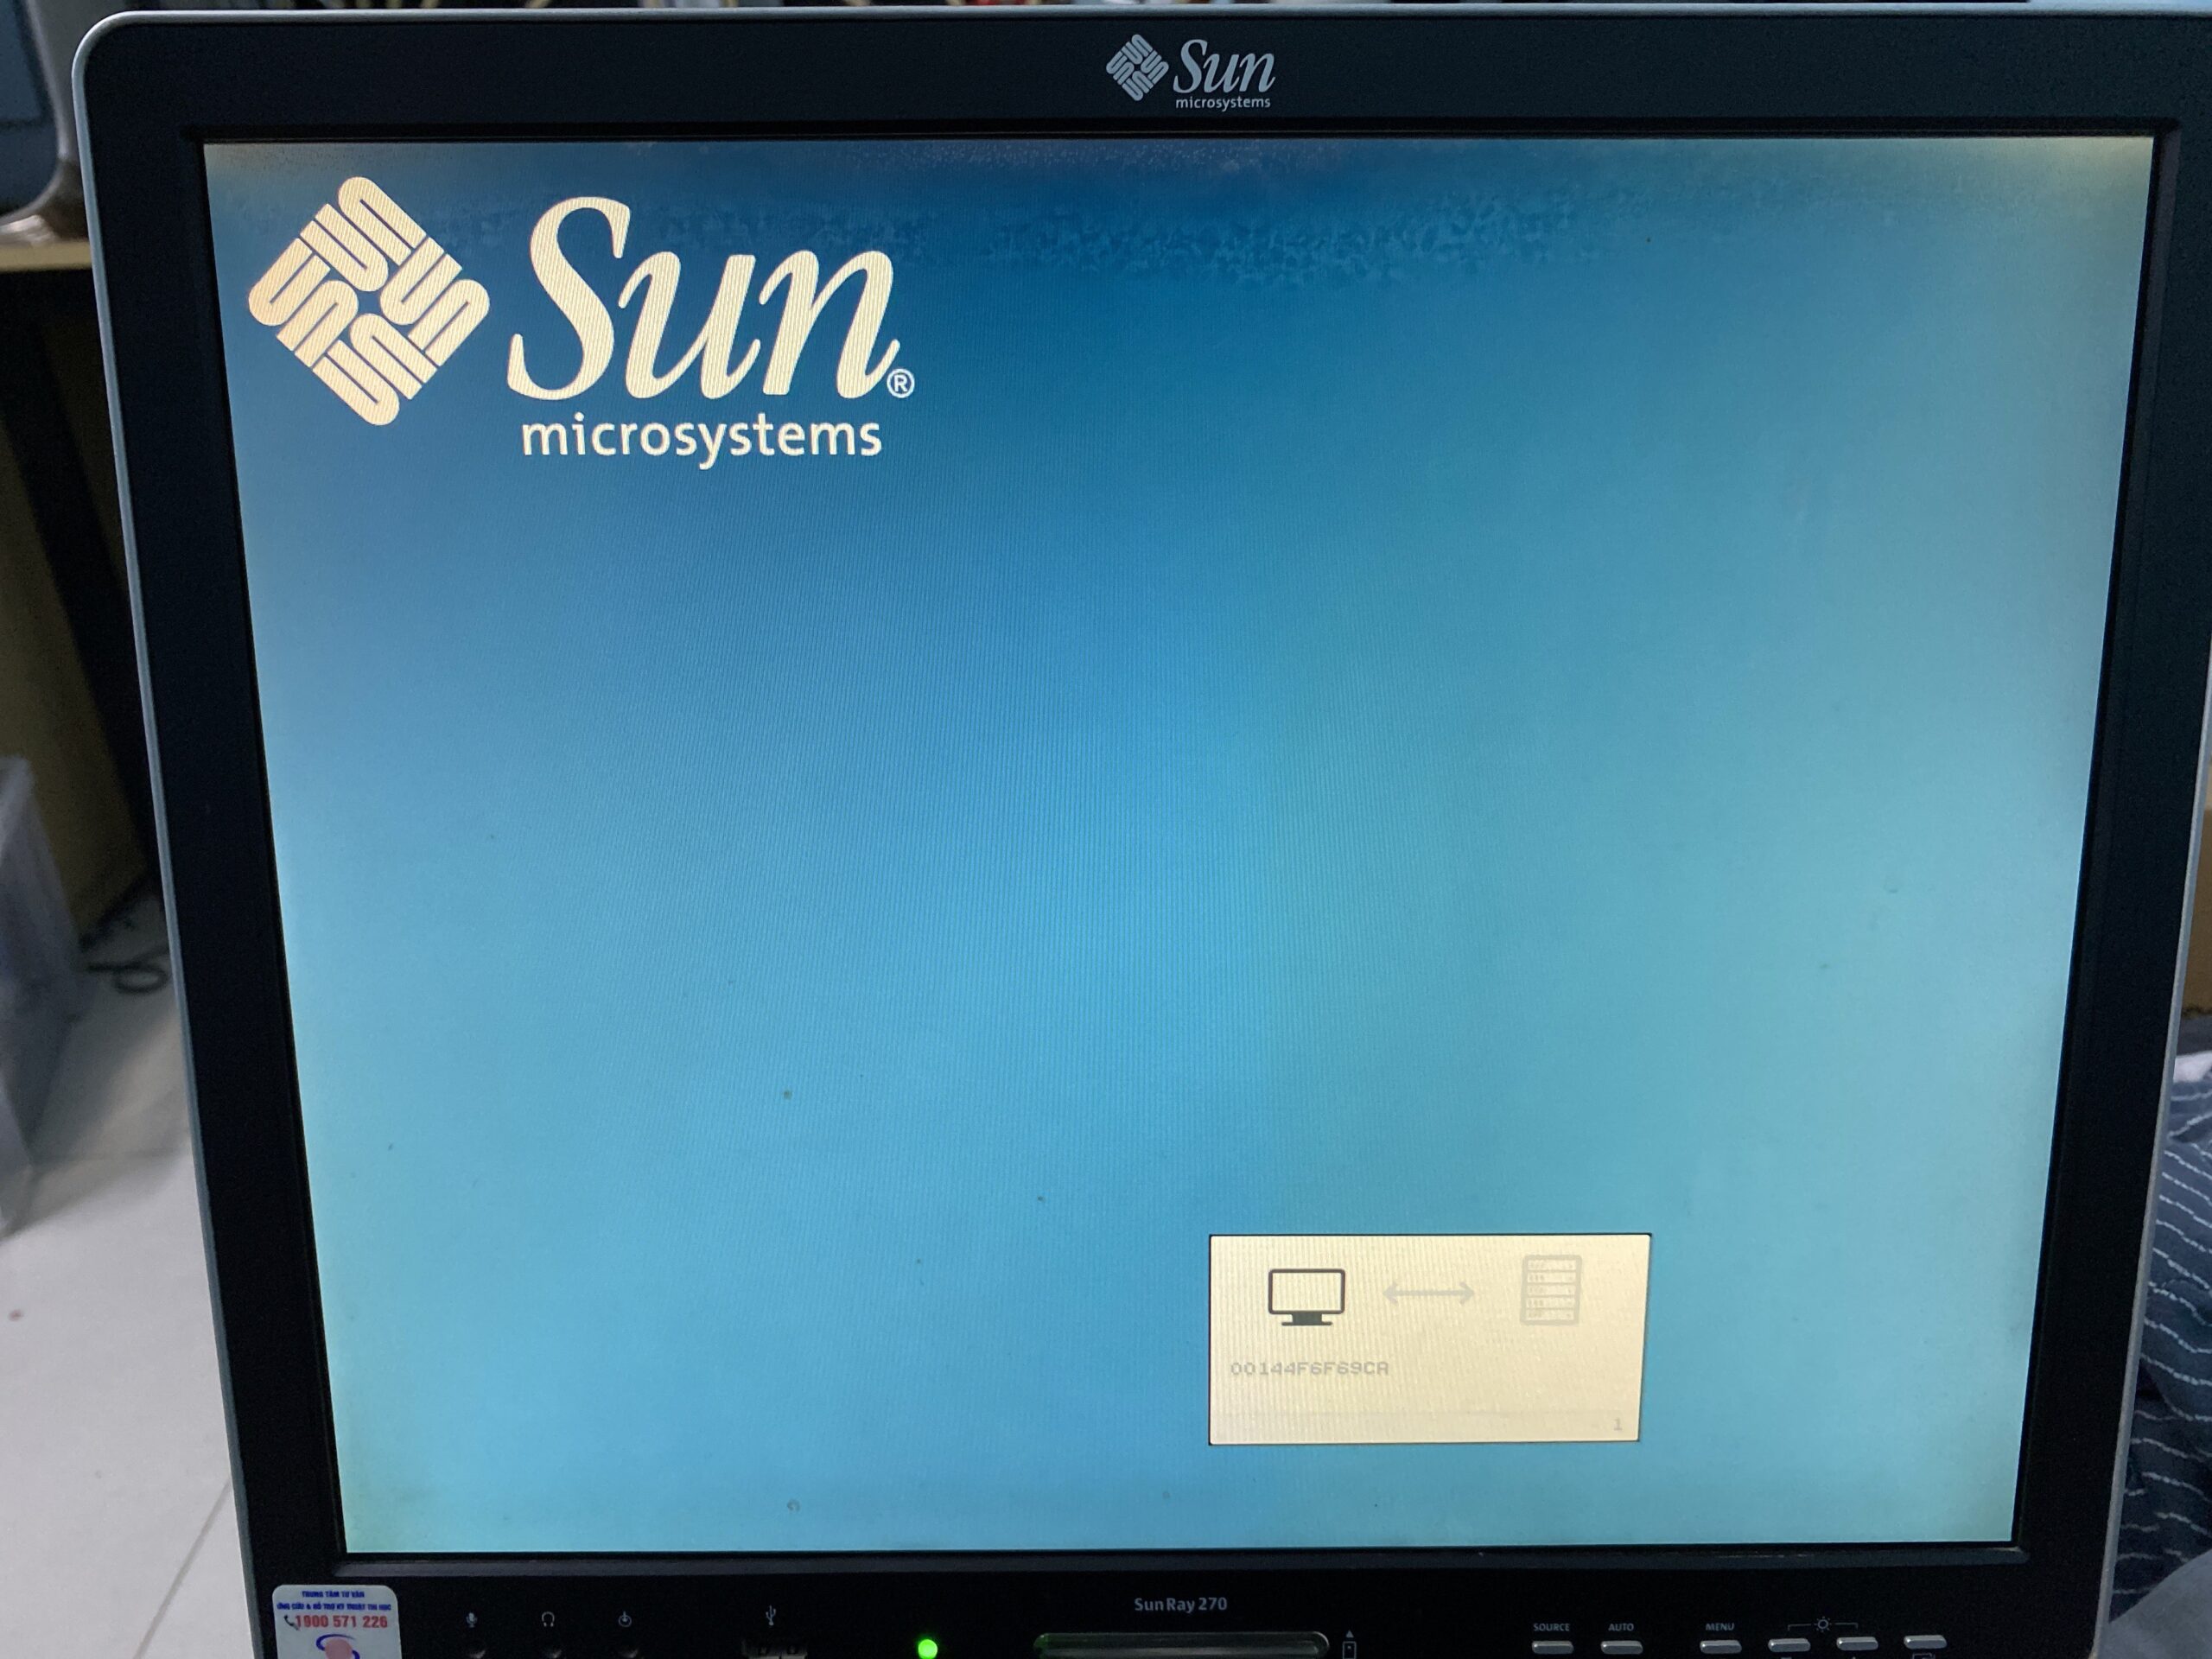
When I got home and powered it on…. yeah. It was flickering. I opened up the menu of the LCD and I quickly noticed something peculiar: the image was flickering but the LCD menu was not. When I opened it up, I made yet another interesting discovery: the whole thing is practically a sun ray duct taped to a normal LCD. The sun ray board is not driving the lcd directly, there’s a separate controller board (similar to what you would find in a normal standalone display without a sun ray shaped tumor on the back).
As it turns out the flickering was caused by a single cap that went bad. I replaced it and the image looks good.
There is a GUI thing I’ve read that allows you to configure various parameters of the sun ray so I tried to bring it up. No matter what key combo I pressed it didn’t show up. Once again, bad news came. My sun ray has the non-GUI firmware. The only way to enable it is to flash a GUI firmware or a firmware with GUI enabled (the firmware shipped with SRSS 5.1 and below has separate firmware files for GUI and non-GUI while SRSS 5.2 and later both GUI and non-GUI are a single file, GUI on/off is specified with a flag during flashing).
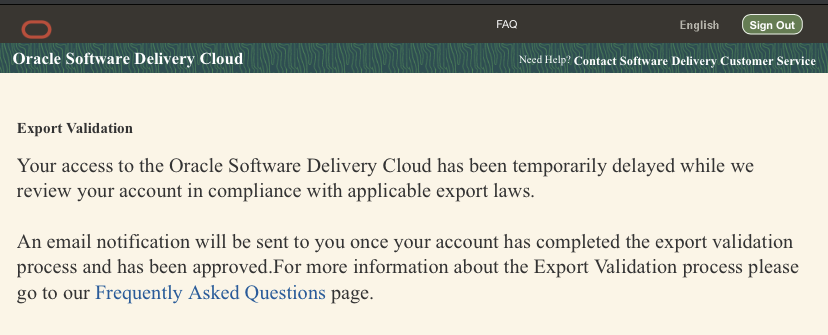
Okay then. No big deal, all I have to do is just flash the firmware, right? Well yes but no. I would very quickly find out that I don’t have the firmware. I had SRSS 5.4 installed and turns out, 5.3 and later stopped including the firmware and that was something you needed MOS for. Great job Larry!
Okay then. No big deal, all I have to do is just download SRSS 5.2, right? Once again, for the second time, yes but no.
*cough*
2 days later I got access to edelivery again. I downloaded SRSS 5.2. I uninstalled SRSS 5.4 and installed 5.2, all I have to do now is just flash the firmware right? riiiight??? Once again, for the THIRD time, yes but no. For some reason I was able to flash the firmware with “utload“ (which has GUI disabled) but I couldn’t flash it with “utadm“ despite it being able to connect to my T5220 and start a session just fine. As I would find out after one whole day wasted, I was supposed to use a separate network served by the T5220, and this is what I did: Setup NET1 port as a dedicated interface for Sun Ray
-bash-3.2$ sudo utadm -a e1000g1
### Warning: DHCP Service is in the maintenance mode
             There could be a problem with the DHCP configuration

### It is strongly recommended to fix the problem and then use:
### "/usr/sbin/svcadm clear svc:/network/dhcp-server:default"
### to get DHCP service out of the maintenance mode before running utadm

Do you want to Continue?  (Y/[N]): y
### Configuring /etc/nsswitch.conf
### Configuring Service information for Sun Ray
### configuring e1000g1 interface at subnet 192.168.128.0
  Selected values for interface "e1000g1"
    host address:       192.168.128.1
    net mask:           255.255.255.0
    net address:        192.168.128.0
    host name:          t5220-e1000g1
    net name:           SunRay-e1000g1
    first unit address: 192.168.128.16
    last unit address:  192.168.128.240
    auth server list:   192.168.128.1
    firmware server:    192.168.128.1
    router:             192.168.128.1
  Accept as is? ([Y]/N):
### successfully setup "/etc/hostname.e1000g1" file
### successfully setup "/etc/inet/hosts" file
### successfully setup "/etc/inet/netmasks" file
### successfully setup "/etc/inet/networks" file
### Disabling Route Advertisement
### finished install of "e1000g1" interface

### Configuring firmware version for Sun Ray
        All the units served by "t5220" on the 192.168.128.0
        network interface, running firmware other than version
        "4.3_146928-01_2011.06.03.14.41" will be upgraded at their next power-on.

### Configuring Sun Ray Logging Functions


DHCP is not currently running, should I start it? ([Y]/N): ### Error: unable to start dhcp services.
    Please restart dhcp manually after utadm has completed.
well… oops. Shouldn’t’ve ignored that. One “svcadm clear dhcp-server“ and one “svcadm restart dhcp-server“ later… Let’s try to flash the firmware.
-bash-3.2$ sudo utfwadm -A -e 00144F6F69CA -n e1000g1 -G force -n interface option ignored. It is no longer required with -e option. Unit "00144F6F69CA" will be upgraded at its next power-on if it is served by host "t5220" and is connected to the network and is not already running firmware version "4.3_146928-01_2011.06.03.14.41".
Options:
        -A            # add the specified unit(s) to the upgrade list
        -D            # delete the specified unit(s) from the upgrade list
        -P            # print version information
        -R            # remove firmware modules from boot directory
        -a            # apply to all units connected to the specific interface
                      #  or subnet
        -e enetAddr   # apply to the unit given by the six hex bytes
                      #  of its ethernet address
        -n intf       # name of a dedicated network interface to enable upgrades                                                                                                                                                              on
                      #  (e.g., hme0, vge1, etc. "all" = all interfaces)
        -G option     # control enabling of configuration GUI on Sun Rays
        -g option     # control disabling of configuration GUI on Sun Rays
        -i filename   # append contents of filename to config files
        -N subnetwork # shared subnetwork address to enable upgrades on
        -d            # actively disable firmware download (useful with "-e")
        -V            # only generate version files, do not configure DHCP
        -F            # force firmware load even if downgrading
        -u            # use frame buffer to do download and decompression
        -f firmware   # use the firmware described by the path "firmware"
                      #  for upgrades on the given network interface(s)
Power cycle with CTRL+Pause+A and…
…success!
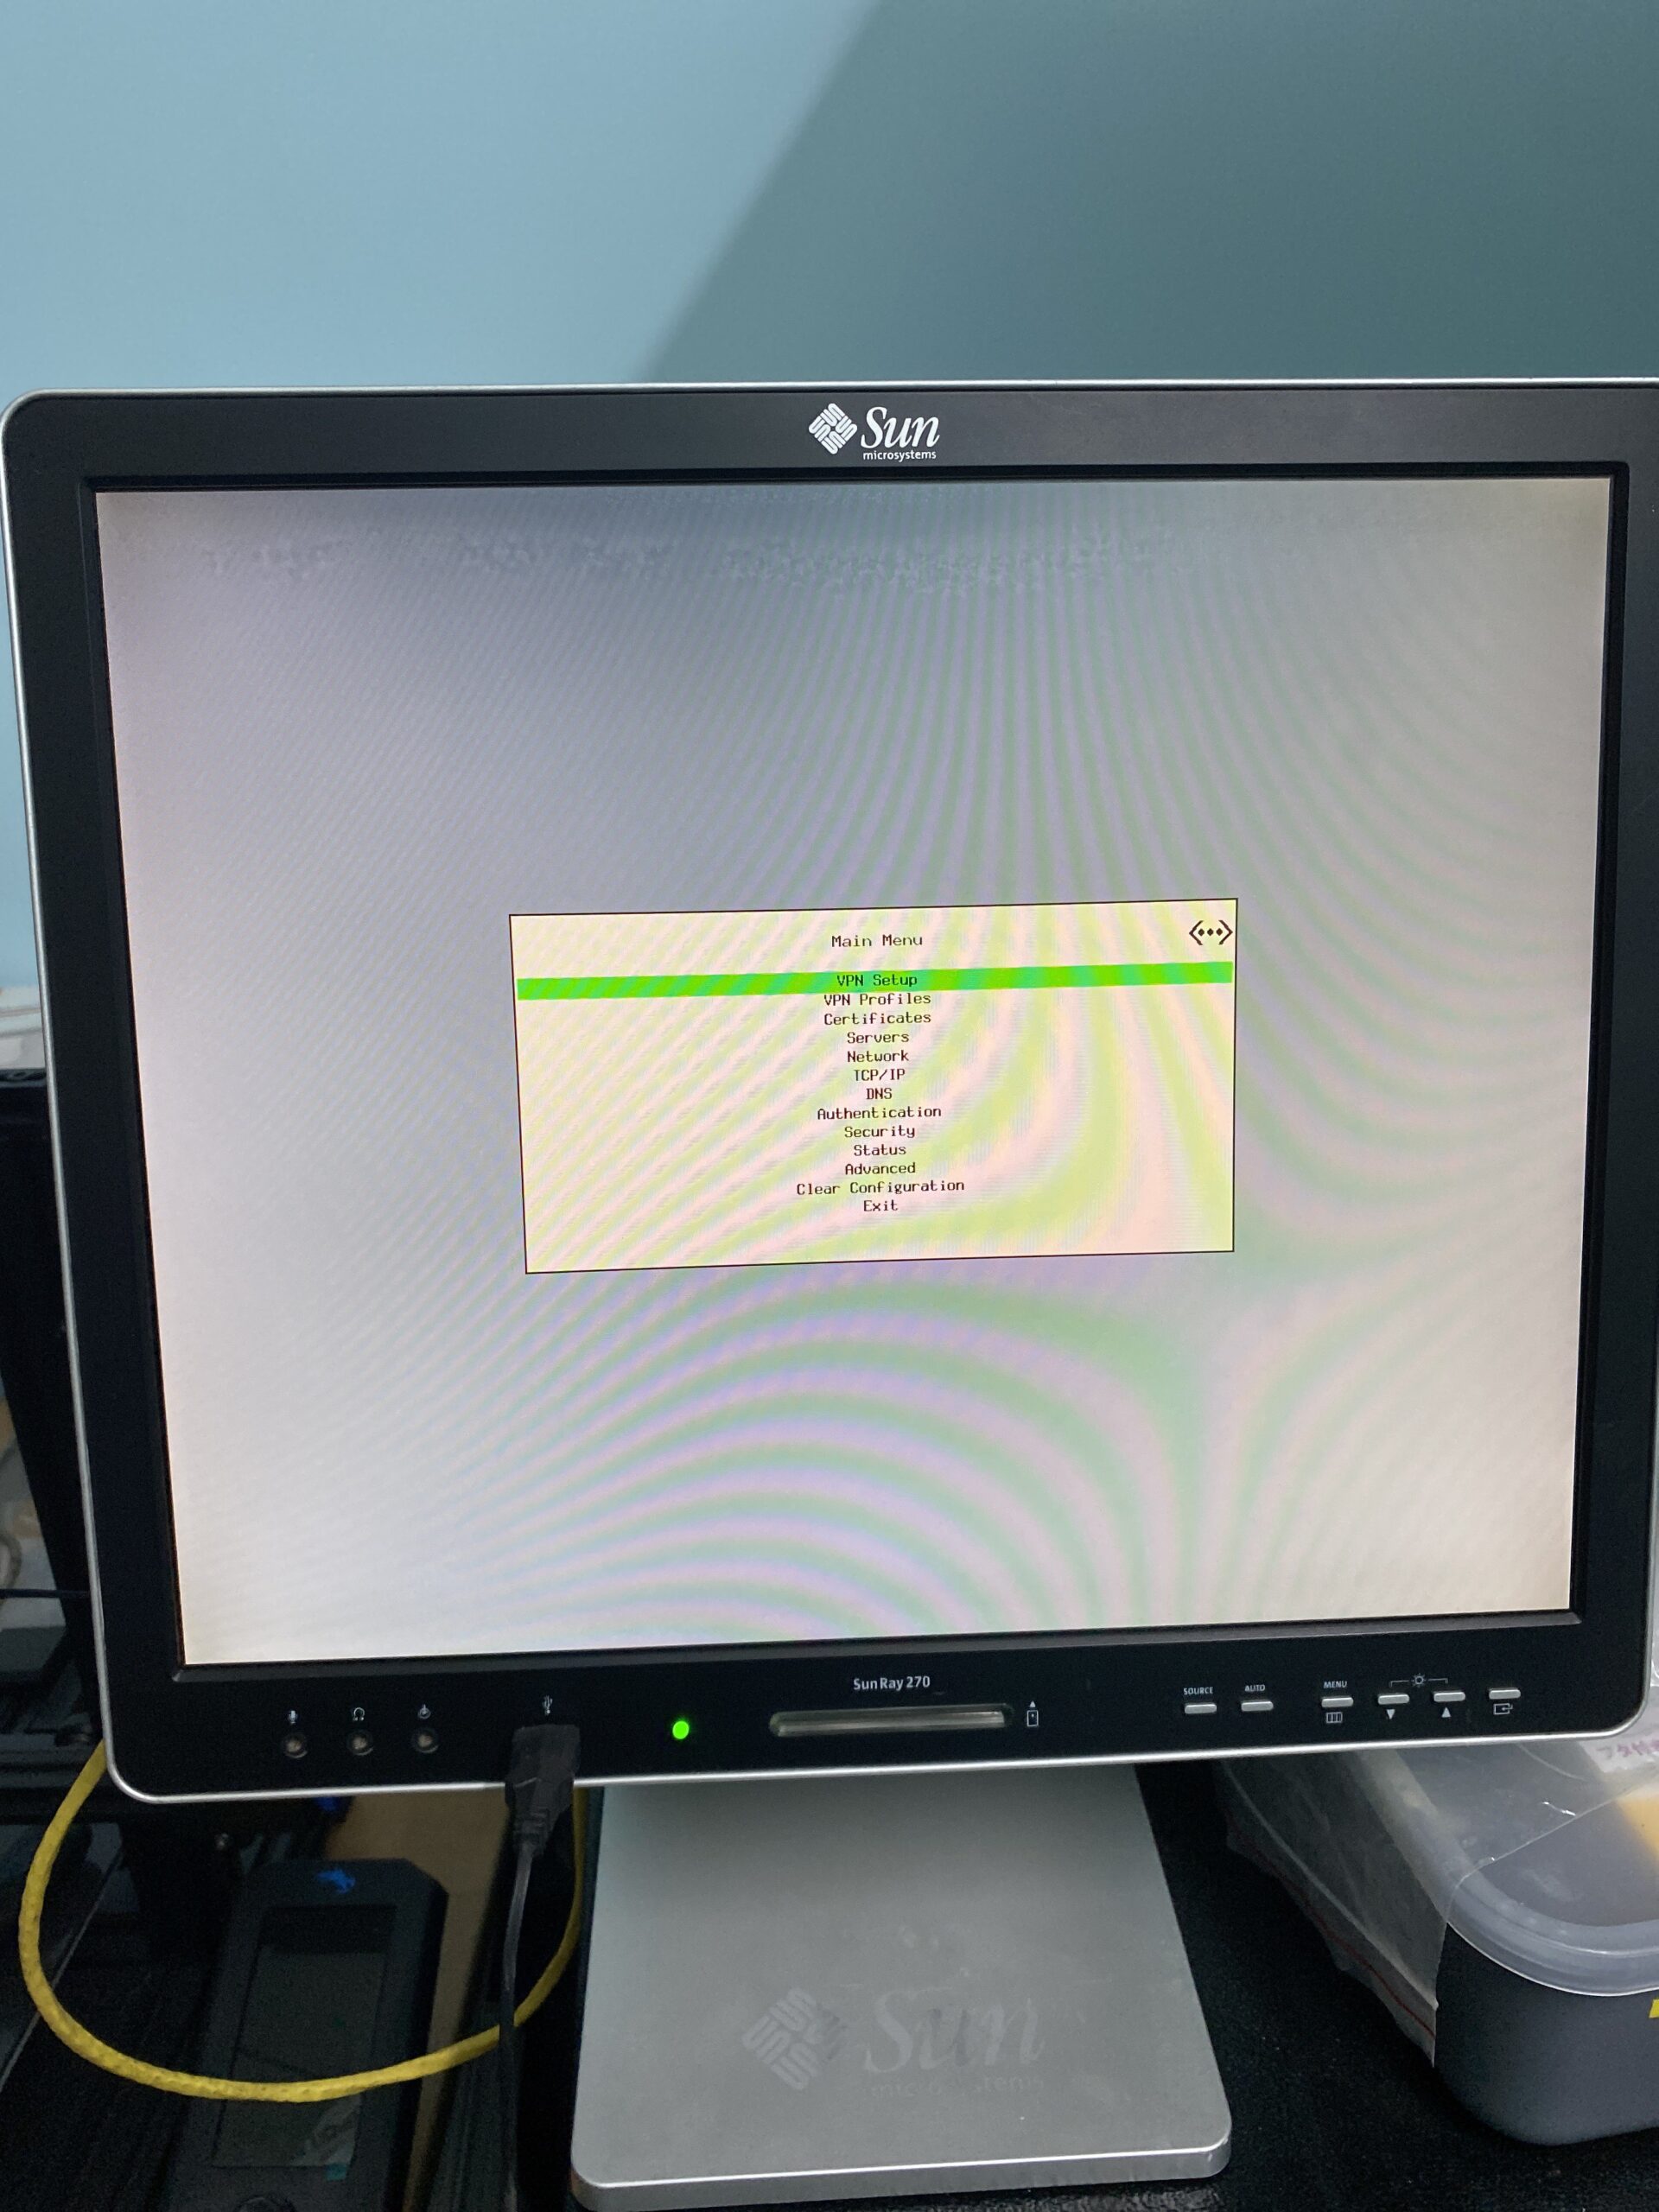
Fun fact: the firmware is stored temporarily in the framebuffer (iirc at least) The GUI can now be accessed:
Sometimes there is a great seemingly timeless resource on the internet, and you pull from it from time to time, make giant compilations, but never really reach out to the creator, or just archive the entire thing.
Then the unspeakable happens and it just up’s and disappears.
I never reached out to Peter Koch, to even thank him for preserving so much, or to apologise for not preserving his site, for some reason it felt like someone else would have done a better job. But then sometimes you find out you were that one person, and you didn’t do it, so you didn’t do it.
I don’t know the story, but it seems Peter did know that it was coming to and end.
May 01 2010 – Ending
Dear friends!
I have to give up my collection.
So if you’re interested in some pieces or know someone who might, please send me an e-mail.
So I’ll put in a call for help for the world at wide? Did anyone save anything more comprehensive than what was in archive.org, or what was in the ‘Titor Special‘?
In the meantime, the site has a new owner, and it’s been restored.
However, with the latest updates, from github, adding in a prior botched attempt, and some messing around, and finally, I got it to ping at first, then it was a matter of where to place the ‘slirp tick’. I first though putting it on the interface poll was a good spot, but for some reason the machine causes a deadlock/stall on boot before the PROM can even initialize. I’m not sure why. Searching further I found a good timer portion and injected the code. And sure enough I was greeted with the login banner:
I’ve been able to paste in about 100kb of a uuencoded tar file, and it didn’t lock the VM, and I was able to uudecode it, and actually build the source (Infotaskforce ’87 if anyone cares). So I’m at the point I think it’s stable enough to shove into the world, although I guess until I revisit it again.
The following is a guest post by PA8600/PA-RISC! Thanks for doing this incredible writeup about an ultra rare Unix!
One of the weirdest times in computing was during the mid-90s, when the major RISC vendors all had their own plans to dominate the consumer market and eventually wipe out Intel. This was a time that led to overpriced non-x86 systems that intended to wipe out the PC, Windows NT being ported to non-x86 platforms, PC style hardware paired with RISC CPUs, Apple putting the processor line from IBM servers into Macs, and Silicon Graphics designing a game console for Nintendo. While their attempts worked wonders in the embedded field for MIPS and the AIM alliance, quite a few of these attempts at breaking into the mainstream were total flops.
Despite this, there were some weird products released during this period that most only assumed existed in tech magazine ads and reviews. One such product was Solaris for PowerPC. Now Solaris has existed on Intel platforms for ages and the Illumos fork has some interesting ports including a DEC Alpha port, but a forgotten official port exists for the PowerPC CPU architecture. Unlike OS/2, it’s complete and has a networking stack. It’s also perhaps one of the weirdest OSes on the PowerPC platform.
It’s a little-endian 32-bit PowerPC Unix and possibly the only one running in 32 bit mode. Windows NT and OS/2 (IIRC) were the other 32-bit PowerPC little-endian OSes and Linux is a 64 bit little endian OS.
It’s a limited access release, yet feels as polished as a released product.
It has a working networking stack.
Unlike AIX, it was designed to run on a variety of hardware with room to expand if more PPC hardware was sold. You can throw in a random 3com ISA NIC for example and it will in fact work with it.
It shares several things with Solaris for Intel including the installer.
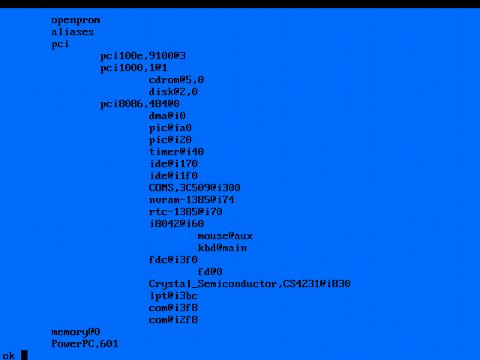
I’m going to demonstrate perhaps the weirdest complete PowerPC OS on fitting hardware: the IBM RS/6000 7020 40p, also known as the Power Series 440 (6015) and by its codename “Sandalfootâ€. The system is a PowerPC 601 based machine, featuring the PCI and ISA buses in an LPX style case. This is also one of the few machines that can run it. All screen captures are from a VGA2USB card as emulators cannot run anything but AIX.
What you need to run Solaris PPC
To run Solaris, the system requirements are just like that of Windows NT for PowerPC. You need a PReP machine (PowerPC Reference Platform, not to be confused with the HIV prevention pill or PrEP according to Wikipedia). Now finding a PReP machine is perhaps the hardest part of setting up Solaris for PowerPC and to understand why you need to know a bit about the history of the PowerPC platform.
One of the biggest problems with PowerPC hardware to this day has been the sheer inconsistency of how each machine boots. While Alpha machines had SRM/ARC and SPARC machines had OpenBoot, each vendor had their own way of booting a PowerPC machine despite rolling out standards.
There were essentially two different camps building PowerPC machines, IBM and Apple. IBM’s plans for universal PowerPC machines consisted of industry standard, low cost machines built around a PowerPC CPU, chipset, and lots of supporting components lifted from the PC platform along with PCI and ISA. The CHRP and PReP standards were essentially PCs with PowerPC processors in them. IBM’s plan was that you were going to replace your PC with a PowerPC machine someday. This was cemented by the fact that Windows NT was ported to the PowerPC platform, that OS/2 had an ill-fated port, and that a handful of third party Windows NT PPC machines were sold.
Apple on the other hand wanted to build Macs with PowerPC CPUs. Older Power Macs featured no PCI slots or Open Firmware, only NuBus slots carried over from classic 68k Macs. In fact much of the boot and OS code was emulated 68k code. Later on Apple would lift bits and pieces of things they enjoyed from the PowerPC standards such as Open Firmware, PCI, and even PS/2 and VGA ports on the clones. Apple’s plan was to replace the PC with the Mac, and Mac clones featured Apple style hardware on LPX motherboards. While the PCI clones featured Open Firmware, this version was designed to load the Macintosh Toolbox from ROM while “futureproofing†them by adding in the ability to boot something like Mac OS X/Rhapsody or BeOS.
Despite these similarities Macs were their own computers and were nothing like the IBM systems internally, aside from sharing the same CPU and maybe Open Firmware later on. But even Macs with Open Firmware were incapable of booting from hard disks formatted for IBM systems and vice versa. This is a common problem with installing PowerPC Linux as many installers do not check which machine they’re run on. Furthermore unlike modern day Intel Macs, PPC Macs were designed to only boot operating systems specifically written for them. They were incapable of running any OS solely written for the IBM machines.
The confusion between PPC machines has also caused a forum question to pop up, “how can I install PowerPC Windows on my Mac?†Even today the new OpenPower/PowerNV machines use a different bootloader than IBM’s hardware and completely lack Open Firmware.
Anyhow IBM built several different generations of PowerPC UNIX machines under several brand names including RS/6000, pSeries, and Power. Nearly all of them (aside from the Linux models) will run AIX, and later ones will run IBM i as well. Not just any PowerPC IBM hardware will run the OSes designed for PReP hardware however.
To run these old PReP OSes you’re looking at a very specific set of machines from the 1994-95 period, many with no characteristic diagnostic display most RS/6000 machines have. To run PowerPC Solaris much of the same applies here. You need a RS/6000 40p, or 7248 43p (not the later 140 and 150 with the display). The rare PPC Thinkpads and Personal Computer Power Series machines will run Solaris as well. It’s also compatible with the PowerStack machines from Motorola and one BetaArchive user had luck running it on a VME board. These machines are hard to find and unemulated as of writing, though the firmware files exist for the 40p at least and some efforts have been made in QEMU.
Mine features a PowerPC 601 CPU, 192mb of RAM (the max), a Weitek P9100 video card (branded as the IBM S15 IIRC), and a non-IBM 3com NIC. The 3com NIC has issues with the system as during boot if the NIC is connected to the network the system will refuse to boot fully and will either freeze or BSOD (in NT). The NIC is also not supported on AIX as well, and will eventually need to be replaced.
Curiously, not only is the IBM 40p/7020/6015 not listed in the HCL but the NIC it uses is. It’s well known that the Sandalfoot systems were used for early PReP OS development and it makes sense. Unlike the RS/6000 model 250, the 40p features PCI and ISA busses along with the same 601 CPU early PowerPC machines had.Â
Installation
To install PowerPC Solaris, you first need to make a boot floppy. This isn’t uncommon with PReP operating systems. PowerPC Windows NT also requires a boot floppy for the ARC loader. The difference here is that there are two boot floppies; one for Motorola machines and one for IBM machines. Even on PowerPC this wasn’t terribly unusual, both the Moto Powerstack and Apple Network Server computers required custom AIX install media as well and Windows NT had specific HALs for each PPC machine.
On the Motorola PowerStack machines you need the same firmware used to install AIX instead of the ARC firmware for NT. On the IBM machines it’s vastly easier, you just need to make the floppy and shove it in. You then press the power switch and you’ll end up dumped to an Open Firmware prompt. As these IBM machines did not have Open Firmware, the bootloader loads Open Firmware from the floppy or hard disk every time you boot the machine. Keep in mind even the system management services are floppy loaded on these machines.
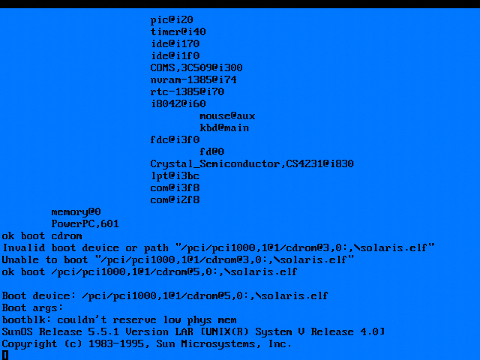
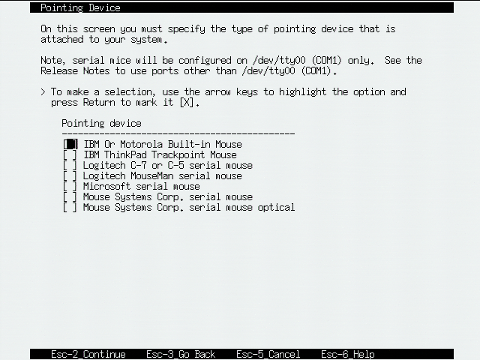
You then run into the first big hurdle to installing the OS, “disk†and “net†are mapped to very specific devices and if the SCSI IDs of these are different it will not boot. If the CD drive is not at ID 3 and the HDD is not at ID 6 the commands will not work. You will need to set an environment variable and tell it to boot from these disks manually for the first install.
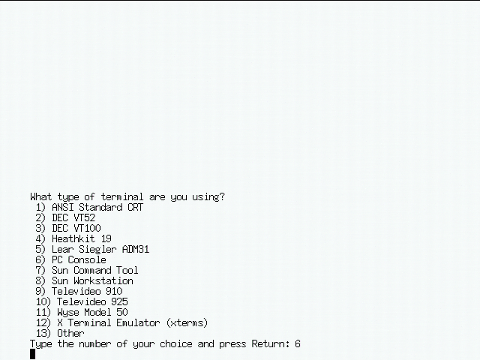
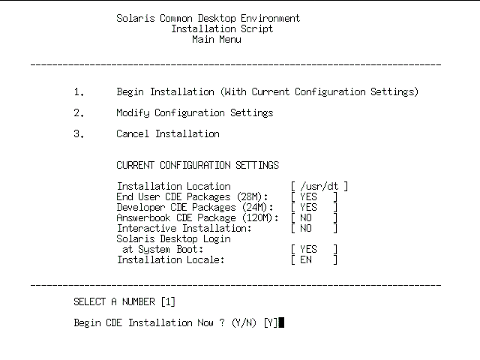
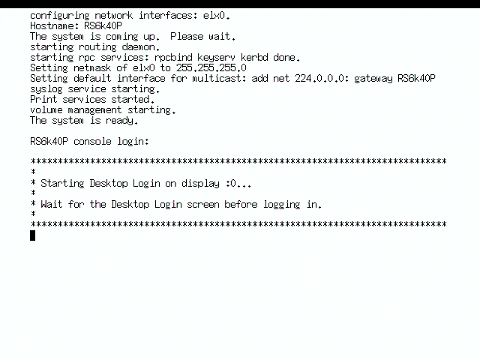
Booting the OS is similar to booting it on a Sun, but the installer resembles that of the Intel version. The first thing that happens is you wait for the slow 2 speed CD drive to load the OS as the screen turns Open Firmware white. You will need to set the terminal type, and then then video and mouse input before X will load. The video options are limited to the S3 864/928, the Weitek P9000 and P9100, and Moto’s Cirrus Logic GD5434. Notice how the Power Series 440 (6015)/RS6k 7020 40p is referred to by its codename “Sandalfootâ€.
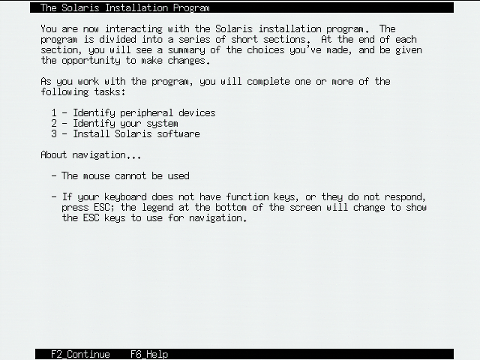
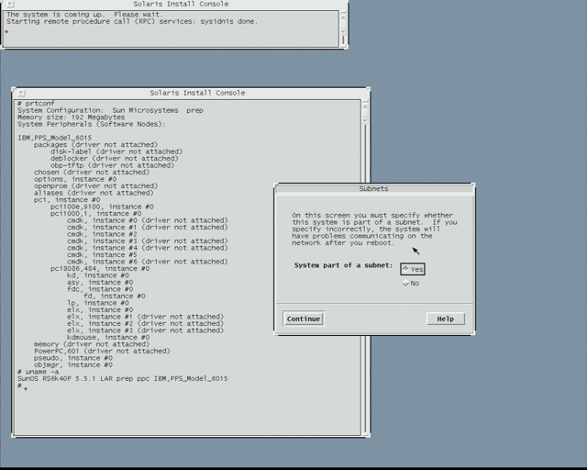
Once you enter this in Solaris will boot load X it does on a Sun or Intel box, and the installer will be exactly the same. This phase is very uneventful as the slow CD drive copies files to the hard disk. I didn’t take a lot of screenshots of this part because you can get the same experience with QEMU or an old SPARCStation. You set the network info, you partition the HDD, you choose what you want, and you sit back as it installs.
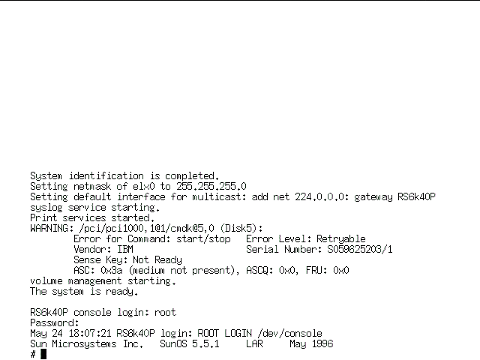
Then you’ll be dropped at the Open Firmware bootloader and you’ll enter the right commands to make it boot if “boot disk†doesn’t automatically boot the OS.
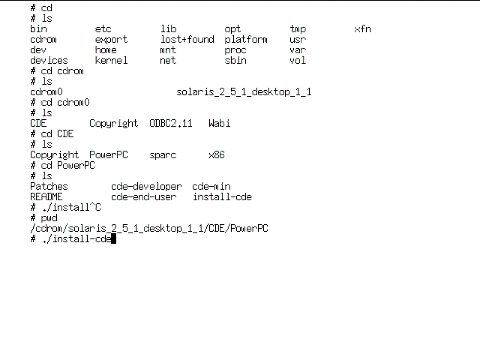
The installation is not complete however. The next step is to swap CDs and install the GUI. A default install will drop you at a command line, with the second disk you can install OpenWindows and CDE and get a full working desktop. Login, switch CDs, change to the correct directory, and run the installer.
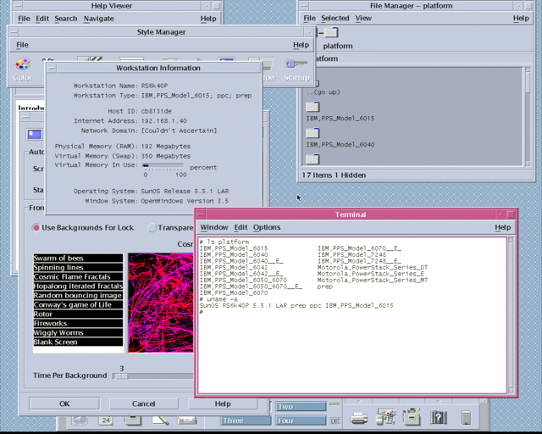
Once this is done, simply type in reboot and once you login you’ll be at a desktop that looks exactly like a Solaris 2.5.1 install on any other platform with one difference. There is literally zero third party software, and for years there was literally zero way of making software for it. You’re stuck with a stock OS and whatever utilities Solaris 2.5.1 came with. You’ll want to use OpenWindows as well, CDE is vastly slower on the 601 CPU (but not as slow as AIX 4.3 for example). The platform directory also tells you what IBM machines it can run on, and all the RS/6000s are titled PPS. The 6015 is the 40p, the 6040 and 6042 are the ThinkPad models 830 and 850, the 6050/70 are the Personal Computer Power Series variants of the 7248 43p, and the PowerStacks are pretty self-explanatory.
The Compiler Problem (and solutions)
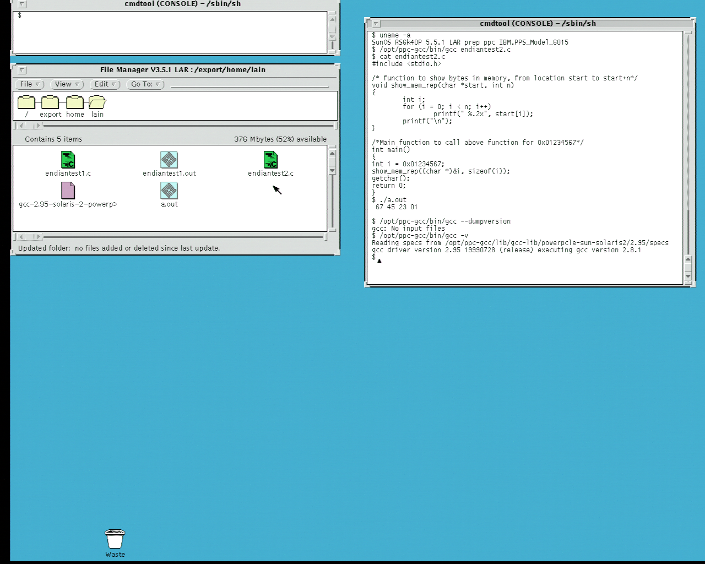
For the longest time Solaris for PowerPC was neglected among those who happened to own a PReP machine for one reason: it lacked a compiler. A compiler is perhaps the most important part of any operating system as it allows one to write code for it. As was the case with UNIX operating systems from the time, the compiler was sold separately. With any UNIX that was widely distributed this wasn’t too much of an issue, as GCC or other third party compilers existed for the platform. Furthermore most compilers for these commercial UNIX operating systems ended up dumped online.
Solaris for PowerPC lacked both of these for ages due to the obscurity and rarity of the port. But in 2018 Tenox dug up the official compiler, yet this remained unnoticed for a while. This led to someone else experimenting with cross compilation on Solaris, and managing to compile PowerPC Solaris software. They then released a port of GCC for Solaris 2.5.1 for PowerPC while posting instructions on how to compile it.
To use GCC for Solaris, you need to unzip the compiler, add it to the path, and then symlink a few files that GCC ends up looking for. This is discussed in the BetaArchive thread about this, but I’ll quote it here.
$ ls -l /opt/ppc-gcc/lib/gcc-lib/powerpcle-sun-solaris2/2.95/
total 13224
-rwxr-xr-x   1 bin      bin      5157747 Feb 16 10:30 cc1
-rwxr-xr-x   1 bin      bin       404074 Feb 16 10:30 collect2
-rwxr-xr-x   1 bin      bin       453525 Feb 16 10:30 cpp
-rw-r--r--   1 bin      bin         1932 Feb 16 10:30 ecrti.o
-rw-r--r--   1 bin      bin         1749 Feb 16 10:30 ecrtn.o
drwxr-xr-x   3 bin      bin         1024 Feb 16 10:29 include
-rw-r--r--   1 bin      bin       673012 Feb 16 10:30 libgcc.a
drwxr-xr-x   2 bin      bin          512 Feb 16 10:30 nof
-rw-r--r--   1 bin      bin         4212 Feb 16 10:30 scrt0.o
-rw-r--r--   1 bin      bin         1360 Feb 16 10:30 scrti.o
-rw-r--r--   1 bin      bin         1104 Feb 16 10:30 scrtn.o
-rw-r--r--   1 bin      bin         7868 Feb 16 10:30 specs
lrwxrwxrwx   1 root     other         24 Feb 22 21:35 values-Xa.o -> /usr/ccs/lib/values-Xa.o
lrwxrwxrwx   1 root     other         24 Feb 22 21:36 values-Xc.o -> /usr/ccs/lib/values-Xc.o
lrwxrwxrwx   1 root     other         24 Feb 22 21:36 values-Xs.o -> /usr/ccs/lib/values-Xs.o
lrwxrwxrwx   1 root     other         24 Feb 22 21:36 values-Xt.o -> /usr/ccs/lib/values-Xt.o
lrwxrwxrwx   1 root     other         26 Feb 22 21:37 values-xpg4.o -> /usr/ccs/lib/values-xpg4.o
$
Once you do this, you can now compile C code at least with GCC. This means that Solaris for the PowerPC platform now is a usable operating system, aside from the fact it has no precompiled software whatsoever. Even Windows NT for PowerPC has more software for it. Software can now be compiled using GCC or the original compiler, and cross compiled with GCC on a non-PPC box. Using the cross compiler lets you compile more basics for compiling PPC Solaris code as well such as make. In this screenshot you can also see me compiling a basic “endian test†code example to demonstrate the little endianness of the PowerPC port.
The only problem is that there’s going to be little interest until someone makes a PReP machine emulator. PReP hardware is very hard to come by on the used market these days and while in the early 2000s it might have been easy to find something like a specific RS6k, but judging by the eBay listings there were a lot more MCA, CHRP, and even later PReP models (like the 43p-140) than there are early PReP machines in circulation. QEMU can emulate the 40p somewhat, but right now its 40p emulation is less like an actual 40p and more like something to please AIX. It definitely has the novelty of being a “little-endian PowerPC Unix†however.
Since I was playing with the 68000 based GCC ’87 I know it was going to be more geared to SUN workstations, certainly of the early 80’s vintage as they would be the most ‘affordable/cheap/donated’ to FSF (Or so I’d imagine).
Naturally the go to emulator is TME, however this time while searching around for the install scripts and stuff I found lisper‘s (heeltoe.com) emulator-sun-2, a greatly cut down and SUN-2 focused emulator that emphasizes ease of use.
Wait, what? SUN-2, and ease of use? Why yes, not only that, as it uses SDL 1.2 it also means it’s much easier to compile. After an hour of messing around with it, I had it running on Windows. After a few minutes I had it running on my ARM based Acer NovaGO.
At it’s core is the m68k 68010 emulation from Karl Stenerud‘s Musashi core which is a great choice for the SUN-2 as it’s a 68010 based machine. Some fun notes from web.cuzuco.com/~cuzuco/sun2/ include:
CPU is a Motorola 68010 running at 10MHz
Maximum physical memory is 4 Megabytes
Maximum virtual memory is 16 Megabytes
All I/O is via a Multibus (an Intel design)
Main disk is a SMD, the largest size is 380Mbyte
Has a SCSI adapter, but the disk is slow and small (42Mbyte)
Sun was just finishing NFS
alludes to future AT&T UNIX System VI and VII
Display supported dual heads and a resolution of 1152×900
List price as tested: $44,900
Sun was still private, had 400 employees and sold 1500 units
I started to integrate sigurbjornl’spatches for networking but I think I need to work through SunOS 2.0’s weird VAX 4.2BSD arp issues (anyone have the source code to SunOS 2.0?!). I’ll probably update it with UDP or some fixed ARP thing to remove that or just let the SUN-2 talk to a VAX with 4.2BSD so they can be weird, together.
I’m also pretty sure my old Cockatrice III sort of debugged SLiRP thing broke the packed structs to let it work properly when compiled with Microsoft C, so I’ll have to break down and either try to fix that, or update and borrow the vastly updated SLiRP from SIMH.
I know in all the trade news everyone is excited that the newest Linux Subsystem for Windows will provide a native kernel. I would imagine it’s going to run along the lines of containers which means using the Hyper-V stuff. So good bye VMWare?
Anyways I want to run SunOS 2.0 which means no graphics are needed, but what I do need is a pty. I’m a n00b so I don’t know how to generate them myself, but I did see that I can piggyback on a ssh session. So first you need to enable & run sshd, which instructions are here, Although with Ubuntu 18.02 LTS there is further steps listed here. If everything is okay, you can SSH into your Windows machine, getting the Linux subsystem.
Some notes on building:
First let’s get the emulator and patches for SunOS 2
wget http://people.csail.mit.edu/fredette/tme/tme-0.8.tar.gz
tar -zxvf tme-0.8.tar.gz
wget http://www.heeltoe.com/download/sun2/diffs-20111125
cd tme-0.8
patch -p1 < ../diffs-20111125
Using GCC 5 or 7 (probably everything post version 3, the -Werror will cause building TME to error out.
I just removed the following block from configure
if test "x$enable_warnings" = "xyes" -a "x$GCC" = "xyes"; then
CFLAGS="${CFLAGS-} -Wundef -Wall -Werror"
CXXFLAGS="${CXXFLAGS-} -W"
fi
Now you can run configure & make. I follow the general wisdom, which involves disabling shared libraries. Otherwise you can play with the dynamic linker. Yuck.
sh configure --disable-shared
make
It doesn't like to build in parallel, so be prepared to wait.
And yes, building fb-xlat-auto.c & fb.c does take a long while. Also make sure to have bison & flex installed.
Using Debian 9/GCC 6.3.0 I do get a bomb compiling module.c
module.c: In function 'tme_module_init':
module.c:93:3: error: 'lt_preloaded_symbols' undeclared (first use in this function)
LTDL_SET_PRELOADED_SYMBOLS();
In this case I just copy the definition from libltdl/ltdl.h and put it into module.c It'll complain about it being a duplicate, but it'll compile. I don't understand that either.
Now we need to set the variable LTDL_LIBRARY_PATH to pickup the config for each hardware component.
export LTDL_LIBRARY_PATH=$HOME/tme-0.8
Ok and now let's get ready to install SunOS 2.0
$ mkdir sunos2
cd
cd sunos2/
wget https://web.archive.org/web/20060720001131/http://www.soupwizard.com/sun2/sunos/sunos_2.0_sun2.tar.gz
tar -zxvf sunos_2.0_sun2.tar.gz
mv sunos-2.0-sun2/tape1 .
wget http://people.csail.mit.edu/fredette/tme/sun2-multi-rev-R.bin
perl $HOME/tme-0.8/machine/sun/tme-sun-idprom 2/120 8:0:20:02:02:02 > my-sun2-idprom.bin
Now we can configure the emulator. One thing to take note of is what pts device has been created once you SSH'd into Windows.
$ ls -l /dev/pts/
total 0
crw--w---- 1 jsteve tty  136, 0 May 13 15:08 0
c--------- 1 root   root   5, 2 May 13 10:47 ptmx
So in this case it's /dev/pts/0 for me, as I'm the first (and only) thing connected.
Now you need to edit the config. This is the one that I'm using:
mainbus0: tme/machine/sun2 multibus my-sun2-idprom.bin
cpu0 at mainbus0: tme/ic/m68010
obio0 at mainbus0 obio: tme/generic/bus size 8MB
obmem0 at mainbus0 obmem: tme/generic/bus size 16MB
ram0 at obmem0 addr 0x0: tme/host/posix/memory ram 4MB
rom0 at obmem0 addr 0xef0000: tme/host/posix/memory rom sun2-multi-rev-R.bin
rom0 at obmem0 addr 0xef8000
clock0 at obio0 addr 0x2800: tme/machine/sun2/clock
tod0 at obio0 addr 0x3800: tme/machine/sun2/tod
zs0 at obio0 addr 0x2000 ipl 6: tme/machine/sun2/zs
mbio0 at mainbus0 mbio: tme/generic/bus size 8MB
mbmem0: tme/generic/bus size 8MB
mainbus0 mbmem at mbmem0 addr 0x00000
sc0 at mbmem0 addr 0x80000 ipl 2: tme/bus/multibus/sun-sc
scsibus0 at sc0: tme/scsi/bus
console0 at zs0 channel A: tme/host/posix/serial device /dev/pts/0 break-carats
sd0 at scsibus0: tme/scsi/disk id 0 type acb4000
disk0 at sd0: tme/host/posix/disk file my-sun2-disk.img
st0 at scsibus0: tme/scsi/tape id 4 type emulex-mt02
tape0 at st0: tme/host/posix/tape
command tape0 load tape1/01  tape1/02  tape1/03  tape1/04  tape1/05 tape1/06  tape1/07  tape1/08  tape1/09  tape1/10
command mainbus0 power up
Now we are almost ready! Create a 1GB disk image with dd:
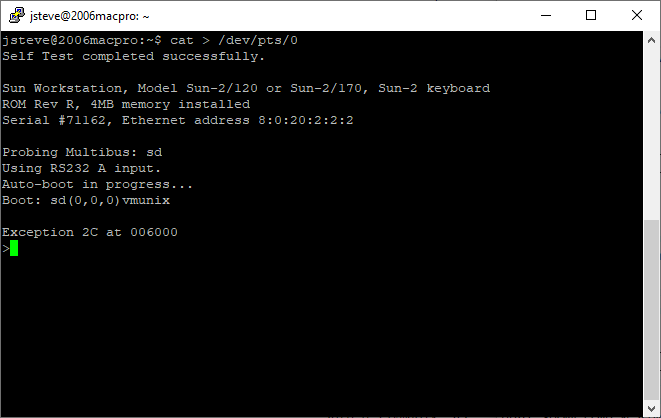
Now we are ready to go. From the ssh connection just type in 'cat > /dev/pts/0' and now everything we type in will be on the console. Now from a normal bash session type in '$HOME/tme-0.8/tmesh/tmesh SUN2-MULTIBUS' If everything goes well the bootpromp text will pop up on your SSH session.
SUN-2/120 on Windows!
And if everything has gone right, we are now at the firmware prompt, ready to install SunOS 2.0!
Instructions from retrocomputinggeek.com gives a pretty good walk through of configuring a 1GB disk, and the installation. Although as a hint use the -as flags when booting SunOS for the install. And after booting the miniroot, follow the instructions on heeltoe regarding doing the 1st tape of the install.
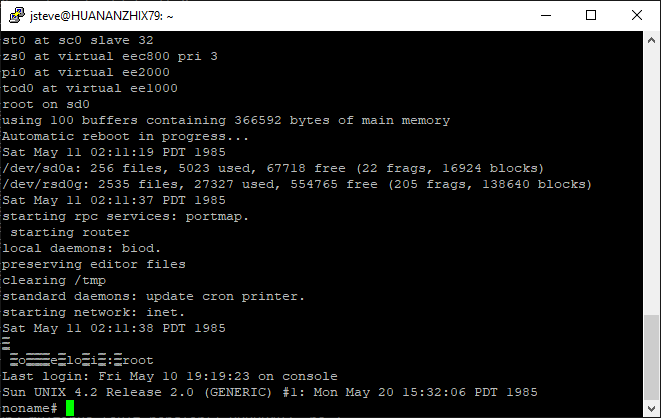
>b st()
Boot: st(0,0,0)
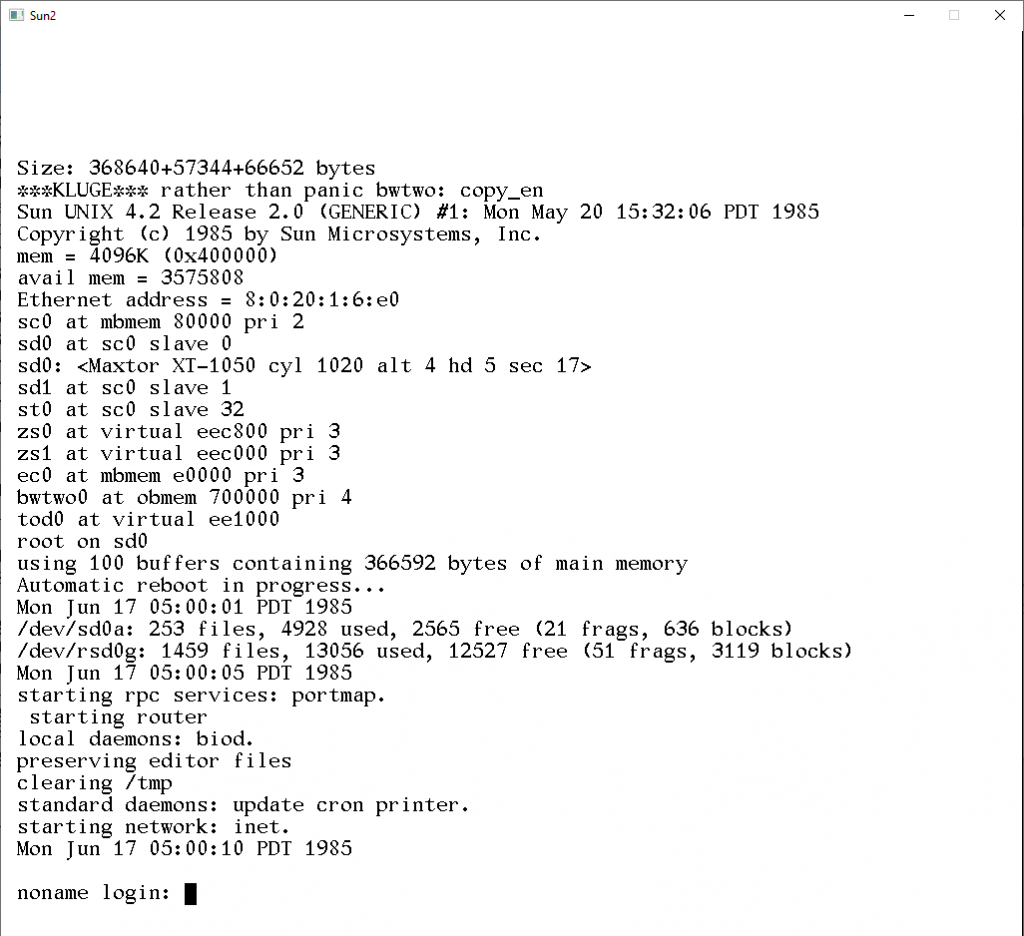
Boot: sd(0,0,1)vmunix -as
Size: 368640+57344+66652 bytes
Sun UNIX 4.2 Release 2.0 (GENERIC) #1: Mon May 20 15:32:06 PDT 1985
Copyright (c) 1985 by Sun Microsystems, Inc.
mem = 4096K (0x400000)
avail mem = 3575808
Ethernet address = 8:0:20:2:2:2
sc0 at mbmem 80000 pri 2
sd0 at sc0 slave 0
sd0:
sd1 at sc0 slave 1
st0 at sc0 slave 32
zs0 at virtual eec800 pri 3
pi0 at virtual ee2000
root device? sd0*
using 100 buffers containing 366592 bytes of main memory
#
After that it's a matter of working out which tar file goes where. Is there even an install process? I just untarred the rest of the tapes in the /usr directory.
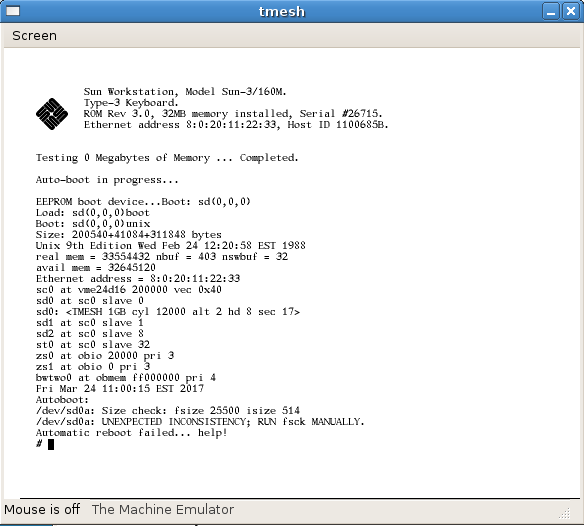
This just in, I have just booted Research UNIX v9 on TME’s SUN-3 emulator!
And there we are booted up and logged in.. pardon the disk error..
funinthe
I’m slightly hesitant about uploading it, as it clearly isn’t right… And this is only the binary component, I have integrated the source tree onto the disk image.  But I haven’t actually tried to compile anything except a simple hello-world program.  You can download it here from sourceforge: SUN3-research_v9.7z If anyone want’s to browse the source, it’s on my CVS browser thing.
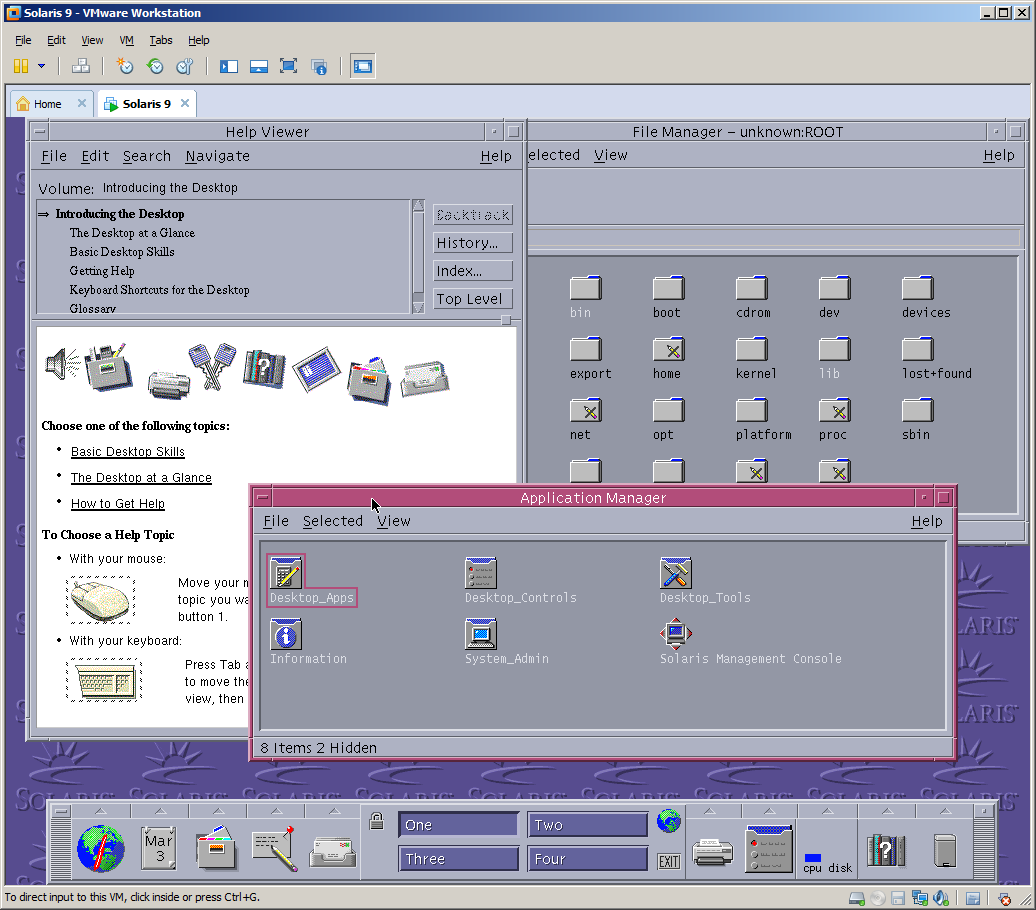
Despite having an unofficial and experimental support for some time now I was not able to install Solaris 9 on VMware Workstation. I have recently upgraded to Workstation 9.0 and Lorenzo Gatti send me a link to complete Solaris 9 x86 u5 media kit so I had an excuse to retry.
After several tries I have determined that the easiest route is to boot and install from cd1 instead of the install disk. Also make sure to select VESA driver instead of standard VGA to get a decent resolution. VMware tools won’t install but it’s not a big deal. Apart from that everything else including networking works out of the box.
Just as a final note Solaris 9 is now 10 years old, time flies fast!
Update:
I have also installed Solaris 8 in a similar manner. Unfortunately it doesn’t have VESA drivers so all I could get is 640×480.
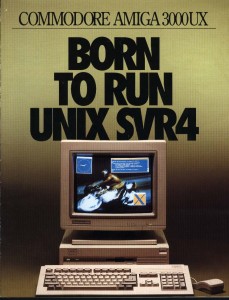
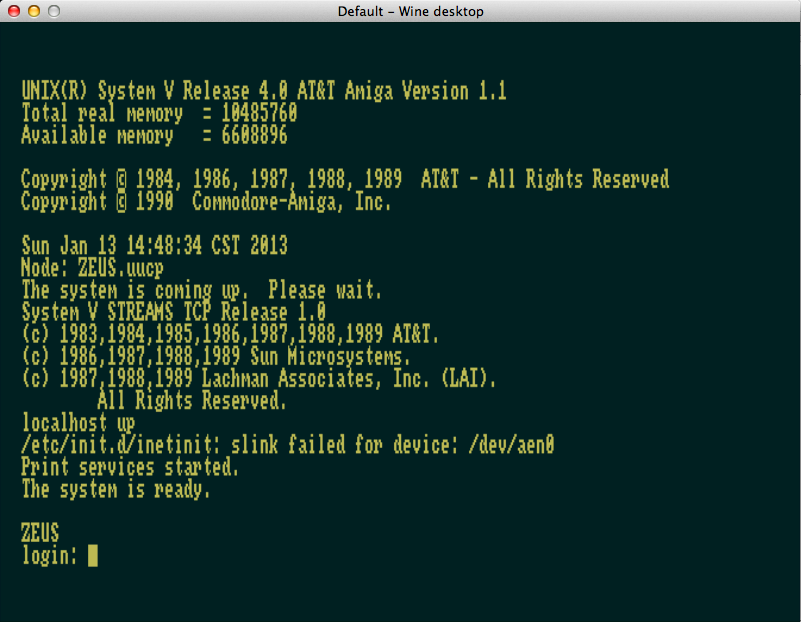
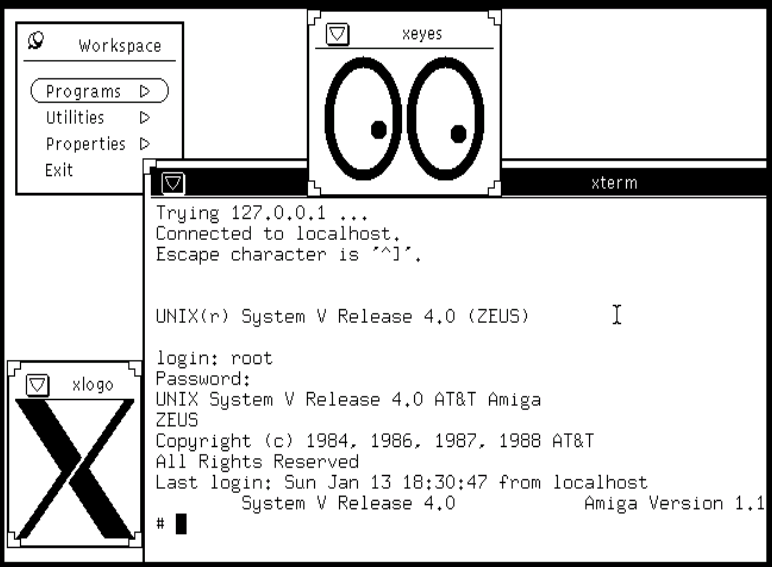
Back in 1990 Commodore took the Amiga in a new direction with it’s new Amiga 3000, by commissioning a port of A&T SYSV Unix to the Amiga. Taking advantage of the 3000’s 68030 CPU and 68881 Math coprocessor, along with its integrated SCSI controller. It certainly was the hallmark of typical UNIX machines of the time.
When originally announced there was some big interest in the platform by SUN, as their original SUN-1, SUN-2 & SUN-3 lines of workstations were all 68000 based machines, and being able to rebrand a mass produced Commodore model would have been a good thing, however the deal ultimately fell through.  The machine would have been the Amiga 3500, which later became the Amiga 3000T.
Another thing to keep in mind is that SUN’s SYSV (Solaris) was targeted to the SPARC processor, and it is unlikely that they would benefit from selling a 68030 based machine in 1991.
Typical of the time, AMIX installs from a set of boot floppies, and then pulls the rest of the installation from a tape drive, such as the A3070.
AMIX was released at a time when the UNIX world was rapidly moving to RISC processors, SUN had their SPARC, SGI had their MIPS, IBM and their POWER, Motorola built UNIX machines around their 88000 RISC processor, NeXT was also going to move to the 88000 until they gave up making their own hardware and shifted to a software company. Â So who would want a then dated 68030 based machine when the industry had made their first steps into the world of RISC computing.
So how does it measure up?  Well it is SYSV, and if you’ve seen one, well honestly you’ve seen them all.  What is kind of neat is that AMIX includes OpenLook and a C compiler, which is kind of a rarity for the period.
Another flaw was that when the 68040 processor was released it’s MMU was incompatible with the 68030, and the VM subsystem for any UNIX would have to be rewritten. Â While NetBSD can run on both the 68030 and 68040, AMIX never was updated, and so it can only run on 68030 based machines.
AMIX never did get any critical traction, and slipped into oblivion with the death of Commodore.
Up until recently it was impossible to run AMIX in any emulator, but there has been a lot of work on the ARANYM and Pervious emulators which included doing 68030 MMU support for the possibility of running early versions of NeXTSTEP. Toni Wilen was able to adapt their work onto WinUAE and it is not possible to run AMIX.!
Reading through this thread,  I was able to put together the needed bits, and get it running under CrossOver, by using the pre-configured settings for WinUAE, and replacing the exe with the new beta exe, the supplied hard disk image from amigaunix.com and I was up and running in no time!  The only real change from the config was to change the SCSI ID of the hard disk from 0 to 6.
AMIX starting up on WinUAE
The default password is wasp. Â I thought it was kind of interesting that AMIX includes ‘dungeon’. Â really cool!
Open Look on AMIX
I am unsure of how to enable the high resolution graphics, but sadly the Amiga known for its multimedia capabilities, AMIX with stock graphics runs in monochrome. Â Such a major underwhelming thing.
Oh well, for anyone inclined you can now run AMIX, and enjoy another dead SYSV.