Getting started with a cisco router

To get started with a cisco router, you’ll first need a console cable.  The newer equipment uses USB, but needs a special driver for use under Microsoft Windows.  The older stuff uses the venerable RS232 protocol, however depending on the age of the equipment it could be a DB25 or a DB9, or perhaps even a RJ45 port in which you’ll need to plug into for the first time to configure the router.  They all start up a 9600 baud, no parity, eight databits, one stop bit (N81).  With newer computers getting a working RS232 port can be a challenge, so don’t throw away any computer that has a working RS232 port.  It may save your life one day.

Since I am using dynagen/dynamips for my example I open up my configuration with dynagen, then start all my routers like this

=> start /all
100-VM ‘nycrtr1’ started
100-VM ‘corewan1’ started
100-VM ‘corertr1’ started
100-VM ‘hkgrtr1’ started
=>

Then I can console to my selected router by typing in console (router)

=> console corertr1
=>

From there it will act like a real console port, just as if I had plugged in a serial console cable. With the console connected, and the router powered up you’ll eventually find the following question being asked:

% Please answer ‘yes’ or ‘no’.
Would you like to enter the initial configuration dialog? [yes/no]:

This is the first thing you’ll be greeted with on the console port of a virgin cisco router.  Honestly I don’t like the intial configuration, and prefer to do this all by myself.

From there the router will prompt you with the cheery:

Press RETURN to get started!

And once you press enter, a status of all the interfaces will be displayed, and you’ll be dumped at the router prompt.

Router>

From here we are in an unprivileged mode, only able to enter in some basic commands, but unable to change the configuration, or do anything really meaningful. You can view what commands are available by typing in a question mark (hit enter!), and the list will scroll by. To change to the enabled (supervisor) mode, we simply type in enable.

Router>enable
Router#

Notice how the prompt changed from > to #.  Now try the ‘?’ command again, and notice that we can do far more commands.

Some useful commands include

  • show version
  • show running-config
  • show log
  • who
  • dir

Take note that the ‘show’ command has many, many possible options to give it.  This will be the command you will use the most to figure out what is going on, inside of your network.

The ‘show running-config’ command will show us the current configuration that the router has.  Take note that it will ask you to hit ‘more’ as you go through the configuration as this has more than 24 lines to display.  This is because your ‘console’ is configured by default for 24 lines (show line 0).  Like everything else it too can be changed, but for now we’ll leave the paging function in.

This is what a ‘blank’ or empty configuration looks like:

Router#sho run
Building configuration…

Current configuration : 974 bytes
!
version 12.2
service timestamps debug uptime
service timestamps log uptime
no service password-encryption
!
hostname Router
!
!
ip subnet-zero
!
!
!
ip cef
call rsvp-sync
!
!
!
!
!
!
!
!
interface FastEthernet0/0
no ip address
shutdown
duplex auto
speed auto
!
interface FastEthernet0/1
no ip address
shutdown
duplex auto
speed auto
!
interface Ethernet1/0
no ip address
shutdown
duplex half
!
interface Ethernet1/1
no ip address
shutdown
duplex half
!
interface Ethernet1/2
no ip address
shutdown
duplex half
!
interface Ethernet1/3
no ip address
shutdown
duplex half
!
interface Ethernet1/4
no ip address
shutdown
duplex half
!
interface Ethernet1/5
no ip address
shutdown
duplex half
!
interface Ethernet1/6
no ip address
shutdown
duplex half
!
interface Ethernet1/7
no ip address
shutdown
duplex half
!
ip classless
no ip http server
!
!
!
dial-peer cor custom
!
!
!
!
gatekeeper
shutdown
!
!
line con 0
line aux 0
line vty 0 4
!
end

You may be thinking that for a ‘blank’ router there is a lot of things in here.  The important thing to notice right now is all the interfaces, and that they are currently in shutdown mode.  By default a router will have all of its interfaces turned OFF.  This is to prevent things from automatically “working” or screwing things up in spectacular ways. Also notice with ethernet interfaces they are typically configured at half duplex.  You very well may want to change this on a real router, emulated ones don’t matter, but if you connect a cisco router to a cisco switch, and the duplex is mismatched they will both let you know.  Quite a bit.  So do pay attention to things like that.  In between each bang (!) is a section of the configuration that can be altered by the user as you see fit.  But right now it just allows a console to plug in, and have full access.

So what are some basic things I like to setup on my routers?  Well to start a name is nice.  We enter the configuration mode from within the enable mode by typing in ‘configure terminal’.  From there we change the hostname by simply typing in hostname along with the name that we want to give the router.  Notice that the name of the router now appears on the prompt.

Router#configure terminal
Enter configuration commands, one per line. End with CNTL/Z.
Router(config)#hostname corewan1
corewan1(config)#

We can now exit the configure mode by hitting CONTROL+Z.

corewan1(config)#^Z
corewan1#
02:26:53: %SYS-5-CONFIG_I: Configured from console by console

Notice that the router will trigger a syslog event, and display it on the console.  All of this is configurable but right now this is the factory default behaviour.

It is important to take note that cisco routers have two configurations, the running configuration, and the startup configuration. When you make changes to a live system, you alter the running configuration, not the startup configuration.  This is done this way that in the event that you lock yourself out of the router (removing ip routing, changing the WAN ip address, typoing the passwords.. mistakes happen) a simple power cycle will restore the router to the prior configuration.  It is imperative to test what you can when you make major changes from a second telnet console before saving the configuration.  It can take valuable time to track people down in remote countries, and walking them through a power cycle of the routers can be daunting as they usually don’t ever touch the routers.

To make this change now ‘permanent’ by committing it to the NVRAM, we can issue the command ‘copy running-config startup-config’

corewan1#copy running-config startup-config
Destination filename [startup-config]?
Building configuration…
[OK]
corewan1#

Take note that we *MUST* be out of the configuration mode to issue this command.

The ultimate test is to reboot the router, and verify that it does come up with the new configuration.  To reboot a router the command is simply reload. However with dynamips reloading the router will cause it to crash.

corertr1#reload
Proceed with reload? [confirm]y
00:20:13: %SYS-5-RELOAD: Reload requested by console. Reload Reason: Reload Command.

ROM: reload requested…

%ALIGN-1-FATAL: Corrupted program counter
pc=0x0, ra=0xBFC011A4, sp=0x62B819D8

%ALIGN-1-FATAL: Corrupted program counter
pc=0x0, ra=0xBFC011A4, sp=0x62B819D8

But switching to dynagen we can quickly restart the router process.

=> stop corertr1
100-VM ‘corertr1’ stopped
=> start corertr1
100-VM ‘corertr1’ started
=> console corertr1
=>

And now we are booted into the router.

00:00:05: %LINK-3-UPDOWN: Interface FastEthernet0/0, changed state to up
00:00:06: %LINEPROTO-5-UPDOWN: Line protocol on Interface FastEthernet0/0, changed state to up
corertr1>

I should also point out that from dynagen I also save the router configuration, which will attach it to the network config file.

=> save corertr1
saved configuration from: corertr1
=>

It should be as easy as that.

Now let’s get to some nice things to add.

I always like banners to at least let you know where you are.  Some people like to have legal disclaimers warning against unauthorized access, or even ascii art.

corertr1#config t
Enter configuration commands, one per line. End with CNTL/Z.
corertr1(config)#banner motd Z
Enter TEXT message. End with the character ‘Z’.
|\ _,,,—,,_
/,`.-‘`’ -. ;-;;,_
|,4- ) )-,_..;\ ( `’-‘
‘—”(_/–‘ `-‘\_) Welcome to the corertr1

Authorized users ONLY!!!!

Z
corertr1(config)#^Z
corertr1#
00:07:23: %SYS-5-CONFIG_I: Configured from console by console

Notice the ‘Z’ which is how I let it know that I’m done with my banner.

Passwords are also a good thing, for now I’m not going to put one on the console, but instead on the ‘vty’ ports which we will configure later for telnet access into the router.  Why not the console?  Well right now I’m operating under the idea that if you have physical access to the router, you are into the network anyways.  Obviously this may not meet your needs, but it is fine for my simple introduction.

I’m going to use a simple password of ‘cisco’.

corertr1#config t
Enter configuration commands, one per line. End with CNTL/Z.
corertr1(config)#line vty 0 4
corertr1(config-line)#password 0 cisco
corertr1(config-line)#exit
corertr1(config)#enable password 0 cisco
corertr1(config)#^Z
corertr1#

First the vty part has the parameter 0 4 which gives the router the ability to handle five connected telnet sessions.  Maybe you want more, maybe you want less.  The next part is that after the password keyword, I’m using the number 0 which means the password is unencrypted.  It has been my experience that you ALWAYS ALWAYS ALWAYS configure the passwords using a 0, as some versions change things, and your encrypted strings may not work how you expected them to.

Another fun feature in IOS 12 is the pipe (|) which you can use to filter output from the show command.  Right now our passwords are in clear text, so we are going to encrypt them.  First to verify that they are clear:

corertr1#sho run | include password
no service password-encryption
enable password cisco
password cisco

Now we enable encryption, and re-run the command:

corertr1#config t
Enter configuration commands, one per line. End with CNTL/Z.
corertr1(config)#service password-encryption
corertr1(config)#^Z
corertr1#sho run | include password
00:11:36: %SYS-5-CONFIG_I: Configured from console by console
service password-encryption
enable password 7 060506324F41
password 7 121A0C041104
corertr1#

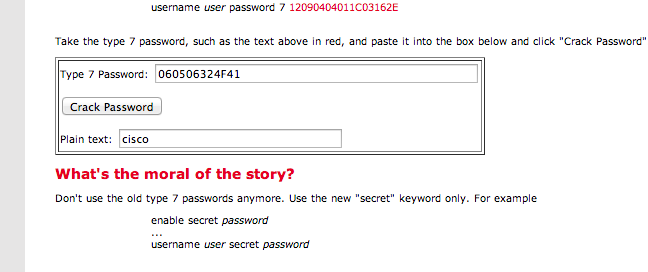
Now our passwords are not so obvious!  But be aware that there are ways to crack these simple passwords.

Screen Shot 2013-09-19 at 9.11.21 AM

My password was cracked!

You can check the site for more information on a more ‘secure’ approach to passwords, but for now it doesn’t matter.

With all of this done, we should save our configuration, and proceed to the next step.

Another popular thing to do is turn off DNS queries.  If you make a typo at the command line, the router will assume that you are trying to telnet to a host.  By default with no DNS servers specified, it will then do a broadcast twice trying to find a DNS server.  This can delay you for 30 seconds to a minute which when you are in a network downtime scenario is very annoying.  To disable this ‘feature’ simply add this to your configuration

no ip-domain lookup

And you’ll never have to worry about this!

cisco router guide

So from the last article I thought I’d go over some basic stuff about cisco routers…

And expect more to change as I go through this some more.

So I thought I’d go through something incredibly elaborate

and for the fun of it.

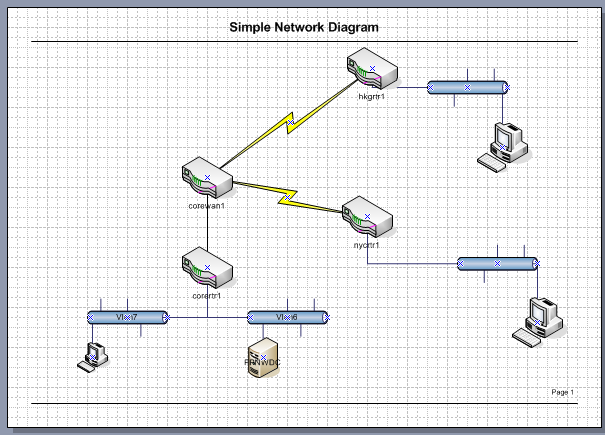
I’ve been playing with the latest release of dynamips (0.2.10), and very excitingly it can build for x86_64 OS X!  So I thought I’d build up a good sized network, much like what I first was exposed to when I started doing cisco networking back in the 1990’s.

Sadly I didn’t hold onto any IOS from back then, so I’m using something much newer, 12.2.  Back then I actually had some IGS stuff with version 9, and bunch of stuff on version 10 & 11.  For the most part I was lucky to use a 7513 as my wan core router, a 7200 for an access router, and 5500’s as my core route/switch fabric with ATM.  It was … very complicated for the day.

To get the ball rolling, I thought I would build out a core site, with a user & server VLAN (voip was a dream back then), and two sites connected via frame relay.  The protocols I most care about will be IPX/SPX and TCP/IP.  I was thinking of porting back the UDP patches for Qemu to version 0.90 so I could run Netware 3.12 in the mix, but honestly it is just easier to use the Netware file & print services for NT 4.0.

So along with the dynamips program, I’m using the obsolete (and easier to configure IMHO) dynagen program.

I’ve fed it a configuration like this:

autostart = False

[localhost]

[[7200]]
image = C7200-JS.BIN
npe = npe-400
ram = 160
idlepc = 0x60529c84
disk0 = 0
mmap = False
ghostios = True

[[ROUTER corertr1]]
model = 7200
slot1 = PA-8E
F0/0 = coresw1 1
E1/0 = coresw1 3
E1/1 = coresw1 8

[[ROUTER corewan1]]
model = 7200
slot1 = PA-8T
F0/0 = coresw1 2
s1/0 = F1 1
configuration = ”

[[ROUTER nycrtr1]]
model = 7200
slot1 = PA-4T+
f0/0 = nycsw1 1
s1/0 = F1 2
configuration = ”

[[ROUTER hkgrtr1]]
model = 7200
slot1 = PA-4T+
f0/0 = hkgsw1 1
s1/0 = F1 3
configuration = ”

#Frame relay switch
[[FRSW F1]]
1:102 = 2:201
1:103 = 3:301

#Core ethernet
#vlan 5 WAN
#vlan 6 server
# 4 FPNW-DC 138.1.1.10
#vlan 7 workstation
[[ethsw coresw1]]
1 = access 5
2 = access 5
3 = access 6
4 = access 6 NIO_udp:41300:127.0.0.1:51300
5 = access 6 NIO_udp:41301:127.0.0.1:51301
6 = access 6 NIO_udp:41302:127.0.0.1:51302
7 = access 6 NIO_udp:41303:127.0.0.1:51303
8 = access 7
9 = access 7 NIO_udp:41304:127.0.0.1:51304

[[ethsw nycsw1]]
1 = access 1
2 = access 1 NIO_udp:41305:127.0.0.1:51305

[[ethsw hkgsw1]]
1 = access 1
2 = access 1 NIO_udp:41306:127.0.0.1:51306

Screen Shot 2013-09-18 at 10.21.03 PM

Or something like this

Ok, now this may look complicated, but in all reality it really isn’t.  It is always a good thing to keep track of what network addresses you are going to use, so here is my chart:


Description IPX IP Mask
CORE
FA0/0 Wan Interconnect C0000001 138.1.0.5 255.255.255.0
Eth1/0 Server C0010001 138.1.1.1 255.255.255.0
Eth1/1 User C0010002 138.1.10.1 255.255.255.0
WAN
Fa0/0 Wan Interconnect C0000001 138.1.0.6 255.255.255.0
S1/0.102 New York PVC A0000001 135.0.0.5 255.255.255.252
S1/0.103 Hong Kong PVC A0000002 135.0.0.1 255.255.255.252
New York
Fa0/0 User C10000001 136.2.0.1 255.255.255.0
S1/0.201 Core PVC 201 A0000001 135.0.0.6 255.255.255.252
Hong Kong
Fa0/0 User C20000001 136.1.0.1 255.255.255.0
S1/0.301 Core PVC 301 A0000002 135.0.0.2 255.255.255.252

For simplicities sake for the routers & IOS I’m using 7200’s everywhere.  The 7200 is a good router with plenty of slots, so it fits my needs just fine.  I suppose I could track down a 2600 or 1700 IOS image, and use them for the access sites, but for now it doesn’t matter.  Mostly because of the ghostios image option where the same memory map can be shared between routers, and of course my Mac Pro has 16GB of RAM.

Now the exciting part of this configuration is that I can easily connect in Qemu 1.6.0 processes to this configuration, allowing me to test the network out in its entirety.  Even better thanks to it being UDP, I can reboot and restart the Qemu or router processes at will.

Naturally like any test scenario, I should spell out some goals, along with some applications that I hope to be able to run.  So to start, a simple setup with an NT 4.0 server with the FPNW services setup.  To run Qemu to attach to the first port on the server VLAN in the core switch I start Qemu like this:

./qemu/qemu-system-i386 -cpu pentium -L ./qemu/pc-bios/ -m 64 -hda FPNW-DC.vmdk -net nic,model=pcnet -net nic,model=ne2k_isa -net socket,udp=localhost:41300,localaddr=0.0.0.0:51300

And from there by changing the UDP numbers I can easily jump VLANs.  Fun.  The major thing is that each additional instance of Qemu will need a unique MAC address, so additional instances should be run like this…

./qemu/qemu-system-i386 -L ./qemu/pc-bios/ -m 16 -net nic,model=pcnet,macaddr=00:11:22:33:44:55 -net socket,udp=localhost:41304,localaddr=0.0.0.0:51304  -fda nwclient-pcnet.vfd

So maybe I should launch into some big diatribe on cisco routers, networking and the rest of the fun stuff.  And maybe I will.

I think the next article will be an anchor page for various topics of what I’m going to get into, and from there evolve my network from the mid 90’s before the internet craze into something far more modern.  And of course a page going over the scope of what I hope to create.

Public Domain Operating System

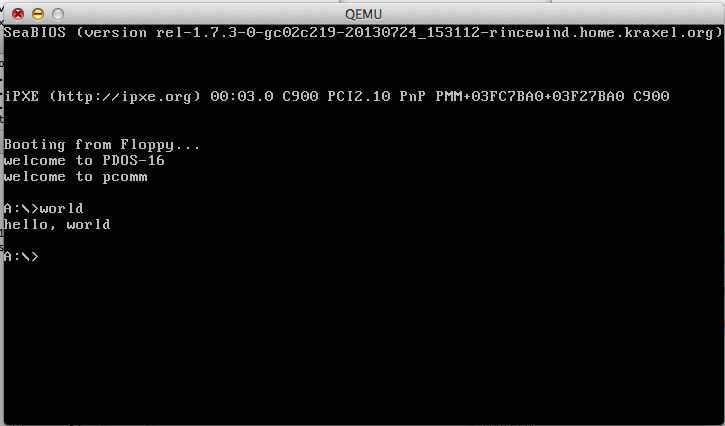
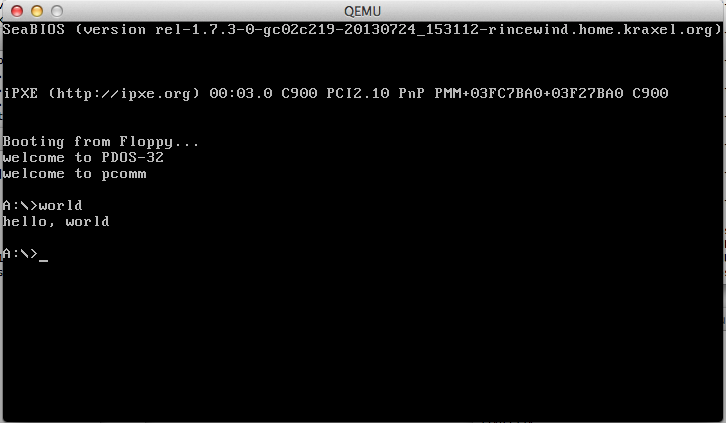
So, I came across this project from some random google search on Watcom the other day.  Simply put it is a MS-DOS API that is supported in both a 16bit real mode operating system, and a 32bit operating system.  It is quite sparse but very interesting all the same.  Using the ancient EMX port of GCC you can build 32bit (simple) programs, and run them in the 32bit DOS like Operating System.  What makes this even more interesting is that there is a port to the IBM 370, and 390 based hardware, along with the fictional 380.

Screen Shot 2013-09-16 at 6.40.03 PM

PDOS-16 booting in Qemu 1.6

Screen Shot 2013-09-16 at 6.39.47 PM

PDOS-32 booting in Qemu 1.6

You can download my diskimages, (VMDK & floppy disk) that I’ve used with Qemu to build & boot PDOS both 16bit and 32bit.

The included libc & system libraries are lacking compared to real MS-DOS, but this is public domain code, and with a bit of TLC it could be made into something much more.

Upgrading Debian Squeeze to Wheezy

These are just my notes on what I had to do, while upgrading my VPS from Debian Squeeze (6.0.7) to Debian Wheezy (7.1)

Just to verify what version I’m running:

# lsb_release -a
No LSB modules are available.
Distributor ID:	Debian
Description:	Debian GNU/Linux 6.0.7 (squeeze)
Release:	6.0.7
Codename:	squeeze

First edit the /etc/apt/sources.list to include ONLY

deb http://ftp.de.debian.org/debian/ squeeze main contrib non-free
deb-src http://ftp.de.debian.org/debian/ squeeze main contrib non-free

deb http://security.debian.org/ squeeze/updates main contrib non-free
deb-src http://security.debian.org/ squeeze/updates main contrib non-free

# squeeze-updates, previously known as 'volatile'
deb http://ftp.de.debian.org/debian/ squeeze-updates main contrib non-free
deb-src http://ftp.de.debian.org/debian/ squeeze-updates main contrib non-free

Next we walk apt through an update/upgrade phase to make sure everything is current before we do the actual upgrade

apt-get update
apt-get upgrade
apt-get dist-upgrade

Now we have to make sure no packages are being held from being upgraded:

dpkg --audit
dpkg --get-selections | grep hold

Then we run ‘aptitude’ and press ‘g’ hoping to get the message:

No packages are scheduled to be installed, removed or upgraded

Which means we are ready to proceed with the upgrade!

Now edit /etc/apt/sources.list to ONLY include:

deb http://ftp.de.debian.org/debian wheezy main contrib non-free
deb-src http://ftp.de.debian.org/debian wheezy main contrib non-free
deb http://ftp.de.debian.org/debian wheezy-updates main contrib non-free
deb http://ftp.de.debian.org/debian-security wheezy/updates main contrib non-free

Now we are ready to pull the trigger!

apt-get update
apt-get upgrade
apt-get dist-upgrade

Provided that went well, we can now reboot into the new system!

# lsb_release -a
No LSB modules are available.
Distributor ID: Debian
Description: Debian GNU/Linux 7.1 (wheezy)
Release: 7.1
Codename: wheezy

Caveats!

First thing I had an issue with, was re-running apt-get update/apt-get upgrade I got the following errors:

The following packages have been kept back:

db4.8-util ia32-libs

So let’s fix the ia32-libs issue first.  For those who don’t know, ia32-libs lets x86_64 systems run old i386 32bit binaries.  Trying a simple ‘fix’ of installing the libraries got me this:

# apt-get install ia32-libs
Reading package lists... Done
Building dependency tree       
Reading state information... Done
Some packages could not be installed. This may mean that you have
requested an impossible situation or if you are using the unstable
distribution that some required packages have not yet been created
or been moved out of Incoming.
The following information may help to resolve the situation:

The following packages have unmet dependencies:
 ia32-libs : Depends: ia32-libs-i386 but it is not installable
E: Unable to correct problems, you have held broken packages.
#

Luckily the fix is rather simple, we need to add the i386 architecture, like this:

# dpkg --add-architecture i386

Then re-run an apt-get udate/apt-get upgrade, followed by the installation of the ia32 libraries:

#apt-get install ia32-libs

And that settled that out.

The db4.8-util thing was somewhat easier:


# apt-get install   db4.8-util
Reading package lists... Done
Building dependency tree       
Reading state information... Done
The following packages were automatically installed and are no longer required:
  lib32asound2 lib32bz2-1.0 lib32gcc1 lib32ncurses5 lib32stdc++6 lib32tinfo5
  lib32v4l-0 lib32z1 libc6-i386 libio-stringy-perl libjpeg62
  libmono-corlib2.0-cil libmono-i18n-west2.0-cil libmono-posix2.0-cil
  libmono-security2.0-cil libmono-system2.0-cil libmysqlclient16 libsox1b
  libt1-5 mono-2.0-gac
Use 'apt-get autoremove' to remove them.
The following packages will be REMOVED:
  libdb4.8
The following packages will be upgraded:
  db4.8-util
1 upgraded, 0 newly installed, 1 to remove and 0 not upgraded.
Need to get 829 kB of archives.
After this operation, 121 kB disk space will be freed.
Do you want to continue [Y/n]? y

Which seemed to be fixing things, but it was an out of date mono installation on my part. So I had to re-add the location where I got my mono:

deb http://debian.meebey.net/pkg-mono ./

Then remove it

apt-get update
apt-get upgrade
apt-get remove mono-2.0

Then remove the mono line from the /etc/apt/sources.list

apt-get update
apt-get upgrade
apt-get install mono-2.0

Another error message I saw in my apache error log was this:

Error: PHP Startup: Unable to load dynamic library '/usr/lib/php5/20100525/suhosin.so' -
/usr/lib/php5/20100525/suhosin.so: cannot open shared object file: No such file or directory in Unknown, line 0

Which can be traced to a no longer supported extension suhosin. So I just purged it from the system:

aptitude purge php5-suhosin

Another problem that has cropped up is the following when adding or removing packages:

dpkg: warning: files list file for package ‘libc6:i386’ missing; assuming package has no files currently installed
dpkg: warning: files list file for package ‘libtinfo5:i386’ missing; assuming package has no files currently installed
dpkg: warning: files list file for package ‘liblzma5:i386’ missing; assuming package has no files currently installed
dpkg: warning: files list file for package ‘libavahi-common-data:i386’ missing; assuming package has no files currently installed

I’m not sure why this suddenly happened.  However the fix is simple enough, we just have to regenerate the lists, something like this for libc:

dpkg-deb -c /var/cache/apt/archives/libc6_2.13-37_i386.deb | awk {‘print $6’} | cut -f2- -d. | sed ‘s|^/$|/.|’ | sed ‘s|/$||’ > /var/lib/dpkg/info/libc6:i386.list

And that seems to be it so far.

TTPod restricted ip address…

So my wife loves this Chinese application TTPod, which lets you listen to music.  And oh joy last night it suddenly stops working because of an error of “invalid ip address”.

Well it seems that the application will now only fully work in China.  Even though we are in a SAR (Hong Kong) it isn’t good enough it would seem.

I haven’t used Pandora in ages, and I thought I’d try that to get the same thing.

So for people who like this kind of thing, (esp my wife who just must have facebook while we are in China) I use OverPlay which has VPN endpoints in numerous countries, and supports things like OpenVPN & PPTP which is perfect for devices like iPhone & Android Phones.  So I can still get my BBC & CBC Fix, along with access to my Hulu subscription while abroad.

I swear that IP restrictions are so retarded, all they do is make you funnel traffic to get around them, and punish expats.

Kali

My friend, Mara’akate is working on locating all the versions of Kali, and it’s precursor iDoom/iFrag.  His collection is available here.

Briefly this software let you play Doom (and other Doom variants) with other people over the internet.

I’ll have to write something up about this later on, but before I head out this Friday evening I thought I should at least give him a quick shout out, and hope that anyone out there has anything further to contribute could do so.

I wonder how hard it’d be to organize a Doom match in 2013…. probably just as hard as it was in 1993 if not more difficult.  Although the main issue today would be time, not finding a capable machine like it was back then.

Restoring the MIPS Magnum in Qemu 1.6.0

As many of you Windows NT MIPS fans may know (apparently there are more than 3 of us now!) the MIPS Magnum target is broken in the current build of Qemu.  The problem lies in the firmware as it accesses unassigned memory.  Luckily I just received an email from Hervé that details how to fix this!

The good news is that the fix is VERY easy, all you need to do is comment out a single line in target-mips/op_helper.c

In the function mips_cpu_unassigned_access:

void mips_cpu_unassigned_access(CPUState *cs, hwaddr addr,
bool is_write, bool is_exec, int unused,
unsigned size)
{
MIPSCPU *cpu = MIPS_CPU(cs);
CPUMIPSState *env = &cpu->env;

if (is_exec) {
helper_raise_exception(env, EXCP_IBE);
} else {
helper_raise_exception(env, EXCP_DBE);
}
}

Simply comment out the line

helper_raise_exception(env, EXCP_DBE);

And you’ll be able to boot up the NT PROM.

MIPS Firmware

MIPS Firmware

Remember you’ll want to run it something like this:

qemu-system-mips64el -L /tmp -M magnum -m 64 -cdrom WindowsNT4.0-MIPS.iso -hda MIPS.disk -net nic -net user -global ds1225y.filename=nvram  -global ds1225y.size=8200

Where I’m keeping my NT PROM is /tmp (although that is probably a bad idea…)  But you’ll need the NVRam stuff to add extra space for the ethernet MAC address.  The clock is always trashed but at least it is doing something this time!

For the uninitiated, some installation notes can be found here.