Qemu now supports the HPPA in softmmu mode!

I’ve worked on machines with HP-UX, but never owned one.  Well Qemu now has system emulation thanks to Richard Henderson! You can find information over at:

https://parisc.wiki.kernel.org/index.php/Qemu

Being the unfair person I am, I thought I’d try NeXTSTEP to see how far it gets.

Processor   Speed            State           Coprocessor State  Cache Size
---------  --------   ---------------------  -----------------  ----------
0      250 MHz    Active                 Functional            0 KB

Available memory: 512 MB
Good memory required: 16 MB

Primary boot path: FWSCSI.6.0
Alternate boot path: LAN.0.0.0.0.0.0
Console path: SERIAL_1.9600.8.none
Keyboard path: PS2

Available boot devices:
1. DVD/CD [lsi 00:00.0 2:0 Drive QEMU QEMU CD-ROM 2.5+]
2. lsi 00:00.0 0:0 Drive QEMU QEMU HARDDISK 2.5+

Booting from lsi 00:00.0 0:0 Drive QEMU QEMU HARDDISK 2.5+

Booting...
Boot IO Dependent Code (IODC) revision 153

HARD Booted.
Can't determine I/O subsystem type

NEXTSTEP boot v3.3.4.17
524288 memory

NEXTSTEP will start up in 10 seconds, or you can:
Type -v and press Return to start up NEXTSTEP with diagnostic messages
Type ? and press Return to learn about advanced startup options
Type any other character to stop NEXTSTEP from starting up automatically

boot:

And amazingly the bootloader works, although that is about it. Trying to boot up OpenBSD gets about this far:

PDC_CHASSIS: Initialize (3), CHASSIS  cec0
>> OpenBSD/hppa CDBOOT 0.2
booting dk0a:/bsd.rd: 2703360+851960+2675712+547840=0x8631f0


SeaBIOS: Unimplemented PDC_CACHE function 1 8ddad0 1 1 1

I found on Windows though that the Debian 8 CD’s work the best, as the earlier ones lock up after loading a kernel, and the later one doesn’t fully initialize.  I’ve been using this one: debian-8.0-hppa-NETINST-1.iso  Serial console interaction is the way to go, so I ran Qemu like this:

qemu-system-hppa.exe -L . -serial telnet:127.0.0.1:4444,server,wait -boot d -cdrom debian-8.0-hppa-NETINST-1.iso -hda Deiban8HPPA.vmdk

So this way I can get get the install kicked off.  Although I should probably have just downloaded debian-8.0-hppa-CD-1.iso

Linux on HPPA

Otherwise, yeah, it’s Linux, on HPPA

And for anyone who is interested, the only version of HP-UX I have hanging around, HP-UX 10.20 [HP9000 S700] gives me the following:

HP-UX 10.20 on Qemu

Mac OS X Server 1.0 installs on Qemu

OS X Server 1.2 on qemu single user mode

That’s right, the ADB is usable enough now to type and move the mouse, meaning that OS X Server can now be installed within Qemu!

It’s incredibly slow, and the mouse is incredibly jumpy, but it’s actually running!

Basically, like A/UX, you boot up into MacOS to partition the drive.

qemu-system-ppc-screamer.exe -L pc-bios -m 256 -M mac99 -prom-env “boot-args=-v” -prom-env “auto-boot?=true” -prom-env “vga-ndrv?=true” -hda 2GB.vmdk -cdrom “Mac OS X Server 1.2, MOSX_Booter.iso” -sdl -device usb-mouse -device adb-keyboard -boot d

OS X Server 1.2 MacOS 9 Create OS X Server partition

And then kick off the installer:

OS X Server 1.2 MacOS 9 Start Install

Which really isn’t much to do, other than tagging the partition, and prepping the machine to reboot.

It’s OK

Qemu doesn’t emulate the NVRAM, so it’ll complete with this ‘non fatal’ ‘fatal error’

After that, boot into the OS X Server kernel, and continue the install:

qemu-system-ppc.exe -L pc-bios -prom-env “boot-args=-v rd=sd0″ -drive file=2GB.vmdk,index=1,format=vmdk,media=disk -M g3beige -cpu g3 -drive file=”Mac OS X Server 1.2, MOSX_Booter.iso”,index=0,format=raw,media=cdrom -prom-env “boot-device=cd:9,\\:tbxi” -m 256 -net none

OS X Server 1.2 installing text mode

It will then format the disk, and copy over the base operating system.  After that it’s time to shutdown, and reboot the VM.  I couldn’t figure out a pure hard disk boot, but again using the CD-ROM, you can just tell it to pull the root from the hard disk.

qemu-system-ppc.exe -L pc-bios -prom-env “boot-args=-v rd=hd0″ -drive file=2GB.vmdk,index=1,format=vmdk,media=disk -M g3beige -cpu g3 -drive file=”Mac OS X Server 1.2, MOSX_Booter.iso”,index=0,format=raw,media=cdrom -prom-env “boot-device=cd:9,\\:tbxi” -m 256 -net none

OS X Server 1.2 installing

And after this, it’ll want to reboot again.  Launch it up and now we get the initial setup

Setup Assistant

And with that out of the way, we can logon!

And after a while, it’ll load up the desktop

OS X Server 1.2 Desktop

As mentioned above, the mouse is incredibly jittery.  Doing anything graphical is very difficult. But here we are, running OS X/Rhapsody for the PowerPC!

That’s all!

Because the mouse is VERY jumpy at the moment, Im going to make some pre-configured disk images available because running the disk tool under OS 9 is a major pain.  The first image has only been partitioned, while the second has completed the ‘text mode setup’, aka a minimal install.

And that’s it for now!

Revisiting a UnixWare 7.1.1 install on Qemu/KVM

So after nearly 8 years ago from messing around with UnixWare, I wanted to confirm something from a SYSV Unix that has a C compiler that isn’t GCC, and I remembered I have UnixWare 7.1.1 from a long time ago.  Anyways I have long since lost the virtual machine I had installed onto, but I still have media and of course the more important licenses.

unixware certificate of license and authenticity

UnixWare licenses. the dread of fixing things 20+ years later

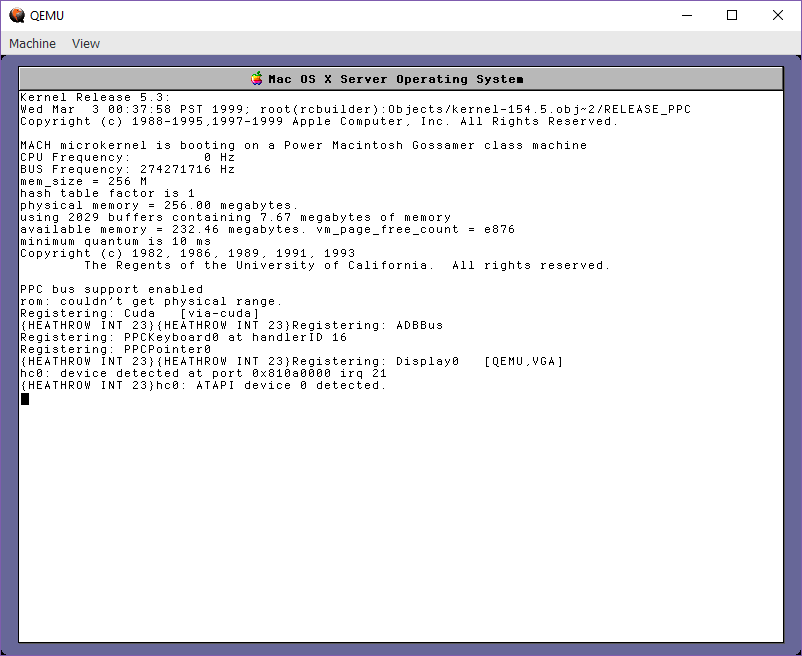
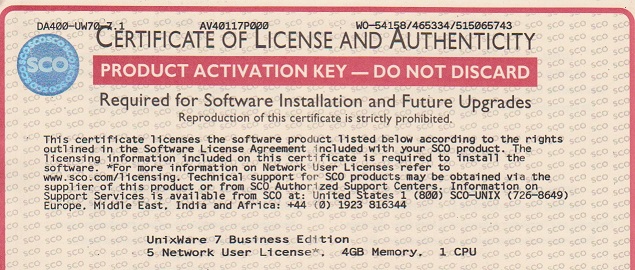
Yep it’s the real thing.  So with my certs in hand I do an initial install in Qemu and on reboot the system basically has bricked itself.

WARNING: System is in an unreliable state.

And then looking at the licenses it turns out that my license has expired.  What?

Somehow I got lucky before, but it turns out that the installation process for ancient UnixWare is NOT Y2K compliant!  And this actually turned out to be a known issue.  I can’t find the original article, but a mirror is here: ischo.net

So basically install using an eval license, which will of course expire on install, and then use your actual license after the installation, remove the eval, reboot and all will be well.

License Number: UW711EVAL
License Code: airhorpx
License Data: d60;m7hjbtt

Now isn’t that great.

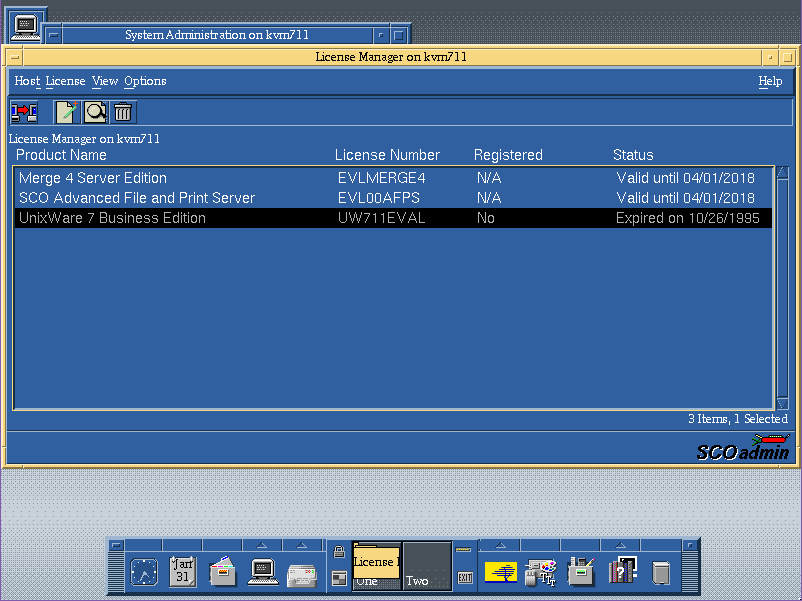
The OS install license immediately expires.

Although you can’t boot up in any real useful state, the networking will kick people off, and it’ll constantly complain that you are in license violation, you can at least bring up the SCO Admin tool, and add in your actual licenses, and then delete the evals.
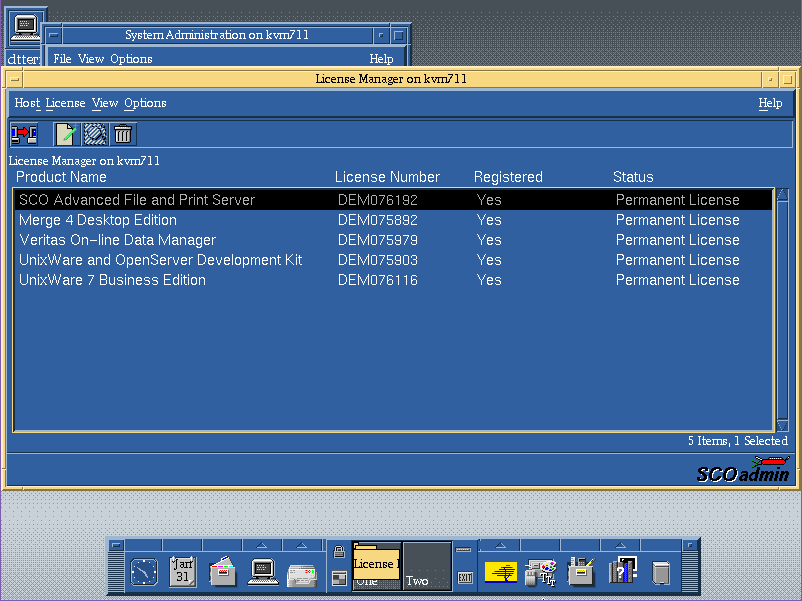
And now we’re good!

Ok, now for the real fun part, flags and how to run with kvm/qemu.  Since I was loading this onto a server for remote access something like this works fine for me as I’m using the VNC remote console.

qemu-system-x86_64 -enable-kvm -m 1024 -smp 4 -hda UnixWare.vmdk -cpu pentium -net none -monitor telnet::444,server,nowait -curses -vnc 10.12.0.1:11 -cdrom iso/SCO_UnixWare711.iso

So the key things are to restrict the CPU level, and I’ve deferred the network configuration so I can update network drivers, and the OS.  I’ve found that by doing the networking during the install resulted in an OS that crashed with an integer divide by zero after installing the fixpack 5.

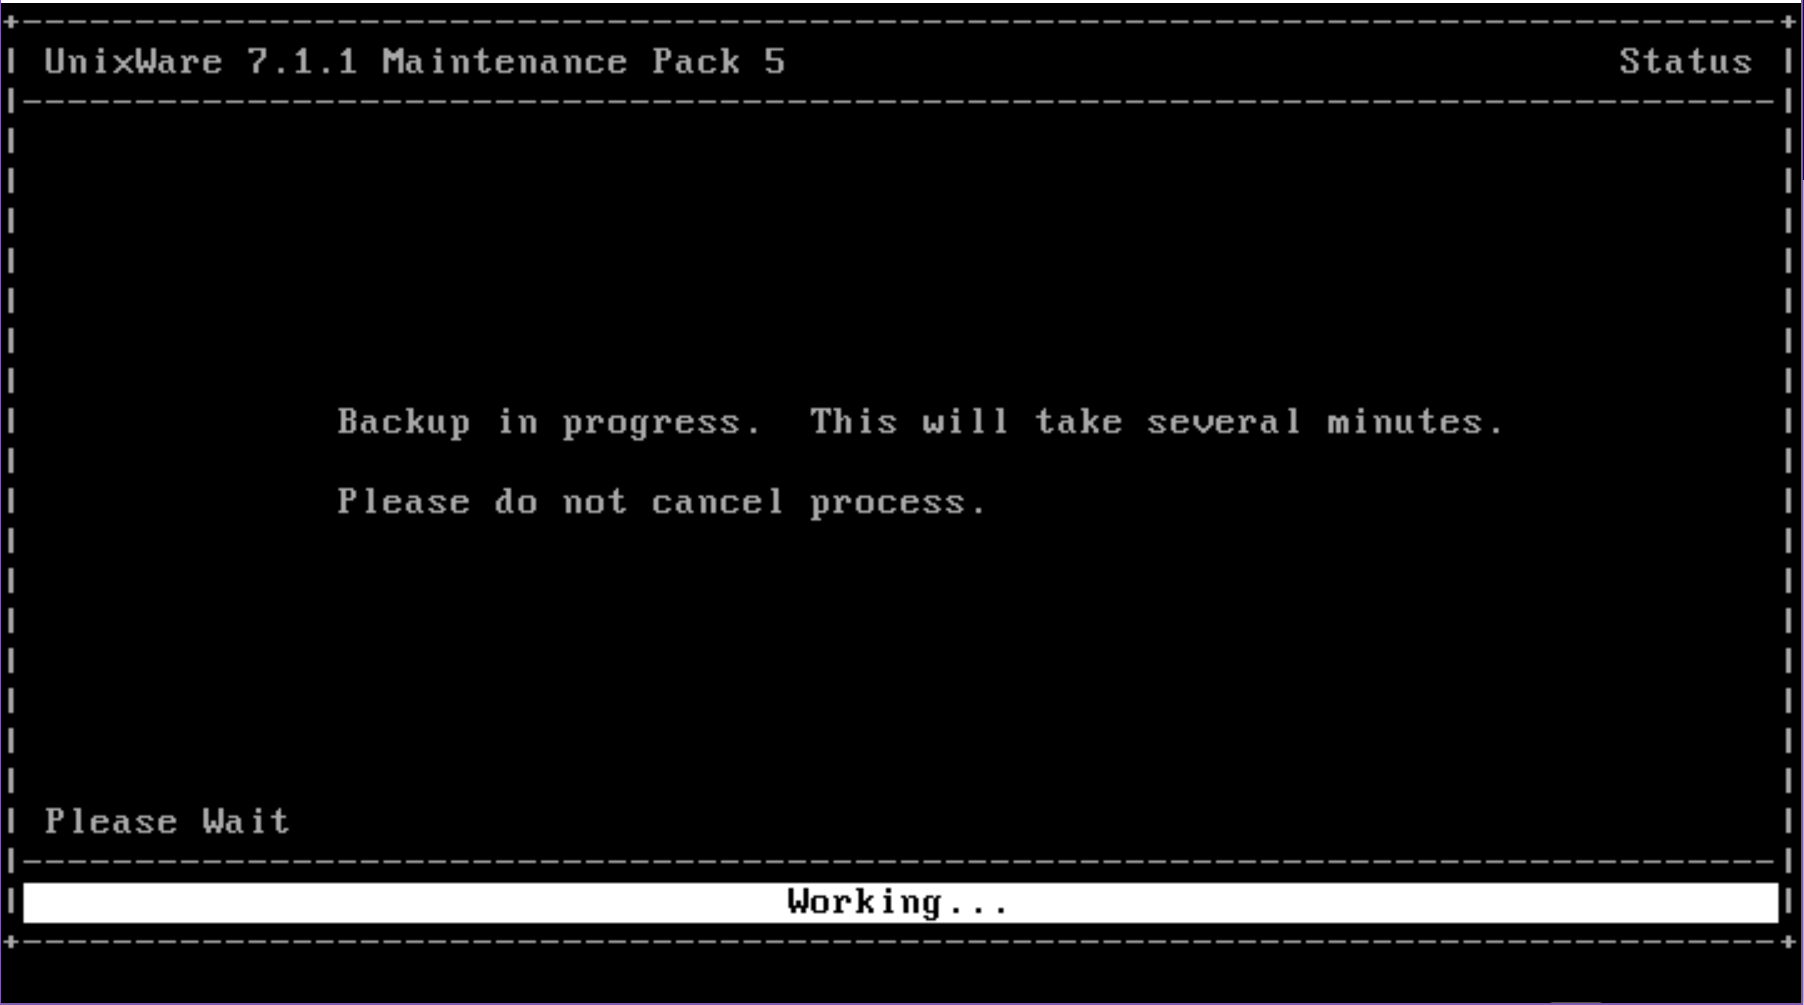
Once you have UnixWare 7.1.1 installed, be sure to install Maintenance Pack 5, which is thankfully still online over at sco.com  I’d also recommend to do this in single user mode, you can enter single user mode by hitting a key during the boot logo and typing in:

INITSTATE=S
boot

And you’ll boot in single user mode, and can install the Maintenance pack with ease.  Until the maintenance pack is installed, expect poor stability, and the system won’t actually listen to the real time clock device, and it’ll accelerate the clock like crazy where I was passing an hour every minute or two.

Adding the AMD PCnet on UnixWare

Once the install and update is done, I just added a PCI network card (So older versions of Qemu work well with the ne2k_isa, but newer work much better with the AMD PCNet card.), which is a popular choice for both machines and VM’s of the era.  Although you can use SLiRP the built in NAT for Qemu/KVM alternatively you can also use tun/tap.  I tried to enable SMP, however it has issues binding to the other processors, although it does see them.  And this is better to give full access to the network stack for fun things like FTP, NFS and whatnot.

qemu-system-x86_64 -enable-kvm -m 1024 -smp 4 -hda UnixWare.vmdk -cpu pentium -monitor telnet::444,server,nowait -curses -vnc 10.12.0.1:11 -device pcnet,netdev=net0 -netdev tap,id=net0,ifname=tap10,script=/etc/qemu-ifup

Telnet access

And just like that I can now access the VM.

And for fun…

# uname -a
UnixWare kvm711 5 7.1.1 i386 x86at SCO UNIX_SVR5
# uname -f
architecture=IA32
bus_types=PCI2.10,ISA,PnP1.0
hostname=kvm711.joes.local
hw_provider=Generic AT
hw_serial=DEM076116
kernel_stamp=04/11/11
machine=Pentium
num_cg=1
num_cpu=1
os_base=UNIX_SVR5
os_provider=SCO
release=5
srpc_domain=
sysname=UnixWare
user_limit=5
version=7.1.1

Oh yeah so I don’t forget years from now I’m using the following OS & Qemu version:

# qemu-system-x86_64 -version
QEMU emulator version 2.8.1(Debian 1:2.8+dfsg-6+deb9u3)

# cat /etc/issue
Debian GNU/Linux 9 \n \l

Also I found an eval serial for SMP, but it doesn’t recognize the second processor after the boot.

# psrinfo -v
Status of processor 0 as of 01/31/18 16:40:07
Processor has been on-line since 01/31/18 16:13:57.
The Pentium processor has a i387 floating point processor.
The following conditions exist:
Device drivers are bound to this processor.

I’ll try apparently this as for some reason it doesn’t detect the MP in Qemu/KVM so it never installed the osmp driver.

pkgadd -d cdrom1 osmp

Add the following line to the file /stand/boot:
ACPI=Y

Converting a Physical disk to a Virtual disk with Qemu’s qemu-img on Windows

Just because even I forget from time to time.

You need to do this as administrator, even better if the disk doesn’t have a drive letter or mounted in any way under Windows.

Fujitsu MPB3021AT

In my case I picked up a 486SX with an aging Fujitsu disk.

qemu-img.exe convert -f raw -O qcow2 \\.\PhysicalDrive2 fujitsu_MPB3021AT.qcow2

And as fast as your machine can read the disk, you’ll have your Qcow2 disk image. As of Qemu 2.9.0 the formats include:

  • blkdebug
  • blkreplay
  • blkverify
  • bochs
  • cloop
  • dmg
  • luks
  • nbd
  • null-aio
  • null-co
  • parallels
  • qcow
  • qcow2
  • qed
  • quorum
  • raw
  • replication
  • sheepdog
  • vdi
  • vhdx
  • vmdk
  • vpc
  • vvfat

Which is quite a list.  Obviously since I’m reading a physical disk, the format is RAW.  I just output it to Qemu for my personal ease.

Also once the image was created I could quickly run it under Qemu, and discover that yes this was a machine running Windows 95.

qemu-system-i386.exe -hda fujitsu_MPB3021AT.qcow2 -soundhw es1370 -vga cirrus

So there you go from a “dead system” to at least fully recovered data in minutes.  KVM may get all the pres excited but it’s nothing without the awesome support of Qemu!

OS X Server 1.0 on Qemu (almost)

booting

I was pretty amazed to see it even get this far.  Credit to Steve Troughton Smith for his patched BootX, which gets the boot process this far.  It’ll actually start the NeXTSTEP style install, but the keyboard won’t work either USB or ADB.  Oh well.

..\qemu-system-ppc.exe -L .. -m 256 -drive file=MacOSXServer10.iso,index=0,format=raw,media=cdrom -drive file=BootX_custom.dmg,index=2,format=raw,media=disk -drive file=bla.disk,index=1,format=qcow2,media=disk -prom-env “boot-device=ide2:2,\BootX” -prom-env “boot-args=-v rd=sd0 debug=0xffe kdp=2” -prom-env “boot-file=ide0:11,\mach_kernel” -g 800x600x8 -device adb-keyboard -device adb-mouse -cpu G3 -M g3beige


Revisiting a Solaris on Qemu install

Since I had written about it the last time, quite a bit of the emulation on Qemu has improved significantly since then.  As always you’ll need to create and prepare a disk image, and I’m using an old SUN Station 5 PROM.

qemu-system-sparc -L . -m 64 -M SS-5 -bios ss5.bin -drive file=36G.disk,bus=0,unit=0,media=disk -drive file=solaris_2.6_598_sparc.iso,bus=0,unit=6,media=cdrom -startdate “1999-04-19”

One nice thing is that now you can boot off the CD-ROM.  And you can boot Solaris 2.6 directly into single user mode to format and label the disk.  It’s very convenient.  All you need here is

boot cdrom:d

And from there you can either kick off the disk partitioning, or the installer will boot up.

Booting from Prom to CD-ROM

And now to the graphical welcome screen!

Welcome

And then off to the ‘graphical’ installer.  Yes, it’s not that graphical at all.  Like before, it’s important that you don’t let it reboot on completion, you have to make changes to the system so it’ll boot up correctly, and make changes to the network config.  At least in graphical mode vi works.

installation

It is absolutely critical that you make this change or the disk will not boot at all.

cd /a/etc
# cat >> system
set scsi_options=0x58
^D

For networking:

And you will want a default route…

# cat > defaultrouter
10.0.2.2
^D

Then in the file /etc/nsswitch.conf change the following:

hosts: files

to

hosts: files dns

Then to ‘fix’ up your /etc/resolv.conf

# cat > resolv.conf
nameserver 10.0.2.3
#

And then I like to add the following hosts to speed up telnet…

# cat >> hosts
10.0.2.2 qemunat
10.0.2.3 qemudns
^D

And then hit Control+D and it’ll reboot back to the PROM.  Now all you have to type in the PROM monitor is:

boot disk0:

And in a minute you’ll be at the login screen.

Login Window

I went ahead with CDE, and over on archive.org the old SimCity for UNIX versions are over there.  One nice thing about being able to use CD-ROM’s is that Qemu can finally auto-mount the disk images.  It’s great.

Meltdown

There is no license for SimCity, and after 5 minutes the city goes into a ‘meltdown’ mode.  It’s a shame that back in the day the upstart x86 Linux was largely ignored by the UNIX market.  But Qemu has come quite a bit where you can run some of this proprietary VAR software.

Microsoft C KnowledgeBase articles online

PC Mag, January 1989

It’s weird I was discussing putting this online in a more human readable format, and then  Jeff Parsons over at the incredible full system emulation in javascript site, pcjs.org just did it.

As you may or not be aware of, Microsoft hit it big as a computer languages company, before they added operating systems into it’s portfolio.  And for some weird reason after the whole OS/2 divorce thing, someone decided that everything that had been painfully learned in the earlier eras should just be expunged from history.  Which is a real shame to anyone interested in Basic, Fortran, Pascal, C and MASM.  Years ago I had gone through the steps of extracting the text the only way I could figure out easily, by writing a simple TSR that would dump the contents of the text video buffer, and write it to a file, then press the page down key, and keep repeating the process. The end result being that I had then dumped the MSPL aka the Microsoft Programmer’s Library.  I had put the text into an archive, aptly named Microsoft_Programmers_Library.7z, and pretty much used grep whenever I wanted any information, and left it at that..

It’s really cool to see it slowly transitioning to more useful information.  You can read Jeff’s article Corporations Are Crappy Archivists about his quest for seemingly simple information about ancient Microsoft mice, and the archive of KB’s for Microsoft C.

One thing that is annoying is that information on CD from the late 1980’s seems to be darned near impossible to find.  I know that each generation of machines until about 2005 was exponentially larger than the previous one (post 2007 we hit the iThing world, along with most machines being ‘good enough’ for day to day usage).  I know this ad may seem insane, but Microsoft really was trying to push people to CD distributions.  As we all know that internet thing didn’t quite tickle their fancy.    Did they ever put resources like this online?  Like on BIX or Compuserve?  It seems like an ideal resource.  But I was a kid, and didn’t have that kind of money.

Awesome CD-ROM collection and drive, starting at a mere $899!

So in the interest of a bad idea, here is MSPL, aka qemu/curses in action.

Oh my god, what I have I done!?

Well as an addendum I thought it’d be cool to put MSPL online, via shellinabox.  First off I needed a 5MB MS-DOS disk, basically enough MS-DOS too boot up, run smartdrive, idle and the CD-ROM driver, along with the minimal MSPL install.  And to button it up, I added a reboot.com from the autoexec, so when you exit it’ll reboot the VM.  Great.

The reboot command was input via debug, as it’ll let you assemble code directly.  Although it isn’t a MACRO assembler, so you have to know exactly what you are doing.

DEBUG RESET.COM
A
XOR AX, AX
NOT AX
PUSH AX
NOT AX
PUSH AX
RETF
(return on a line by itself)
RCX
9
W
Q

And with that saved, now I have to setup Qemu.  Since I’m taking the shellinabox approach that means I need something text mode, and I was thinking this was light weight. Qemu has a curses output so that’ll work.  I set it up to use qcow2 and a backing store image so that way every forked user doesn’t eat 5MB of disk space, it’s more like 100kb.

#!/bin/sh
set -m
PID=$$
mkdir /tmp/$PID
cd /tmp/$PID
qemu-img create -f qcow2 -b /usr/local/mspl/MSPL.qcow2 MSPL.qcow2
qemu-system-i386 -m 4 -cpu 486 -hda MSPL.qcow2 -cdrom /usr/local/mspl/Microsoft-Programers-Library-v1.3.iso -curses -no-reboot
cd /tmp
rm -rf /tmp/$PID

Then to tie it into shell in a box, it’ll just need the flag:

-s /mspl:nobody:nogroup:/:/usr/local/bin/mspl.sh

and this will run it as nobody, and kick off the above bash script.  Now that’s great and all, but what about stale/abandoned sessions?  I wrote this quick script to clean them up.

#!/bin/bash

FIND=”find /tmp -type d -regextype sed -regex ‘.*/[0-9]*’ -mmin +30 | sed ‘s/\/tmp\///’>/tmp/kill_out.txt”
eval $FIND
while read process; do

KILL=”kill -9 ${process}”
eval $KILL
RMDIR=”rm -rf /tmp/${process}”
eval $RMDIR

done < /tmp/kill_out.txt
rm -rf /tmp/kill_out.txt

So it’ll find numerical directories that are at least 30 minutes old, kill them and remove their directory.  Probably very dangerous to run, but it’s isolated so Im not too worried.  Then just have root add that script to it’s crontab, and run it every minute, and it’ll kill the old stuff hanging around.

I’ll add a video later on how to use MSPL via this setup.  And maybe I’ll rig something to have RDP access as well, depending on how I’m feeling.

What is a VLAN (part 5)

With the textmode setup complete, it’s time to do the graphical setup of Windows NT 4.0

Next

You can use any name/org

Select how many licenses you have for your NT Server.

Give the server a name

I’m not going to build a domain, so a stand alone server is fine.

You can give the Administrator account a password if you so desire.

I don’t need any emergency repair disk, as this server is the epitome of disposable.

I added all the components.  Again for this test it really doesn’t matter.

Configure the networking

Now for the fun part, we are going to configure the networking.

I’m sticking to ‘wired’ networking.  I’ll save RAS for another lifetime.

Everyone wants to be a webserver.  Sure why not.

You can either manually select a NIC, or just let it auto-detect.  We are going to auto-detect it though.

And it’ll correctly identify the AMD PCNet card.

I selected all the protocols available.  I didn’t bother adding other ones like AppleTalk.

Next..

Next

It’ll prompt for the media type and duplex.  The card isn’t real and it’ll work fine no matter what.  I just leave the options alone.

Our network doesn’t have any DHCP server.  Since we are plugged into a simple hub.  DHCP requests will fail.  Let’s give it a static address.  For Advanced people, yes you could wireshark on the wire to observe the DHCP.  We will touch on how to do that later, as I just want to get NT installed .

There is no need for a gateway.

We don’t have any bindings that need adjusting, so you can just hit Next

And Next again

Again, no domain, so run in workgroup mode.

Finish, although it’s far from over.

IIS components to install.  I just hit OK for the defaults.

Confirm the creation of the directory

And the child directories

And creating the IIS child directories

Gopher isn’t happy without a domain name, but I don’t care.

Select your timezone.  Or don’t.  This is from 1996, so many of the timezones are no-longer correct.  Just as DST has changed so many times.  But it really doesn’t matter yet again.

The display adapter is SVGA compatible.

Move the resolution slider to 800×600

Then hit OK.  It’ll want to test the resolution

Everything looks good

YES I saw the bitmap

OK

OK to accept the display at 800×600

Files will finally start to copy

And now we can finally restart are computer.

By default the NT Loader will wait for 30 seconds.  You can hit enter to get it to load right away or wait.

But we have now completed installing Windows NT, so we can now move on to capturing some traffic, aka part 6..

What is a VLAN (part 4)

In this post we are going to install Windows NT 4.0 Server into our VM.

The first step is to turn the VM on.  Simply right click on the VM, and choose Start. The red dot will then turn green.  Although it may appear that nothing is happening we just can’t see it yet.

Right click again, and choose the console, and VNC will then connect to the Qemu VM, and we can now interact with it.

And here is where we start installing Windows NT 4.0.  I’ll just put the keys in parenthesis of what I’m doing. In this case just hit:

(enter)

(enter)

(c)

(page down) until you get to the end, then hit (f8) to agree to the license

The default options are OK.  (enter)

(c)

(enter)

I chose NTFS for my server.  Although I’m not interested in creating a domain, so FAT will work too.  It really doesn’t matter.

(enter)

(enter)

(enter)

Waiting for the files to copy

(enter)

On reboot if you have selected NTFS it’ll convert the filesystem like this:

converting FAT to NTFS

After the conversion, NT will reboot again, then it’ll continue the setup process.

Otherwise you’ll just reboot directly into the graphical setup of Windows NT, and we can continue in part 5.

What is a VLAN (part 3)

In our previous post, we configured a Qemu template for Windows NT.

With the NT template ready we will be prompted to give this project a name.

So I called this one ‘what-is-a-vlan’ sticking with the theme.

Now we can drag components out.  I selected the NT template that I’ve created, and dragged it out to the design pane.  Now we have a computer!

I then selected a simple Ethernet hub, to begin verifying that our configuration is working.  Just drag it out to the toplogy pane.

Now for the fun part, we are going to connect the Windows NT VM to the Hub.  Right click on the Qemu VM, and it’s available Ethernet interfaces will pop up.  It only has one, so select Ethernet 0.

Now you can select the Hub to complete the connection.  Hubs repeat every packet they receive, and don’t change anything.  They offer zero intelligence, and have no way to save you from yourself, if you do anything stupid (see creating a loop).  Every packet that comes into a hub is sent to every port going out.  They don’t care about protocols, or anything they just simply repeat.


So this will be our simple network.  The next thing to do is to turn on our PC, and install Windows NT 4.0.  I’ll save that for the next step which you can follow here.  If you don’t care about installing Windows, then you can skip to the following step where we will do a simple packet capture of the NT machine connected to the hub so we can observe how it’s packets look.