The way things were…. MS Mail & OS/2

So I’ve been spending the last day fighting some Active directory, and Exchange 2010 fun. I suppose if I wanted to be all new and exciting I’d document that journey. Maybe I will. But after all that fun, it had me remembering the way things used to be done, and really wondering how much further we’ve either come, or maybe…. not come.

So for the sake of it, I’m going to build out a postoffice, and connect the bastardchild of IBM & Microsoft, OS/2 to it!

How you gonna do it? PS/2 it!


So first I need to establish a server to run my postoffice on. The cool thing about MS Mail is that it could run on all kinds of things, from Novell Netware, Lan Manager, or any other file sharing network out there that MS-DOS’s lock could work with. Originally the product was for Macintoshes, before Microsoft bought it! The bad part, buried in there is that there isn’t a dedicated IPC like server, it really is a flat, shared, database. A bunch of files.

Just like MS-Access.

Really.

As luck would have it, there is a copy of MS Mail 3.5 on one of my Exchange CD’s so looking at the date, Windows NT was out at the time. So I figured for the sake of the experiment, I’d use Windows NT 3.51 . While I’ve used Windows NT 3.1 a bunch, I figured I’d try 3.51 . 3.51 came to us at a time of mass transition, when everything was going forward to Chicago (Windows 95), and the old program manager/presentation manager world was going to finally slip away.

Looking back it’s so archaic, it’s hard to believe that anyone thought progman/fileman were good ideas.

I also wanted to use Microsoft OS/2 1.3 however installing the network client causes it to trap. It does work on real hardware but that wouldn’t be quite as virtual as I wanted. Another wrench is that I’m on my Sprint access card waiting for something, and if I try to do some fun networking it disconnects me.

However I do have a workaround for Sprint’s lameness. You see “SmartView” isn’t all that smart, and thankfully it doesn’t care about interfaces *without* TCP/IP. So we take a loopback network adapter, and *ONLY* bind the Virtual PC protocol to it, by unclicking everything else..

And now we can connect our VM’s to this loopback interface. Then we could, say install an OpenBSD firewall VM that has 2 NIC’s one configured for usermode NAT, and the other on that LoopBack interface. We can now VPN to our hearts content, and even have a virtual LAN. Hell I bet you could even connect a physical Ethernet, connect Virtual PC to that as well, and plug that into a WAP. I hate it when stupid software tries to limit us, but you know… There is always a way around.

So getting back to the experiment at hand, I setup Virtual PC 2007 sp1 (making sure to tag it to a single core, imagecfg doesn’t work for some reason) and I disabled the hardware virtualization. I know OS/2 does some weird stuff with it’s LDT that most things cannot dodge, and it seems that NT 3.51 doesn’t play nice either. But no problem, luckily we can disable it.

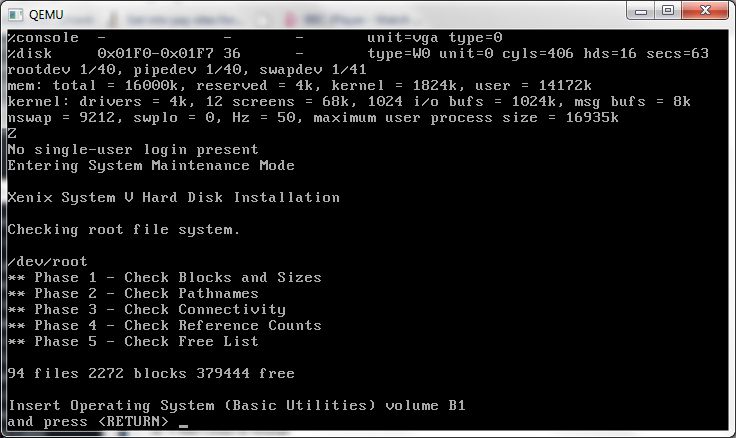
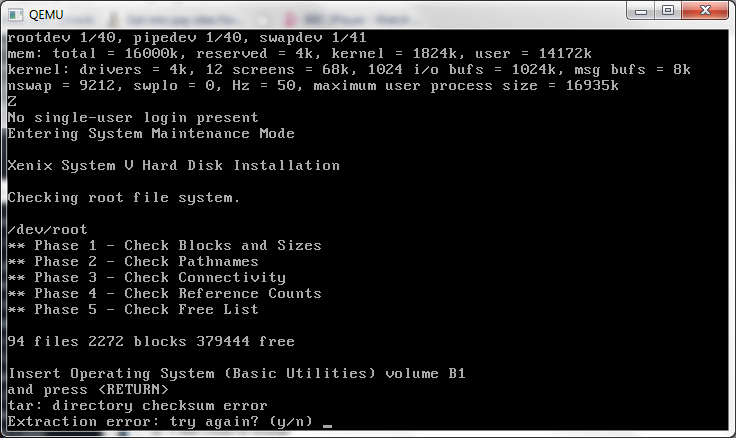
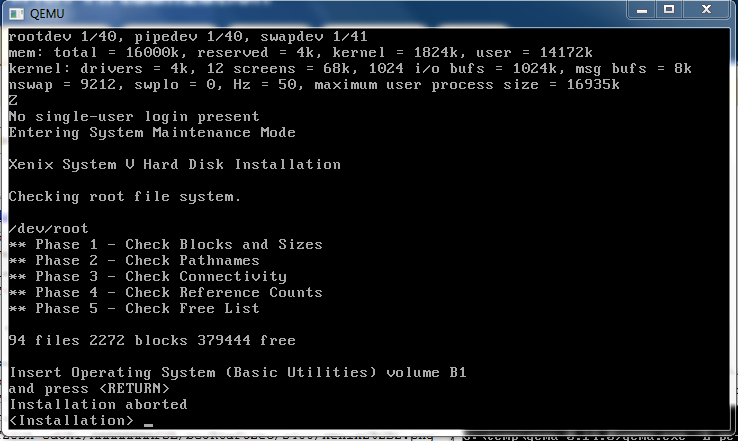
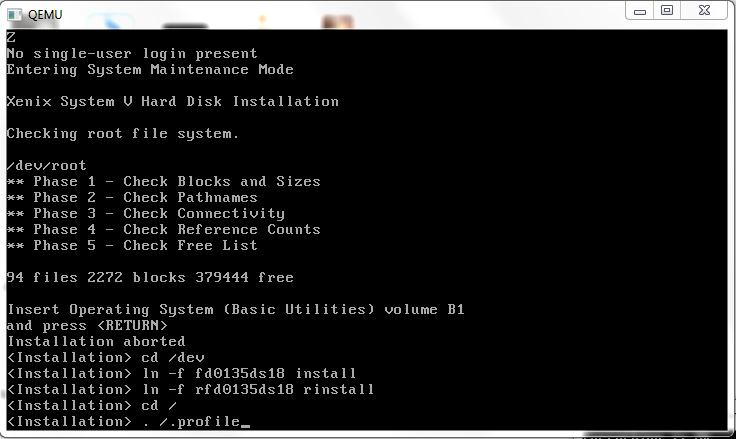
I installed Windows NT 3.51 by first generating the 3 needed boot floppies to kick off the install. While IDE CD-ROM’s are supported by NT 3.5 & 3.51, they El-torrio boot method is not, so you need to make the 3 diskettes under MS-DOS if you’ve lost them (WINNT /OX) then you can boot off of those, and install. I setup a 2GB IDE disk, and partitioned it 512 (NTFS for NT) for C, 256 for E (FAT to swap) and finally a 1.2GB F drive to install the post office to.

Yes, the installer really is MS-DOS based. So you could run this thing on anything modern today… I would imagine even the ‘share’ hack for DOSBox could work.

Naturally we’ll create a new post office.

As I had mentioned above, I’m going to store mine on the F: drive. Don’t forget that you end up sharing out the data directory, and everyone maps it to the M: drive… If you install to the M: drive bad things happen as it expects the mail directories to be in the root… Although I guess you could just slam it in the root, but it seems… wrong.

I’ll call my post office, POSTOFFICE for the theme.

And the corporation may as well be any given MEGACORP. This was semi popular in small corporations. But it being based on fileshares meant it didn’t scale all that well. You could use special MTA’s (Mail Transfer Agents) to transmit mail from one post office to another.. We’ll get into that later.

I’m going to install with MS sharing hooks… But look a MS product that supports NetWare! Embrace, Extend & Extinguish!

I’m going to install the admin tools & agents. I don’t plan on using a modem, so scratch that!

Let’s keep the admin tools away from the users!

And let’s support MS-DOS, Windows 3.0 & OS/2. That’s right the OS/2 / Windows option is the same, that is because of WLO. This makes this one of the handful of things that shipped with WLO, (Windows Libraries for OS/2. It is a ‘port’ of the Windows 3.0 API to OS/2 as an underpinning. This was the foundation of porting Windows to NT, into Win32. Or at least that is what showstopper mentions.)

And deploy the clients to the drive that I’ll share for mail.

Everything looks good, so let’s go!

Files are copying….

And we are done!

And for the heck of it, I’m going to install the big exciting thing for Windows NT at this point, the Microsoft Mail Multitasking MTA. And it was a big deal at the time, because, naturally almost *NONE* of the other agents were multitasking (ie supported OS/2 in OS/2 mode). In fact it wasn’t un common for people to try running this stuff on Windows/386 or Windows 3.0 / 3.1 in enhanced mode with multiple MS-DOS VM’s. It was not a thing of beauty and stability. And don’t forget prior to OS/2 2.0, OS/2 could only run a single MS-DOS session, and only when it was in the foreground.

Kicking off the install.

Point it towards the mail directory.

By default the admin account it ‘admin’ and the password is ‘password’. We haven’t had a chance to change it, but those are the defaults.

I’m going to put the agent in the mailexe directory. It creates sub directories so it’s no big deal.

This isn’t a preconfigured store, so overwrite it, I don’t care.

Files copy…

Pick a group…

And we are done!

So now I’ve gone over how Sprint’s modem access is limited, and presented a way using VM’s to get around it. It’s really needed if you want to use a VPN (Virtual private network) so it is relevant to other people. Then I’ve installed Windows NT 3.51, and MS Mail 3.5 along with the MMTA. This is getting long, but in part two, I’ll setup OS/2 2.0 on Virtual PC. In part three I’ll get the network working along with some information on running MS Mail 3.5 on OS/2.

Installing Windows 2000 on Qemu 0.14.0

Well good news on the Qemu front, I haven’t tried Windows 2000 in a while, but it installs without any major issues on Qemu 0.14.0.

First I created a 4GB disk..

qemu-img.exe create -f qcow2 win2.disk 4G
Formatting ‘win2.disk’, fmt=qcow2 size=4294967296 encryption=off cluster_size=0

Then I’m firing up Qemu like this:

qemu.exe -L pc-bios -m 512 -hda win2k.disk -net nic,model=pcnet -net user -redir tcp:4444::3389 -cpu pentium -soundhw sb16,adlib -cdrom windows2000.iso -boot d

I’ve setup the AMD PCNet ethernet adapter, and some soundblaster/adlib fun. What the heck.

Since I’m using my MSDN stuff, I figured I’d install Advanced Server.. not that I need the clustering or anything, but what the hell, it sounds exciting. Anyways in the old days we needed to add this -win2k-hack which forced the disks into extra slow mode (PIO). The good news is that we don’t have to worry about that anymore.

And the installer comes up without any issues….

And for the hell of it, let’s go NTFS. Go ahead and go thru the rest of the install steps, and then it’ll be ready to reboot.

The only ‘issue’ I’ve seen, and it goes for physical installs to is you’ll come up to when it’s detecting physical hardware and it’ll freeze right here.

Move the mouse hit some keys… And it’ll move. Otherwise, you’ll be sitting on this screen for a long long time. But Windows 2000 did the same thing on physical hardware too. Also it’s best to be moving the mouse around when the GUI boot completes otherwise it may just seemingly lock. I’ve had this issue on ‘fine’ Dell equipment too..

I like the terminal services & remote administration mode…

Even though with Qemu you can send the frame buffer out via VNC, but RDP is more robust.. not to knock VNC. Anyways Windows 2000 will continue to do it’s thing… So sit back and it’ll keep on chugging…

Registering components takes a while… Windows 2000 had a BIG push moving everything into COM objects, which sounded like a great idea, but it takes a while to register all this stuff… And it gave us the incredible DCOM protocol to go forward. Too bad it doesn’t NAT for crap, but it’s amusing watching it ‘MEOW’ around the network.

Then we are on to saving the settings…

Which isn’t too fast either. Waggle the mouse a bit, for the hell of it. And keep on waiting.

And then…

And we are done!

So now Qemu will reboot the image.. The Windows 2000 ISO’s can optionally not boot so ignore it, and..

Hopefully no inaccessible boot device errors…

And now starting up…

And here we are! Now just to send a control alt delete…

I know this is hard for some people, but there is no ‘clean’ way to hit control alt delete, you just hit control+alt+2 which will bring you to the console which then you can send in the command by typing in…

sendkey ctrl-alt-delete

And then to switch back, it’s control+alt+1 … Easy, right?

And then you can login and all is well.

Another tip is to use a USB tablet once Windows 2000 is installed. This allows for a ‘seamless’ pointer, so you don’t have to worry with the control+alt to release the window.

-usbdevice tablet

Well although netware 3.x & 4.x seem to have catastrophic issues, Windows 2000 certainly works well!

MS-DOS / PC emulator for the GBA, DSx86.

What is cool is that you can follow it’s progress through the authors blog here.

I don’t have a DS so I’ve not run it, although I guess I could just use the emulator that he uses to run it, the no$gba… The site for no$gba seems to be down, but if I remember right, he’s the same guy that decompiled CP/M zork, and rebuilt it in pascal..

Anyways check out the above blog, to see how his emulator progressed!

Internet Explorer 10 test drive.

That’s right, Internet Explorer 10.

Yes they did just release 9, but they are already working on version 10! So right now you can download the ‘test drive’ version of Internet Explorer 10 right here. And if you are on Windows I’d recommend it for the ability of the test drive to quickly change rendering engines.

Holding down the alt key, and pressing 5,7,8,9,0 will let you choose IE 5-10. But notice how IE 6.0 is left out? I wonder if this has anything to do with it?

At any rate, I loaded up a Windows NT 4.0 VM with IE 5.5, and precoded to install IE 6.0 out of solidarity.

Thankfully they haven’t pulled the plug on new IE 6 installs. Yet.

So rest assured you can load up IE6, and hit MSN for your daily Paris Hilton fix. Which initially I was about to joke about and.. well. There you go. Like some things, neither one of them will go away.

So what is useful about being able to quickly shift rendering engines? Well if you still have any Virtual Server 2005 installs, is that you have to admin them from Internet Explorer, and IE 8 and beyond have broken the admin interface like this:

Which makes it impossible to select anything from a drop down list, like ISO’s, networks disks etc..

But now with this version of IE10 you can quickly known it down to IE 7, or 5 and get…

The interface the way it was meant. And it’s far easier to navigate with alt keys a native app, then something in a VM.

It’s been a boring day

My package from Germany finally arrived…!

And it contains Phar Lap 386 versions 4.1 and 5.0!

But something arrived in the mail. So I spent 2 hours cleaning things up and fighting with Watcom getting a skeleton verison of Doom to build. It’s finally running. Now to do some keyboard/video stuff.

Maybe more later though. But I may have to bench them some how Dos4G/W vs Phar Lap 386…. I donno.

Installing Xenix 286 on Qemu 0.14.0

For all the 286 fans, which… I never understand, good news, it turns out that using the same method for installing Xenix 386 works on Qemu 0.14.0!

Booting up a kernel on a 1.2MB floppy disk image I get this:

Notice that the device is fd096ds15, which then corresponds to 2,52 for the major minor. Armed with this information you can install happily. And enjoy your segmentation, and SMLH memory models. Ugh.

I still say the 80286 was the worst thing to mainstream IT.

So I’ll leave you with this gem, from tenox..
MICROSOFT STRIKES GOLD.

Migrating Windows 2000 servers to Proxmox/VE

I’m not going to get into the a super amount of detail here… Maybe the next server I do, but not right now. The mergeide registry addition didn’t work for me. Maybe it’s because this was an old server that was converted to VMWare?

It was Windows NT 4.0 when it was physical, then it was converted to VMWare 2.x back when that was new, then upgraded to Windows 2000, then migrated across to VMWare 3.x where it sat dormant. However it now needed to be brought back to life, so the first step was to remove the old VMWare tools. And that proved to be an episode on it’s own (make copies of all your VMWare Tools ISO’s!!).

Once that was squared away, I kind of expected to load mergeide.reg, then shut down SQL Server, fire up SelfImage, and transfer away. But I was instead greeted with a BSOD, the infamous *** STOP: 0x0000007B (0x818B51B0, 0xC00000010, 0x00000000,0x00000000) INACCESSIBLE_BOOT_DEVICE

So I tried manually adding in the IDE drivers, and then using BartPE to quickly copy the c:\winnt\system32\config\system* files. Well that didn’t work either.

Much to my luck, Proxmox/VE includes SCSI emulation, because it’s based on KVM which in turn uses the hardware framework from Qemu. So it can use the sym_895a.sys driver from LSI which can be downloaded from here. So within Windows 2000, on VMWare I was able to load up the LSI/SYM scsi driver (which hides in the miniport directory on the zip file).

With the driver loaded, I shut down the VM yet again, booted back up with BartPE, and re-copied over the system registry files (c:\winnt\system32\config\system*) along with the scsi driver (c:\winnt\system32\drivers\sym_895a.sys). Now with those in place, I could then finally reset the VM on Proxmox/VE and get this….

So in the end it is finally transfered, I used the ‘pcnet’ Ethernet adapter to maintain the same NIC drivers. So far all seems pretty snappy with it.

VMWare ESX 2.5 on Qemu 0.14.0

Ok this is going to sound crazy but here we go!

Today I’m migrating this old SQL 7/Windows 2000 database server from VMWare ESX 3.5 to Proxmox VE. However this server started out on a VMWare ESX 2.5 server. And in the subsequent years had been decommissioned , and never updated but rather just copied onto the 3.5 cluster as we decommissioned the 2.5 cluster. At least I figured disk space was cheap enough we should keep the old VMs that “we will never need again” because.. Eventually someone will panic, and realize they need it again.

In the first step of doing so I needed to remove the old version of VMWare tools. But the catch is, this old version requires you to have the msi package handy to remove it. Well isn’t that a fun little catch. And you’ll find all kinds of ideas on what to do now that you don’t have your original “VMWare Tools.msi”. And more importantly you’ll now realize that you should have not only saved your old ISOs of ESX, but you should have also pulled out the tools ISOs and saved them as well.

Luckily I did save the software keys thought! Although I suspect that is also somewhere on their website, but they make it a chore to find the old stuff.. At any rate with 30 minutes of searching I finally came across the last version of 2.5, ESX Server 2.5.5 Build 57619.

Now it would seem that the VMWare tools are kept in an RPM file. Which is going to be a major pita for me to extract on Windows so I decided to take the more insane route, and install ESX on Qemu!

First I create a 5GB IDE disk to boot VMWare ESX server off, and a 10GB SCSI disk for the vmfs.

qemu-img.exe create -f raw esx25.disk 5G
Formatting ‘esx25.disk’, fmt=raw size=5368709120

qemu-img.exe create -f qcow2 esx-scsi.disk 10G
Formatting ‘esx-scsi.disk’, fmt=qcow2 size=10737418240 encryption=off cluster_size=0

With the disks created, I then fire up Qemu like this:

qemu-system-x86_64 -cpu Opteron_G2 -L pc-bios -m 512 -hda esx25.disk -drive file=esx-scsi.disk,if=scsi,bus=0,unit=0 -option-rom 8xx_64.rom -net nic,model=e1000 -net user -net nic,model=e1000 -redir tcp:8088::80 -redir tcp:8022::22 -redir tcp:8433::443 -cdrom \install\esx-2.5.5-57619.iso -boot d

This pulls in a few things, the SCSI configuration along with the AMD CPU type configuration that I’ve touched on previously.

qemu 0.14.0 ESX 2.5 boot

And away we go!

ESX 2.5 install

And Qemu should easily boot the graphical installer.

ESX 2.5 system

So using my configuration, I dedicate one Ethernet card to ESX, another to the guests, and share the SCSI adapter between the console and the guests…

ESX 2.5 partitions

And when it comes to the partitioning, I simply extended the root partition to the rest of the drive, and setup vmfs2 on the SCSI disk. I’m not even thinking about clustering, I’m primarily after the extensions.

installing

Installation takes about 20 minutes. It is just the way it is. The pegasus cimom for linux takes forever, along with the provider-esx package. I have no idea why, it’s probably thousands of little files or something crazy like that. But be patient, it’ll install.

ESX 2.5 installed

And there we go, a successful installation!

Now VMWare will want to reboot, I just kill Qemu, and then launch it booting off the IDE harddisk (-boot c).

ESX 2.5 boot options

Now we get an ESX and Linux boot menu. I’m feeling brave, so let’s try to boot ESX!

vmkernel loading..

It’s loading…

Purple screen of death

And it panics. Bug 1406:2154 BugNr=34866
“measured cpu and bus speeds conflict”

Oh well. But we can boot into Linux, and scp out the extensions! Which do hide in /usr/lib/vmware/isoimages/windows.iso . So it’s not a total loss. I did notice on VMWare Fusion there was a setting for ESX, perhaps I can run ESX 2.5.5 on my Mac? Perhaps, but I’ll try that for later.

Now with the ISO finally in hand, I put it in my VM, and tell it to uninstall the extensions, I provide it with the VMWare Tools.msi and I get…

The file VMWare Tools.msi is not a valid installation package for the product VMware Tools.
Try to find the installation package ‘VMware Tools.msi’ in a folder from which you can install VMware Tools.

However the ISO did offer a chance to ‘upgrade’ my apparently older 2.5 extensions. So I did that, rebooted, then with a matching level ISO I was able to remove them. Wow was that convoluted! If anything I guess we’ve found out you want to hold onto these extension CD’s not matter what.. You never know if someone comes in with an old VM, or if you had a decommissioned VM that suddenly has to be brought back to life, it’s best to have these handy to get them back into shape. Just because your setup is all ‘complete’ it doesn’t stop people from throwing you curve balls.

Windows 2008 & Proxmox VE

Just a quick tip to people running Windows 2008 under Proxmox/VE (I know this applies to the amd64 x86_64 version probably i386 as well) sometimes when you reboot it’ll come up and crash saying that there is no available hard disks. Then it’ll go into recovery mode and … somehow claim you have no hard disks.

Turn the VM OFF.

Wait a few seconds.

Turn the VM ON.

I had this issue after installing antivirus software in the VM, but I guess there is other things that may set it off. Anyways after a shutdown, power cycle of the VM it’ll boot back up.

That’s it!

Installing Xenix on Qemu 0.14.0 part two.

Ok, we left off from part one, having prepared the hard disk. Now we are going to boot off the hard disk like this:

qemu.exe -L pc-bios -m 16 -hda xenix.disk -fda b1


xenix2 1 (1)Now if we go ahead and try to install normally it’ll fail like this:

xenix2 2 (1)


Which isn’t good at all.

xenix2 3 (2)

Instead, what we are going to do is hit the delete key breaking us to an install shell.

xenix2 4

So at the shell, we are going to fix the install/rinstall devices to force them to the 3 1/2″ high density diskette like this:

cd /dev
ln -f fd0135ds18 install
ln -f rfd0135ds18 rinstall
cd /
. /.profile

xenix2 5

Now we can proceed with the install, and since diskette B1 is already in the drive, we just hit enter. Once the B diskette is copied, the install script will prompt for a root password.

xenix2 6

Now it’s time to pick a timezone, and yes, I’m in North America.

xenix2 7

In EST.

xenix2 8

And sadly, yes we do DST. (*NOTE being this old, you can bet the offsets are all wrong for DST, I’m sure there is some deal to update the files, but I’m not sure of it off hand. But it’d be nice to update the timezone stuff for 4.2BSD as well).

xenix2 9

Let’s continue with the install.

xenix2 10

And let’s finish the operating system install.

xenix2 11

Now we’ll need the X1 diskette…

So far we’ve not needed to swap diskettes live under Qemu, but I thought I’d remind people that it’s a simple matter of hitting ctrl+alt+2 to bring up the Qemu console, then typing in:

change floppy0 x1

To verify you’ve even done this correctly, you can issue a “info block” command, and you should now see the floppy0 device referencing the x1 file.

Once you are done, you can switch back by hitting ctrl+alt+1

We are going to install one or more…

All of them as a matter of fact.

I’m going to fast forward a little here, and process all the X diskettes… there isn’t much to see here, it’ll prompt for a diskette, mount it in the qemu console, and switch back and proceed.

Yes this is a root only install, KISS (Keep it simple stupid) as they say.

Now it’ll prompt for the backup user password, then start to compress man pages. Needless to say on a fast computer this takes mere seconds… Not so back in the day on a 386!

Now it’ll prompt for the sysadm password, generate the termcap, then it’s time to swap series to the N series diskettes..

Now onward to N2.

Time to license & activate the system. Again.

Ok we are done.

And there we go, Xenix is installed!

A quick reboot, and we are ready to go!

So looking back, we’ve just done the impossible, we’ve installed Xenix on Qemu.