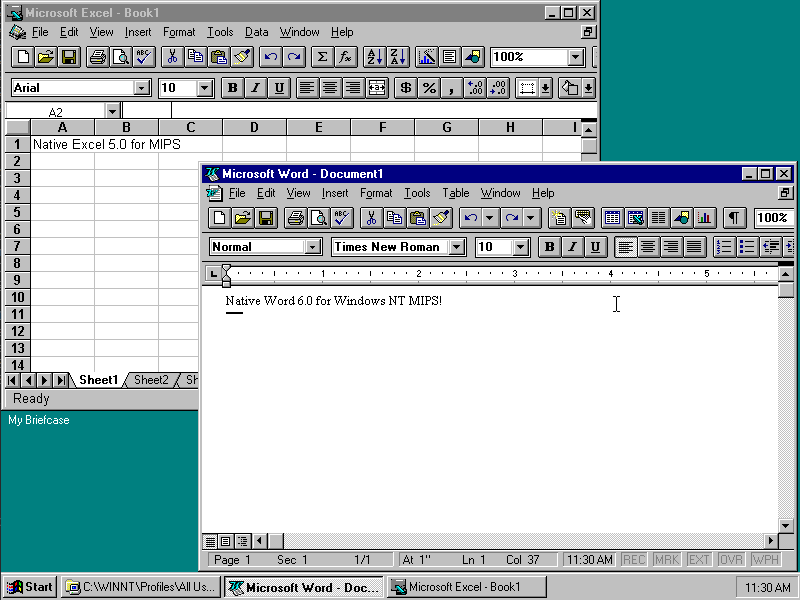
Years ago when I’d bought Office 4.2 for Windows NT, it only included i386 & Alpha builds of Word and Excel in the box, and a coupon for MIPS and PowerPC.
About the only thing interesting is that it actually ran under Win32s.
But today looking at term24‘s uploads on archive.org, I saw two CD-ROM images:
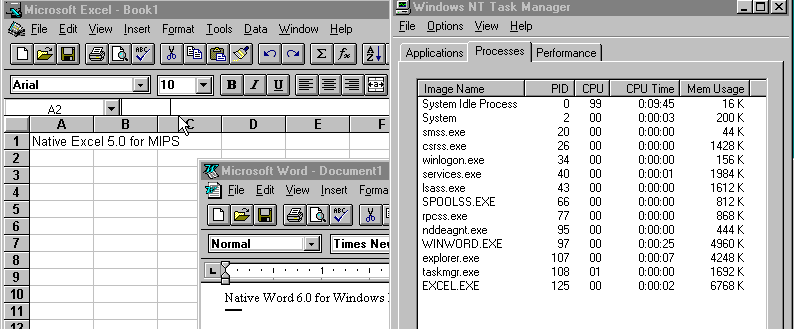
I quickly fired up Qemu MIPS NT, and confirmed that both do in fact contain a MIPS version! Excel does have the PowerPC version as well.
As far as I know the only RISC platform to get apps from Office 97 was the Dec Alpha, but at least MIPS users can rejoice now, knowing that they too have been blessed with 32bit Office 4.2 apps!
One of the amazing things about NT & portable apps is that visually, they look identical. So other than me telling you that these are the MIPS native versions, there really is no way to tell.
Well, other than there is no ntvdm running. There is no WOW needed here!
100% native.
I guess the only other question is that since the Word is 1994, and Excel is from 1995, did they have earlier versions for Windows NT? It seems like everything was finally coming together for RISC NT, except the users. Would a release of 64bit Windows 2000 on Dec Alpha save the platform by bringing a strong 64bit platform with integrated JIT i386 WoW built in? (AXP64 Windows 2000 didn’t use !FX32). I guess we’ll never know.
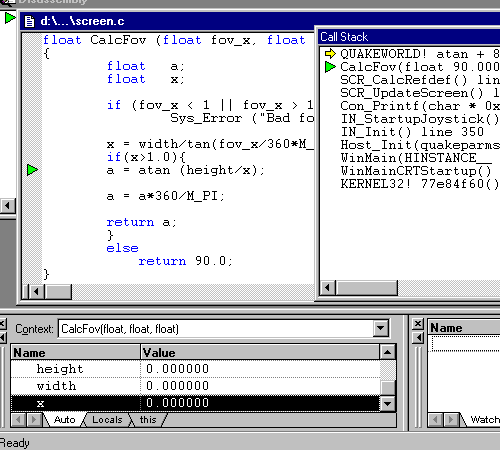
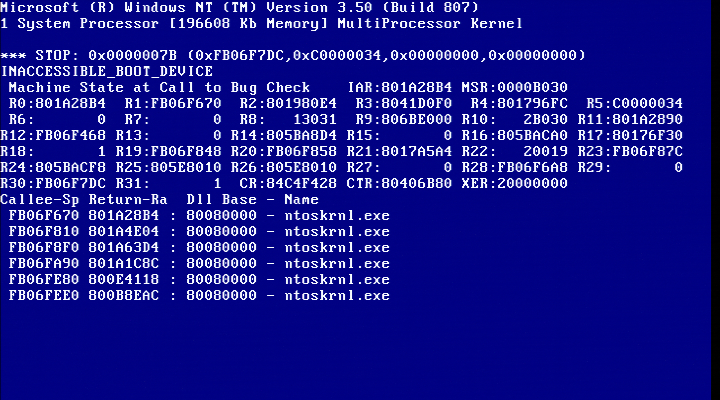
I came across this fun thing debugging a QuakeWorld client on a RISC machine. I think something is failing as I’m using terminal server. For some reason width is being passed as 0. Not sure why I didn’t debug it enough to care, so I setup a quick block to only evaluate the Fov if the calculated x was greater than 1.0
And Microsoft C did not disappoint.
I think it may have been some incremental linking issue? I’m not sure I purged the build directory and re-ran make and didn’t experience the crash again. I had to get the screenshot or even I wouldn’t believe it.
In the end I got it running:
Of course among the eagle eyed you may notice this is version 13.00.8499 of the compiler. But the last compiler for the Dec Alpha / Windows NT was version 12…
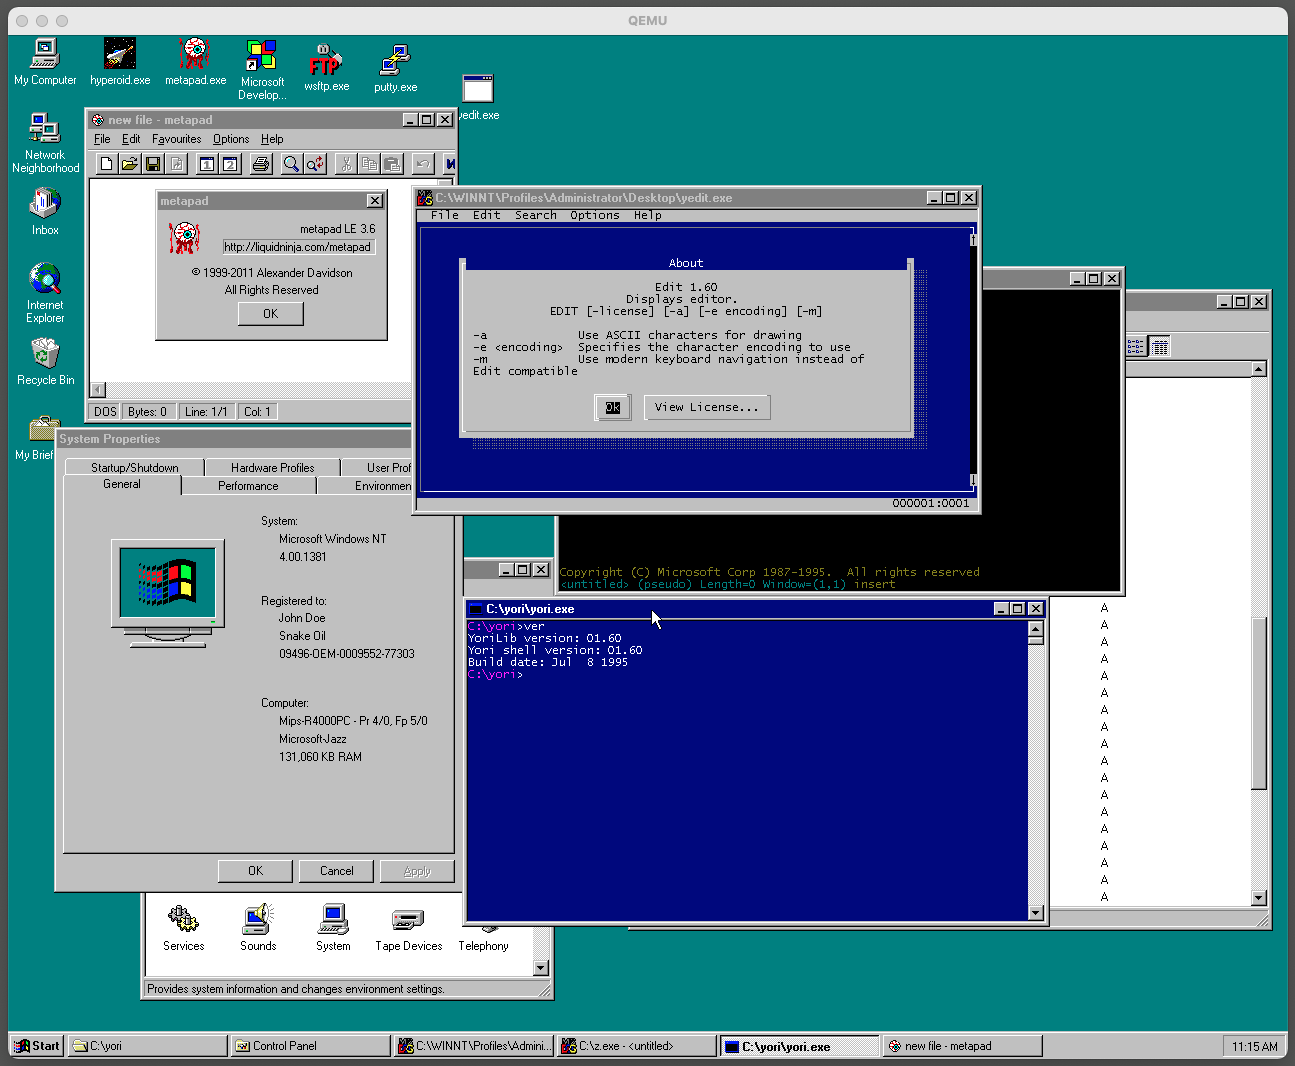
(This is a guest post by Antoni Sawicki aka Tenox)
This was previously well covered by Gunkies and Neozeed, however as almost a decade passed, some improvements could be made and annoyances fixed.
Firstly NT MIPS now works in 1280×1024 resolution under QEMU. It previously had issues with mouse tracking, but this is now fixed. So the new image has a higher resolution.
Secondly the old images were made with FAT filesystem which I didn’t like too much. The reason for that is the infamous RISC NT osloader needs to be placed on a FAT partition. Then, if NT is installed on a second NTFS partition the default drive will be D:\, C:\ being the just the osloader drive. This was super annoying in practice. So a common procedure was to just have one FAT partition for both osloader and winnt. I have fixed it by supplying a pre-partitioned disk and specified the second partition for osloader and the first for NT.
Also I only had just a bare/vanilla image with no additional software installed. The new image includes most of the available apps, including IE3, some editors, Reskit and Visual Studio.
Lastly I wanted to figure out all the right settings and flags for qemu as they were discrepancies between different sources and nothing seem to work smoothly. The correct flags seem to be:
The -rtc flag is not really needed if you are ok with having the current date in the guest.
Thanks to Neozeed for figuring out the network settings! Unfortunately the old/legacy -net nic -net user is no longer working while the new -device doesn’t like dp83932. The documentation was quite helpful.
Thanks to reader Mark for pointing out the correct NVRAM settings! See comments below.
The new image with all the apps preinstalled is here and a plain “vanilla” here.
Curiously this now works right out of the box on QEMU 6.1 and is pretty smooth and stable compared to what it was before. Good job QEMU team and thank you! Just in case I still keep the old binaries for Windows made by Neozeed here.
Update: I built Yori for NT MIPS! You can download here!
The following is a guest post by PA8600/PA-RISC! Thanks for doing another great writeup on that PowerPC that was going to transform the industry!.. but didn’t.
The history of the PReP platform from IBM is quite interesting, not only because of its place in the history of Windows NT but also the history of the PowerPC architecture in general. When the PowerPC platform was new, IBM (just like a few other vendors, notably DEC) had grand plans to replace the x86 PC clone market (they helped create) with PowerPC. Of course thanks to various factors such as Apple’s refusal to play along, the launch of the Pentium Pro CPU (and the later Itanium disaster), and high cost, this plan never ended up panning out. Later IBM PReP machines were designed for AIX and Linux use only, and they were sold as regular old RS/6000 computers.
Still, Microsoft being Microsoft and willing to port their OS to literally anything hedged their bets and made MIPS, PowerPC, and Alpha ports of Windows NT (along with a PC98 release for Japan only). In the guest post about Solaris for PowerPC I made, I talked about the history of IBM’s PReP platform some more so you should go read that post if you want an initial rundown on PReP’s flaws and history. But I have learned a bit about the Windows NT port for PowerPC, and I discovered a rare version of it as well. By now everyone with a PReP machine (or PPC Thinkpad) has run Windows NT 4.0 on it, and if PReP machines are emulated it’s guaranteed this will be the second most run OS on it aside from AIX of course.
IBM also made a half-baked OS/2 port for PowerPC as well, and then there’s the previously mentioned Solaris port. All of these are rarities and it’s worth documenting. With how rare PReP machines are and their high prices on eBay when they do turn up for sale (or their tendency to be snapped up fast), I think it’s fitting to write perhaps the most in depth look at PReP hardware that anyone has seen.
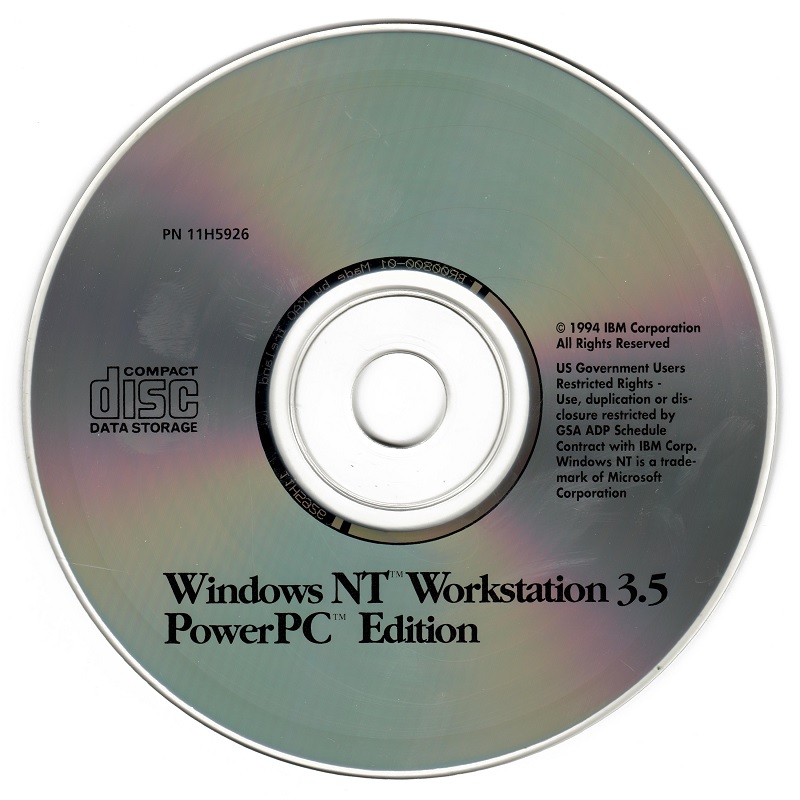
Windows NT 3.51: “The PowerPC Release”
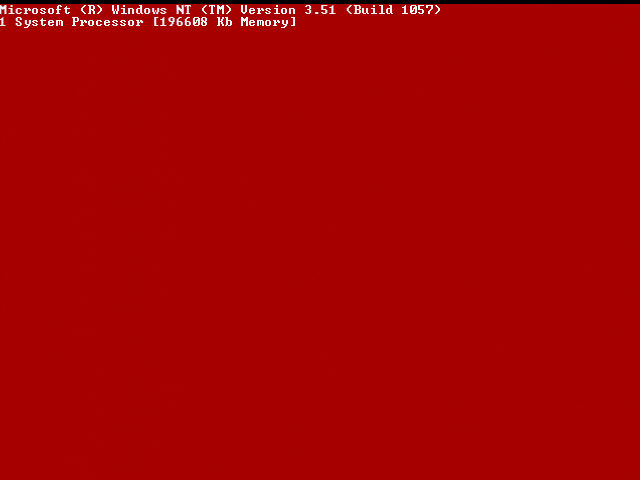
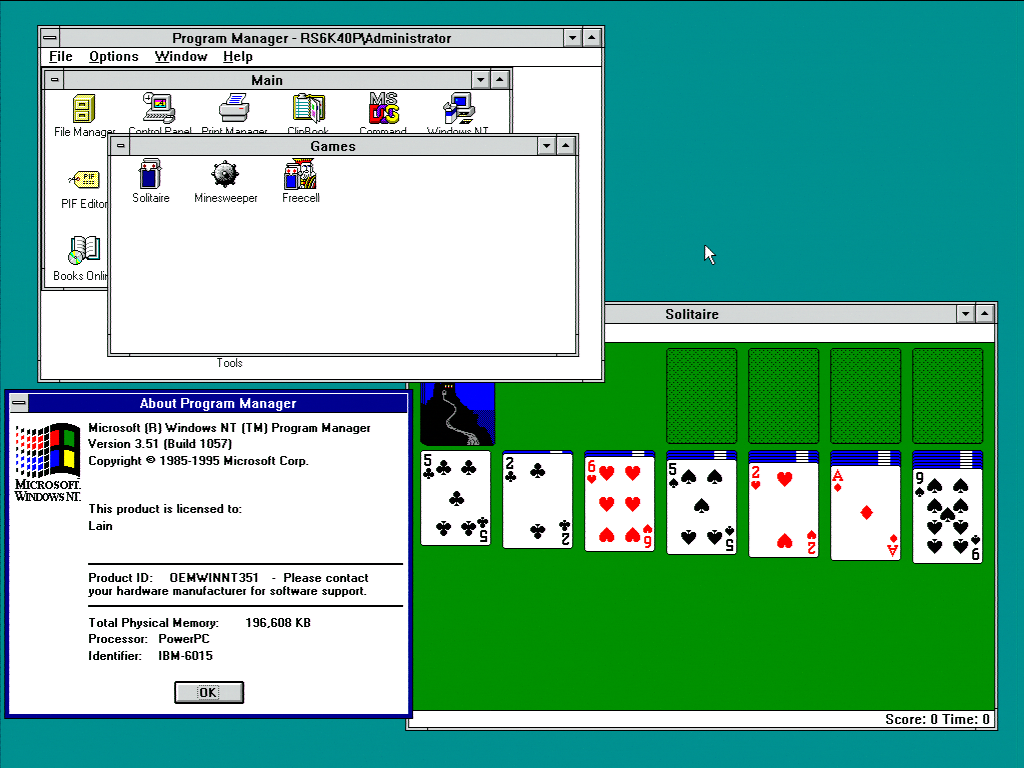
It’s commonly accepted that Windows NT 3.51 was the first release for PowerPC hardware and it was even called this within Microsoft. Featuring HALs for most of the early PReP machines including the Moto Powerstack, the rare FirePower machines built for NT (which used Open Firmware), the Power Series 6050/70 (and maybe 7248), and the unobtanium IBM 6030, it’s pretty much what you’d expect for a first release for PPC. It’s a polished, solid OS that’s arguably faster than NT4 on the same machine. Aside from the red boot screen (on my Weitek GPU), it’s pretty much Windows NT 3.51 but on the PowerPC. It’s like running NT 3.51 on MIPS or Alpha, it’s interesting but more software will likely run on 4 anyhow (especially on Alpha).
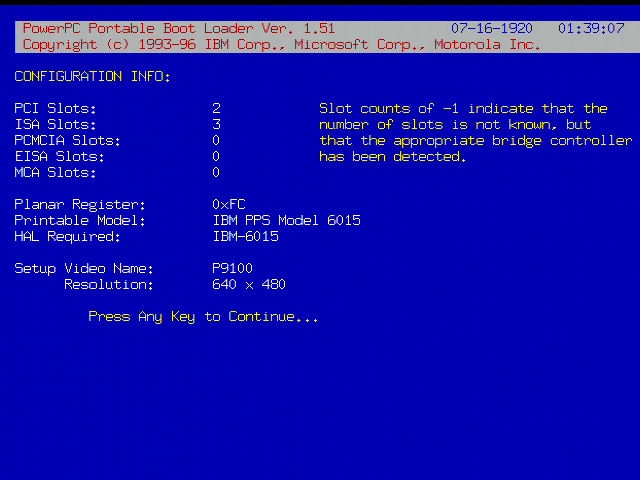
One interesting quirk of Windows NT for PowerPC is it does not report the CPU type of your machine. It simply reports “PowerPC” and what machine you’re running it on. It does not tell you that you’re running it on a 601, it tells you that it’s running on an IBM-6015.
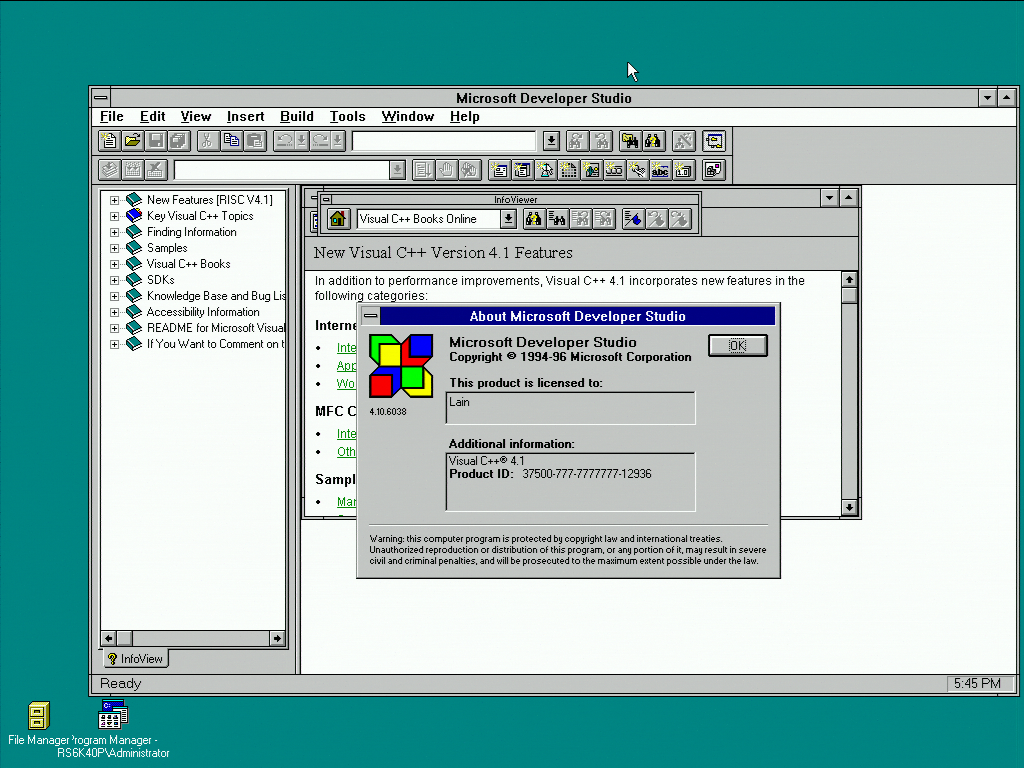
Unsurprisingly Visual C++ 4 works on PowerPC Windows NT 3.51 as well. This is no shock, Visual C++ 4 was designed to work on 3.51 as well as NT 4.0. The same goes with many of the pre compiled programs. One advantage Windows NT 3.51 offers over 4.0 is that it is simply faster than 4.0 on the PowerPC 601.
There’s not much else about Windows NT 3.51 for PowerPC quirk wise that hasn’t been said elsewhere about NT 4. It runs in little-endian mode (one of the few PPC OSes to), it has 16 bit Windows emulation that’s slow, and it needs specific PReP machines to run. One interesting series of articles about the “behind the scenes” of the port worth reading is the Raymond Chen article series, and this discusses the quirks of programming a PowerPC 60x CPU in little-endian mode as well. It can be installed with the same ARC disks NT4 uses, and of course the same SMS and firmware disks will work. In fact QEMU at one time was capable of booting the IBM firmware image from these disks.
Here’s something I’ve found out from research however. There was actually a limited release of Windows NT 3.5, it’s been dumped, and it is a real operating system. It also requires a very specific model of RS/6000 to work, and one with a interesting history giving it a unique place among the PReP machines. While I was unable to make it work in the end, I did discover and document a lot of interesting features of PReP machines.
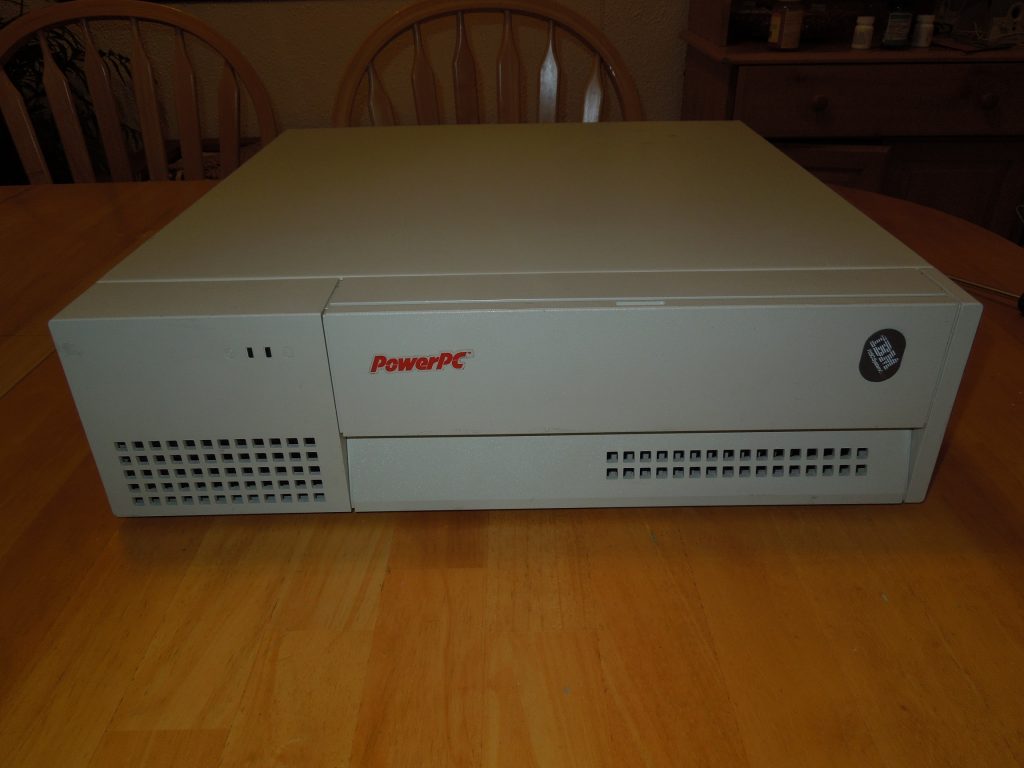
Enter Sandalfoot: The IBM 7020/6015 (and demystifying PReP machines)
To understand the HCL and weirdness of Windows NT for PowerPC (and why it won’t run on Macs), we need to take a look at one such machine it runs on. This is my RS/6000 40p, a machine that was given several brand names by IBM and used as a development platform for PReP software and operating system ports. This is also perhaps the most historically significant RS/6000 model from the era. While it wasn’t the first PowerPC RS/6000 (that honor goes to the 250), it was the first to use the PCI and ISA busses and it was a few months ahead of both the initial PCI PowerMacs and other PReP boxes. It’s also one of the few true bi-endian machines as just like other PReP machines, the MIPS Magnum, HP’s Integrity, and modern Power8+ machines it has OSes for both endians available.
In 1994 (presumably October 28, if the planned availability date is correct), IBM released the RS/6000 40p (announcement letter here, codenamed Sandalbow) and the Power Series 440 (codenamed Sandalfoot). Both are near-identical machines with different faceplates and boot screens. The RS/6000 ranged in price from around $4,000-6,000 and was designed to be an entry-level AIX workstation, bundling a copy of AIX with each machine. As an AIX machine it’s relatively slow and fits the entry-level badge quite well, but thanks to the 601’s POWER instructions it served as a transition machine over to the later 604 AIX machines. Unlike the later PowerPC 603 and 604 machines, it featured POWER instructions allowing it to run both legacy AIX POWER software and later PowerPC software. The Power Series was presumably sold to those wanting a PReP box for Windows instead.
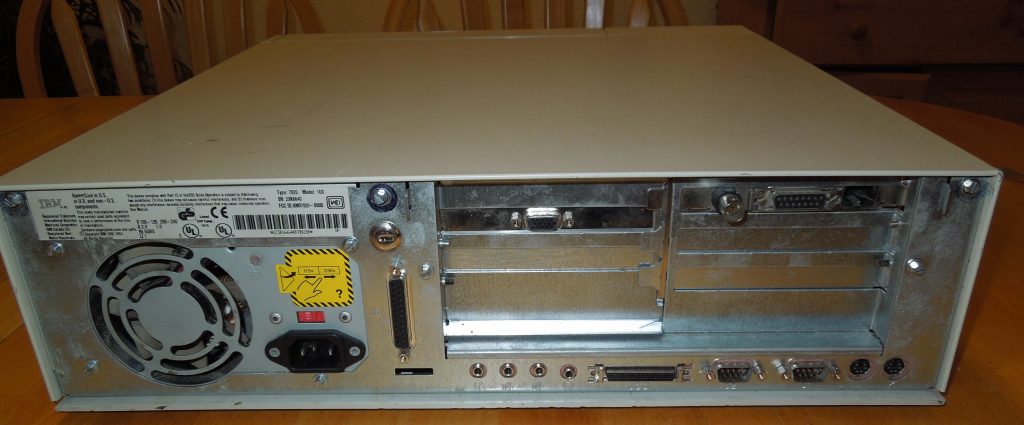
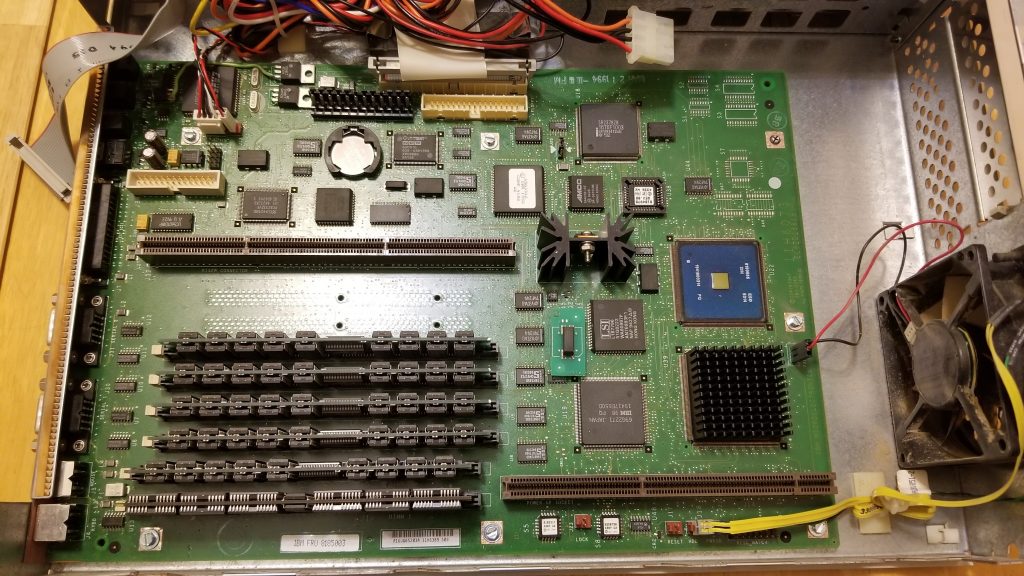
Since IBM PReP hardware is so obscure and undocumented, I’m going to document this as best as I can being the owner of an IBM Model 6015/7020. The machine features a 66mhz PowerPC 601 (similar to that of the Power Mac 6100 and RS6K 250), PCI and ISA slots, and IBM’s “Dakota” PReP firmware (more on the boot process here). It uses an off the shelf NCR 53c810 SCSI controller, Crystal CS4321 sound chip, an Intel 82378 PCI bridge, and a NIC can be inserted into the ISA slots (mine has the famous 3com Etherlink III). The Super-IO chip is also off the shelf, and is a National PC87312VF. The clock IC is a Dallas DS1385S, a close relative of the Dallas DS1387 (with internal battery). At least some of the IBM custom ICs are the chipset ICs and those are also documented. A Linux 2.4 dmesg can be found here.
Mine is also maxed out at 192mb of RAM, however there are some solder pads for more and the chipset is limited at 256mb. This makes me wonder if the system was based on a reference design of some sort. There was an ultra-rare 604 upgrade as well, but considering how there are more 7248 and 7043 machines in the wild I can assume many customers just waited for that instead due to its superior AIX performance.
If the idea sounds familiar (off the shelf chips + RISC CPU) it’s because it was the very same idea used to create the two other non-x86 Windows NT platforms. The Microsoft Jazz MIPS platform most MIPS NT boxes were influenced by was infamously based on the same idea of a “PC with a MIPS CPU”. To a lesser extent, this was also seen on the DECpc AXP 150 and other EISA/ISA/PCI based Alpha machines designed to both run Windows NT and DEC’s own OSes. Crazy undocumented custom hardware and expansion busses were thrown out the window in favor of industry standards. In fact when I posted a photo of the motherboard to a chat full of PC nerds, they stated it looked remarkably like a normal PC motherboard. The whole industry would later adopt PCI and sometimes ISA on non-x86 machines to cut costs and reuse the same expansion cards.
The main difference between the RS/6000 40p and the Power Series variant is the boot ROM logo and chime. The RS/6000 and “OEM” systems used a boot ROM that featured the PowerPC logo and just a beep, while the Power Series machines featured a logo more closely resembling the PowerPC Thinkpads complete with the chime. One can boot firmware from a floppy as well by typing in the name of the ROM image in the prompt and pressing enter, and watching as it reboots once the firmware is loaded into RAM. Here’s a video I filmed demonstrating this, along with some other quirks including there being two SMS keys: F1 for a nice flashy GUI SMS and F4 for a text based SMS, along with F2 for netbooting (with the right NIC of course).
The Sandalfoot machines were LPX form factor machines, featuring a riser card and generic sheet-metal case popular with prebuilt machines from this era. The LPX form factor was wildly popular in the mid 90s due to its versatility, seeing use by both IBM and DEC for their RISC machines, various PC builders, and even Apple for the clone program and clone based Power Macintosh 4400. The Sandalfoot machines also drove home one of the core goals of the PReP project, which was to build a PowerPC platform using as many off the shelf and PC style components as possible instead of using lots of custom ICs like Apple did. I dug out one of my cameras to take a few high-res photos of the motherboard of this computer to illustrate this. Compare this to the motherboard of the Power Macintosh 6100 or even the 601 based 7200 and notice the bigger heatsink and use of fewer custom ICs (Apple loved those).
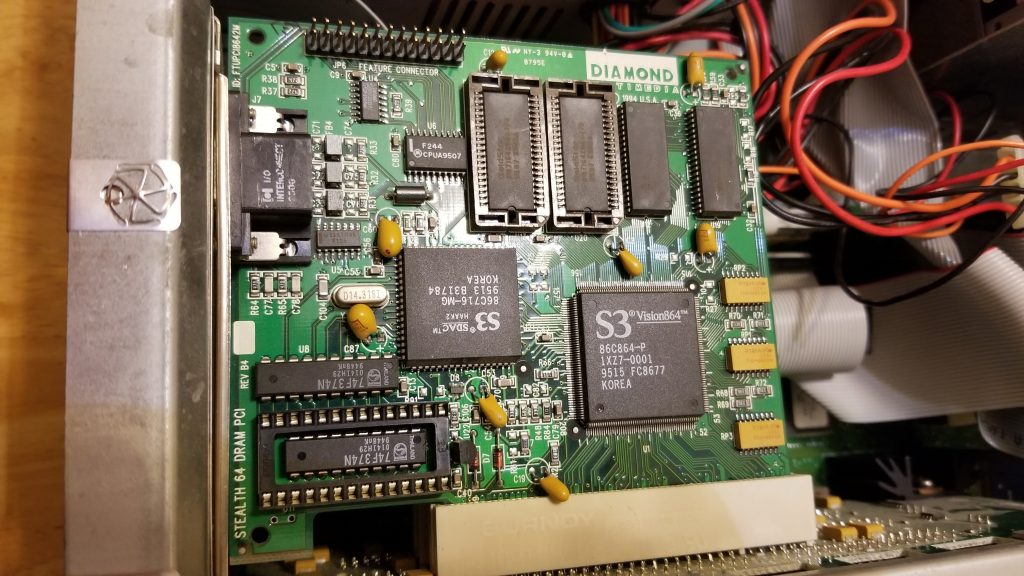
There were three main GPU options: the famous S3 Vision864, the Weitek Power 9100 (or P9100 for short) as a higher end option, and IBM’s own GXT150P. The S3 was the entry level GPU and the Weitek was a higher-end and faster GPU. The GXT150P is beyond the scope of this because it is unsupported on the other PReP OSes, only AIX. The other two video cards are essentially unmodified Diamond PC cards with the BIOS chips missing.
The Sandalfoot machines are perhaps the most important PReP machines due to their role in PReP OS development. Both OS/2 Beta 1 and Windows NT 3.5 were written for this machine in particular as it was one of the first PowerPC machines to support PReP and feature PCI/ISA slots, unlike the NuBus Macs released a few months earlier or the first PPC box: the MCA based RS/6000 Model 250. They also often shipped with the well documented and emulated S3 Vision 864 video card, a common GPU family in PCs of the time to the point where it was even included on some motherboards and emulated in too many PC emulators/virtualization programs to count (notably 86box/PCem). In fact it’s successor (the 7248) featured one soldered to the motherboard.
Windows NT 3.51 was dubbed the Power PC release, because it was designed around the Power PC version of NT, which was originally supposed to ship in version 3.5. But IBM constantly delayed the Power PC chips, necessitating a separate NT release. “NT 3.51 was a very unrewarding release,” Thompson said, contrasting it with Daytona. “After Daytona was completed, we basically sat around for 9 months fixing bugs while we waited for IBM to finish the Power PC hardware. But because of this, NT 3.51 was a solid release, and our customers loved it.” NT 3.51 eventually shipped in May 1995.
I think a more accurate thing to write is that there simply weren’t many PReP boxes out in late 1994. Windows NT 3.51 supported the Motorola PowerStack series, the IBM 6050/6070 (and maybe the 7248, which came out in July 1995), and rare FirePower machines. Windows NT only features HALs for the 6015 (Sandalfoot/Power 440/RS6K 40P), 6020 (Thinkpad 800), and the 6030 (a rare IBM machine that likely was only sent to a few developers). By 1995, there were more PReP machines on the market and this made the NT 3.51 release logical. NT4 even supported a few servers, mainly the RS6K E20, E30, and F30.
Windows NT 3.5 was most likely a limited release for testing purposes on the Sandalfoot machine as it’s HCL file declares it as “Build 807” with a date of October 18, 1994. The date seems to be around a week or two before the first 40p machines at least shipped. Some more files were modified later on and the folders were created on November 9th, 1994. Hardware support is very barren, and the readme file even has a section dedicated to quirks of the 40p along with a list of supported software for the x86 emulator. This might have been considered a beta as well, as an announcement letter for the Thinkpad 800 (6020) explicitly mentions Windows NT and that this version might be a beta for developers. It also talks about a Windows SDK for it and a Motorola compiler used to build 3.5 software.
However the real problem for me has to do with getting a video card. Windows NT 3.5 for PowerPC does not support the Weitek P9100 GPU that came with many RS/6000 branded machines, and neither does OS/2 for PowerPC. It only supports the S3 Vision 864 and 928 video cards. It’s listed in the setup options, but choosing it causes a txtsetup.sif error. I’m going to assume that the development units came with the S3 video card instead. My box contained a Weitek card which works for AIX, Solaris, and Windows NT 3.51/4. I bought a card from eBay to use with NT 3.5 and the OS/2 port.
The readme also features an ominous warning with the S3 video cards, that only revision B3 is supported and that 928 cards need 2MB of VRAM for anything above 256 colors. My revision of the card I ordered was B4, so I took the risk of seeing if it worked with my system. I also removed the ROM chip as the system initializes the video card itself and that having a ROM chip can cause the system to not complete the self-test or display video. As the IBM Weitek card lacks a BIOS, I did this.
Despite the scratches on the card from possibly coming out of an ewaste pile, the card worked fine in both a PC I inserted it in for testing purposes and the IBM system. I now had a 40p with a GPU much more well supported among non-AIX or Windows NT operating systems.
Anyhow, let’s talk about the install process in closer detail here. Windows NT for PowerPC installs in a similar manner to Solaris for PowerPC on the IBM PReP machines. First the floppy disk boots ARC, then when you choose to install it the machine copies the ARC bootloader/firmware to the hard disk so it can load it from there at each boot. The floppy disk can also be used to load ARC if the loader is damaged on the hard disk. Keep in mind, on IBM machines ARC is not stored in the ROM unlike on many other ARC capable machines so this has to be done. The Firepower machines do something very similar by using an Open Firmware shim, and unsuccessful attempts at emulating PPC NT have exploited VENEER.EXE to attempt booting instead of using the IBM firmware. It fails because they’re not emulating the hardware, just trying to find a quick way to just boot NT.
Once this is done, the installer loads up and installs just like every other NT install. It checks the HAL by reading the machine ID, what video hardware the machine has, and whatnot to prepare the installer. You need a IBM 6015, 6020, or 6030 according to the HALs it has and only the S3 video cards are on the HCL.
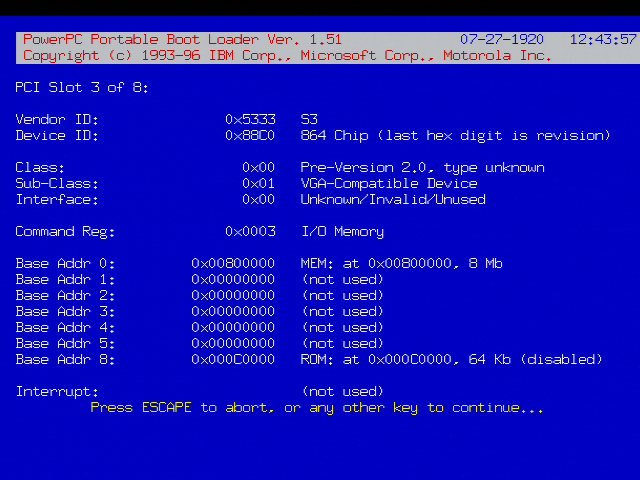
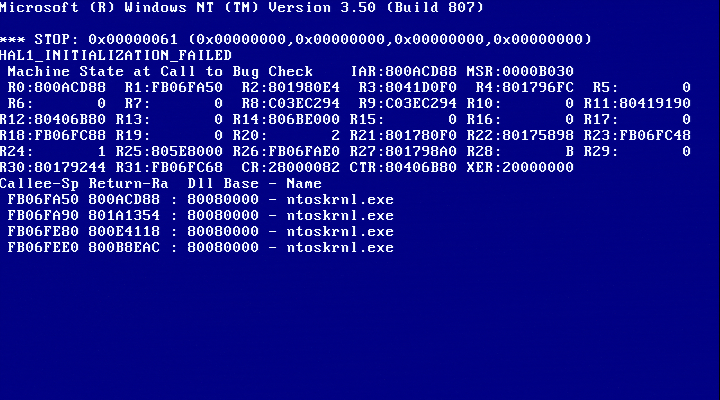
Or that’s what should happen. I first tried using ARC 1.51 as it worked for 3.51 and was greeted with a HAL error BSOD:
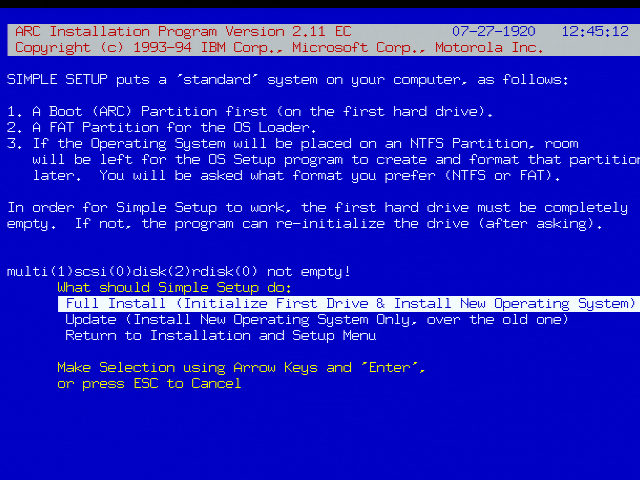
I first attempted to use older ARC boot floppies and I got somewhere, the BSOD changed to the classic 07b, and then I got nothing else. Using ARC 1.48 and 1.49 gave me this, I got some i/o error with ARC 1.46 (the first 3.51 ARC floppy), and any previous ARC floppy is most likely undumped. I’m assuming either the error is due to an ARC mismatch, a weird firmware mismatch/hardware revision mismatch, or some incorrect SCSI ID Solaris style. There might very well be some weird forgotten trick to making it work (maybe a Windows expert could dig through the files and find some weirdness), but I’m going to move onto another obscure PPC rarity:
OS/2 PowerPC Boot Attempts: Beta 1 and the Final
Recently the OS/2 Museum site dumped Beta 1 for PowerPC. It’s an earlier version of OS/2 for PowerPC that insists on a Sandalfoot machine with an S3 GPU. Unlike the other OS/2 PowerPC disc, it features a verbose boot featuring the kernel it uses. If you want to really see OS/2 for PPC working, try it on a 7248 or read this post about it.
This failed to boot, throwing up an error about mounting the disk or something. I did record it doing something at least however, an improvement over the Weitek which just does nothing at the PowerPC screen. I tried several things including removing the external SCSI CD drive and that didn’t fix much. It also declares 88c05333 an unknown PCI device.
So I decided to try the “final” build. The final build requires a 6050/70, and some people did get it working on the PPC Thinkpads. I decided to see what it’d do on my machine. Unsurprisingly it did absolutely nothing but give me a blank white screen and sometimes a 00016000 error (for a trashed CMOS). If anything the 6015 loves to trash it’s CMOS contents for absolutely no reason, especially when OS/2 is involved.
Anyhow this was very anti-climatic, as the OSes I threw at it found reasons to not work on it whatsoever. I weeded out the GPU being at fault by testing Windows NT 4.0 and finding out that it works just fine with the GPU, however I seem to have fewer resolutions available than what the Weitek card allows. It did change the boot screen font, making me wonder if the red boot screen is a GPU driver quirk.
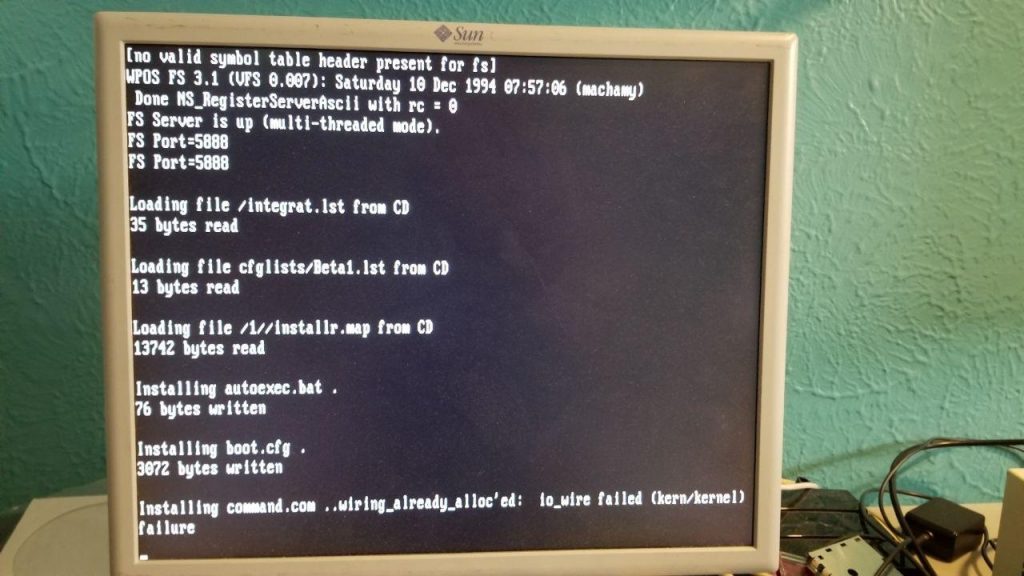
However changing the device IDs with OS/2 PowerPC Beta 1 got me somewhere, as I now got a screen about the HDD failing to write. I formatted the HDD to FAT using the ARC diskette, then I nuked all the partitions, but not much else changed. I’m not sure what the error means, but it was a letdown.
Unless these OSes require some long lost firmware, I’m wondering if there’s else that’s causing issues with installation. Either way, it was a letdown. Nothing I tried worked and I spent hours messing with everything from SCSI IDs to using different drives.
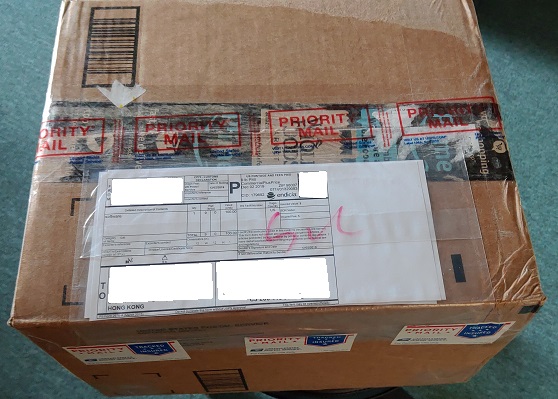
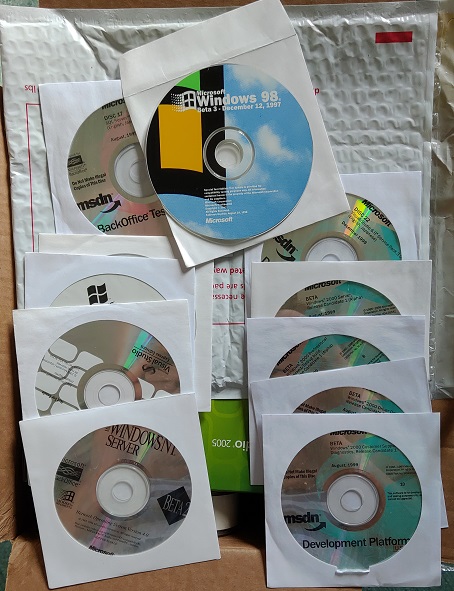
Iv’e been in Japan the last 10 days, but upon my return to Hong Kong this little 9kg box was eagerly awaiting me!
I know that ‘unboxing’ donation videos are quite popular, but I thought I’d do the blog equivalent. I don’t want to ‘out’ the sender, although I did email them back a big THANKS, although I didn’t get a reply. Maybe it’s an email thing but I wanted to tell them THANKS again!
To start is a bunch of loose CD’s including old SDK’s, and the infamous Windows 2000 RC1 set including Dec Alpha builds of workstation & server. Also in there is Beta 3 of Windows 98! Cool!
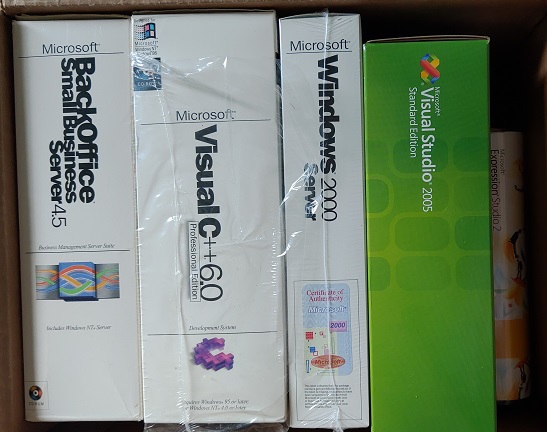
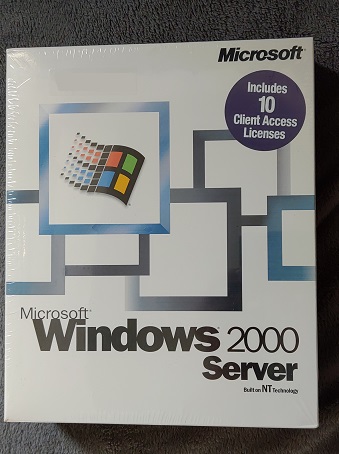
In the box was also Back Office 45, Visual C++ 6.0, a sealed copy of Windows 2000 Server, Visual Studio 2005 Standard and Expression Studio 2.
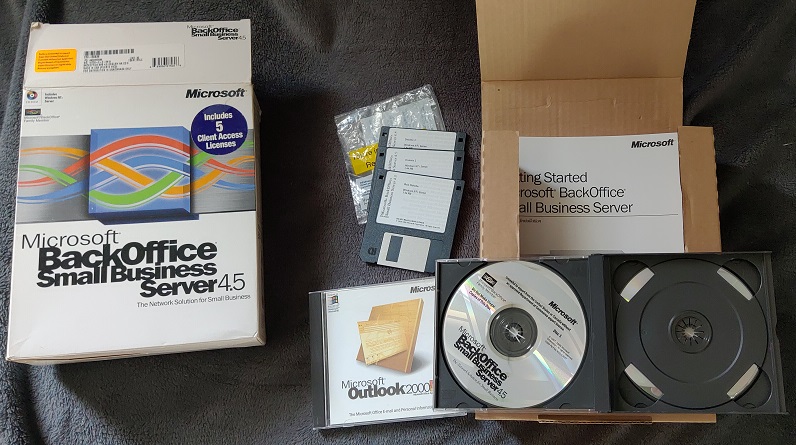
I’ve always loved this, it’s NT 4.0 and all the good bits of 1997, like Exchange 5.5 & IIS 4.0! Also in there is a copy of Outlook 2000, so this is a much later build/packaging of Back Office 4.5 . I’ve always wondered how many if any Back Office purchasers ever used SNA Server. I’ve seen it something exclusively used in real enterprises that have site licenses anyways.
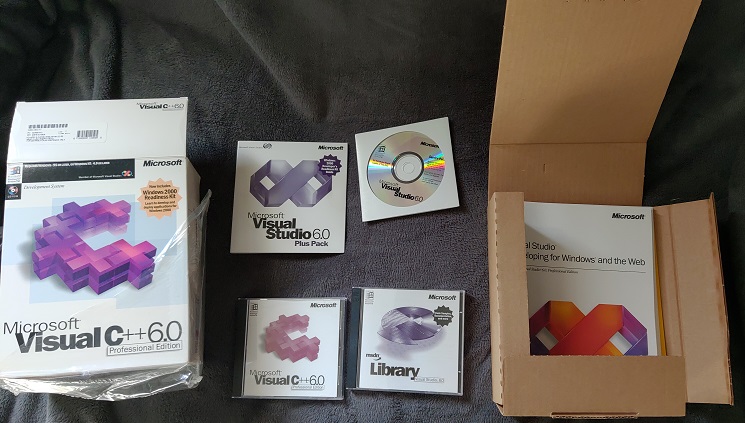
Visual C 6.0 is the last x86 compiler that was ‘pure’ before the .NET invasion. Although you can with a bit of work get 2003 and onward to build for strict Win32, but who wants to work? This is getting increasingly hard to find, and getting far more expensive. But it’s great to have this in retail in the box again! (I used to have this and Visual Studio 97/6.0).
It almost feels wrong to break the seal on this, although I’ll probably do an active directory deployment eventually now that I have machines running in the USA, Hong Kong, and Japan.
I’m super thankful for all of this, and if anyone else wants to send me their ‘old / obsolete junk’ drop me a line!
One of my favorite things about VMware is that it can run itself. This allows me to test & stage new setups, test API stuff on my desktop, allowing me to build a “micro data center” that I don’t need to ask & beg for permission to take down, or if I do something stupid, I’m just a quick revert away from putting it back, and more importantly not making other people mad.
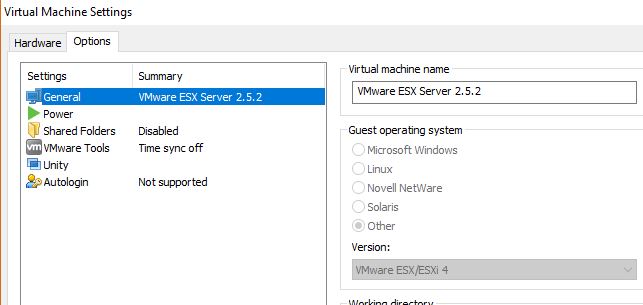
This also let’s me step back in time, in this case to the dark & ancient world of 2005, where I’d first deployed VMware ESX 2.5.2 along with vCenter 1.3.1 . I figured that I could use my ancient Dell P490, as I’d been using it as a desktop at home for casual use, but this seemed like a good thing to stress the system on. Also handy to have is the installation guide, which VMware still has online.
I installed Windows 10 Pro, and VMware Player 12.5.9, The box has a single physical processor that is dual core, 8GB of RAM and a 1TB disk. Not exactly a high end machine, but it’ll suffice.
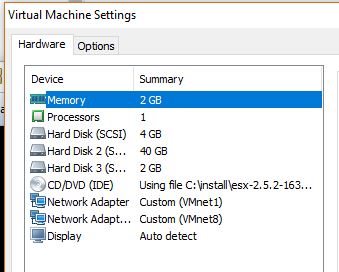
The first thing to do was install ESX 2.5.2, I’d set it up as a Linux VM, with 1 CPU, 2GB of RAM, and 3 disks, one for the OS, another for SWAP, and a Data store / Data disk.
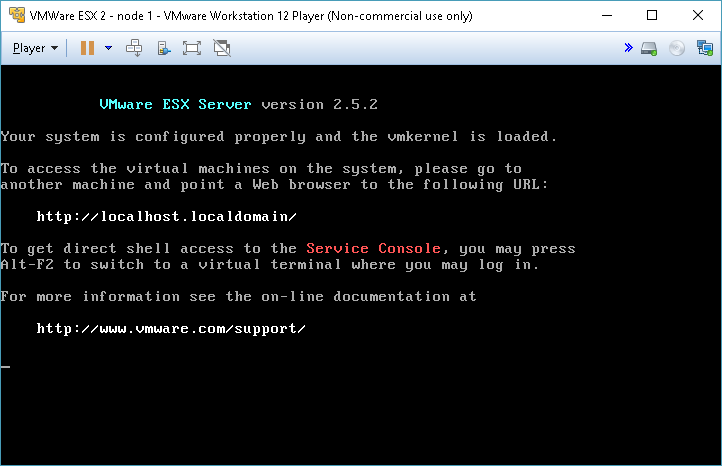
After the nice GUI setup is completed we are dumped to a console on reboot. ESX is meant to be managed remotely.
Once the OS installed, edit the VMX file, and make the following changes, to allow VMware to setup the passthrough capabilities so the VM can run other VMs.
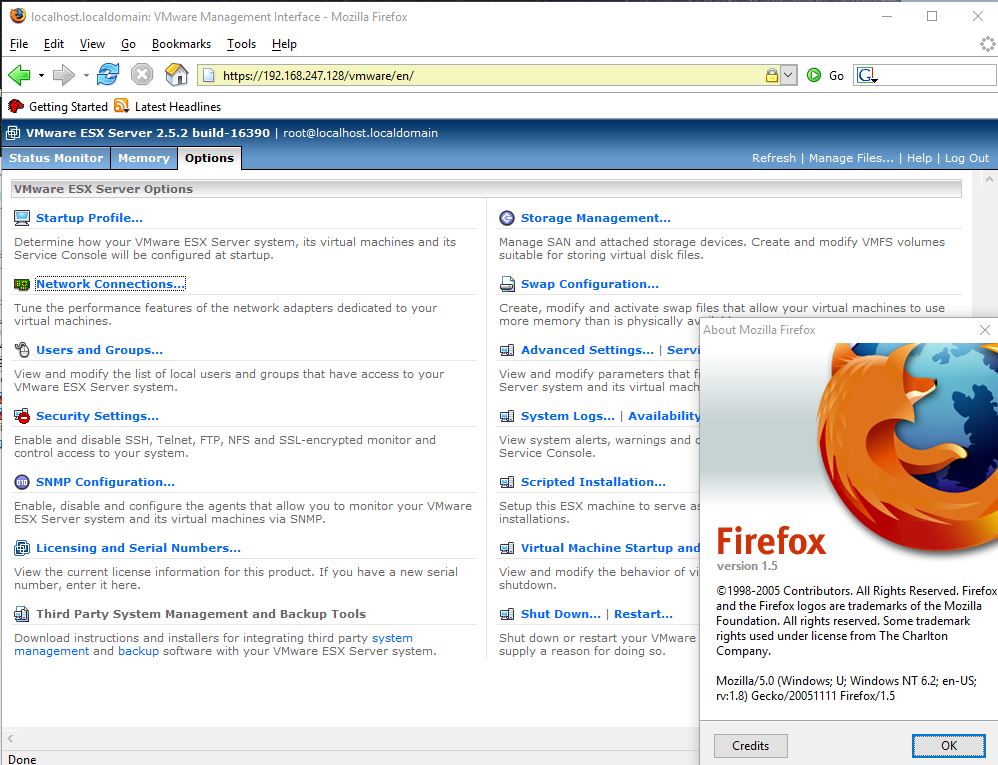
Now the Version will report that it’s VMware ESX. The other thing you’ll find out quickly is that you need a browser to manage the server (funny how things went back to this direction, later versions relied entirely on the ‘fat’ .NET client), and I found that FireFox 1.5 works the best.
The .NET client requires .NET 1.1 to operate correctly. It will not install on Windows 10 by default, as the .NET 3.5 (which includes .NET 2.0 runtime) is not acceptable, it has to be the 1.1 runtime, along with the J# runtime, which it’ll install if needed. I went through the installation steps in the aptly name ‘Installing .NET 1.1 on Windows 10‘. post.
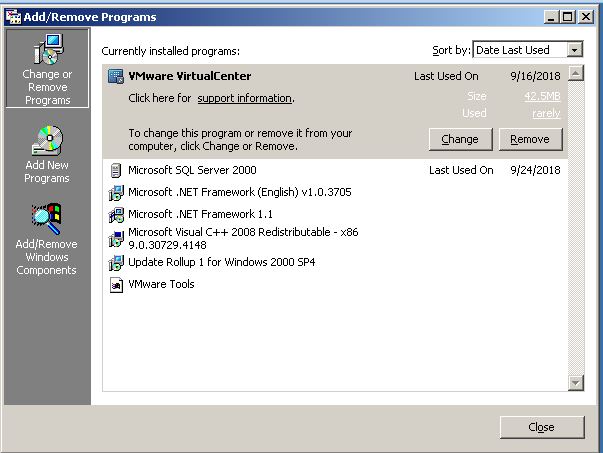
Of course you’ll need a place to run the vCenter server, I just setup a Windows 2000 server, installed SQL 2000, .NET v1.0 & v1.1 and then the Virtual Center component. VirtualCenter relies on a database backend, and I thought it’d be interesting to look at the tables through MSSQL, although Oracle, Access and some generic ODBC are also options for this ancient version of VirtualCenter.
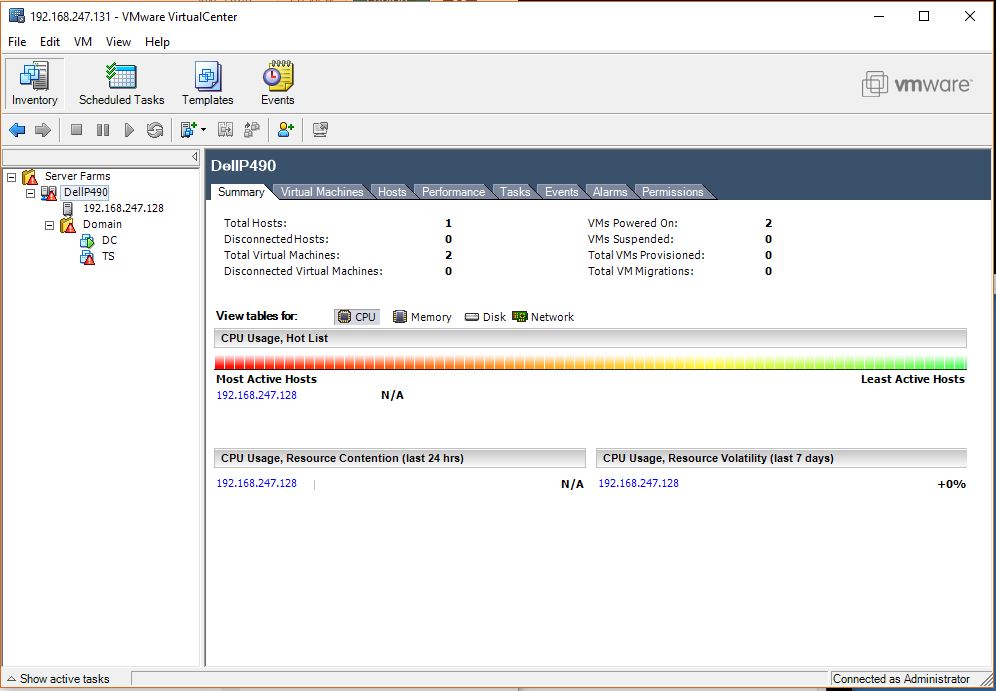
For those who don’t know, VirtualCenter is the application that lets you build a ‘virtual datacenter’ join multiple ESX servers together, and more importantly orchestrate them together into a cluster, allowing you to vMotion VMs between servers, which of course is the ‘killer feature’ of VMware ESX. If you don’t have vCenter / VirtualCenter then you are missing out on so much of the products capabilities, which is sadly hidden away.
I setup a tiny Windows NT 4.0 domain, with a domain controller, and a terminal server. My host machine is a bit weak to setup more ESX hosts, as there just isn’t enough punch in the box. Although any modern machine will probably exhaust RAM before CPU running a mid 90’s workload.
Back in the day, I had moved our entire DC onto 4 ‘killer’ machines with fiber channel storage and had consolidated the entire DC to a single cabinet. It was incredible that we were initially able to almost meet existing performance. Of course the killer feature again is vMotion so a year later, I only needed 4 new servers which was an easy budget ask, and in the middle of the day I vmotioned from the old servers into the new servers, and things across the board were now faster Finally the bean counters saw the light that we didn’t have to buy faster gear for a single group, or that we no longer had the issues where we had ‘important enough’ to be in the data center but with no hardware maintenance, or proper backups. Now everyone is on equal footing and all the boats raised with the tide so to speak.
In this quick re-visitation it would be fun to setup shared storage, multiple hosts and vMotion, but back in the days of ESX 2.5 there was no support for having VMFS over NFS or iSCSI. As much as I’d love to use the Dr Dobbs iSCSI Target Emulator, it just sadly isn’t an option. The ability to move beyond Fiber Channel shared storage (or other supported dedicated host bus adapters) was added in version 3, greatly expanding the capabilities of ESX.
Obviously the career mistake here was to be a happy Admin, and concentrate on other things as now the infrastructure ‘just worked’ and it freed up an extraordinary amount of time. The smarter people were either taking these types of experiences and turning it into a consultation gig (low effort) , or taking lessons learned in VMware space, and focusing them onto QEMU/KVM and building libre infrastructure (high effort).
Such is life, be careful riding those trendy waves, eventually you have to either lead, follow or just get out of the way.
It’s been a few years since Tenox had mentioned OpenNT 4.5, and in that time the project pages, repositories and well just about everything has vanished. It seems that the hardest thing to do with OpenNT had become finding it.
Then I found this over on vetusware, and with my curiosity piqued, I thought I’d check it out.
As mentioned the first thing to do is combine the parts, and create the single 7zip file, and then extract that.
Extracting that will give a simple ISO file, weighing in at 1.7GB!
While not obvious at first, there is a readme in the ISO that provides instructions on how to compile it. Basically it boils down to a few main points:
xcopy the CD onto a ‘W’ drive, or subst any other drive to ‘W’ as apparently the build process requires it to be on W. Did I mention that the CD needs to be copied onto the W drive?
Run the ‘setup.cmd’ file to configure the environment and get the build process ready
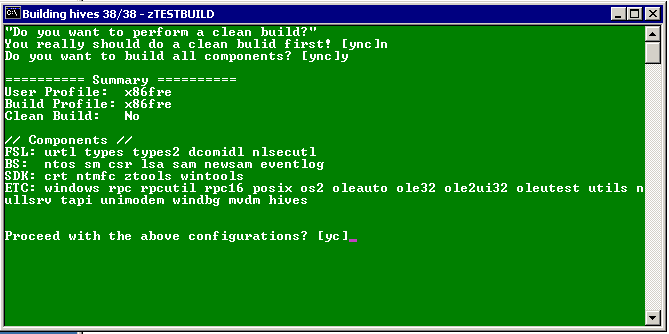
run zTESTBUILD and do a clean build. It will run and eventually fail.
run zTESTBUILD again, but do not do the clean build, and it should finish
run \cdimg\genall to create the ISO image
So with those points basically figured out after the fact, let’s go!
The first thing to do is either create a VM to compile this in, or just xcopy and go. The big requirement though is that it must be a 32bit version of Windows, as part of the build process requires the ability to use NTVDM. For simplicity sake, I chose Windows 2000 server, so I could allocate 2GB of RAM, and 4 CPU cores. During the build it doesn’t use that much memory, cores are more so important during various phases of the build that can seemingly use any and all cores, while various other parts only run on a single core.
OpenNT disk space after a build.
I chose to use a separate ‘C’ drive, and ‘W’ drive for the 2000 VM. With no idea how much space to give it, I setup a 32GB W drive, which after the build takes up just under 4GB of space.
With the VM installed, and the W drive formatted, and the contents of the CD copied over, it’s time to start the build.
Phase 1
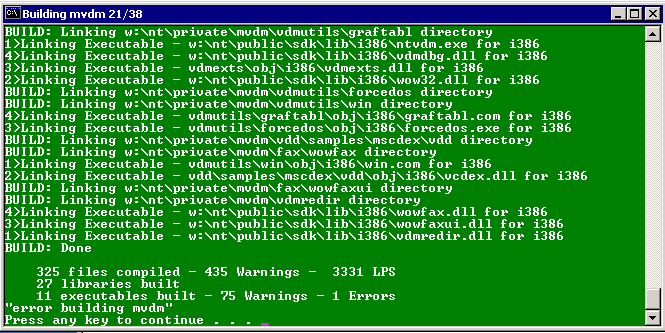
So basically you just answer ‘Y’ to zTESTBUILD.cmd and it’ll do it’s thing. For me this took about 42 minutes for this to run until it failed, as expected.
Failure building MVDM
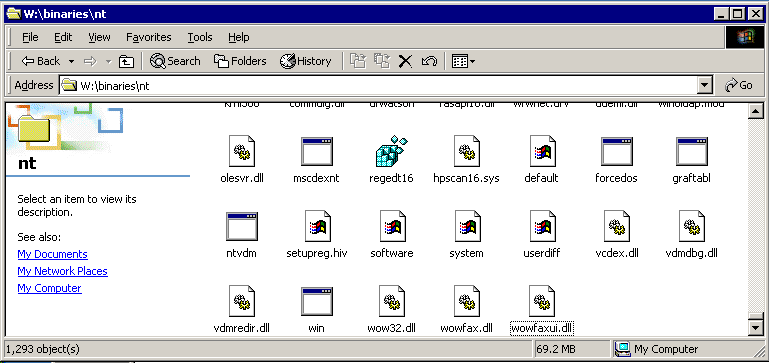
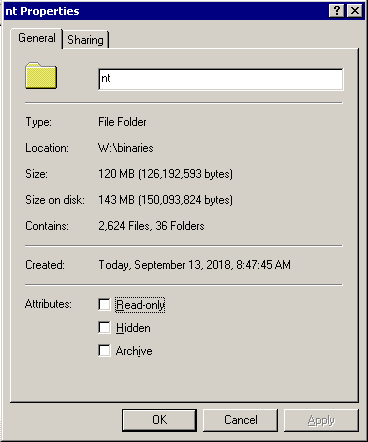
Looking at the \binaries\nt directory there was now 1,274 files currently built. Naturally with the failure this is not a complete build.
Starting phase 2
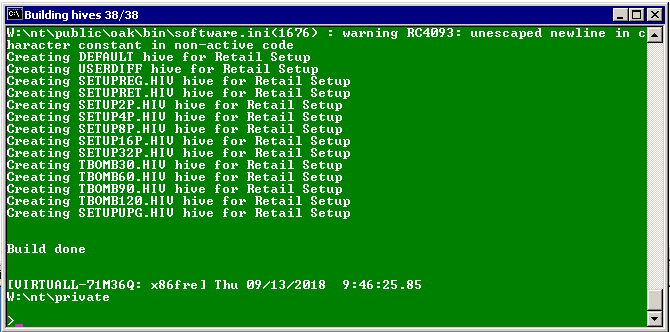
After this failure you then re-run zTESTBUILD.cmd but this time answer ‘No’ to the clean build.
This step took about 15 minutes to complete.
The \binaries\nt directory now has 1293 files.
Checking the binaries\nt directory there is now 1,293 files and looking at the entire directory there is 2,624 files taking up about 120MB of space.
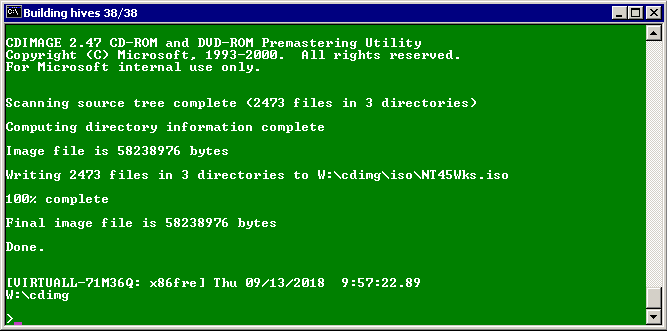
With the OS compiled, all that remains is to create an install CD and boot it up. running \cdimg\genall.cmd will create the ISO image.
Creating the ISO with CDIMAGE 2.47
This will compress almost all the files, and took another 15 minutes to create the CD. After this is all done it’s just a matter of setting up a VM to run the NT45Wks.iso file.
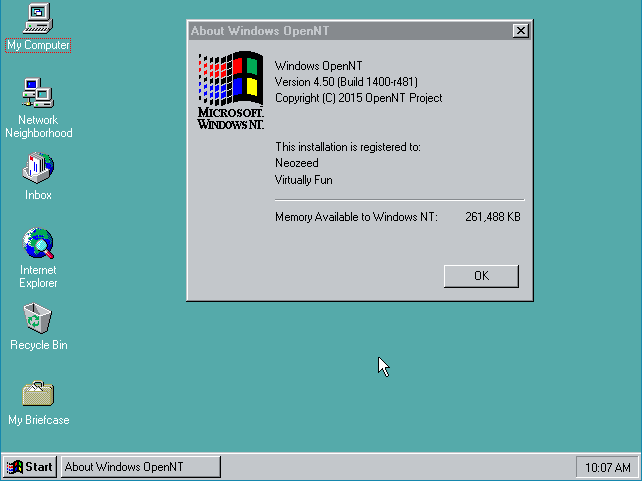
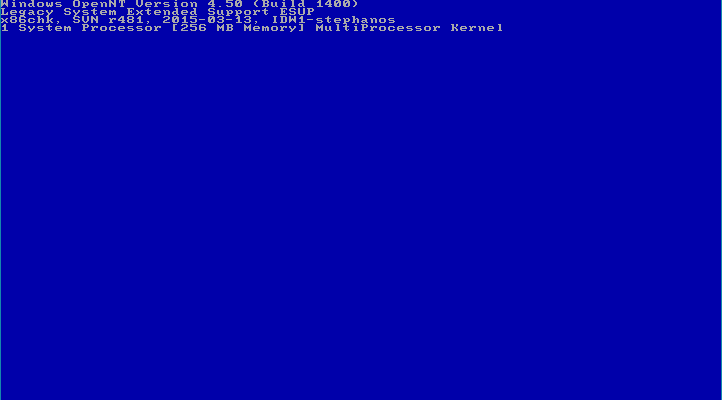
Bluescreen bootup of OpenNT 4.5
The first thing you notice is the extra banners on OpenNT 4.5, when compared to a retail copy of NT 4.0.
OpenNT Project
And of course the different branding during setup. One of the nice things about OpenNT is that it can format filesystems directly as NTFS, instead of the old way of first creating a FAT partition, and converting it to NTFS. This ought to bypass all the limitations of disk/partition sizes for the older NT.
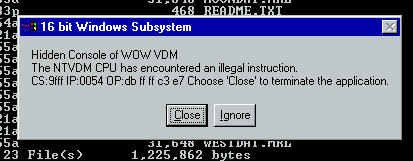
WOW Crash
Running OpenNT 4.5 on VMWare seemed to run the Win32 stuff okay, although Win16/WOW stuff immediately crashed, and MS-DOS was incredibly slow with screen redraw issues. I know that NT 4.0 builds prior to SP 6 have issues with many newer emulation/hypervisors even when CPU levels are set to regular Pentium.
MS-DOS DPMI stuff like DooM are incredibly slow, and seemingly lock up when launching.
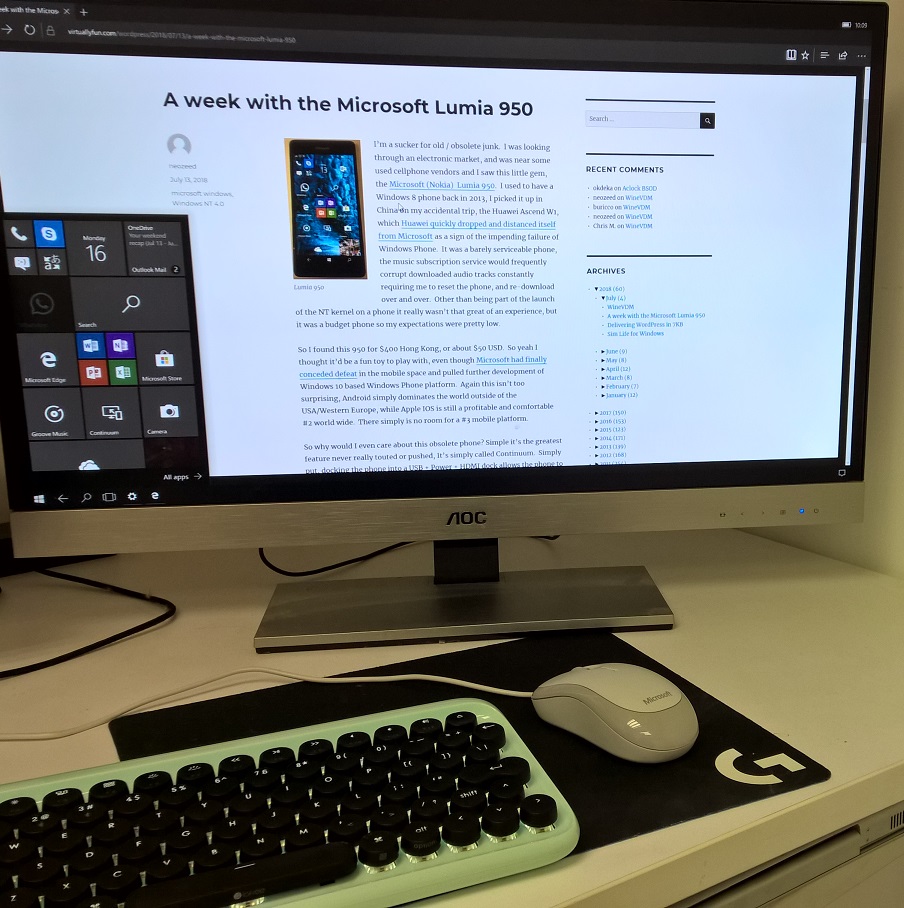
I’m a sucker for old / obsolete junk. I was looking through an electronic market and was near some used cellphone vendors and I saw this little gem, the Microsoft (Nokia) Lumia 950. I used to have a Windows 8 phone back in 2013, I picked it up in China on my accidental trip, the Huawei Ascend W1, which Huawei quickly dropped and distanced itself from Microsoft as a sign of the impending failure of Windows Phone. It was a barely serviceable phone, the music subscription service would frequently corrupt downloaded audio tracks constantly requiring me to reset the phone, and re-download over and over. Other than being part of the launch of the NT kernel on a phone it really wasn’t that great of an experience, but it was a budget phone, so my expectations were pretty low.
So I found this 950 for $400 Hong Kong, or about $50 USD. So yeah I thought it’d be a fun toy to play with, even though Microsoft had finally conceded defeat in the mobile space and pulled further development of Windows 10 based Windows Phone platform. Again, this isn’t too surprising, Android simply dominates the world outside of the USA/Western Europe, while Apple IOS is still a profitable and comfortable #2 worldwide. There simply is no room for a #3 mobile platform.
So why would I even care about this obsolete phone? Simple it’s the greatest feature never really touted or pushed, It’s simply called Continuum. Simply put, docking the phone into a USB + Power + HDMI dock allows the phone to transform into a (limited) desktop.
Lumia 950 with Continuum
I know for most people it’d be “just get a real computer” but I have to say that this is one of those opportunities blown things in the fun world of corporate IT. You see many of us ‘desktop’ users have been reduced to glorified mainframe users, where our desktops are actually just access ports into products like VMWare VDI, where we no longer have VPN access in this brave new world, and on our local machines all we have if Microsoft Office, all 3rd party installations are blocked by GPOs. And this is where a corporate phone like the HP x3, Microsoft 950/950xl simply shines, as now we can dock and have that VDI terminal, we still can run office from the phone, and better we can unplug and take the phone with us on the go. I have no doubt that this was instead targeted to executive users, numbering in the tens instead of the entire back office in the tens of thousands.
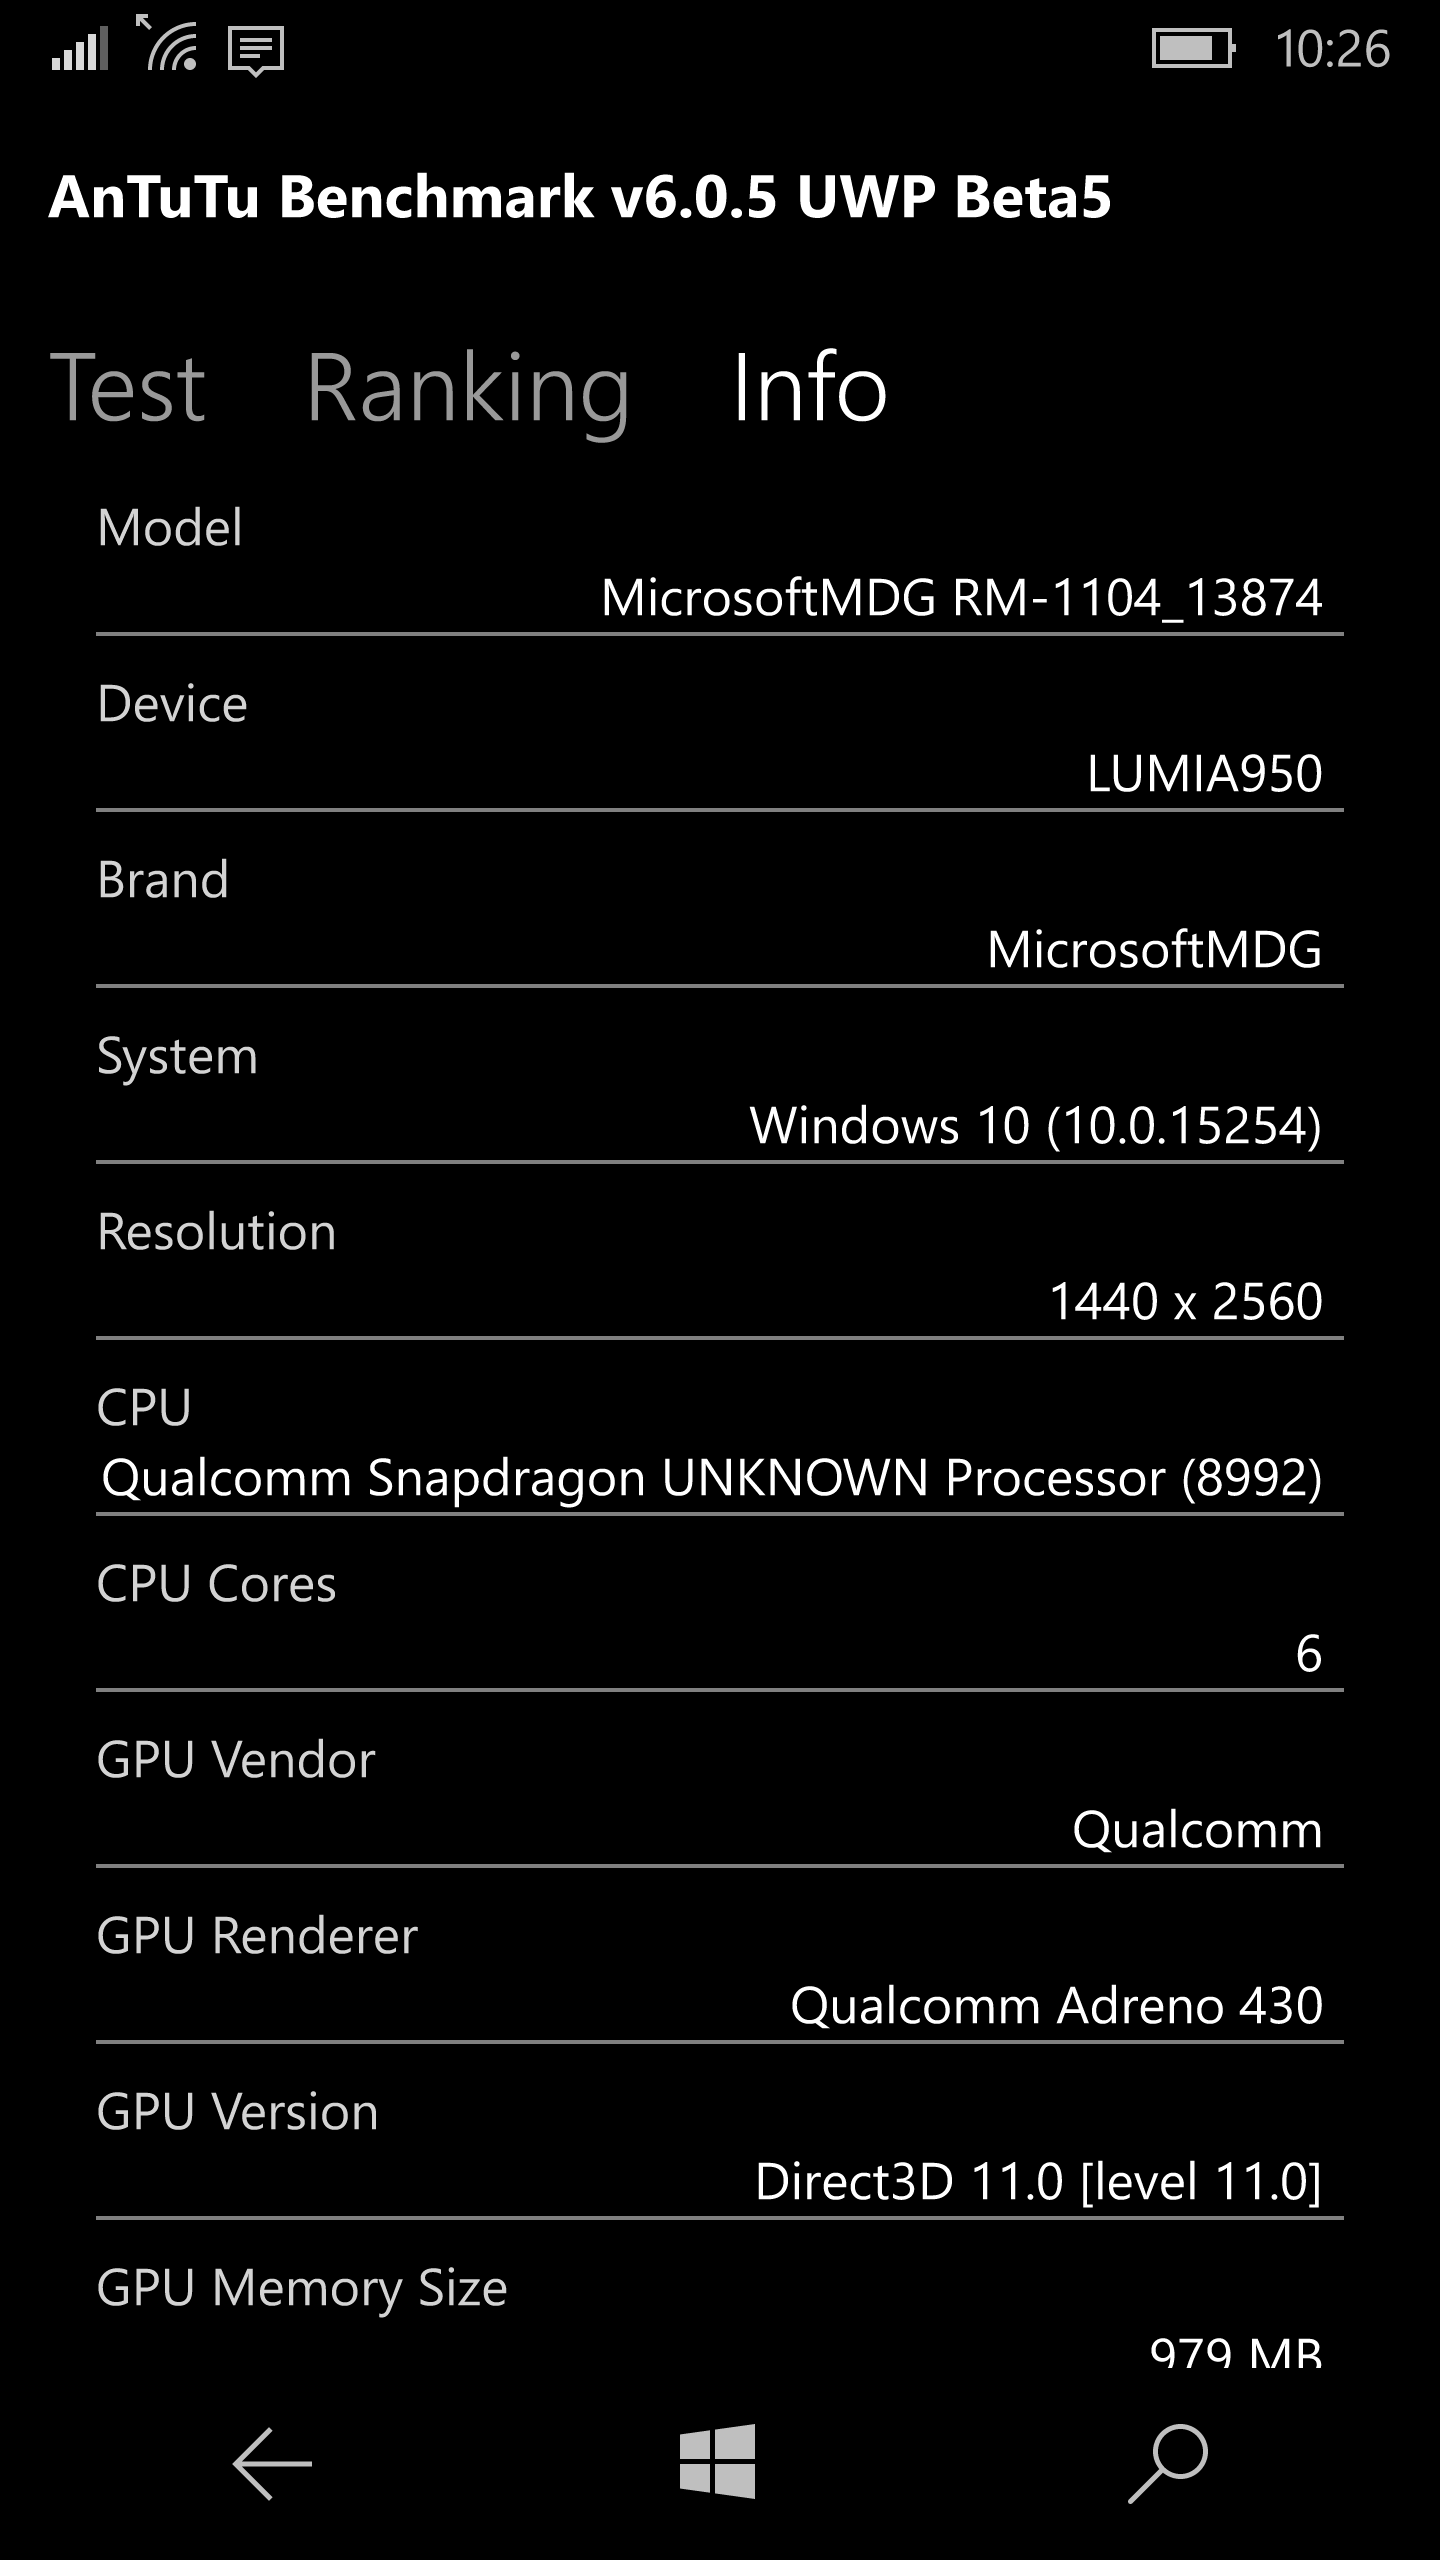
Well ok that’s all cool, but how does it function as a phone? I’ve taken call on it, and yeah it was OK. Looking at the hardware specs from AnTuTu gives you some idea of the class of hardware for this vintage October 2015 handset.
Lumia 950 Specs
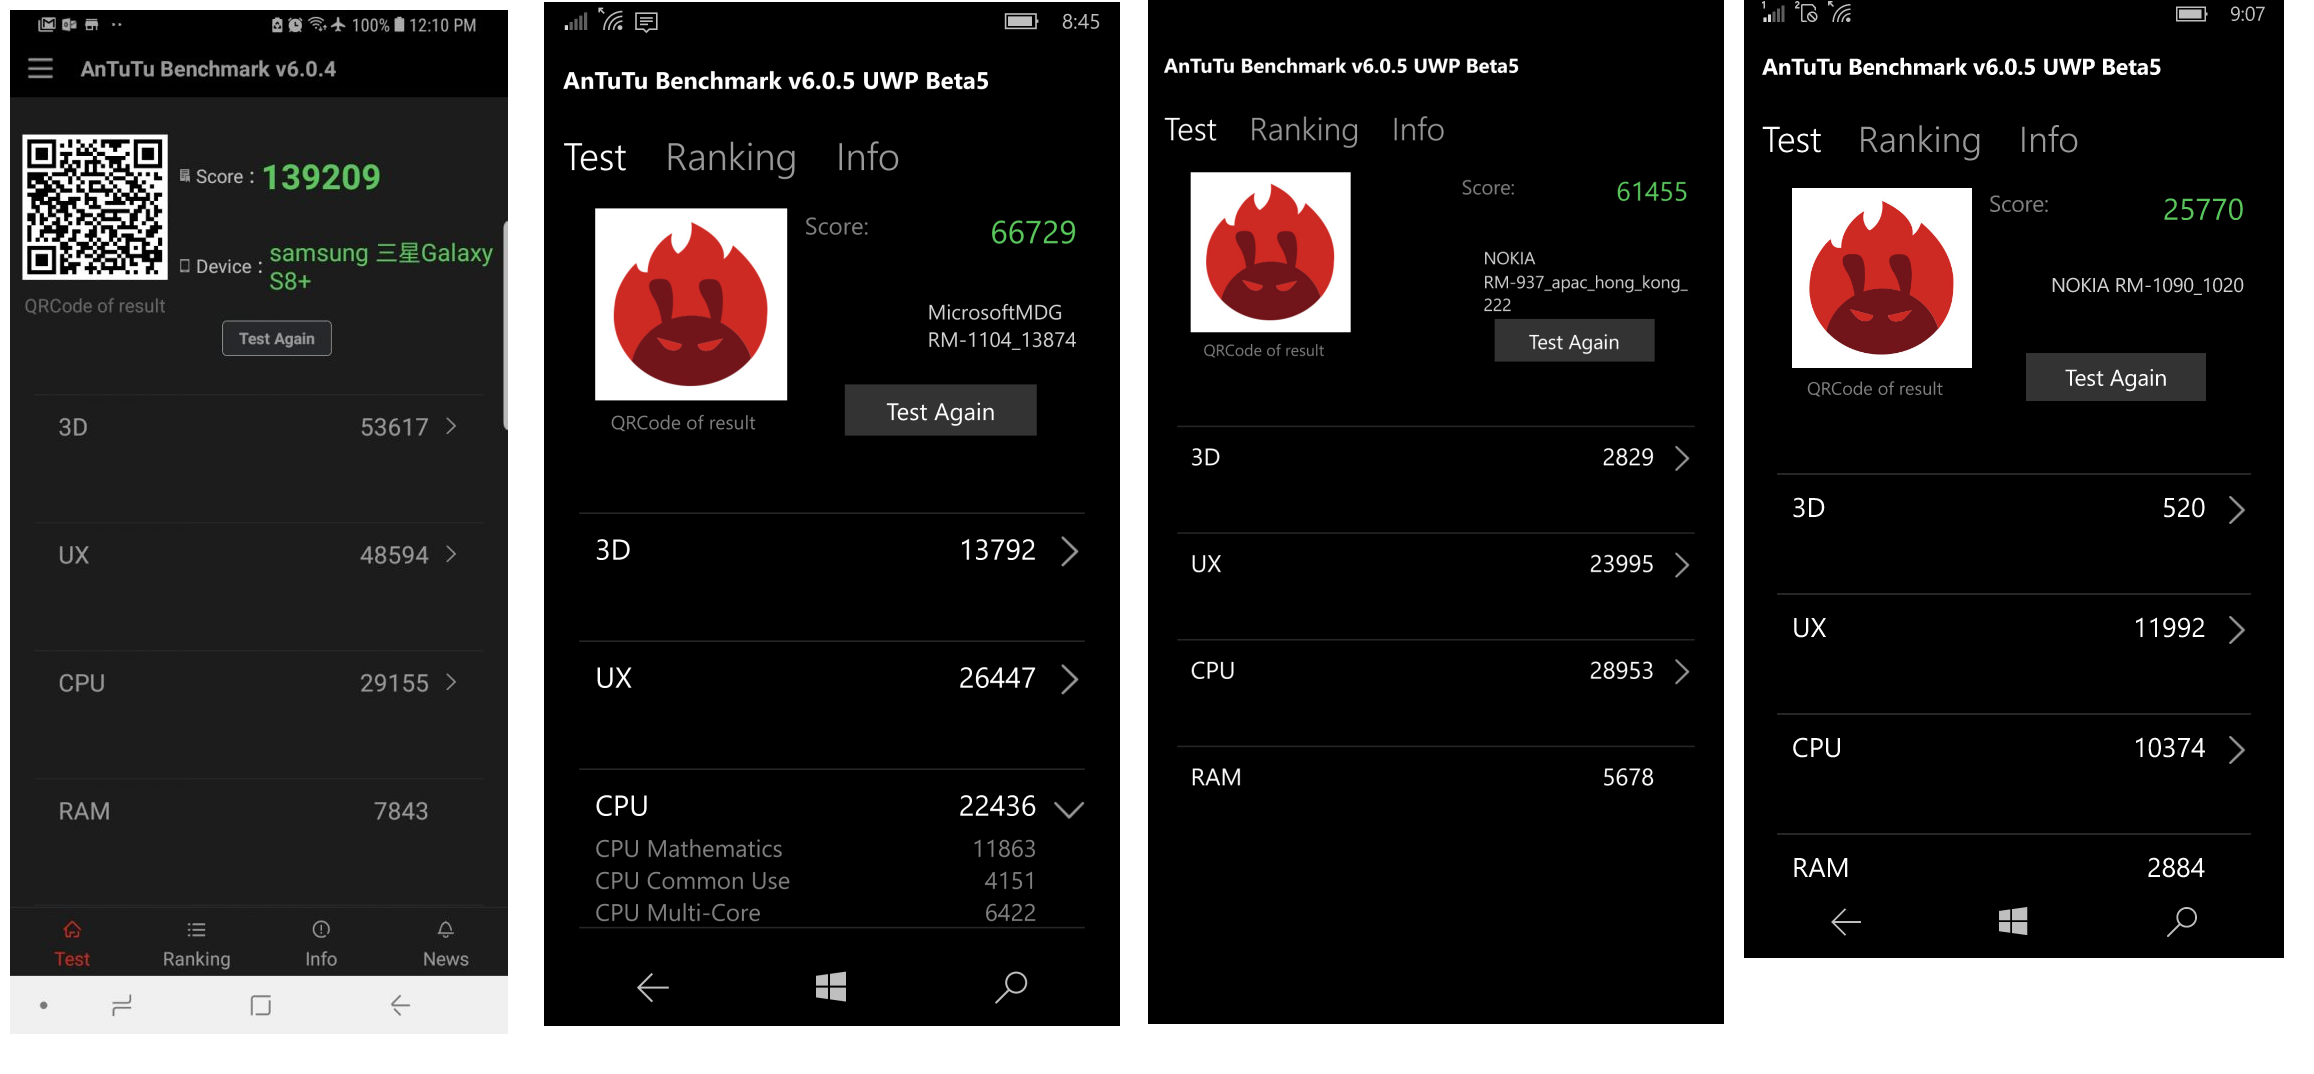
And how does it hold up? Well as luck has it I managed to scrounge up some other models, and put the numbers together:
From left to right, the Samsung Galaxy S8+, The Microsoft Lumia 950, The Nokia Lumia 1520, and a Microsoft Lumia 535.
Three years is a LONG time in the cellphone market, and comparing a high-end model to a mid-range at best is just not fair, although if anything it really goes to show how 3D performance has picked up. One fun thing is that since the AnTuTu benchmark is a Windows Universal application I can run it on my vintage 2010 MacPro and see how it compares!
And in this case a circa 2010 Xeon with a Nvidia 1030 crushes cellphones. Even though it weighs significantly more.
And then there is the apps. And the complete lack of. Since I go between Hong Kong & China the lack of WeChat makes Windows Phone 100% useless and reduces me to a feature phone with a nice camera. Obviously Microsoft Office works nice on here, but it also runs on Android & IOS just as well. I used it for work, and it was okay for me, but the lack of anything fun besides Minecraft was well.. sad.
There was an Uber application, however it’s been terminated, and instead redirects you to use a web page instead. I was lucky in that I already knew where I was, and where I wanted to go, but the web interface to Uber is poor at best. Looking around the map, or trying to pick locations on the web interface is just an all-around terrible experience.
Naturally there are NO Google applications for the Windows Phone. So, you can only view YouTube via Edge, which actually works surprisingly well. Even on a lowly 535 that really was only hampered by the tiny screen. Speaking of Google the Mail/Outlook program on the phone reads Gmail just fine.
Another must have application for me is Google translate, which Microsoft certainly had no answer back in 2013, however there is now Microsoft Translator however it does NOT currently support OCR of Asian languages. Which is a really big disappointment as the quality of text translations felt better with the Microsoft app. That said, it is now available for Android and IOS, which goes to show that Microsoft really has no choice but to fully commit to abandoning their own platform.
There is one thing to be said about having next to no applications which is it is very free of distractions and gave me more moments to looking around at the world, instead of staring into a tiny screen. For those who care, here are some pictures from the 950.
It’s always interesting when a major player falters and misses out on a new platform setting themselves up for obsolescence. And doubling down by not chasing the business market harder instead being happy to fade into irrelevance. Microsoft has done it’s best to take the success of crushing most midrange to small range UNIX with Windows NT, but the lawsuits against Linux have in the long term set them up to fail on their own island. Just as they have lost the mindset of generations of developers and even with their purchase of GitHub in an attempt to stay relevant will be any indication if they really are going to long term exit the desktop/server market and become a cloud services company first, and a language developer second.
Yes, this WinFile. So Microsoft apparently went through their Windows NT 4.0 source code tree from 2007, and decided to pull this tool out, and send it out into the world. It’s available in a ‘original’ version, and a ‘v10’ version which includes the following enhancements:
OLE drag/drop support
control characters (e.g., ctrl+C) map to current short cut (e.g., ctrl+c -> copy) instead of changing drives
cut (ctrl+X) followed by paste (ctrl+V) translates into a file move as one would expect
left and right arrows in the tree view expand and collapse folders like in the Explorer
added context menus in both panes
improved the means by which icons are displayed for files
F12 runs notepad or notepad++ on the selected file
moved the ini file location to %AppData%\Roaming\Microsoft\WinFile
File.Search can include a date which limits the files returned to those after the date provided; the output is also sorted by the date instead of by the name
File.Search includes an option as to whether to include sub-directories
ctrl+K starts a command shell (ConEmu if installed) in the current directory; shfit+ctrl+K starts an elevated command shell (cmd.exe only)
File.Goto (ctrl+G) enables one to type a few words of a path and get a list of directories; selecting one changes to that directory. Only drive c: is indexed.
UI shows reparse points (e.g., Junction points) as such
added simple forward / back navigation (probably needs to be improved)
View command has a new option to sort by date forward (oldest on top); normal date sorting is newest on top
Which is quite the list of things to add to the old WinFile.


