
This is a guest post by Seal331
Since I’ve been dealing with XHomer a lot lately in order to get the two dumped VENIX/PRO versions to work, I noticed that the XHomer documentation mentions a thing called “maintenance mode” and the DEC Pro port of 2.9BSD, so I was interested.
After doing a bit of searching around I found some install notes on www.frijid.net from real hardware, so I decided to adapt these notes for XHomer and install it. TL;DR – I did it, here I’m explaining all this stuff.
Step 1 – Acquiring XHomer
XHomer is a DEC Pro 350 emulator that can run P/OS, Venix, 2.9BSD and possibly RT-11, but I didn’t get to installing the last one yet. There is a statically linked binary but, since I’m a Gentoo Linux person (but I didn’t use Gentoo for this particular install)and prefer compiling everything I can, I grabbed the source code (https://xhomer.isani.org/xhomer/xhomer-9-16-06.tgz) and quickly compiled it on my Linux box. It was pretty simple, just install a development toolchain (build-essential on Debian based systems), the libX11 development package (libx11-dev on Debian based systems) and the XShm extension which is included in libxext-dev on Debian based systems. During make it spit out a bunch of warnings but I got a working xhomer binary. Also it kind of messes the xterm settings a bit after being closed, so I’d recommend running it in a separate xterm window. Since there’s no install target in the Makefile I just copied the xhomer binary to /usr/bin, and that was it. From here on, I will assume that the XHomer binary is called xhomer and is somewhere in your PATH, if not just modify the way I run XHomer.
Step 2 – Acquiring the distribution
Thanks to the people at the same www.frijid.net site I mentioned earlier, I was able to easily piece together a distribution set. Since we don’t really rely on how many physical floppies we have with an emulator, I grabbed the recommended root disk set and the 15 disk usr set with the source code, although we won’t be compiling the kernel in this post. Maybe next one? We’ll see.
The site with the floppies is http://www.frijid.net/download/pro350/bsd/raw/ and here’s what I used for my install:
box#0/maintenance0.img
box#1/usr+k00.img
box#1/usr+k01.img
box#1/usr+k02.img
box#1/usr+k03.img
box#1/usr+k04.img
box#1/usr+k05.img
box#1/usr+k06.img
box#1/usr+k07.img
box#1/usr+k08.img
box#1/usr+k09.img
box#1/usr+k10.img
box#2/usr+k11.img
box#2/usr+k12.img
box#2/usr+k13.img
box#2/usr+k14.img
box#2/usr+k15.img
box#2/root1.img
box#2/root2.img
box#2/root3.img
box#2/root4.img
box#2/root5.img
The 3 disk usr set in box#2/ doesn’t include the source, so I didn’t grab it.
The maintenance disks are all the same, so I just grabbed the one in box#0/.
The 6 disk root set in box#0/ does include some extra dev files and something that appear to be leftovers from the development DEC Pro, but it’s missing /bin/ed and /bin/passwd, so I suggest using the 5 disk set instead.
There is also box#2/procomm.img which was labeled as containing “PRO/COMM terminal emulation” but when I mounted it to install, there was only an empty lost+found directory. Perhaps the original disk had gone bad over the years or someone accidentally reformatted it? We may never know.
Step 3 – XHomer configuration & serial port preparation
Since the maintenance (install) floppy uses a serial terminal interface over the printer port and XHomer only allows us to send its output over serial, I had to do some searching again since most PCs nowadays don’t have a serial port to use. Thanks to cantoni over at StackOverflow I managed to find instructions for using socat in order to generate a pty, which actually worked for me. At first you need to install socat (bruh) and then run “socat -d -d pty,raw,echo=0 pty,raw,echo=0”. Something like this will be printed out on the terminal:

Then we do a quick test. I use putty to connect to the pty’s output, in my case it’s /dev/pts/3. Just use the default settings for serial connection with speed 9600 and the device as /dev/pts/3. If everything goes well, you will get a blank putty terminal window. Don’t panic, the fact it’s blank is normal.
Let’s test if our serial port works. Echo something in the pty’s input, in my case it’s /dev/pts/4. For example, “echo “Test” > /dev/pts/4″. If the word “Test” appears on the screen, congratulations, you have successfully set up the pty to a point where BSD will happily talk to it when we set up the connection later. !! DO NOT CLOSE THE PUTTY WINDOW AT ANY POINT DURING THE INSTALL UNTIL WE NO LONGER NEED IT (at the initial hd boot) !!
Now we configure XHomer. At first, let’s make a disk image. BSD only supports RD51 or RD50, we’ll use RD51 as it’s slightly bigger. If you get the hard disk wrong, BSD will silently hang at boot. Here’s the command to make a 10MB RD51 disk image for use with XHomer:
dd if=/dev/zero of=29bsd.rd bs=10027008 count=1
Let’s make the XHomer config file. Note that everything after the symbol | including the symbol itself does not need to be inputed, it’s just my notes.
screen = window | make the emulator window mode
window_position = 0, 0
window_scale = 2
full_scale = 3
screen_gamma = 10
pcm = on
framebuffers = 0
serial0 = /dev/pts/4 | change to your needs, pty input
la50 = null
la50_dpi = 300
kb = lk201
ptr = serial0 | DO NOT CHANGE, we'll replace it later when we no longer need serial
com = null
rd_dir = ./
rx_dir = ./
rd0 = 29bsd.rd, 4, 306, 16 | change if not using suggested disk
force_year = 99 | fix y2k bugs by forcing year to 1999
maint_mode = on | DO NOT CHANGE, bsd install uses maintenance mode for terminal
int_throttle = off | random workarounds for clocks or older linux systems, we don't need this on new stuff
nine_workaround = off
libc_workaround = off
lp_workaround = off
Save the file as xhomer.cfg.
Now run the xhomer binary. If everything goes right, you should have something like this on your screen:
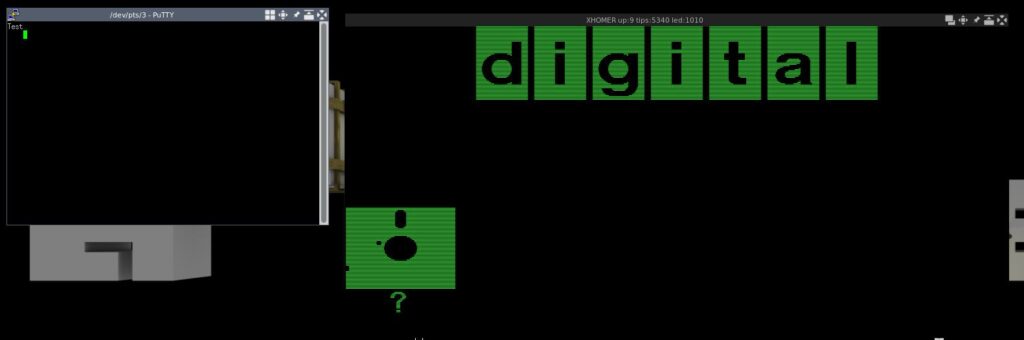
If you didn’t run the test documented above or changed the string, the “Test” string will not be in the terminal or will be some other text, this is all okay.
Step 4 – BSD install
In order to feed floppies to XHomer, you have to use the XHomer control menu. In order to get to it, press Ctrl+F1 when the emulator window has focus. The two floppy drives we need are rx0: and rx1:, these are equivalents of A: and B: in DOS. Insert the maintenance0.img disk in rx0. If all goes okay, the floppy disk picture should disappear from the display window, leaving just the DIGITAL logo. The putty window should then display something like this:
40Boot
:
(all following input is in the terminal unless otherwise stated)
If all is okay, congratulations, you have booted from the installation diskette. Now type the following in the putty window after the : symbol:
r5(0,0)rdfmt
Then, if you inserted an RD51 10MB disk in the emulator as suggested, type 0 when asked for drive type. If you inserted the 5MB RD50 instead, type 1. If you don’t know the exact disk sizes and types, refer to the XHomer documentation, specifically the Emulated Hard Disk part. The formatting shouldn’t take long, then it will dump you back in the 40Boot prompt. Now you need to boot the UNIX kernel, type this in the putty window:
r5(0,0)unix
If everything goes okay, you should have something like this now:
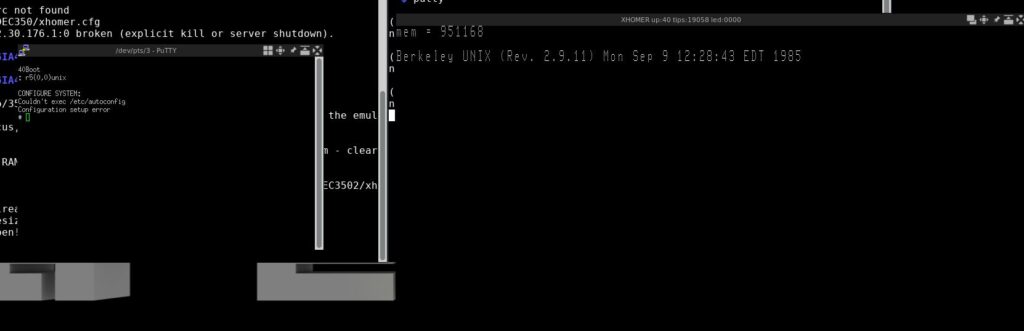
If you get a boot hang instead (like me), restart both XHomer and putty, connect putty back to the pty, then in XHome insert the maintenance0 floppy back and boot the UNIX kernel again. DO NOT FORMAT THE DRIVE AGAIN!!
Install time!
At first, create the root filesystem by running:
/etc/mkfs /dev/rrd0a 2240
Then insert the root1 disk in the 2nd floppy drive (rx1) and restore the root filesystem dump from the 5 root set floppies:
restor rf /dev/rr51 /dev/rrd0a
When it says “Last chance before scribbling on /dev/rrd0a.” just press Enter.
When it says “Mount volume N”, just insert the right floppy and press Enter. Volume number == floppy number in this case.
After the “end of tape” message, verify the rootfs:
/etc/fsck /dev/rrd0a
If it succeeds, create the usr filesystem by running:
/etc/mkfs /dev/rrd0c 6528
Then insert the usr+k00 disk in the 2nd floppy drive (rx1) and restore the usr filesystem dump from the 16 usr set floppies:
restor rf /dev/rr51 /dev/rrd0c
When it says “Last chance before scribbling on /dev/rrd0c.” just press Enter.
When it says “Mount volume N”, just insert the right floppy and press Enter. Floppy number == volume number – 1 in this case.
After the “end of tape” message, verify the usr fs:
/etc/fsck /dev/rrd0c
(all following input is in on the Pro display unless otherwise stated)
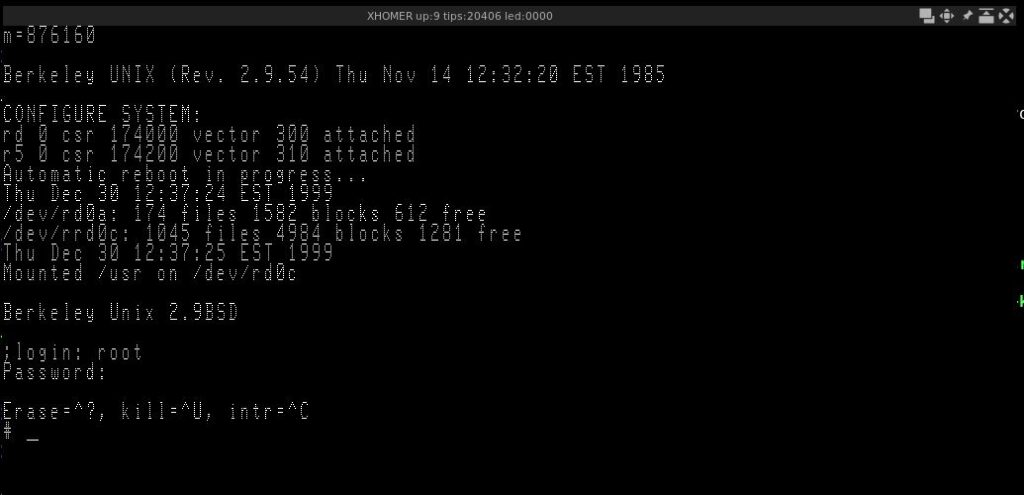
If everything is okay, run sync two times and shut down the emulator. Restart it with only the maintenance floppy in rx0, then type this in the terminal (NOT the Pro display):
rd(0,64)unix
This should boot up Berkeley UNIX (BSD). We’re not done yet, but it’s close.
Type the following to install the hard disk bootblock:
dd if=/rdboot of=/dev/rrd0h count=17
If everything goes okay, set the root password:
passwd root
Congratulations, you have successfully installed 2.9BSD. Here are the cleanup and hdboot prep stuff:
Bring the OS to single user mode:
shutdown +1
(you can close putty now)
Then run sync two times and shut down the emulator.
Step 5 – Booting the OS
In order to boot the OS, you need to do the following:
Open the xhomer.cfg file;
Remove the serial0 = line;
Change the ptr = serial0 line to ptr = null;
Change the maint_mode = on to maint_mode = off.
Then save, after running XHomer you should be able to just log in.
Congratulations, you have successfully installed 2.9BSD for the DEC Pro 350! Sadly it’s pretty unstable, and due to emulation issues in XHomer vi completely crashes BSD, but there’s always ed 😉
Appendix A – Transferring Files
In order to transfer the files (up to 400KB per file) you will need some additional utilities. Here’s a guide on how to install them:
(the following steps are done on the Linux host side)
- Grab the following files:
https://xhomer.isani.org/xhomer/BSD/f2rx
https://xhomer.isani.org/xhomer/BSD/rx2f.c
https://xhomer.isani.org/xhomer/BSD/lbn2xhomer.c
- Apply the following patch to lbn2xhomer.c:
--- lbn2xhomer.c   2015-07-05 07:51:19.000000000 +0300
+++ lbn2xhomer.c        2021-12-30 17:13:28.539768500 +0300
@@ -25,6 +25,7 @@

 #include <string.h>
 #include <stdio.h>
+#include <stdlib.h>

 #define SECSIZE                512
 #define SECTORS                10
@@ -66,7 +67,7 @@
   if (fptr_v == NULL)
   {
     printf("Unable to open %s\n", argv[1]);
-    exit();
+    exit(1);
   }

   fptr_x = fopen(argv[2], "w");
- Compile lbn2xhomer:
cc -o lbn2xhomer lbn2xhomer.c
- Set up f2rx for operation:
chmod +x f2rx
- Make a floppy image with the BSD side utility:
./f2rx rx2f.c
- Run XHomer and attach the generated rx2f.c.dsk to rx0
(the following steps are done on the BSD side)
- Grab the file from the floppy:
dd if=/dev/r50 of=rx2f.c skip=18 bs=1 count=891
- Compile the utility:
cc -o rx2f rx2f.c
You’re now ready to transfer files.
Short file transfer handbook:
- Run f2rx FILE on the host box, FILE being the file to use;
- Insert FILE.dsk into rx0 on XHomer;
- Run rx2f on the BSD side.
Appendix B – Init: no more children issue workaround
On some hosts, programs from the install floppy may randomly die with the “no more children” message. A workaround is to disable RTC mode and enable IOTRACE mode in the XHomer Makefile and recompile, leading to a much more slower (due to accurate timing) and working XHomer. After the installation, you can revert to normal settings and it should work, as the programs installed on the hard drive to not appear to suffer from the same issue.
Appendix C – Sequels
Possibly coming soon to VirtuallyFun:
Undocumented Madness 2 – Big hard drives on 2.9BSD XHomer
Undocumented Madness 3 – Custom Kernel on 2.9BSD XHomer
I need the “no more children issue workaround”
How to: disable RTC mode and enable IOTRACE mode in the XHomer Makefile?
Wonderful instructions, by the way!!!
I tried:
USE_RTC = N
and:
CCDEFS += -DIOTRACE
Compiles fine, but still:
# /etc/mkfs /dev/rrd0c 6528
isize = 4176
m/n = 5 10
# Init: no children left
# Init: no children left
# Init: no children left
# Init: no children left
# Init: no children left
# Init: no children left
# Init: no children left
#
:-((
It’s been ages since I last dealt with DEC Pro stuff. Is Xhomer slower? I’ve seen some issues where stuff just doesn’t apply correctly.
PS: I am the author of these instructions.
FYI, I have released an updated version of Xhomer on xhomer.isani.org. This release addresses a number of small issues related to running 2.9 BSD. The “vi bug” seems to have been related to a PDP11 CPU emulation issue, which has been fixed. I’m able to perform full-screen editing in vi now. Various games in /usr/games seem to work as well. Support has been added for 128 MB disk images, and a pre-built 128 MB 2.9 BSD hard disk image is provided. For those wanting to build their own larger disk images (RD31, RD32, RD53, or 128 MB) from scratch, I have uploaded a number of maintenance disk variants to support this (as well as the corresponding kernels needed for the hard disk file system). Instructions and the scripts which I wrote to create these images (via binary edits) are also provided. And, an “exit_on_halt” option has been added to xhomer.cfg, which allows you to use “reboot -h” to shut down both BSD and Xhomer.