Enter the Pi1541! What makes this different from the SD2IEC is that this emulates both the 6502 processor of the 1541 drive, it also emulates the two 6522 chips as well giving far stronger emulation. Is this enough to satisfy CP/M? Or is my issue something deeper?
Cleaned up a little
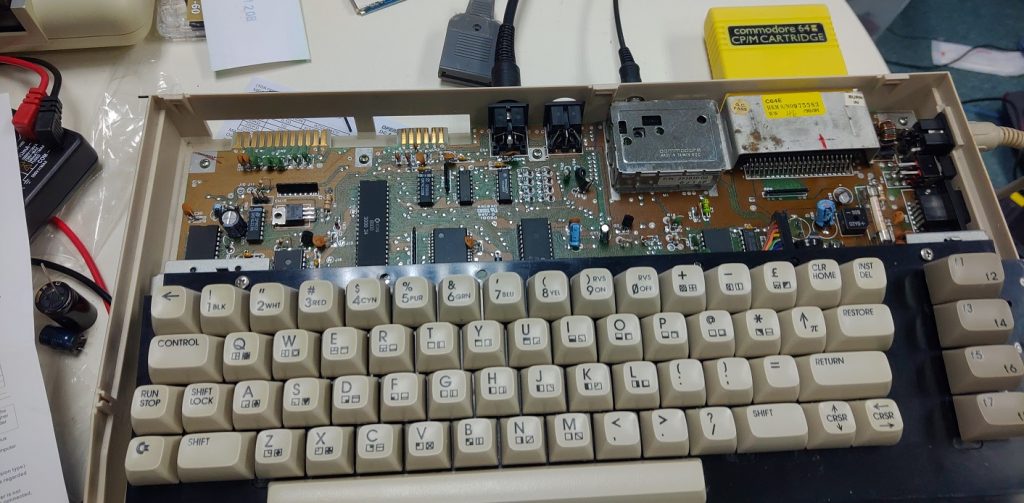
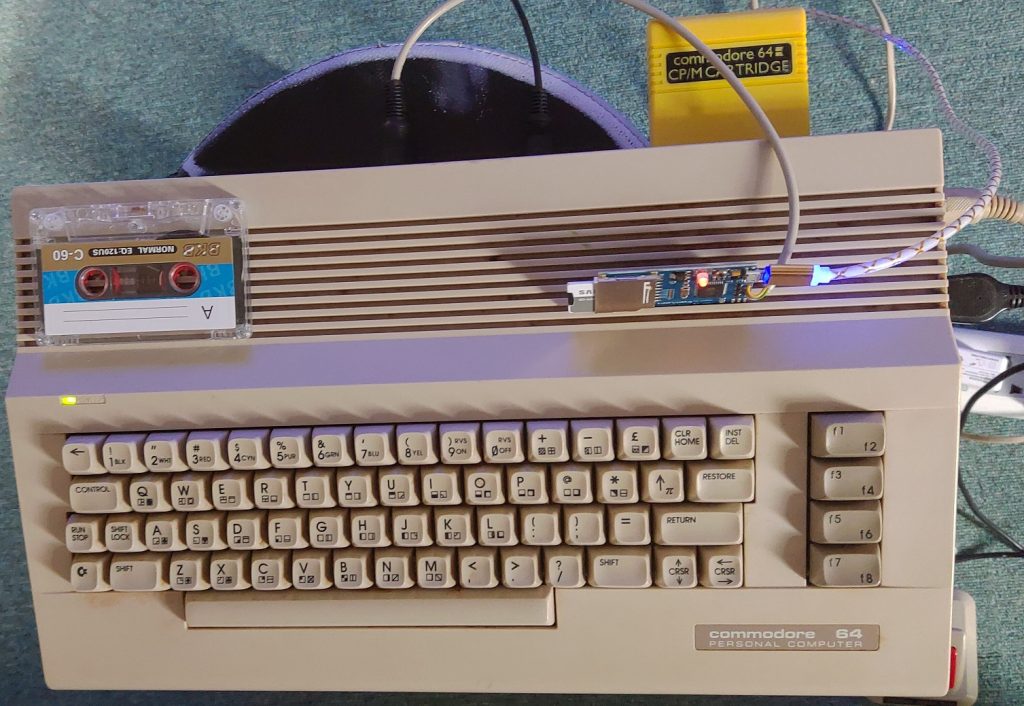
So in my continuing adventure of stuff arriving for my Commodore 64 project, I took the opportunity to pull the keyboard apart and clean it. I didn’t do any weird retrobrite thing, as I don’t care that this looks 30+ years old. And I haven’t swapped out any further caps just yet, although I did also get a big box of random caps ranging from 0.1 to 220uF, so I can probably do all the small stuff on the board when I feel like it next.
It took a bit extra effort to get this far.
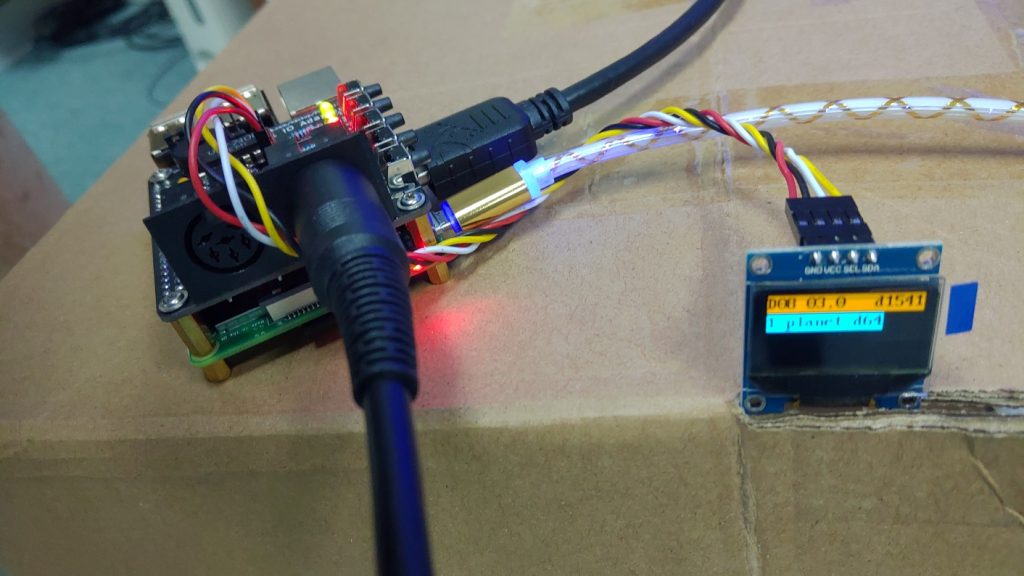
The IEC cables had finally arrived, and that means I could connect up the Pi1541 hat I bought and get this project going.
Although it’s the latest ‘rev 4’ board, it doesn’t support the Pi4 (does anything support the Pi4? What an evolutionary dead end!), auction did include the LCD display, but no software, and no serial cable. The cooler looking one I wanted was all assembled in Poland and they are unable to ship.
Bummer.
Anyways, turns out the software is written by one Stephen White, who doesn’t get any cut of the board sales, but in turn I guess they aren’t bundling the software either… I’d have imagined it’d be some kind of 1+1 thing, but it’s not to be. I guess it’s also why so many people keep on thinking you can buy a PiZero for $5 or so, when they are much closer to $25.
Anways, getting the initial part of the board working was just a matter of reading Steve’s site, and following which files to be download, and where to be placed onto a FAT32 formatted SD card. This is one of those ‘bare metal’ type projects, so this also doesn’t run Linux.
Unfortunately for me the Pi1541 didn’t do ANYTHING on powering on, that is until I connected the HDMI cable. And yeah what a let down. And even worse when trying to load anything it’d just hang. So frustraiting!
But thanks to this post by jerrykurtz over on lemon64, I was able to put together this fragment to get it working (for me!)
Now this of course works for my v4 hat, and the way I like it. Also keep in mind that if the C64 isn’t detected it will appear to hang after loading the chargen ROM. It took a while to figure that out, until I just turned on the c64 to see what would happen. I also hate having it change disks when I power cycle, so IgnoreReset was a great feature, well for me anyways.
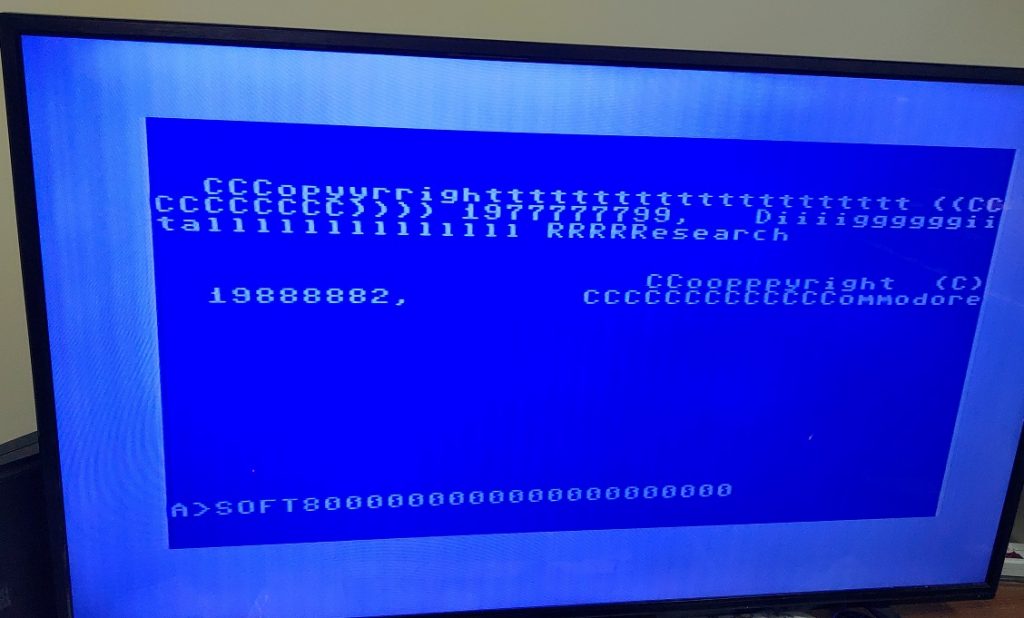
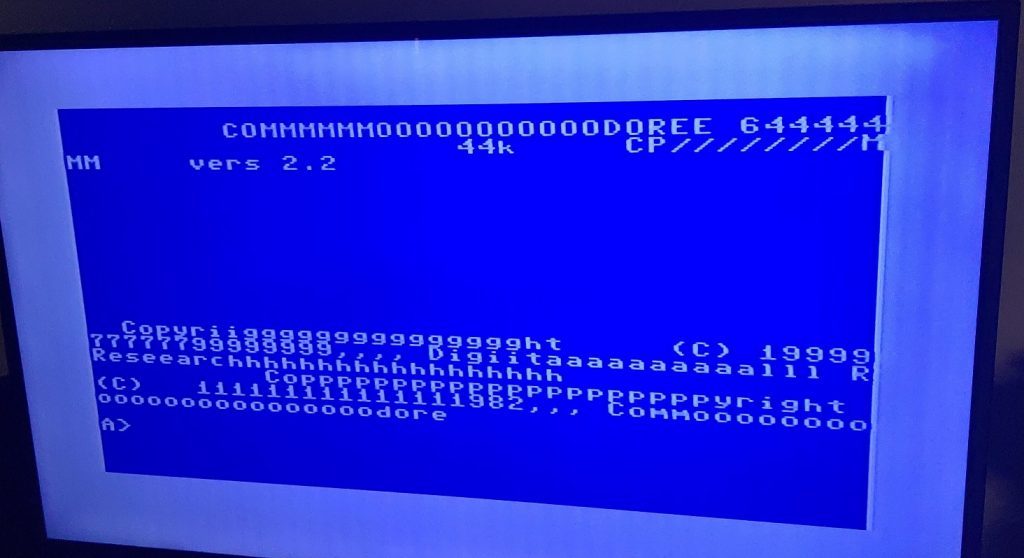
I fired up CP/M, and yeah it’s doing the same thing. So it turns out that it’s not the SD2IEC adapter that I have. I’m kind of mixed about this, on the one hand that’s great as the SD2IEC’s are significantly cheaper and easier to come by, at the same time I had hoped a little that the bigger investment of the Pi1541 would make the difference. At least it’ll be the difference for stuff like Ghosts’N’Goblins Arcade.
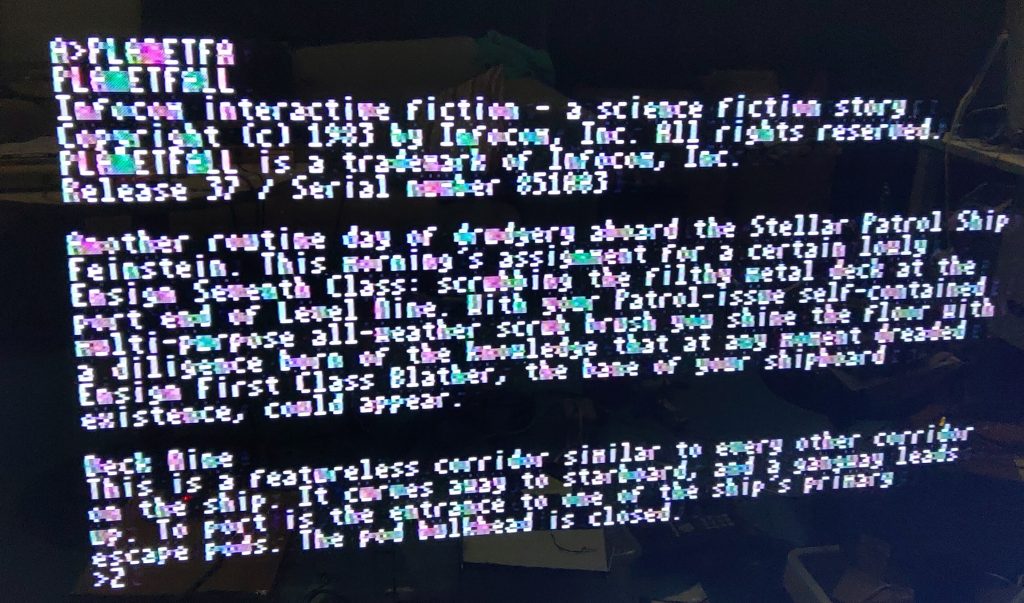
CP/M Planetfall
One interesting thing is that SOFT80 is now faster, getting somewhere between 1-3cps. It’s still totally unplayable, but I guess that’s progress?
Still waiting for the dead test cart to see if it tells me anything useful.
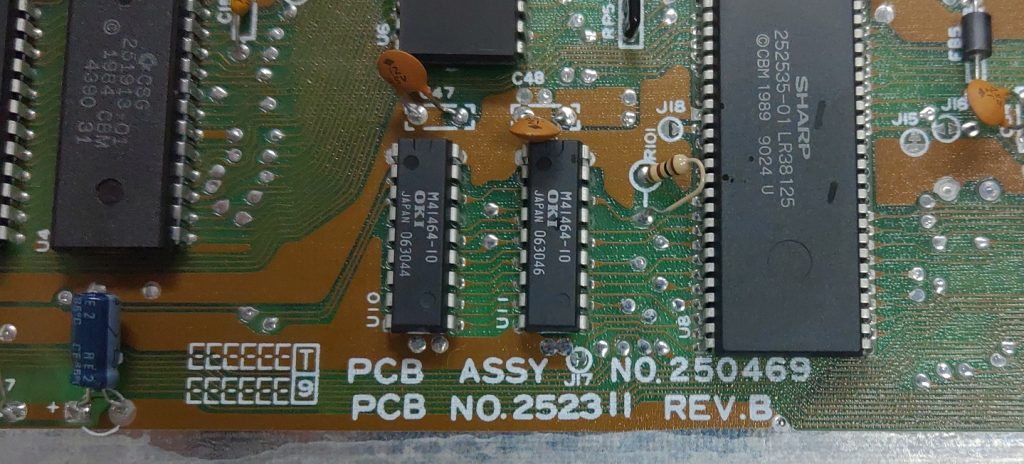
So since CP/M is acting all wrong, there is clearly something up with the C64. I hadn’t opened it yet, and I almost regret doing so as despite it ‘working’ it was a MESS!
After separating the case halves, and unplugging the top LED, I saw that capacitor C66 had exploded. There was some faint hint of staining from the top, but I didn’t expect it to be something like this.
The board was disgusting, like the cap had something spilt onto it? Then it ruptured? or did it rupture? it still powered on and ‘worked’ despite this gunk.
Isopropyl is in short supply still, so I did something probably dumb, I took a 50% baiju a brush and gave it a quick rinse.
Cleaned up board
with all the fuzz removed it’s a 250469 REV.B… which I understand is a pretty late model. It’s one of the short boards, which not a lot of chips, which I’d hope means fewer things to fault, although at the same time, some of these chips are going to be impossible to source.
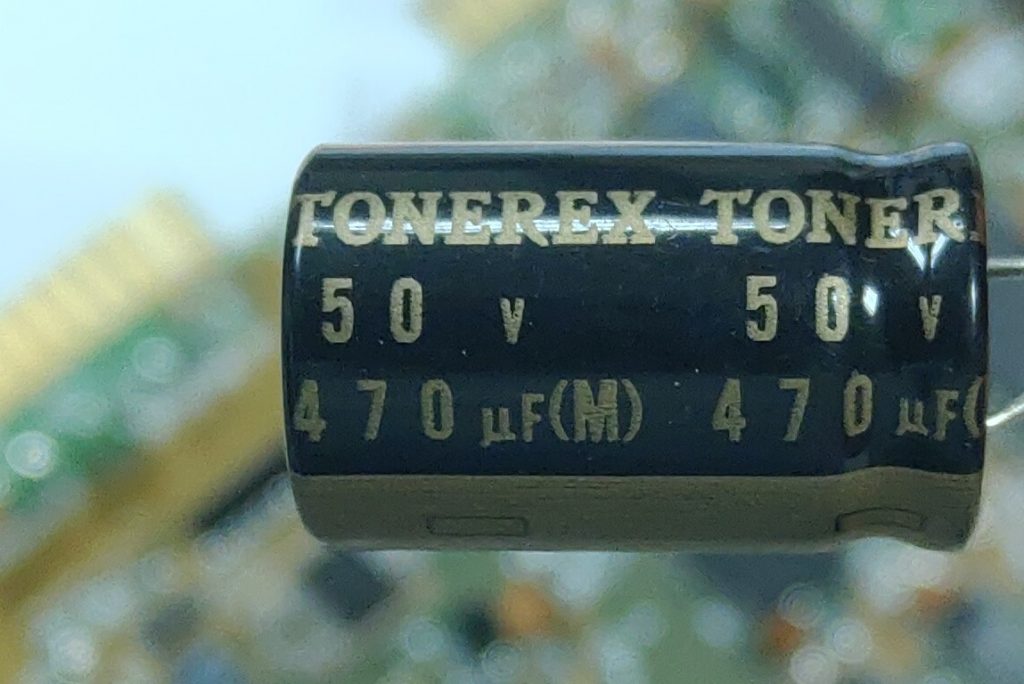
Also, I should add that I found various C64 schematics online, and none had a 470uF cap for C66. Maybe I’m going crazy? I found an E-bay auction for replacement caps, and yep, they also have a 470uF in there. Am I crazy?
TONEREX 50v 470uF(M)
Now I was hoping that being in Hong Kong, that means I could actually find some retail shop actually selling capacitors. So I went around the audiophile places and scored this higher voltage cap for a whopping $5 USD! The store owner was insistent that this was for ‘high end audio gear’ and not my toy 80’s computer. That this thing was somehow some magical ‘audio only’ capacitor. Has anyone heard such a thing? Is this like audiophile grade SATA cables?!
Massive cap installed!
So I replaced the cap, and NOTHING. The power led turns green and that’s about it. I had to dig up a simple volt meter and yeah power is going places. I gave up and went home for the night. Turned it on this morning expecting a POP or further disappointment, and it fired up.
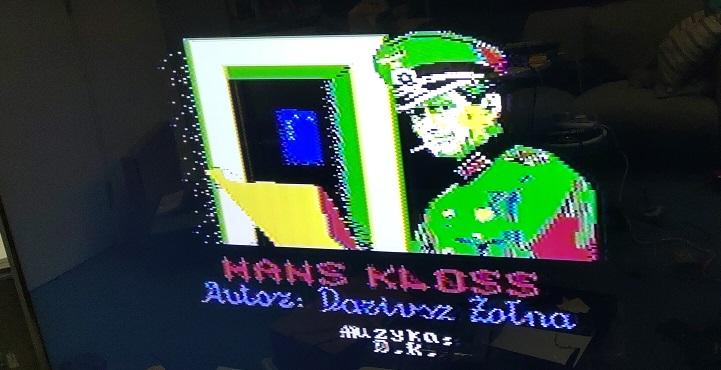
A bit of digging around I found HeadAlign v1.1, which I transferred to the SD2IEC, and much to my amazement the stupid tape drive started working, although it was a full screw turn out of alignment, and it looked normal (no picture). I rewinded the tape, and loaded up Hans Kloss, and it worked!
Sadly CP/M still is printing far too many things to the screen. I guess I need to replace more caps, and keep on waiting for that dead test cart to get a bit of a further hint. Although my soldering skills are terrible.
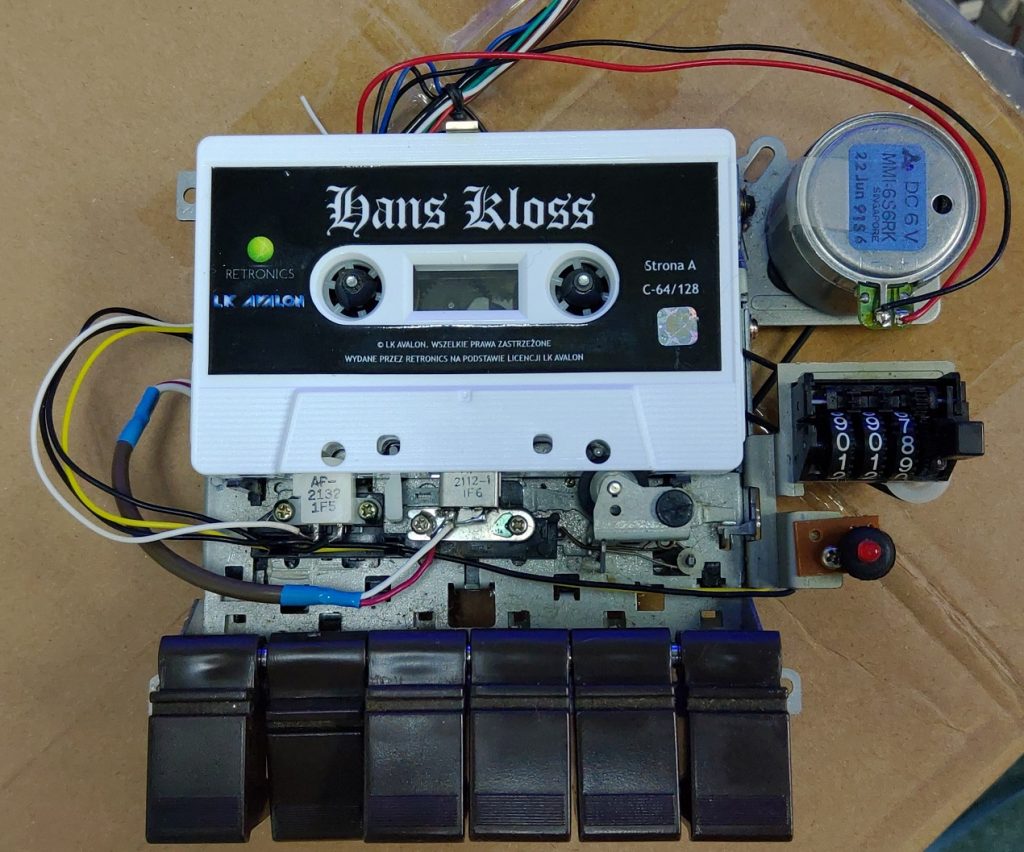
Ever since I found that ‘cheap’ Commodore 64 online I’ve been wanting to try something. The machine came with a tape drive, so I ordered some ‘cheap’ reproduction tape game, to see if it worked.
1530 mech
While it almost works, it sees the program on the tape, the thing stalls out. Granted it being dated to 1991 probably means the belts are beyond usable. I am having a friend proxy some belts for me as nobody will ship them to Hong Kong (pandemic didn’t have any real effect there).
While this machine is a newer ‘C’ model, I’ve had seen this auction pop on and off on Ebay from time to time advertising a refactored and improved CP/M cart advertising that it works on all models. I’ve read somewhere that post 128 that they finally had figured it out, far too late to matter. But maybe with this new cartridge things could work?
I managed to get a SD2IEC board delivered from Germany, which uses external USB power, so it won’t tax the C64 PSU (I should look, is there an ATX to C64 PSU?). I can load some silly games and stuff seemingly okay. I haven’t bothered with GEOS, as I used it far too much when I had to, and it’s just far too slow to even dream of being usable. Anyways with the SD2IEC it came with ZERO instructions but I did find the page with the needed firmware, and the ‘FB64.PRG’ program to have it browse the SD card and mound D64 images as needed.
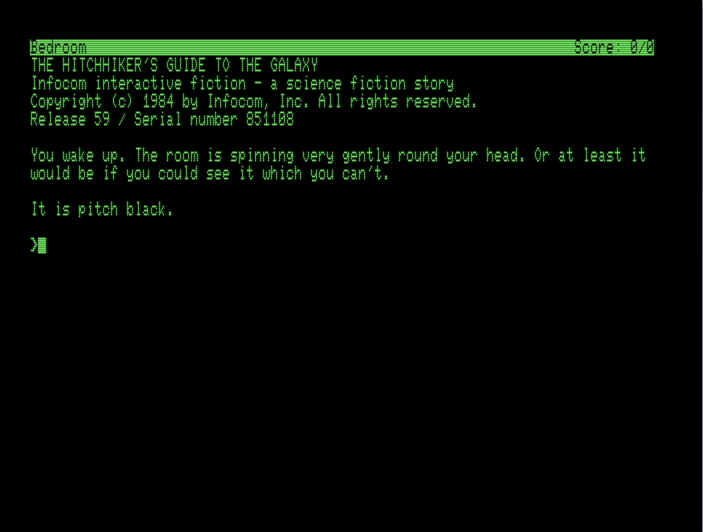
I have to admit, ever since I did that article about “Running CP/M on the Commodore 64” I’ve been dying to try this on real hardware. With all the excitement in the room, I mounted the CP/M disk, and held my breath as the *’s went across the screen….
DDDDDDDDDOOOOOOOOOOBBBLE TROUBLEEEEEEEEEEEE
And, well something isn’t right. I tried a bunch of images I could find online, and they all do the same thing. They print far too many characters on the screen from time to time. Clearly it’s some timing/IRQ issue. Something to do with the VIC chip.
Despite the screen being corrupt, it is running, and it does let you run commands, it’s just the output is being doubled (or 10x!) up.
So I tried the soft80 program which will setup an 80 column CP/M experience. It didn’t matter what version I used, the old one from the 80’s or the patched up one from Luis Antoniosi, they all do the same thing, which is run at a blistering 1cps.
I thought it’d be fun to stream this old beast playing the CP/M version of planetfall, but at 1cps I just can’t do it. Which is just a shame. I haven’t tried a regular C64 Infocom game, as the 40 cols was always crazy, but I guess it’s the fallback.
I know these things are so rare, but I had high hopes for this thing.
I never heard of this one before, but it’s legit!… As long as you have expanded your RAM, Edilbert’s Z-Machine opens up the world of Infocom to a whole host of machines:
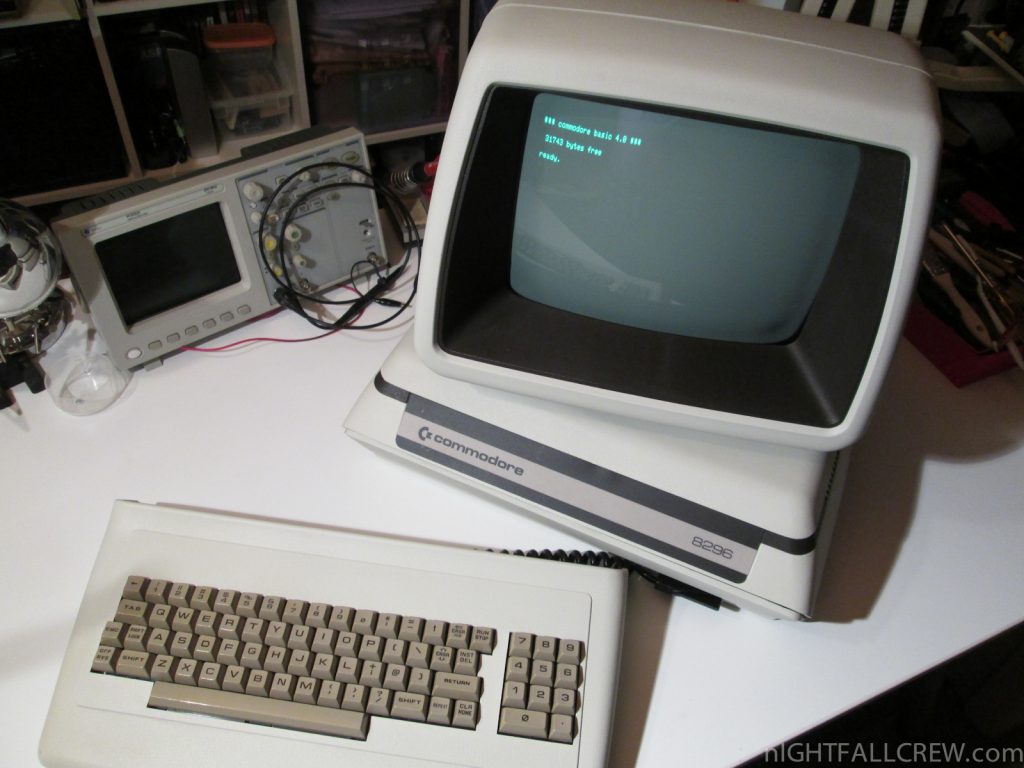
I’ve never seen the more advanced ‘European Business’ PET’s before, I’ve only dealt with the incredibly limited PET 2001-8C Chiclet keyboard models that were so insanely limited. It wasn’t until much later I saw the dual disk drives (4040’s??) that could have helped those machines so much more, but that was that. I’d been asked as a kid to make an electronic card file on an 8kb machine with a single tape drive. Sadly 8 year old me didn’t know about loading and saving sequential records on tape. Or maybe luckily as I can only imagine how insanely slow this would have been, and or tedious to not only save and update, but find things.
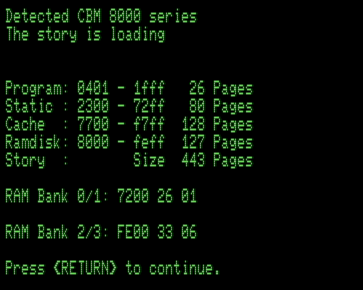
Anyways I thought I’d fire up some mythical 8296 beast with 128Kb of RAM. Attaching the disk image, and firing up “LOADER”, you can watch it load up as much as possible into memory:
And once it’s loaded up, the Z-Machine is active!
Now granted I don’t have a PET to test with, but using VICE, I can happily say that for an 8bit machine, this is incredibly fast. Maybe it’s the disk subsystem interface, as the VIC-20/C64 have an absolutely dreadful interface, but yeah wow playing HHGTTG on a non C64!
But at the same time there is great value in old computer hardware.
In my opinion around 2006-2007 we basically hit peak computing. The biggest restrictions I see on older machines is memory sizes, and disk speeds. And for the most part these can be taken care of with ease, although many chipsets and formfactors of the time seem to have these incredibly tiny 8Gb/16Gb/32Gb limitations that just really are annoying in the distant future of 2019 when you may want to run a few things at once.
Yes, ‘Mouse’ computer is a thing
So I bought this used i640GA6-BDO, an i7 machine oem’d by mouse computer. Yes the name of the business is the same name as the 2nd most popular peripheral of all time. From the blurb:
From the “NEXTGEAR series” with high cooling and excellent maintainability, Intel® Core™ i7-4790K processor, dual channel 16GB memory, 1TB hard disk (7200rpm), DVD super multidrive, NVIDIA ® GeForce® GTX™ .970, 80PLUS® BRONZE certified700W power supply, pre-installed Windows 8.1 Update i640GA6-BDO” is 149,800 yen.
I paid just over 20,000 yen for this machine. So losing some 120,000 yen, or about 80% of it’s value over 5 years is certainly not a good investment proposition. It seemed like a good bargain.
Finding the corporate website was NOT easy, but thankfully they own mouse-jp.co.jp so one of those wild guesses turned out being right. They seem highly influenced by the ‘idol group’ thing that is popular and japan, and they have an extensive YouTube channel over at MouseComputer2010. And an extensive ad gallery.
(the original video was taken down and made private… ? https://www.youtube.com/embed/mPd-vUSsAAo very strange)
They even have the making of videos. I could find so much about the advertising and various talent, but the machines… that was much more difficult than I could imagine.
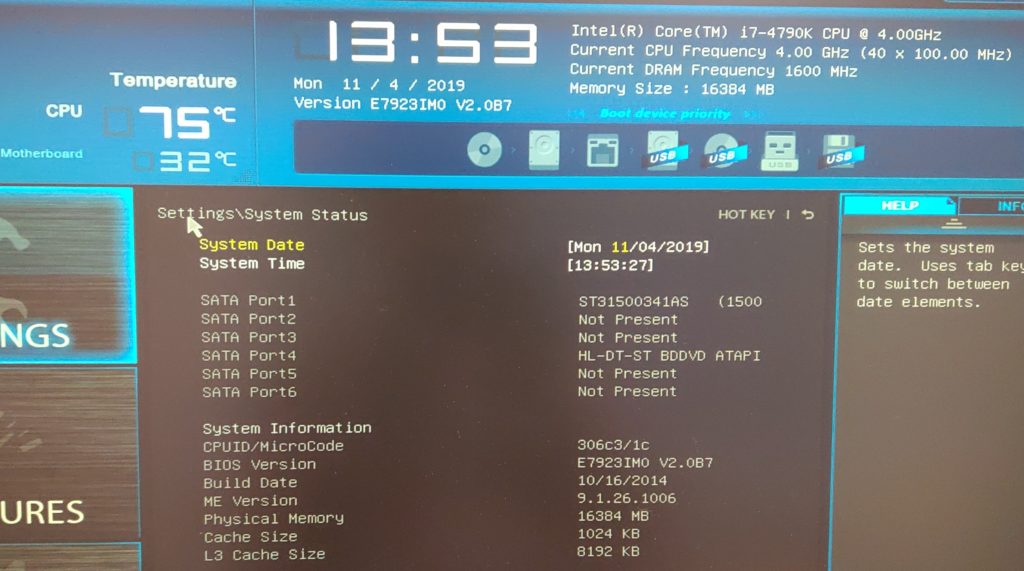
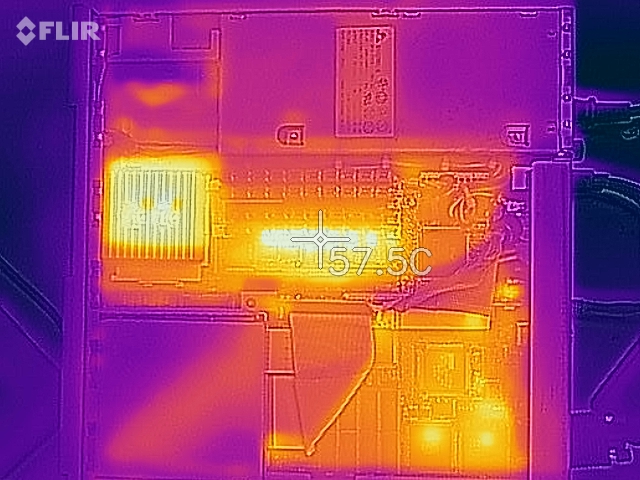
The build quality however left a bit to be desired, when I turned it on and jumped into the BIOS the first thing that I noticed was that it ran HOT.
75c in under a minute!
So yeah 75c in under a minute is not a good thing. The water pump was making a weird noise as the bearings were clearly shot, and it’s just not circulating anywhere near fast enough.
Although I didn’t take a picture I was able to find one online, that shows that despite the bottom of the case has a big slot for the PSU fan, but the fan was pointing up into the case, not venting to the bottom.
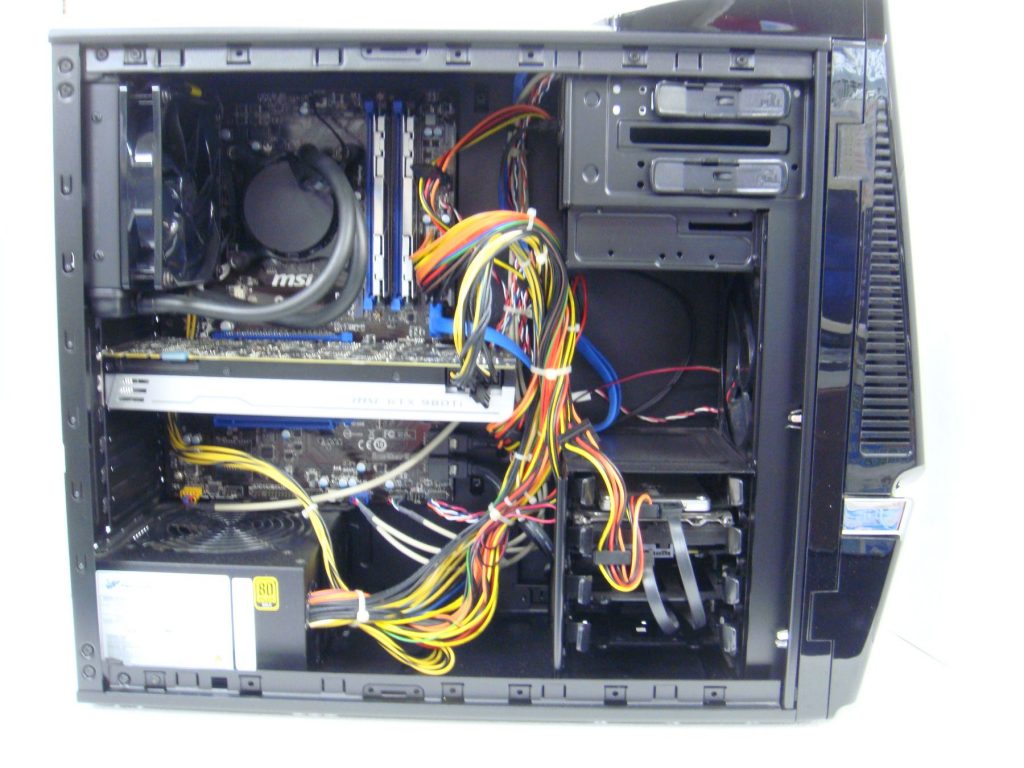
I guess that the original owner got rid of the machine as it was overheating, and/or thermal throttling. I ended up going back out looking for a new cooling solution, and I was torn between a cheap fan thing for $10 or another all-in-one liquid cooler for $50. I decided to go with the all-in-one, as this machine was originally liquid cooled anyways.
I’m not sure why everything needs a cartoon..
The machine also had no storage, so I also picked up a M.2 drive, and a spinning rust disk. I have to say that even for this ancient machine, it’s great it had a M.2 slot, and WOW I thought SSD was fast, but this positively blows it away!
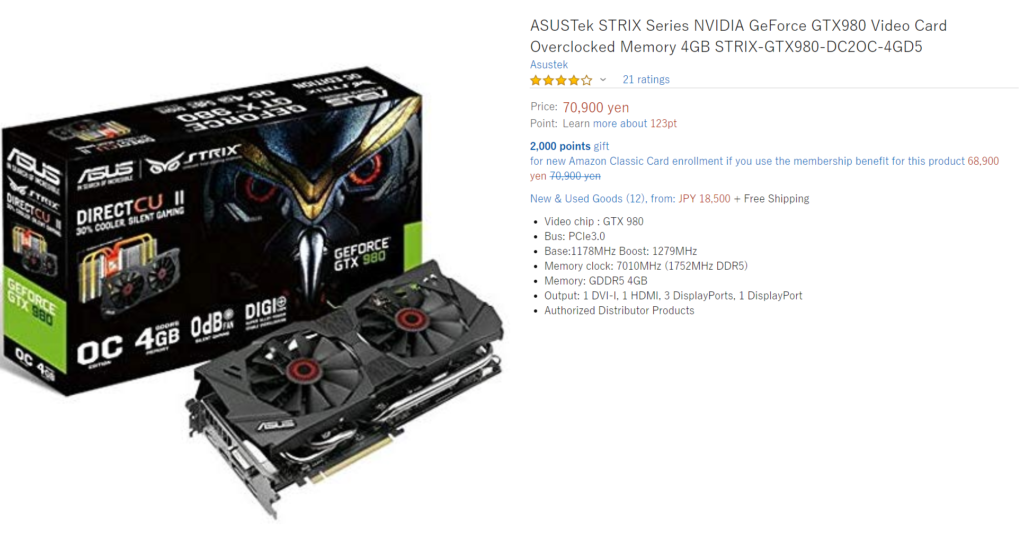
While I was out I see this former holy grail of GPU’s a Nvidia GTX 980 for ¥12,000. Now granted the machine I picked up has a GTX 970, a nice touch as I wasn’t expecting anything, but I can always use another DVI capable card back at home, so I’m probably taking that along with the i5 back to my HK office.
Now the real killer is that the card is a ASUS GTX, and looking around online it’s the STRIX-GTX980-DC2OC-4GD5 model.
I look around and find it on Amazon, and if the ad thing is to be believed the new price on this thing was ¥70,900! Looking around on that part number also shows kakaku.com with a list price of ¥73,480!
So granted the card is 5 years old now, but wow what a drop in price! It’s one more stop away from the junk piles that the other 9xx’s currently are (I’ve seen boxes of Zotac 750’s and up).
Naturally of course, like the i7, this card also had issues the moment I put it into my PC. The screen was flashing with garbage, and it’d eventually lead to a system freeze after a few minutes. What a pain, bad memory I suppose. And like the PC, I took the card apart, cleaned up the old thermal compound, and added some new generic stuff, put it together, and left it running The Outer Worlds at ultra high settings just fine. Who knows, maybe it’ll break later on, I don’t know, but I now have a ‘high end 5 year old’ gaming system for about the same or slightly more than a PS4. And I could be wrong but i’d like to think an i7/980 would crush a PS4. Although I could be wrong.
Naturally running cinebench 14, basically shows that the 970 & the 980 perform so close to each-other it makes no real difference. Although the fan setup on the 980 is far more aggressive, and it runs much more quieter. So that’s a nice bonus.
And if userbenchmark.com can be trusted, the performance difference from the 980 to the 1080, isn’t all that bad. It’s unreal that now even with 2nd generation RTX 2080’s out there, the 1080 is still an expensive GPU.
So, sometimes it may be worth looking at the junk piles. Although at the same time if you have nothing, the new/lowend stuff like the 1030’s/1050’s really aren’t so bad either. But for some reason I always seem to like yesterdays powerhouse.
(This is a guest post by Antoni Sawicki aka Tenox)
DEC Multias are known for notoriously overheating. Someone even coined a term “Multia Heat Death”. The typical folklore recommendation of the time was to only run it vertically and replace the built-in fan with a more powerful one.
In modern times one can inexpensively acquire a thermal camera that attaches to a mobile phone. So why not take a peak inside the inferno.
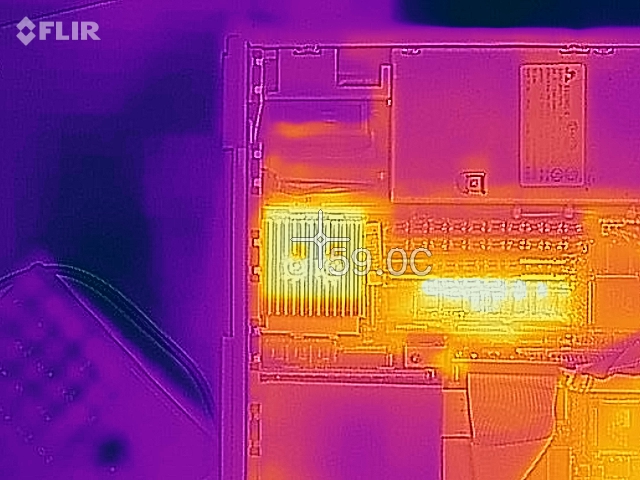
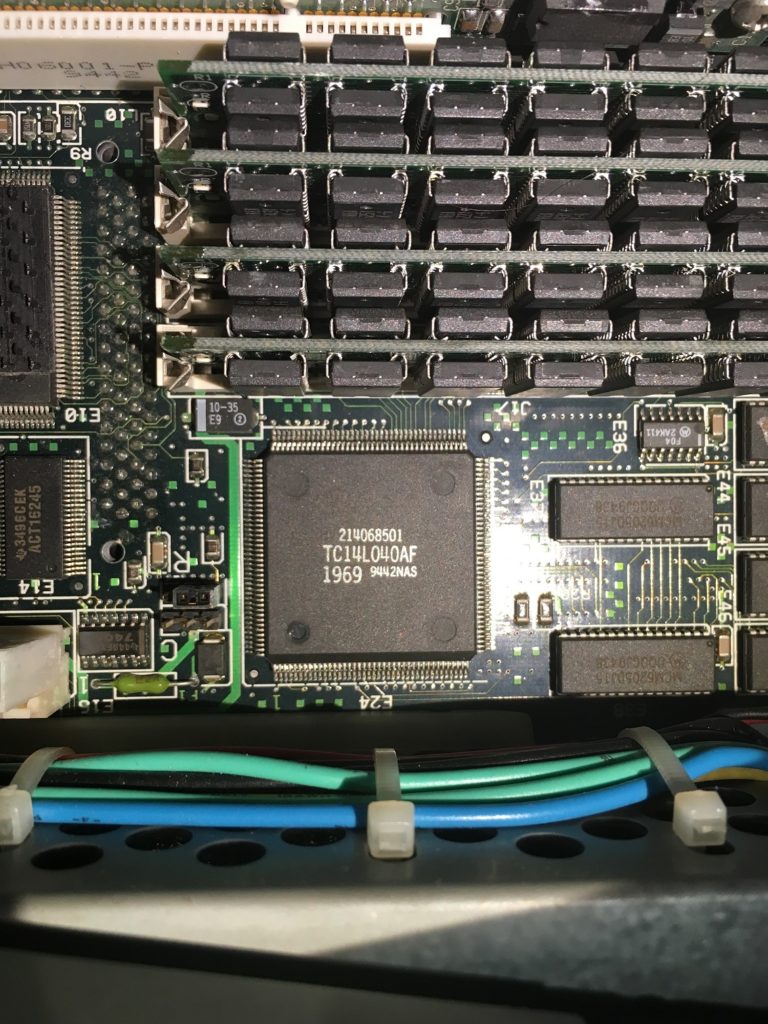
Multia with 166 MHz CPU Under FLIR
This is how Multia looks like in a thermal camera. PS is on top right. CPU on the left. FDD/HDD bottom left.
The CPU, Alpha AXP, runs at around 60C, not great, not terrible.
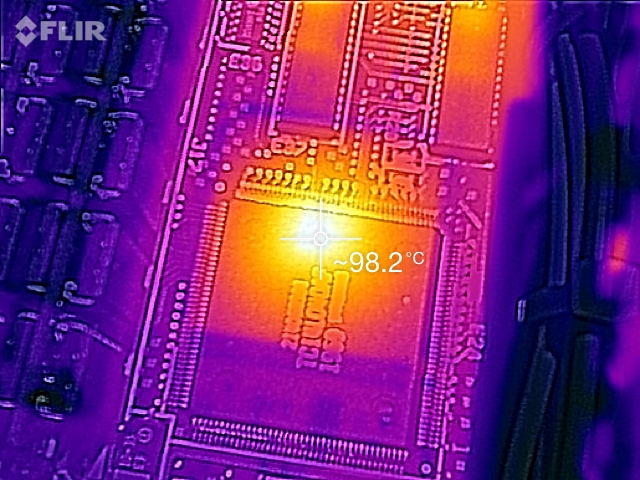
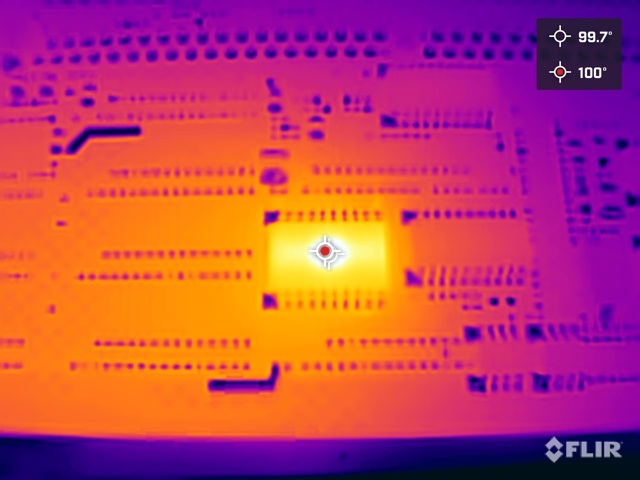
Scanning up close through individual chips I found this curiosity:
Wedged between the memory chips and the power supply is a little chip that generates almost 100C. That’s a boiling temperature of water. Note the thermal image is shifted in regards to the visual part due to close range.
What does this chip do? I have no clue. Perhaps someone can help here. What I however did to it is this:
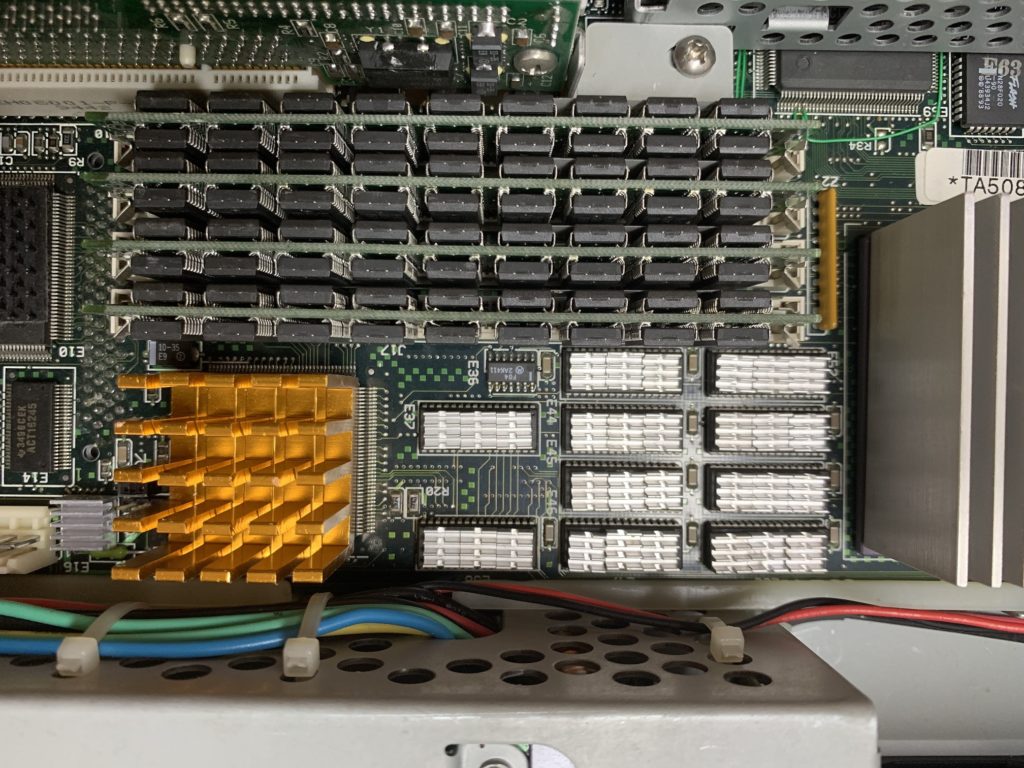
Slapped on this really nice radiator. In fact I added little radiators you can buy for Raspberry PI to all the chips generating tons of heat.
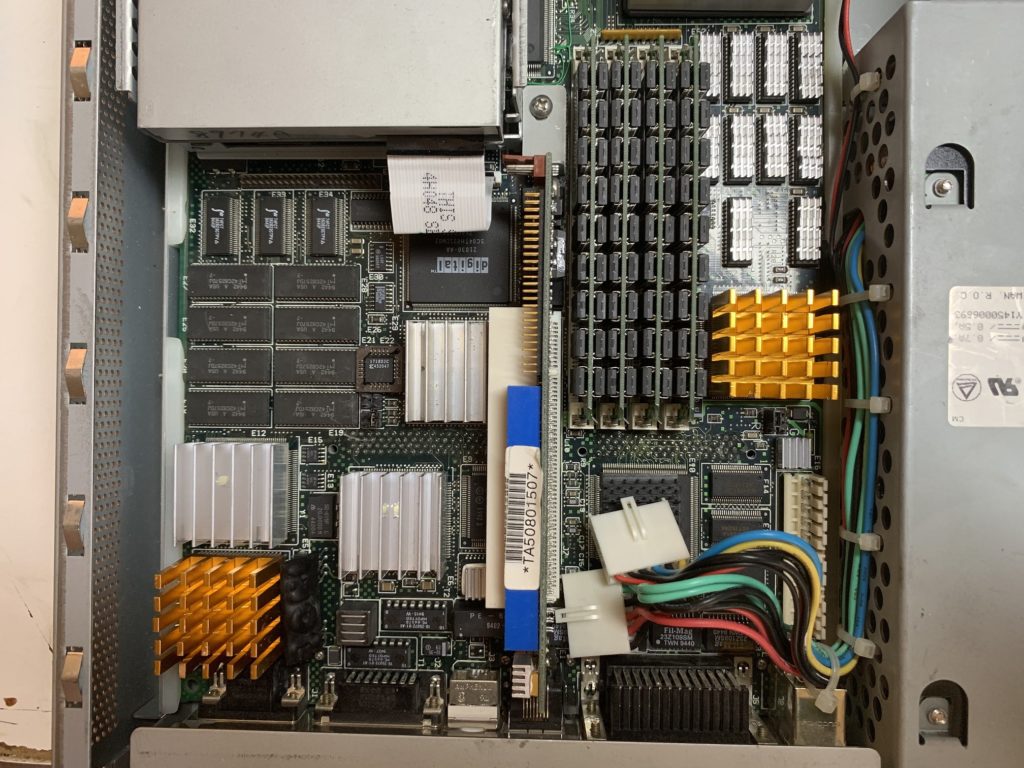
This is how the motherboard looks like right now:
I also added a tiny fan on top of the CPU. Drilled some holes in the case and of course replaced the main fan with a highest air flow I could find.
Time will tell if this resolves the heat death, but my Multia now runs much cooler with help of all the radiators and extra fans.
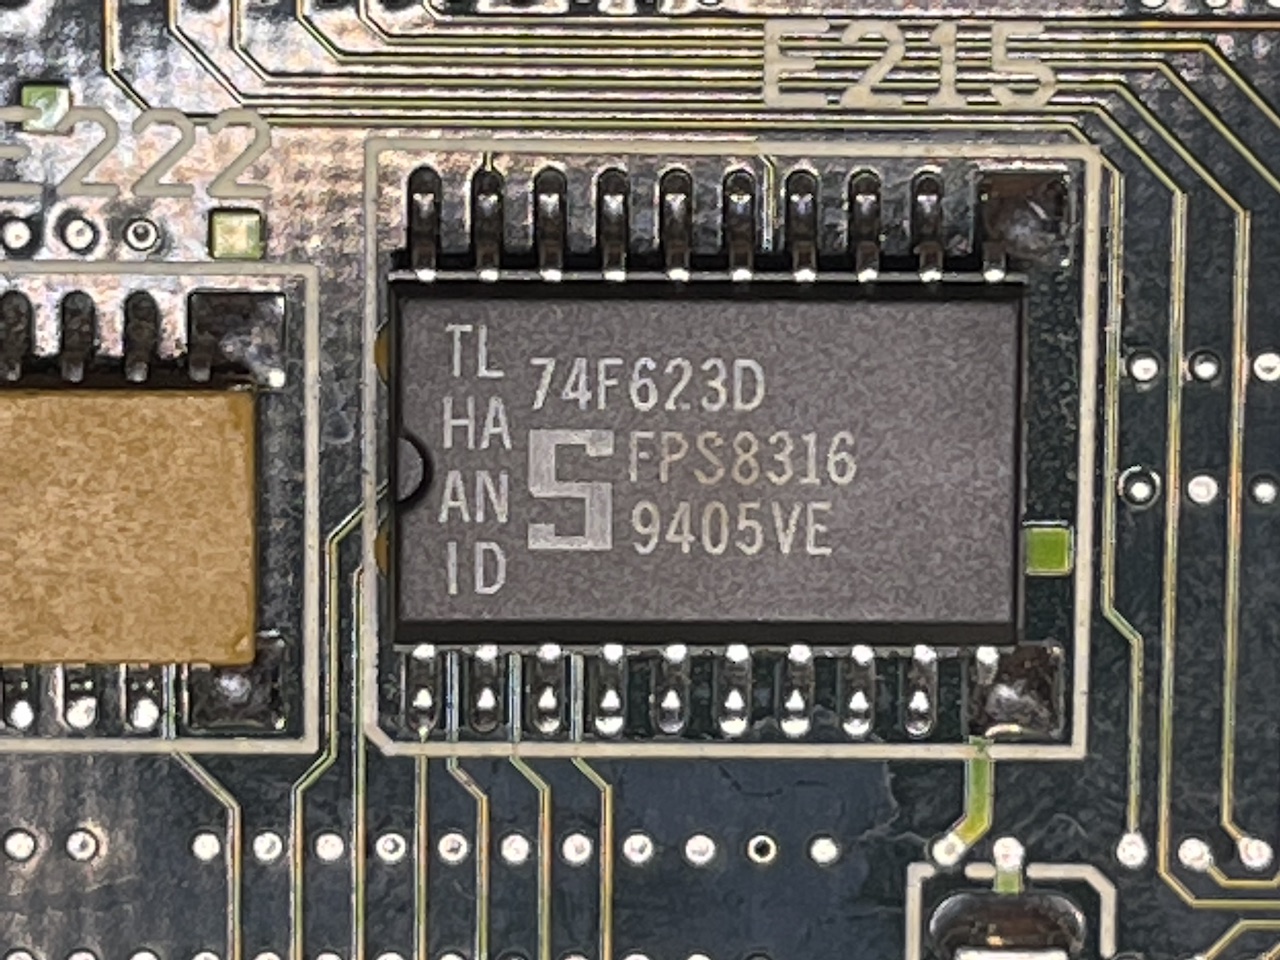
UPDATE in 2022:
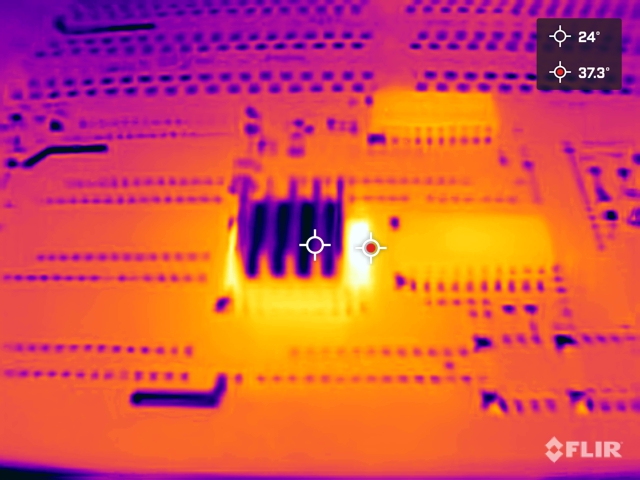
Readers frequently asked “what about the heat death chip?“. Multia indeed has one specific chip that is a source of most of Multia casualties. According to NetBSD Multia Page the chip is 74F623 and is located on the bottom (flip) side of the motherboard.
You can tell it’s little charred. I so I went to take a peek with a thermal camera:
Can you locate it? FLIR found it immediately… Up close the chip goes above 100C:
I have added a small heat sink to it and now looks a little better!
I saw this great board online carousell, on some local seller board. Although eBay may be the defacto site for buying old garbage, keep an eye out for local stuff too. There is craigslist in the USA & Kijiji in Canada.
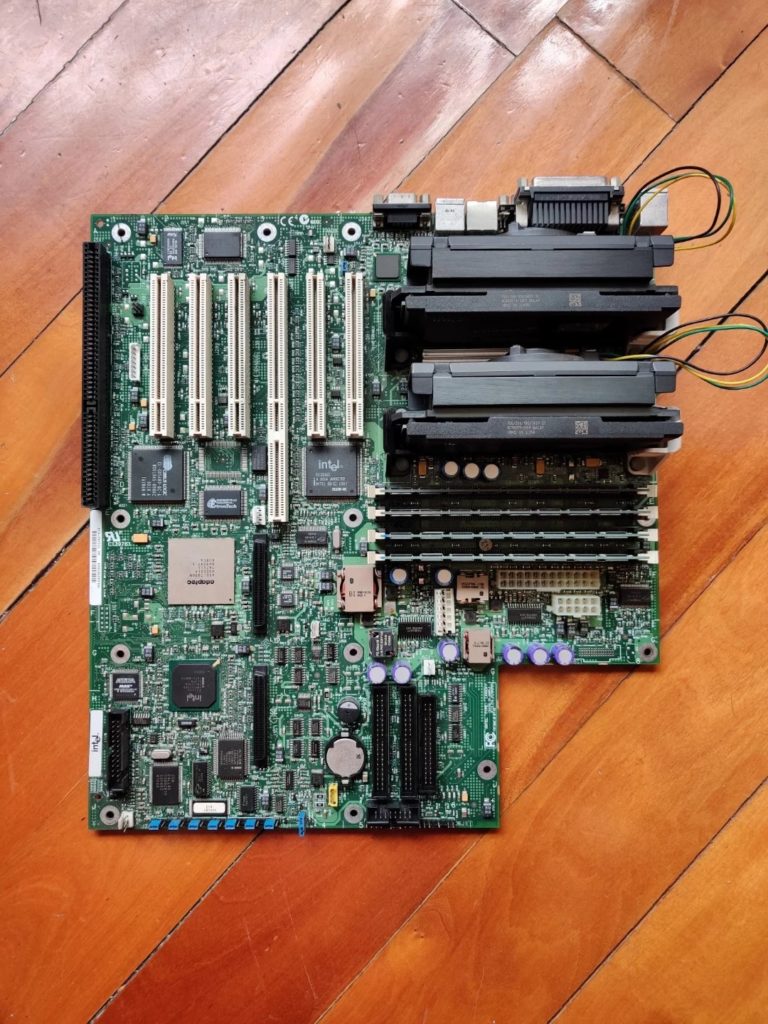
Intel l440gx+
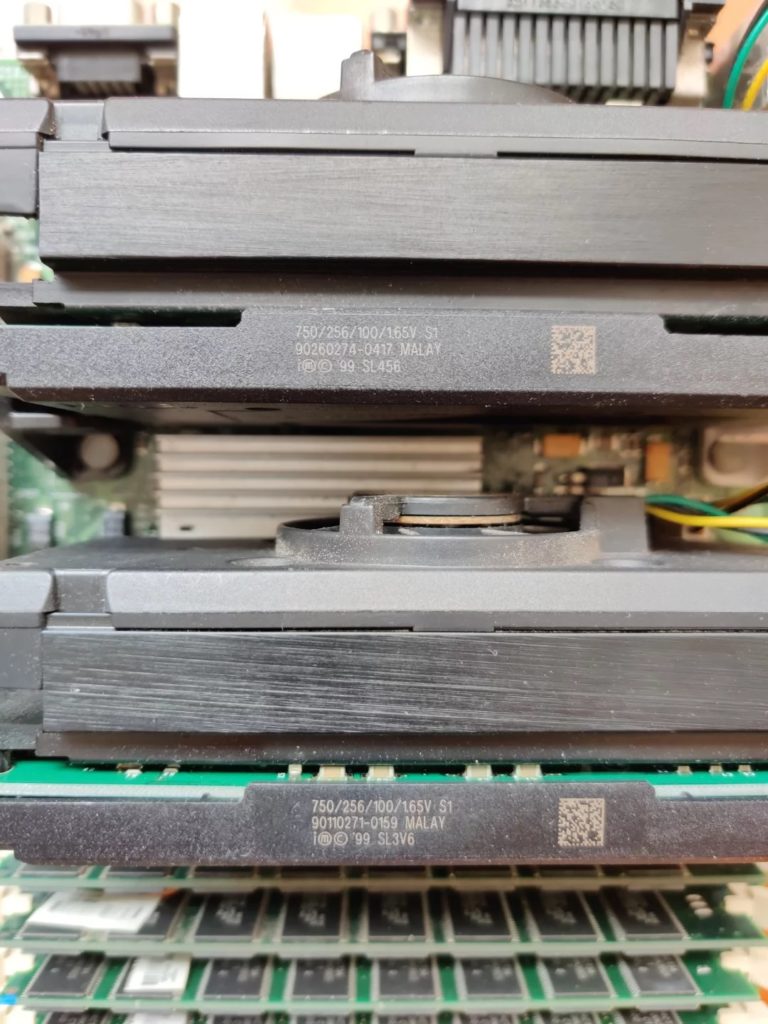
Yes, it’s an Intel l440gx+, a dual processor motherboard, with an ISA slot! I’m pretty sure it’s all 5v PCI slots, but who knows. And at $250 HKD, much cheaper than the ones on eBay. Although condition is pretty much unknown.
Pentium III 750Mhz
And it has two Pentium III’s clocked in at an amazing 750Mhz. It’ll make a great MS-DOS box for sure, with plenty of punch. Along with being great for Windows NT 4.0
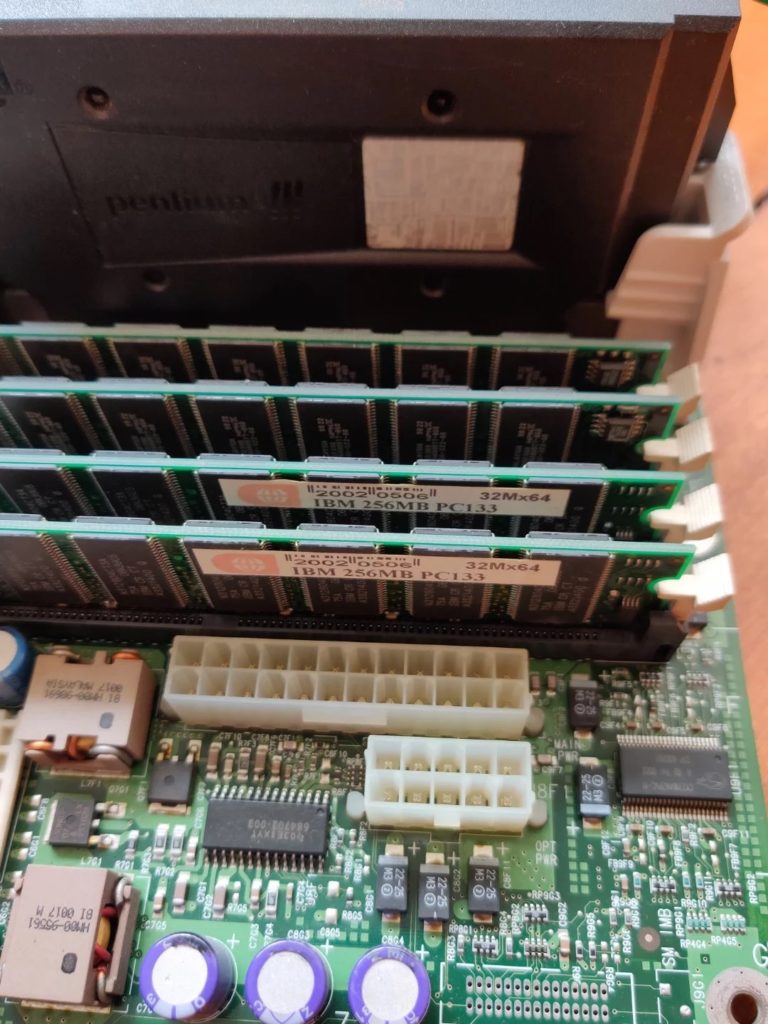
I think it may have 128MB of RAM as well. Not great, but it’s still pretty good.
Being this old also means it most certainly is MP 1.1 compatible, as I just found this mp_v1_1.c lurking in the OSFMK used in the ancient/abandonded mach kernel for MkLinux. Of course half the fun will come in trying to build the kernel from source (can’t find any intel binaries), and seeing if this old board works.
Of course getting the board was a mission in itself, as I had to cross through one of the big protests last night to get it. I took some video of it on my way back, and walked up to where the front line was going to be.
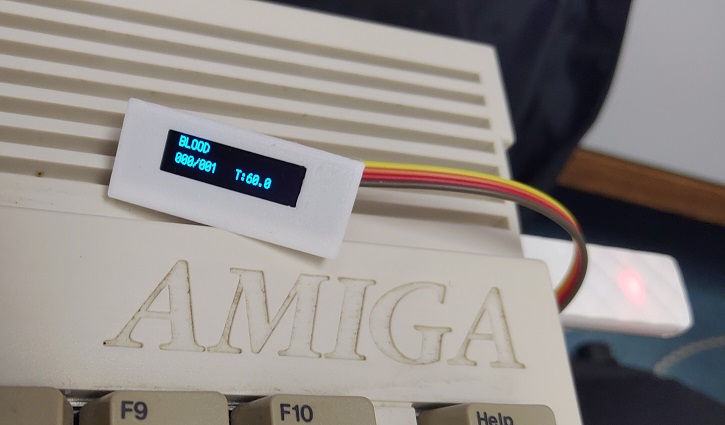
It was everything I had hoped it to be. I paid extra for a 3d printed mounting bracket and the cute led display.
I had one adf handy to test, Captain Blood, a nice pirated version so the weird encoding wouldn’t be an issue.
It was kind of nice watching it boot up, although as slow as I remember a mechanical drive being. But at the same time nice not using 30 year old media.
I have a few more upgrades on the way to deck out my 600, although I need to do some kind of RGB thing as the composite video has so much noise it’s unreal.
Anyway despite the old flame war on floppy emulation, the Goteks are dirt cheap, and. Hell if it’ll work in an Amiga, it’ll work anywhere.
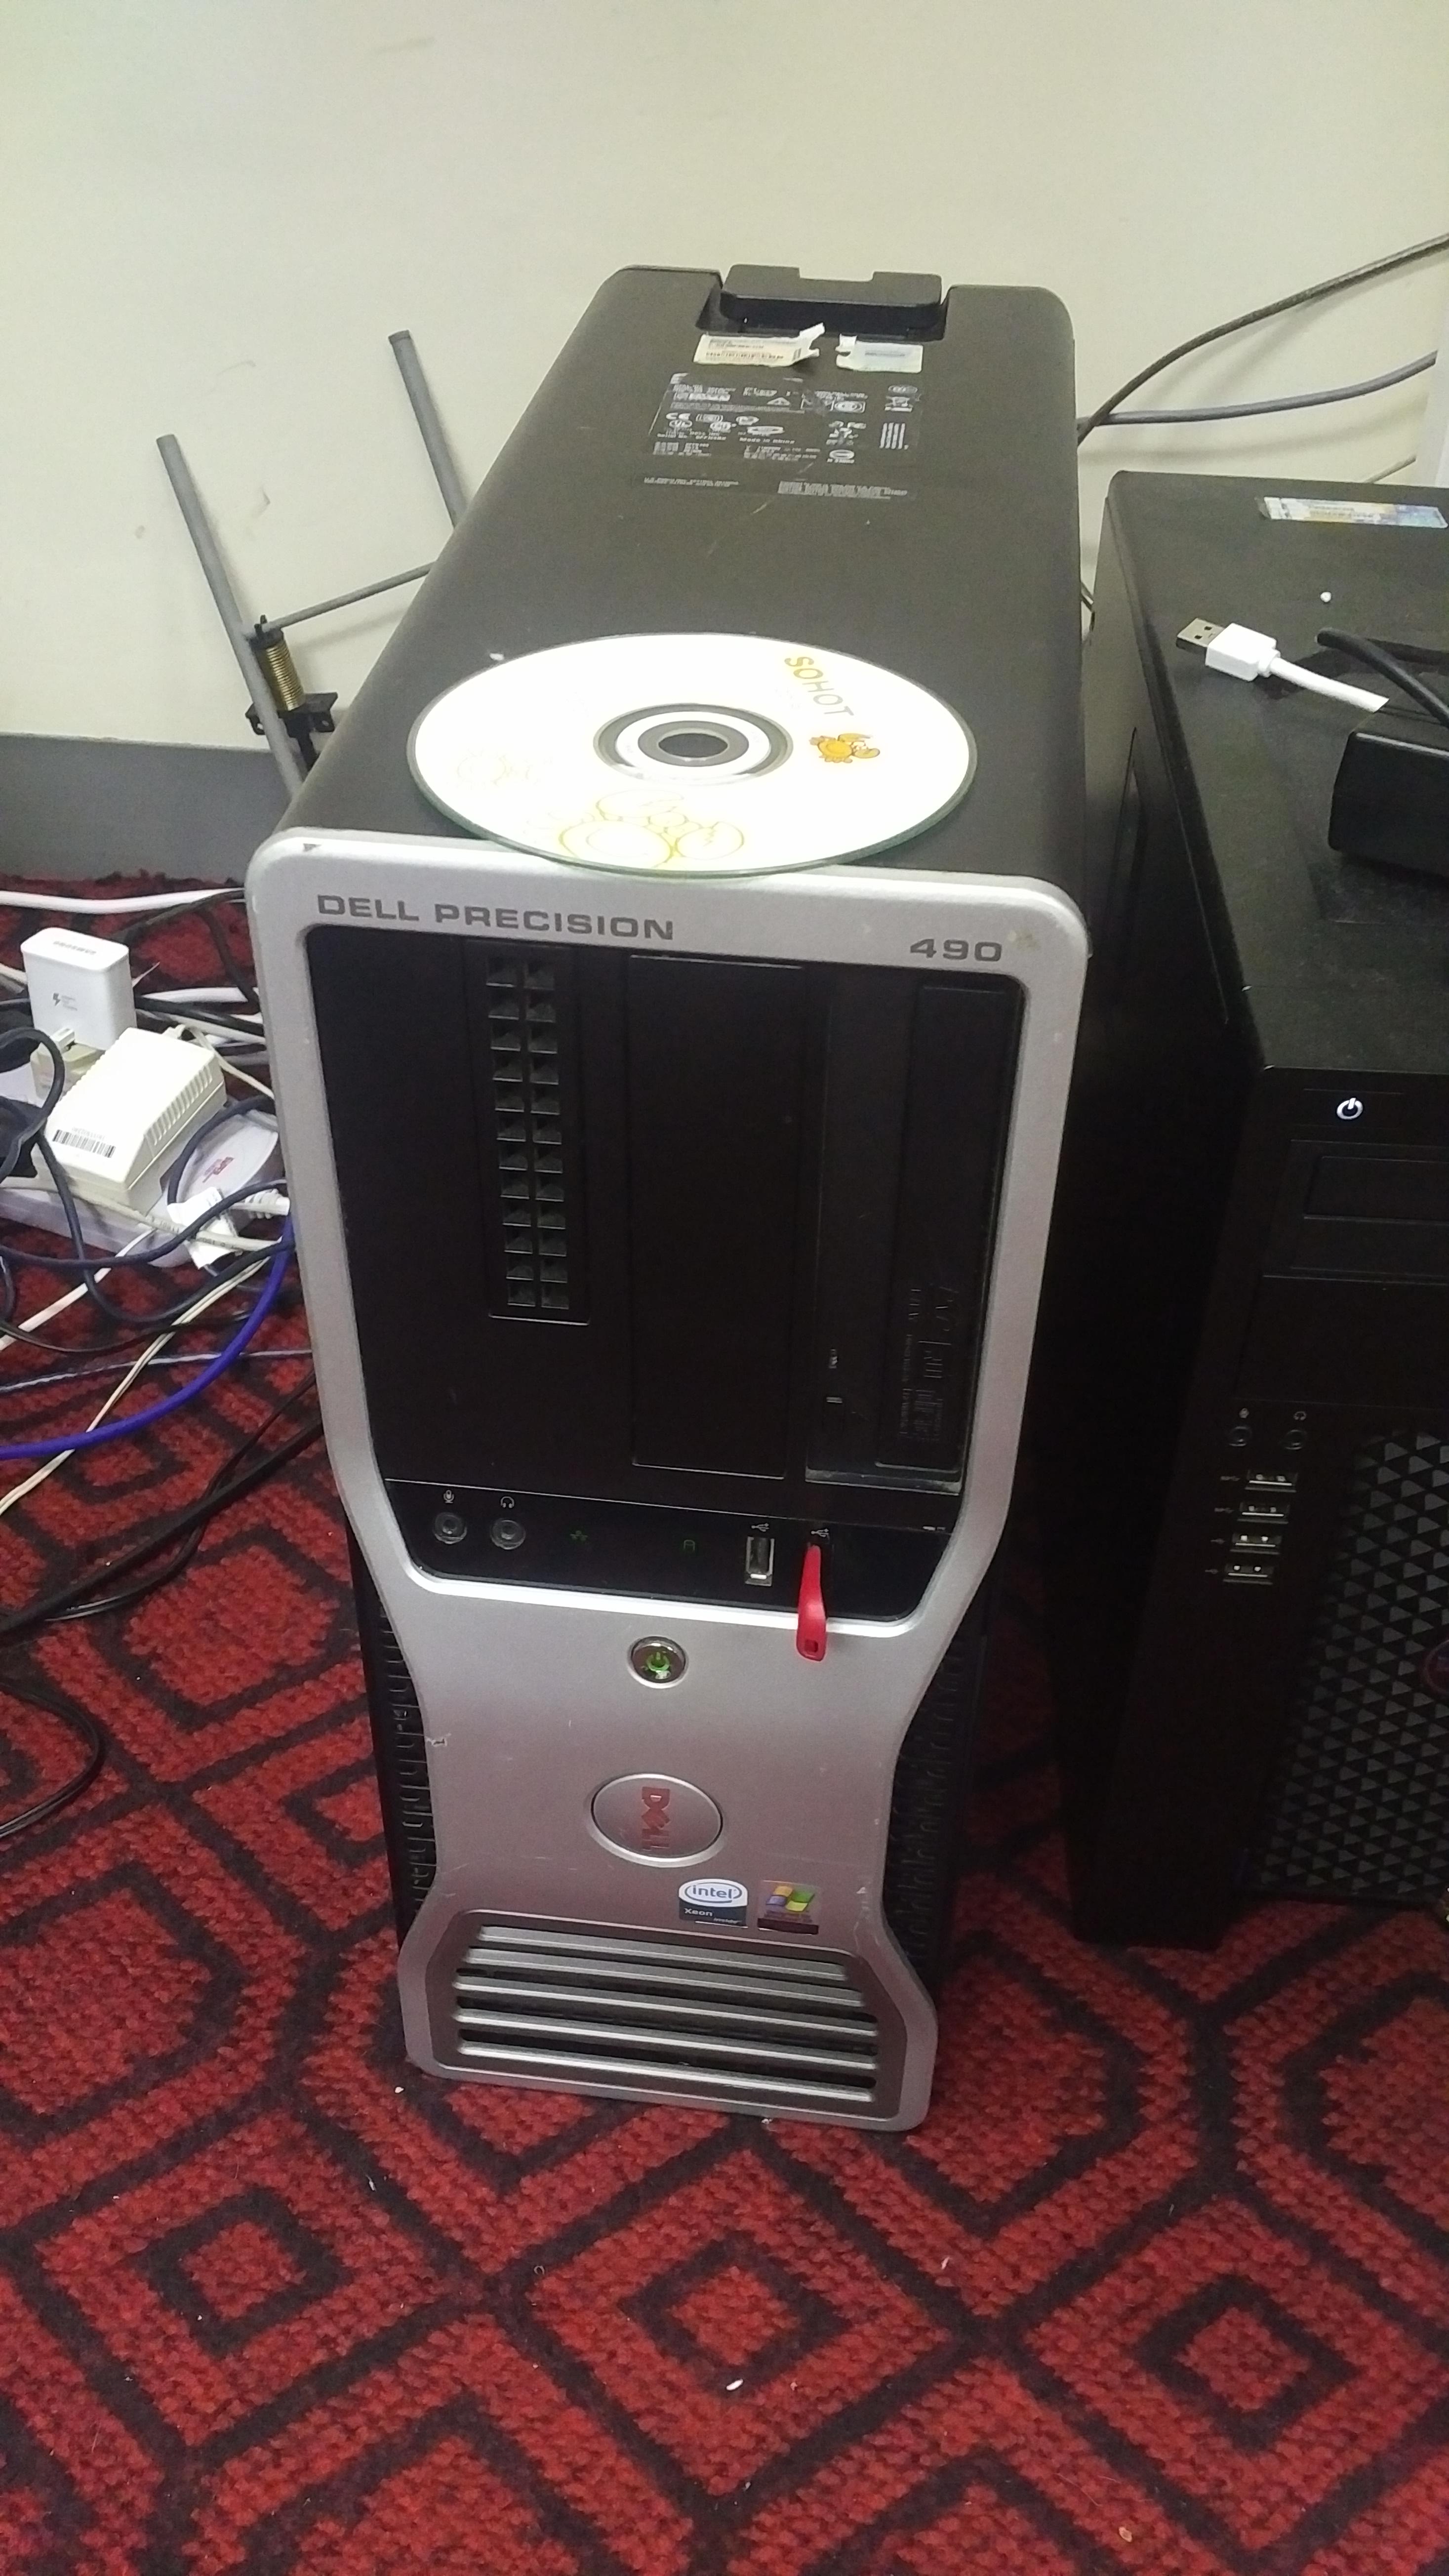
I was cruising around New Capital Computer Plaza, looking for some cisco console cables, and I saw a bunch of old Xeon desktop computers for sale. Prices were in the 250-500 USD range, which seemed pricey to me. And keeping in mind that my desktop is already a Xeon E3-1230, it did seem kind of pointless. But then I saw this Dell Precision 490 for about $99 USD.
Dell Precision 490
Great, so what are the general specs?
Well, the ‘nice’ thing about Dell is that they keep all their old stuff online, so looking at the specsheet we can see It’s not a bad machine for something circa 2006. Even archive.org has the old pricing online too!
Mine came with a Xeon 5160, 8GB of ram, 250 GB disk, and an ATI HD 4850
250GB SATA 3.0Gb/s,7200 RPM NCQ Hard Drive with 8MB DataBurst Cache™ [add $90]
By my calculations this machine was about $5,012 USD, and that isn’t including the after market video card, which would be about $180 USD when it was new in 2008, bringing the total MSRP on this thing to $5,192 USD!
Of course it is now 2016, and this machine is 10 years old, with an 8 year old video card. Also of interest is that it came licensed for Windows XP x64, which was the first publicly available AMD64 OS from Microsoft. Unlike traditional Windows XP, this 64bit version is actually built around Windows server 2003.
The computer came with a pirated copy of Windows 7, which I wanted to promptly remove. I have an old MSDN copy of Windows XP x64 that I wanted to install, however the optical drive is broken, and I needed to install from USB. Thankfully even though this machine is old, it can boot from USB devices. The first step was to download WinSetupFromUSB 1.2 to get XP onto a USB stick. Naturally once I had booted from USB, the disk controller wasn’t supported. The BIOS screen revealed that it was a:
Serial ATA AHCI BIOS, Version iSrc 1.02.25 07222007. Copyright (c) 2003-2006 Intel Corporation. Copyright (c) 2003-2006 Dell, Inc. Controller …
This translated into the Intel iaStor product, and I was able to slipstream in the last version from 2009, 8.9.0.123 into the USB by using nlite.
I have to say that once I had removed the gratuitous pirated Chinese Windows 7, and installed XP that this machine was pretty damned snappy! As always I updated to service pack 2.
The onboard NIC is a Broadcom NetXtreme 57xx gigabit NIC, which unlike the ‘gigabit’ NIC on my newer desktop, this one actually works at 1Gb.
With Windows XP installed, I went to the AMD/ATI site, and found the download for the HD 4xxx series, and went ahead and installed Steam.
I have to say that Half-Life 2 runs GREAT. According to it’s onboard FPS counter I was getting anywhere around 60-180 FPS. Pretty awesome. Fallout 3 runs pretty snappy too. I tried Deus Ex: Human Revolution, and much to my surprise this vintage 2011 game runs on my 2006 Windows XP x64 setup.
What about the overall internet experience? Well this being Windows XP, You are pretty limited by the traditional browsers. Internet Explorer 6 is the default browser which to say it’s dated is an understatement. I prefer Internet Explorer 7 over 6, but they are both so old it doesn’t matter. Internet Explorer 8 is also an option. The last version of Google Chrome to support Windows XP was 49.0.2623.75. Chrome 49 plays youtube just fine, Scripted Amiga is a little pokey, but does run.
And how does this thing compare to my normal desktop? Running Geekbench 2, I get a score of 3396 vs 10864. Now keep in mind this $99 machine only has a dual core processor, while my newer machine has a quad core + hyper threading CPU. An interesting comparison is with the Xeon E5320 CPU, with the Dell eking out a victory.
Installing additional software was possible via Virtual Clone Drive, while I did have ISO images of stuff I’ve had physical media of in the past, a broken drive wasn’t going to help me read anything.
I didn’t activate it, but Windows 10 will run on this machine as well. I’ll probably upgrade by getting a second JD210 heat sink (I already found another 5160 processor for $10)
It’s a great machine for sub $100. I’d hate to have spent over $5,000 on this thing, but it’s kind of cool to see that a 10 year old machine like this can still be sort of usable. Of course updating the software will certainly go a long way in making it really usable.
So, Ive been playing around with emulators, and for some reason I think it’d be awesome to have a real one. Â So I check ebay, and yeah there is a few, Altered Beast, Shinobi, and even an Outrun, and a couple of Hang Ons! Â Wow this is so cool, then I check the prices, and shipping and yeah it’s REAL expensive, REAL quick. Â And even back when I did own an Altered Beast board, I never got it hooked up as it was ‘too hard’.
So, I’m about to give up on the whole thing, then I spot this Altered Beast board, for sale for a mere €50!  And the shipping isn’t too insane either!  But looking at the PCB board in the picture, and I can tell something is not quite right:
€50 board!
Now for those who don’t know, this clearly is not a System16 board. Â However it certainly does have a 68000, and z80 processor! Â Could this be some 2nd tier manufacturing job? Or perhaps it’s one of these infamous bootleg boards?
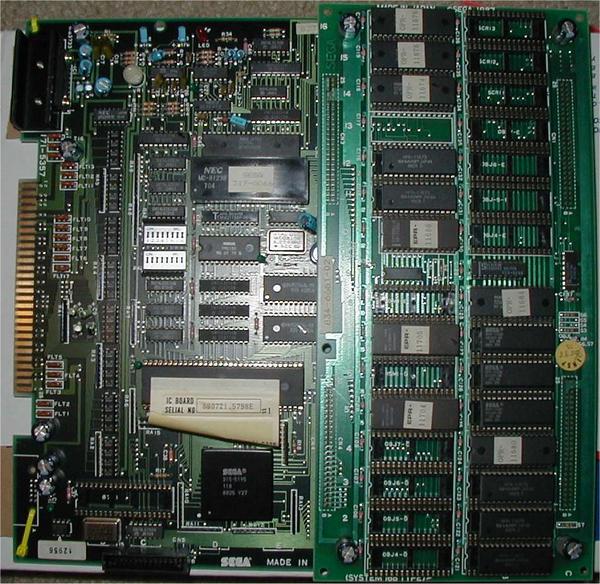
For comparison, here is a real SEGA System16 board
A real System16 board
As you can see, they really look nothing alike.  Also the other give away is that the far cheaper €50 board is JAMMA compatible.  All the old SEGA boards are not.
What the heck is JAMMA anyways? Â You see that edge connector? Â That is where you would plug in the power, coin catchers, the player buttons, and the speakers to. Â Even in the old days, recycling cabinets was a thing, and having modular boards was a ‘good thing’. Â But SEGA didn’t want you to swap out their boards with anyone elses, so they used their own system. Â But it’s just a wiring thing, there is nothing digitial locked down, no encryption either (look at HDMI!). Â So you can use an adapter, to interface from SEGA to JAMMA.
Anyways, I went ahead and placed the order.
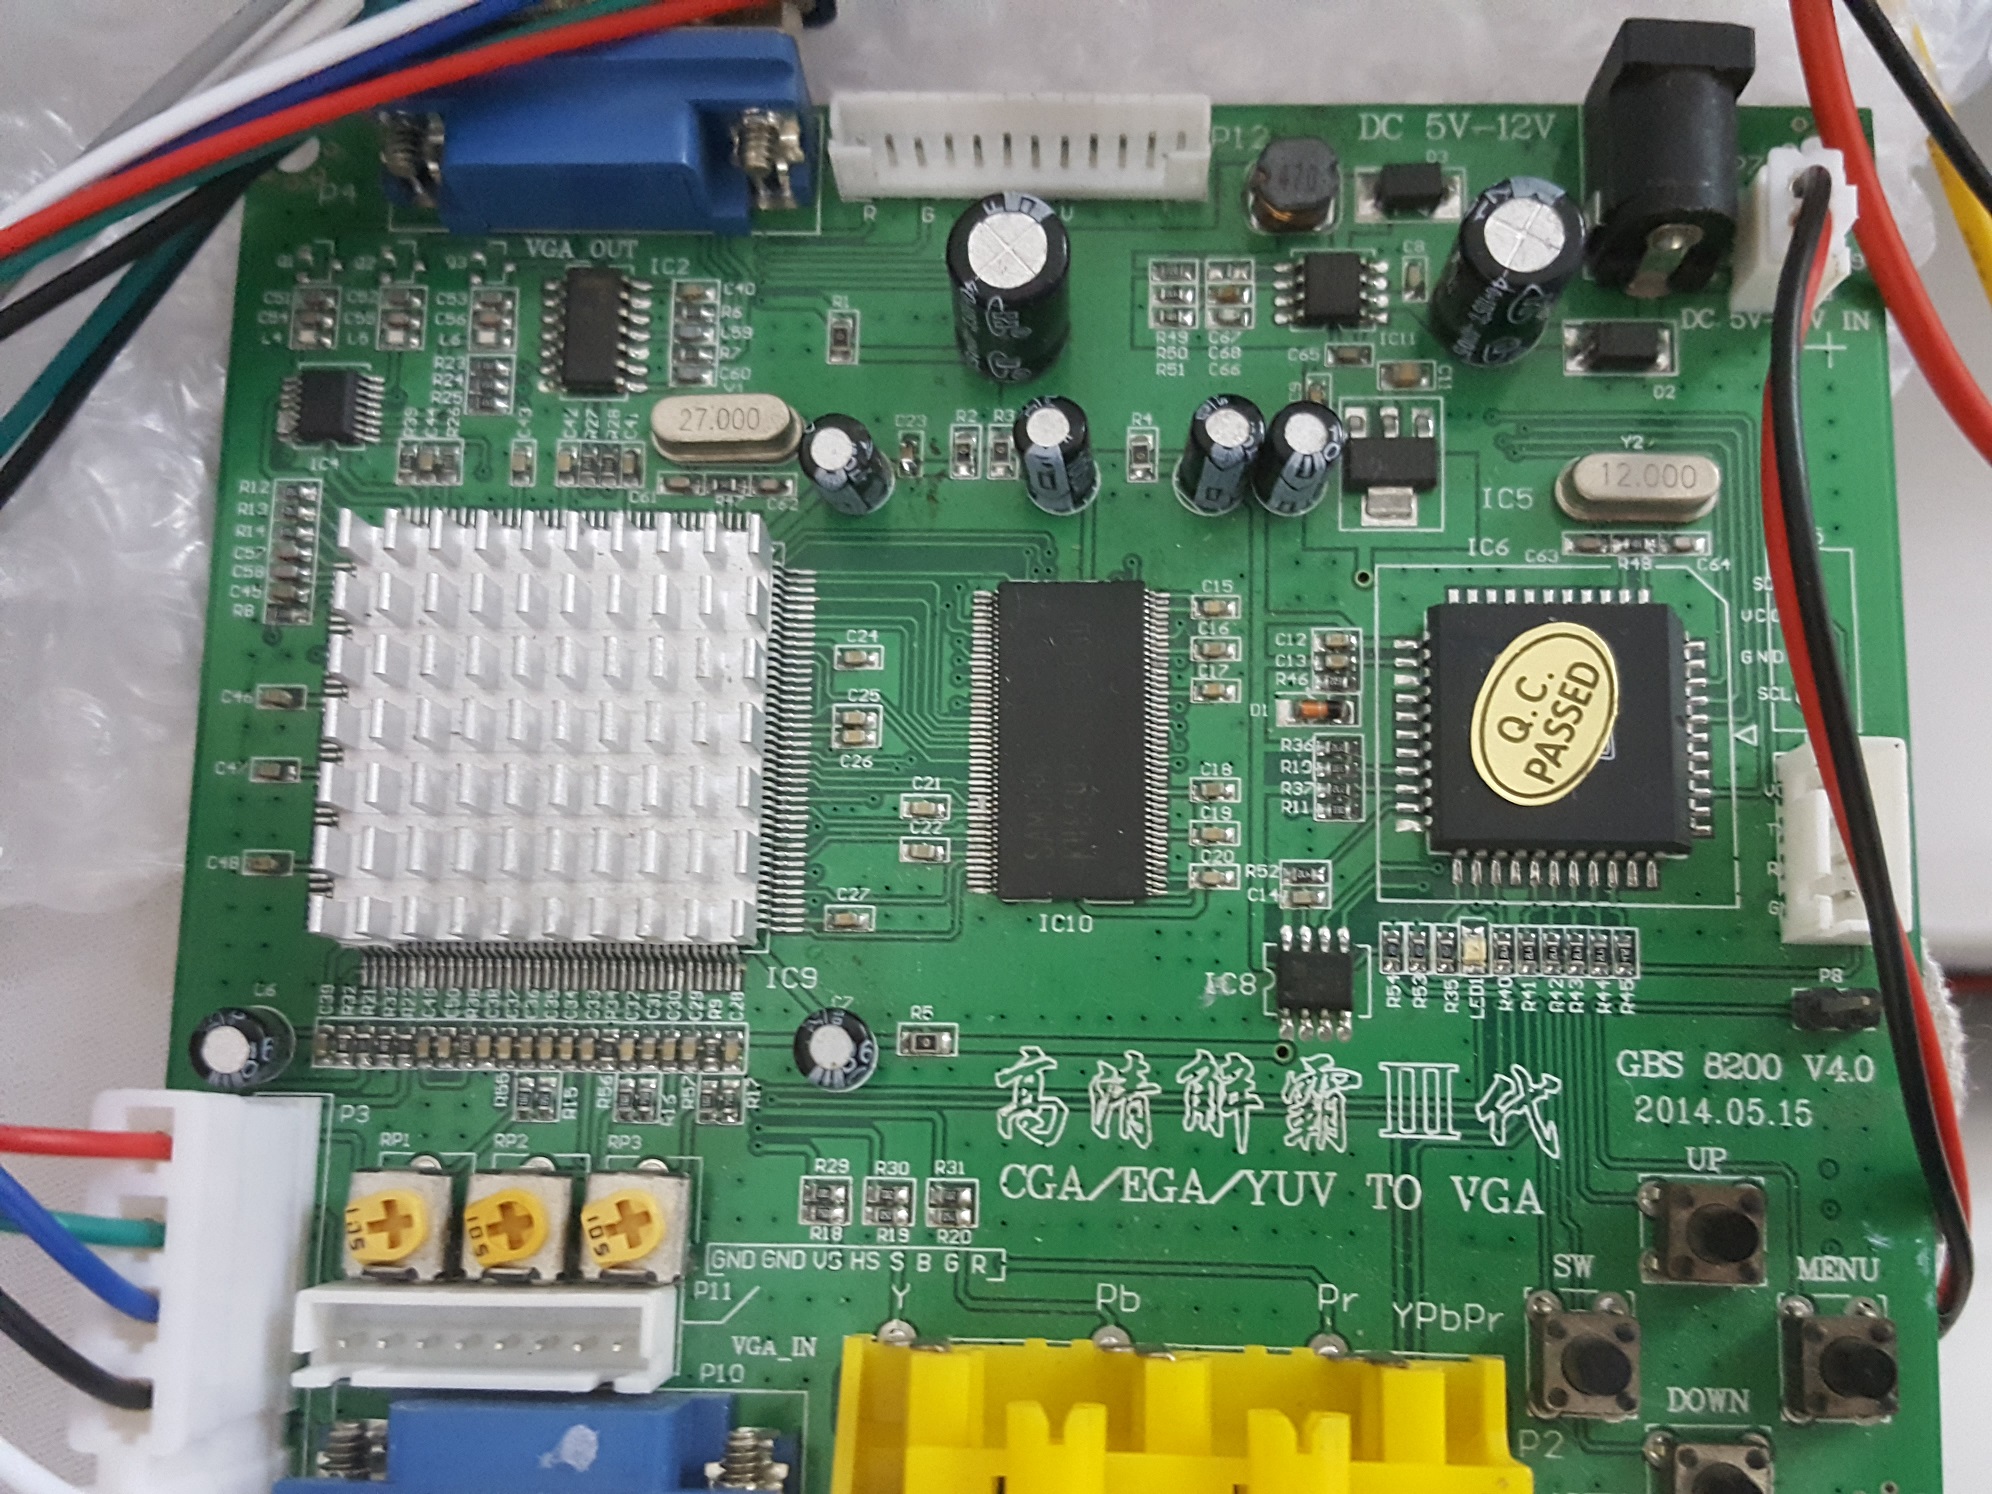
Now doing some more research, and the monitors used in 1980’s arcades were RGB+Sync driven.  Which are ancient, and of course, HEAVY. But a little bit of searching led me to the to the GBS 8200 v4.0.
GBS 8200 v4.0
AKA known as the “GBS8200 CGA/EGA/YUV/RGB To VGA Arcade Game Video Converter”. Â Well this certainly looks perfect! Â I mean from the description alone, it’ll do what I want. Â Even better they make them a few KM from here, and I could get one for ~ $20 USD. Â Perfect.
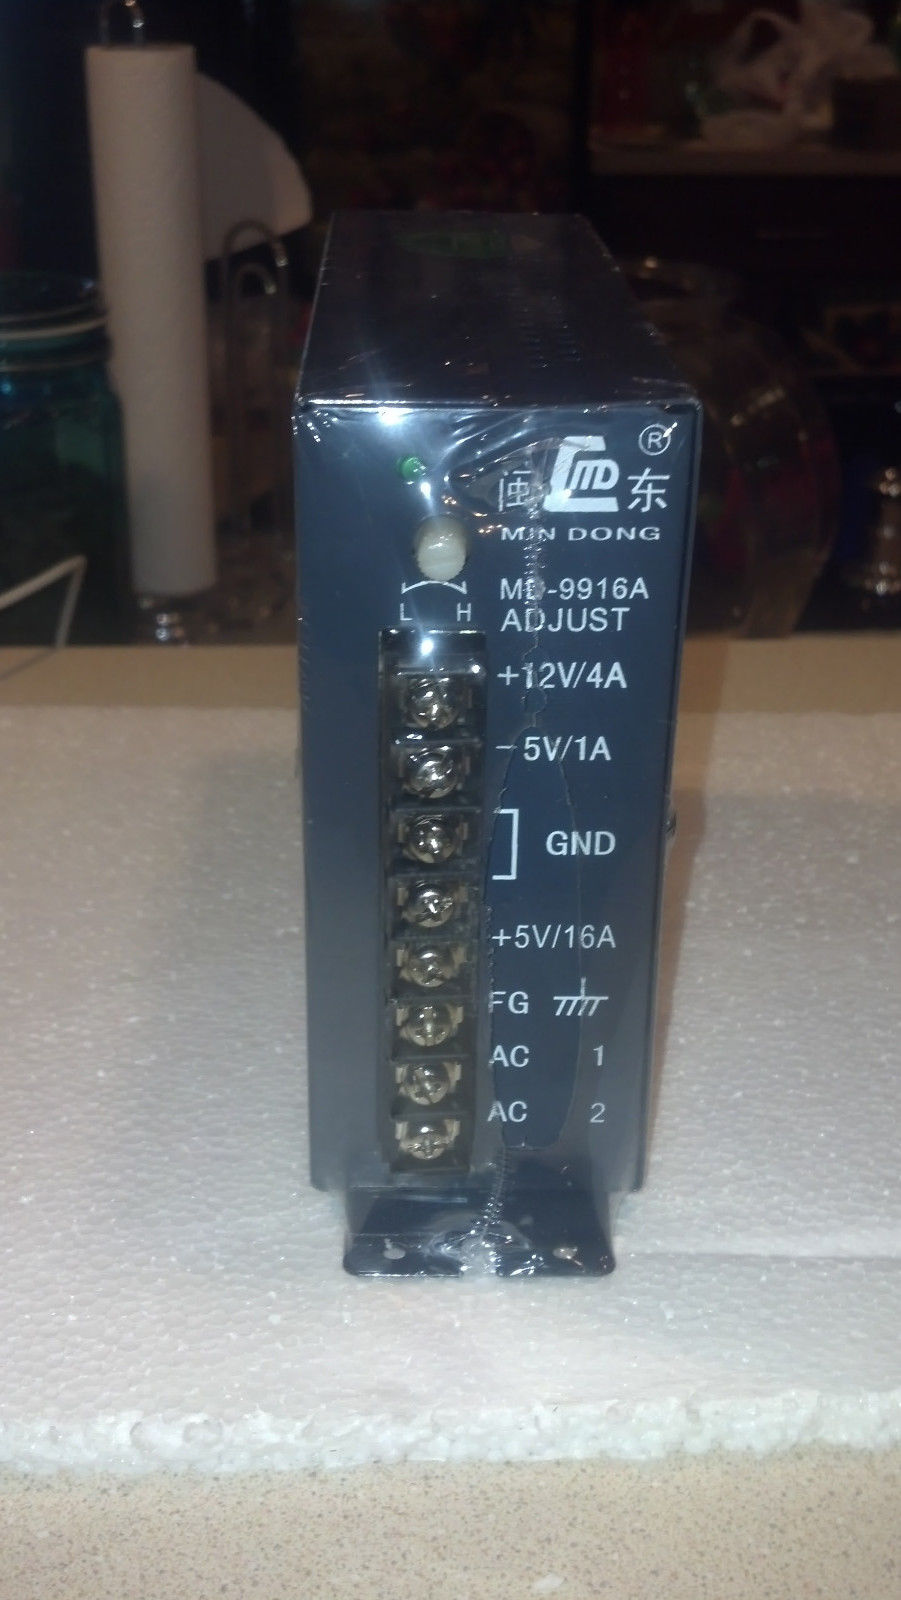
Next up is the power, I decided to get a “JAMMA” power supply. Â A bunch of searching, and this one was the cheapest one I could find, and again shipping wasn’t too bad, but not great either. Â The supply was again around $20 USD, but shipping was $15. OUCH.
MD-9916A JAMMA switching power supply
I figured having the ability to screw in would be a ‘good thing’.
Naturally, I need the cables to wire this mess together, so I ordered a “JAMMA Cabinet Wire Wiring Harness Loom” for about $15 USD. Â Naturally mine is all in Chinese since I went cheap. Â But it’s OK, I have a multi meter so I can test continuity.
Finally I saw a QANBA N1 arcade style joystick in a local mall for $230 HKD.  That is less than HALF the price of the ones I see online in the USA, Europe, or Canada.  So at least that is nice.  Now with all the parts, I just have to wait for the board to arrive.  And wait, and wait.  Nothing updated on ebay, then suddenly I check a few days later, as it’s been two weeks by this point, and it turns out that it’s been sitting in the post office in Hong Kong for a week!  If only they let me know…  SF Express, and FedEx have come without issues.  Oh well, now I have the board!
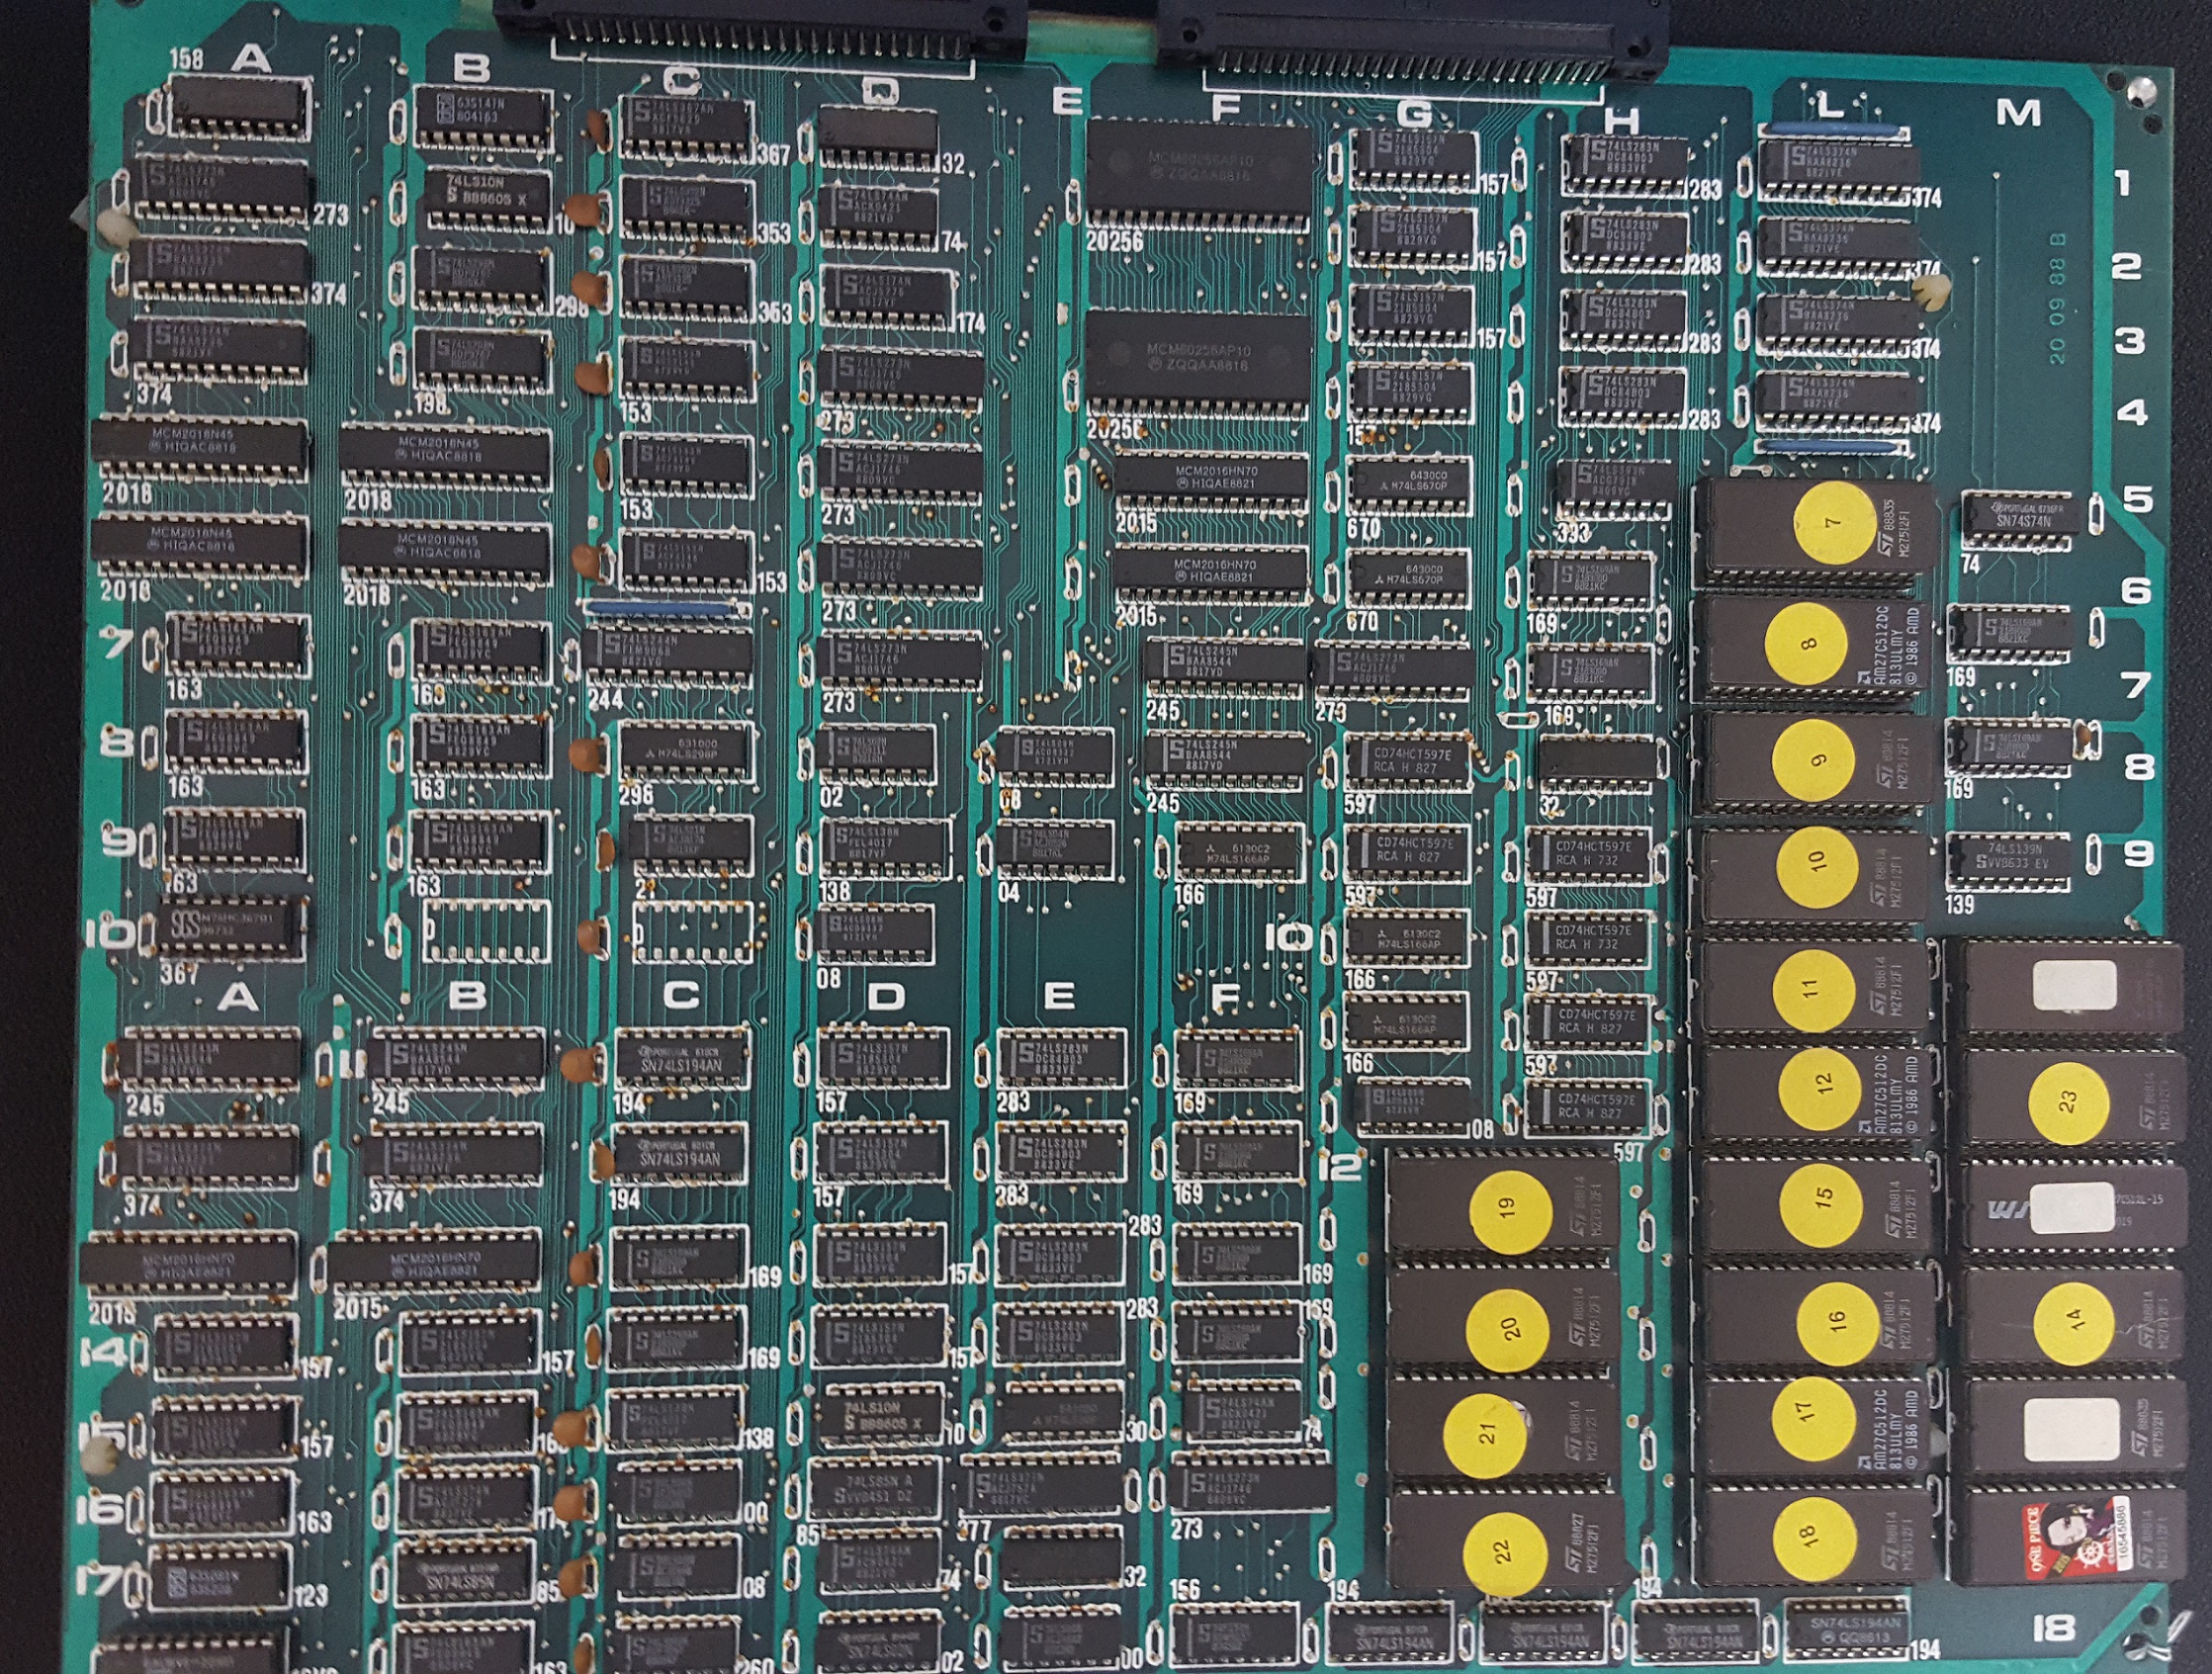
I can now finally flip it over to reveal:
Graphics board
It’s all 74L TTL logic chips, EEPROMS, and some PALs as well. Â There are NO custom SEGA chips at all. Â If anything this is what is inside of the SEGA ASIC’s on the System16 board. Â Whoa.
Ok, so this is certainly a bootleg board. Â A quick search of MAME shows that they have a Datsu ROMset, so maybe this is one? Â Nothing on the boards say Datsu, however it does say ALTER/S, and it shows being QA’d on 11/11/88.
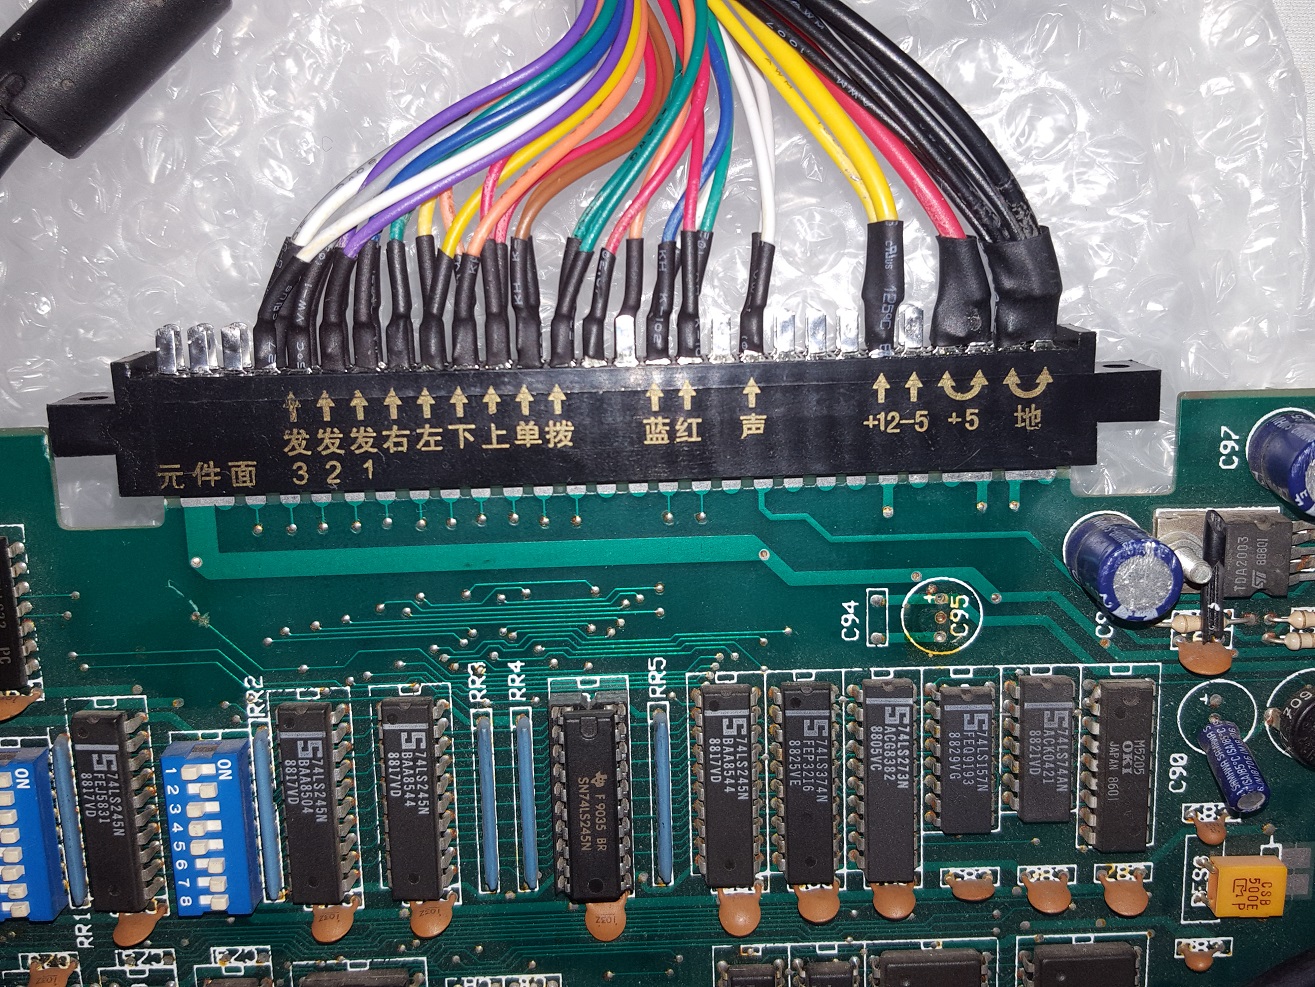
Now it’s time to cable this thing up!
But first JAMMA boards are typically key’d so you cant put the adapter in backwards. Â There is no key on this board, so I need to check the voltages to make sure I don’t flip it backwards.
JAMMA Standard Pinout
**
Solder Side
Parts Side
**
GND
A
1
GND
GND
B
2
GND
+5v
C
3
+5v
+5v
D
4
+5v
-5v
E
5
-5v
+12v
F
6
+12v
Key, No Pin
H
7
Key, No Pin
Coin Counter 2
J
8
Coin Counter 1
Coin Lockout
K
9
Coin Lockout
Speaker (-)
L
10
Speaker (+)
NC
M
11
NC
Video Analog Green
N
12
Video Analog Red
Video Composite Sync
P
13
Video Analog Blue
Service Switch
R
14
Video Ground
Tilt/Slam
S
15
Test
Coin B
T
16
Coin A
Player 2 Start
U
17
Player 1 Start
Player 2 X-Dir
Player 2 Up
V
18
Player 1 Up
Player 1 X-Dir
Player 2 Y-Dir
Player 2 Down
W
19
Player 1 Down
Player 1 Y-Dir
Player 2 X-Clk
Player 2 Left
X
20
Player 1 Left
Player 1 X-Clk
Player 2 Y-Clk
Player 2 Right
Y
21
Player 1 Right
Player 1 Y-Clk
Player 2 Button 1
Z
22
Player 1 Button 1
Player 2 Button 2
a
23
Player 1 Button 2
Player 2 Button 3
b
24
Player 1 Button 3
1 Player 2 Button 4
NC
c
25
NC
Player 1 Button 4 1
1 Player 2 Button 5
NC
d
26
NC
Player 1 Button 5 1
2 Player 2 Button 6
GND
e
27
GND
Player 1 Button 6 2
GND
f
28
GND
This is the standard pinnout of a JAMMA harness. Importantly you can see it’s Ground than +5v. Â So looking at the 68000 processor to check it’s pinnout:
D4
1
64
D5
D3
2
63
D6
D2
3
62
D7
D1
4
61
D8
D0
5
60
D9
AS
6
59
D10
UDS
7
58
D11
LDS
8
57
D12
R/W
9
56
D13
DTACK
10
55
D14
BG
11
54
D15
BGACK
12
53
GND
BR
13
52
A23
VCC
14
51
A22
CLK
15
50
A21
GND
16
49
VCC
HALT
17
48
A20
Reset
18
47
A19
VMA
19
46
A18
E
20
45
A17
VPA
21
44
A16
BERR
22
43
A15
IPL2
23
42
A14
IPL1
24
41
A13
IPL0
25
40
A12
FC2
26
39
A11
FC1
27
38
A10
FC0
28
37
A9
A1
29
36
A8
A2
30
35
A7
A3
31
34
A6
A4
32
33
A5
 You can see it’s power input is on pin 14.  Likewise, the ground is on pin 53.  Also looking at the edge connector, you can see the two pairs of pins, which correspond to the double ground, and double +5v.
Connecting the harness
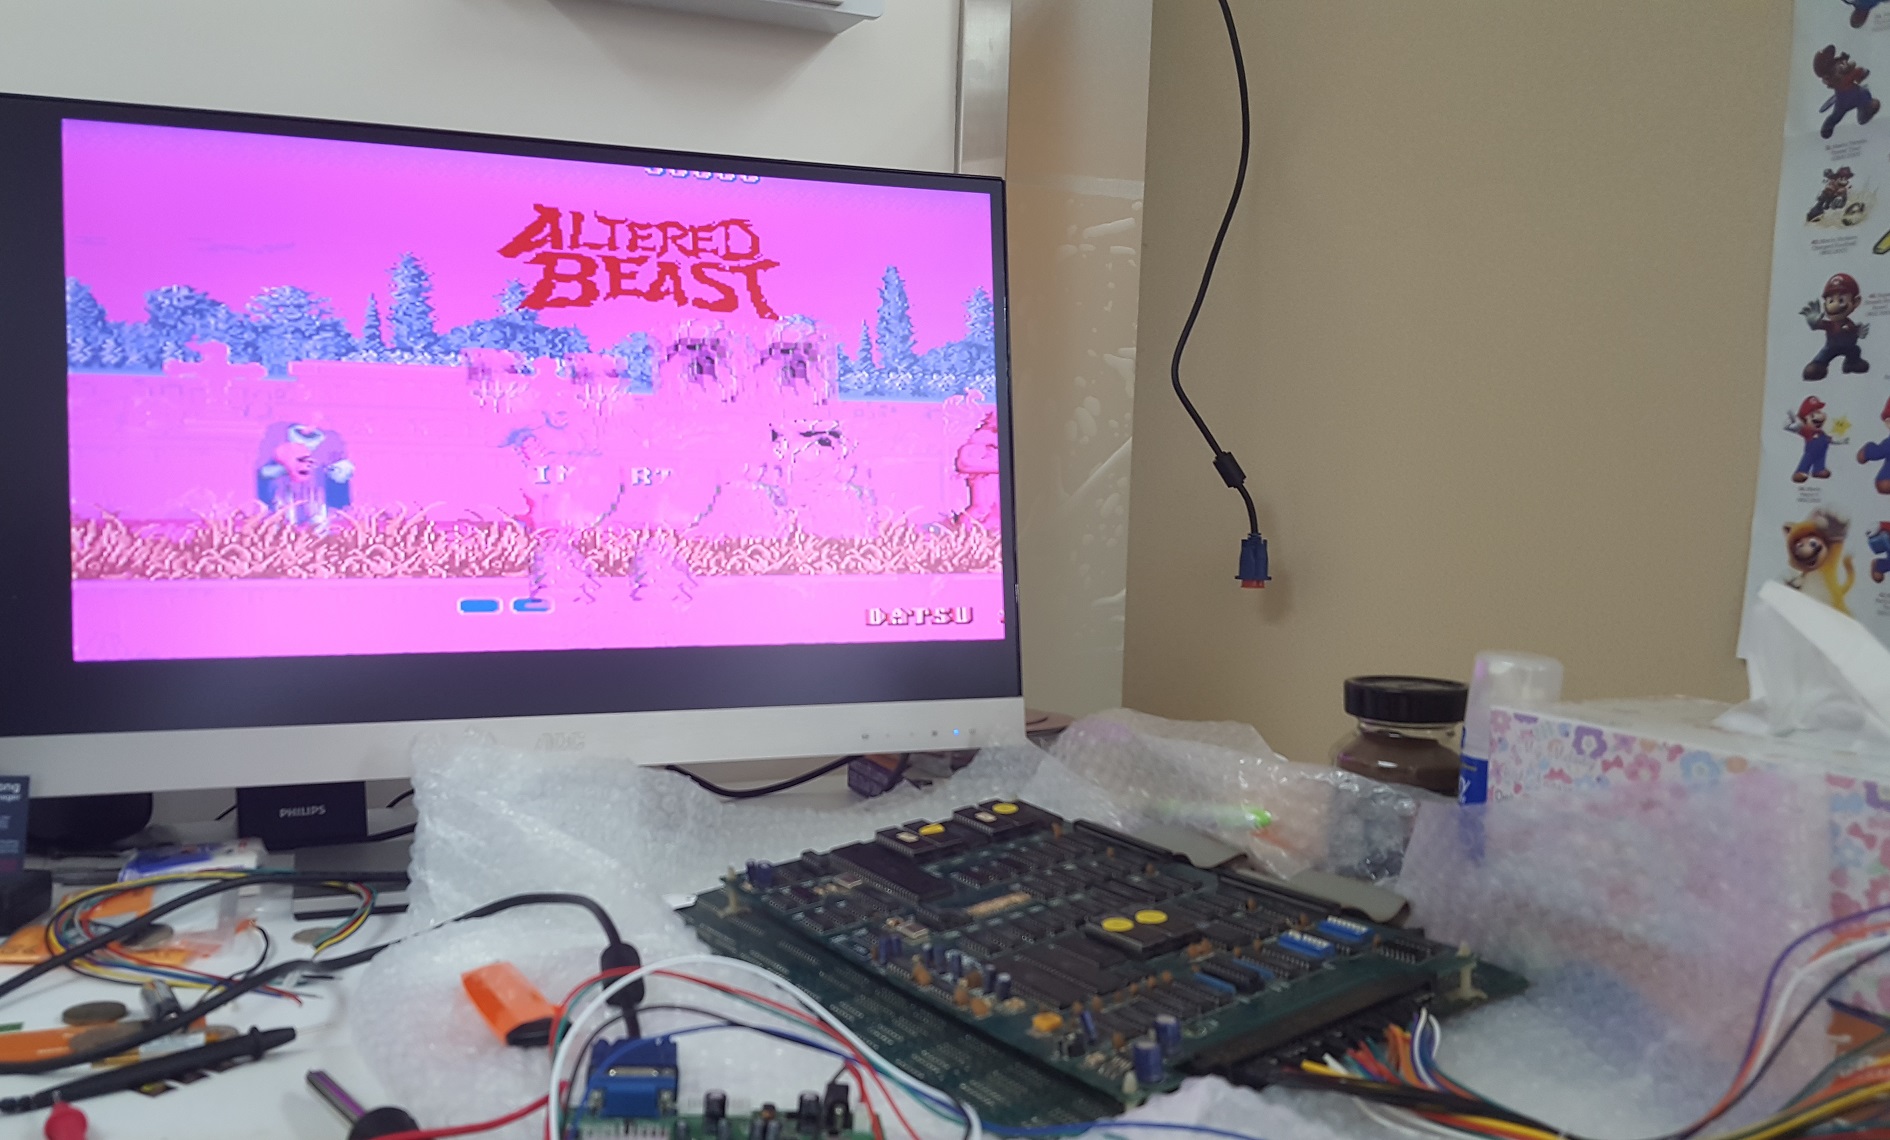
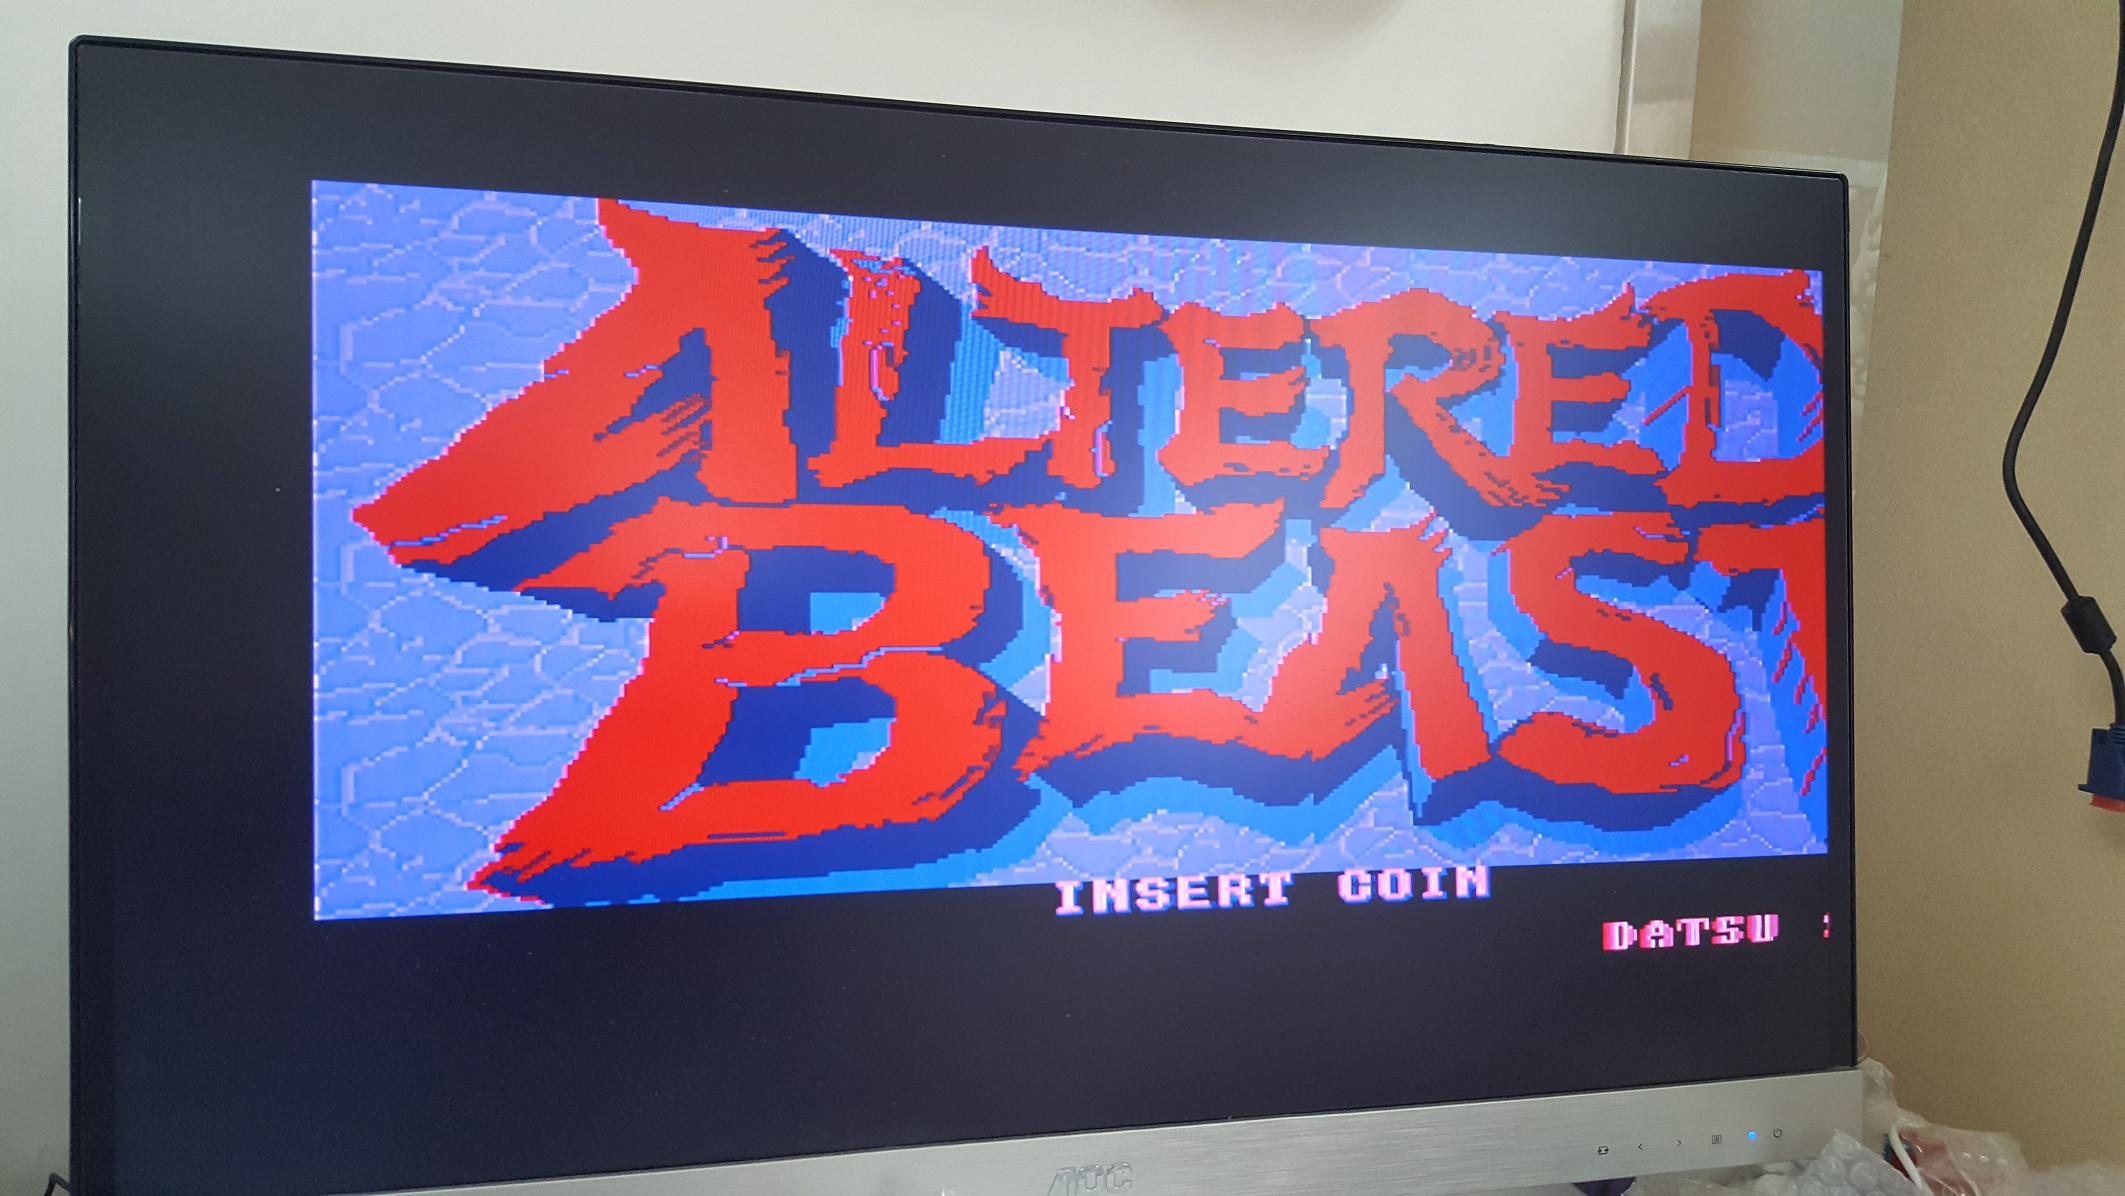
From there, it was a matter of connecting up the power supply, adding in the power to the video board, connecting the RGBS connector, and powering it up. Â It was very cool to get a glimpse of Altered Beast!
Something is wrong
And hello, it is a Datsu board.  I’ve tried to google about these boards, and all that I could find out is that they seemed to be popular in Italy.  They may have been made in Korea.  There was another variation called ‘Mutant Warrior/Super Warrior‘.  There was some posts about it in an Italian game forum mameitalia.net, and arcadeitalia.net . Google translate works fine enough to read, but they were in smaller places that couldn’t afford mainstream games, so enter the bootlegs.  And this makes sense, as the board I got was from rural France.
I maybe had a picture for 20 seconds, it was frozen, then the screen went black. Â I power cycled, to nothing. Â I tried it again to a green screen. Â And again to a green screen. Â At this point I think it’s died. Â I let it rest for a few minutes, and try again. Â Nothing. Â I leave it powered up, and feel the processor, and it’s warm. Â It’s doing something, so I think. Â So I start to play with the video board, and as I change resolutions, I get an image!.. then it disappears. Â Power cycling, and changing resolutions occasionally gives me an image. Â I look more closely at the CPU board, and notice that it has 4 standoffs placed on each corner. Â There is nothing in the middle, and over the past 28 years the board is sagging.
In order to fix the sag, I decouple the two boards, and spread them out. Â I try it again, and it doesn’t show me anything. Eventually I play with all the video board settings, and manually set it to the RGBS input, and then the image stays! Â The board is running. Â I tweek some of the settings, and the pink goes away, and now it looks correct!
LOGO
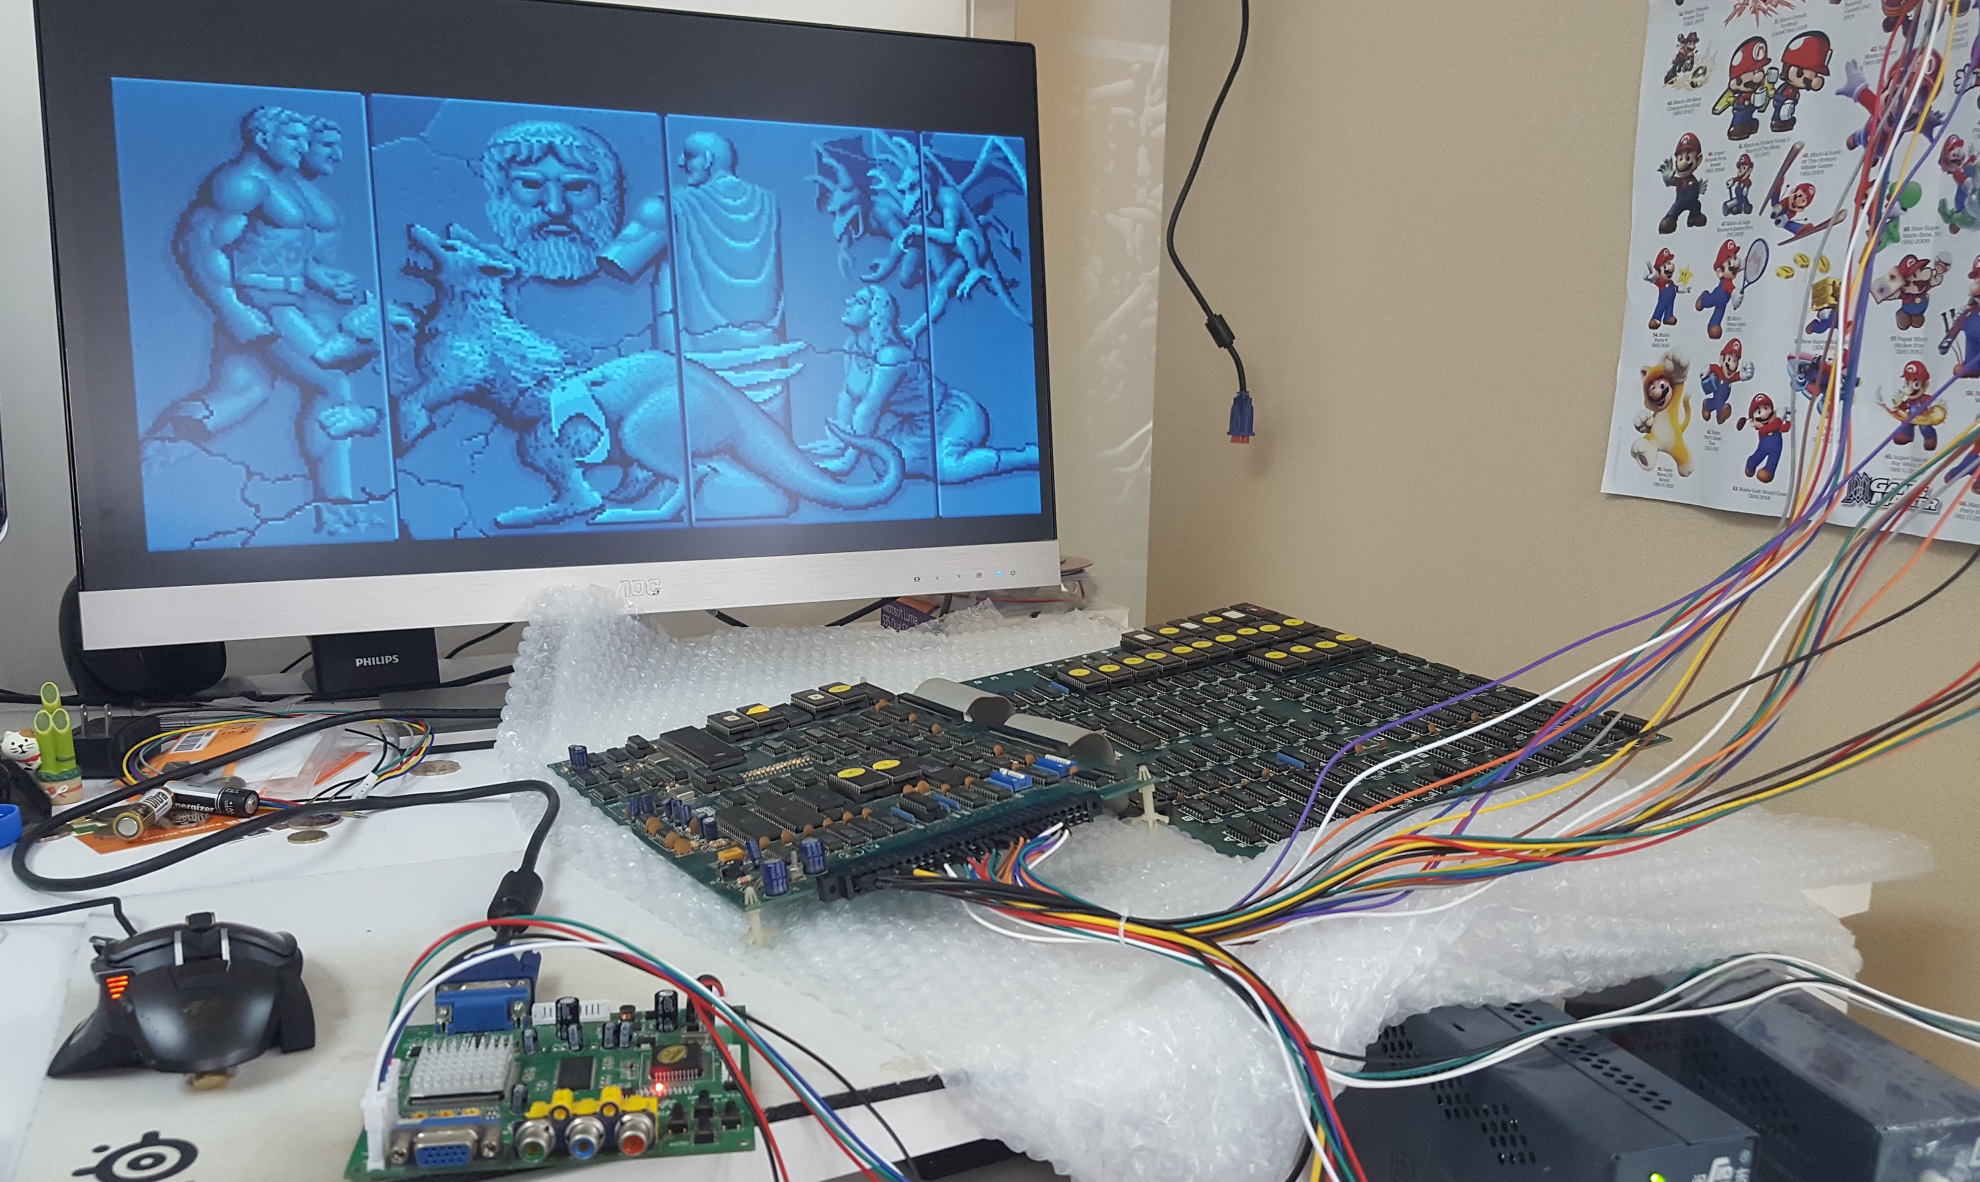
And even the intro animation is OK
Looks good
OK, now it’s time to turn it off, and wire up the joystick.
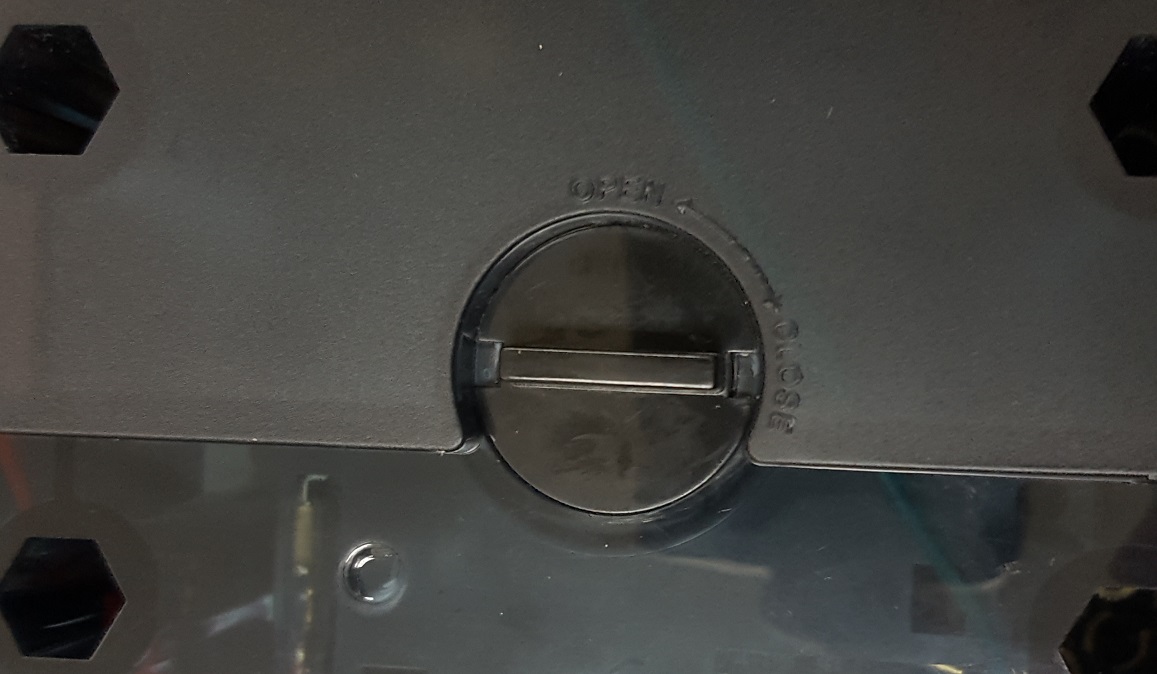
The first step is to remove the joystick ball, and on the QANBA N1 you first flip it upside down, and remove the little cover.
Remove the cover
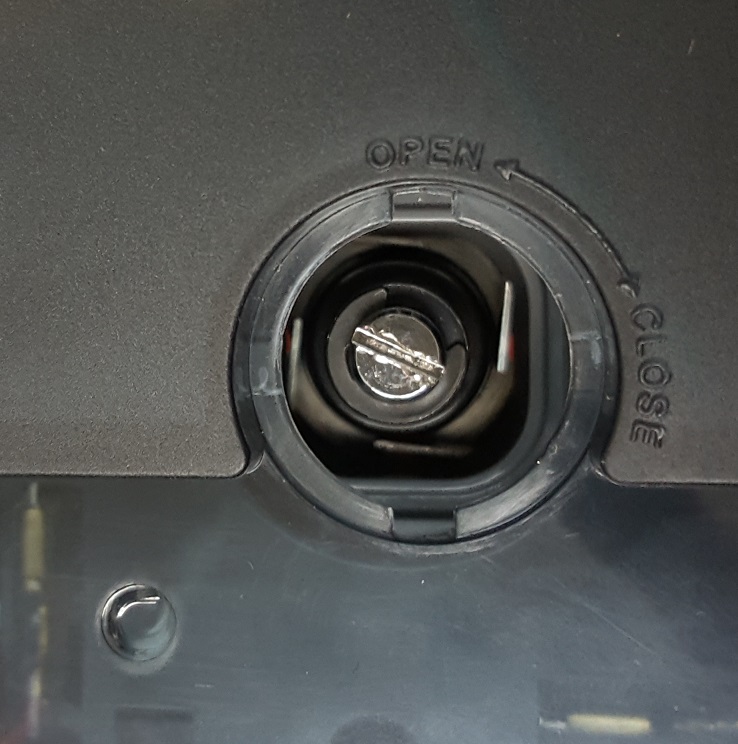
to reveal the screwdriver slot to let you hold the stick in place as you unscrew the ball.
slot
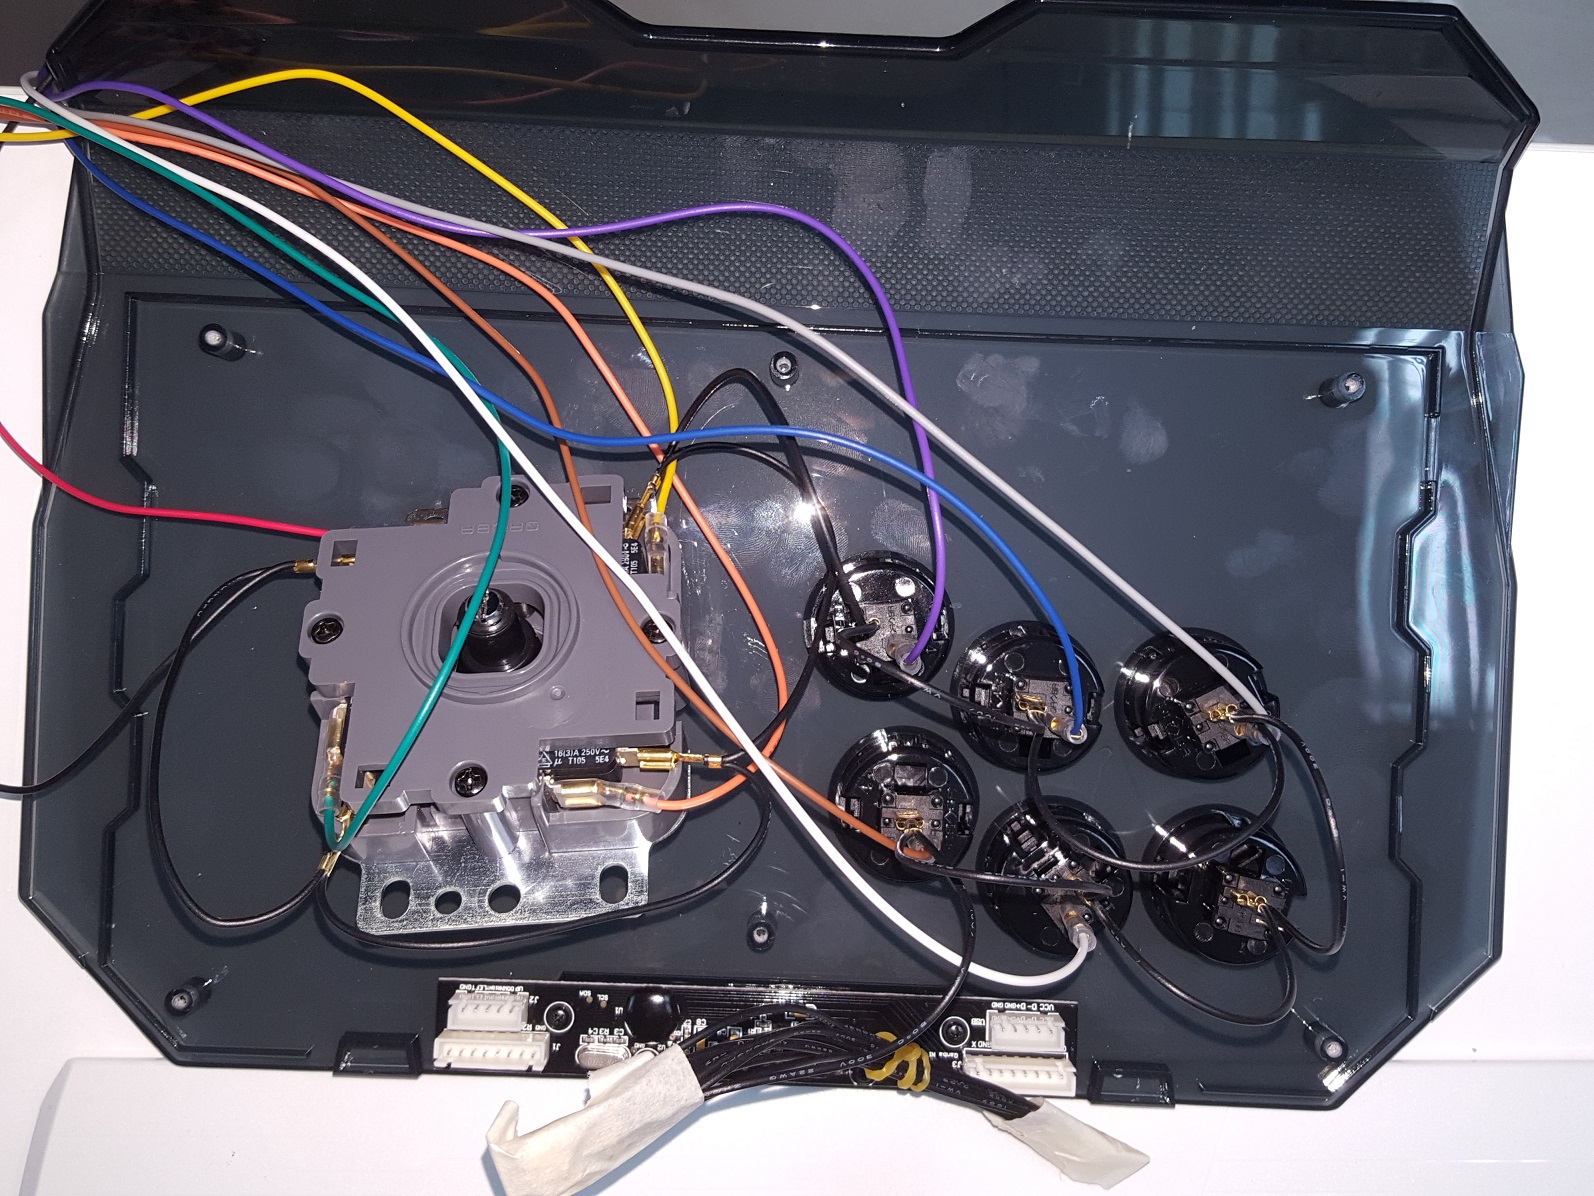
Now it pops off, and it’s really easy to remove the USB interface cables, and drag in the JAMMA cables. Â Again use a tester to tone out what goes where. DO NOT FOLLOW MY COLORING GUIDE. Â I’m pretty sure there is no colour standard, so just because mine is like this, yours will 99.9999% not be. Â The only common thing is that each of these buttons needs a ground.
Joystick wired up
My harness has a common ground for P1 and P2, so I just tapped up the end and tucked it in the joystick body. Â Now with wired up, I can put the joystick back together, and play!
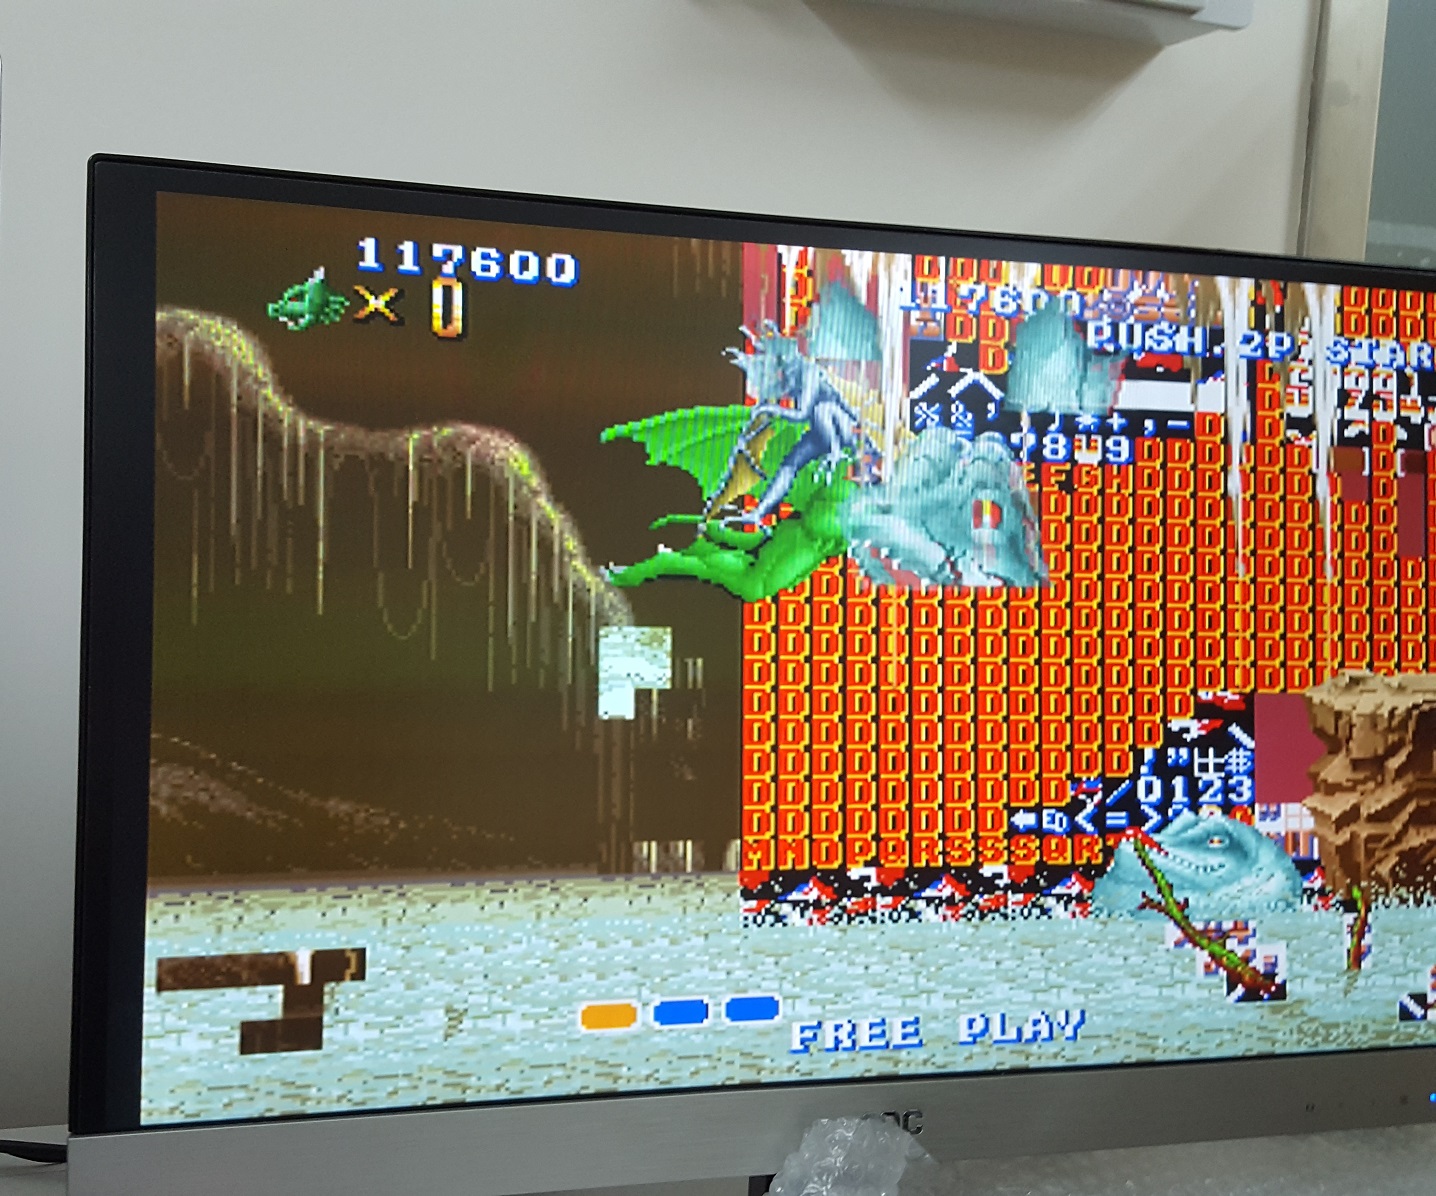
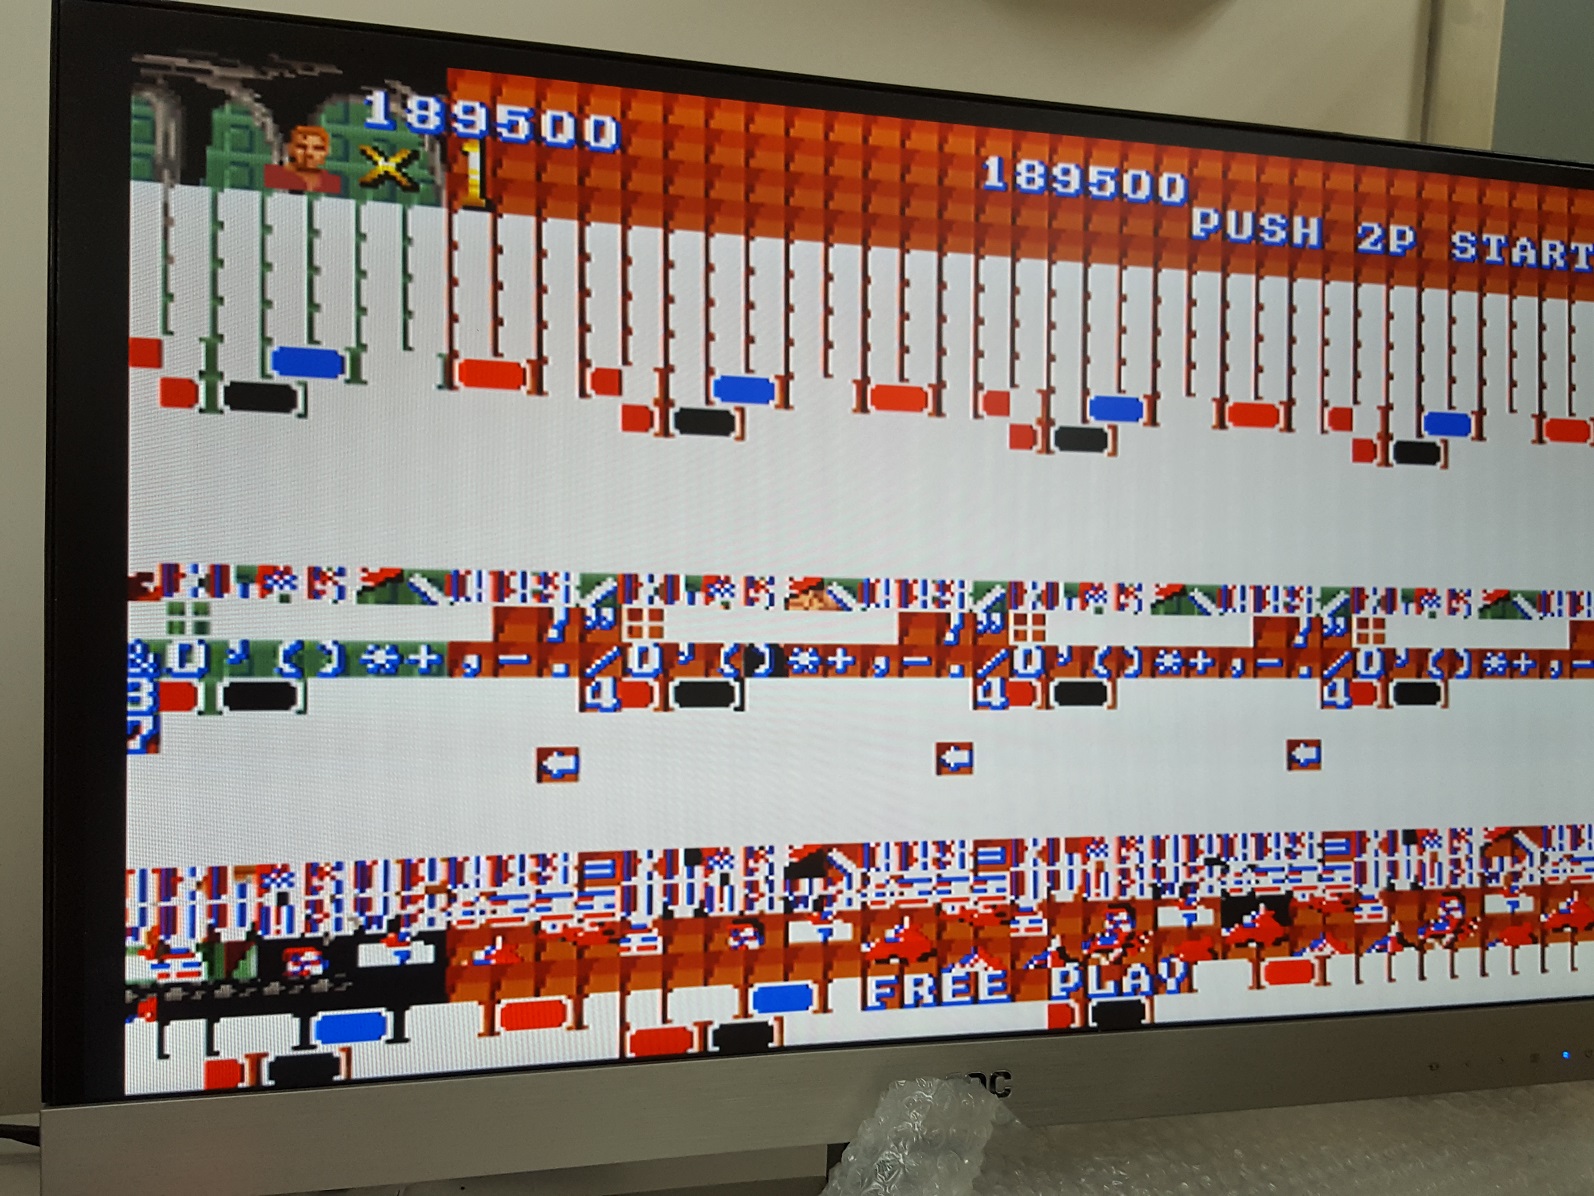
And that is when I could finally see that something was wrong. Â I was doing pretty well, then in the 2nd level I saw this weird thing:
An actual wall of text
The sprites are working fine, and the gameplay continues. Â But eventually the wall of text effect went from the background to the foreground obscuring game play.
foreground tile corruption
So no doubt something is bad on the board. Â I need to get it looked at, and see about first dumping and checking the EEPROMS. Â Next the RAM on the graphics board, may be suspect as well. Â I think the CPU is fine since it runs OK, I’m just unable to really see pass the wall.
For the heck of it, I went and got some powered speakers, and hooked them up:
And it sounds so different from the SEGA version. Â An inspection of the board shows that there is no YM2151, but rather a pair of YM2203’s and an OKI M5205 for the speech synths.
In retrospect, I probably should have gone with something like the arcade supergun. Â I didn’t know it was a thing unfortunately. Â My solution is more “traditional” , but it works.