20 years of OpenBSD

puffy58Yes, 20 years!

The list announcement:

OpenBSD's source tree just turned 20 years old.

I recall the import taking about 3 hours on an EISA-bus 486 with 
two ESDI drives.  There was an import attempt a few days earlier, 
but it failed due to insufficient space.  It took some time to 
repartition the machine.

It wasn't terribly long before David Miller, Chuck Cranor and 
Niklas Hallqvist were commiting... then more people showed up.

The first developments were improvements to 32-bit sparc.

Chuck and I also worked on setting up the first 'anoncvs' to make 
sure noone was ever cut out from 'the language of diffs' again.
I guess that was the precursor for the github concept these 
days :-).  People forget, but even FSF was a walled garden at 
the time -- throwing tar files with vague logs over the wall 
every couple months.

I was lucky to have one of the few 64Kbit ISDN links in town,
otherwise this would not have happened.  My desktop was a 
Sparcstation 10; the third machine I had was a very slow 386.

The project is now at:

~322,000 commits
~44 commits/day average
~356 hackers through the years

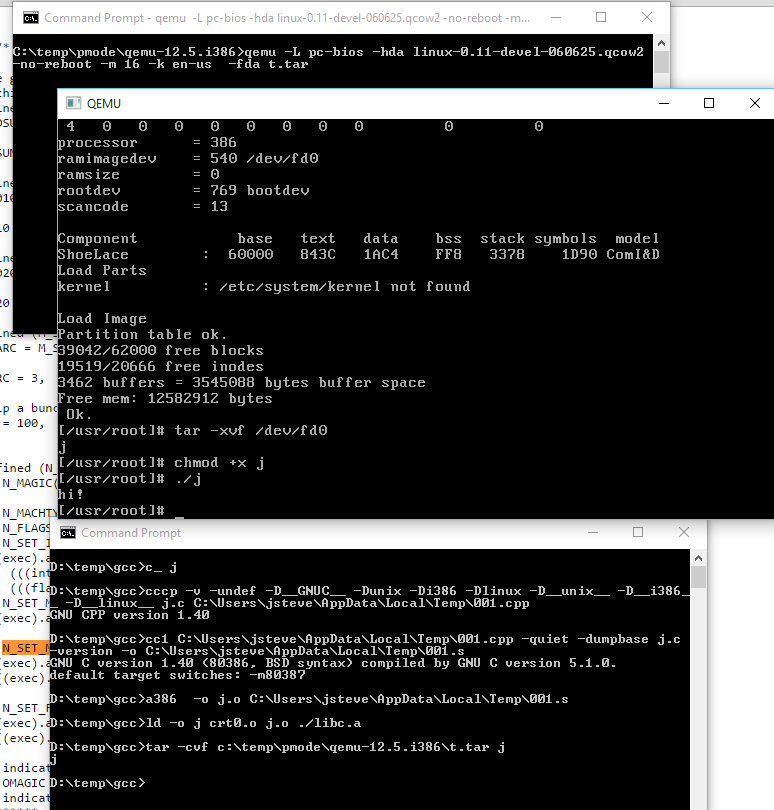
I thought I’d try OpenBSD 2.0 SPARC on Qemu!  Well either with SUN PROMs, or OpenBIOS the result is the same, it crashes when initializing the SCSI bus.

ok boot disk0:b
Boot device: /iommu/sbus/espdma@5,8400000/esp@5,8800000/sd@0,0:b File and args:
>> OpenBSD BOOT [$Revision: 1.2 $]
Booting /bsd @ 0x4000
1179616+113448+93300+[48552+53058]=0x16f46e
(if this doesn’t work, fix pmap_bootstrap4m in pmap.c)[ preserving 101620 bytes of bsd symbol table ]
Copyright (c) 1982, 1986, 1989, 1991, 1993
The Regents of the University of California. All rights reserved.

OpenBSD 2.0 (GENERIC) #2: Thu Oct 10 17:50:37 MDT 1996
deraadt@sun4c:/usr/src/sys/arch/sparc/compile/GENERIC
real mem = 33165312
avail mem = 29028352
using 404 buffers containing 1654784 bytes of memory
bootpath: /iommu@0,10000000/sbus@0,10001000/espdma@5,8400000/esp@5,8800000/sd@0,0:b
mainbus0 (root): SUNW,SPARCstation-5
cpu0 at mainbus0: FMI,MB86904 @ 1169 MHz, MB86910 or WTL1164/5 FPU
cpu0: physical 16K instruction (32 b/l), 8K data (16 b/l) cache NOT enabled for 4/0 cpu/mmu combination
obio0 at mainbus0
clock0 at obio0 addr 0x71200000: mk48t08 (eeprom)
timer0 at obio0 addr 0x71d00000 delay constant 73
auxreg0 at obio0 addr 0x71900000
zs0 at obio0 addr 0x71100000 pri 12, softpri 6
zs0a: console i/o
zs1 at obio0 addr 0x71000000 pri 12, softpri 6
[slavioconfig at obio0] addr 0x71800000 not configured
power0 at obio0 addr 0x71910000
fdc0 at obio0 addr 0x71400000 pri 11, softpri 4: chip 82077
fd0 at fdc0 drive 0: 1.44MB, 80 cyl, 2 head, 18 sec
iommu0 at mainbus0 addr 0x10000000: version 5/0, page-size 4096, range 64MB
sbus0 at iommu0: clock = 584.500 MHz
dma0 at sbus0 slot 5 offset 0x8400000: rev 2
esp0 at dma0 slot 0x5 offset 0x8800000 pri 4: ESP200 40Mhz, target 7
scsibus0 at esp0
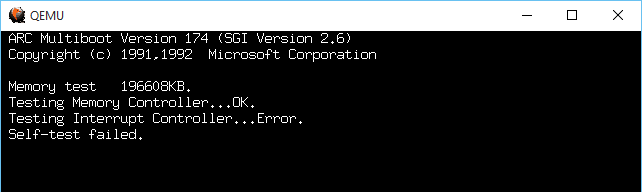
trap type 0x29: pc=f80e2494 npc=f80e2498 psr=4001bc0<EF,S,PS>
panic: trap
Stopped at _Debugger+0x4: jmpl [%o7 + 0x8], %g0
db>

But you can play kernel hangman, if you are into that kind of thing.

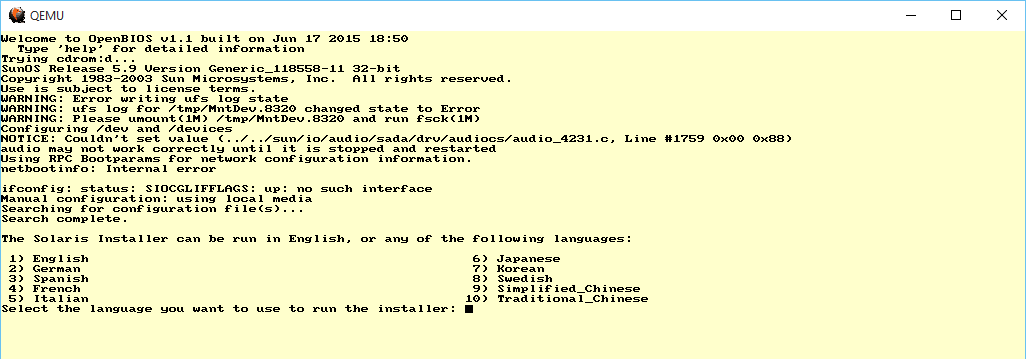
But make no mistake, the new 5.8 release (just released!) boots up just fine on Qemu:

Welcome to OpenBIOS v1.1 built on Jun 17 2015 18:50
Type ‘help’ for detailed information
Trying disk…
Not a bootable ELF image
Loading a.out image…
Loaded 66648 bytes
entry point is 0x4000
bootpath: /iommu@0,10000000/sbus@0,10001000/espdma@5,8400000/esp@5,8800000/sd@0,0

Jumping to entry point 00004000 for type 00000005…
switching to new context:
>> OpenBSD BOOT 2.11
Booting bsd
Loading at physical address 400000
1316320+2139464+409400=0x3b0604
cannot open /etc/random.seed: No such file or directory
console is ttya
Copyright (c) 1982, 1986, 1989, 1991, 1993
The Regents of the University of California. All rights reserved.
Copyright (c) 1995-2015 OpenBSD. All rights reserved. http://www.OpenBSD.org

OpenBSD 5.8 (RAMDISK) #23: Sun Aug 9 00:08:29 GMT 2015
[email protected]:/usr/src/sys/arch/sparc/compile/RAMDISK
real mem = 117309440 (111MB)
avail mem = 111083520 (105MB)
mainbus0 at root: SUNW,SPARCstation-5
cpu0 at mainbus0: MB86904 @ 170 MHz, MB86910 or WTL1164/5 FPU
cpu0: 16K instruction (32 b/l), 8K data (16 b/l), 512K external (32 b/l) cache enabled
obio0 at mainbus0
clock0 at obio0 addr 0x71200000: mk48t08 (eeprom)
timer0 at obio0 addr 0x71d00000: delay constant 73, frequency 2000000 Hz
zs0 at obio0 addr 0x71100000 pri 12, softpri 6
zstty0 at zs0 channel 0: console
zstty1 at zs0 channel 1
zs1 at obio0 addr 0x71000000 pri 12, softpri 6
zskbd0 at zs1 channel 0: no keyboard
zstty2 at zs1 channel 1: mouse
fdc0 at obio0 addr 0x71400000 pri 11, softpri 4: chip 82077
fd0 at fdc0 drive 0: 1.44MB 80 cyl, 2 head, 18 sec
auxreg0 at obio0 addr 0x71900000
power0 at obio0 addr 0x71910000
slavioconfig at obio0 addr 0x71800000 not configured
chosen “reg” property length = -1 (need multiple of 12)
builtin “reg” property length = -1 (need multiple of 12)
iommu0 at mainbus0 addr 0x10000000: version 0x5/0x0, page-size 4096, range 64MB
sbus0 at iommu0: 21.250 MHz
dma0 at sbus0 slot 5 offset 0x8400000: rev 2
esp0 at dma0 offset 0x8800000 pri 4: ESP200, 40MHz
scsibus0 at esp0: 8 targets, initiator 7
sd0 at scsibus0 targ 0 lun 0: <QEMU, QEMU HARDDISK, 2.4.> SCSI3 0/direct fixed
sd0: 6MB, 512 bytes/sector, 12288 sectors
cd0 at scsibus0 targ 2 lun 0: <QEMU, QEMU CD-ROM, 2.4.> SCSI3 5/cdrom removable
ledma0 at sbus0 slot 5 offset 0x8400010: rev 2
le0 at ledma0 offset 0x8c00000 pri 6: address 52:54:00:12:34:56
le0: 16 receive buffers, 4 transmit buffers
tcx0 at sbus0 slot 3 offset 0x800000 pri 9: 1024x768x8
wsdisplay0 at tcx0
wsdisplay0: screen 0 added (std, sun emulation)
“SUNW,CS4231” at sbus0 class serial slot 4 offset 0xc000000 not configured
“power-management” at sbus0 slot 4 offset 0xa000000 not configured
bootpath: /iommu@0,10000000/sbus@0,10001000/espdma@5,8400000/esp@5,8800000/sd@0,0
root on rd0a swap on rd0b dump on rd0b
erase ^?, werase ^W, kill ^U, intr ^C, status ^T

Welcome to the OpenBSD/sparc 5.8 installation program.
(I)nstall, (U)pgrade, (A)utoinstall or (S)hell?

Just don’t bother with the ‘install diskette’ try the miniroot instead.

Adding ncurses into Qemu!

Text mode.. text mode..

Text mode.. text mode..

One thing that’s always bugged me about the Qemu 1.0 and higher is that they don’t print anything to the Win32 console.  So you have to go digging around in stdout.txt or stderr.txt .  Very annoying.  And of course Windows users can’t have the nice ‘curses’ text mode interface.  Or can they?

While I was re-updating the 4.4LiteBSD MIPS Qemu package, I turned off the normal SDLmain so that it now acts like a console binary, meaning that stdout/stdin now function properly.  So, if Qemu had a problem, you can see it!

And while I was in the source, I thought why not see how hard it is to manually turn on curses?  It’s a quick one liner to config-host.mak (since it’s not detecting) then updating everywhere it has <curses.h> hard coded to use <ncurses.h> …. I guess I could have made a symlink, but whatever.  It links and more importantly I can run text mode MS-DOS in text mode!

To activate simply use the -curses flag.

Rest assured that SDL is still in there as well. But now you can see error messages like this:

C:\qemu>qemu-system-i386.exe -L pc-bios -m 16 -soundhw sb16
dsound: Could not initialize DirectSoundCapture
dsound: Reason: No sound driver is available for use, or the given GUID is not a valid DirectSound device ID

So now you know there may or may not be issues… In this case, I don’t care about recording audio, so it doesn’t matter.

I’ve updated the existing files on my server, so simply re-download.  Otherwise for new people my i386 only package (~4MB) is here:

qemu-2.4.0.1_win32-x86_x86_64.7z

And the ‘full system’ package (~22MB) is here:

qemu-2.4.0.1_win32-all.7z

For the two of three people who like this kind of thing..

LiteBSD

So I stumbled onto LiteBSD while I was trying to see if I can cross compile 386BSD 0.0 from Windows (it compiles, but triple faults on boot.)

LiteBSD is a 4.4 BSD derived OS for PIC32MZ microcontrollers.

And to make things more fun, Serge Vakulenko has a Qemu fork that includes these simulators so you can run them on Linux and OS X.

So what about us poor Windows users?

Well a few tweeks, and only one annoying bug remains, but it’s easy enough to sidestep and it runs!

4.4BSD-Lite

4.4BSD-Lite

Even better, I got the console to kind of work, although you can still control+c it to kill Qemu.  I guess I could capture the signal being kind of UNIXy.

For some reason when opening the SD card image, it’s already open by the time pic32_sdcard_init is called.  Or so I suspect.  It gets the file handle of 3 which tells me that it shouldn’t be open.  So my fix is lame but it works.  Since something is holding the file that I can’t see, I launch Qemu like this:

qemu-system-mipsel.exe -machine pic32mz-wifire -nographic -serial vc -serial vc -serial vc -serial mon:stdio  -bios boot-wifire.hex -kernel vmunix.hex -hda litebsd.img

with the SD/HDA being litebsd.img but in pic32_sdcard_init I do this:

sprintf(newfname,”%s.SD”,filename);

So you need a dummy file named litebsd.img (it’s just junk but it needs to exist), so whatever is blocking it will block it, then let pic32_sdcard_init open the file litebsd.img.SD which is the real file.

C:\litebsd>qemu-system-mipsel.exe -machine pic32mz-wifire -nographic -serial vc -serial vc -serial vc -serial mon:stdio -bios boot-wifire.hex -kernel vmunix.hex -hda litebsd.img
WARNING: Image format was not specified for ‘litebsd.img’ and probing guessed raw.
Automatically detecting the format is dangerous for raw images, write operations on block 0 will be restricted.
Specify the ‘raw’ format explicitly to remove the restrictions.
Board: chipKIT WiFire
Processor: microAptivP
RAM size: 512 kbytes
Load file: ‘boot-wifire.hex’, 6916 bytes
Load file: ‘vmunix.hex’, 522408 bytes
sdcard: opened d->fd 3
Card0 image ‘litebsd.img’, 339969 kbytes
Copyright (c) 1982, 1986, 1989, 1991, 1993
The Regents of the University of California. All rights reserved.

4.4BSD-Lite build 13 compiled 2015-01-20
sergev@ubuntu-sergev:LiteBSD/sys/compile/WIFIRE.pic32
cpu: PIC32MZ2048ECG100 rev A4, 200 MHz
oscillator: system PLL div 1:6 mult x50
real mem = 512 kbytes
avail mem = 344 kbytes
using 18 buffers containing 73728 bytes of memory
spi1 at pins sdi=D14/sdo=C1/sck=D1
spi2 at pins sdi=F0/sdo=D11/sck=G6
spi3 at pins sdi=B10/sdo=C4/sck=B14
spi4 at pins sdi=F5/sdo=G0/sck=D10
uart1 at pins rx=F1/tx=D15, interrupts 112/113/114
uart4 at pins rx=F2/tx=F8, interrupts 170/171/172, console
sd0 at port spi3, pin cs=C3
sd0: type I, size 339968 kbytes, speed 12 Mbit/sec
sd0a: partition type b7, sector 2, size 204800 kbytes
sd0b: partition type b8, sector 409602, size 32768 kbytes
sd0c: partition type b7, sector 475138, size 102400 kbytes
bpf: sl0 attached
bpf: lo0 attached
WARNING: preposterous clock chip time — CHECK AND RESET THE DATE!

starting file system checks.
/dev/rsd0a: file system is clean; not checking
starting network
clearing /tmp
standard daemons: update.
Wed Dec 10 21:06:39 PST 2014

4.4BSD-Lite (bsd.net) (tty4)

login:

So there it is!  As always, you can do the whole telnet console, on port 2023 like the SPARC with:

qemu-system-mipsel.exe -machine pic32mz-wifire -nographic -serial vc -serial vc -serial vc -serial mon:telnet:127.0.0.1:2023,server,wait  -bios boot-wifire.hex -kernel vmunix.hex

In this case, I prefer to use the ‘wait’ portion of the server, so I can watch it boot.  Maybe I’m just weird.  But this way you can control+c to your hearts content.

As always, you can download my image here.

Also for those who like graphical serial connections (???) you can launch it like this:

qemu-system-mipsel.exe -machine pic32mz-wifire  -serial vc -serial vc -serial vc -serial vc  -bios boot-wifire.hex -kernel vmunix.hex -sd litebsd.img

And use control+alt and hunt around for s3, and you’ll have your console….. That you can’t paste into.

**EDIT I found out I forgot to link this with static libgcc so there were missing DLL’s.  sorry, I’ve re-linked and now it’ll just work out of the box (tested with clearing my path on Windows 10).  Next I need to add curses support.

For my dear friend snejannatr

Password strength

Yes I see you trying to login as me.  Yes I blocked your Russian and Ukrainian addresses.

What are you so desperate to see here?

There is no deep secret files, or drafts.

If anything I get into trouble for revealing too much when I do find stuff.

Take it easy man, there really isn’t anything to see here.

More on adding disks to Solaris

So a while back, I built some stuff for Solaris on QEMU, and stuck it in a virtual disk.  Great.  Now the fun is years later trying to use it for yet another project.

By default Solaris doesn’t magically build out the dev tree so adding a disk won’t make it magically appear in the dev tree.  Add the ‘-r’ flag when booting, and it’ll do that.  I still like the verbose boot, so from the prom it’s ‘boot disk0 -rv’

Type help for more information
ok boot disk0 -rv
Boot device: /iommu/sbus/espdma@5,8400000/esp@5,8800000/sd@0,0 File and args: -rv

And away we go!

while the kernel boots I can see it see’s my second disk

sd0 at esp0: target 0 lun 0
sd0 is /iommu@0,10000000/sbus@0,10001000/espdma@5,8400000/esp@5,8800000/sd@0,0
<Qemu2GB cyl 4090 alt 2 hd 16 sec 63>
sd1 at esp0: target 1 lun 0
sd1 is /iommu@0,10000000/sbus@0,10001000/espdma@5,8400000/esp@5,8800000/sd@1,0
<Qemu2GB cyl 4090 alt 2 hd 16 sec 63>
sd2 at esp0: target 2 lun 0
sd2 is /iommu@0,10000000/sbus@0,10001000/espdma@5,8400000/esp@5,8800000/sd@2,0
<Qemu2GB cyl 4090 alt 2 hd 16 sec 63>

And once it starts user processes it’ll add in the device files

Configuring the /dev directory
Configuring the /dev directory (compatibility devices)

Which is great.  But how to view the disklabel?

prtvtoc can tell us, remember that s2 is the ‘whole disk’ on SYSV.

# prtvtoc /dev/rdsk/c0t2d0s2
* /dev/rdsk/c0t2d0s2 partition map
*
* Dimensions:
* 512 bytes/sector
* 63 sectors/track
* 16 tracks/cylinder
* 1008 sectors/cylinder
* 4092 cylinders
* 4090 accessible cylinders
*
* Flags:
* 1: unmountable
* 10: read-only
*
* First Sector Last
* Partition Tag Flags Sector Count Sector Mount Directory
0 2 00 0 132048 132047
1 3 01 132048 263088 395135
2 5 01 0 4122720 4122719
6 4 00 395136 3727584 4122719

So we have a 0, the 1 is ‘swap’, 2 is he whole disk, and a 6.

Running fsck can reveal that 0 is a real filesystem:

# fsck /dev/rdsk/c0t2d0s0
** /dev/rdsk/c0t2d0s0
** Last Mounted on /mnt
** Phase 1 – Check Blocks and Sizes
** Phase 2 – Check Pathnames
** Phase 3 – Check Connectivity
** Phase 4 – Check Reference Counts
** Phase 5 – Check Cyl groups
4 files, 32504 used, 29111 free (15 frags, 3637 blocks, 0.0% fragmentation)

while 6 is not.

# fsck /dev/rdsk/c0t2d0s6
** /dev/rdsk/c0t2d0s6
BAD SUPER BLOCK: MAGIC NUMBER WRONG
USE AN ALTERNATE SUPER-BLOCK TO SUPPLY NEEDED INFORMATION;
eg. fsck [-F ufs] -o b=# [special …]
where # is the alternate super block. SEE fsck_ufs(1M).

Sadly none of the stuff in there is ‘ready to run’ but rather built in it’s source directory.

And I wanted to make a 2GB /usr/local on another disk, so I copied my disk template file, (can use the OS, or the gnu-utils) and run format on the disk.

It was a matter of clearing out partitions, and making ONE BIG partition 0.

# format /dev/rdsk/c0t1d0s2
selecting /dev/rdsk/c0t1d0s2: data
[disk formatted]
Warning: Current Disk has mounted partitions.

FORMAT MENU:
disk – select a disk
type – select (define) a disk type
partition – select (define) a partition table
current – describe the current disk
format – format and analyze the disk
repair – repair a defective sector
label – write label to the disk
analyze – surface analysis
defect – defect list management
backup – search for backup labels
verify – read and display labels
save – save new disk/partition definitions
inquiry – show vendor, product and revision
volname – set 8-character volume name
quit
format> partition

PARTITION MENU:
0 – change `0′ partition
1 – change `1′ partition
2 – change `2′ partition
3 – change `3′ partition
4 – change `4′ partition
5 – change `5′ partition
6 – change `6′ partition
7 – change `7′ partition
select – select a predefined table
modify – modify a predefined partition table
name – name the current table
print – display the current table
label – write partition map and label to the disk
quit
partition> print
Volume: data
Current partition table (original):
Total disk cylinders available: 4090 + 2 (reserved cylinders)

Part Tag Flag Cylinders Size Blocks
0 alternates wm 0 – 4069 1.96GB (4070/0/0)
1 unassigned wu 0 0 (0/0/0)
2 backup wu 0 – 4089 1.97GB (4090/0/0)
3 unassigned wm 0 0 (0/0/0)
4 unassigned wm 0 0 (0/0/0)
5 unassigned wm 0 0 (0/0/0)
6 unassigned wm 0 0 (0/0/0)
7 unassigned wm 0 0 (0/0/0)

Good fun.  As always don’t forget how to mount the CD-ROM under Qemu, and add packages as needed.

I still think the quickest, and easiest way to power ‘off’ the VM is the poweroff command.

# poweroff
Apr 18 20:26:33 qemu24 poweroff: poweroffed by root
Apr 18 20:26:35 qemu24 syslogd: going down on signal 15
syncing file systems… done

Brutal, quick, and efficient.

Building Linux 0.11 on Windows 10

No really, it compiles! on Windows!

No really, it compiles! on Windows!

So continuing with the fun from yesterday, where I had managed to get gcc 1.40 running on Windows with MinGW, it was time to try to take the final leap and build Linux.

There wasn’t too much to massage on Linux, mostly Makefiles for the various tool name differences, and how to handle keyboard.S as the default setup for NTFS is case insensitivity. While I did get some old version of as16 and ld16 to build, I’m not sure if they are working correctly. Or it could be the ‘build’ tool. The downside is that the final ‘Image’ file produced doesn’t work (I should add that all issues have since been fixed, and it is now possible to cross compile a running kernel from Windows, and boot it with Qemu).

But copying the ‘system’ file that is compiled on Windows, to a Linux VM, and having it do the boot setup does work!

And it boots!

And it boots!

Very cool to say the least!

I almost wonder if MSVC 1.0 could build any of this. Then it could be possible to bootstrap Linux from Windows NT 3.1 … Although Windows 10 is good enough for me, right now.

And I got the DJGPP 1.0 gcc driver to work (soft of)!

C:\aoutgcc\test>gcc -v hello.c -o hello -I ../include-0.12 -L../lib
gcc version 1.40
cpp -v -I ../include-0.12 -undef -D__GNUC__ -Dunix -Di386 -D__unix__ -D__i386__ hello.c C:/Users/neozeed/AppData/Local/Temp/cca0_388.cpp
GNU CPP version 1.40
cc1 C:/Users/neozeed/AppData/Local/Temp/cca0_388.cpp -quiet -dumpbase hello.c -version -o C:/Users/neozeed/AppData/Local/Temp/cca0_388.s
GNU C version 1.40 (80386, BSD syntax) compiled by GNU C version 5.1.0.
default target switches: -m80387
a386 -o hello.o C:/Users/neozeed/AppData/Local/Temp/cca0_388.s
ld -o hello c:/aoutgcc/lib/crt0.o -L../lib hello.o c:/aoutgcc/lib/gnulib -lc c:/aoutgcc/lib/gnulib

Sorry that doesn’t format so well on a blog. But now I only have to force the include path, and the lib directory. At this point I’d call it ‘good enough’

I uploaded the archive MinGW-aout-linux-011.7z. If you want to compile Linux, you’ll need a MSYS from MinGW. Otherwise, this is only interesting to people who run Windows and want to play with Linux 0.11. Â I also included the Linux VM, and binaries for the tools. It’s not even 7MB. How is that for crazy small?

** EDIT

I got it all working now that I found all the portions to set to output as O_BINARY/wb that are needed on a Win32 host, so using MinGW I can build the as86/ld86/binutils/gcc and Linux 0.11!

My updated post is here.

Also I put all the source onto git, along with binaries up on sourceforge. It’s worth mentioning that since I wrote this article, I have gotten quite a number of older versions of Linux to build, along with simple kernel debugging with GDB. Kernels include:

Download Ancient Linux on Windows

Download Ancient Linux on Windows

Craziest cross compile yet!

Windows 10 to target Linux 0.11!

It works!

It works!

Sadly that ancient line program only runs ELF binaries, so that won’t work to test.

As I mentioned gcc doesn’t work. I need to tear more into DJGPP
to see how they did it or just use it’s gcc driver to run this.

In the test directory I’ve mimic’d what a Linux 0.11 install does when compiling
a single file into an exe.

simply run:

c_ hello

and it’ll compile hello.c into hello.

C:\aoutgcc>..\bin\cpp -v -I../include-0.12 -undef -D__GNUC__ -Dunix -Di386 -Dlinux -D__unix__ -D__i386__ -D__linux__ hello.c C:\Users\neozeed\AppData\Local\Temp\001.cpp
GNU CPP version 1.40

C:\aoutgcc>..\bin\cc1 C:\Users\neozeed\AppData\Local\Temp\001.cpp -quiet -dumpbase hello.c -version -o C:\Users\neozeed\AppData\Local\Temp\001.s
GNU C version 1.40 (80386, BSD syntax) compiled by GNU C version 5.1.0.
default target switches: -m80387

C:\aoutgcc>..\bin\a386 -o hello.o C:\Users\neozeed\AppData\Local\Temp\001.s

C:\aoutgcc>..\bin\ld -o hello ../lib/crt0.o hello.o ../lib/libc.a

Wasn’t that fun?

The ‘best’ way I can think of to test is to tar the exe like this:

C:\aoutgcc>..\bin\tar.exe hello.tar hello

And then run it with the Linux 0.11 on Qemu which can be found here:

qemu-12.5.i386.zip

qemu -L pc-bios -hda linux-0.11-devel-060625.qcow2 -no-reboot -m 16 -k en-us -fda hello.tar

Then once Linux boots, do this:

tar -xvf /dev/fd0
chmod +x hello
./hello

Fun?!

For anyone who wants to play at home, here is the complete sources, and binaries.

Qemu 2.4.0.1 binaries for Windows

So here is my cross compiled Qemu binaries for Windows.

I added in my Control+Alt+d ‘fix’ to be a Control+Alt+Delete that anyone who runs Windows NT or MS-DOS will no doubt love.  The kbd_put_keycode function had been removed, so I also put that back in.

I also undid the weird scaling thing that has been around since version 1.1.  And I tried my best to merge in some NE2000 fixes.

Solaris 9

Solaris 9

I threw a Solaris 9 ISO at it, and it booted up to the text installer!

asd

MIPS ARC

The MIPS ARC firmware however always bombs out on reset with an Interrupt Controller Error.

I tried the ‘doom’ test, and installing DooM 1.1 took FOREVER.  Writing to the disk is slow. Incredibly slow. I guess forcing the write thru cache is mandatory?

-drive file=bla.disk,if=ide,index=0,media=disk,cache=writethrough

I haven’t tested.

Also DO NOT USE THE PCSPEAKER DEVICE.

I nearly went deaf.  It doesn’t work properly, but rather loops so that one beep turns into a hurricane of beeps.

I’ve included the needed DLL’s, and compiled everything I could statically.  I guess I could have fought more but I have other things to do.

So the ‘cut down’ version which is i386/x86_64 only is HERE.

Those who want to try out the various RISC processors download the ‘full’ package HERE.

Building MinGW32 Qemu on Linux (or anything else I guess)

So as always it’s the glibc2 wars.  And as part of the fun you need pkg-config.  And since it has to run, you’ll end up with the native version.

Luckily I found this site, mega-nerd.com

So you can create a i586-mingw32msvc-pkg-config file.  Just in case it get's lost here it is:

#!/bin/bash

# This file has no copyright assigned and is placed in the Public Domain.
# No warranty is given.

# When using the mingw32msvc cross compiler tools, the native Linux
# pkg-config executable works fine as long as the default PKG_CONFIG_LIBDIR
# is overridden.
export PKG_CONFIG_LIBDIR=/usr/i586-mingw32msvc/lib/pkgconfig

# Also want to override the standard user defined PKG_CONFIG_PATH with
# a mingw32msvc specific one.
export PKG_CONFIG_PATH=$PKG_CONFIG_PATH_MINGW32MSVC

# Now just execute pkg-config with the given command line args.
pkg-config $@

Fun as always, right?

And as always Qemu can be configured with:

configure --cross-prefix=i586-mingw32msvc-

When cross compiling.

VAX Snoopy!

Hey Snoopy!

Hey Snoopy!

Following up on Adventures with Snoopy, Mihai has delivered!  Snoopy printed out from a VAX onto a real 9 pin printer, onto paper!

Just the way we used to do things a million years ago!

Be sure to check out the whole thing on hawk.ro,  complete with pictures, and source material!  Totally check it out, for that real programmer’s vibe!

And for those who have no idea, here is where it all started.