So this is probably nothing that exciting for most people, but for me, I wanted to have a Terminal Server onto a DECnet network. Sure I could have probably just done one nice with tun/tap, dumped all the protocols on there, and called it even. But for some reason I wanted 2 NICs to keep the IP on one side, and DECnet on the other.
One thing I wanted was an internal bridge for DECnet only traffic, and since I just need MSRDP access, SLiRP can handle a single TCP port redirect.
The flags are as always pretty simple once you work them out:
And the two network scripts starting with nt4tse-up:
#!/bin/bash
echo starting $1
ip tuntap add mode tap tap1
ifconfig tap1 up
ifconfig tap1
brctl addif decnet0 tap1
brctl show decnet0
echo done with tuntap
And the nt4tse-down:
#!/bin/bash
echo shutting down $1
ifconfig tap1 down
brctl delif decnet0 tap1
brctl show decnet0
ip tuntap del mode tap tap1
echo done shutting down $1
for completeness here is the bridge config in /etc/netplan/50-cloud-init.yaml
This way I have an IP bound bridge for things that talk IP, and a raw bridge, decnet0 that has my non IP decnet stuff on there. Naturally it’ll have my SIMH VAX on there:
# brctl show decnet0
bridge name     bridge id               STP enabled     interfaces
decnet0         8000.aede9f227e7b       no              tap0
                                                        tap1
Also the ability to mount directories as fake fat drives had it’s syntax change as well
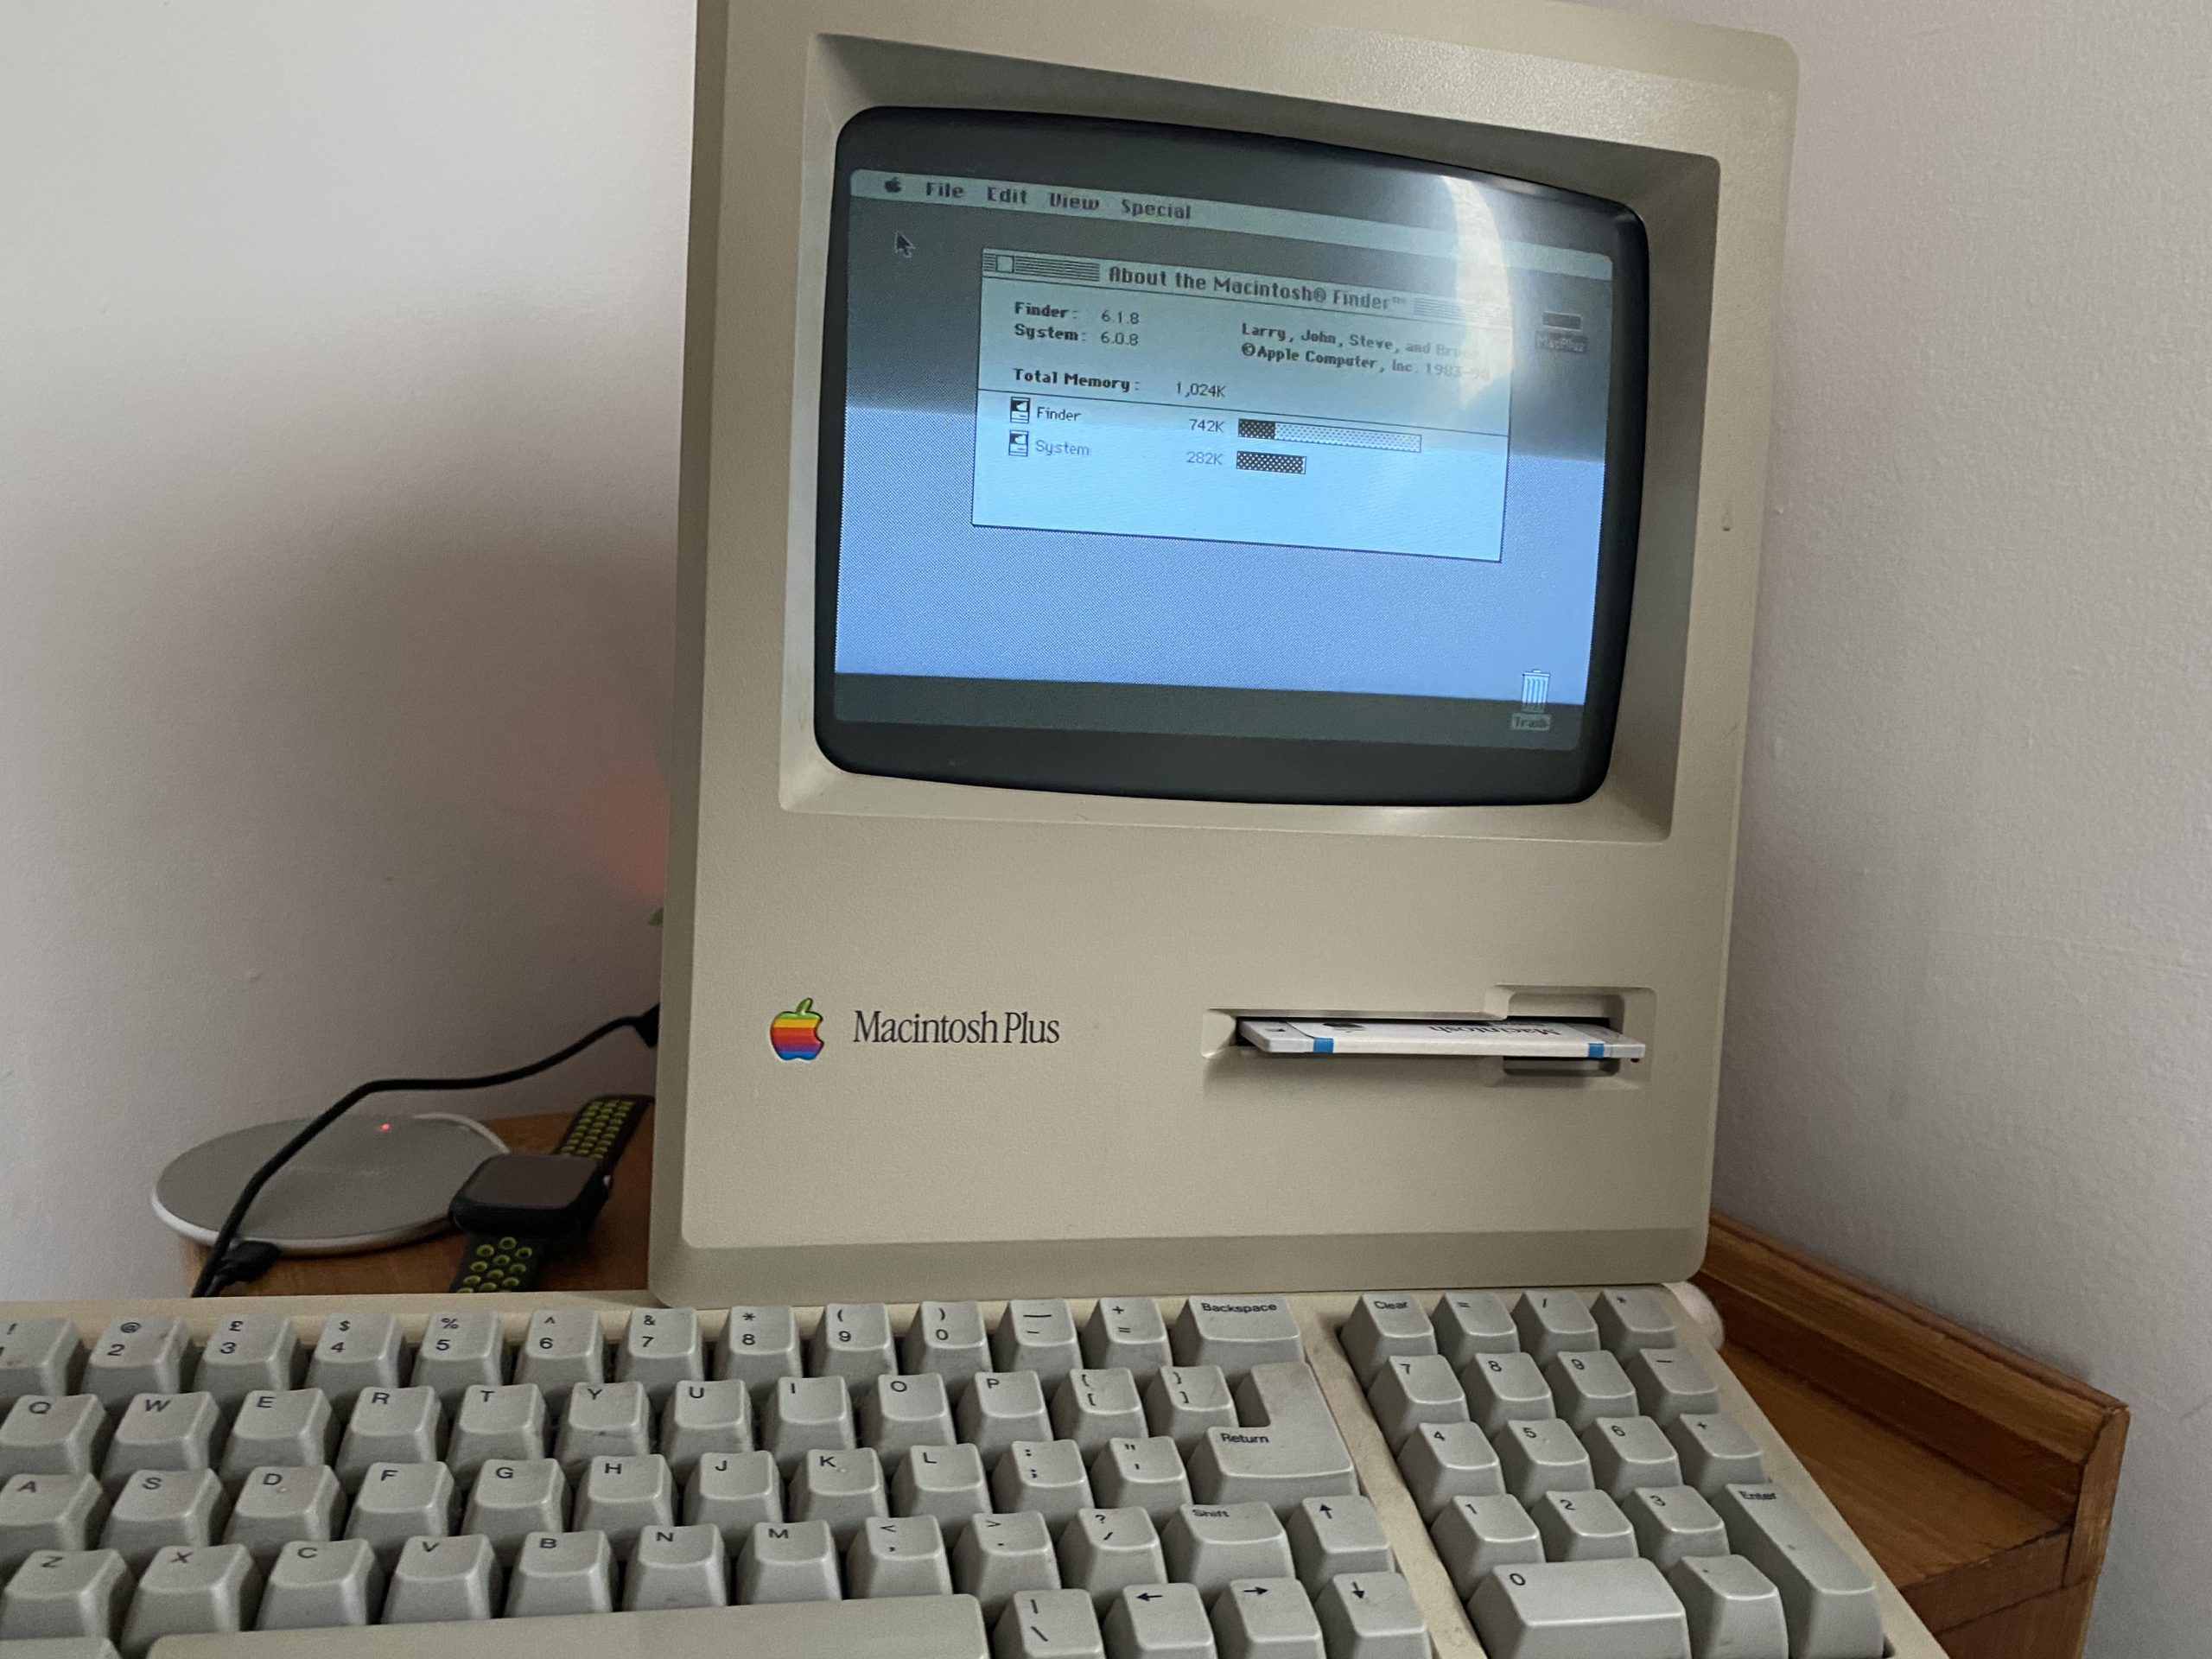
This was rather unexpected, but this auction for a loaded Macintosh Plus had shown up, and it was shipping local, and very cheap for what it was. It included the larger keyboard, original mouse, and an external 20MB hard disk.
Assembled in Scotland!
Sadly, the hard disk is dead. And not like dead dead, but dead dead dead! After I freed the disk from the external enclosure, and tried to power it on, stand alone, the PSU refused to start as the disk has a hard short in the board somewhere. And I can’t say that I’m all that surprised that a hard disk from 1989 is broken. I’m more surprised that someone was using this in 1989 and didn’t take the plunge and upgrade the machine to the full 4Mb of ram.
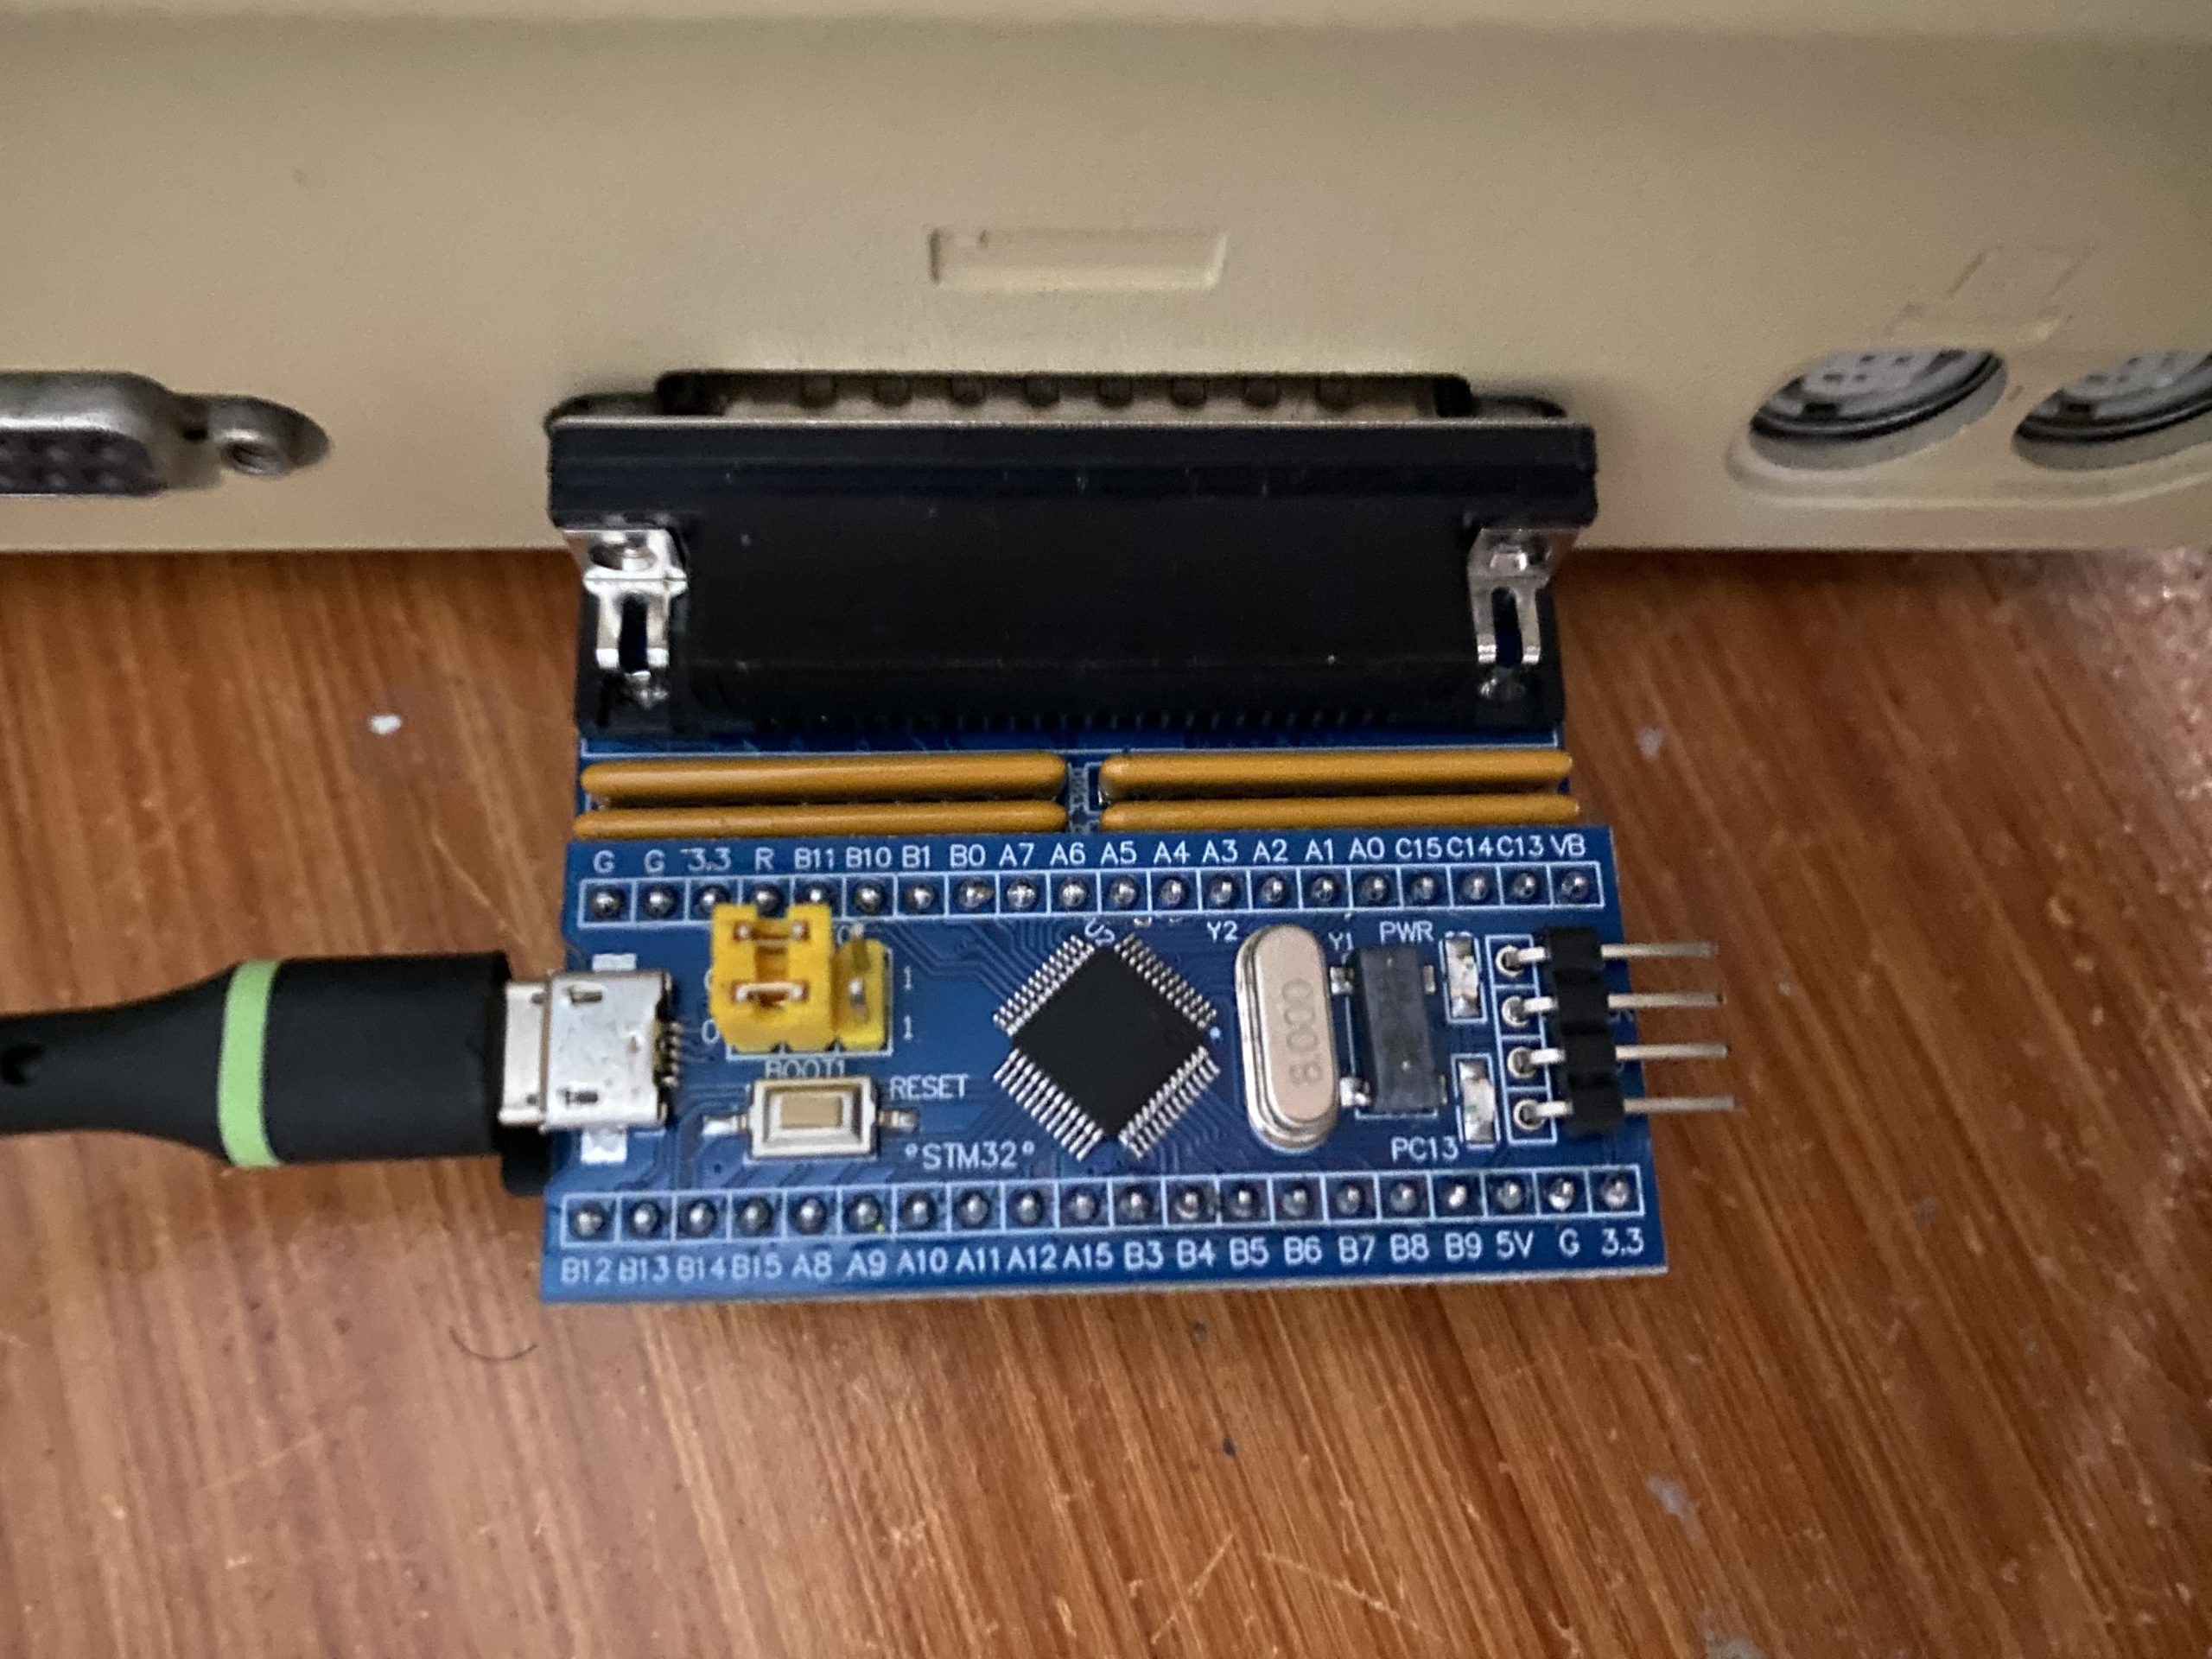
Anyways I have this chunk of plastic and glass on a desk, but I can’t do a thing with it. I’ve heard of various SCSI emulators out there, and decided to go with a bluescsi v1 with a DB25 interface as they are generally cheaper, and the Macintosh Plus isn’t exactly all that fast so the effort of the v2 is mostly lost.
Bluescsi module on the back of the Macintosh Plus
Documentation on the bluescsi is scant, but it seems that a diode needs to be soldered onto the Macintosh Plus motherboard to enable bus power, so you don’t need an external USB power source. I’m a bit worried about opening up this thing as I’ms suspecting the plastics are a log weaker than they look, so I opted for just using a USB cable to power the device.
Anyways let me cut to the chase, I have an 8Gb Micro SD card that I formatted ExFAT (the documentation says Fat32 will work, but I found it might work once, but it’ll definitely never work after a reboot), with a single file emulating a 100Mb hard disk (Luxurious!). I named the file simply ‘HD10_512.hda’ which specifies it’s a hard disk, SCSI ID 1, target 0, 512 bytes/sector and it’s a ‘hda’ image. It’s what the Bluescsi want’s so don’t fight it!
To prepare the virtual hard disk, I used Cockatrice III, since the Macintosh Quadra 800 emulation includes SCSI, which let me create a raw disk image, partition it, and format it under MacOS 8.1. The real trick was installing the operating system.
I first tried MacOS 7.0.1, but it would boot up greeting me with the error that needs more than 1Mb of ram. I tried installing a MacOS 6.0.8 manually, but it crashed saying the system folder was corrupt, and then it just went empty disk mac on further boots.
I’m not sure what the problem was, it’s possible it was the filesystem on the card, or some other issued with the Macintosh, I have no idea.
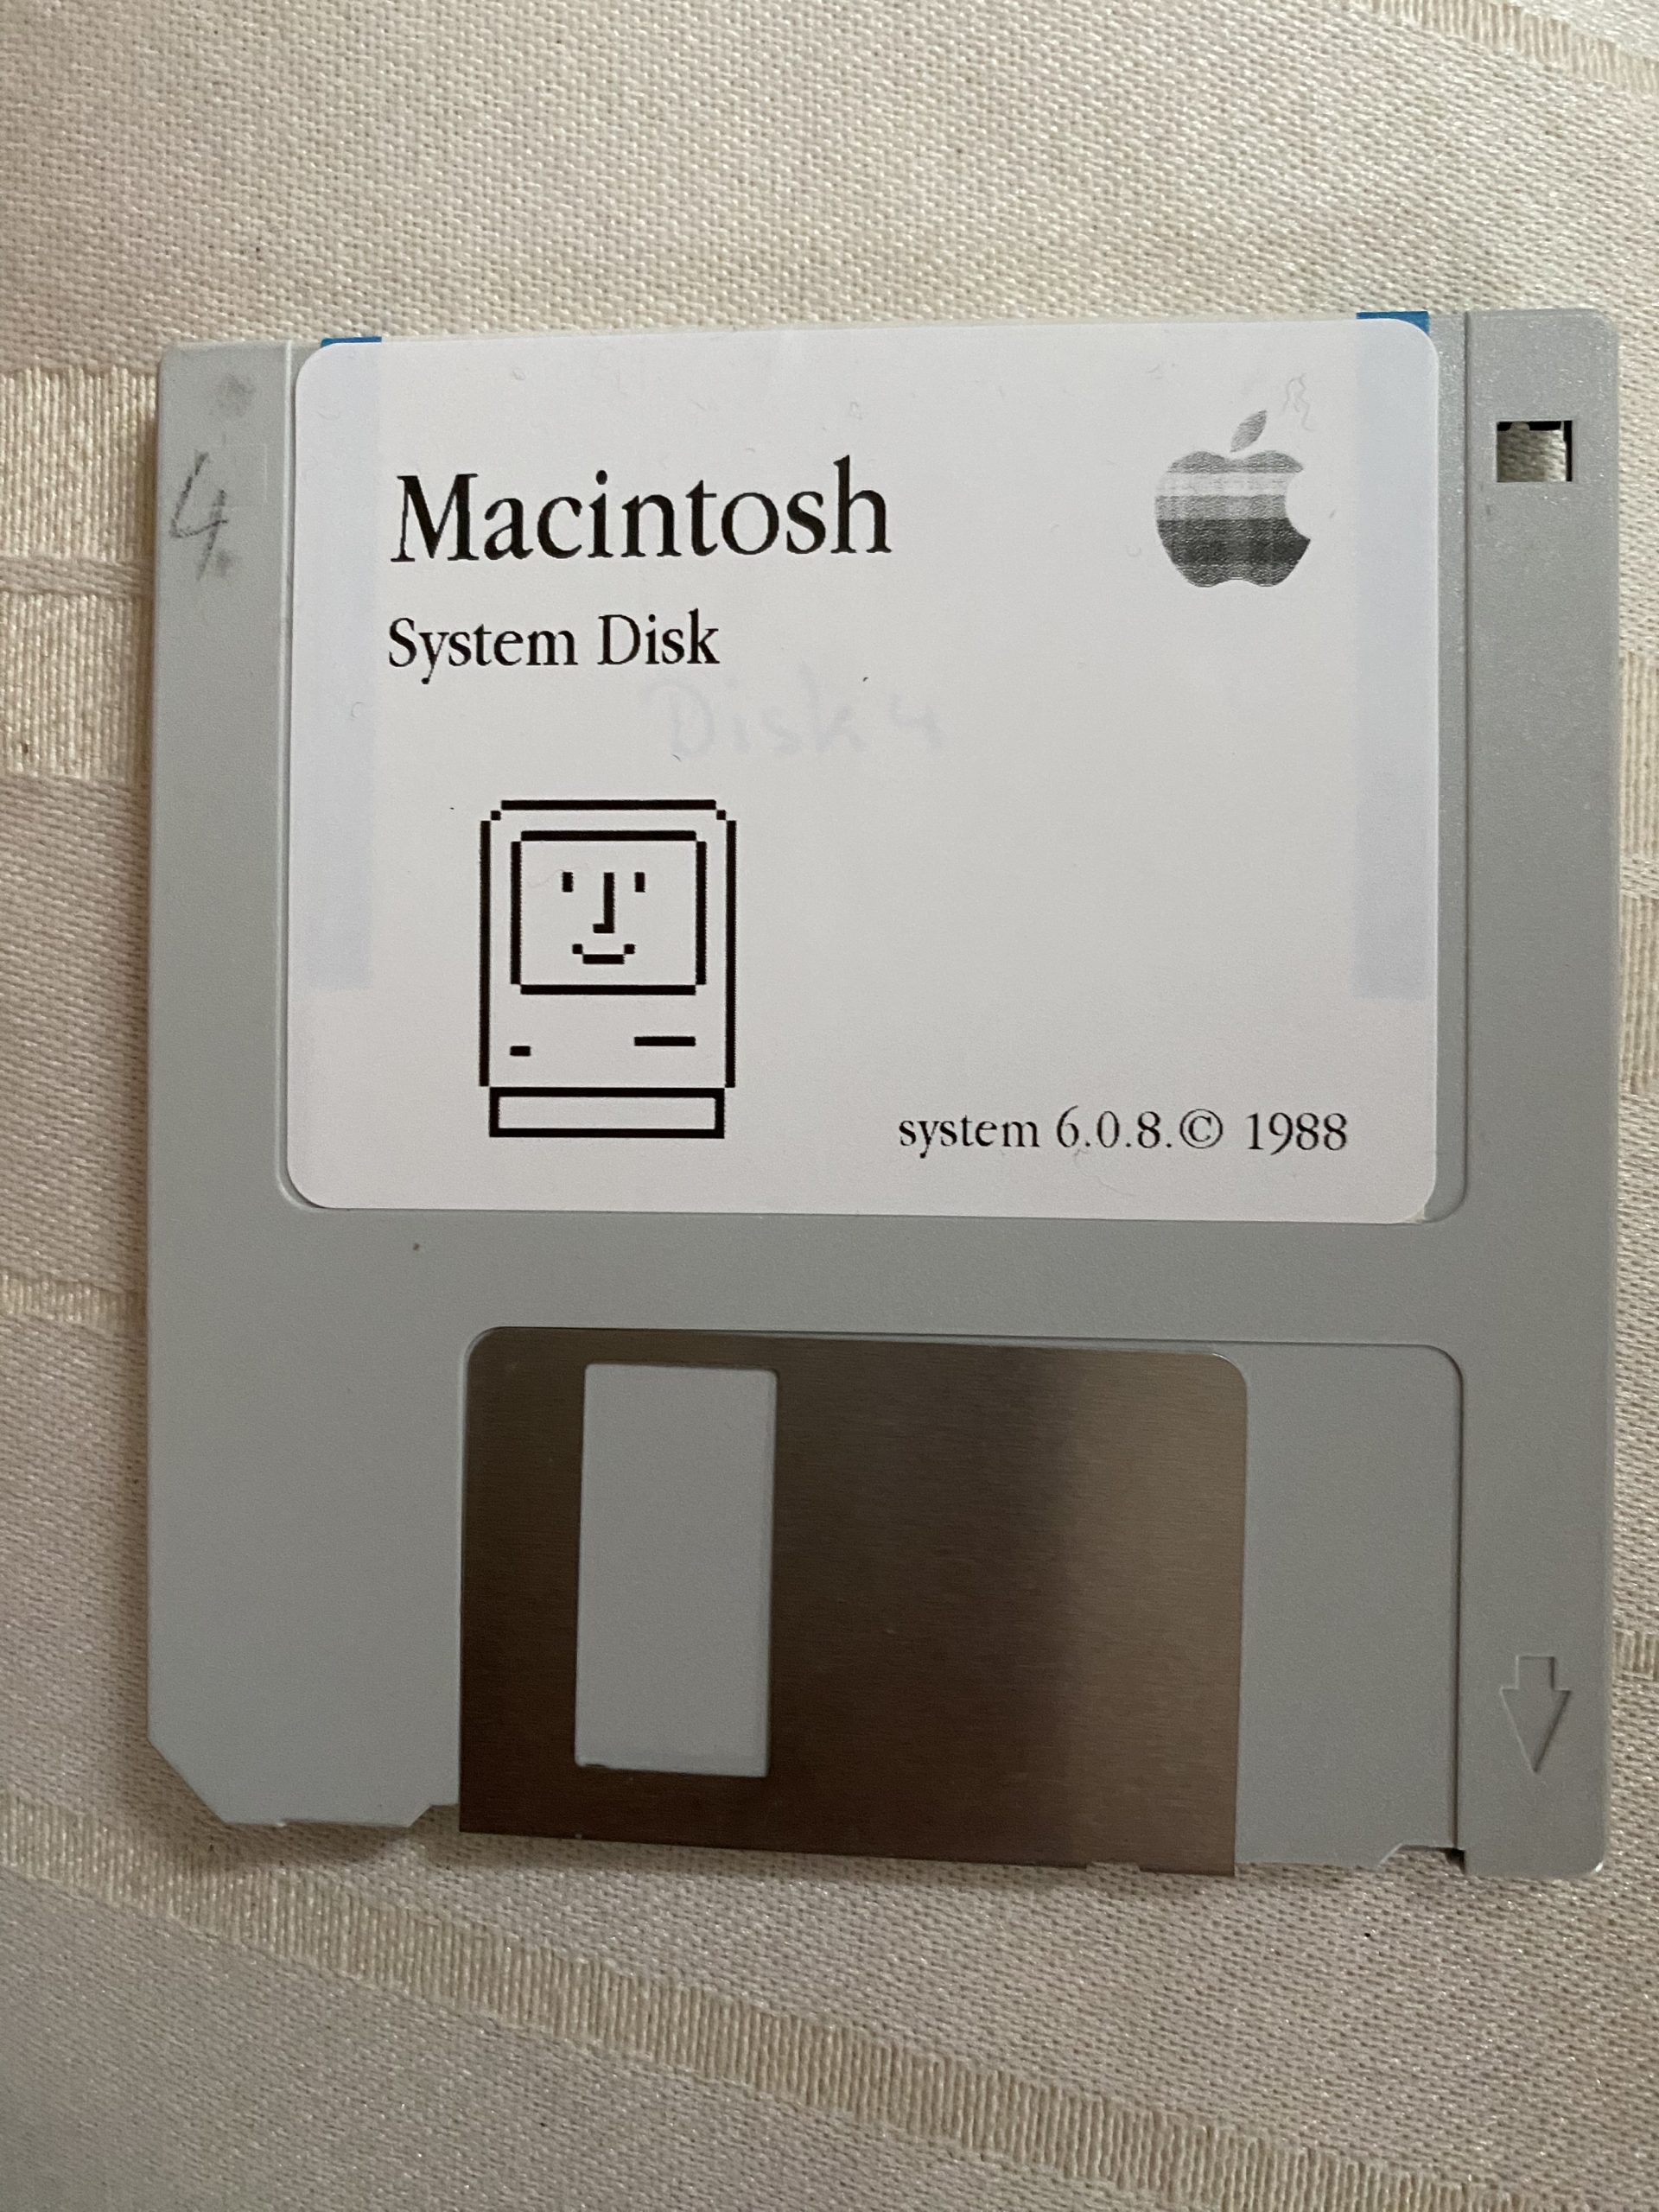
So I broke down and ordered a pre-installed diskette with MacOS 6.08.
Repurposed System 6.0.8 disk
I booted off the diskette, and amazingly the floppy drive worked! And in about a minute I had booted up, and it saw the hard disk! I dragged the System folder over the hard disk, and rebooted, and yeah it booted right up!
Obviously, the next step will be to get a proper screwdriver to open this thing, figure out how to discharge the CRT so I don’t kill myself, and add some additional RAM. I know it’ll be slow but I do want to see MacMiNT run on this thing! Maybe I’ll find/order the needed diode and make the DB25 bus powered eliminating one cable.
A long long long time ago I did own a Macintosh Plus, with 4Mb of RAM, although I mostly used it as a terminal, since it powered up quickly (it was the mid 90s!) and doesn’t take up that much space, so maybe I can slave it to an ESP32?
**UPDATE
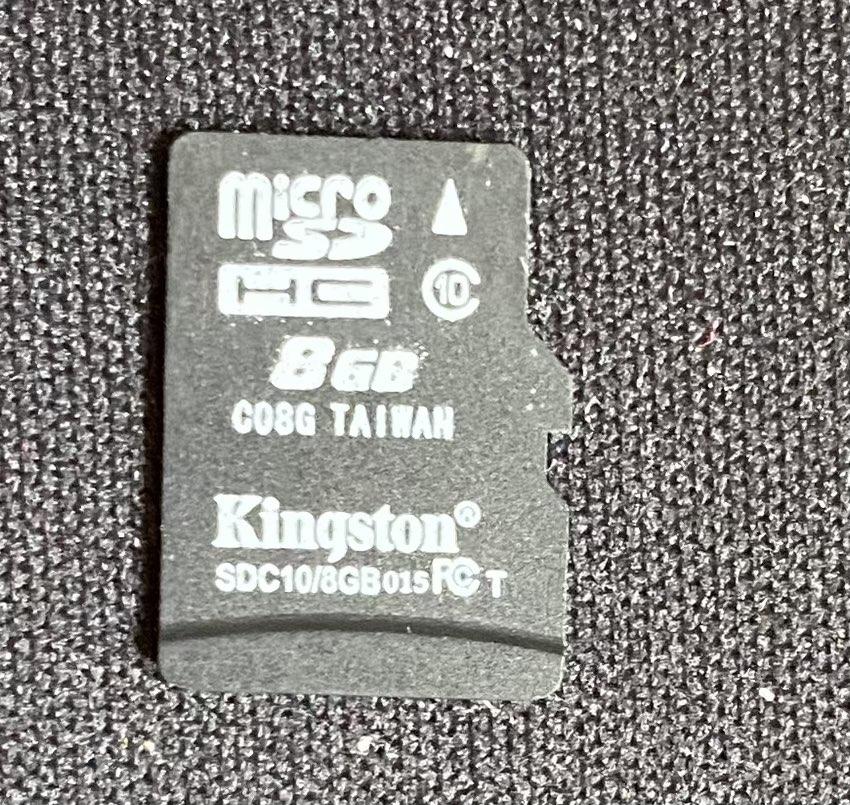
I had been using some generic 8GB microSD card on this, and while it seemed mostly fine on the Macintosh Plus, I had since managed to score a Performa 6400. I had been using this Kingston generic 8GB card, and it had frequent timeouts writing/reading on the Performa. As a matter of fact if the SD card was plugged in at powerup with an ISO image it would crash the Mac.
Kingston SDC10/8GB 015FCT C08G… no good!
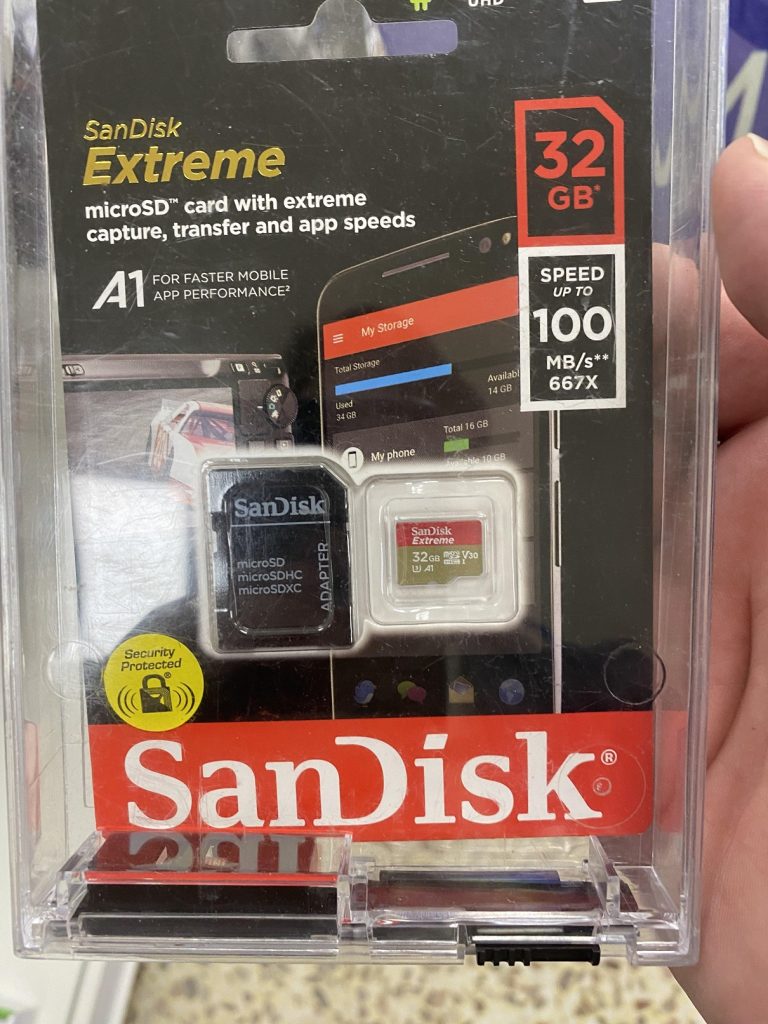
I scored this SanDisk Extreme 32GB for £15. A bit pricy but it turns out totally worth it!
£15 SanDisk Extreme!
Not only does the Performa not crash with an ISO image but it’s pretty darn quick! Well worth the purchase as all my weird issues seemingly just disappear!
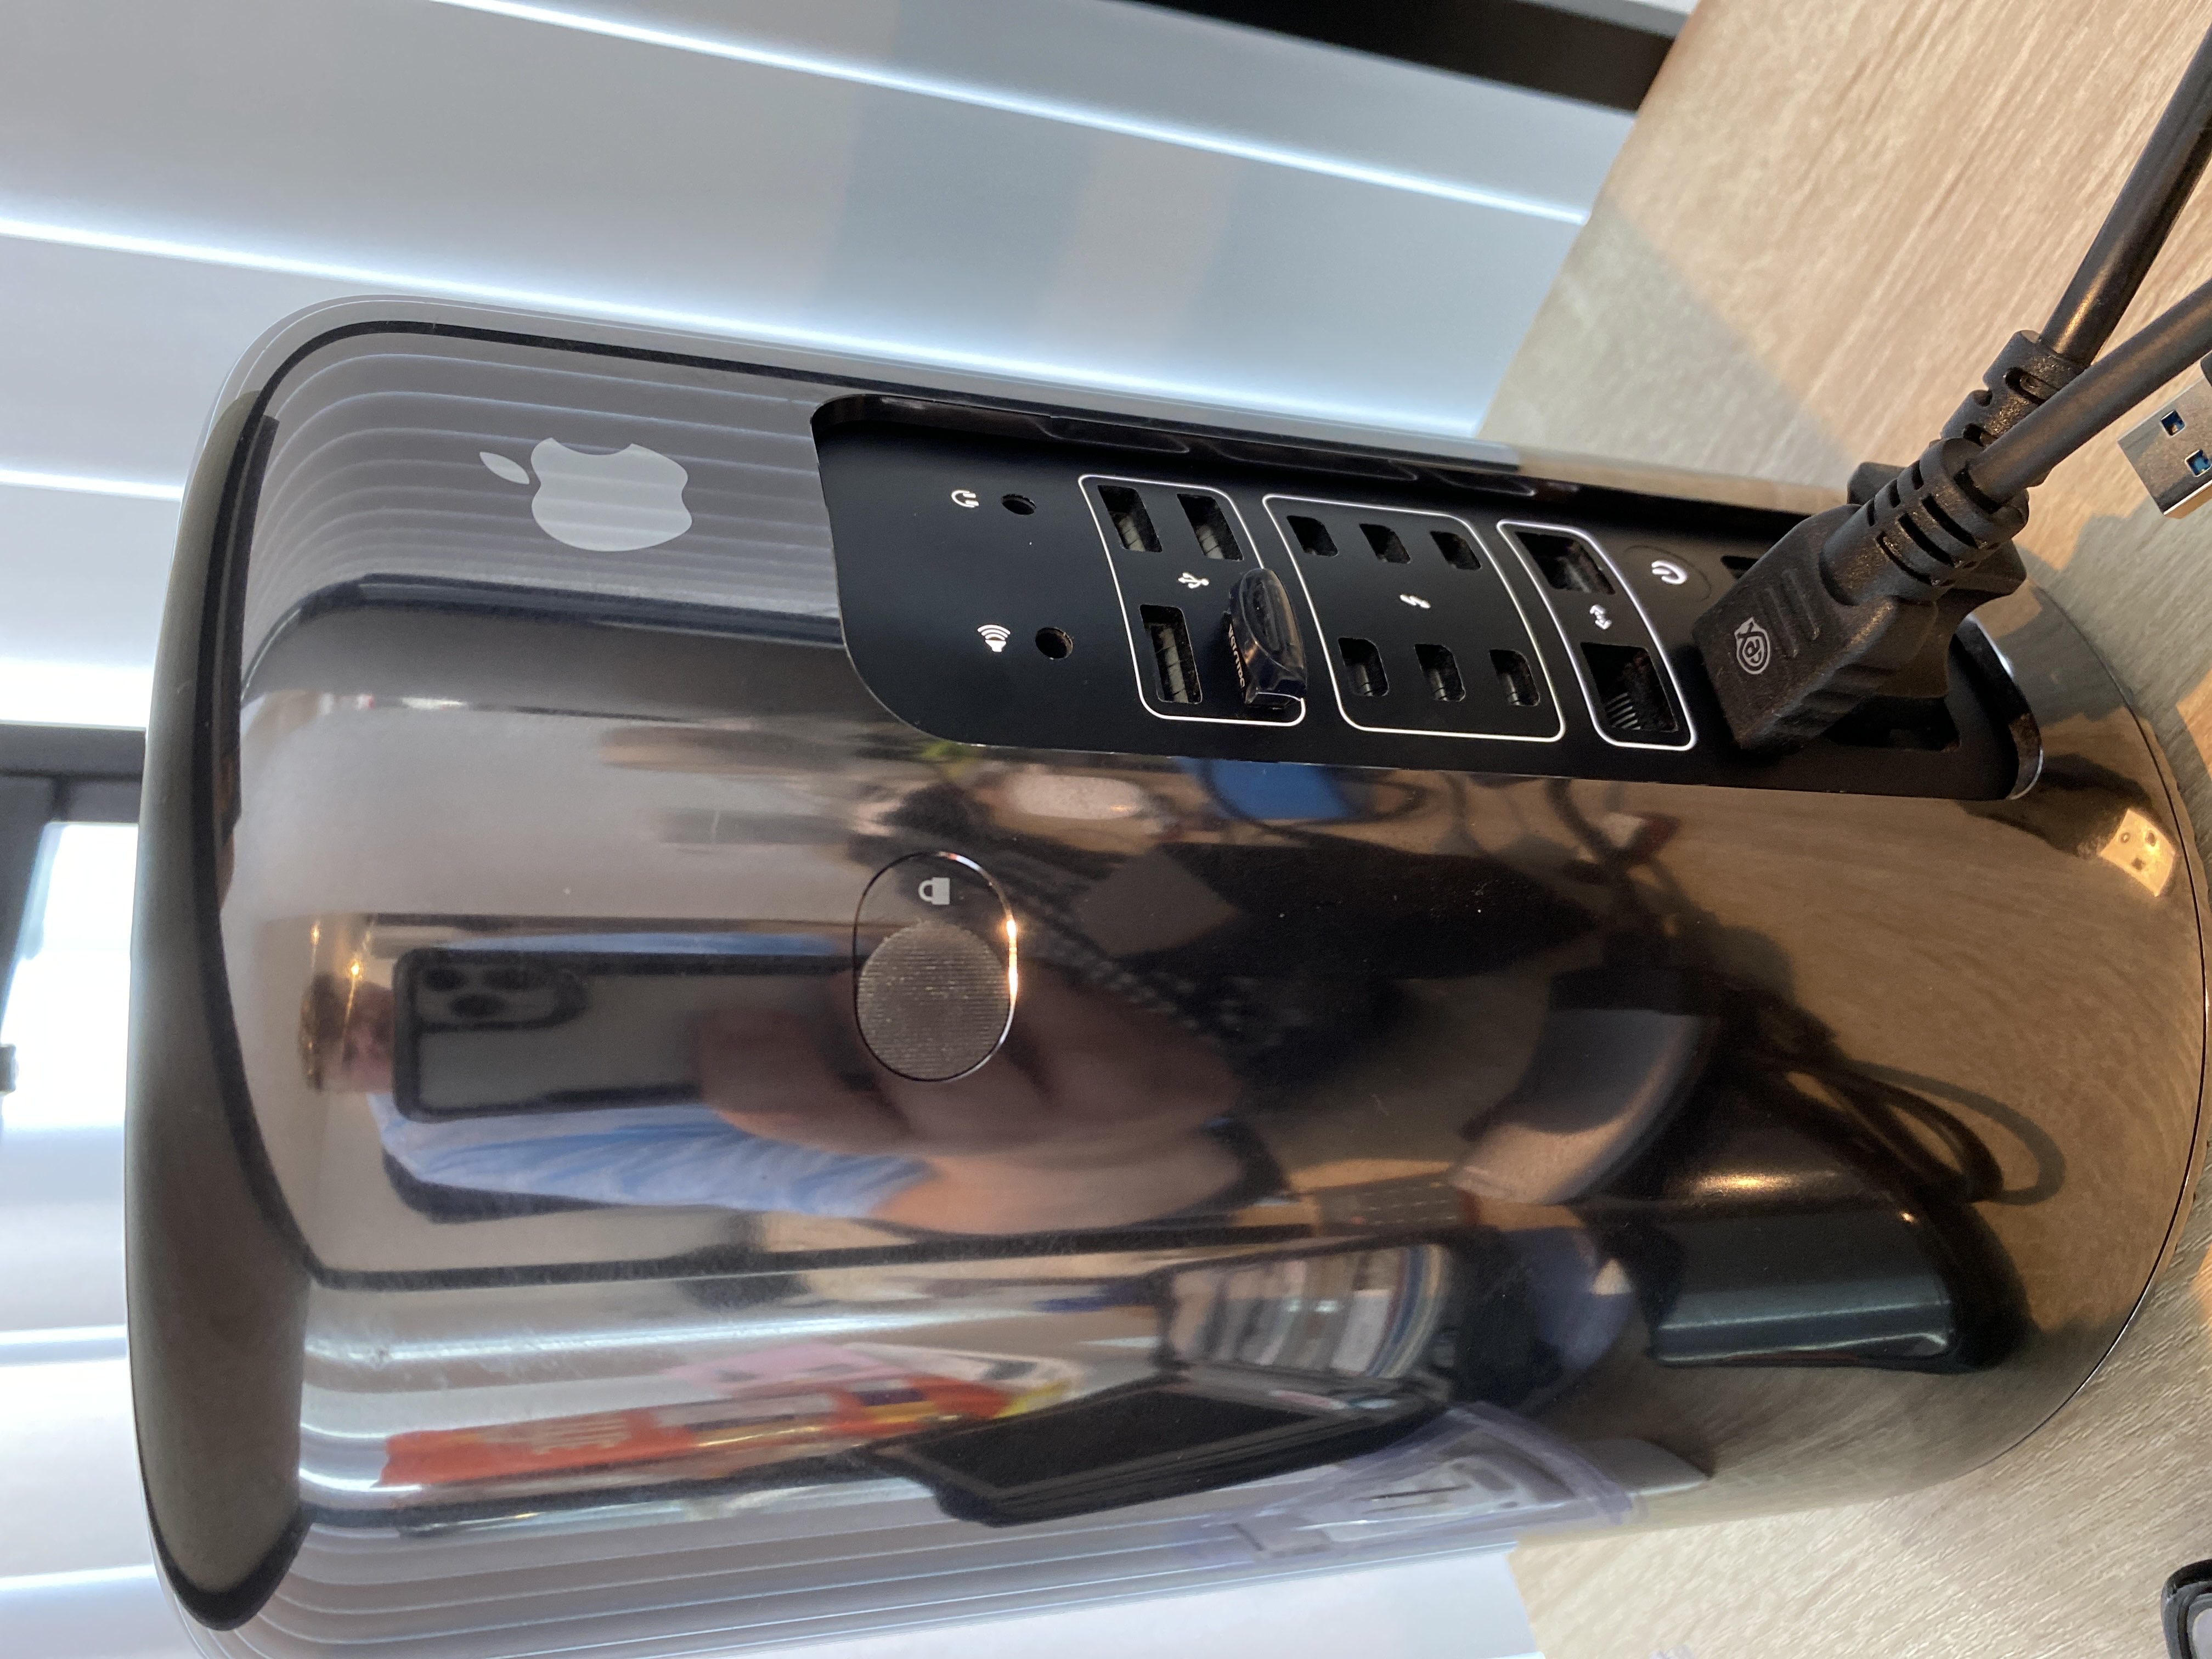
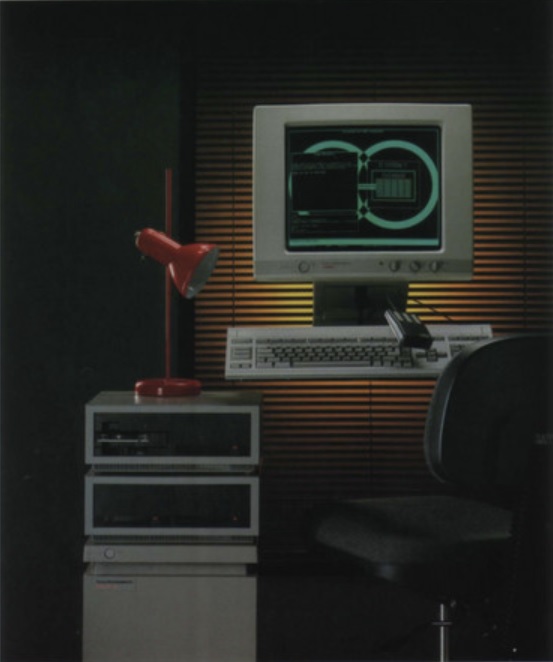
Back nearly a decade ago, Apple was going to release a new Mac Pro. And it was goi to be unlike all the other computers, it was going to be compact, and stylish, a jet engine for the mind.
However instead, we got what everyone would know as the trash can.
big brain idea
So at the time i had this idea that I wanted a Xeon workstation in a nice portable form factor. And this little cylinder seemed to fir the bill. But things changed in my life, i was okay being tied down, and a regular Xeon desktop became my goto machine, a desktop would do just fine.
Then years later, an artist id commish to do some stuff was selling their Mac Pro, as they’d gone all in on Hackintosh, and this was my chance to get one on the cheap. As I’m on a business trip at the moment, I thought this would be a good time to test out what I had envisioned as the future of a personal server in a can.
A long while ago, I’d bought a newer/faster/larger flash for the Mac Pro, and it was a simple matter of hitting the Windows key + R and the machine boots up into an internet recovery mode, and will install OS X Mavericks over the wire. Which sounds great, but this is where the fun begins. Since I ordered. a NVMe M.2 module, it of course is too new for the 2013 machine, so I had to use a shim bridging the Mac’s NVMe SSD port to M.2 for my modern flash. And it never fit exactly right, and I kind of screwed it in incorrectly, but it held in place. Obviously flying bumped things around, as I had kind of figured, but I’m getting ahead of myself.
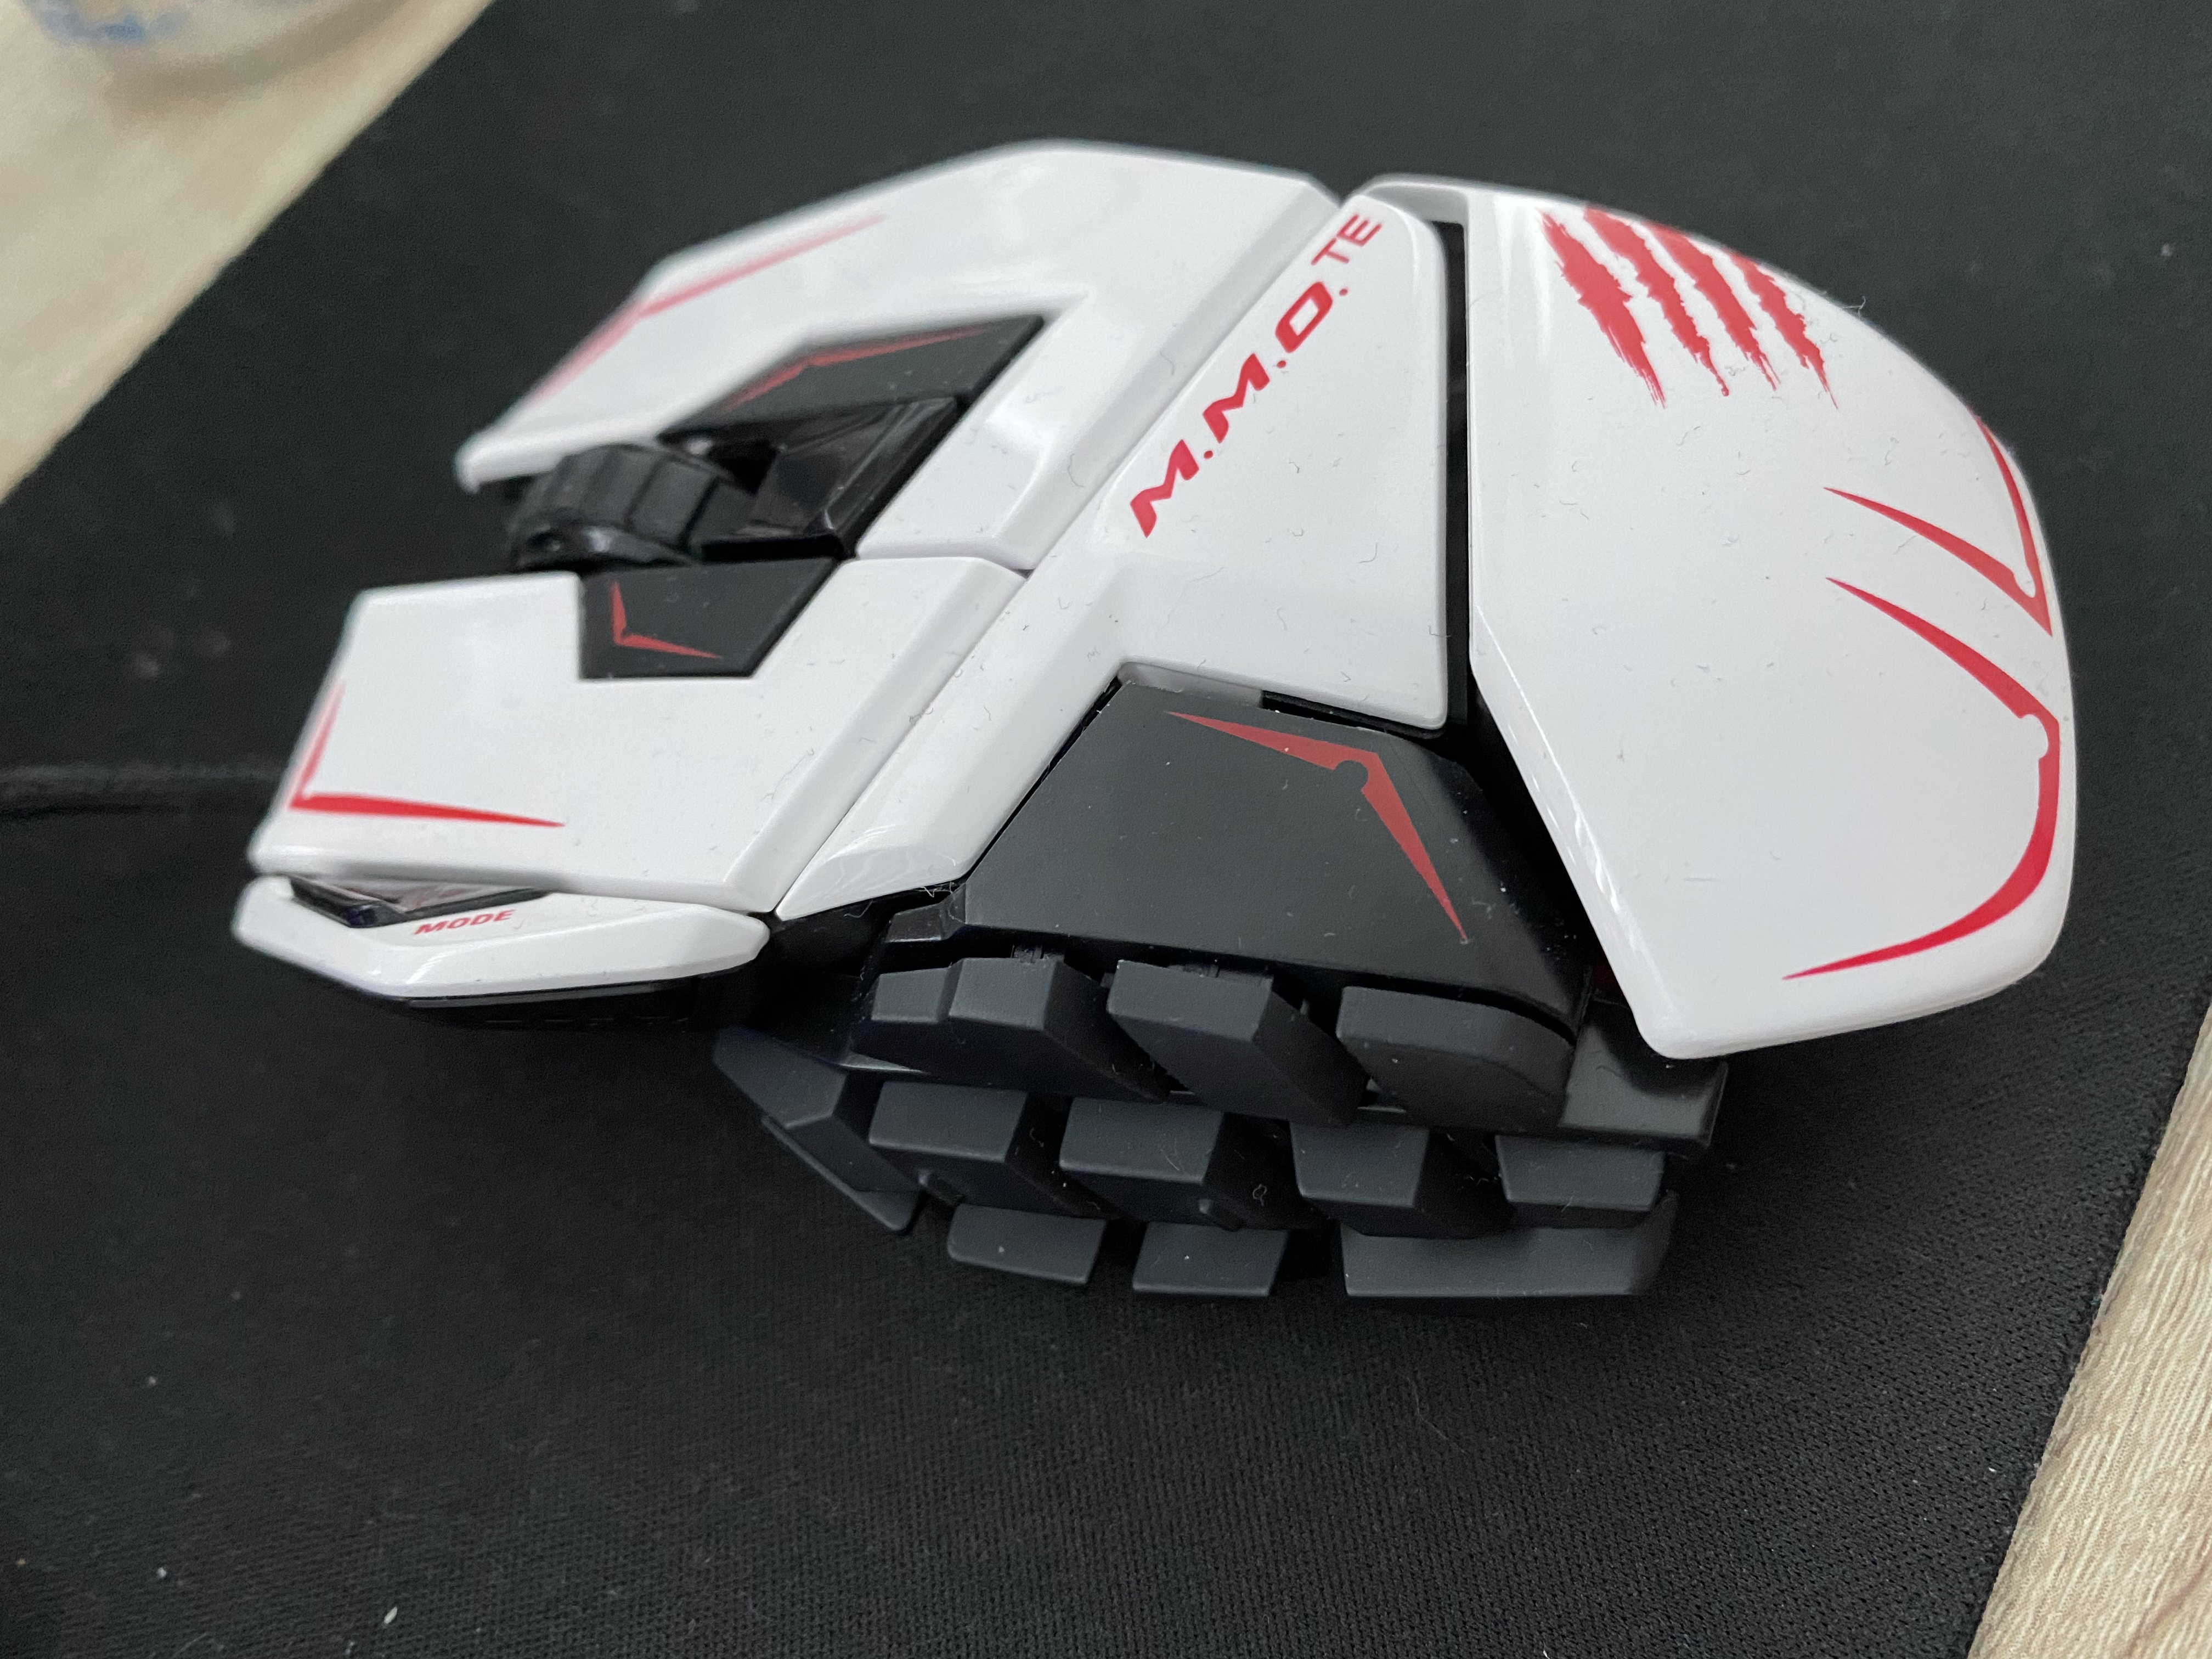
I didn’t take any big peripherals with me, as I figured I’d just get some new stuff, and didn’t worry about it at all. I picked up a View Sonic VX2770 for £45, I got this RED5 Gaming keyboard for £13, and I already had this Mad Catz 43714 mouse NIB with me. I think I paid $200 HKD or so a year ago, but I like the feel of this style of mouse, and was happy to bring it with me. Little did I know…
So after setting up a desk, and the system, it performed like crap. Worse it was locking up again at random times. I already was using Macs Fan Control to set the fan to 100%, and still it was locking up. I had guessed it’d taken a jostle too many, and I reseated the storage. And then on booting it back up I only got the blinking folder. Great, either it was dying, or I’d just killed it.
A quick jump on Amazon, and I found the “Timetec 512GB MAC SSD NVMe PCIe Gen3x4 3D NAND TLC”, which at a whopping £68 seemed like a good idea. And since it was SSD NVMe, it’d just slot into the Mac Pro, and life would be good. Or so I thought.
The first problem I ran into is that I couldn’t boot the mac into either diagnostics, or recovery mode. There is something really weird with a UK keyboard on a non UK machine. I think the 2013 (and probably many more) power up as American, and this is some kind of common issue with non American keyboards. Seriously why is the pipe,backslash on the lower row? Quotes is over 2? It’s a mess. And since I got my Mac Pro in Asia, maybe it defaults to Chinese? Japanese? Who knows?!
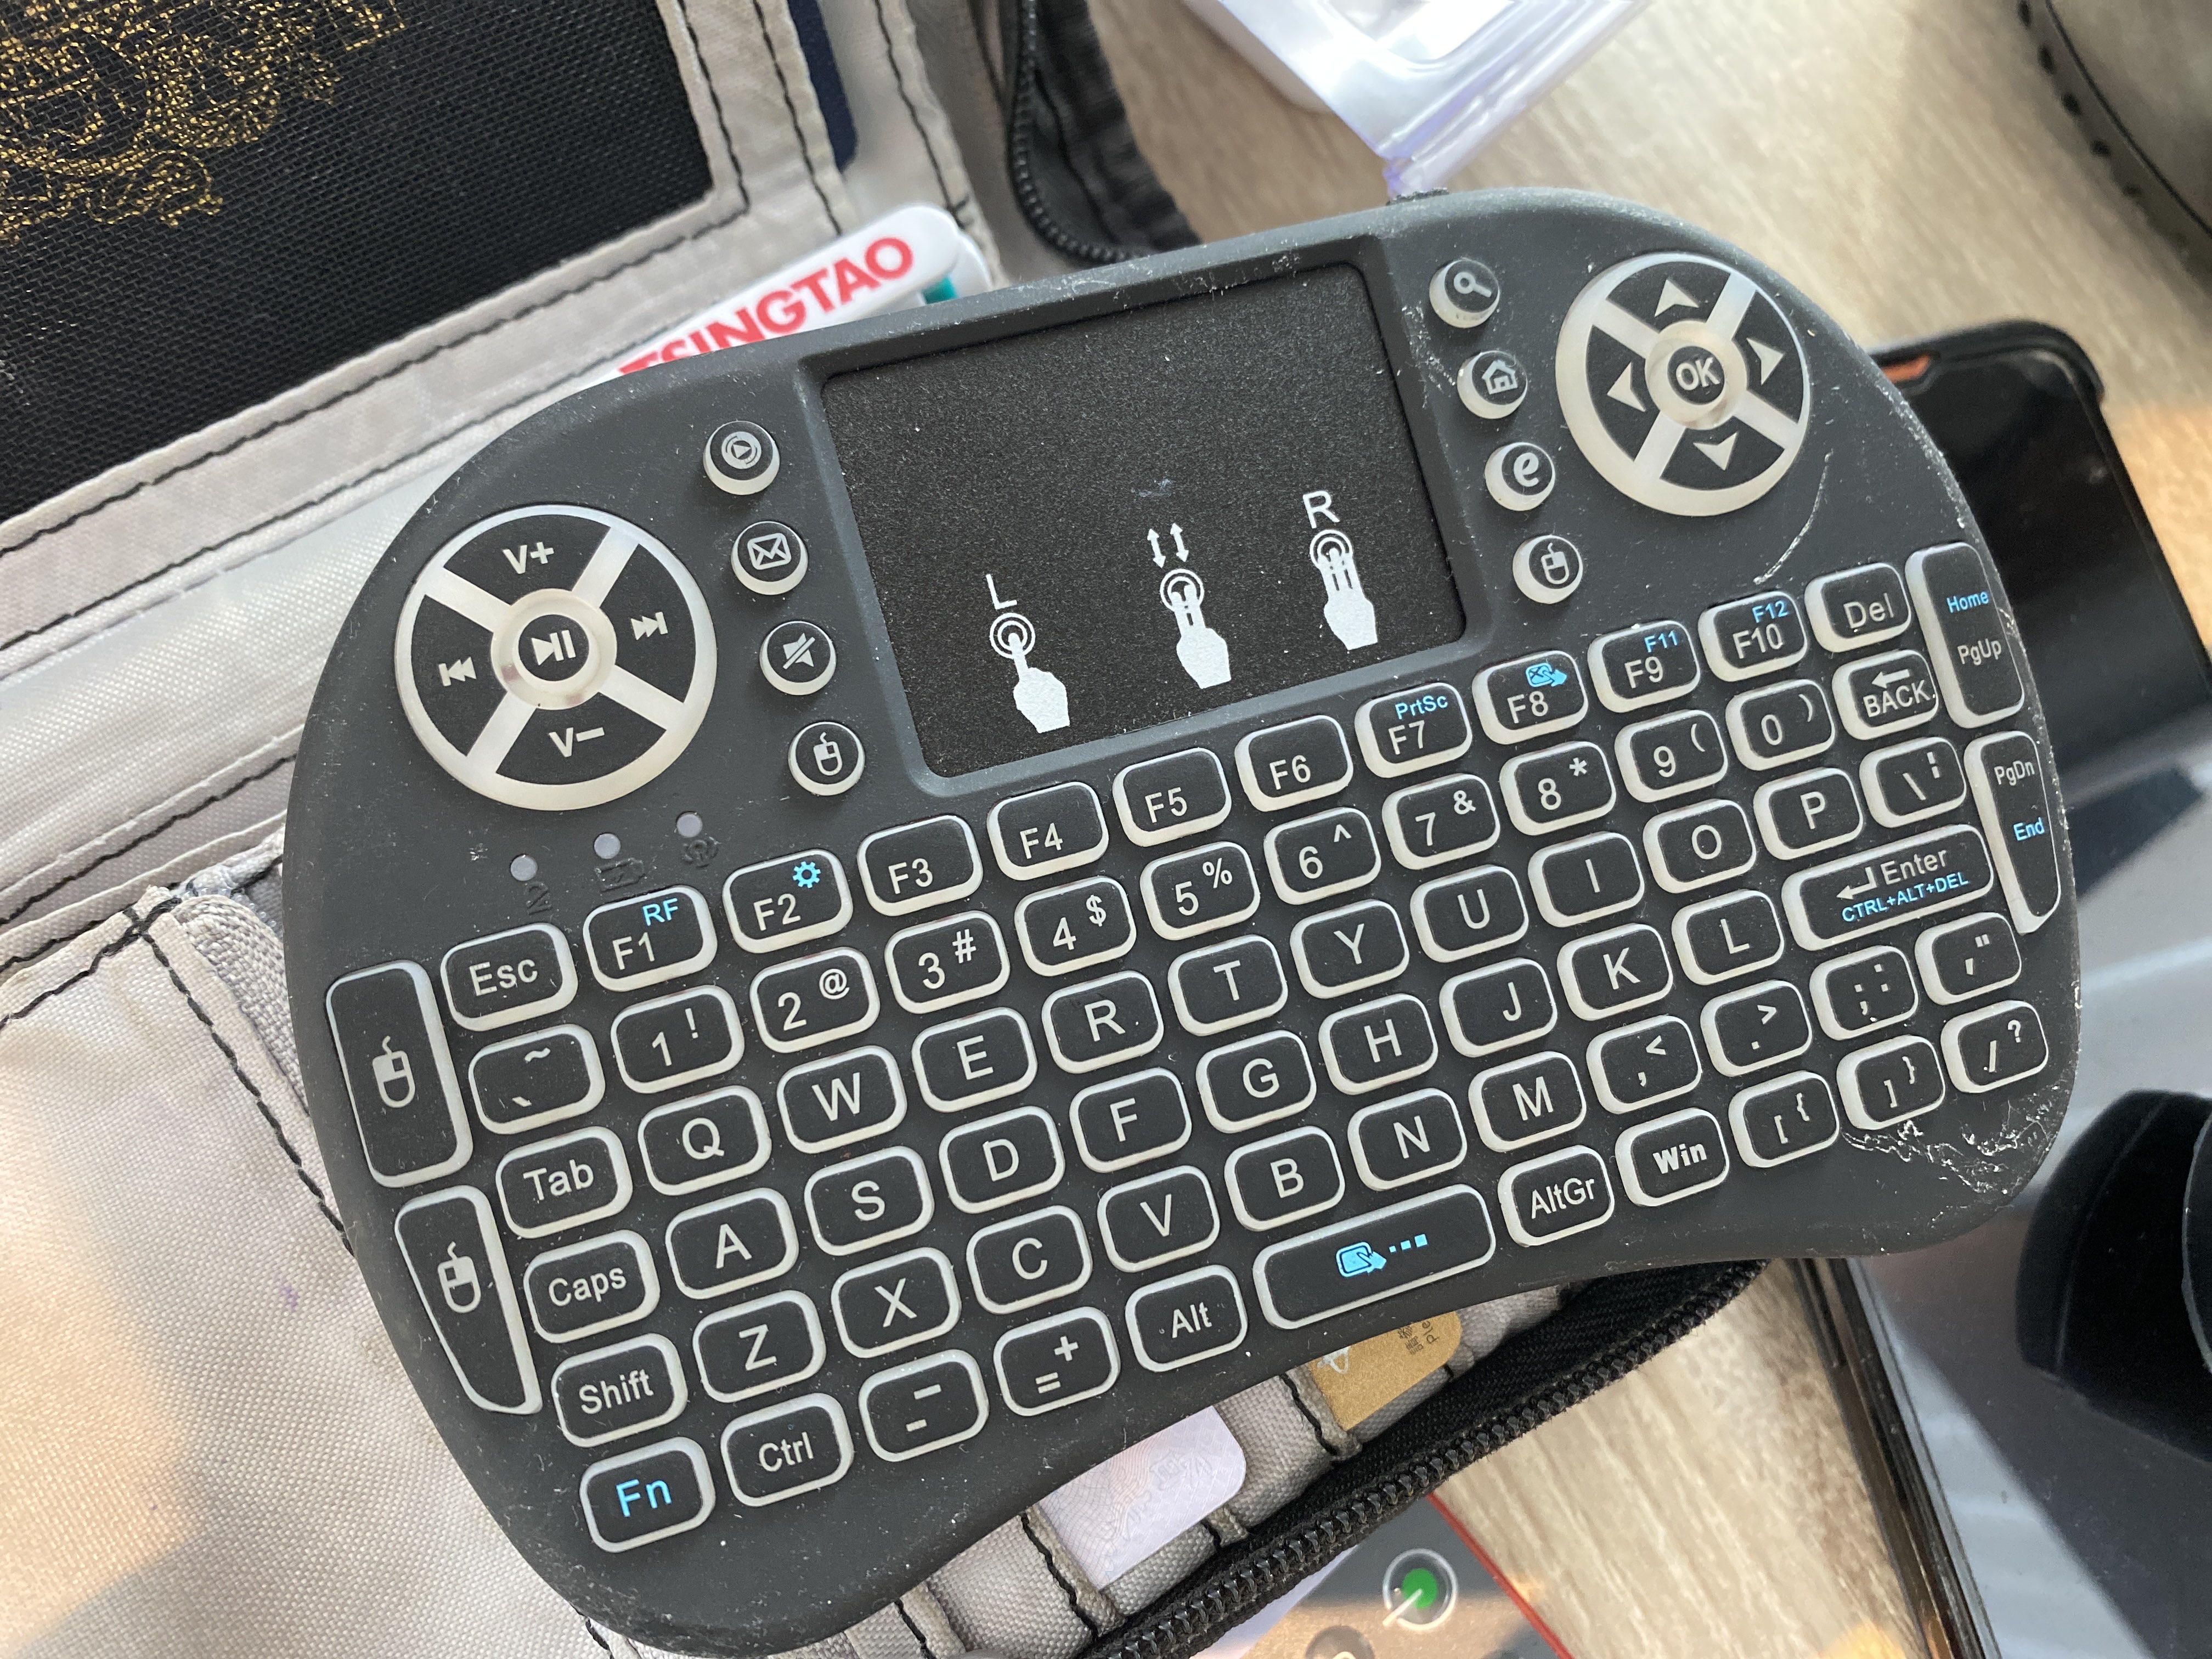
Crappy keyboard controller
Lucky for me, I had this ugly little thing with me for another project. And yeah holding down the ‘Win’+R button got me to recovery mode, with zero issues.
Loading Recovery
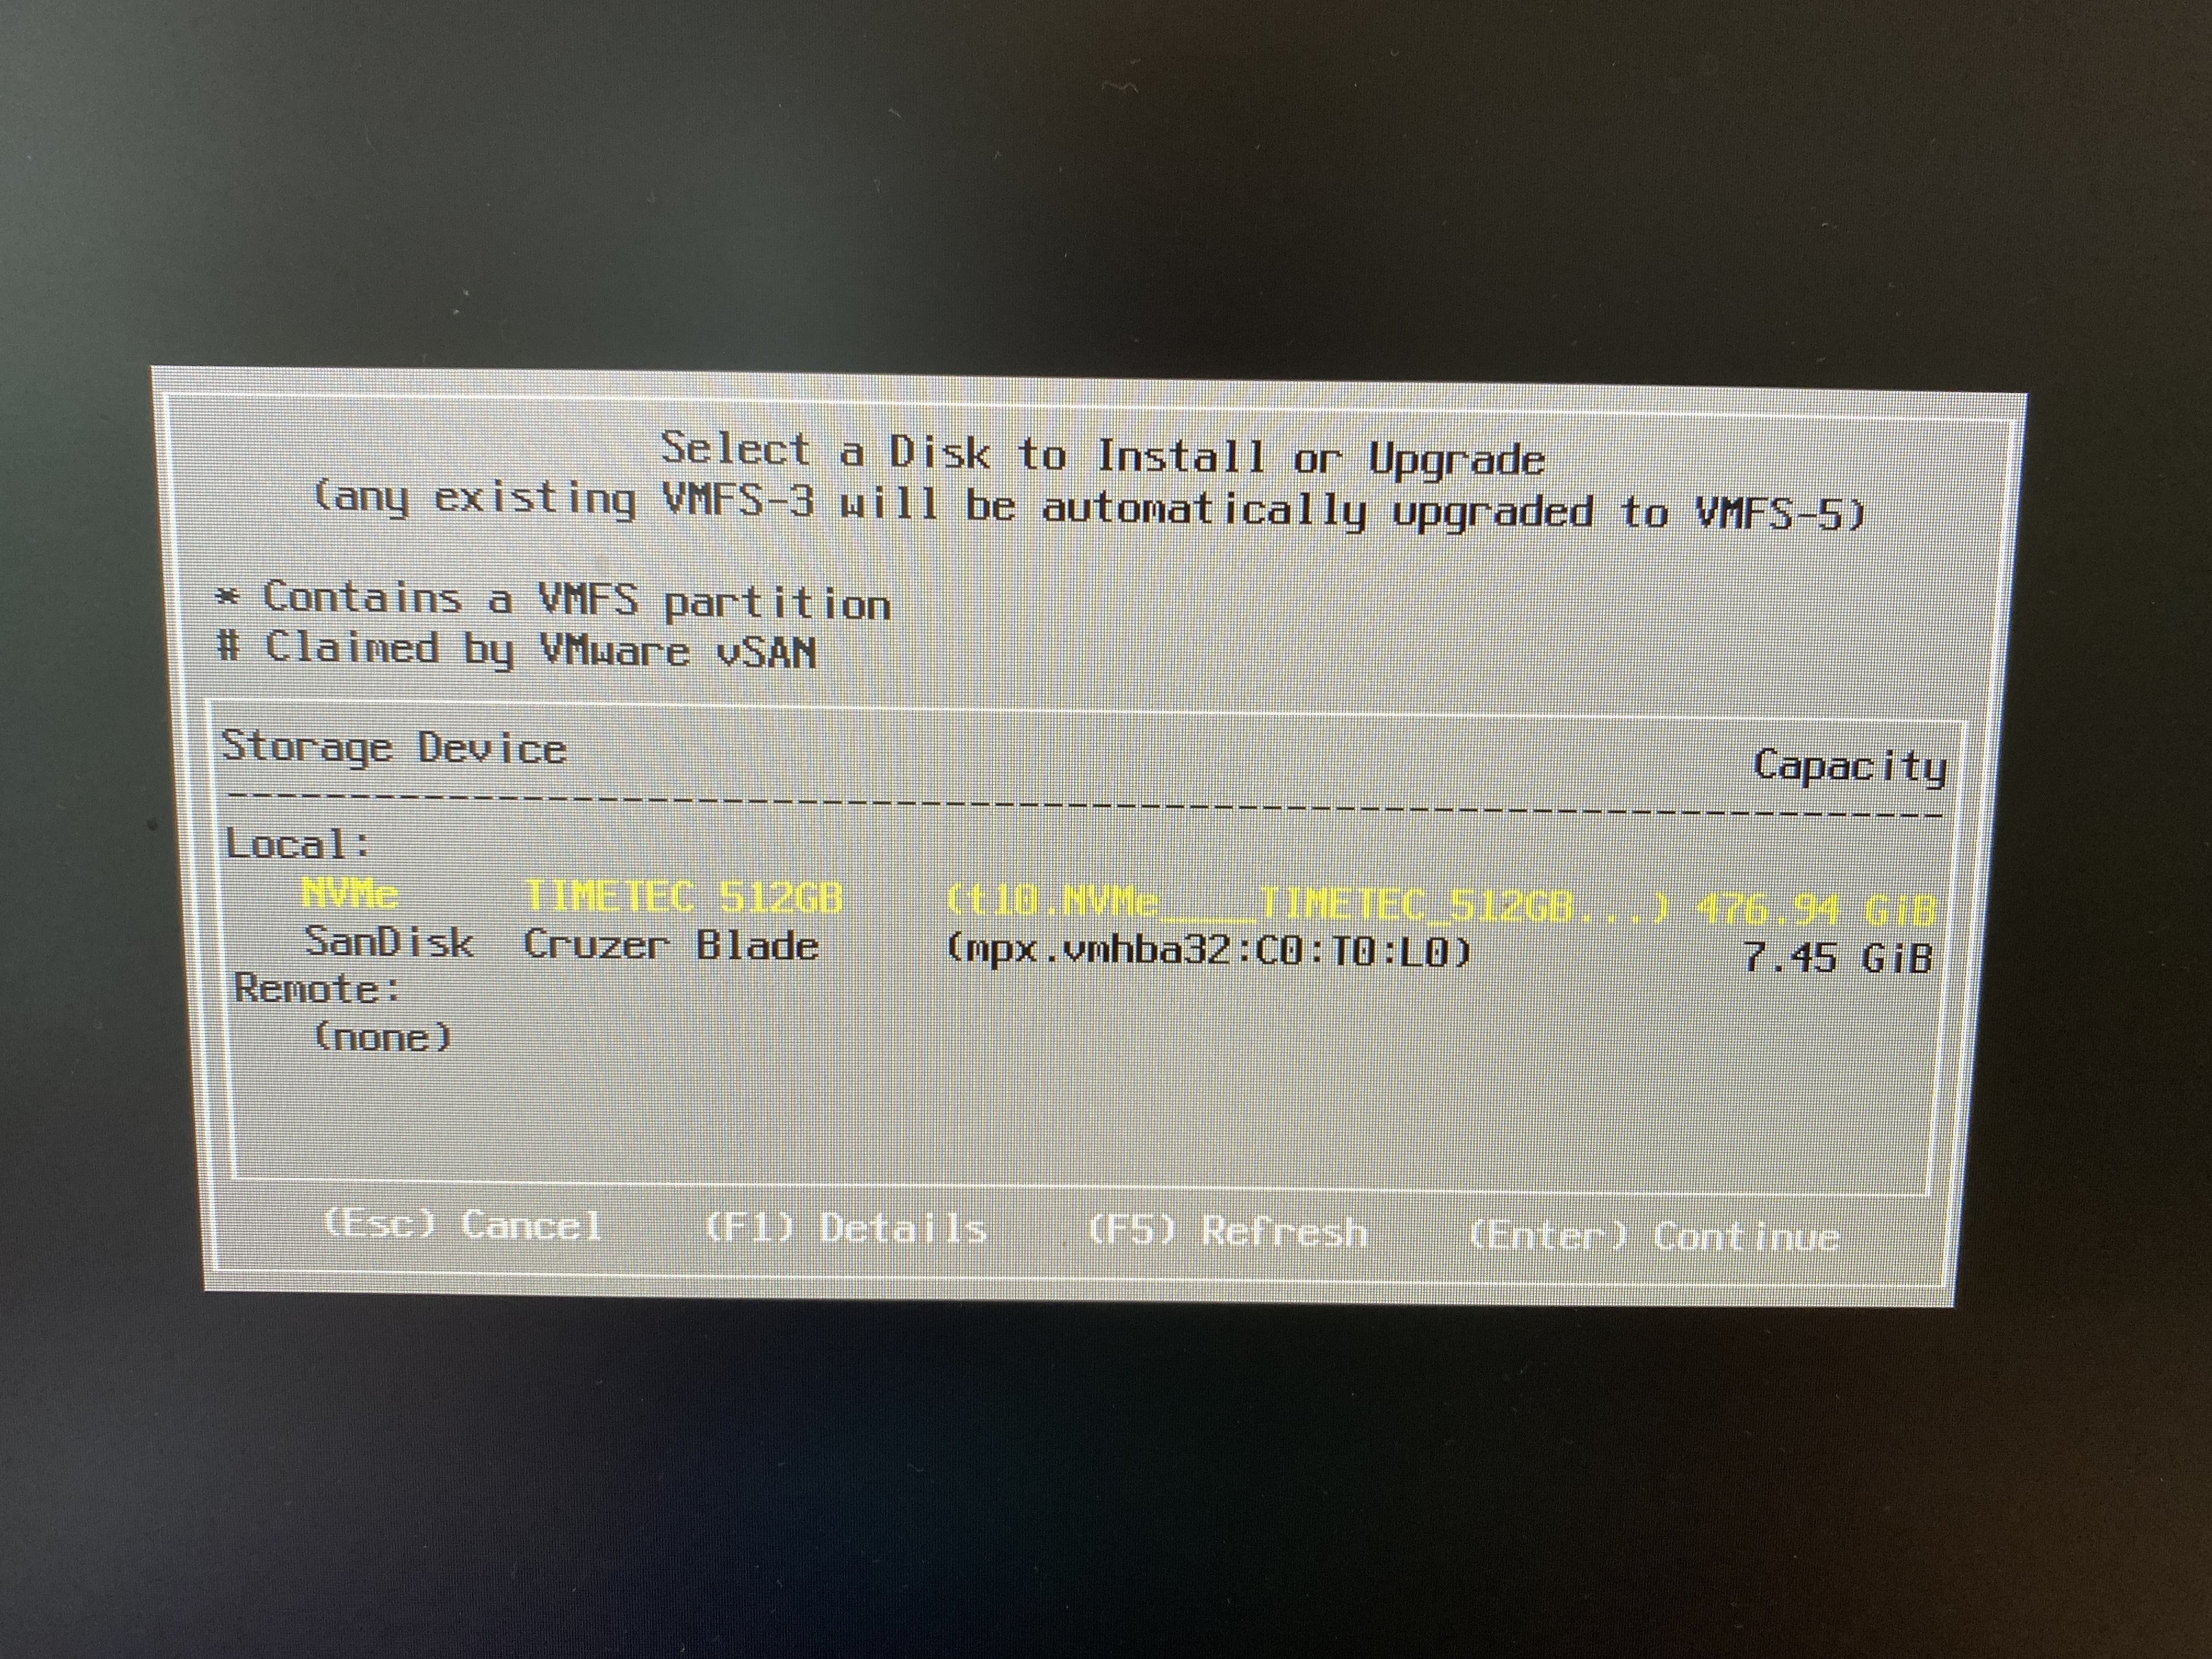
I still have to say, this is pretty cool. However what wasn’t cool, is loading the disk util, and yeah, NO FLASH detected. I have VMWare ESX 7.0 on USB, so booting that up, and yeah it totally sees the drive:
TIMTEC drive is spotted!
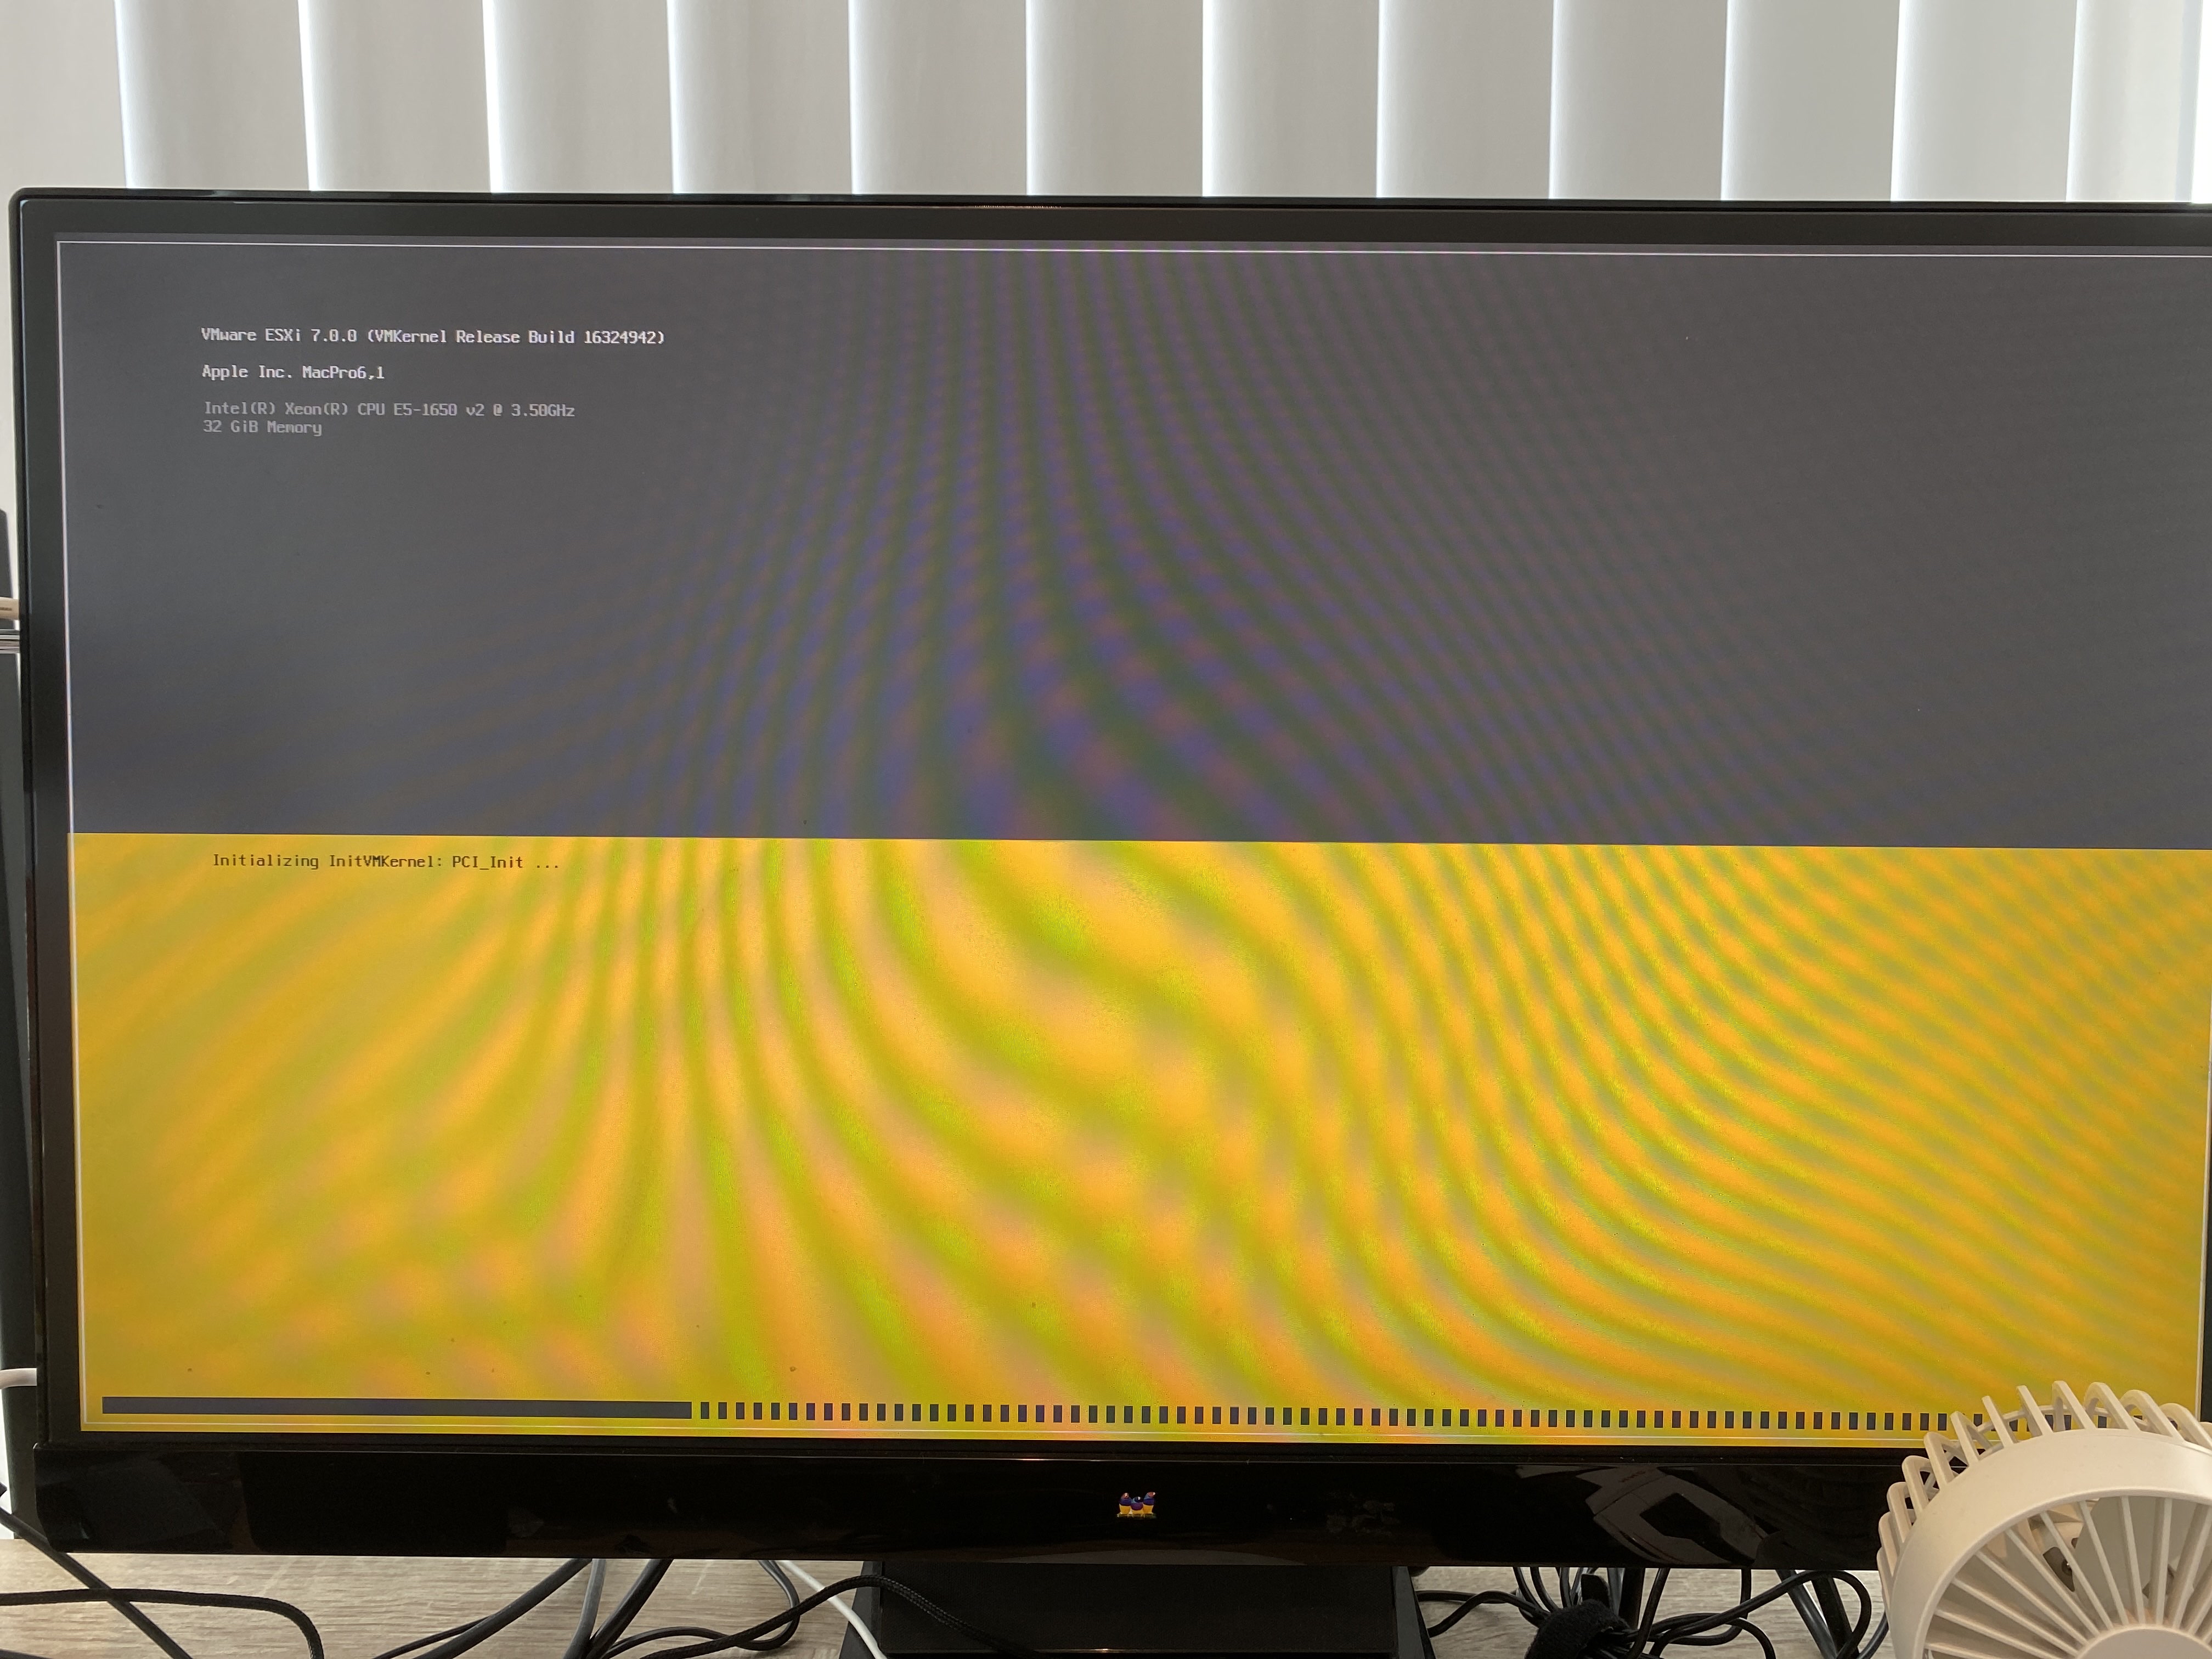
And of course, like an idiot, I installed VMware to at least make sure it’s working.
ESX on Mac
Yeah it’s booting fine.
By default the Mac Pro seems to be picking up bootable USB devices, so I pop in a Windows 10 MBR USB, and instead I get this:
Bad memory on the GPU? Bad cable? Bad monitor? I have no idea. At this point I’m thinking I’ve totally killed the machine, but a power cycle, and I’m back in ESX in no time. Something is up.
I pull the flash, and I can boot Windows 10 to the installer, but obviously there is no storage to install to. I try adding in a 16GB USB thumb drive, and … It won’t let you install to it. It appears that there is a way to prepare a USB drive for Windows 10 to install, but it’s not exactly something that is easy to do. However Mac OS X, doesn’t suffer this limitation and will let you install to whatever you want, so I install Mavericks to the 16GB drive, and yeah it’s booting. And SUPER slow. The flash still doesn’t show up, so I read the amazon page some more and find this tidbit:
“My Macbook came with Mac OS Capitan as the operating system for recovery, and therefore did not detect the SSD. I had to create a High Sierra installer on a USB using another Mac and an app (DiskMaker) in order to reinstall the operating system from High Sierra. Once this was done, the SSD appeared available and I was able to install the operating system and upgrade without problem.” –Gilberto R. Rojina
Oh, now isnt’ that interesting? So of course I got to update my thumb drive, and of course 16GB isn’t enough space. Great. So I order a Elecife M.2 NVME Enclosure for £23, thinking I should be able to figure out once and for all if I can see the old drive, or maybe boot from it. I get the drive, plug in the storage, and Disk Util sees a drive, but will not mount it, nor is it selectable too boot from. The issue of course is that it’s APFS, which I guess cannot boot from external media? I have no idea, but I don’t have anything that critical on there, as I keep my stuff backed up on some cloud thing. So I do have a 128GB thumb drive on me, so I format the 1TB as HFS+, backup the drive, and and once more again reboot to the recovery mode, using the crap keyboard, to install Mavericks onto the 128GB flash. Thinking everything is going to be fine, I find this apple support page, with the needed links to get ‘old’ versions of MacOS.
These versions can be directly downloaded and installed without the store.
Another weird thing is that Mavericks won’t let me login to the Apple store. It notifies me on my phone, I approve it, but it never prompts for the verification. Maybe it’s too old? Anyways I install macOS Sierra, and do the upgrade.
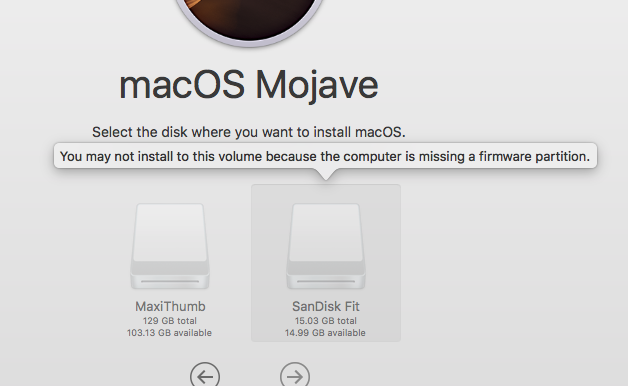
Now running Sierra, I can use the store, and try to take the leap on my USB to Mojave. And of course disappointment strikes again:
You may not install to this volume because the computer is missing a firmware partition.
What the hell?! So now I’m trying to find out how to create a bootable USB installer from the download. That leads me to this fun page at apple. Apparently an ‘install installer to USB drive’ would be too complicated for Apple, so its hidden in a terminal command. Fantastic. Since I’m using that 128GB as my system, I grab that 16GB flash drive, and install the installer to that.
sudo /Applications/Install\ macOS\ Mojave.app/Contents/Resources/createinstallmedia --volume /Volumes/SanDisk\ Fit
What an insane path to get this far. The tool will partition and format the drive, and now I can shut down, pop out the 128GB Sierra drive, and boot into the Mojave installer.
I didn’t take pictures, but by default the Mojave installer & DiskTool only show existing partitions. You have to right click on the drive, to expose the entire drive. This was an issue as I’d installed ESX onto the new storage. I clear the drive, and now I can finally install Mojave.
Home run?
Thinking it’s all over, I reboot into the Mac Pro, thinking everything should be fine, I have a properly fitting drive that is super fast, and It’s already 10.14.6 the latest and last version that lets me run 32bit stuff. Except that It’s slow. And unstable. No progress was seemingly made.
Trying to search ‘why is my Macintosh slow’ is, well a total waste of time. And it periodically locks hard making it extremely annoying.
I have a quad-core CPU Mac Pro late 2013 (Model Identifier: MacPro6,1).  MacOS X 10.9.5.
I have had all sorts of USB devices hooked up to it.  At any one time, I usually have all 4 ports filled.  I have a 3TB USB 3.0 disk that stores my large files, a USB mouse and keyboard (logitech with a usb mini dongle), a cable to charge my logitech USB cordless mouse, Lightning cable to my iPhone 5, and other things that I rotate in and out, like CF card reader, Audio Box USB audio interface from PreSonus, Sony Webcam, etc.
About 3 months into having the Mac Pro, I noticed that my keyboard went dead in the middle of using it.  The mouse was dead too.  I blamed the RF dongle that they both share, because the Apple Magic Trackpad (bluetooth) I have still functioned.  Try as I might, I couldn't get the keyboard or mouse to work again, so I used the Magic Trackpad to restart the machine, and then my keyboard and mouse worked again.
It wasn't until later that I realized that all the USB busses on the machine had frozen or "died" temporarily.  I realized it later because my USB hard drive complained about being "ejected improperly."
Now I have had the USB die on the Mac Pro at least 15 times over the last month and a half.  Usually once every two days or so.
I have tried (almost one by one) using some of the USB devices on the mac, and removing others to ascertain if it's a certain USB device that is causing this.  But the odd thing is that I never get a message from the OS like "xxx USB device is drawing too much power."
I'm going a little nuts here because I cannot see any rhyme or reason to the USB interface lock ups.  And each time it happens, all the USB devices go dead until I restart.  Sometimes, I'm able to SSH into the machine from my iPhone and issue a "shutdown -h now" and even though I see the Mac OS X UI shutdown, it never fully halts.  I often have to hold the power button to get the machine to turn off.
I really can't say if it's software related, hardware related or what.  I've tried to watch my workflow carefully to see if anything seems to make a pattern, but nothing yet.
Any suggestions? Is anyone else seeing behavior like this?  Do we think it's a USB device... or is my Mac Pro flakey? -- Cheule
"When I plugged in the same config on my new machine USB 3.0 directly it was very weird, devices would not remount and only show up if they were then when present at startup, and thruput was sluggish. So I stopped using the in built USB 3.0 and grabbe the old belkin thunderbolt USB hub, and BAM it all works perfectly. Better than that after testing the throuput , the belkin gave me 30-50% better performance that the inbuilt USB, that is without any hubs just direct." -- symonty Gresham
And sure enough another search about the USB setup seems to confirm it from Anandtech
Here we really get to see how much of a mess Intel's workstation chipset lineup is: the C600/X79 PCH doesn't natively support USB 3.0. That's right, it's nearly 2014 and Intel is shipping a flagship platform without USB 3.0 support. The 8th PCIe lane off of the PCH is used by a Fresco Logic USB 3.0 controller. I believe it's the FL1100, which is a PCIe 2.0 to 4-port USB 3.0 controller.
Unreal. I notice as I try to use the machine more occasionally the mouse turns itself off. Replugging the mouse shows it powering up and immediately powering off. I turn on the annoying backlight of the keyboard, and yeah it powers down too, however reinserting it brings it back to life. Luckily I still have this A1296 Apple Wireless Magic Mouse with me, so I pair that and unplug the mouse, and everything else USB.
This mouse killed my Mac Pro
It was the mouse. I can’t believe it either. I am simply blown away how this could possibly be a thing. I haven’t ordered the thunderbolt to USB dock yet, as I really didn’t want to spend any money on this thing, it was a grab and go solution, that has proven itself not so much grab and go.
Finally getting somewhere
After 6 hours of working yesterday, I shut it down to give it a break for a few hours, and it’s been up some 12 hours so far, pain free. In 2022, the Xeon E5v2 processor just really isn’t worth lugging around, but I already had it, so when it comes to transport, it actually works out pretty well. I wonder if this would have been a good traveling solution 2013 onward, but the fact a mouse could basically bring the machine down makes me think I’d have gone totally insane trying this on the road. Just as the USB Win/Alt/Alt GR/FN keys not being able to trigger the recovery mode was also crazy.
I don’t know why Apple insists on such fragile machines, but maybe the new Arm stuff is better? I can’t justify one at the moment.
Updates in the field
I’m working on getting some local retro kit, and I’ll have more fun coming up. But this fun experience ate 4 days of my life, and the least I could do is document it. I don’t know if it’ll help anyone in the future, maybe once these become iconic collectable, like the Mac Cube. Although as a former cube owner, those at least didn’t freak out when you used a 3rd party mouse.
So due to recent economic events I’m having to consolidate all my VM’s back to the office I’m currently renting. I had a fancy 1gig internet connection installed and I’m still under contract for a year. Before the c00f it made sense as I did a lot out of that office and was getting ready to do something fun and big. I had planned on making a cloud service, I’d bought a bunch of Xeon boards, and started the initial build of my cloud to shop around but then the world ended the following weekend. As they say, bad timing.
So as a fan of old junk I still have some NT 4.0 stuff, and it’d been running on VMware for years, no issues everything being great. But I need to do double+ duty at the moment and to make it easier than trying to get GPU passthru working, I’m just going with Hyper-V on the Windows 10 desktops that I have running. May as well make people doubly useful!
In some idea of ‘performance’ I had converted all the virtual disks to ‘flat’ VMDK’s and never thought twice about it as it worked, and all was well.
Naturally to start with I uninstall VMware Tools while running under ESXi and shut down the VMs.
Well after rsync‘ing my disks back, I converted them with qemu-img and got this weird error that my VMDK’s were not VMDK’s. They are infact FLAT disk images. With really screwed up geometry that prevented both qemu and Hyper-V from mounting the raw converted disk images.
And sure enough yeah it’s like a typical DOS disk with the start 63 sectors in. So to mount this under Linux (WSLv2 too!) we need to tell the loop driver the offsets, which is the start and size * 512 or:
# mount -o loop,offset=32256,sizelimit=2097414144 USENET-AltaVista-flat.vmdk /mnt
And all is good. Yes even a type 7 for HPFS/NTFS it mounted find and the data is there.
Now the ‘fix’ was an old one from back in the day, when moving stuff around and things get goofed you can try to xcopy and permissions always get messed up or cheat, and just use another NT installation and format a floppy disk and copy the following system files to it:
ntldr
ntdetect.com
boot.ini
In my case that’s all I needed to do, I re-ran qemu-img to convert from raw to vpc disk images:
qemu-img convert -f raw -O vpc USENET-AltaVista-flat.vmdk USENET-AltaVista-flat.vhd
And setup Hyper-V to boot my virtual diskette first, and in no time my NT was back up and running.
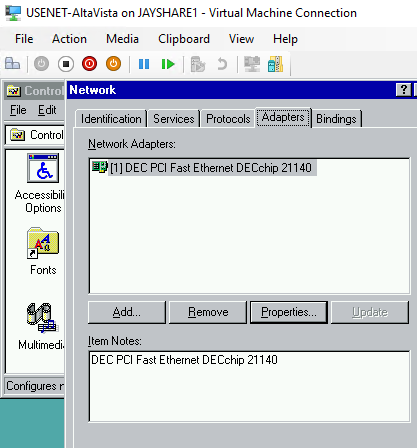
Naturally be sure to install the legacy network adapter for the VM, and re-configure NT for the DECchip 21140 adapter.
DECchip 21140
Dont’ forget to re-run service pack 6, and the update. Since these disks & VMs were pre-installed I didn’t have to mess with the “CompatibilityForOlderOperatingSystemsEnabled” flag. Although that was quite the fun adventure at the time.
In my case there was some IP addresses to change, but it’s back online with minimal effort which is always fine. Hyper-V doesn’t have any real integration stuff for old Windows so it’s pretty much a set it an forget it thing, or use Terminal Server for remote access.
So yes, many of the hosted things I have are down. I know. Yes it sucks. And yes I think the disk I put this on at the moment kind of sucks too. It’s been super cold here lately and I didn’t want to be exposed out there riding around getting soaked in the high winds so I’ll keep shuffling stuff later. But for now I got to save some hosting fees. And things like the gopher are dead. for the moment.
In my “C:\Program Files (x86)\Windows Kits\10\Emulation\Mobile\10.0.14393.0” directory I have a modest 2GB file called flash.vhd which contains the phone image. I copy it to where I run my VM’s and run it with the XDE emulator:
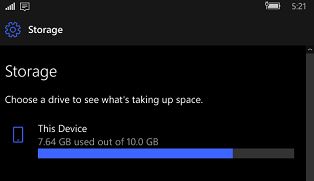
And I’m running in no time, I login, load some apps, then I notice the storage:
What is this, a phone for ants?
What?! the disk image is a paultry 10GB. I guess the idea is that you wouldn’t actually try to load up the emulator like it’s your daily driver, rather you load YOUR app and only YOUR app, and just pretend that this isn’t some weird offshoot nostalgia machine.
Well needless to say something needs to be done about this storage situation.
I look and find this package, vhdutils. I had to go to some sketchy site, but it did include source. I should put this somewhere more legit to take away from all those weird squatters.
So with stuff installed onto my phone I’m almost at 7GB physical 7.6 virtual space. I could go all crazy with 128 or 256GB but it’d largely be stuff I bought… which of course thanks to the magical world of DRM won’t play.
Yeah I guess you are welcome that I bought all those movies, and stuff but sure I wasn’t going to watch them on this phone… emulator. Thanks. thanks again.
So the resize vhd is quick. brutal. and efficient. I go with 64GB, because, why not? I could probably just grow it again if I needed to.
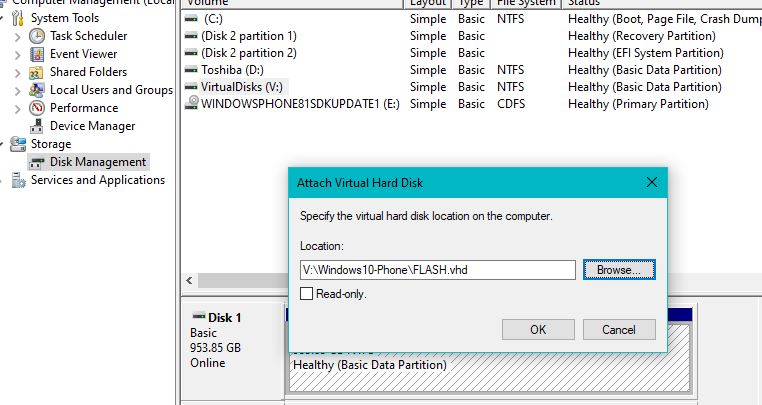
Now for the fun part. We need to attach the vhd, and resize the volume. I hope you like diskpart.
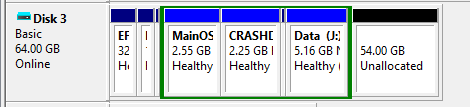
In the MMC I attach the disk image.. it’ll pop a few folders as it’s got a bunch of drive letters. I’ve never explored a phone, I don’t know if the ARM images are just as weird.
Even more strange, it’s MBR!
So if you were thinking, lots of partitions, and a clear win for GPT, sadly this isn’t it.
Sadly there is no free partitions (although one hiding could be deleted…?) And the UI doesn’t support expanding a logical drive (the green container). But diskpart does.
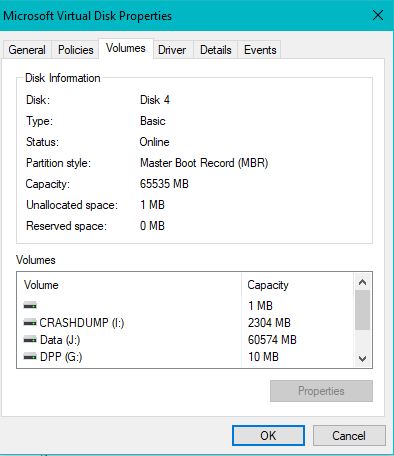
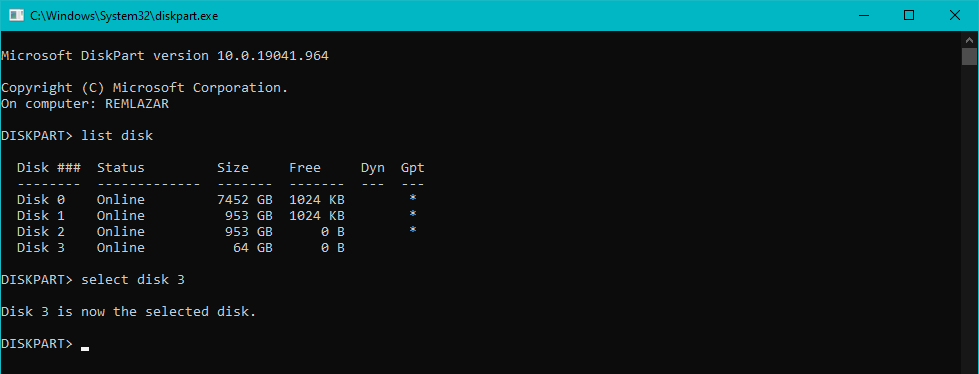
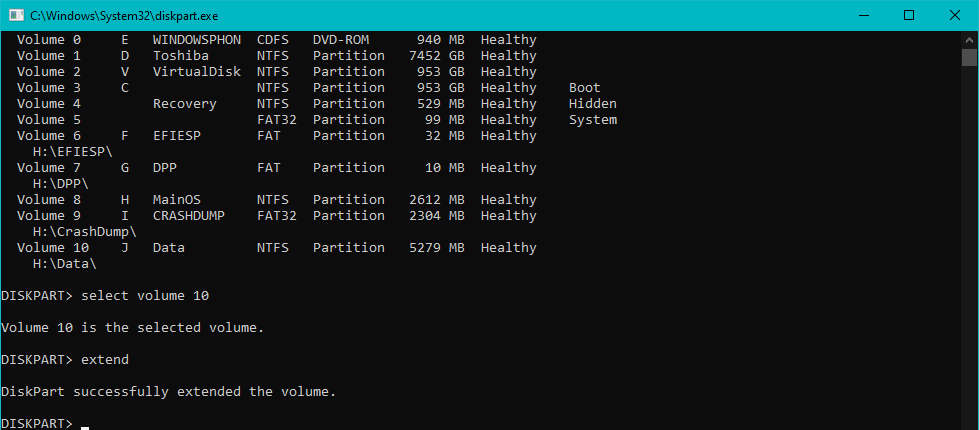
As indicated above the emulator’s vhd is disk3. You can see it’s the 64GB disk. Select it.
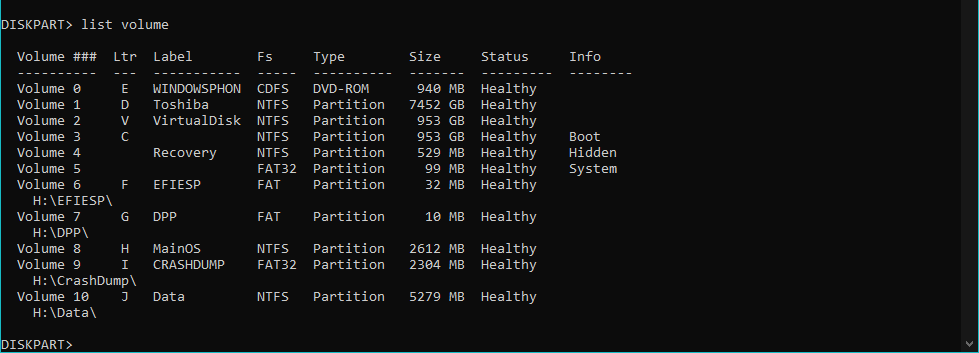
Next list the volumes. The Data disk (J:) is what we want so select Volume 10.
Literally just ‘select volume 10’ and ‘extend’. Don’t tell me this is difficult.
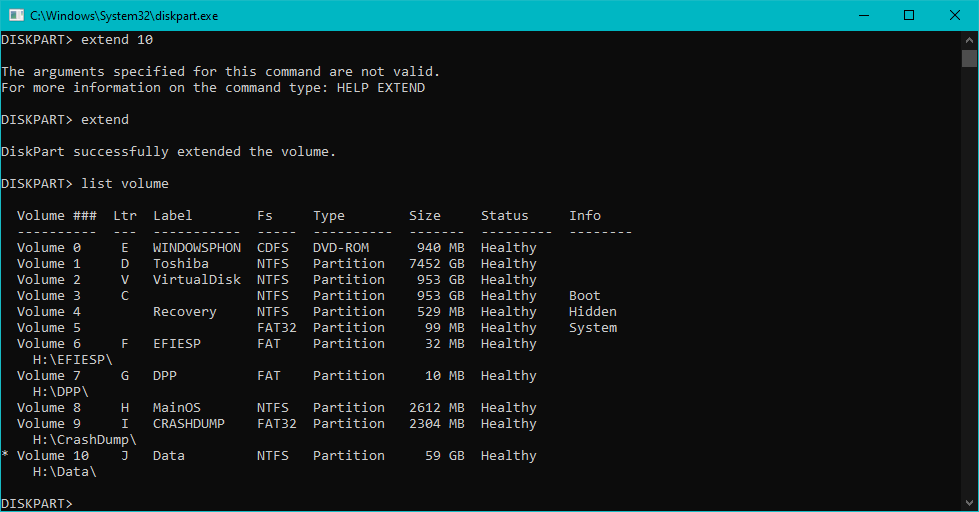
Listing the volumes again will show a 59GB Data partition. Congratulations we did it!
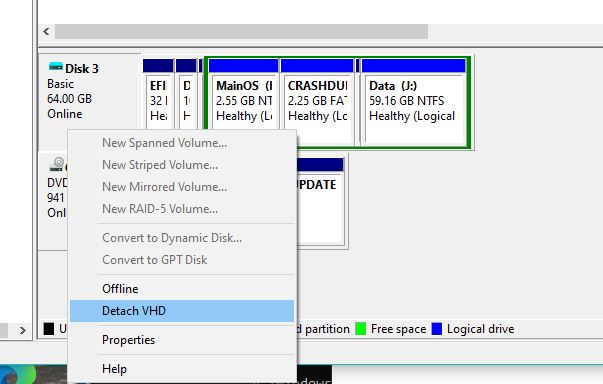
Back in the MMC, you’ll see it as well how the Data partition, along with the green extended partition is now taking up the entire disk. So we can now Detach the VHD, and run the emulator again!
Nice!
And just like that we now have plenty of free space on the emulator.
I downloaded some games, and some music. It’s nice to be back home.
It’s not an extensive list as I didn’t game much on my phone but here is what I know works:
Final Fantasy 1
Heroes of Larkwood
Skulls of the Shogun
Sonic CD
FL Studio
Candy Crush Saga
Pixel Dungeon +
Halo Spartan Asslt just closes, and Asphalt 8: Airborne doesn’t get the screen size right so it’s impossible to click enough buttons.
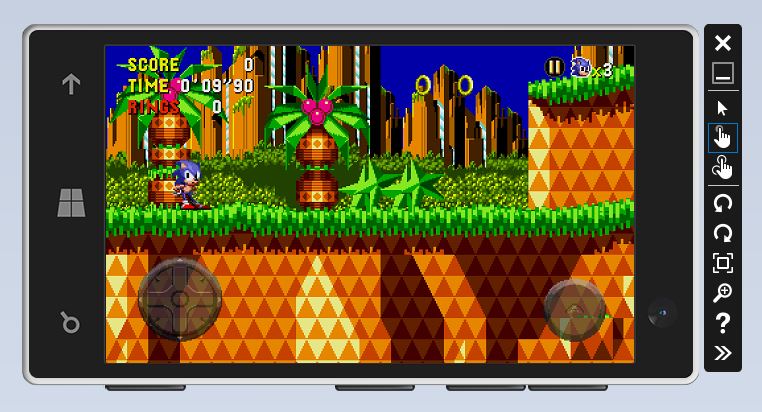
Sonic CD on Windows Phone 10
It’s nice that sonic runs, (haha) although using a mouse makes it impossible to control.
Now one fun thing is that the emulator is x86, nor ARM based so I converted the VHD to a VMDK, ran it under VMware, and YES it RUNS… sort of.
Perhaps a format that never was to be, the Phone/Tablet but it boots quickly and is so responsive. Windows without most of the .. Windows bits. I guess the real experiment will have to be will it run on a Surface?
It’s all 32bit anyways, and such an evolutionary dead end. Pitty.
Claunia‘s Aaru project is hitting a 5.3 milestone, and having a launch party!
Aaru is a fully featured media dump management solution. You usually know media dumps as disc images, disk images, tape images, etc.
With Aaru you can identify a media dump, extract files from it (for supported filesystems), compare two of them, create them from real media using the appropriate drive, create a sidecar metadata with information about the media dump, and a lot of other features that commonly would require you to use separate applications.
So this started out as a weird thing that killed a day for me. I thought it was a little fun to look at but, ultimately I proved that I could extract files, but not from the requested image.
So let’s get into some more details, my failure, and well it’s been raised into another chance for some luck/fast knowledgeable hacker to get a payout to extract a single file.
As mentioned above the computer is the Texas Instruments S1500, the disk image was dumped on bitsavers years ago as s1505_cp3540/s1505_cp3540.dd.gz. As you may guess it’s a raw ‘dd’ of a disk.
Now looking at a few sources namely unix-ag the OS in question is TI System V, an AT&T SVR3.2 derivate. Running strings does reveal ‘SysVr3TCPID’ And this appears to be the Unix Version Banner:
(c)Copyright 1993 Hewlett-Packard Company,  All Rights Reserved.
(c)Copyright 1986-1992 Texas Instruments Incorporated,  All Rights Reserved.
(c)Copyright 1984-1988 AT&T, All Rights Reserved.
(c)Copyright 1979, 1980, 1983, 1985-1990 The Regents of the Univ. of California
(c)Copyright 1980, 1984, 1986 Unix System Laboratories, Inc.
(c)Copyright 1990 Motorola, Inc.
(c)Copyright 1989-1990 The Santa Cruz Operation. All Rights Reserved.
                         RESTRICTED RIGHTS LEGEND
Use, duplication, or disclosure by the U.S. Government is subject to
restrictions as set forth in sub-paragraph (c)(1)(ii) of the Rights in
Technical Data and Computer Software clause in DFARS 252.227-7013.
                         Hewlett-Packard Company
                         3000 Hanover Street
                         Palo Alto, CA 94304 U.S.A.
Rights for non-DOD U.S. Government Departments and Agencies are as set
forth in FAR 52.227-19(c)(1,2).
Along with further extraneous info like:
TI Sys V
V/68-1.0
3.3.2
MC680X0
Hewlett-Packard 9000 Series 1500
Fantastic. Well digging around you’ll eventually find that SYSV filesystems have a magic number, and it’s 0xfd187320
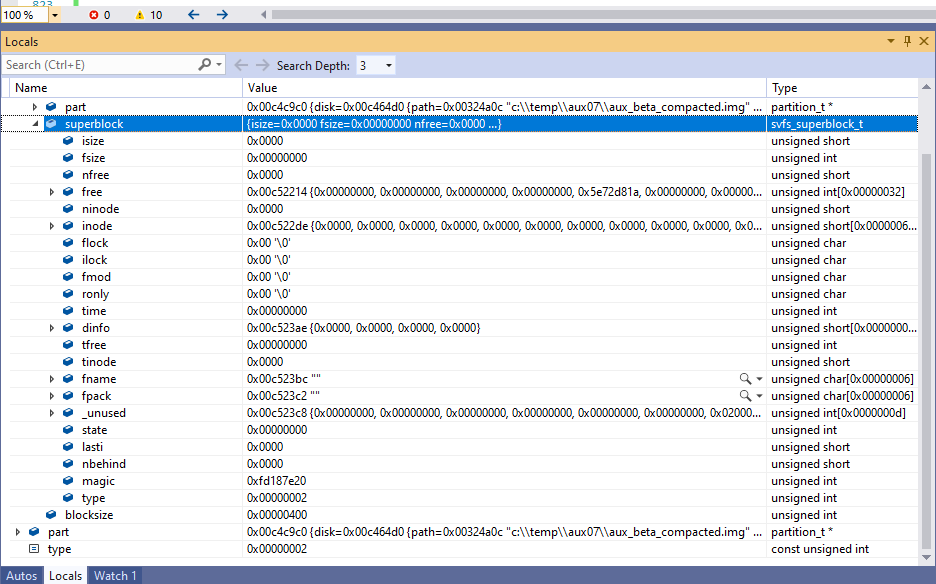
So a simple search through the raw filesystem reveals some:
And this fits the bill, as the next 32bit ‘word’ is the version, in this case 2 to indicate 1024k blocks ,and improvement added to SYSVr2. One thing is that the struct to read a super block is 512bytes (or is it always?), and the magic number is near the end, so from the above offsets, subtract 496 (decimal!) and you can get the start and sizes of each filesystem. Fantastic!
Speaking of SYSVr2, Do you know what is another SYSVr2? A/UX.
Shoebill was panned for not emulating the full Macintosh, rather it reads the kernel directly from the filesystem, and boots into it. That means Shoebill can read UFS/SYSV. Great start?
So I took the filesystem code from Shoebill, hacked it enough to let me build on Visual Studio, and point it to a raw filesystem and take a look. I put it here: filesystem.c
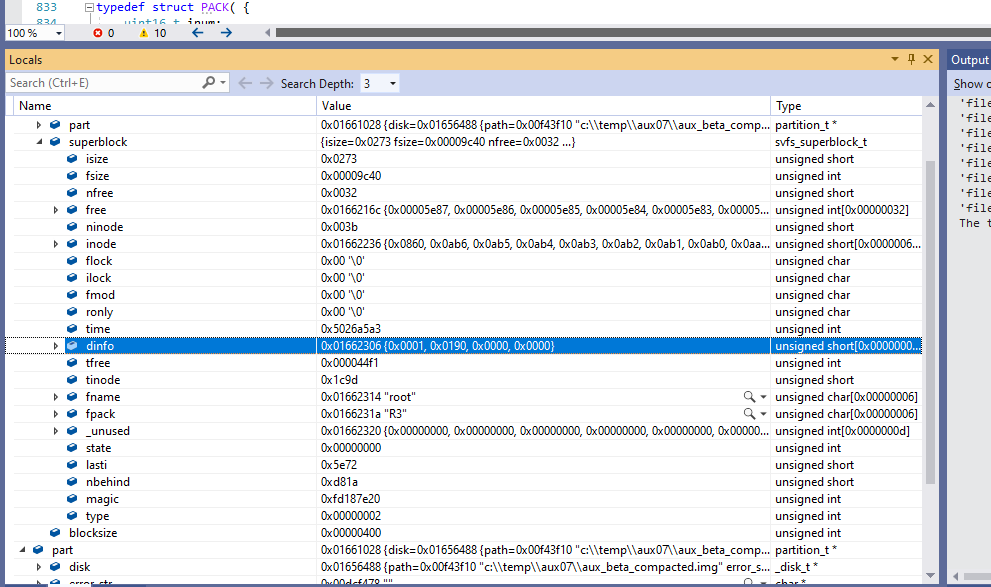
Now I’m impatient so it still needs a legit Apple A/UX virtual disk. Granted we don’t need it, but it made it easier to let the existing code fiddle with apple partitions, but when it comes time to read SYSV blocks, I closed the file handle and swapped things around. And that lead to this:
As you can see there is a LOT of zeros. However the magic & type align.
Meanwhile here is what an A/UX SYSV filesystem looks like. Notice far less zeros.
Additionally I was able to get another 68k based SYSV Unix disk, and yeah not all zeros. Also yes, using the Shoebill code it extracted files just fine.
However using my approach on the filesytem I always only get a directory with 2 enteries the ‘. ..’. I modified the source to just count inodes and write them to disk. And use inode 2 is just a tiny file. No doubt with all the zeros the disk is either very corrupted (backup superblocks?! where?! how?!) or the kernel implicitly knows these things, or finds them somewhere else.
I’ve been authorized to give a bounty of $200 USD to be able to extract arbitrary files from the 1505 disk image. I thought I’d give it a shot, but I don’t get how the super block aligns but the data doesn’t. Unless there is some other insane padding thing for a 1k superblock? The more I think about it, it’s probably likely as I know at some point I was skipping 3 blocks from an offset to get to a superblock, and 3 is just a weird number. 1 block header, 2 block superblock makes more sense.
Additionally this table may prove useful, especially for the ‘skip 3’ or pad to 1k:
Tape and disk utility is in progress...

26 partitions, 12-longword descriptors:
     Name    Start    Length   User  Comments
1  * LABL vl 0        2        FFFF
2  * PTBL pt 2        3        FFFF
3    SAVE sb 5        3        FFFF
4    FMT  fp 8        9        FFFF
5    TZON tz 17       296      FFFF
6  * unx1 lb 313      1024     0002  TI Sys V 3.3.2
7  * unx1 lb 313      1024     000A  TI Sys V 3.3.2
8  * unx1 lb 313      1024     0013  TI Sys V 3.3.2
9  * unx1 lb 313      1024     0014  TI Sys V 3.3.2
10   unx2 lb 1337     1024     0002  TI Sys V 3.3.2
11   unx2 lb 1337     1024     000A  TI Sys V 3.3.2
12   unx2 lb 1337     1024     0013  TI Sys V 3.3.2
13   unx2 lb 1337     1024     0014  TI Sys V 3.3.2
14   unx3 lb 2361     1024     0002  TI Sys V 3.3.2
15   unx3 lb 2361     1024     000A  TI Sys V 3.3.2
16   unx3 lb 2361     1024     0013  TI Sys V 3.3.2
17   unx3 lb 2361     1024     0014  TI Sys V 3.3.2
18 * cfg1 cb 3385     17       FFFF  TI Sys V 3.3.2
19   cfg2 cb 3402     17       FFFF  TI Sys V 3.3.2
20   cfg3 cb 3419     17       FFFF  TI Sys V 3.3.2
21 * root fb 3436     12288    FC02  TI Sys V 3.3.2
22   usr  fb 15724    32768    FC02  TI Sys V 3.3.2
23   jdis an 48492    2        FFFF  multi-volume file system anchor
24   pipe fb 48494    1024     FC02  pipe file system partition
25 * swap pb 49518    32768    0002
26   prt1 fb 82286    448972   FC02  part of jdis multi-volume
Did you know there is almost nothing left to document that this poor machine even existed?
I got a question the other day about how to easily move files in and out of Cockatrice III, especially since as part of my ‘try to make it stable by cutting features out’ approach I removed the ability to mount foreign directories under Basilisk II.
For my personal use, I have an AppleTalk LAN, and I just use a Windows NT 4.0 server with AppleTalk, as a file server/proxy and that works pretty good for me, so much so that I didn’t even think of any other way of doing this.
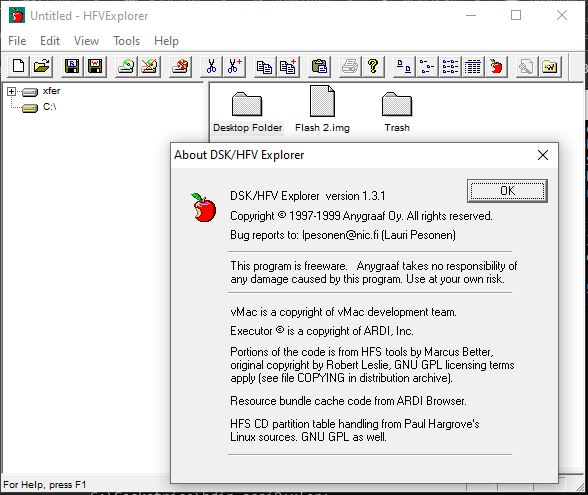
HFV Explorer 1.3.1
One of the quickest and easiest is HFV Explorer, however the ‘catch’ being it doesn’t read SCSI disk images (aka things with partition maps). But for the ‘massive floppy’ images it’s more than fine.
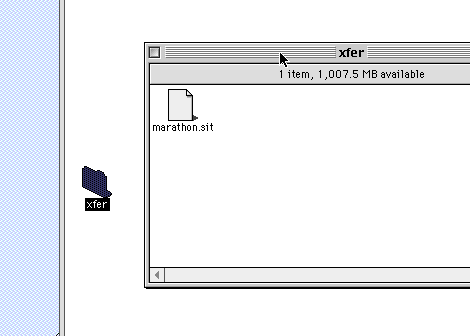
HFSUtils is another approach, it’s like the old ‘MS-DOS utils’ of ancient Unix days, allowing you to ‘mount’ a disk image, and copy files in and out. I thought I’d give this a spin to copy Marathon into my virtual OS 8.1 image. It’s pretty straight forward first ‘mount’ the disk image:
C:\Cockatrice>hmount.exe scsi0.dsk
C:\Cockatrice/scsi0.dsk: contains 1 HFS partition
Volume name is "SCSI0"
Volume was created on Sat May 19 14:04:04 2018
Volume was last modified on Mon Nov 16 14:59:02 2020
Volume has 1056545280 bytes free
Now make a directory:
C:\Cockatrice>hmkdir scsi0:xfer:
And then copy in the file:
C:\Cockatrice>hcopy marathon.sit scsi0:xfer:

C:\Cockatrice>hdir scsi0:xfer:
f  ????/UNIX         0   5627676 Nov 16 15:34 scsi0:xfer:

C:\Cockatrice>
And just like that it’s there!
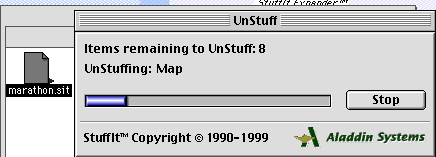
And yes it unstuffs!
And just like that we have downloaded a game from the garden, copied it into a virtual SCSI disk, and gotten it to run, from the painful CLI.
Again super thanks to shadyjesse for finding and fixing the larger issues, and philpem for his great emulator, freebee!
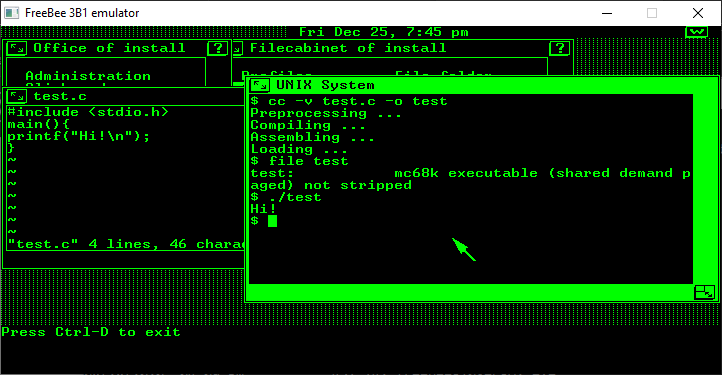
So 1970’s
I have to say, having never played with an AT&T Unix PC, it’s kind neat with this windowing non X11 UI. Although even in emulation it’s incredibly slow. But such was the Unix microprocessor revolution of the era, it’s crazy to think the mighty SUN-2 is also on the same level of performance, although SUN would at least go the way of the 68020 before giving up on the 68k for SPARC.
Even though the 68000 lacked the ability to recover from bus faults, allowing a better path to UNIX with the 68010, OEM’s still brought their own MMU technology to flesh it out, leading to divergent systems. Not that it mattered all that much for AT&T as they started to establish themselves as the new defacto go to UNIX vendor they quickly abandoned the market leaving the Unix PC, and 3B2’s to die off. While so many like to think that the ‘Unix’ business is booming, it really only boomed once AT&T exited the market until Linux had started to gain enough mindshare post 1.0… Which also included 68000 support, although aimed for the the stronger 68030/68040’s.
Anyways I’m sure you didn’t come here for my ramblings about the 68000 instead you want an easy to run package to click and GO!
There are two executables, for normies, tourists, and people only wanting to witness the fun it doesn’t matter which one you use. For anyone wanting to install the 3B1 Unix, you’ll want “freebee-10sec-O2.exe”. Since the 3B1 uses a non standard format, if you want to use FAT 360kb disks from a PC emulator then you’ll need “freebee-9sec-O2.exe”. Isn’t compatibility great?
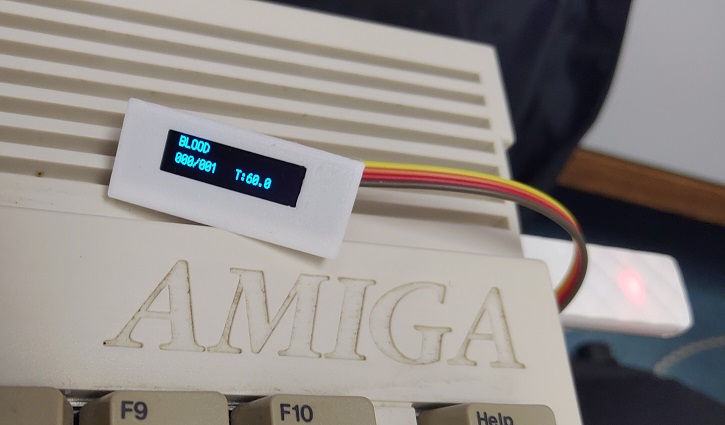
It was everything I had hoped it to be. I paid extra for a 3d printed mounting bracket and the cute led display.
I had one adf handy to test, Captain Blood, a nice pirated version so the weird encoding wouldn’t be an issue.
It was kind of nice watching it boot up, although as slow as I remember a mechanical drive being. But at the same time nice not using 30 year old media.
I have a few more upgrades on the way to deck out my 600, although I need to do some kind of RGB thing as the composite video has so much noise it’s unreal.
Anyway despite the old flame war on floppy emulation, the Goteks are dirt cheap, and. Hell if it’ll work in an Amiga, it’ll work anywhere.