SQL Server 4.21a on Windows 10 x64

SQL Server 4.21a!

SQL Server 4.21a!

It’s been 7 YEARS, since I last took the SQL Server 4.21a plunge by getting it running on Windows Vista.  I was thinking with all this Windows NT 3.1 fun, I should get SQL Server 4.21a up and running on my current Windows 10 machine.  However this proved more involved.

Unlike Windows Vista, the setupdll.dll from Windows NT 4.0 will not work.  I used the one from Windows NT 3.1, and it will run the setup program fine, but the file copy bombs out.  I went crazy and modified the setup.inf to not actually copy files, take an xcopy of the raw files from an old install, and it won’t even try to install the service, it just builds a master database, and exits.

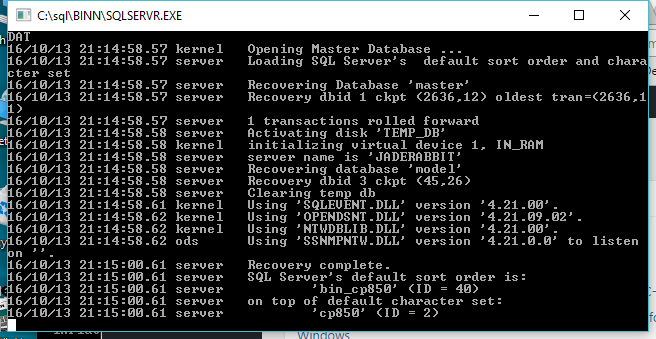
Trying to run the SQL Server directly, and you get this fun error:

16/10/13 21:19:08.40 kernel   Unable to start due to invalid serial number.

Well isn’t that great.  So naturally you either have to install it, or just import an existing registry key setup like this SQL.REG file.

If you are so inclined, you can even remove named pipe support, and have it listen only on TCP/IP.  Or the other way around.  Or even change the TCP port.

In the HKEY_LOCAL_MACHINE\SOFTWARE\Microsoft\SQLServer\Server key there should be a Multi-String key called ListenOn … and it’s just the network transport DLL, and how they listen.  As you can see SSNMPNTW is the named pipe transport, and SSMSSOCN is the TCP/IP transport.
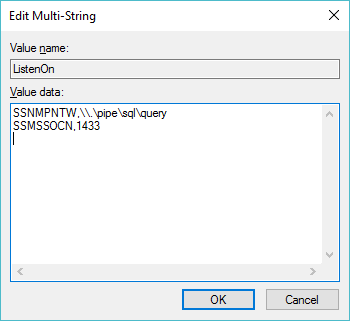
ListenOn key

ListenOn key

SQL Server really wants to load the TCP/IP trasnport DLL from the Windows\System32 directory.  On 64bit versions of Windows, however that means copying the SSMSSOCN.DLL file to the SysWOW64 directory, in order to have TCP/IP networking.

SQL server is not terribly useful in it’s current state as it turns out that master database is actually empty.  So without stored procedures or much of anything you really can’t do anything with it.  However looking at the install directory there is a bunch of SQL scripts.  Even better on the VM where I’ve installed it, there is some output files, that by their date & time tell me in what order to run them!

First things first, I copy the following files from the C:\SQL\DLL diredctory to the C:\SQL\BINN directory so I don’t have to mess with paths:

NTWDBLIB.DLL
OPENDSNT.DLL
SQLEVENT.DLL
SQLTL32.DLL
SSNMPNTW.DLL
SSMSSOCN.DLL

Now I can run the SQL server from the C:\SQL\BINN directory

START SQLSERVR.EXE

And now it’s running.  If there is any issues, or your master database is either damaged, or just plain doesn’t exist, you can create one with the BLDMASTR.EXE program.

C:\sql\BINN>BLDMASTR.EXE
Buildmaster 4.20a NT : Wed Jan 26 12:37:00 1994

Master disk name? (default is master.dat) :

Master disk size (in 2k blocks)? (default is 6144) :

Configuration only? (default is N) (y or n) : n

Databases only? (default is N) (y or n) : n
Master device: master.dat
writing configuration area
writing the MASTER database
writing the MODEL database
writing allocation pages for remaining 7 MB, (3584 pages)
7 MB
Buildmaster complete

It’s that simple!  Move the master.dat file into the C:\SQL\DATA directory and if the server doesn’t find it by itself, you can just tell it where it’s located:

START SQLSERVR.EXE -d ..\DATA\master.dat

And it should start.

Now the file CONFIG.SQL needs to be modifed (if you have a prior config) or created.

The two key lines are:

update master.dbo.sysdevices set phyname=’C:\SQL\DATA\MASTER.DAT’ where name = ‘master’
sp_addserver YOURMACHINE,local

Which as you can imagine simply sets where the master database lives, and what the machine name is, as SQL server LOVES to know the correct machine name.  With that done, here is my simple script for populating the master database:

CHARSET.EXE /S . CP437\noaccent.437
isql -Usa -P < ..\INSTALL\INSTMSTR.SQL
isql -Usa -P < ..\INSTALL\INSTNT.SQL
isql -Usa -P < ..\INSTALL\INSTMODL.SQL
isql -Usa -P < ..\INSTALL\INSTCAT.SQL
isql -Usa -P < ..\INSTALL\CONFIG.SQL
isql -Usa -P < ..\INSTALL\INSTPUBS.SQL
isql -Usa -P < ..\INSTALL\ADMIN2.SQL
isql -Usa -P < ..\INSTALL\OBJECT2.SQL
isql -Usa -P < ..\INSTALL\HELPSQL.SQL

And once this has finished it will have populated all the tables in your master database.  Hit CTRL+C in the SQL Server window, and it’ll shut down. Re-launch it, and it’ll be initialized.

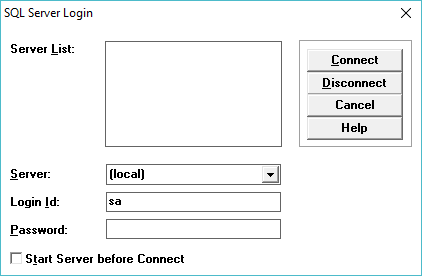
Assuming this all went according to plan, you can now launch SQLADMIN, the SQL Administrator, and then you can get a connect screen like this (I only got it running with the named pipes transport…)

SQL Admin connect

SQL Admin connect

Remember by default the sa user has no password!
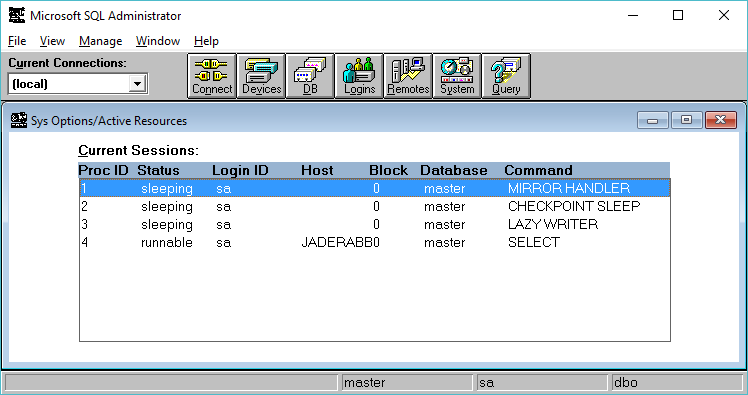
SQL Administrator

SQL Administrator

And we are good to go!  Feel free to grab SP4, and apply it by unzipping, and copying the files & dll’s to their respective places.  So there we go, from January of 1994, to October of 2016, SQL Server still running!

As a follow up, check out Loading the MS SQL 6.5 drivers on Windows 10, for enabling ODBC access on newer versions of Windows.

Apache 1.3.4 on Windows NT 3.1

Yes, I know it’s crazy old, totally useless, but it did mostly compile.

Apache 1.3.4 running on Windows NT 3.1 Advanced Server

Apache 1.3.4 running on Windows NT 3.1 Advanced Server

Assuming it’s hasn’t been crashed or hacked it should be online here:

http://winnt31.superglobalmegacorp.com/

Unlike Serweb 0.3, Apache is HTTP 1.1 compliant, which means that I can put it behind haproxy, and enjoy the fact it doesn’t need a dedicated IP address.

Although I can’t imagine anyone wanting it, here is the binary/source and my htdoc dump.  Download it here: apache-NT-31.zip & unzip.exe

Apache console mode

Apache console mode

I had to pull out some stuff, like some of the service features, so it really only runs as a console app.

I’ve compiled it with /Zi meaning full debug and no optimization.  If you want to re-compile you’ll probably want either the Win32 SDK, or Visual C++ 1.0 32bit, and replace the headers and libraries from the Windows NT 3.5 SDK.  Much like trying to build GCC 2.6.3 on Windows NT.

Also in a silly way, thanks to Qemu, I’m now running both OS/2 & Windows NT on the same server, running Linux.

Just got a Roland Soundcanvas SC-88!

Roland Soundcanvas SC-88

Roland Soundcanvas SC-88

As annoying as it is that Windows 10 won’t drive my el-cheapo USB-MIDI interface adapter, I have to say that even loading Windows XP into VMWare Player, and then loading DOSBox is a pleasant enough experience when connecting to the Roland.

Pluses include the built in power supply, RCA jacks, and of course it just sounds snappier compared to the Yamaha MU-80.

I’ll have to capture samples from both, to compare and contrast.

I have to say that for a mere 2,400 Yen I’m really enjoying this fine piece of hardware!

I’m unsure of the difference between the SC-88, the SC-88 Pro, the SC-88VL and the SC-88ST, and of course the SC-88ST Pro.  I just know I’m lucky that mine arrived OK and in working order!  Thanks ps38152000, whomever you are.

Starting on an ELF cross compiler for Windows

I’m using Slackware 4.0 as a starting point, so it’s Binutils 2.9.1 and GCC 2.7.2.3 .. I verified that I can build a static hello world executable, and it runs! …

However Linux 2.0.40 has the same issue, it starts to decompress, and triggers a reboot in both Qemu and PCem.  Going in circles I guess.  I suppose the next step is to use the exact version they have in Slackware to see if Qemu can actually run that pre-built kernel, and if I can create one via cross compiling.

I should add that on Debian 7.1 I got GCC 2.7.2.3 running, and it too produces the exact same thing.

Not that I think anyone cares, but here is my pre-built toolchain with some source (The binutils was built under Linux, using a MinGW cross compiler) elfgcc_2.0.40.7z

Windows NT 3.1 & KVM

No go.

No go.

I don’t know what I was expecting, but I thought I’d try to install Windows NT 3.1 Advanced Server in a KVM virtual machine.  No doubt the processor is just too new.  The -cpu 486 / -cpu pentium flags didn’t help things out at all.  However using Qemu has it running just fine.

I also had this crazy idea that haproxy could front HTTP 1.1 requests into serweb so I could go back to having a Windows NT 3.1 web server.  Naturally that didn’t work.

502 Bad Gateway

The server returned an invalid or incomplete response.

Oh well.

The useless update, is that I managed to get Apache 1.3.4 to compile and run on Windows NT 3.1!

Apache 1.3.4 on Windows NT 3.1

Cross compiled Linux 1.0.9!

Linux 1.0.9 running!

Linux 1.0.9 running!

After getting Linux 0.98 to compile, I thought I’d take a stab at Linux 1.0.  I vaugely recall when it was released, and I just remember a much larger push to 1.1.  So I guess it really comes as no surprise that in the Linux kernel archives, there is simply the 1.0 tar, and 9 patch files.

I went ahead, and patched up the release, and then tried to build with GCC 2.3.3.  This however proved not to be up to the task, as 2.3.3 has issues with some of the assembly macros, so delving into the readme shows that you need to use GCC 2.4.5 or higher.  Since I wanted to keep at least the tools on par, I went ahead and build 2.4.5, and once more again used the gcc driver from 2.6.3.  I further ended up relying on headers, and checking tool versions from Debian 0.91, which also revealed that they were still using GAS 1.38 back then.

One interesting note while building piggback, which takes the compressed system object, and wraps it in an object file, is that it directly uses the magic “0x00640107”, which is for a later “Linux/i386 impure executable (OMAGIC)” filetype.  But because my binutils is so ancient, I needed to change it to “0x00000107” so that the linker would recognize it as a “386 executable not stripped” file.  As always when having no idea what I was doing, it was easier to have it make an empty object file, set the type for 12345678 and look for where it occurs in the data stream, and just match it with a known object file.  As you can see, it worked.

I don’t know if it is of any interest, but the kernel source, along with a binary is available to download linux-1.0.9.7z, and the same goes for GCC gcc-2.4.5.7z.

And of course, you’ll want the latest download, which includes the pre-built tools, qemu, and build environment to get you started.

User Mode Linux revisited (UML) aka SLiRP networking

So my uh ‘friend’ that got into trouble when he found out that his ‘dedicated’ machine turned out to be a VM which he couldn’t launch nested KVM VM’s, and instead found that User Mode Linux (UML), would allow them to run their touchy ancient Linux application in a psudo VM/Container.  Well they finally bit the bullet and decided to move to something better.

And by better, it was cheaper.  And why was it cheaper?  Because it is even a more restricted VM.

Great.

So naturally the panic call was made, because TUN/TAP networking was not permitted in this new VM.  So what to do.

Well, keeping in mind how Qemu gets around this problem, it binds in a copy of SLiRP.  And it turns out that UML can actually call SLiRP directly!  So cool we have an ‘out’.  First things first, we need SLiRP on the host machine.  I’m old, so that means I build it from source.That means I’m downloading slirp-1.0.16.tar.gz, along with the 1.0.17 patch.  I’m not sure if I need to go into how to extract source, patch, running configure and compiling.

One thing of note is that you really really really want to set the “FULL_BOLT” option either in the Makefile, or in config.h

With SLiRP built, I just copy it into /usr/local/bin .. I’m sure there is packages and stuff out there, but heh I’m old.

OK next up I make a small script to call SLiRP, in this case, I’m going to redirect port 80 directly into the VM.  And for a test port 2323 which then goes into port 23 (why not ssh? .. sigh don’t go there).

So my script looks like this:

#!/bin/sh
/usr/local/bin/slirp “redir 80 80” “redir 23 2323”

Pretty simple right?  I’m using a script as there will be more than one VM, so relying on .slirprc isn’t a solution for me.

./linux-2.6.24-rc7 ubd0=junk.ubda eth0=slirp,,/virtual/sl.sh

And away we go!

Inside the VM we can configure it with the usual SLiRP config:

ifconfig eth0 10.0.2.15 255.255.255.0
route add default gw 10.0.2.2

And now we can access the internal http server!

Add in some magic to /etc/resolv.conf such as:

nameserver 10.0.2.3

and it’ll automatically use whatever the host is configured to do.

Torbjörn Granlund’s Excellent resource on running free OS’s on Qemu

Ever get tired of x86 on x86?  yeah me too.

How to solve that problem?

Simple, grab QEMU, and jump off into all those cool RISC processors of the 1990’s that were going to save us all from the WINTEL hegemony!

Lots of instructions, samples, images, and hints here:

https://gmplib.org/~tege/qemu.html

It’s really more comprehensive than I’ve sat down to do, so yeah it’s awesome!

Supported platforms include:

mips32,mips64,sparc32,sparc64,ppc32,ppc64,arm32,arm64,s390x,alpha

MIDI Mayhem on Windows 10

So I know it’s ‘probably’ the super cheap generic USB to MIDI dongal I got on the cheap, but it just doesn’t work on Windows 10.

Using DOSBox, I get the following output when cycling between devices on the console:

MIDI:Opened device:win32
MIDI:win32 selected Microsoft GS Wavetable Synth
MIDI:Opened device:win32
MIDI:win32 selected USB2.0-MIDI
MIDI:Opened device:none
MIDI:win32 selected MIDIOUT2 (USB2.0-MIDI)
MIDI:Opened device:none

As you can see it clearly can see the USB device, but when it opens the device it fails. And yes I’ve tried Administrator.  And for the hell of it, I fire up Windows XP on VMWare, connect the USB dongal, and amazingly:

MIDI:Opened device:win32
MIDI:win32 selected USB Audio Device
MIDI:Opened device:win32
MIDI:win32 selected USB Audio Device [2]
MIDI:Opened device:win32
MIDI:win32 selected Microsoft GS Wavetable SW Synth
MIDI:Opened device:win32

Yes, I can open the out port just fine.  So now I run a virtualizer to run my emulator to drive a physical peripheral… Ugh.  Has MIDI been this messed up all along and I never noticed?

Oh yeah, the GS Wavetable Synth works fine, as did MUNT before I uninstalled it, thinking it was somehow interfering with anything.

I know I’m using this fine device, the QinHeng USB MIDI adapter, which apparently is notorious crap, but my recently acquired Yamaha MU 80, works fine with it on Windows XP.

QinHeng USB MIDI adapter

QinHeng USB MIDI adapter

Ugh.

Cross compiling Linux 0.95c+ & 0.96c from Windows

So first thing is to build GCC 2…  I couldn’t find any of the Linux patches for 2.0, 2.1 or 2.2.. I only tried to build 2.0 from source as targeting a.out i386 but it looks like the 2.0 files on the FSF’s site are missing files?

Anyways GCC 2.3.3 actually includes builtin support of Linux!  I was able to build most of it, but just like GCC 2.5.8 for OS/2 EMX, But this time I used the gcc driver from GCC 2.6.3, which added support for Windows NT 3.5 native builds, and I now had my GCC cross compiler!

D:\aoutgcc\src>gcc2 -v -c hi.c -o hi
gcc version 2.6.3 -Linux 2.3.3
cpp2 -lang-c -v -undef -D__GNUC__=2 -Dunix -Di386 -Dlinux -D__unix__ -D__i386__ -D__linux__ -D__unix -D__i386 -D__linux hi.c C:\Temp\cca09324.i
GNU CPP version 2.3.3 (80386, BSD syntax)
cc12 C:\Temp\cca09324.i -quiet -dumpbase hi.c -version -o C:\Temp\cca09324.s
GNU C version 2.3.3 (80386, BSD syntax) compiled by GNU C version 5.1.0.
a386 -o hi C:\Temp\cca09324.s


Thankfully the prior binutils and assembler I was using in my GCC 1.40 cross compiler, still cooperated just fine, and I could happily build and link just fine.

From there it was a matter of fighting the makefiles as for some reason as make calls other makefiles they are not passing variables, so I just cheated, and changed the paths, along with editing the dependencies to finding stuff in a more sane manner.  Plus all the Makefiles have include paths hard coded into the build process as expected.  After fighting for a while, it linked and even better, it runs!

linux-0-96c-71-cross-compiled-from-windows

Linux 0.96c-71 cross compiled from windows

So yeah, using the MCC hard disk image from oldlinux.org and it boots!

Cool stuff, indeed!

As an added bonus I was also able to get 0.97 & 0.98 to compile as well!

Download your copy @ MinGW-aout-linux–001_010_011_012_095_096_097_098.7z.