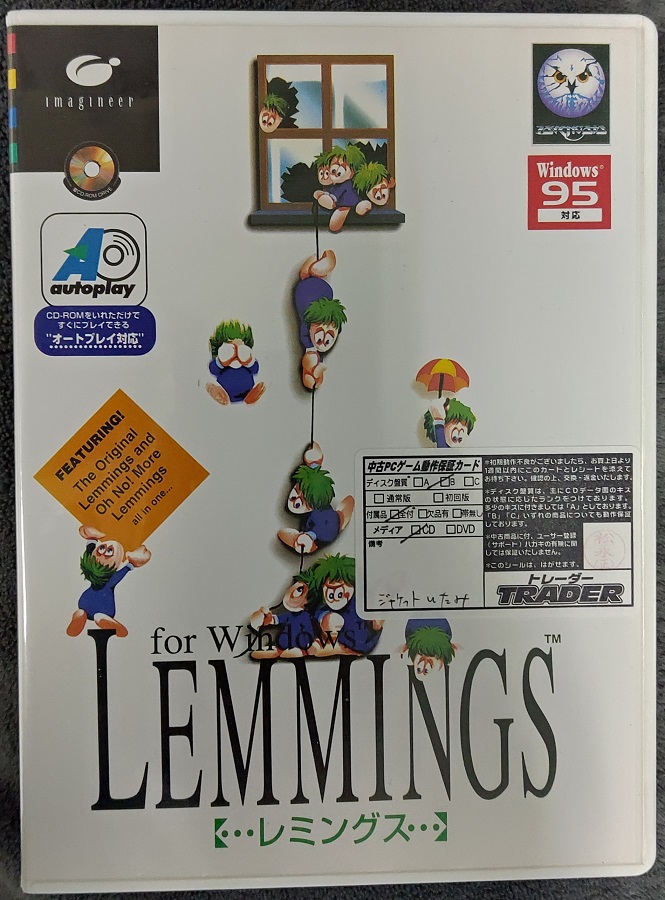
On one of my later trips I picked up this fun title, Lemmings!
And looking at the back of the box, what fun it contains!
Support PC-98, Epsons, IBM’s, IBM PC/AT.. Probably FM Towns as well
One interesting thing about 1995, is that with the rise of Windows 95, this marked the end of the specialized PC market in Japan. Just as WING/Direct X basically killed off the DIY driver/extender environment on MS-DOS, by being able to abstract the hardware it removed any meaningful difference between an EPSON PC vs a PC-98, FM Towns, or even the lowly IBM AT/386.
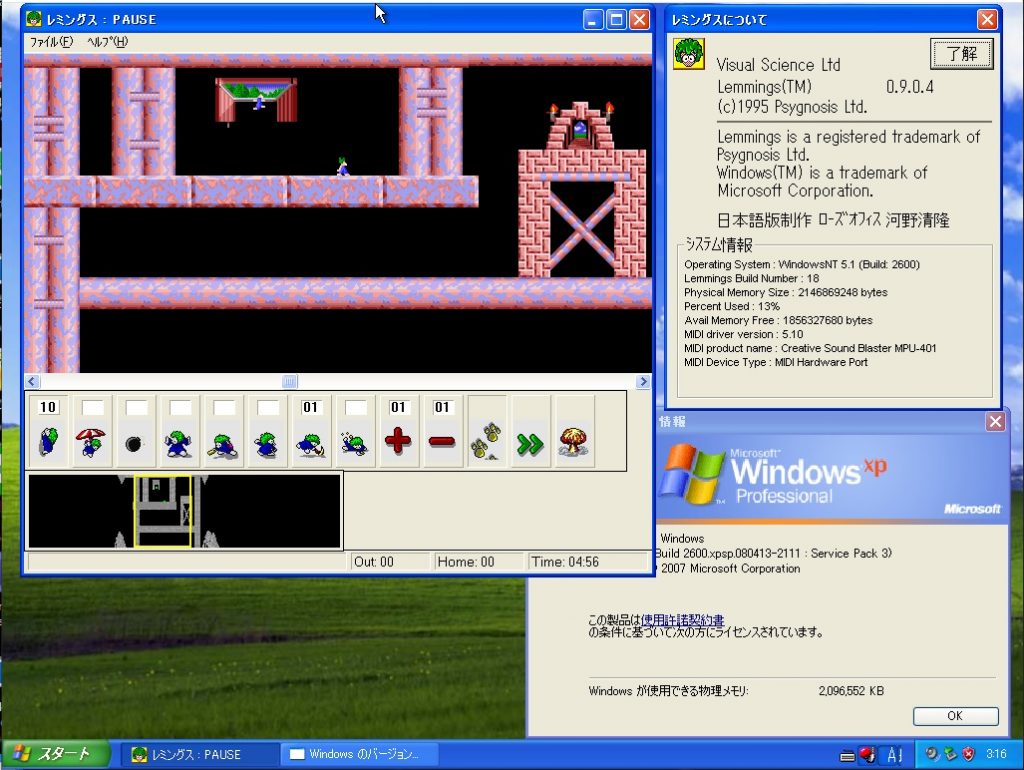
This being a Win32 includes both WING & Win32s. A perfect snapshot of an early Win32 commercial game circa 1995, as you needed to cater to that massive Windows 3.1 install base, although so many were rushing to Windows 95. Naturally this also means that the setup program is a Win16 app, once more again to preserve that bridge of the Windows 3.1 & Windows 95 world.
Well the obvious thing to do is just install it on a legacy 32bit OS, and what better than Windows XP?
Lemmings happily running under Windows XP via VMWare.
Now to run it on something like Windows 10, it’s just a matter of copying the WINLEMM.INI into %sysroot%, along with placing a copy of WING32.DLL into the %sysroot%\SysWOW64 directory and you are good to go!
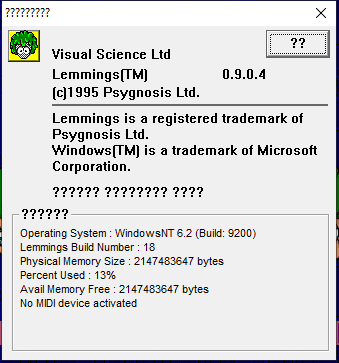
Japanese Lemmings on English Windows 10
Sadly the character encoding in Windows is still really lacking and doesn’t render all that great. However that had me thinking as almost a decade ago I did find a demo of Lemmings for Windows. Could it be possible to just overlay the executables & DLL’s to produce an English commercial version?
Surprisingly the answer is yes. I wasn’t sure what to expect, but it’s as simple as that!
The game is mostly playable, some parts are just coded to run as fast as possible, as no doubt nobody was imagining 1+ Ghz machines. So the intro, warp & suicide are almost instant.
It’s something to keep the kids entertained for a day in recent events. It’s been a LONG CNY.
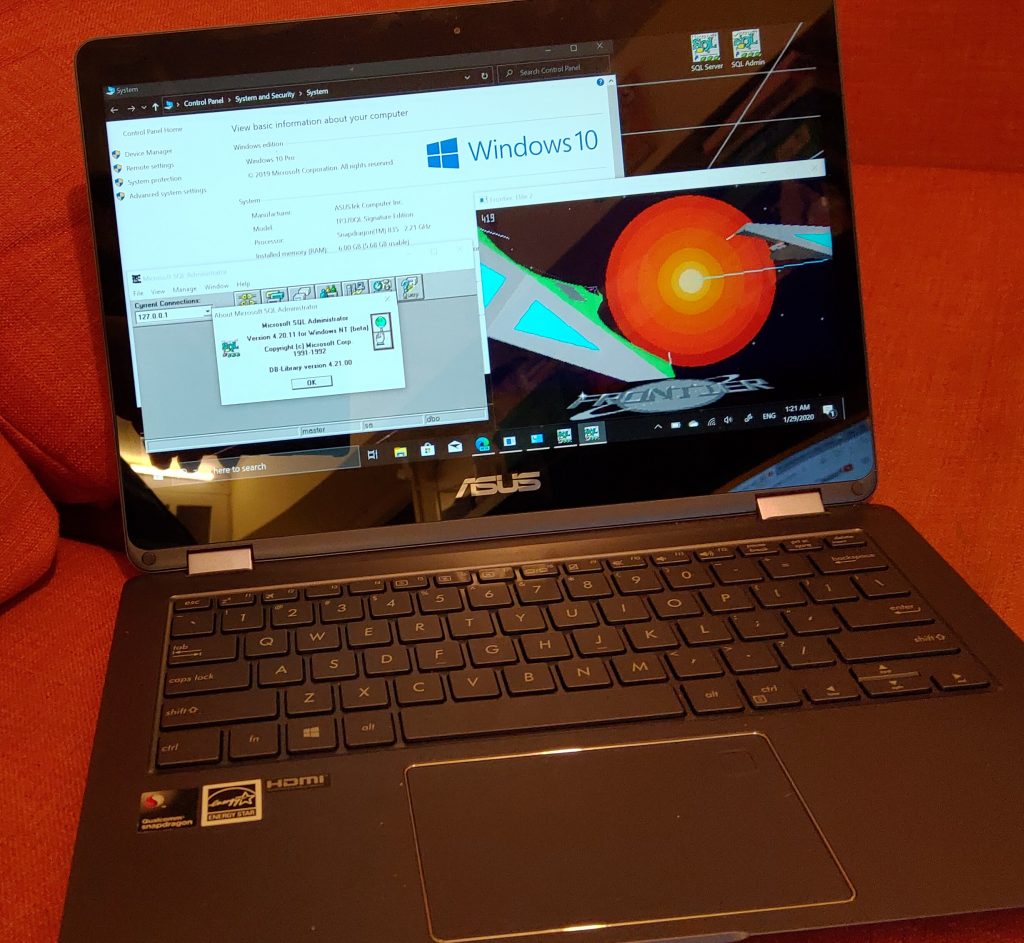
So after the crazed purchase I made a few weeks ago, I returned from Japan, and was able to unbox and use the machine I’d been wanting for a while, a non x86 Windows laptop!
The NovaGo has a Snapdragon 835, and my phone, the ASUS ROG phone has the 845. Yes for this week, my cellphone actually has the stronger processor than my computer. Honestly this is almost an unthinkable situation! Although I haven’t been using my phone as a desktop substitute this week. It’s amazing how MS screwed up 10 on the phones, and Continium.
By default it comes crippled with this ‘S’ mode Windows, which hearkens back to the Windows RT launch, with the difference that it’s a quick trip to the application store to unlock Windows 10 Professional. It’s a free download as it should be, and it doesn’t even require a reboot!
Build quality isn’t so bad, the screen folds all the way back to make the machine into a ‘tablet’ although I don’t like that mode so much, it just feels wrong to wrap a keyboard around a monitor. However if you have rambunctious young kids, it’s great as when someone went running by me flailing their arms around like a while animal, when they struck the laptop the screen could easily fold back 180 degrees. Yay.
My first thing to do after setting up Office and VMWare VDI was to install the Linux subsystem, and Ubuntu. it’s exactly the same as it is on x86_64, which is great. And this let’s me have the best of both worlds, just like x86_64. As much as I dislike stumbling around with that aborted child of Pascal & Fortran (Python) at least I can run it under (mostly) Linux to get something close to like the production environment.
The C/C++ compiler is actually all cross tools. I wanted CLI only stuff because I like torturing myself, and it required a few GB of downloads. The good news is that the latest Windows 10 SDK does support GDI/CLI apps, so no crazy SDK hacking required, unlike back in the Windows RT days. Oddly enough the Taskforce 87 interpreter runs fine, but nothing else does.
I did a horrible job at hacking up SDL 1.2 to at least run (kind of, the audio doesn’t work, and it’s all WinDB*EDIT I got it fixed!!!) I got a few things up and running, including DOSBox and FrontVM. One thing that greatly helps is that i386 binaries ‘just work’. Honestly you wouldn’t even know you are running them when you are. Which made hunting down the ARM64 version of Chromium Edge kind of difficult to find. There really needs to be a more apparent way to tell them apart, if anything for battery efficiency.
Again the audio in my crap SDL build doesn’t work, so DOSBox is silent, and without Direct X, the text mode is tiny. Oh also, there is no OpenGL in this version of Windows dev kit for some reason. Running ssystem is ungodly slow. Also the default optimizations seems to be Os, optimize for space, and on this ASUS I have to say /Ox is way way faster. DooM is quite playable on DOSBox when build with /Ox, unlike /Os.
For me, I spend most of my day to day in Office, and VMWare VDI, connecting to secure networks. So I’m just one step above a terminal. Which I guess is kind of sad, but this machine more than fills that roll for me. The 120GB of storage is tight. This isn’t a development machine persay, nor is it something to download tonnes of data to, it’s a lightweight machine where it’s strength is the built in 4G modem, and when running ARM software the longer battery life. To me the biggest drawback is that the keyboard isn’t backlit. Even though I touch type, I didn’t realize how much I’d grown used to it for casual use.
I guess it’s a hard toss up from this and a PINEBOOK Pro, I think most readers here would prefer the Pinebook, for all it’s openness, although I still like the idea of being able to copy over the Win32s version of Lemmings, and it just running. For me I kind of like this thing, although once I switch back to an x86_64 with more memory, better GPU and disk options, maybe this just feels like some kids toy.
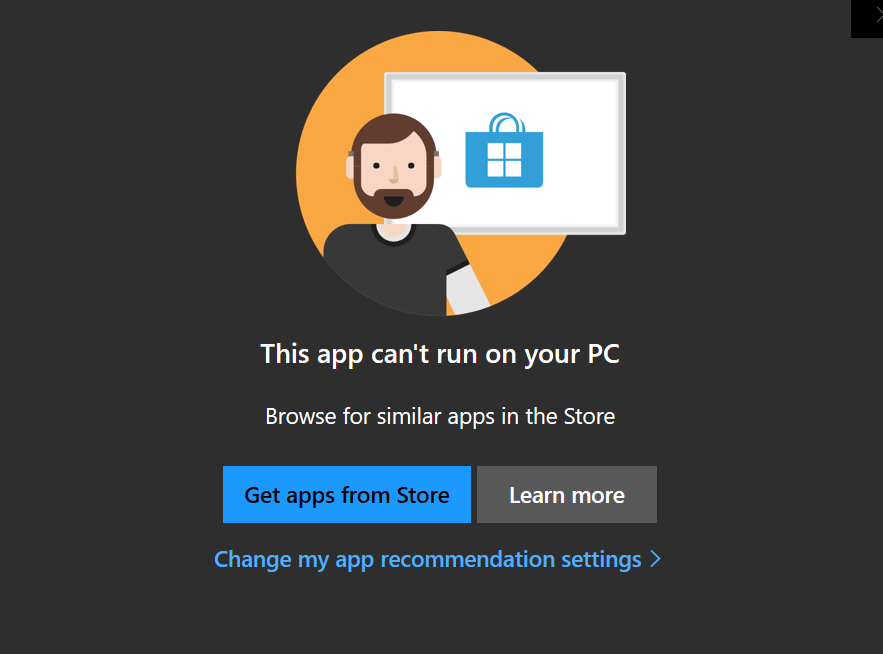
Neko98 ARM!
I don’t know how I didn’t think of this, but I also ported Neko98! Although the STL is having an issue with the ‘control panel’ so Neko is on autopilot.
This app can’t run on your PC
As for the emulation, it is 32bit only, so expect to see this stupid message quite a bit. The neckbeard is a nice touch though.
Also built into the thing is a cell modem. I guess it’s really not a surprise as the 835 really is a cellphone SOC. I have a ‘wifi egg’ as they are called here, a WiFi hotspot with unlimited internet from CLS, which is on the old 4G network. I popped the SIM in, and it picked up the APN settings on it’s own and I was connected in under a minute. I have to say that it’s about time that SIM cards have this stuff programmed into them for a plug & play experience. And thankfully the ASUS is unlocked, although from what I understand these were sold in the USA bundled with some cell service plans.
For anyone with one of these rare machines that cares to play along you can find my built stuff on my ‘vpsland’ archive:
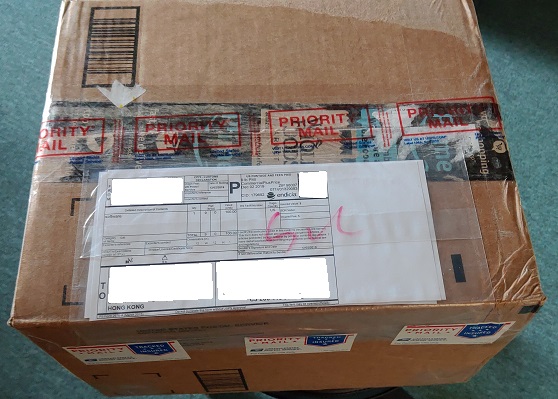
Iv’e been in Japan the last 10 days, but upon my return to Hong Kong this little 9kg box was eagerly awaiting me!
I know that ‘unboxing’ donation videos are quite popular, but I thought I’d do the blog equivalent. I don’t want to ‘out’ the sender, although I did email them back a big THANKS, although I didn’t get a reply. Maybe it’s an email thing but I wanted to tell them THANKS again!
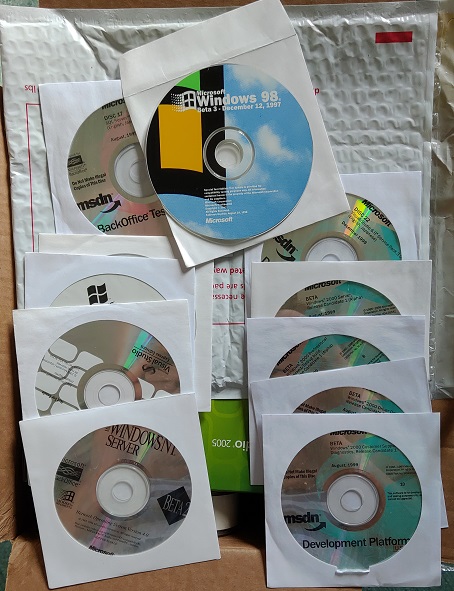
To start is a bunch of loose CD’s including old SDK’s, and the infamous Windows 2000 RC1 set including Dec Alpha builds of workstation & server. Also in there is Beta 3 of Windows 98! Cool!
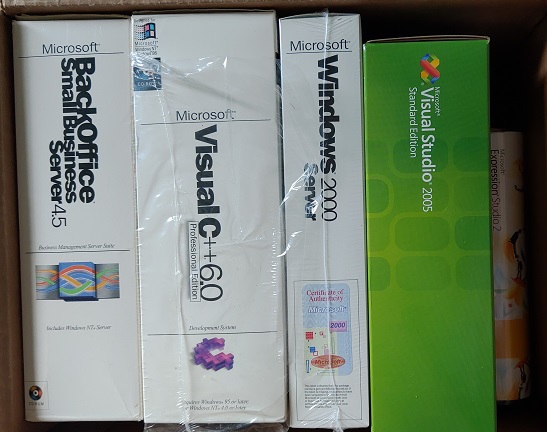
In the box was also Back Office 45, Visual C++ 6.0, a sealed copy of Windows 2000 Server, Visual Studio 2005 Standard and Expression Studio 2.
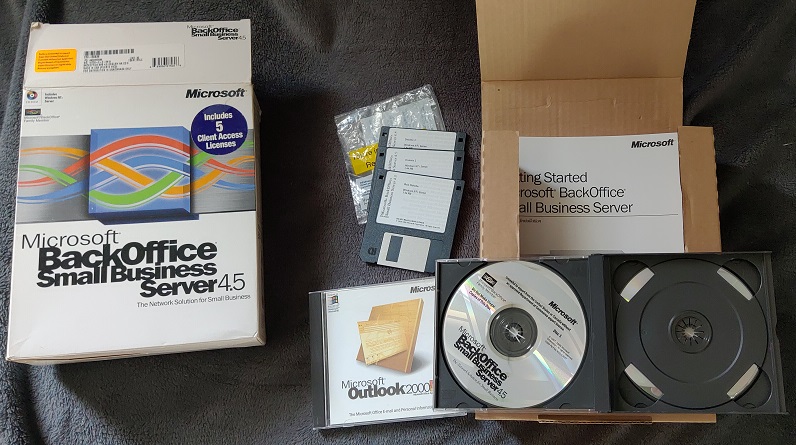
I’ve always loved this, it’s NT 4.0 and all the good bits of 1997, like Exchange 5.5 & IIS 4.0! Also in there is a copy of Outlook 2000, so this is a much later build/packaging of Back Office 4.5 . I’ve always wondered how many if any Back Office purchasers ever used SNA Server. I’ve seen it something exclusively used in real enterprises that have site licenses anyways.
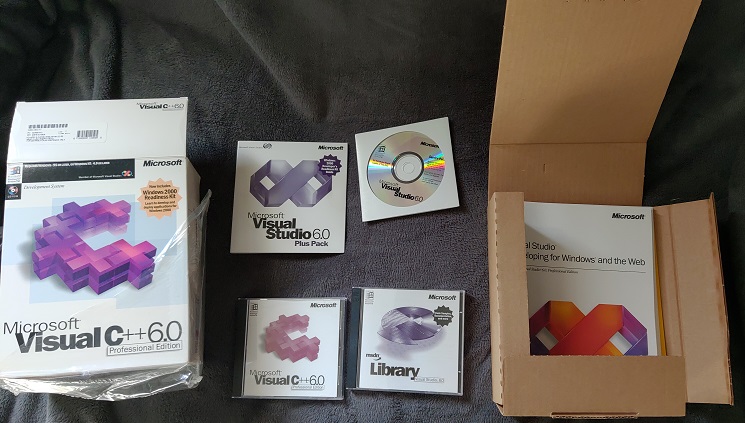
Visual C 6.0 is the last x86 compiler that was ‘pure’ before the .NET invasion. Although you can with a bit of work get 2003 and onward to build for strict Win32, but who wants to work? This is getting increasingly hard to find, and getting far more expensive. But it’s great to have this in retail in the box again! (I used to have this and Visual Studio 97/6.0).
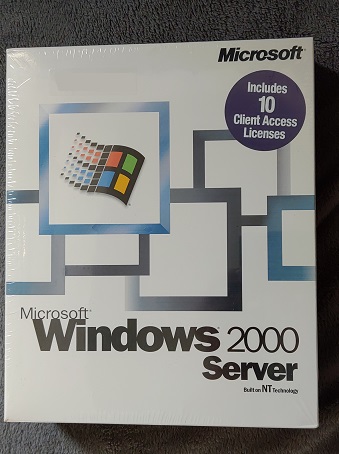
It almost feels wrong to break the seal on this, although I’ll probably do an active directory deployment eventually now that I have machines running in the USA, Hong Kong, and Japan.
I’m super thankful for all of this, and if anyone else wants to send me their ‘old / obsolete junk’ drop me a line!
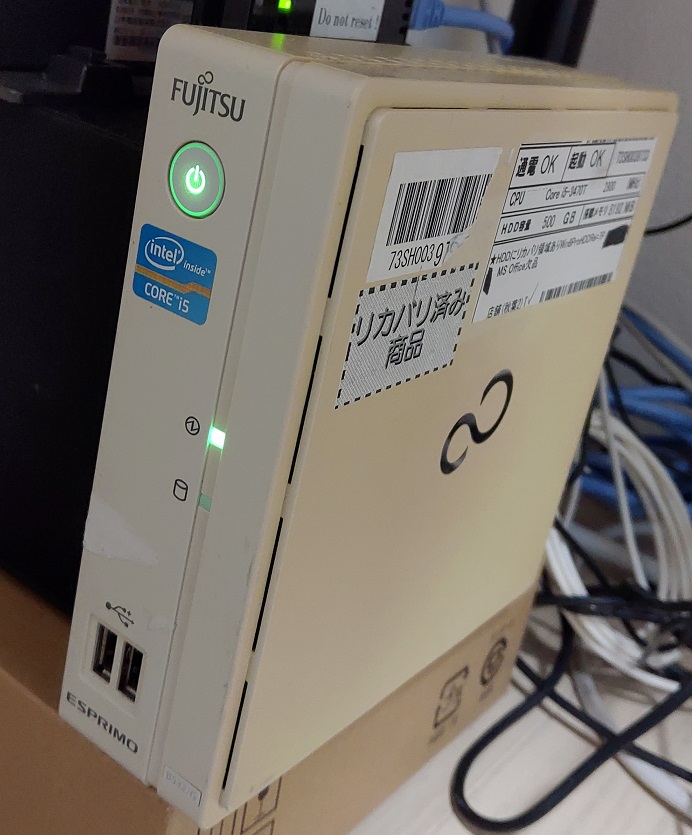
So while I’m in Japan, I bought this tiny and borderline useless Fujitsu Esprimo B532, powered by an i5, and not very much else. I upped it to 8GB of RAM, and put in a SSD and upgraded to Windows 10 to make it slightly tolerable.
i5-3470T
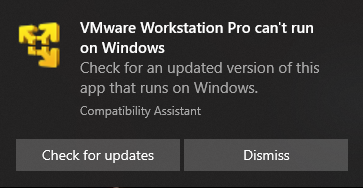
The i5-3470T is ancient! And so old that newer versions of VMware and Hyper-V won’t run on it. The old solution was simply to use an older version of VMware. In my case the highest version that’ll run is 12.5.9, however when trying to launch it I got this fun message:
VMware Workstation Pro can’t run on Windows!
Well wasn’t that a big bust.
I guess there is something hidden somewhere, but I just renamed the executable, and set it to Windows 8.0 compatibility mode, and wow it works!
Windows NT 3.1 October 1991 pre-release
And there we go! Now the latest version of NT can run the first public pre-release of Windows NT. YAY.
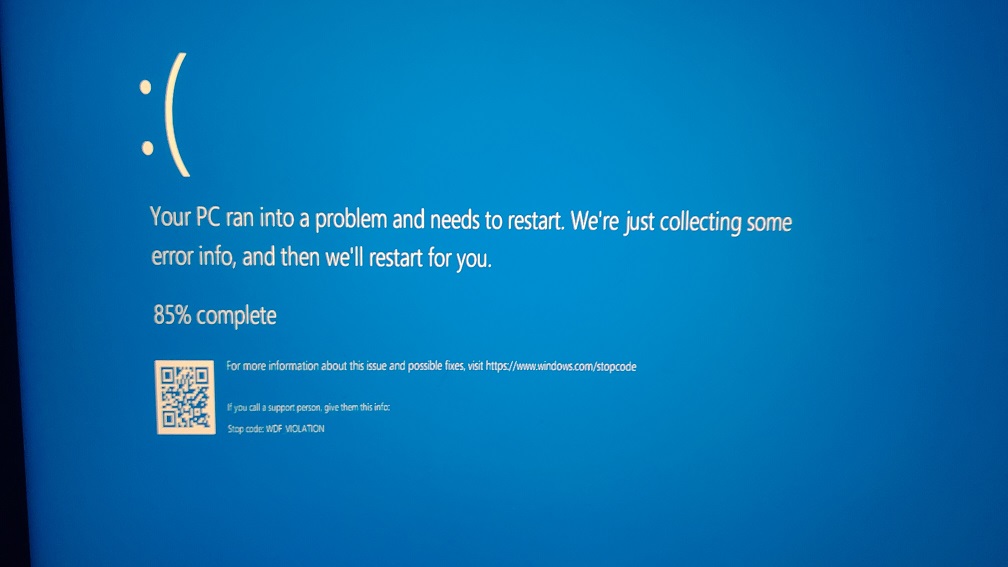
So I bit the bullet and updated to Windows 10 build 1903. And then the fun started on my glorious 2006 MacPro. It finished the update, and on reboot I get the login screen, and then almost immediately a blue screen.
Naturally the QR code is useless as it doesn’t specify any stop codes, and the minidump… Well that requires gigabytes and gigabytes of crap to download to get a tool to read it. (I still haven’t finished that rabbit hole, like COME ON! why isn’t it included?!).
However after hitting F8 a million times, I found that safe mode & networking work just great. Searching online was basically useless as there was no specific stop code to go with this WDF_VIOLATION. Further looking around I did notice one thing, and that it was all Macintosh machines that crash out to this WDF_VIOLATION error. It must be something specific to the Apple hardware running Windows 10!?
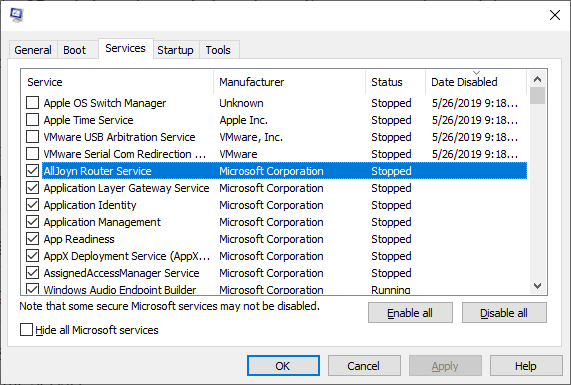
Armed with this (dis)information, I went ahead and disabled all the Apple specific drivers & startup items.
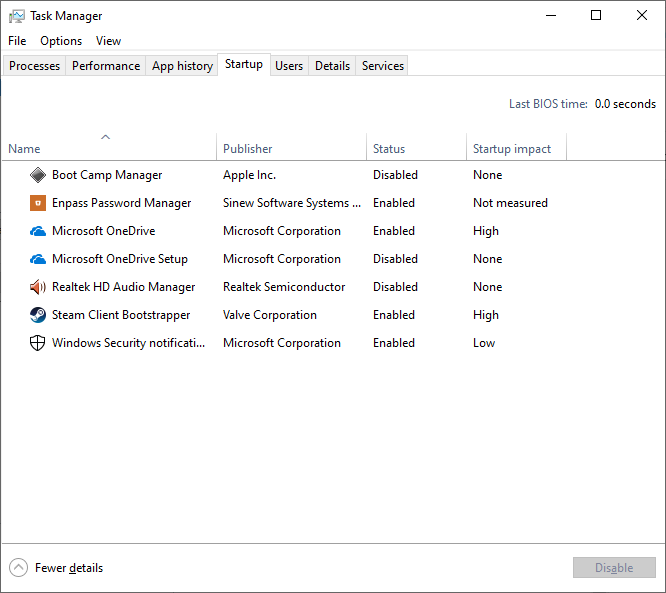
From msconfig.exe:
From MSCONFIG.EXE I disabled the following services:
Apple OS Switch Manager
Apple Time Service
And in the task manager, I disabled the following startup items:
Realtek HD Audio Manager
Boot Camp Manager
I had the other VMWare serial & USB hook previously disabled, as I just don’t want them at all on my setup. The big upshot is that after rebooting out of safe mode, I’m now up and running on Windows build 1903.
Considering the BootCamp stuff was so woefully out of date, don’t expect Apple to fix this anytime soon. And since I’m on a MacPro 2006, I certainly won’t be getting any updates from Apple. But at least I can struggle to keep this thing up to date otherwise.
Now I can enjoy that ‘new command prompt’ everyone keeps telling me about.
***UPDATE***
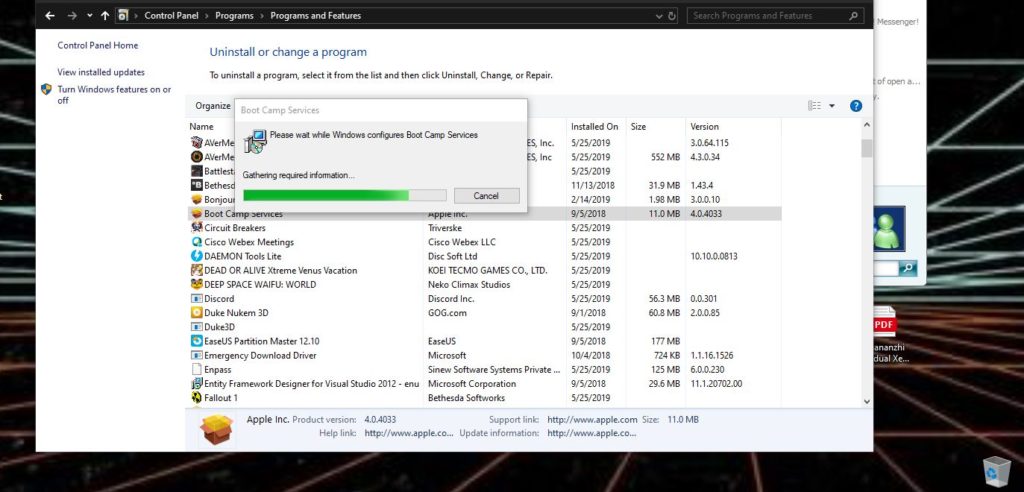
I went through this on another Bootcamp Mac, and what I had to do was uninstall the “Boot Camp Services”. It’s startup component triggers the bluescreen as it’s doing some nonsensical inventory, banging around on the drivers in a not friendly way. I had version 4.0.4033 of the Boot Camp Services installed.
Uninstall Boot Camp Services version 4.0.4033
Removing this kept all the old drivers, which continue to work just fine.
Once more again I’m confronted with a situation where I needed a SQL, but I don’t have direct access to the data. The machine I’m able to run some stuff on is not only insanely out of date (yay!) but doesn’t have enough disk space for even something like SQL Server 2000.
Enter SQL 4.21a
I “installed” 4.21a on this 32bit 2003 server in much the same way I transplanted 4.21a onto Windows 10. However I did use the srvany utility to load up the SQL Server service, much like how I used it to run an instance of Qemu in the background elsewhere. Now I have my intermediary SQL Server running like a normal service, and set a password for the SA user.
Now for the fun.
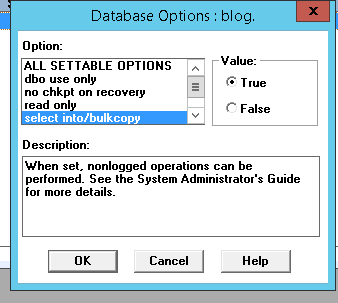
First be sure to set your target database for ‘bulk/load’ and I’d also set it for ‘truncate log on checkpoint’. If you don’t set the bulk/load then you cannot BCP data into the database.
Using the SQL Explorer tool I could view the tables I wanted, and export them as ‘SQL CREATE’ giving me the table layout. I then quickly converted them into something acceptable for 4.21a. Now it’s a matter of establishing a connection to the old server from the new.
First I tested with the ISQL command. I needed to copy the DLLs DBMSSOCN.DLL & NTWDBLIB.DLL into the directory to get the command to fire up. Since my strategy here is to do a BCP dump/BCP load the first thing I need to do is purge the data.
This of course assumes that the server address is 192.168.1.42 and that in this case I’m deleting the firewall_mapping table from the network database. If you’ve made it this far that means we are 1/4th of the way there!
I found this ‘one trick’ to get the BCP command from the SQL 4.21a tools to connect to the 2016 server and dump the table as a trusted connection. I’m not sure how much longer this kind of thing will work, but I was pretty amazed it did. I didn’t even bother trying to see if the 4.21a BCP tool could read a 2016 BCP dump. Maybe it would if you keep the formatting the same, but I find ‘like to like’ much easier. I renamed the old BCP.EXE to BCP42.EXE so that they won’t collide in any way causing weirdness. At the same time I run them from a directory that is NOT in the system path.
bcp42 "[Network Database].[dbo].[firewall_rules]" out c:\temp\1.csv -t, -r= -P
The notation looks weird, as my source database name has a space in it. This initially caused endless frustration, but it was just a matter of using the fully qualified name, which is in quotes
"[database].[role].[table]"
I set the field delimiter as a comma, and the row terminator as an equal sign. I tried not setting it but I was getting ‘spiraling data’ as it was not picking up the end of row correctly at first.
The first time you run the BCP without a format file it’ll walk you through the specifics of the fields. I just blindly accepted the defaults, and saved the file as firewall_rules.fmt . Now on subsequent runs, I can run the export like this, which uses the saved formatting:
bcp42 "[Network Database].[dbo].[firewall_rules]" out c:\temp\1.csv -t, -r= -P -ffirewall_rules.fmt
Great so if everything is going well, we have no exported our data! Now the next step is to import the data into our old server. Since we have that format file, this “should” go pretty smoothly. Notice the server is an IP address which implicitly has it connecting by TCP sockets, not named pipes. As such there is no implicit ‘Trusted connection” as there was when talking to the local 2016 server.
bcp42 network.dbo.firewall_rules in c:\temp\1.csv -Usa -PPASSWORD -S192.168.1.42 -t, -r= -ffirewall_rules.fmt
Naturally change PASSWORD to whatever password you have for the SA user.
Starting copy...
1000 rows sent to SQL Server.

1892 rows copied.
Network packet size (bytes): 512
Clock Time (ms.): total =   2216 Avg =      1 (853.79 rows per sec.)
And there you have it, all being well you’ll see the program update every 1,000 rows as it inserts data.
Originally I wanted to use the data transformation wizard thing (whatever they renamed DTS to) however the ODBC is limited to the newer .NET 4 stuff, which won’t use the old SQL Server 6.5 ODBC drivers. I really didn’t think the SQL Server 4.21a BCP command to work on a modern server against a new(ish) version of SQL Server, but it did!
I guess you could neaten it up with a command file to drop tables/re-create if you wanted, or at the least delete data/checkpoint and set the load options, dump/load data, and then turn off the load state for the database. I’m not doing reports or anything fancy, just visualizing data as they say.
Although things like ODBC have drifted out, it’s still kind of interesting that ancient BCP can still communicate over named pipes as an implicit trust.
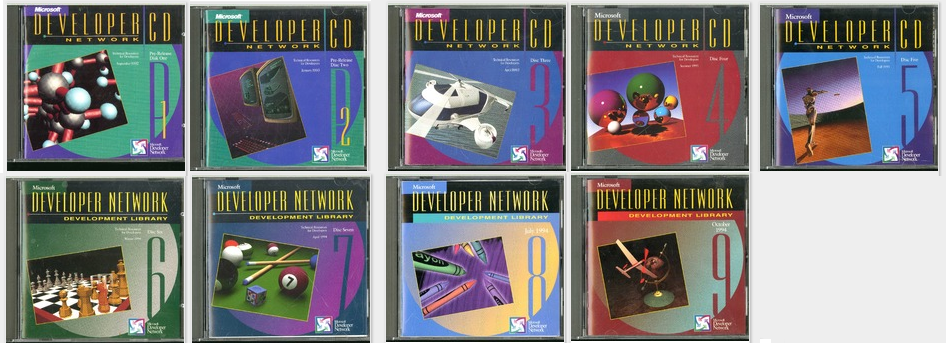
I ran across this, and thought it was cool. These CD’s are getting harder and harder to find, and unless you want the old physical disks, getting ISO images is, of course the next best thing.
Granted these disks replaced the much older Microsoft Programmer’s Library. The new CD’s use a Windows based search & interface program removing the clunky old MS-DOS program that made it feel like trying to view the world through a straw. (Although the up side of the MS-DOS version is that you could easily dump the video RAM and save the contents to plain text).
And in this brave new post Windows 3.0 centric world of Microsoft just about everything regarding OS/2 was dumped, and the seeding of Win32 via Windows NT had started.
Naturally after winning this war, Microsoft withdrew many low end products and just couldn’t compete with the tidalwave that was GNU/Linux.
At any rate for the curious kids down the road that want to see what all the fuss was with Win16, and how Windows 3.0 had changed the landscape removing the force of IBM it’s worth a look.
So I have this 2006 Mac Pro 1,1 that I’ve had laying around and I wanted to put my old Nvidia 1030 into it, along with Windows 10 for a newer (stronger?) home machine.
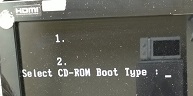
So I burnt the downloadable ISO from Microsoft onto a DVD, tried to boot it up and got this:
Ignore the microwave…
I got stuck at this “Select CD-ROM Boot Type : ” prompt, which you can’t type anything into. Apparently it’s a common and known issue with 64bit boot code, as the older Intel Apple Mac’s are of course 32bit only. So there is a fix, you have to use something called “oscdimg” to rebuild the ISO with a 32bit friendly loader.
So first I just used 7zip to extract the downloaded ISO, and then create the new 32bit ISO with the following:
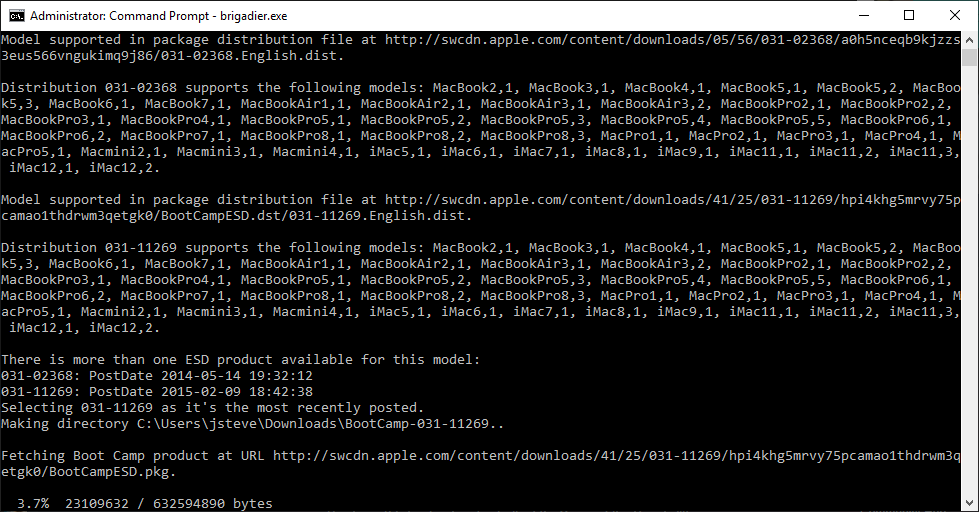
Now what about those special ‘bootcamp’ drivers? Obviously under Windows 10 there is no nice way to get the ones you want. And what about which model/download package to get?
Then I found Brigadier!
It’ll probe your hardware type and grab the drivers for you!