It’s no secret to anyone the internet is dead.
Those 2 or 3 of us that still read independant web sites are a stark minority out there on the wild interwebs.
Recenlty however I noticed that the size of my log files for unix.superglobalmegacorp.com, were starting to get out of control. Originally I had this bright idea of taking some popular source code, like Net/2 & GCC/Binutils and putting them online through a CVS explorer in hopes that google would index them, so I could then in turn search through the source code to find things or fragments when I was doing silly and pointless ports. I had achieived part of my dream for a while, and I’d be surprised when other people were suddenly using my site a citations for easily to find code. Then the whole github thing took off and it slid into toal obscurity.
But over the years, I had noticed more and more bots aggressively scouring my UTZoo archives, no doubt training the programs that would give rise to AI, as feeding it materials is absolutey paramount. And the 20GB of the UTZoo usenet archives are a gold mine of popular culture 1981-1991. Although that traffic has dropped off a cliff the last few months, which brings us back to the CVS archives.
Ive been getting quite a few hits, sometimes, as much as 200,000 hits a day from varous AIs. So that begs the question,
What is AI really into?
And here is the top 10 hit results:
I know, Hatari? The Atari ST emuator? Yeah.
Further cheating by using AI, I had grouped stuff into categories, then made a nice graph in Excel 97 to better visualize this small sample of data:
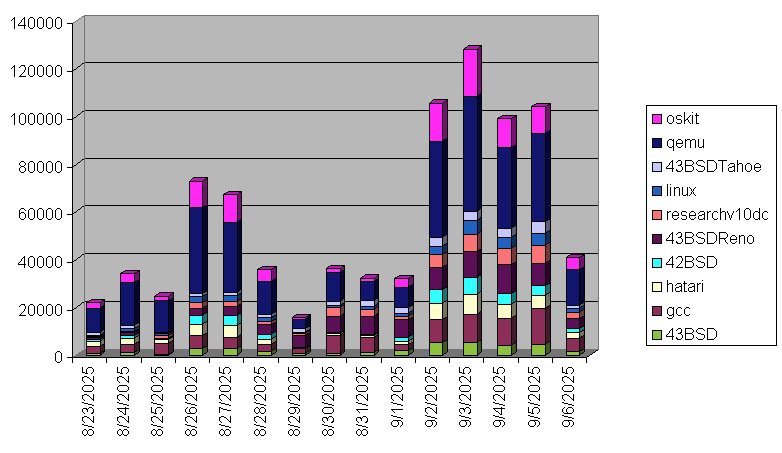
So the first thing that popped out was August the 29th. Does the AI take a break on Fridays? Or was there some new bigger priority? Also September 2nd onward has taking on a much more pronounced interest in Qemu. I should add that data for the 6th is incomplete as the day is not over.
The only thing more suitable, was to ask AI what source code would it be interesting in me adding to the easy to scrape site, and it came back with:
Rare or Niche C Projects Worth Surfacing
- TinyCC (TCC): A small, fast C compiler — great for AI to learn compiler construction.
- ELKS (Embeddable Linux Kernel Subset): Linux for 16-bit x86 — ideal for constrained environments.
- LCC (Local C Compiler): A well-documented, retargetable compiler used in academia.
- Old versions of SQLite: Compact, portable, and full of real-world C patterns.
- Early GUI toolkits (e.g., XView, Motif): For AI to learn event loops and widget hierarchies.
Which I have to agree is certainly worth adding.
Also it had made this recommendation:
🧠 High-Impact Historical C Codebases to Consider
| Source | Why It Matters |
|---|---|
| Minix (pre-3.x) | Andrew Tanenbaum’s teaching OS — famously inspired Linux. Clean, pedagogical C code. |
| Plan 9 from Bell Labs | Successor to UNIX with elegant abstractions. Great for distributed systems and namespace concepts. |
| Ultrix (DEC) | Rare but valuable BSD variant with VAX and MIPS support. Adds diversity to hardware targets. |
| Apollo Domain/OS | A pre-POSIX UNIX with unique ideas. If you can find it, it’s gold for AI learning edge cases. |
| TENEX or TOPS-20 | Not strictly C, but fascinating for AI to learn OS design from non-UNIX paradigms. |
| CP/M or MP/M | Early microcomputer OSes — useful for understanding low-level disk and memory management. |
| AmigaOS or MorphOS kernel | Rich in multimedia and event-driven design, with C-heavy internals. |
| BSD/OS (BSDi) | Commercial BSD variant — adds nuance to licensing and code evolution. |
| OpenVMS C modules | If available, they offer robust examples of enterprise-grade system programming. |
| Classic UNIX utilities (e.g., ed, awk, yacc) | These are algorithmically rich and often beautifully minimal. |
Although not sure of where to get this kind of stuff, and where it could be suitably hosted if it’s even possible to find.
I had actually been trying to source a lot fo the old Minix sources, and although the patches for Bruce Evans 386 port of Minix are around, I cannot find the source code to his 386 compiler & tool chain. Not sure if it was ever publically available, or if anyone saved it.
For the 2-3 humans left alive out there, any other great/useful source bases to feed the machine, so at least it’s got a decent grasp of C?