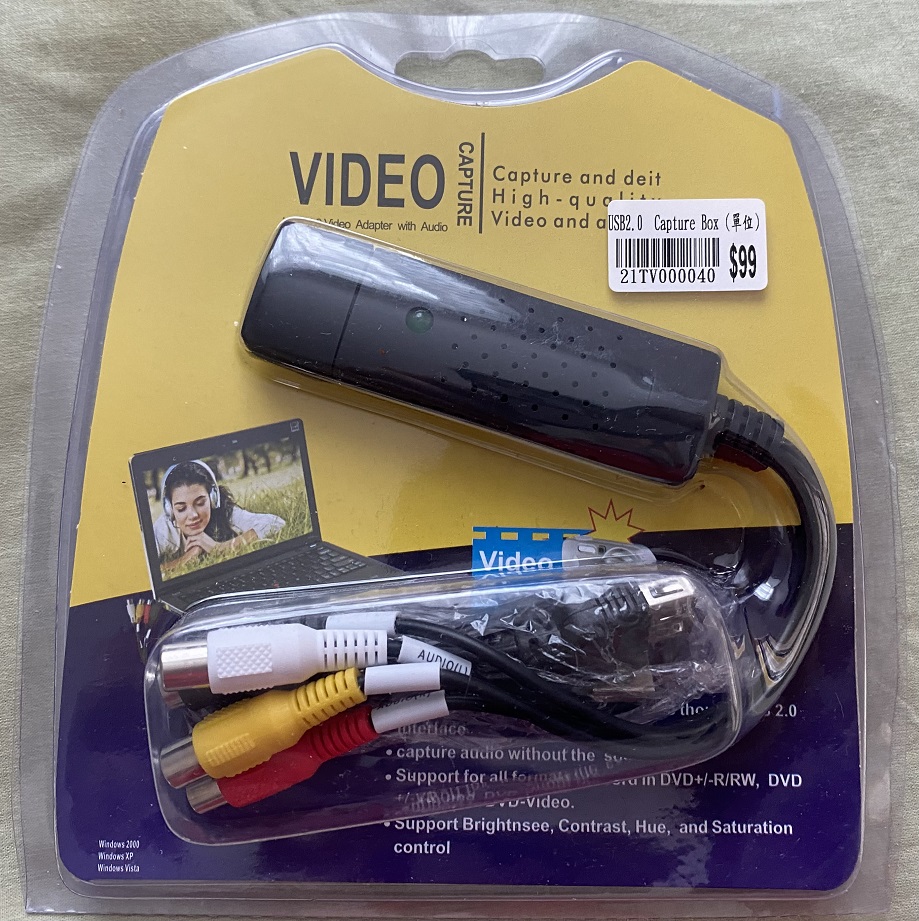
VIDEO Capture USB 2.0 Video Adapter with Audio

Capture and deit High – quality Video and audio!

So I wanted to capture some composite PAL signals, and well yeah I have a fancy capture card but it’s only HDMI of all things. NO VGA, EGA/CGA and sure no composite. So I headed down to Sun CHeong Computer Co. Ltd. 246 Apliu Street Shum Shai Po, and picked up one of these.

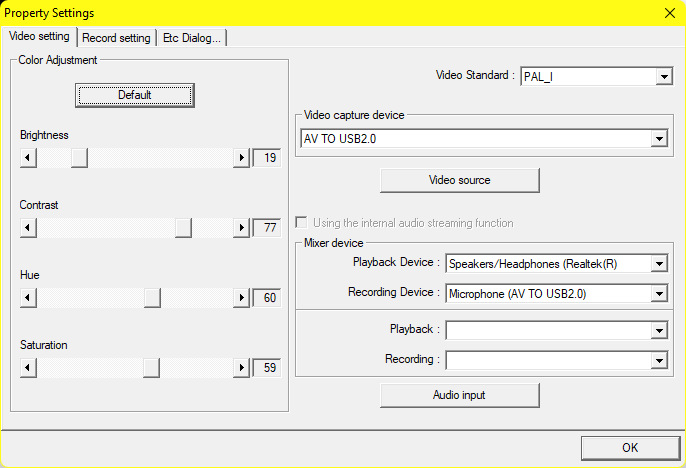
The bundled software, honestech VHS to DVD 3.0, is pure garbage. Basically it always sets for NTSC and never works. The program to change the input style does nothing either. terrible. But the honestech TVR 2.5 (37MB download!) however does work.

As a plus it lets you set PAL or NTSC

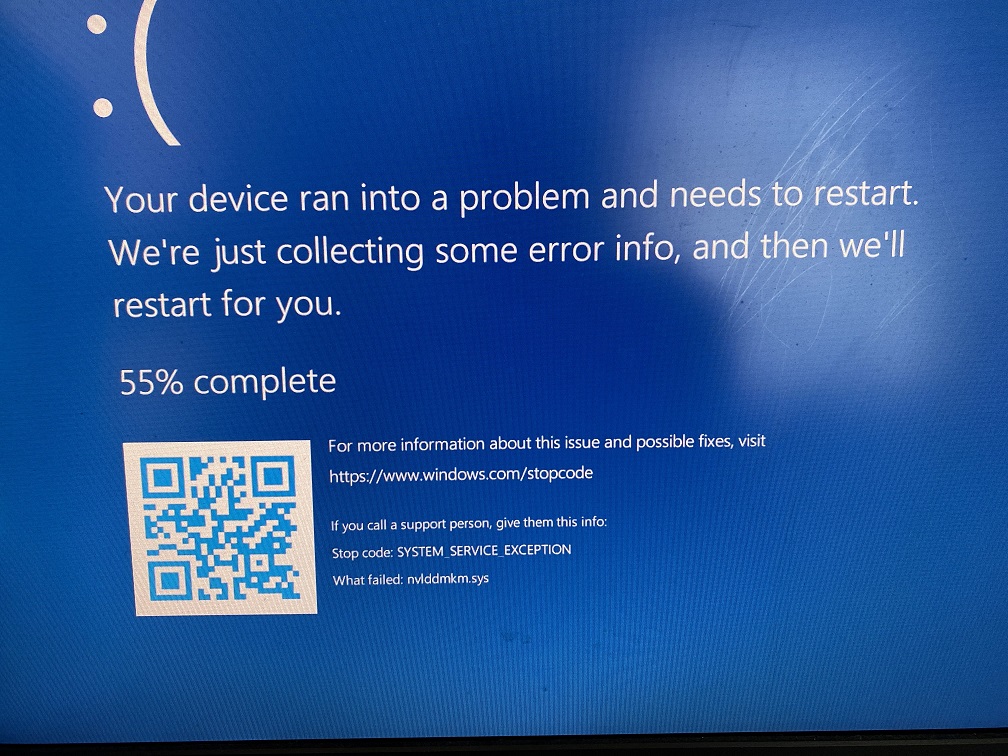
Although it’s not all that great, I have a webcam, and toggling between the display inputs can trigger a bluescreen.

So yeah it’s not so great.

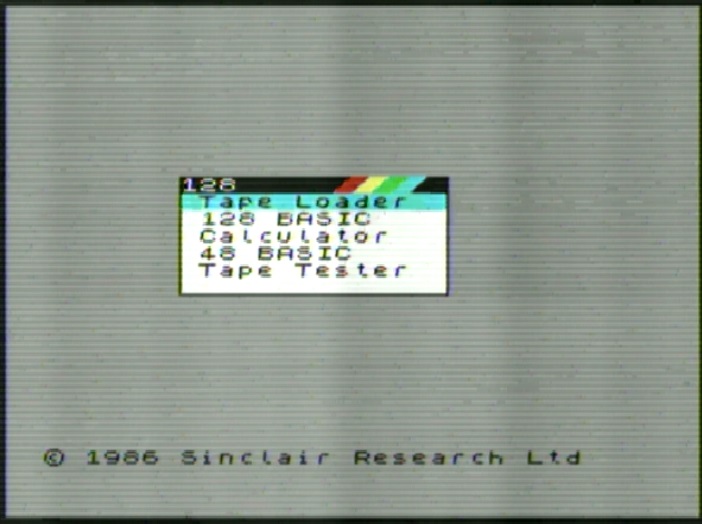
I can’t really comment on the quality of the capture as it turns out I don’t have any RCA cables, so this is me running a jumper wire to the device directly. This is FAR from ideal but here we go:

So yeah…. It’s probably me, but there you go. at $99 HKD ($13 USD?) it’s not great. Actually its damned near temperamental. But its better than nothing.

Otherwise, MEH.

The arrogance of Silicon Valley is astounding: or the death of 6to4

For many people across the world, and I suspect the majority the deathmarch rollout of IPv6 has been about as obtainable today as it was in the early 00’s. Absolutely no traction from ISP’s. Where I live in Hong Kong, none of the residential or even commercial connections I have access to have native v6. Instead there was this fantastic option of tunneling IPv6 into IPv4, using a technology called 6to4 which gave everyone with a registered IPv4 address suddenly had 65535 networks to build out their own massive IPv6 deployment.

Simply put 6to4 put the individual onto the map for a NAT’less IPv6 world. 6to4 allowed two IPv6 hosts to talk to each other through the IPv6 Internet backbone, with zero changes on the Internet required. It just worked.

And of course Silicon Valley knows best, and decided that this network democratization must be stopped. Power to the People is the anthesis of the megacorps.

Google DNS Primary: 2001:4860:4860::8888
Google DNS Secondary: 2001:4860:4860::8844
Cloudflare DNS Primary: 2606:4700:4700::1111
Cloudflare DNS Secondary: 2606:4700:4700::1001
Quad9 DNS Primary: 2620:fe::fe
Quad9 DNS Secondary: 2620:fe::fe:9

This is a list of some popular ‘common’ IPv6 DNS servers. Windows 10/11 (probably 8/8.1 but who uses that?!) are not only IPv6 capable but actually IPv6 native, with a preference for the IPv6 DNS servers.

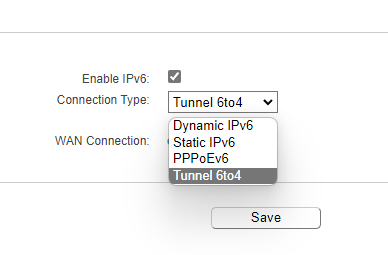
TP-Link Wireless N Router WR840N choices

I have this low end TP-Link Wireless N Router WR840N router, as where I live the maximum speed is 30Mbit/10Mbit DSL. There was no point in buying anything crazy expensive. My ISP has zero IPv6 deployment. The only way I can participate is buying a tunnel, or using 6to4. So I’d been using 6to4 for a while, and things have been great. But the last while it’s been super downhill. Sadly the firmware doesn’t give an option to force IPv6 DNS, but it automatically chooses Google.

C:\Users\neozeed>ping 2001:4860:4860::8888

Pinging 2001:4860:4860::8888 with 32 bytes of data:
Request timed out.
Request timed out.
Request timed out.
Request timed out.

Ping statistics for 2001:4860:4860::8888:
    Packets: Sent = 4, Received = 0, Lost = 4 (100% loss),

And sure enough I’m getting massive timeouts, and the web had basically become utterly unusable. Fantastic.

I’d even gone through the steps of creating a local DNS server and having it VPN to the United States thinking that’d help me, as the DNS errors felt like the encroaching Great Firewall of China. However the source of all my problems just turned out to be out of touch Silicon Valley arrogance.

rfc7526 (ietf.org) Deprecating the Anycast Prefix for 6to4 Relay Routers

This is where they chose to kill over IPv6 for the masses, because local firewalls work as expected.

Authors' Addresses

   Ole Troan
   Cisco
   Oslo
   Norway

   EMail: [email protected]

Yeah what a surprise. And of course Google cut off IPv6. These tech giant oligarchs are not your friends.

The good news is that the other ISP’s Cloudflare & Cloud9 still honor 6to4.

Configuring IPv6 DNS on Windows 11

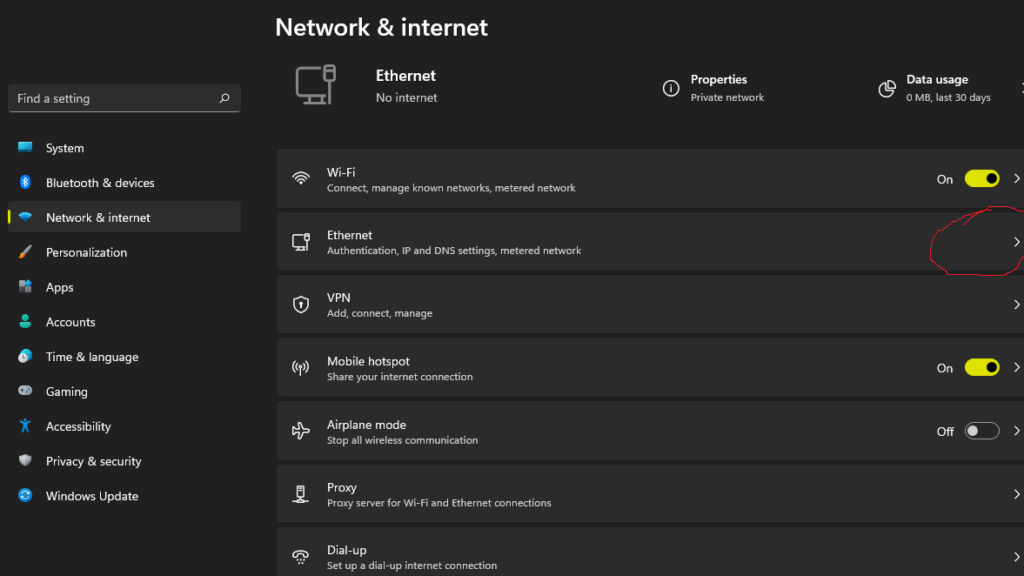
Windows 11 supports DNS over HTTPS, so you just need to enable it. I’m hardwired so under the settings -> network then -> Ethernet for me, maybe Wi-Fi for you?

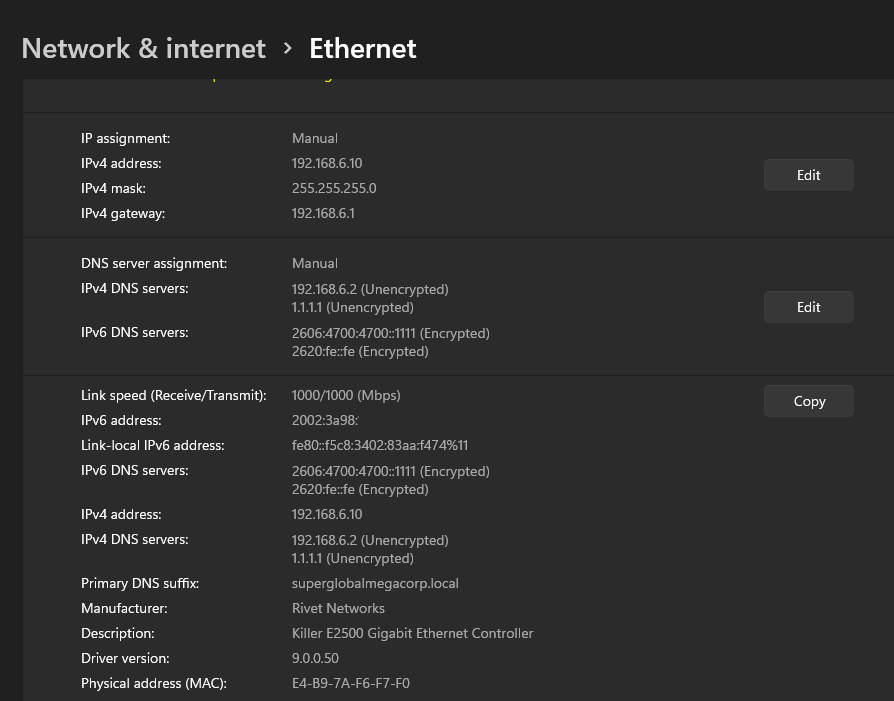
Then just hit Edit over the DNS server assignment:

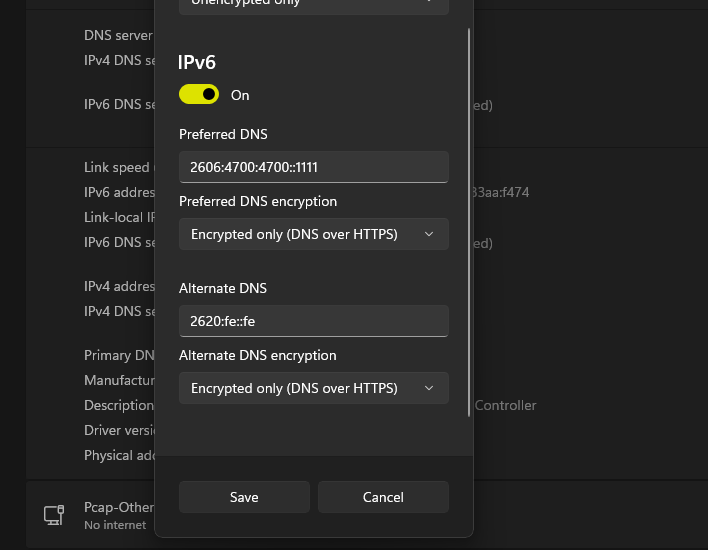
Then go ahead and pick a NON GOOGLE DNS service, and select DNS over HTTPS for the ‘ultra secure’ wave of the future.

And now your DNS will work. YAY.

C:\Users\jason>nslookup
Default Server:  one.one.one.one
Address:  2606:4700:4700::1111

> google.com
Server:  one.one.one.one
Address:  2606:4700:4700::1111

Non-authoritative answer:
Name:    google.com
Addresses:  2404:6800:4001:800::200e
          172.217.174.174

Of course you won’t be able to connect to anything from Google over IPv6, but that is the price you pay for not living in the precious Silicon Valley tech bubble.

Personally I think it’s a good thing when elitists lock themselves away from the world, and decrease their relevancy to everyone.

Obviously the end game won’t be some magical rollout of IPv6 over Asia, rather it’ll be the end of IPv6. As always the problems stemmed from the backbone, even the 512MB limit of the cisco 7200 was overcome, but NAT got around the limitations of the fixed and exhausted IPv4 network. Too bad they had to kill it, but of course it’s just because random people could just host stuff on their own network, and well network democratization isn’t what cisco et all is all about.

Nothing

I’m not sure why but I seem to be getting pulled into the ZX spectrum. Maybe it’s because I’ve yet to have seen one, and find it interesting about this massive parallel space I knew nothing of.

I’d found this review of the game, by sinc LAIR, which goes over a bit of history behind this port of the game. Very cool stuff, but for non русский speakers like me, be sure to turn on the auto translated subtitles!

The game is for sale for a mere €3 zxonline.net. One thing I had issues with, is because it’s Russian, normal Pay Pal blocks the transaction of account to account, so you have to use incognito mode, and tell Pay Pal to process it as credit card and it’ll work fine. Keeping in mind since Pay Pal does the CC charge, your # never goes to Russia. And it’s a damned shame, it’s not like ever Russian hacker is all about online crimes, some just want to make cool games.

Game play is challenging as hell! It’s very much a ‘one touch and you are dead’ game. I cheated and uses save states from the EmuZWin emulator.

ABSOLUTELY GET A JOYSTICK!

I don’t know why I was playing with the keyboard, holy crap don’t do that, don’t waste your time!

Would I recommend nothing for the ZX Spectrum 128k? Absolutely. It’s totally worth the €3, you can feel the love in this game!

sinc LAIR is going to have a live stream of it in a few hours, so I can see how to get past the spinning monster thing on level 2. Maybe I’ll post some video of me constantly dying.

Closing out 2021

Sometimes it snows in the tropics

Well to say the year has been a challenge would be an understatement. Perhaps the one thing that puts things into perspective is that we are all aware of the collective ‘suck’ at the moment. At the same time through the eyes of my children, employees and friends I see that despite the prevailing atmosphere of fear and uncertainty there is also the unbreakable optimism of tomorrow.

Sometimes it snows in the tropics.

No really. It does. Black swans are a thing. And sometimes all you need is the Imagineering will of a bubble machine, a fan and a tight mesh and the virtual snow will fall.

I have been so incredibly blessed these years as despite losing so much, having businesses implode, having to do layoffs, downsizing and shuttering stuff, I’ve also found new opportunities and been able to do what I can to softland the best I can, and more importantly push onwards.

I know it’s tough, especially when everyone is looking to you for the answers, and well, yeah it reminds me of an episode of STNG: Attached when Crusher realizes that Picard is human, and knows that he has to give the appearance of confidence and control despite having neither. Or as the millennials will say, fake it until you make it.

Starting new businesses in this environment has been an incredible challenge, along with maintaining the status quo. But like everything else in life, there is no ‘perfect time’ rather a window of opportunity where only the bold and crazy can and will step in and take the chance.

So while the kids enjoy their virtual snow, I’m chilling a dozen bottles of bubbley getting ready to ring in the new years.

Happy New Years!

Undocumented Madness – 2.9BSD on XHomer

This is a guest post by Seal331

Since I’ve been dealing with XHomer a lot lately in order to get the two dumped VENIX/PRO versions to work, I noticed that the XHomer documentation mentions a thing called “maintenance mode” and the DEC Pro port of 2.9BSD, so I was interested.

After doing a bit of searching around I found some install notes on www.frijid.net from real hardware, so I decided to adapt these notes for XHomer and install it. TL;DR – I did it, here I’m explaining all this stuff.

Step 1 – Acquiring XHomer

XHomer is a DEC Pro 350 emulator that can run P/OS, Venix, 2.9BSD and possibly RT-11, but I didn’t get to installing the last one yet. There is a statically linked binary but, since I’m a Gentoo Linux person (but I didn’t use Gentoo for this particular install)and prefer compiling everything I can, I grabbed the source code (https://xhomer.isani.org/xhomer/xhomer-9-16-06.tgz) and quickly compiled it on my Linux box. It was pretty simple, just install a development toolchain (build-essential on Debian based systems), the libX11 development package (libx11-dev on Debian based systems) and the XShm extension which is included in libxext-dev on Debian based systems. During make it spit out a bunch of warnings but I got a working xhomer binary. Also it kind of messes the xterm settings a bit after being closed, so I’d recommend running it in a separate xterm window. Since there’s no install target in the Makefile I just copied the xhomer binary to /usr/bin, and that was it. From here on, I will assume that the XHomer binary is called xhomer and is somewhere in your PATH, if not just modify the way I run XHomer.

Step 2 – Acquiring the distribution

Thanks to the people at the same www.frijid.net site I mentioned earlier, I was able to easily piece together a distribution set. Since we don’t really rely on how many physical floppies we have with an emulator, I grabbed the recommended root disk set and the 15 disk usr set with the source code, although we won’t be compiling the kernel in this post. Maybe next one? We’ll see.

The site with the floppies is http://www.frijid.net/download/pro350/bsd/raw/ and here’s what I used for my install:

box#0/maintenance0.img
box#1/usr+k00.img
box#1/usr+k01.img
box#1/usr+k02.img
box#1/usr+k03.img
box#1/usr+k04.img
box#1/usr+k05.img
box#1/usr+k06.img
box#1/usr+k07.img
box#1/usr+k08.img
box#1/usr+k09.img
box#1/usr+k10.img
box#2/usr+k11.img
box#2/usr+k12.img
box#2/usr+k13.img
box#2/usr+k14.img
box#2/usr+k15.img
box#2/root1.img
box#2/root2.img
box#2/root3.img
box#2/root4.img
box#2/root5.img

The 3 disk usr set in box#2/ doesn’t include the source, so I didn’t grab it.
The maintenance disks are all the same, so I just grabbed the one in box#0/.
The 6 disk root set in box#0/ does include some extra dev files and something that appear to be leftovers from the development DEC Pro, but it’s missing /bin/ed and /bin/passwd, so I suggest using the 5 disk set instead.

There is also box#2/procomm.img which was labeled as containing “PRO/COMM terminal emulation” but when I mounted it to install, there was only an empty lost+found directory. Perhaps the original disk had gone bad over the years or someone accidentally reformatted it? We may never know.

Step 3 – XHomer configuration & serial port preparation

Since the maintenance (install) floppy uses a serial terminal interface over the printer port and XHomer only allows us to send its output over serial, I had to do some searching again since most PCs nowadays don’t have a serial port to use. Thanks to cantoni over at StackOverflow I managed to find instructions for using socat in order to generate a pty, which actually worked for me. At first you need to install socat (bruh) and then run “socat -d -d pty,raw,echo=0 pty,raw,echo=0”. Something like this will be printed out on the terminal:

Then we do a quick test. I use putty to connect to the pty’s output, in my case it’s /dev/pts/3. Just use the default settings for serial connection with speed 9600 and the device as /dev/pts/3. If everything goes well, you will get a blank putty terminal window. Don’t panic, the fact it’s blank is normal.

Let’s test if our serial port works. Echo something in the pty’s input, in my case it’s /dev/pts/4. For example, “echo “Test” > /dev/pts/4″. If the word “Test” appears on the screen, congratulations, you have successfully set up the pty to a point where BSD will happily talk to it when we set up the connection later. !! DO NOT CLOSE THE PUTTY WINDOW AT ANY POINT DURING THE INSTALL UNTIL WE NO LONGER NEED IT (at the initial hd boot) !!

Now we configure XHomer. At first, let’s make a disk image. BSD only supports RD51 or RD50, we’ll use RD51 as it’s slightly bigger. If you get the hard disk wrong, BSD will silently hang at boot. Here’s the command to make a 10MB RD51 disk image for use with XHomer:

dd if=/dev/zero of=29bsd.rd bs=10027008 count=1

Let’s make the XHomer config file. Note that everything after the symbol | including the symbol itself does not need to be inputed, it’s just my notes.

screen = window | make the emulator window mode
window_position = 0, 0
window_scale = 2
full_scale = 3
screen_gamma = 10
pcm = on
framebuffers = 0
serial0 = /dev/pts/4 | change to your needs, pty input
la50 = null
la50_dpi = 300
kb = lk201
ptr = serial0 | DO NOT CHANGE, we'll replace it later when we no longer need serial
com = null
rd_dir = ./
rx_dir = ./
rd0 = 29bsd.rd, 4, 306, 16 | change if not using suggested disk
force_year = 99 | fix y2k bugs by forcing year to 1999
maint_mode = on | DO NOT CHANGE, bsd install uses maintenance mode for terminal
int_throttle = off | random workarounds for clocks or older linux systems, we don't need this on new stuff
nine_workaround = off
libc_workaround = off
lp_workaround = off

Save the file as xhomer.cfg.

Now run the xhomer binary. If everything goes right, you should have something like this on your screen:

If you didn’t run the test documented above or changed the string, the “Test” string will not be in the terminal or will be some other text, this is all okay.

Step 4 – BSD install

In order to feed floppies to XHomer, you have to use the XHomer control menu. In order to get to it, press Ctrl+F1 when the emulator window has focus. The two floppy drives we need are rx0: and rx1:, these are equivalents of A: and B: in DOS. Insert the maintenance0.img disk in rx0. If all goes okay, the floppy disk picture should disappear from the display window, leaving just the DIGITAL logo. The putty window should then display something like this:

40Boot
:

(all following input is in the terminal unless otherwise stated)

If all is okay, congratulations, you have booted from the installation diskette. Now type the following in the putty window after the : symbol:

r5(0,0)rdfmt

Then, if you inserted an RD51 10MB disk in the emulator as suggested, type 0 when asked for drive type. If you inserted the 5MB RD50 instead, type 1. If you don’t know the exact disk sizes and types, refer to the XHomer documentation, specifically the Emulated Hard Disk part. The formatting shouldn’t take long, then it will dump you back in the 40Boot prompt. Now you need to boot the UNIX kernel, type this in the putty window:

r5(0,0)unix

If everything goes okay, you should have something like this now:

If you get a boot hang instead (like me), restart both XHomer and putty, connect putty back to the pty, then in XHome insert the maintenance0 floppy back and boot the UNIX kernel again. DO NOT FORMAT THE DRIVE AGAIN!!

Install time!

At first, create the root filesystem by running:

/etc/mkfs /dev/rrd0a 2240

Then insert the root1 disk in the 2nd floppy drive (rx1) and restore the root filesystem dump from the 5 root set floppies:

restor rf /dev/rr51 /dev/rrd0a

When it says “Last chance before scribbling on /dev/rrd0a.” just press Enter.
When it says “Mount volume N”, just insert the right floppy and press Enter. Volume number == floppy number in this case.

After the “end of tape” message, verify the rootfs:

/etc/fsck /dev/rrd0a

If it succeeds, create the usr filesystem by running:

/etc/mkfs /dev/rrd0c 6528

Then insert the usr+k00 disk in the 2nd floppy drive (rx1) and restore the usr filesystem dump from the 16 usr set floppies:

restor rf /dev/rr51 /dev/rrd0c

When it says “Last chance before scribbling on /dev/rrd0c.” just press Enter.
When it says “Mount volume N”, just insert the right floppy and press Enter. Floppy number == volume number – 1 in this case.

After the “end of tape” message, verify the usr fs:

/etc/fsck /dev/rrd0c

(all following input is in on the Pro display unless otherwise stated)

If everything is okay, run sync two times and shut down the emulator. Restart it with only the maintenance floppy in rx0, then type this in the terminal (NOT the Pro display):

rd(0,64)unix

This should boot up Berkeley UNIX (BSD). We’re not done yet, but it’s close.

Type the following to install the hard disk bootblock:

dd if=/rdboot of=/dev/rrd0h count=17

If everything goes okay, set the root password:

passwd root

Congratulations, you have successfully installed 2.9BSD. Here are the cleanup and hdboot prep stuff:

Bring the OS to single user mode:

shutdown +1

(you can close putty now)

Then run sync two times and shut down the emulator.

Step 5 – Booting the OS

In order to boot the OS, you need to do the following:

Open the xhomer.cfg file;

Remove the serial0 = line;

Change the ptr = serial0 line to ptr = null;

Change the maint_mode = on to maint_mode = off.

Then save, after running XHomer you should be able to just log in.

Congratulations, you have successfully installed 2.9BSD for the DEC Pro 350! Sadly it’s pretty unstable, and due to emulation issues in XHomer vi completely crashes BSD, but there’s always ed 😉

Appendix A – Transferring Files

In order to transfer the files (up to 400KB per file) you will need some additional utilities. Here’s a guide on how to install them:

(the following steps are done on the Linux host side)

  1. Grab the following files:

https://xhomer.isani.org/xhomer/BSD/f2rx
https://xhomer.isani.org/xhomer/BSD/rx2f.c
https://xhomer.isani.org/xhomer/BSD/lbn2xhomer.c

  1. Apply the following patch to lbn2xhomer.c:
--- lbn2xhomer.c   2015-07-05 07:51:19.000000000 +0300
+++ lbn2xhomer.c        2021-12-30 17:13:28.539768500 +0300
@@ -25,6 +25,7 @@

 #include <string.h>
 #include <stdio.h>
+#include <stdlib.h>

 #define SECSIZE                512
 #define SECTORS                10
@@ -66,7 +67,7 @@
   if (fptr_v == NULL)
   {
     printf("Unable to open %s\n", argv[1]);
-    exit();
+    exit(1);
   }

   fptr_x = fopen(argv[2], "w");
  1. Compile lbn2xhomer:
cc -o lbn2xhomer lbn2xhomer.c
  1. Set up f2rx for operation:
chmod +x f2rx
  1. Make a floppy image with the BSD side utility:
./f2rx rx2f.c
  1. Run XHomer and attach the generated rx2f.c.dsk to rx0

(the following steps are done on the BSD side)

  1. Grab the file from the floppy:
dd if=/dev/r50 of=rx2f.c skip=18 bs=1 count=891
  1. Compile the utility:
cc -o rx2f rx2f.c

You’re now ready to transfer files.

Short file transfer handbook:

  1. Run f2rx FILE on the host box, FILE being the file to use;
  2. Insert FILE.dsk into rx0 on XHomer;
  3. Run rx2f on the BSD side.

Appendix B – Init: no more children issue workaround

On some hosts, programs from the install floppy may randomly die with the “no more children” message. A workaround is to disable RTC mode and enable IOTRACE mode in the XHomer Makefile and recompile, leading to a much more slower (due to accurate timing) and working XHomer. After the installation, you can revert to normal settings and it should work, as the programs installed on the hard drive to not appear to suffer from the same issue.

Appendix C – Sequels

Possibly coming soon to VirtuallyFun:

Undocumented Madness 2 – Big hard drives on 2.9BSD XHomer
Undocumented Madness 3 – Custom Kernel on 2.9BSD XHomer

PETSCII Robots released for the ZX Spectrum

PETSCII Robots title

So yeah on the surface, it’s an 8 bit game on another platform. Not that exciting but this isn’t a 6502, the Spectrum is a Z80! So yes it’s been manually ported by mr287cc with music from Shiru.

faux petscii mode

So this is pretty cool watching the game break out of the 6502 that spawned it. So overall yeah, it’s the same game, but new platform. And the first image is the traditional game, which works fine, but where would be the fun in that? Instead you get a whopping 4 versions of the game, along with a program that plays all the sountracks, a full 184kb worth of fun. I suspect it’s a full tapes worth.

Gripes on strange and foreign platforms…

The biggest and weirdest thing to me is loading the tape files into an emulator. I have to admit I never even heard of a Spectrum until college, and it was largely that it’d been emulated better before anything Commodore, and that it too had an extensive (although 100% tape based) library, which really restricted things like RGP’s and Adventure games, having to run from the incredibly limited 8bit ram.

Anyways to load from tape the command is:

LOAD "".

But the spectrum doesn’t have a Microsoft Basic, rather you type in J for the load command. Yes. J.

Spectrum Keyboard matrix

I had to google around a fair bit to find this, butt here is a keyboard matrix.

The P key

Yes seriously. And because it’s the most pressed key, many of them are impossible to tell from images that they have the double quote. Also it’s a “symbol shift” key so in emulators it maybe a control or alt key, so it’s J CTRL+P CTRL+P, then play on your virtual tape deck and listen to the screeching data (just like a modem). The game loads in a minute or so, and off you go!

The Microbots image

Adding to the keyboard fun, this is the game keyboard layout:

So it’s not too bad.

Colour Micro Robots banner

Is it worth it?

Absolutely! You do get several versions for your $10, and the ZX-Microbots version is the best by far, with music, and of course a high resolution screen letting you see far more of the action!

I’ve tried it in a bunch of emulators, and it works fine, so compatibility seems to be very good, but I don’t have any hardware to run it native. You do get WAV & TAP files in the sizeable download, along with PDF’s of the manuals. I haven’t seen anything about mastering tapes, so I don’t think there will be a physical release.

You can pick it up on David’s site for $10 USD. It’s totally worth it in my opinion.

My disclosure is that I’ve bought it for the Pet/c64 twice (once by accident), ZX and Amiga, 100% on my own money.

68000/Amiga

As a bonus non 6502, there is also an Amiga version, which sounds great, plays fine, but compared to the Spectrum version, it just feels cramped.

Linus DECUS ’94 talks found!

As I’m sure this will be making the rounds from Facebook (yes how tragic it’s on that thing of all things), and YES you have to login as King Zuck-my-users-are-idiots-erberg demands to know if you are reading this.


This is written by Jon “maddog” Hall

This is the long-promised Christmas present to all those good little girls and
boys who love GNU/Linux.

It was November of 1993 when I received my first CD of what was advertised as "A
complete Unix system with source code for 99 USD".   While I was dubious about
this claim (since the USL vs BSDi lawsuit was in full swing) I said "What the
heck" and sent away my 99 dollars, just to receive a thin booklet and a CD-ROM
in the mail.   Since I did not have an Intel "PC" to run it on, all I could do
was mount the CD on my MIPS/Ultrix workstation and read the man(1)ual pages.

I was interested, but I put it away in my filing cabinet.

About February of 1994 Kurt Reisler, Chair of the UNISIG of DECUS started
sending emails (and copying me for some reason) about wanting to bring this
person I had never heard about from FINLAND (of all places) to talk about a
project that did not even run on Ultrix OR DEC/OSF1 to DECUS in New Orleans in
May of 1994.

After many emails and no luck in raising money for this trip I took mercy on
Kurt and asked my management to fund the trip.   There is much more to this
story, requiring me to also fund a stinking, weak, miserable Intel PC to run
this project on, but that has been described elsewhere.

Now I was at DECUS.  I had found Kurt trying to install this "project" on this
stinking, weak, miserable Intel PC and not having much luck, when this nice
young man with sandy brown hair, wire-rim glasses, wool socks and sandals came
along.  In a lilting European accent, speaking perfect English he said "May I
help you?" and ten minutes later GNU/Linux was running on that stinking, weak,
miserable Intel PC.

I sat down to use it, and was amazed. It was good. It was very, very good.

I found out that later that day Linus (for of course it was Linus Torvalds) was
going to give two talks that day.  One was "An Introduction to Linux" and the
other was "Implementation Issues in Linux".

Linus was very nervous about giving these talks.   This was the first time that
he was giving a talk at a major conference (19,000 people attended that DECUS)
to an English-speaking audience in English.   He kept feeling as if he was going
to vomit.   I told him that he would be fine.

He gave the talks.  Only forty people showed up to each one, but there was great
applause.

The rest of the story about steam driven river boats, strong alcoholic drinks
named "Hurricanes", massive amounts of equipment and funding as well as
engineering resources based only on good will and handshakes have been told
before and in other places.

Unfortunately the talks that Linus gave were lost.

Until now.

As I was cleaning my office I found some audio tapes made of Linus' talk, and
which I purchased with my own money.  Now, to make your present, I had to buy a
good audio tape playback machine and capture the audio in Audacity, then produce
a digital copy of those tapes, which are listed here.  Unfortunately I do not
have a copy of the slides, but I am not sure how many slides Linus had.  I do
not think you will need them.

Here is your Christmas present, from close to three decades ago.   Happy
Linuxing" to all, no matter what your religion or creed.

An Introduction To Linux
Linux Implementation Issues In Linux

I’ve also archived the slides & audio files on archive.org.

Merry Christmas

I had a bunch of stuff in my head for this year. Really. Some 'new' Commodore 64 game reviews. some random g2a action, and just some all around fun. Then my schedule slacked and log4j happened. On the one hand none of the stuff I ran was immediately impacted as it was inward facing. I had already gutted the 'magical nonsensical scripts' t hat kids these days use to deliberaly complicate running simple services. So adding the right flags to disable this crap in the Java runtime was something I could do quickly. Sadly the rest of the organization didn't fare so well.

Things are bad.

But life finds a way.

So in the words of the late George Carlin, Merry Christmas, and try to do the best you can.

Can you trust a man in a van with your virtual plan?

Once upon a time this was a legitimate ad. Tad from VM-limted.com. Sadly the domain has all but lapsed and finding any reference to this ad is pretty much impossible to search for. You’d think with the ‘glamp’ of vanlife and living in a van that people would love to take notes from the Microsoft VM-limited 70’s style conference van.

Nissan NV350

Instead I was getting crap like this Nissan NV350 which looks so 1960’s SciFi that it’s just unlivable and unusable. Compare that pod living thing to this incredible 1970’s themed van from VM-limited!

So comfortable!

From leather chairs, rolodexes, tube televisions to the mandatory ashtrays, wood paneling and shag carpet how could this not be a ‘work from the road’ thing today? While looking at other solutions for working on the road they seem to be so boring and unlived in that they feel about as legit as that new starwars hotel that looks like a telephone game of ‘space conflict’.

As far as I can tell it started as a print campaign in 2011 to be launched the same time as the big VMware convention (vmworld?!) back then.

2011 print ad

I do have to admire the very Atari-esque look of it. Apparently it was good enough to get some videos shot in the van:

And along with that was a TADTalk. I mirrored it on my site, and with a bit more searching I found some more and put them on archive.org.

It’s too bad the domain lapsed, and Microsoft didn’t hop onto the van-life trend with their future thinking retro 70’s conference van.

Anyways to help me google/bing it in the future Microsoft man in van selling virtualization.

Anyone else living the nomadic life? I guess with wife + kids it’s hard, but I’m sure someone is doing it.

Microsoft OneDrive & SharePoint Library dropdown menu insanity!

I don’t know what is so exciting about this feature but Microsoft has paged me about 2-300 times this morning about this exciting feature.

Microsoft OneDrive & SharePoint Library dropdown menu

As of 10:25 BST/HST it’s still going off. I had to mute the Office 365 Admin application. Talk about either over excited or just plain broken. Over on reddit yeah, it’s everyone else.

Do people even use sharepoint anymore?