Although I should have gone more in depth with the cisco part.
Namely showing how to check the interfaces, the ethernet l2 traffic, how the DLSw peers, and then the establishment of the circuit once the session is established.
But I wanted to be quick. I don’t think I can edit a video that is up so I’ll probably follow it up with another quick video.
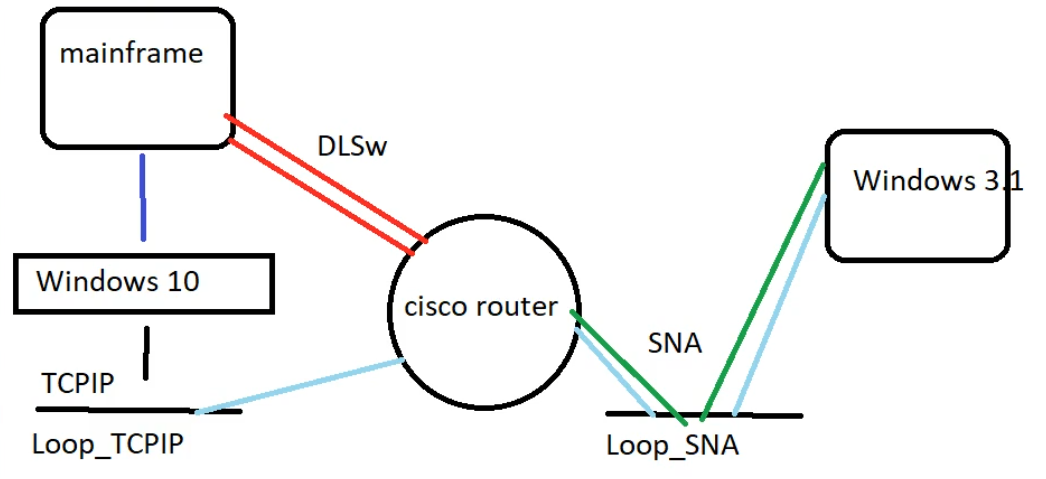
simple network diagram
Trying to put it into words, the Windows 3.1 VM hosts Extra! 4.2 talking SNA to the Loop_SNA virtual Ethernet interface, which then is connected to the virtual cisco router, which also has a TCP/IP enabled interface, Loop_TCPIP, which the host Windows 10 machine can talk to, allowing it to communicate with the Hercules VM which I had compiled to run as a native Win64 EXE for Windows.
Basically, at it’s heart, this is the important part of the cisco config:
I used a ‘clean’ VMware virtual machine to host this test, just to show how to do the setup from scratch, taking nothing for granted.
Hopefully this explains it a bit better for those who wanted to know, along with the video to show the high level of it working. Not sure anyone would want to watch me stumble through setting up MVS, along with going into more detail on the cisco config & workstation config.
As always, thanks to 9track for providing the patches, and showing that this whole setup was possible!
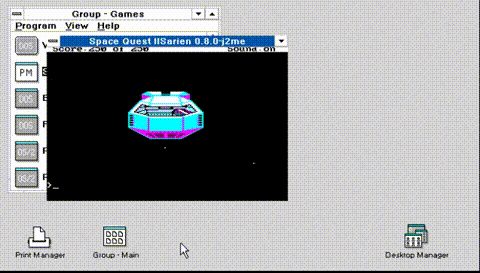
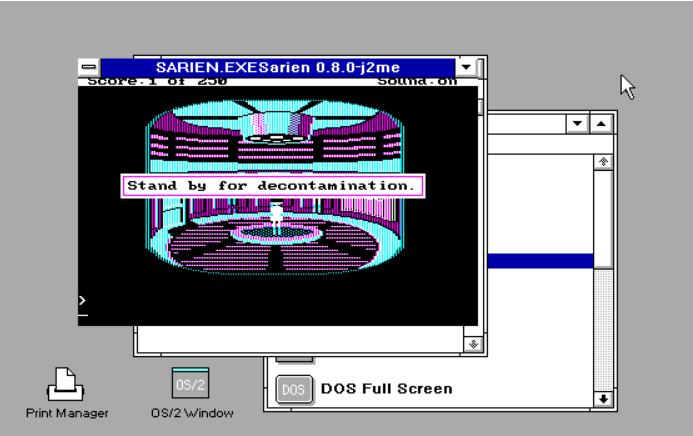
No, really, I never played it all the way through. I thought it was also a good test of SarienPM, on Microsoft OS/2 2.0 Pre-Release 2, and much to my surprise despite having screwed up the sound code so that it’s always on, and not using an input queue for the keyboard, making it difficult to type fast, but despite all of the challenges, I was able to complete the game.
I did record it, although I need to test levels properly, the audio is a bit muddled. I don’t know if it’s worth watching it all the way through, I die.. A LOT. And stupidly. And don’t save anywhere near enough and have to repeat some parts over and over and over.. The stupid alien vine maze took me over half an hour as it was impossible many times to clearly see.
Also, it has my terrible DosBeep code, which of course sounds terrible. There ought to be some way to tell sound effects from ‘music’ as it seems they are coded for different durations and tones. But I don’t know what I’m doing, I’m just a monkey banging keys.
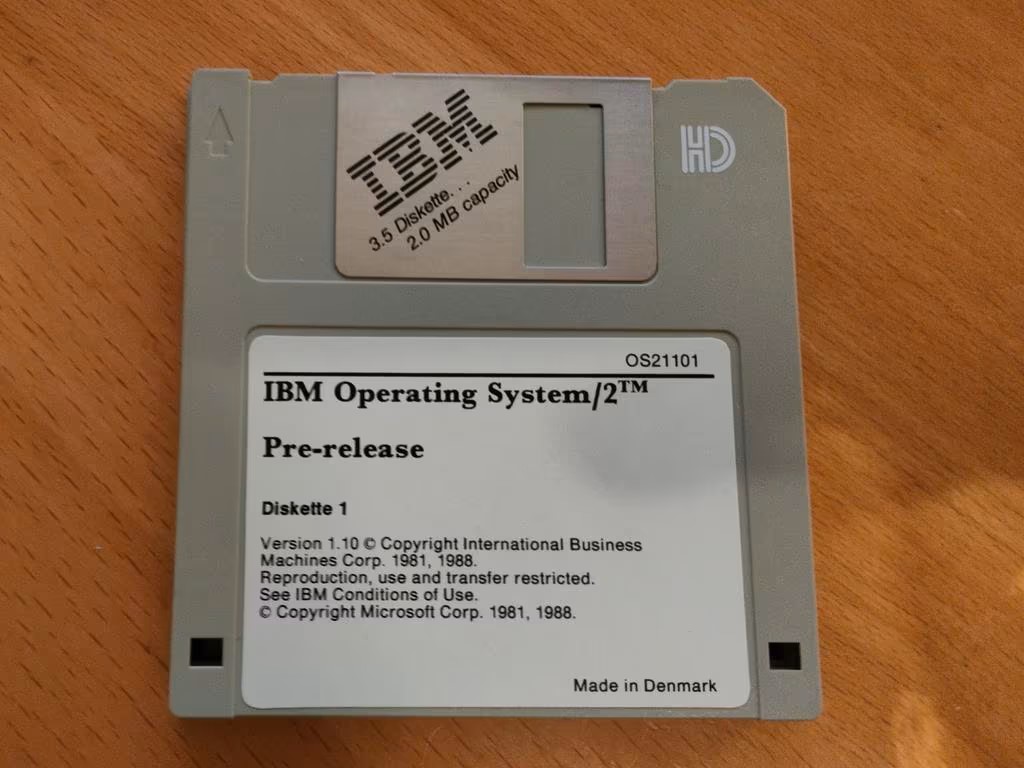
Another Pre-release of OS/2
IBM Operating System/2 Pre-release 1.10
In other exciting OS/2 news, I came across this previously un-dumped IBM Pre-Release of 1.10! It’s tagged for 08/08/88! No doubt very lucky for someone. The only mention I can find of this comes from Excel 2.2 for OS/2
B. Supported Releases of OS/2
-----------------------------
Microsoft Excel for OS/2 is compatible with OS/2 Versions 1.1 and 1.2.
If you are running an early release of IBM OS/2 Version 1.1, you should
verify that your copy of OS/2 supports Microsoft Excel for OS/2:

    1. Open an OS/2 full-screen command session.
    2. At the OS/2 command prompt, type SYSLEVEL and press ENTER.
    3. Check the number listed on the line "Current CSD Level."

Microsoft Excel for OS/2 requires a CSD Level of:
    *  WR2030 or higher for IBM OS/2 Standard Edition Version 1.1
    *  XR2030 or higher for IBM OS/2 Extended Edition Version 1.1

If your release does not support Microsoft Excel for OS/2, use the coupon
included with IBM OS/2 1.1 to order your Device Support Supplement, or
contact your IBM dealer to obtain the appropriate Corrective Service Disks.
Of course, good luck finding any updates for this OS from 1988.
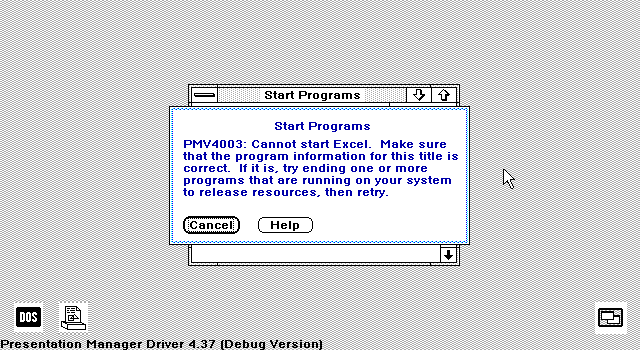
Presentation Manager Driver 4.37 (Debug)
It does look and feel pretty complete for a such an advanced beta. But was there any actual software for it? I have to wonder that given the note in Excel 2.2 was there a pre-release version Excel that was for this? Excel is dated 23/09/89, so maybe there was some fancy ‘executive demo’, with protected mode massive memory models? You have to think in that window prior to Windows 3.0 the spreadsheet pros would have demanded Excel on OS/2 (When did Lotus finally do 1-2-3?)
There must have been something that had to have been distributed with this Pre-release and I suspect it was more geared towards end users. But I’m just speculating.
Hobbes saved!
There has been so much noise about the OS/2 Hobbes archives being removed, that the community has not only mirrored it all over the place (It’s a tiny 18GB), but the search database has been transferred, and it’s now usable over at:
After seeing the spotlight on twitter from WinWorld, on NetManage Chameleon, an old TCP/IP stack that supported Windows 3.0! With more details over on the forum. I was inspired to set it up myself.
I did go a bit overboard showing how to install MS-DOS & Windows 3.0 on Qemu. Maybe it’ll help someone who wants to try to use Qemu, but is too scared? Maybe I moved too quickly.
One thing I did do differently in this run, is launching the monitor and a serial port as tcp servers so I could telnet into the VM, effectively having a way to share text like a clipboard back and forth. I’m kind of surprised I hadn’t really started using Qemu in this manner much earlier.
Long answer? Well depends on what you mean by run.
1.21 on 2.00 6.78
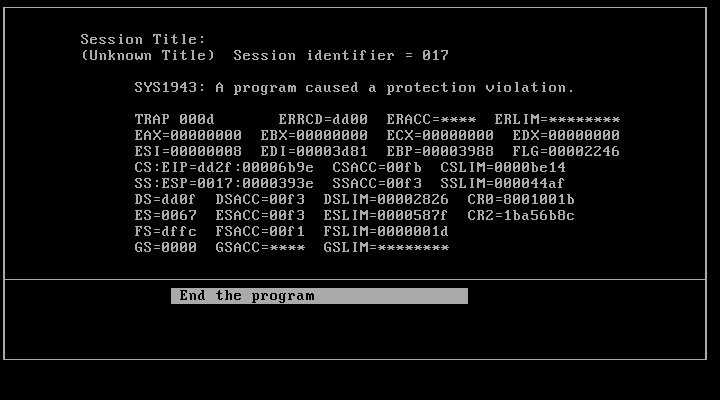
I did get the PM from OS/2 1.21 running on 6.78! But launching anything results in an immediate crash.
SYS1943:
OS/2 was not happy.
I did find that you can copy the BVH* video drivers from 1.21 onto 2.0 6.78, and OS/2 does boot. Perhaps the oddest thing is that with the 1.21 video drivers DOS sessions can launch windowed, and full screen, but OS/2 sessions only launch full screen. There is obviously at lot more hooked into the shell than just being a shell.
overwriting the following files from 6.78 result in a non-booting system:
pmwin
pmviop
pmshapi
pmgre
No matter how dysfunctional the system was replacing many of the DLL’s on 6.78 the pmspool always launched. I tried to substitute it from CMD but it just beeps like crazy. I tried other Presentation Manger applications, but they die immediately, leaving me with an empty desktop.
I suppose I’ll have to try other versions.
And trying to copy pmshell onto 2.00 GA results in a crash in the infamous SINGLEQ.
Has anyone else been able to mix Presentation Managers on OS/2?
This release marks the last time that Microsoft would release an OS/2 beta to developers, instead with the runaway success of Windows 3.0, Microsoft would remove resources from the constrained OS/2, and refocus both on Windows 3.1, and Windows NT.
Thanks to one of my Patrons – Brian Ledbetter, the much-sought Microsoft OS/2 2.0 Pre-Release 2 is now available! So obviously the first thing to do was to re-create the original magical screenshot.
One thing of note is that thanks to some of the metadata left at the end of the disks we know when this disk set was made:
$FTIME = Wed Jun 22 09:00:56 1988
$DTIME = Tue Aug 15 07:48:10 1989
$PCTIME = Thu Apr 27 11:51:54 1989
$FREV = Wed May 31 09:17:24 1989
$DUP TIME = Fri Jul 13 16:02:27 1990
Given that the PC Magazine issue was published in May of 1990, it showcased version 6.43, shipped to devs early January of 1990, and timestamped 20/12/1989. I would speculate that it’s the Pre-Release 1.
The OS/2 Software Development Kit
This Pre-Release 2 set was made in July with the files being timestamped 01/06/1990, so physical releases every 6 months? I guess that makes sense when you look at how many disks have to be duplicated, boxed up and sent out. It’s one big win for digital downloads, or how Windows 10/11 can background download updates, or even entire OS updates (that are more like new installs) today. Mailing big heavy boxes must have sucked. And dealing with lost/damaged disks. Also as you can see on the box, it only contains 5 1/4″ disks, they didn’t even ship dual media.
Maybe the large box is a reaction to the first Pre-Release’s 16 disks & a few photocopied sheets mere 10oz. Maybe people were displeased that they didn’t get much printed ‘bang’ for their $2,600 – the price of the 2.0 SDK.
The disks were dumped with Kyroflux, and on several of the disks there is extra trailing information on the disks revealing data from when they were manufactured:
This is *NOT* a comprehensive version of MS-DOS 4.0. Then again anything to do with disks, you should be using OS/2. It’s more so commands needed for working inside the virtual MS-DOS environment. And yes, it doesn’t include any basic.
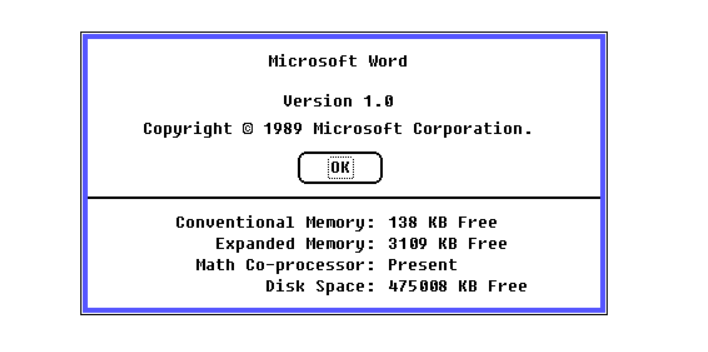
There is built in support for EMS, and there is an XMS driver, but it’s not activated by default. I didn’t bother trying Windows 3.0, but I did install Word for Windows, which has a runtime version of Windows 2.11
Windows 2.11 Runtime on OS/2
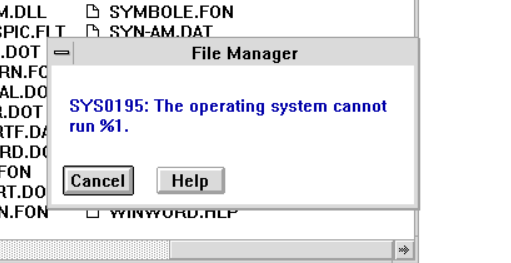
Trying to run the windows executable directly gives a weird error:
SYS0195: The operating system cannot run %1.
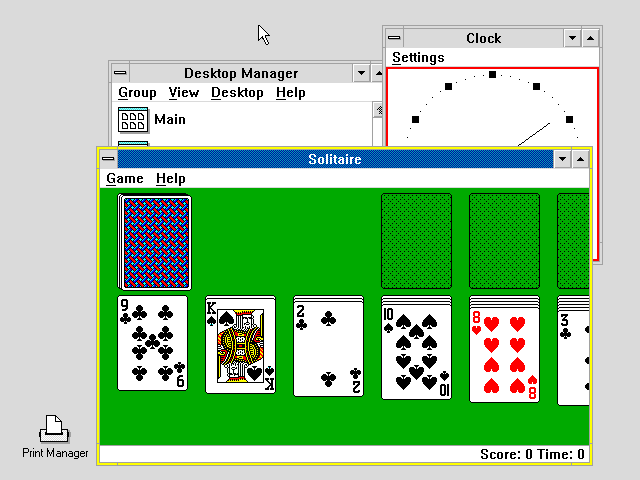
I went ahead and installed WLO, or the Windows Libraries for OS/2, and some things do run, and many more hang the system. I think its an issue in PM, and CAD (Control+Alt+Delete) does reboot the system.
WLO on Microsoft OS/2
It’s a shame Microsoft couldn’t get Windows as the UI to OS/2, it certainly would have had a far more viable lifetime. I’ve ranted about it before but IBM’s insistance of supporting the 286, releasing a $6,000 286 in 1987 basically ensured early OS/2 was facing the wrong direction technically, and by ignoring the existing Windows stack, it just delayed OS/2 being useful from the get-go.
Anyways…..
And running strings against the OS2KRNL reveals:
Copyright 1986 IBM Corp.
Internal revision 6.78, 90/05/09
I would imagine a lot of the v86 mode virtual device drivers came from Windows/386. But it looks like these were all written in C? Running strings against all the virtual device drivers reveals all C? I got zero hits for .asm
It’s not like any of this is ever going to see the light of day, but it’s all interesting, at least to me.
Let’s install!
Installing Microsoft OS/2 2.0 Beta on VMware
I’ll have to update where I had found this, if it was the electronic documentation, or the one time I got to go through the printed documentation that the Microsoft version was adding True Type Fonts. Sadly I can’t find any evidence in the binaries.
OS/2 System Monospace Fonts
OS/2 Courier Fonts, (c) Copyright 1988 Microsoft Corp., Portions Copyright 1985 Bitstream, Inc.
OS/2 Helvetica Fonts, (c) Copyright 1988 Microsoft Corp., Portions Copyright 1985 Bitstream, Inc.
OS/2 Times Roman Fonts, (c) Copyright 1988 Microsoft Corp., Portions Copyright 1985 Bitstream, Inc.

  "PM_Fonts"           "SYSMONO"            "C:\OS2\DLL\SYSMONO.FON"
  "PM_Fonts"           "COURIER"            "C:\OS2\DLL\COURIER.FON"
  "PM_Fonts"           "HELV"               "C:\OS2\DLL\HELV.FON"
  "PM_Fonts"           "TIMES"              "C:\OS2\DLL\TIMES.FON"
Well, that’s sad.
No VIO access from 32bit
As I had touched on earlier, These early OS/2’s have no user accessible way to call the legacy 16bit OS/2 API’s. At best you have simple text mode stuff, anything graphical, you need to port to Presentation Manager.
I was able to take the GCC port I did to OS/2 and re-link the objects ,and I was correct, it ran without any changes! I had compiled it using the December 1991 Windows NT Pre-Release’s CL386 compiler. So far so good.
I tried to use the 1991 compiler to build Sarien, and it instantly crashes. I also tried building everything but the Presentation Manager with GCC, and again instant crash. I was able to use the OS/2 2.1 v1.2 DDK, and get a working EXE, even using /Ox (maximum optimisations!). Clearly there is something fundamentally missing or I’m missing something fundamental.
While there is a HPFS installable filesystem, there is no CD-ROM IFS. Running strings against HPFS reveals this much when looking for C. There was no hits for .asm
execioh.c: calling strat2 with PIOH=%p
execioh.c: returned from strat2 with PIOH=%p
qdiskop.c: entered, ioh=%p lsnStrt=%lu csec=%u pbData=%p
unlckio.c:entered, pioh=%p
unlckio.c:retheaping lock handle %p
Even more strange, is that HPFS for OS/2 was still 16bit. I had hoped that even though this is a beta, that there would be a 32bit version of the filesystem. Sadly that kind of feature was reserved for Lan Server installs.
HPFS.IFS: MS-DOS executable, NE for OS/2 1.x (DLL or font)
Could you imagine shipping a 32bit filesystem to home/low/middle tier users today? Speaking of, let’s check the rest of the C:\OS2 binaries:
ANSI.EXE:     MS-DOS executable, NE for OS/2 1.x (EXE)
ATTRIB.EXE:   MS-DOS executable, NE for OS/2 1.x (EXE)
BACKUP.EXE:   MS-DOS executable, NE for OS/2 1.x (EXE)
CACHE.EXE:    MS-DOS executable, NE for OS/2 1.x (EXE)
CMD.EXE:      MS-DOS executable, NE for OS/2 1.x (EXE)
CREATEDD.EXE: MS-DOS executable, NE for OS/2 1.x (EXE)
E.EXE:        MS-DOS executable, NE for OS/2 1.x (EXE)
EAUTIL.EXE:   MS-DOS executable, NE for OS/2 1.x (EXE)
FDISKPM.EXE:  MS-DOS executable, NE for OS/2 1.x (EXE)
FIND.EXE:     MS-DOS executable, NE for OS/2 1.x (EXE)
HELPMSG.EXE:  MS-DOS executable, NE for OS/2 1.x (EXE)
MAKEINI.EXE:  MS-DOS executable, NE for OS/2 1.x (EXE)
MOVESPL.EXE:  MS-DOS executable, NE for OS/2 1.x (EXE)
PATCH.EXE:    MS-DOS executable, NE for OS/2 1.x (EXE)
PICICHG.EXE:  MS-DOS executable, NE for OS/2 1.x (EXE)
PICPRINT.EXE: MS-DOS executable, NE for OS/2 1.x (EXE)
PICSHOW.EXE:  MS-DOS executable, NE for OS/2 1.x (EXE)
PMCPL.EXE:    MS-DOS executable, LE executable
PMEXEC.EXE:   MS-DOS executable, LE executable
PMFILE.EXE:   MS-DOS executable, LE executable
PMSHELL.EXE:  MS-DOS executable, NE for OS/2 1.x (EXE)
PMSPOOL.EXE:  MS-DOS executable, LE executable
PSTAT.EXE:    MS-DOS executable, NE for OS/2 1.x (EXE)
REPLACE.EXE:  MS-DOS executable, NE for OS/2 1.x (EXE)
RESTORE.EXE:  MS-DOS executable, NE for OS/2 1.x (EXE)
SORT.EXE:     MS-DOS executable, NE for OS/2 1.x (EXE)
SPOOL.EXE:    MS-DOS executable, NE for OS/2 1.x (EXE)
SYSLOG.EXE:   MS-DOS executable, NE for OS/2 1.x (EXE)
TRACE.EXE:    MS-DOS executable, LE executable
TRACEFMT.EXE: MS-DOS executable, NE for OS/2 1.x (EXE)
UNPACK.EXE:   MS-DOS executable, NE for OS/2 1.x (EXE)
VIEW.EXE:     MS-DOS executable, NE for OS/2 1.x (EXE)
VIEWDOC.EXE:  MS-DOS executable, NE for OS/2 1.x (EXE)
XCOPY.EXE:    MS-DOS executable, NE for OS/2 1.x (EXE)
The vast majority of them are 16bit. The 32bit stuff is in the defunct LE format. This is why nothing from the GA (General Availability) versions will ever run on these betas, and why I was trying to make stuff available as linkable objects. And yes, my Sarien port is LE:
There is a LAN client disk set, so I guess you were expected to just go across the LAN.
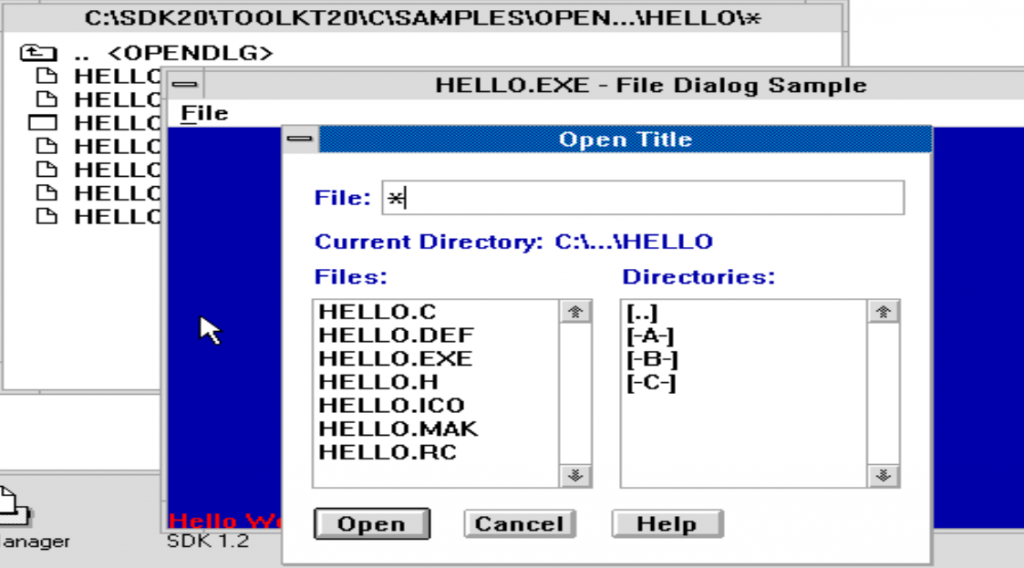
The SDK & Toolkit for this beta have been around for a substantial time. The big difference is that we now have binary compatibility so we can run ALL the examples, namely the Open Dialog demo.
Open Dialog
We take this kind of thing for granted today, common controls, but back in the early 1990’s this was a surprisingly lacking from many UI’s of the time. Since these beta DLL’s use a different format, this won’t run on the later betas, let alone the release. So, this is for those looking for secret hidden stuff.
Is it usable though? Well if your workload is OS/2 applications, ABSOLUTELY. If you want to do cute stuff on MS-DOS.. It’s all YMMV, but traditional apps seem to behave pretty well.
It’s a shame for some reason that overall, these early OS/2 2.0 betas were not all that wide spread, as they are just so interesting! And compared to the GA version of OS/2 2.0 these ancient versions with the 1.x Presentation Manager do feel a lot faster. Sometimes I miss the Workplace Shell, Other times I miss the old terrible Desktop Manager with its incredible simplification.
For those just wanting to mess with the Operating System, it really is a developer’s release so it’s pretty spartan. Sadly there is no XGA drivers in these early betas, there is 8514/a support but I had no luck with it. I suspect it’s probably something I had done wrong. I should also point out, if you are using 86Box, and are using a 486DX/Pentium be sure to enable the softfloat option.
FPU passthru gives major issues with MS-DOS under OS/2
Maybe a math co-processor really was a hidden requirement of these early OS/2 betas? So, perhaps more confirmation that buying an 80387 was NOT a waste of money. I should also add that when trying to compile PHOON, I did have to use /FPi87 or inline 8087 instructions, otherwise instant crash. I had thought it was a mixed FPU mode crashing the linking of GCC+MSC code but I tried a few combinations, none of them worked.
Once more again, I want to thank my Patrons for making this possible, and a big thanks to Brian Ledbetter for being so kind to preserve this incredibly rare, and historically significant software kit.
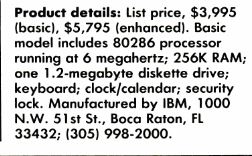
Don’t get me wrong, it’s a very 1980’s awesome machine. Aesthetically. But practically? No way, it’s a legit white elephant. And it killed OS/2 before it even became a thing. I know what about the JDA, and IBM interference? What about the poor choice of the 80286 processor? What about DOS Extenders? YES it’s all there, Half an Operating System, for Half a computer, the real reason OS/2 failed, and it’s wrapped up in a 20 x 8 x 18 inches package weighing in at 40 pounds.
Behold the IBM PS/2 model 60.
The PS/2 model 60 from the OS/2 1.0 brochure
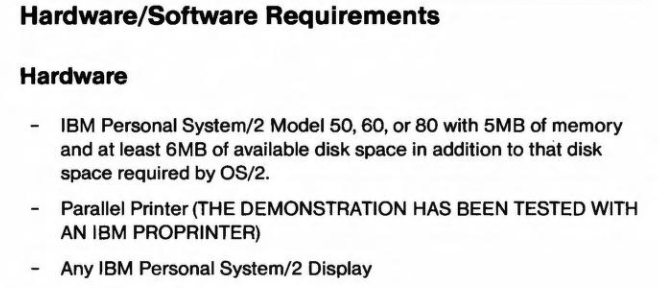
The base model PS/2 60 with the 44Mb hard disk was priced at an eye watering $5,925 in 1987. And to be clear that is with only has ONE megabyte of RAM which is nowhere near enough to even boot OS/2. Realistically, you would need the additional memory card, and another 4MB of RAM, raising the price far higher, as stated in the requirements for the sales demonstration of OS/2.
The realistic OS/2 requirements, 5MB of RAM!
The 77Mb disk system would set you back $6,295, again not counting the needed memory upgrades.
It’s BIG, loud, expensive, and more importantly obsolete on day one.
Going back, to the original success of the IBM PC and it’s open architecture lead to the one big issue, which is that it was trivial for people to clone, as they published everything you’d want to know in their technical reference manuals. The one thing that was copywrite was the BIOS. However as I’m sure everyone heard the story of how Columbia Data Products released the MPC 1600, which set the gold standard on reverse engineering, but opened the floodgates to bigger players like Compaq, and ushered in the clone revolution.
IBM was obviously not happy with this. IBM always looked to hardware for money, and IBM build quality, and of course that lead us to the PS/2. There is no way they could have developed this in the space of a year, which again if it took 2-3 years to bring them to market, it would explain so many of the missteps of the Model 30 which both had an ISA bus, and had either an 8086 or 80286 processor. This may have been okay for 1985, but they were far too old & slow for 1987. Many people have cited that part of the PS/2 revolution was the new bus on the model 60/80 Microchannel which unlike ISA had to be licensed from IBM, but of course it didn’t catch on, instead it gave confidence to the industry to not only set out on their own 386 machines, but then their own 32bit bus EISA. Yet another reason the 8086/80286 machines should never had existed.
$5,795 MSRP for the IBM AT – InfoWorld 3 Dec 1984
Looking back to December of 1984 we can see the MSRP for the 6Mhz IBM AT was $5,795, the AT model 099 included a whopping 20MB hard disk, a single high density 1.2MB 5 1/4″ floppy drive, and 512kb of RAM. Now jump forward a few years, and every clone manufacturer has benefited from economies of scale as the commodity parts increase of demand and sourcing has only led to lower prices. Except for IBM. While the Model 60 does have twice the RAM going up to a base configuration of 1 megabyte, and a 44MB hard disk, the price is $6,995 or a 20% price increase!
What lead to this massive stagnation from 1985 to 1987? I’m sure it has almost everything to do with Don Estridge’s untimely death in 1985. I can’t imagine IBM releasing an XT years later with the same design language as the new ‘powerful’ machines, no doubt just fooling consumers into thinking they are ready for the 1990’s when instead, it’s a product more akin to 1982.
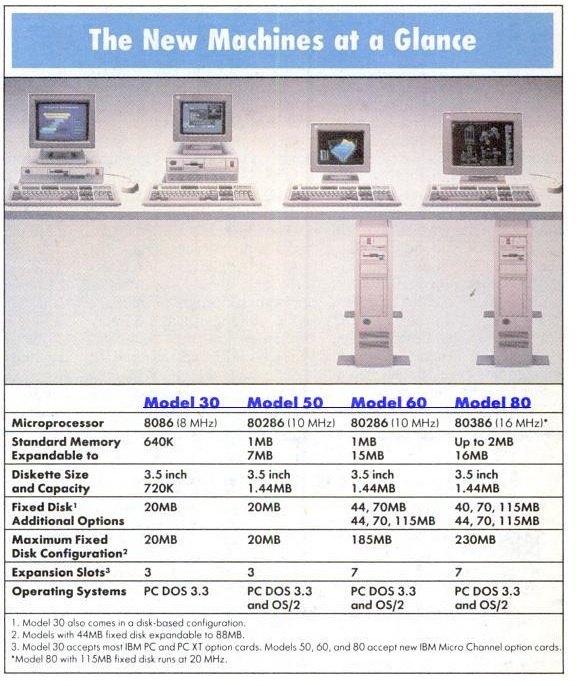
IBM PS/2 models at a glance – InfoWorld 6 Apr 1987
From Infoworld 1988:
On the one hand, IBM has shipped nearly 2 million PS/2s in the year since the machines were introduced. The Model 50 is currently the best-selling microcomputer in the industry a position it has held since November 1987, according to market research firm Store-board Inc. What makes these figures even more significant, say analysts, is that many of the alleged benefits of the PS/2 have yet to be fully exploited.
Although there was certainly an initial corporate interest in the PS/2’s IBM did not keep up with faster Intel CPUs quick enough and failed to keep up interest in the base models, leading to significant price cuts in the spring of 1988.
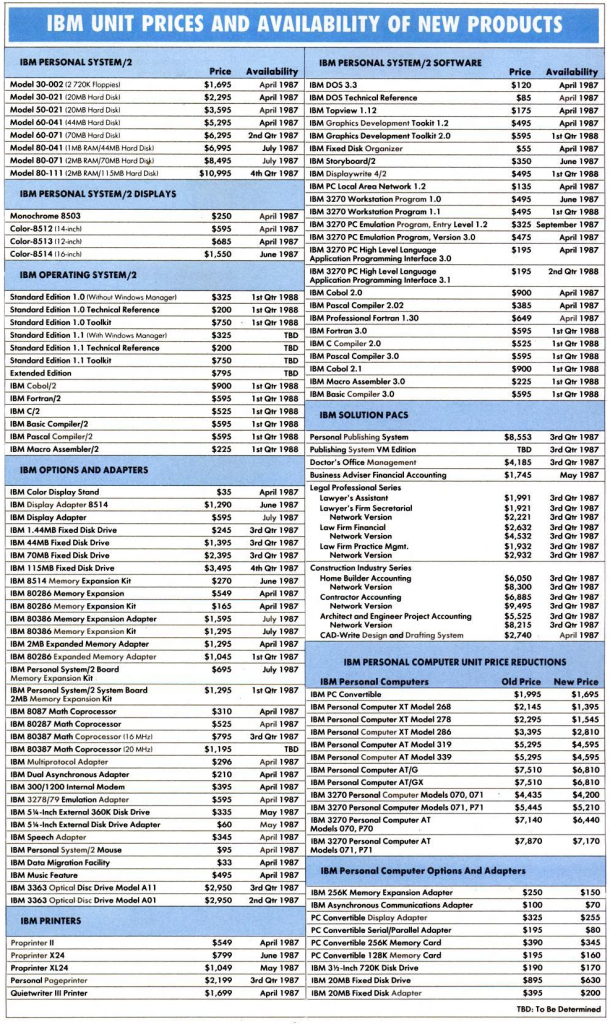
Drastic price cuts – InfoWorld 18 Apr 1988
Time and time again you’ll hear how there was no software poised to take charge of these 286/386 models, and there was no compelling reason to do so. And it’s why it was such a big mistake to not have allowed Microsoft to being GDI to OS/2 along with it’s working drivers & applications to have shortened development time to get them to market. By shipping these expensive premium machines without OS/2 (normal users don’t change operating systems), and the double slap insult being that none of these machines are capable out of the box of running *any* version of OS/2 it’s not hard to see why it failed.
Okay so the PS/2 was too expensive!
Actually, it was too cheap! They should have not bothered with the new look XTs it only created branding confusion, and really all 286/386 equipped models should have been able to run OS/2, with no upgrades needed. I can’t imagine anyone would be happy after spending six plus thousand on a new machine to only find out that to run the OS of the future, you need to spend a few more thousand.
Windows was irrelevant in 1987!
There is no doubt that being able to run Windows applications natively on OS/2 would have only helped it tremendously, as OS/2 would be the ‘professional’ version of Windows. Although OS/2 did achieve this through paravirtualization, having GDI/USER native to OS/2 would have consumed far less ram as you wouldn’t need to load two windowing environments at once!
While Balance of Power may not have been the #1 chart topper, it was one of the first commercial games for Windows (Maybe it was the first?), showing that instead of developing UI code & drivers, that even a run-time platform was a viable choice.
v86 mode was too difficult and it delayed OS/2 2.0 for years!
What if I told you that there is FOOTBALL & PIGSKIN? Granted they are text mode, but they absolutely incorporate v86 mode into what is basically OS/2 1.0. In 1987. Why was there no OS2/386? Yeah. IBM.
Instead, all the 1.x versions of OS/2 had a SINGLE MS-DOS box, or penalty box, even the 386 has the single DOS session limitation. So if your work flow was stuck to a single DOS session what compelling reason would there be to upgrade to OS/2? NONE. Speaking of 1987 however there was Windows/386 towards the end of the year.
Windows/386, is the friendliest glance into today’s future (Think of it as a graphical hypervisor, like VMware/KVM). Windows was the one environment where Microsoft didn’t need IBM’s permission to do anything, or adhere to any other standards, Microsoft added v86 support into Windows, and it brought mainframe power to the average user, by allowing them to create virtual machines running their own isolated MS-DOS applications, and even allowing copy/paste of data from between them, and into new Windows applications. While Windows 2 was a shadow of what would become the Windows 3.0 juggernaut of 1990, it was quickly headed in the right direction.
What is it with the 386 anyways?
And why were they so adverse to the 386? the 1st gen Model 80 motherboard feels more like a begrudging reaction to Compaq rather than what it should have been by the time they released the 3rd – 25Mhz version, with onboard cache controller & ram. Beyond v86 mode, there was the large memory space, and 32bit registers making it possible to port minicomputer (and even mainframe) programs to the PC. Was this desktop future too scary for IBM? Did they really thing that by refusing to adopt the 386 that they could somehow influence the rest of the market to not being 32bit computing to the masses? Even in the early 80’s there was the Definicon, a NS32016 cpu board you could plug into your IBM PC and unleash a programmable 32bit processor with upwards of 2MB of RAM. If IBM was not going to make a 32bit computer, others would find a way, utilizing the ever-increasing supply of open PC hardware.
As far as I can tell IBM didn’t even permit Windows/386 or any version of Windows to be bundled or shipped with the PS/2’s further alienating them from the growing market of software. And of course, by not increasing the RAM the pre-loaded operating system was still PC-DOS, not OS/2. It really shakes confidence when IBM won’t even preload their jointly developed Operating System of the future.
Then along came Windows.
While Windows 3.0 was fine enough running in 16bit protected mode on both the 286 & 386, having the ability to launch v86 machines, and take advantage of hardware paging of the 386 on Windows 3.0. At least you were 2/3rds of the chip’s capabilities, unlike OS/2 1.x where you used none.
There is money in those developer hills!
Time and time again, this has been one of the industry’s biggest failings. Just as IBM charged a fortune for SDK’s and DDKs all it did was raise the bar so high very few people paid for them, strangling the supply of apps & drivers.
InfoWorld 6 Apr 1987
While the PS/2’s were very expandable, it seems outside of collectors, very few are. Which again speaks to why it was so important to get that initial pre-loaded configuration right. And you control that with the pre-load, just as Apple forced the wedge by first loading OS X onto machines, then making it the default. At best with Warp IBM pre-loaded it on many devices, but users were oblivious that it was even there. It was more than once I’d seen someone buy a retail copy of Warp, to run this OS/2 thing to only find out their ThinkPad already had a copy.
$3,000 a bargain!
The prices to get started with technical information, the toolkit and a compiler may seem expensive, but compared to the infamous $3,000 SDK & seminars.
Instead, developers should have been given copies for free, or even back then, on the MSPL. While the Microsoft Programmer’s Library is an invaluable resource, the lack of tools is just odd. Why even have slack space on those early CD-ROMs?
No doubt all the painful lessons were learned from OS/2 for Windows. Just as Windows NT ended up being everything NTOS/2 3.0 was going to be.
So yeah, really it was the PS/2 Model 60?
Bringing out a super expensive 16bit machine in 1987, holding Microsoft back in every technical way possible, along with all the poor choices revolving around IBM’s fear of the 386, and the 32bit future doomed OS/2 before it even began.
At best the 8086/80286 machines should have been cheap machines for MS-DOS present, but again the outlier is the PS/2 Model 60. Far too expensive with no real compelling reason to buy one – Don’t get me wrong I love mine! But it’s incredibly impractical.
If anything, once more again, OS/2 1.x should never been a thing, it performs terribly on 286’sand the single 3xdos session is just painful. With its heavy requirements, it always should have been targeting the 386, and the brave future of 1987 onwards, not 1984, and certainly not the PS/2 model 60, which never should have existed.
Hamstringing OS/2 to the $6,995 PS/2 model 60 in 1987 doomed it all from the start. It never stood a chance.
Originally with all the buildup of compilers & GCC ports to OS/2, I had a small goal of getting Sarien running on OS/2. I did have it running on both a 286 & 386 DOS Extender, so the code should work fine, right?
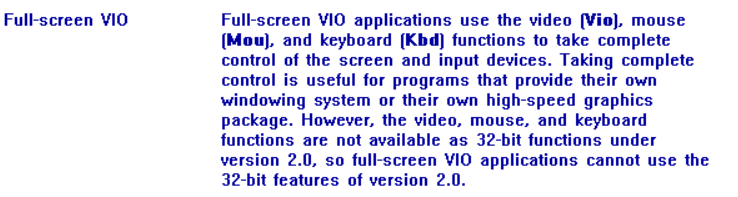
To recap, years ago I had done a QuakeWorld port to OS/2 using the full screen VIO mode, a legacy hangover from 16bit OS/2. It works GREAT on the released 2.00 GA version. I went through the motion of getting the thunking from 32bit mode to 16bit mode, to find out that it doesn’t exist in the betas!
No VIO access from 32bit
So that meant I was going to have to break down and do something with Presentation Manager.
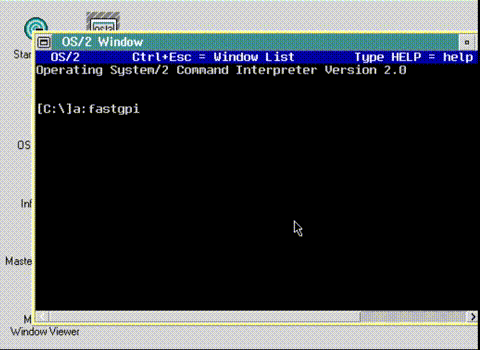
So the first thing I needed was a program I could basically uplift into what I needed, and I found it through FastGPI.
Donald Graft’s FastGPI
While it was originally built with GCC, I had rebuilt it using Visual C++ 2003 for the math, and the Windows NT 1991 compiler for the front-end. As you can see it works just fine. While I’m not a graphical programmer by any stretch, the source did have some promise in that it creates a bitmap in memory, alters it a runtime, and blits (fast binary copy) it to the Display window. Just what I need!
  for (y = 0; y < NUM_MASSES_Y; y++)
  {
    for (x = 0; x < NUM_MASSES_X; x++)
    {
      disp_val = ((int) current[x][y] + 16);
      if (disp_val > 32) disp_val = 32;
      else if (disp_val < 0) disp_val = 0;
      Bitmap[y*NUM_MASSES_X+x] = RGBmap[disp_val];
    }
  }
It goes through the X/Y coordinate plane of the calculated values, and stores them as an RGB mapping into the bitmap. Seems simple enough right?
  DosRequestMutexSem(hmtxLock, SEM_INDEFINITE_WAIT);

  /* This is the key to the speed. Instead of doing a GPI call to set the
     color and a GPI call to set the pixel for EACH pixel, we get by
     with only two GPI calls. */
  GpiSetBitmapBits(hpsMemory, 0L, (LONG) (NUM_MASSES_Y-2), &Bitmap[0], pbmi);
  GpiBitBlt(hps, hpsMemory, 3L, aptl, ROP_SRCCOPY, BBO_AND);

  DosReleaseMutexSem(hmtxLock);
It then locks the screen memory, and then sets up the copy & uses the magical GpiBitBlt to copy it to the video memory, then releases the lock. This all looks like something I can totally use!
I then have it call the old ‘main’ procedure form Sarien as a thread, and have it source the image from the Sarien temporary screen buffer
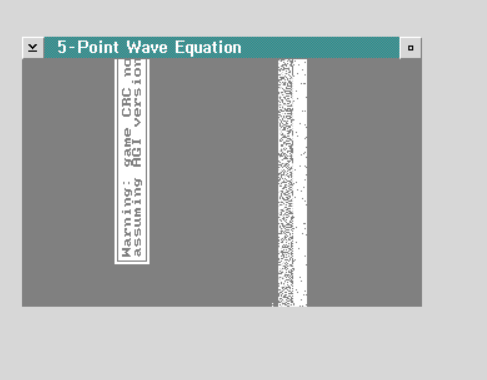
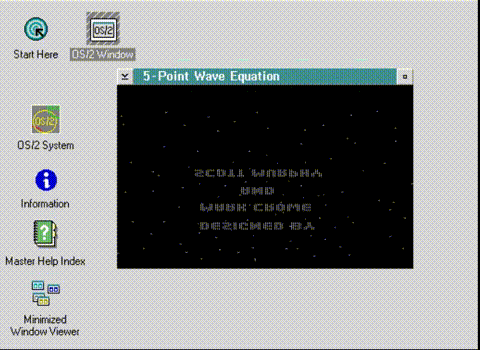
And WOW it did something! I of course, have no keyboard, so can’t hit enter, and I screwed up the coordinates. I turned off the keyboard read, flipped the X/Y and was greeted with this!
Welcome to OS/2 where the memory is the total opposite of what you expect.
And it’s backwards. And upside down. But it clearly is rendering into FastGPI’s gray palette! I have to admit I was really shocked it was running! At this point there is no timer, so it runs at full speed (I’m using Qemu 0.80 which is very fast) and even if there was keyboard input it’d be totally unplayable in this reversed/reversed state.
The first thing to do is to flip the display. I tried messing with how the bitmap was stored, but it had no effect. Instead, I had to think about how to draw it backwards in RAM.
  {
    for (x = 0; x < NUM_MASSES_X; x++)
    {
      disp_val = ((int) screen_buffer[y*NUM_MASSES_X+x] );	//+ 16);
      if (disp_val > 32) disp_val = 32;
      else if (disp_val < 0) disp_val = 0;
      Bitmap[((NUM_MASSES_Y-y)*(NUM_MASSES_X))-(NUM_MASSES_X-x)] = RGBmap[disp_val];
    }
  }
Running in the correct orientation
Now comes the next fun part, colour.
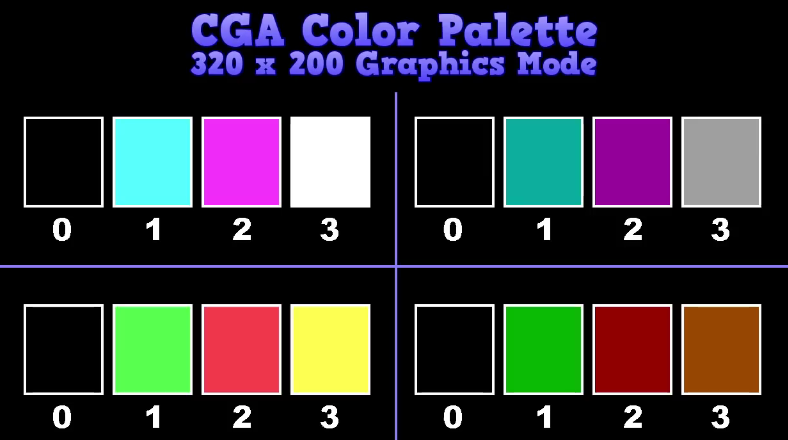
I had made the decision that since I want to target as many of the OS/2 2.0 betas as possible they will be running at best in 16 colour mode, so I’ll stick to the CGA 4 colour modes. So the first thing I need is to find out what the RGB values CGA can display.
So now it’s looking right but there is no timer so on modern machines via emulation it runs at warp speed. And that’s where OS/2 shows its origins is that it’s timer ticks about every 32ms, so having a high resolution timer is basically out of the question. There may have been options later one, but those most definitively will not be an option for early betas. I thought I could do a simple thread that counts and sleeps, as hooking events and alarms again suffer from the 32ms tick resolution problem so maybe a sleeping thread is good enough.
And it crashed. Turns out that I wasn’t doing the threads correctly and was blowing their stack. And somehow the linker definition file from FastGPI kept sneaking back in, lowering the stack as well.
The next big challenge came of course from the keyboard. And I really struggled here as finding solid documentation on how to do this is not easy to come by. Both Bing/google want to suggest articles about OS/2 and why it failed (hint it’s the PS/2 model 60), but nothing much on actually being useful about it.
Eventually through a lot of trial and error, well a lot of errors I had worked uppon this:
    case WM_CHAR:
      if (SHORT1FROMMP(parm1) & KC_KEYUP)
        break;
pm_keypress=1;
      switch (SHORT1FROMMP(parm1))
      {
      	case VK_LEFT:
	key_from=KEY_LEFT;
	break;
	case VK_RIGHT:
	key_from=KEY_RIGHT;
	break;
	case VK_UP:
	key_from=KEY_UP;
	break;
	case VK_DOWN:
	key_from=KEY_DOWN;
	break;

	case KC_VIRTUALKEY:
	default:
	key_from=SHORT1FROMMP(parm2);
	break;
      }
I had cheated and just introduced 2 new variables, key_from, pm_keypress to signal a key had been pressed and which key it was. I had issues mapping certain keys so it was easier to just manually map the VK_ mapping from OS/2 into the KEY_ for Sarien. So it triggers only on single key down events, and handles only one at a time. So for fast typers this sucks, but I didn’t want to introduce more mutexes, more locking and queues or DIY circular buffers. I’m at the KISS stage still.
I’m not sure why it was dropping letters, I would hit ‘d’ all I wanted and it never showed up. I then recompiled the entire thing and with the arrow keys now mapped I could actually move!
Roger walks for the first time!
And just like that, Roger Wilco now walks.
From there I added the savegame fixes I did for the 286/386 versions, along with trying to not paint every frame with a simple frame skip and…
Sarien for OS/2 running at 16Mhz
And it’s basically unplayable on my PS/2 model 80. Even with the 32bit XGA-2 video card.
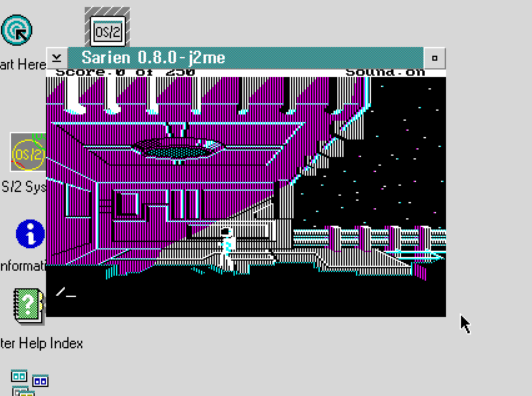
I had to give it a shot under 86Box, to try the CGA/EGA versions:
CGA
It’s weird how the image distorts! Although the black and white mapping seems to work fine.
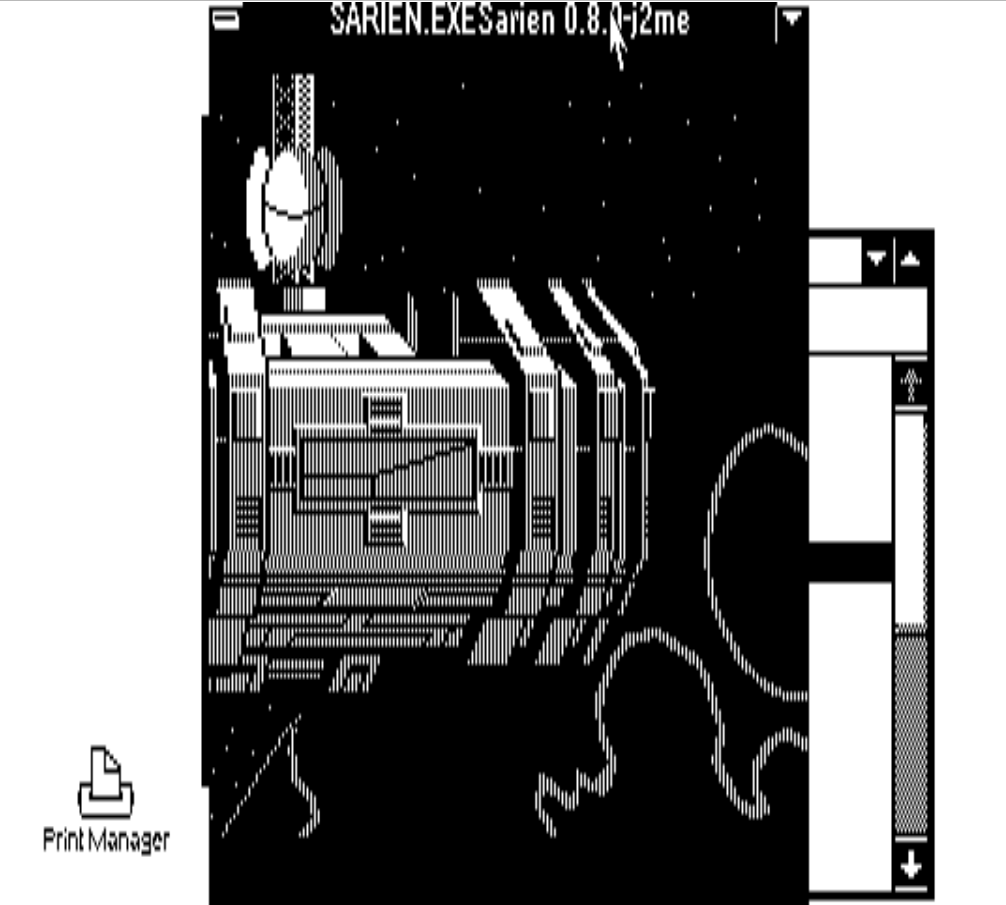
Sarien on EGA
I should also point out that the CGA/EGA versions are running on OS/2 2.0 Beta 6.123, which currently is the oldest beta I can get a-hold of. So at the least I did reach my goal of having a 32bit version for early OS/2.
I would imagine it running okay on any type of Pentium system, however. So, what would the advantage of this, vs just running the original game in a dos box? Well, it is a native 32bit app. This is the future that was being sold to us back in 1990. I’m sure the native assembly that Sierra used was far more efficient and would have made more sense to just be a full screened 16bit VIO application.
So how long did it take to get from there to here? Shockingly not that much time, — 02/20/2024 6:02 PM for running FastGPI, to — 02/20/2024 10:56 PM For the first image being displayed in Presentation Manager, and finally — 02/21/2024 10:39 PM to when I was first able to walk. As you can see, that is NOT a lot of time. Granted I have a substantially faster machine today than what I’d have in 1990 (I didn’t get a 286 until late 91? early 92?), compiling Sarien on the PS/2 takes 30-40 minutes and that’s with the ultra-fast BlueSCSI, compared to even using MS-DOS Player I can get a build in about a minute without even compiling in parallel.
I think the best way to distribute this is in object form, so I’ve created both a zip & disk image containing the source & objects, so you can link natively on your machine, just copy the contents of the floppy somewhere and just run ‘build.cmd’ which will invoke the system linker, LINK386 to do it’s job. I have put both the libc & os2386 libraries on the disk so it should just work about everywhere. Or it did for me!
So that’s my quick story over the last few days working on & off on this simple port of Sarien to OS/2 Presentation Manager. As always, I want to give thanks to my Patrons!
So, with a renewed interest in OS/2 betas, I’d been getting stuff into the direction of doing some full screen video. I’d copied and pasted stuff before and gotten QuakeWorld running, and I was looking forward to this challenge. The whole thing hinges on the VIO calls in OS/2 like VioScrLock, VioGetPhysBuf, VioScrUnLock etc etc. I found a nifty sample program Q59837 which shows how to map into the MDA card’s text RAM and clear it.
It’s a 16bit program, but first I got it to run on EMX with just a few minor changes, like removing far pointers. Great. But I wanted to build it with my cl386 experiments and that went off the edge. First there are some very slick macros, and Microsoft C just can’t deal with them. Fine I’ll use GCC. Then I had to get emximpl working so I could build an import library for VIO calls. I exported the assembly from GCC, and mangled it enough to where I could link it with the old Microsoft linker, and things were looking good! I could clear the video buffer on OS/2 2.00 GA.
Now why was it working? What is a THUNK? Well it turns out in the early OS/2 2.0 development, they were going to cut loose all the funky text mode video, keyboard & mouse support and go all in on the graphical Presentation Manager.
Presentation Manager from OS/2 6.605
Instead, they were going to leave that old stuff in the past, and 16bit only for keeping some backwards compatibility. And the only way a 32bit program can use those old 16bit API’s for video/keyboard/mouse (etc) is to call from 32bit mode into 16bit mode, then copy that data out of 16bit mode into 32bit mode. This round trip is called thunking, and well this sets up where it all goes wrong.
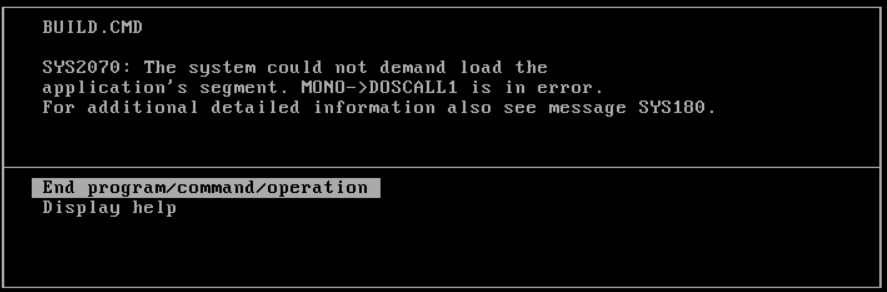
Then I tried one of the earlier PM looking betas 6.605, and quickly it crashed!
SYS2070:
Well this was weird. Obviously, I wanted to display help
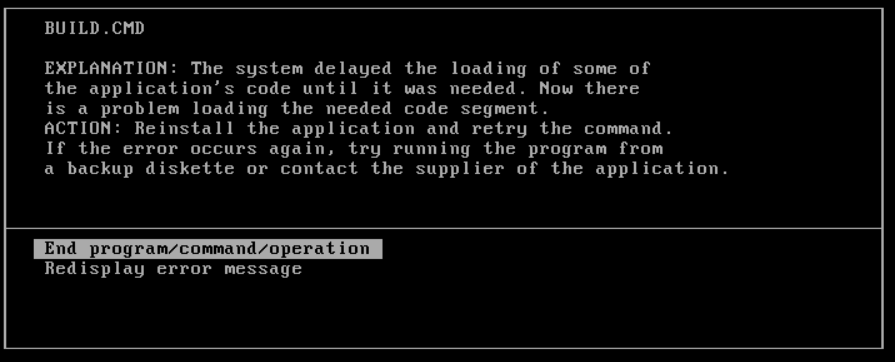
Explanation:
This ended up being a long winded way of saying that there is missing calls from DOSCALL1.DLL. Looking through all the EMX thunking code, I came to the low level assembly, that actually implemented the thunking.
EXTRN   DosFlatToSel:PROC
EXTRN   DosSelToFlat:PROC
After looking at the doscalls import library, sure enough they just don’t exist. I did the most unspeakable thing and looked at the online help for guidance:
No VIO
So it turns out that in the early beta phase, there was no support for any of the 16bit IO from 32bit mode. There was no thunking at all. You were actually expected to use Presentation Manager.
YUCK
For anyone crazy enough to care, I uploaded this onto github Q59837-mono
It did work on the GA however so I guess I’m still on track there.
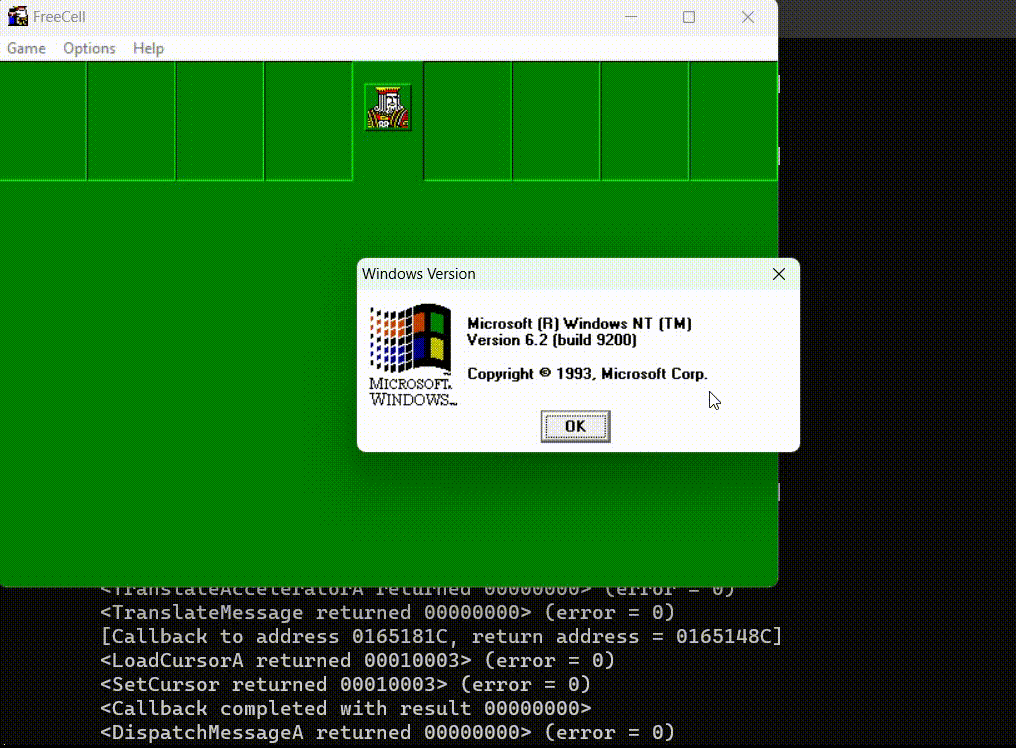
Hello, everyone. This is a continuation of my previous blogpost on EmuWoW (formerly win32emu) found here, but to summarize, I’m the 18-year-old developer behind a project that allows running applications compiled for the MIPS/Alpha version of Windows NT on standard x86 PCs through emulation, but without requiring a full system emulator. Since that last post, the project has made some substantial strides.
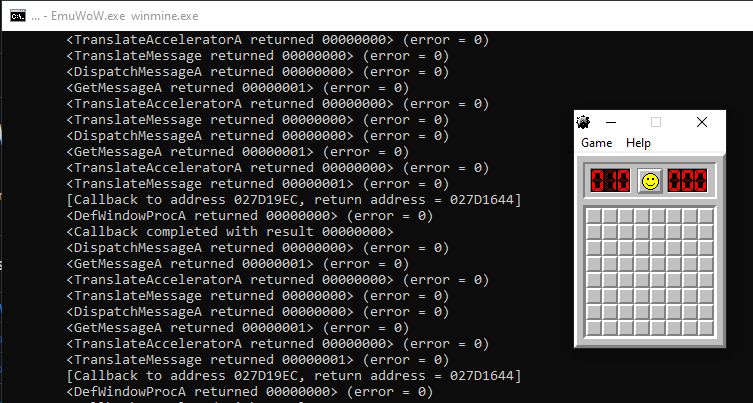
Since then, I’ve adapted the MIPS emulator from MAME, which is both more accurate and faster than my own (writing my own was a fun exercise but to the end of running applications, borrowing an emulator was a better decision). This alone enabled WinMine to function, which can be seen below.
Winmine for MIPS!
Around the same time, another VirtuallyFun member named x86matthew entered the scene. His prior credits include a similar project, for Win16. He was inspired by the initial win32emu blog post, created his own similar project called WoWMIPS, which quickly started running a few simple apps, such as WinMine, Solitaire, and Notepad. Be sure to check out WoWMIPS – MIPS Emulator for Windows, Part 1: Introduction, and parts 2,3,4,5,6!
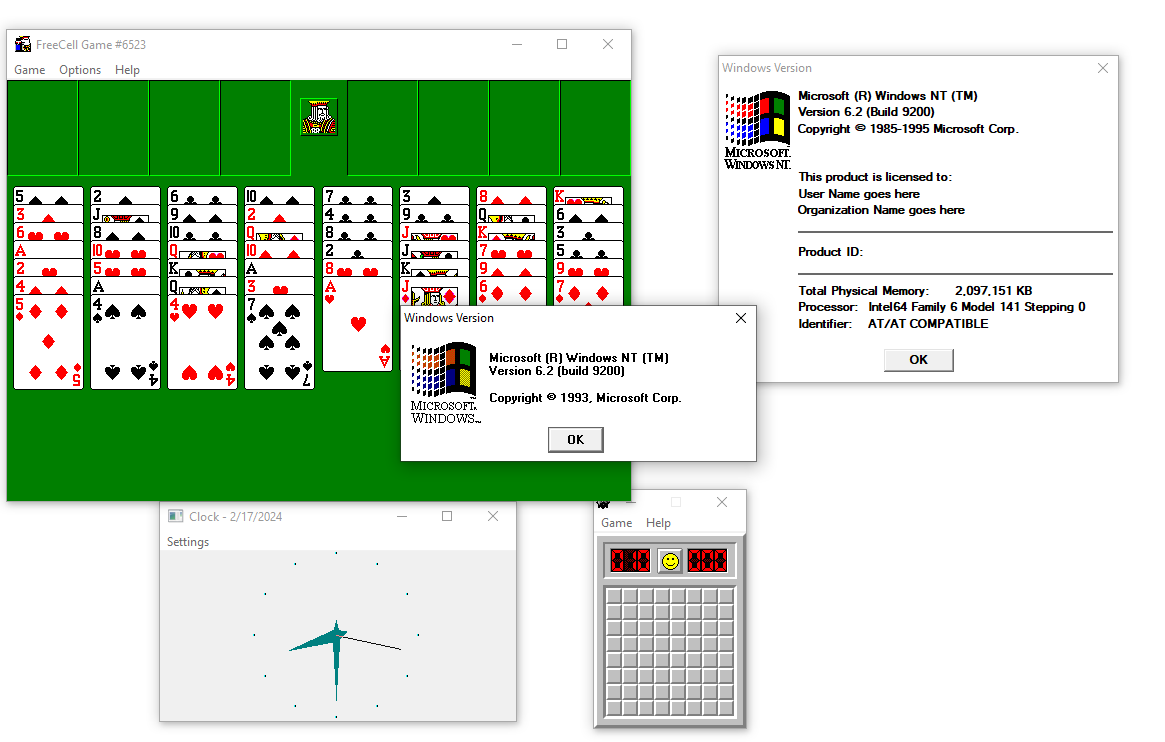
This had actually been what I was hoping for from the beginning; I always saw win32emu as a proof of concept for a smarter person (either myself in the future or someone else altogether) to come back later and do it better, and this is a massive undertaking for a single individual. What makes x86matthew’s WoWMIPS so incredible is its clean design. For one, there’s no thunk DLLs required. When an application tries to import a DLL, the host x86 DLL is first loaded, and then any attempts to get the address of an exported procedure from it are then redirected to an auto-generated stub of MIPS code which invokes the emulator to call the function. In other words, the thunk DLLs are generated at load time. Additionally, there’s no window procedure thunks required either. Instead, MIPS code pages are marked as non-executable, causing an access violation when Windows attempts to call them. Using an exception handler implemented via Windows XP’s Vectored Exception Handling feature, one can detect this and then invoke the emulator to execute the callback. Storing the CPU state in thread-local-storage allowed proper support for multithreading. I duplicated these design choices into EmuWoW, and the results largely speak for themselves. Unlike WoWMIPS (at time of writing), EmuWoW is still capable of loading MIPS DLLs (and will prefer to do so if possible), however.
Various MIPS Windows NT applications running
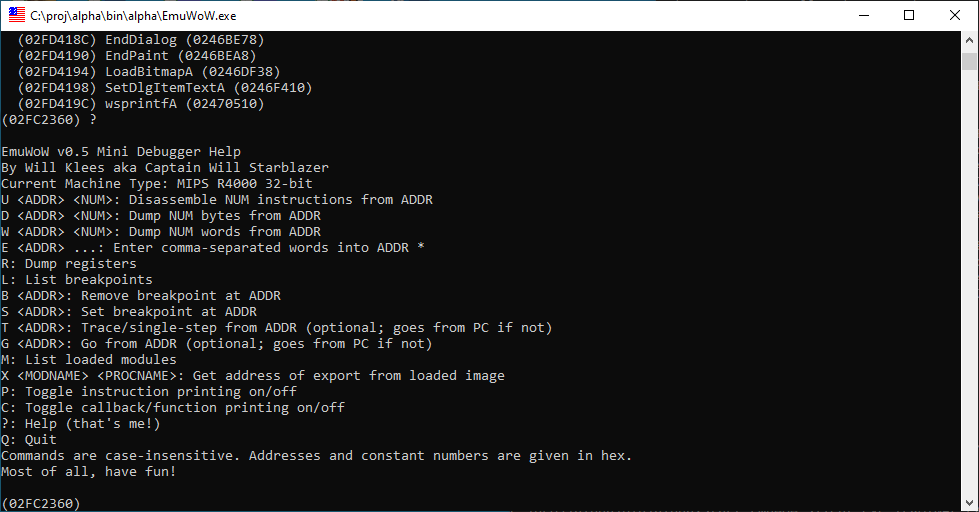
To aid the process of fixing faults in the emulator, I hacked up a quick, minimal debugger into EmuWoW. First of all, there’s a “crash screen” which will indicate the type of error and dump registers and the current instruction if there’s a fault, and a running disassembly can be printed as you go, but most crucially, there’s a limited degree of interactive debugging functionality.
The built in debugger to EmuWow
The main capabilities contained herein are dumping registers and memory to the screen, disassembling regions of memory, listing loaded modules, getting import entry points, setting breakpoints, and single-stepping, along with printing functions. It’s no gdb (especially for the lack of PDB symbol support), but it’s something.
MIPS is all well and good, however, but we can already emulate Windows NT for MIPS. MIPS is a fairly clean, simple architecture, often used for teaching, and short of weirdness like delay slots, is dead simple to emulate. And it fits the bill for what I’m trying to do here – a RISC architecture Microsoft abandoned, fixed-length 32-bit instructions, the works. However, adding support for the DEC Alpha AXP will finally get this project to where it was intended to be from the beginning, and I hope for it to eventually be able to run the Visual C++ compiler toolchain under EmuWoW. Being able to compile (and even test!) Alpha apps on readily available modern PCs will be a game-changer, and I intentionally wrote EmuWoW to be CPU-agnostic, so adding rudimentary support for the Alpha wasn’t difficult. Like with MIPS, I lifted the emulator from MAME. This admittedly did pose some challenges, due to MAME’s use of C++ features such as
Classes (which I had to substitute for passing pointers to structs)
Templates (which I had to substitute for macros)
Function-style casts (which I had to change into C-style casts)
There was a lot of weirdness in how Alpha function calls, but it was my misunderstanding of the calling convention, and when to consider values to be 32-bit vs 64-bit posed a modest issue, but I got it to the point where some very simple DEC Alpha programs started to run, though many of them have various issues.
Various Dec Alpha Windows NT applications running
This is the first time this has ever been possible; emulation of AXP NT programs on standard PCs has just become possible now. I’m hoping to see EmuWoW continue to evolve, and I welcome contributions, whether that be improving support for the CPUs I already have, adding support for another (such as PowerPC) or anything else. To take a look at the code, go to github.com/bhty/emuwow and to download EmuWoW and try it out for yourself, click here.
From cracyc and roytam’s fork, I have incorporated a correction. These include file access using FCB and fixing exceptions around the FPU of the MAME version of the i386 core. In addition, the DAA/DAS/AAA/AAS/AAM/AAD instructions of the MAME version of the i386 core have been modified based on the DOSBox implementation. With the Pentium 4 version, the testi386.exe is the same as the real thing.
The I386 core of NP21/W has been updated to equivalent to ver0.86 rev92 beta2. Also, fixed the build time warning so that it does not appear.
Improved checking when accessing environment variables, referencing incorrect environment tables. Recent builds have resolved an issue that prevented testi386.exe from working. Improved the efficiency of memory access handling. Basic memory, extended memory, and reserved areas (such as VRAM) can be accessed in that order with a small number of conditional branches. The processing speed may be slightly increased.
I don’t want to complain or anything, I’m very thankful for the tool. It’s just so amazing.
but on my Windows 10 install I have so many issues relating to the font/screen changes, that I just made an incredibly lame fork, and commented out those changes, msdos-player_. I stumbled onto the issue by accident by redirecting stdout/stderr, and compiling stuff ran fine, but as soon as it started to mess with the console it’d just crash.
No console changes, no crashes.
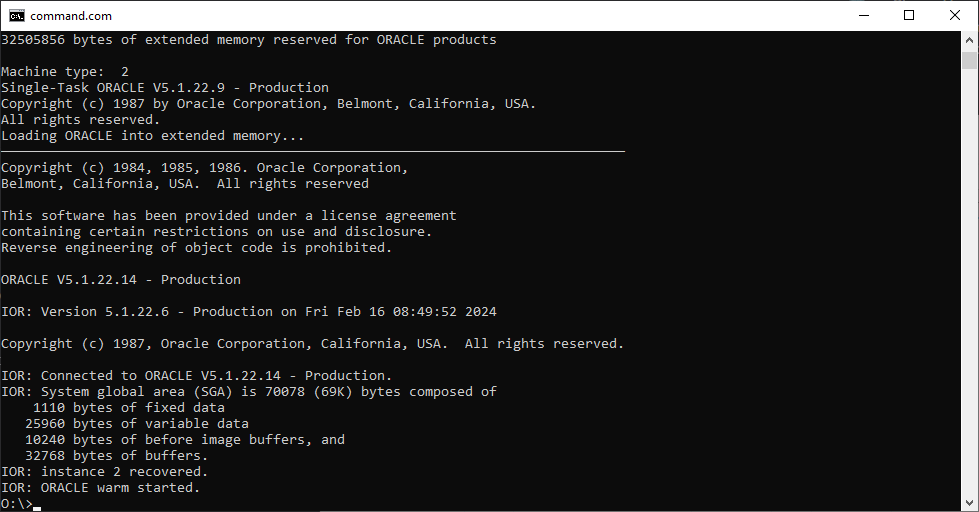
OK so you can run some basic stuff like compilers, but what about ORACLE?!
Oracle 5!
I did have to subst a drive, as I didn’t feel like dealing with paths and stuff, I had extracted it from oracle-51c-qemu, and modified the autoexec & config.ora and yeah, using the 386 or better emulation it just worked! Sadly there is no network part of the install, although there is a SDK so I guess there ought to be a way to proxy queries.
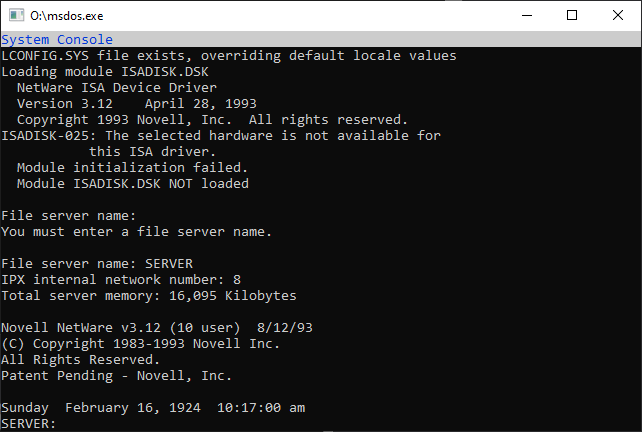
OK, but how about something even more complicated?! NETWARE!
Netware 3.12 on MS-DOS Player
Obviously there is no ISA MFM/IDE disks in MS-DOS Player, but the server loaded!
Needless to say this update is just GREAT!
I’d say try the one hosted on Takeda’s site! It’ll almost certainly work fine for you. Otherwise I guess try mine. Or not.