
With all that Dec Alpha talk, and how hard it is to get hardware, and how seemingly exclusionary it is, I thought I would try to touch on a more available 64bit ‘risc’ platform, for the masses!
While a couple years ago I had touched on running Windows 10 on the Raspberry Pi 4, in the brave new world of 2023 getting ahold of a pi4 is expensive, hard to find, and kind of depressive, which lead me to this (old) but exciting project, the Renegade Project!
Long story short, there exists enough drivers & information to facilitate a port to the Snapdragon 845, a 64bit System On a Chip( SOAC!), meaning that if you have a device with this chip it *can* be slightly possible to install Windows 10 onto it.
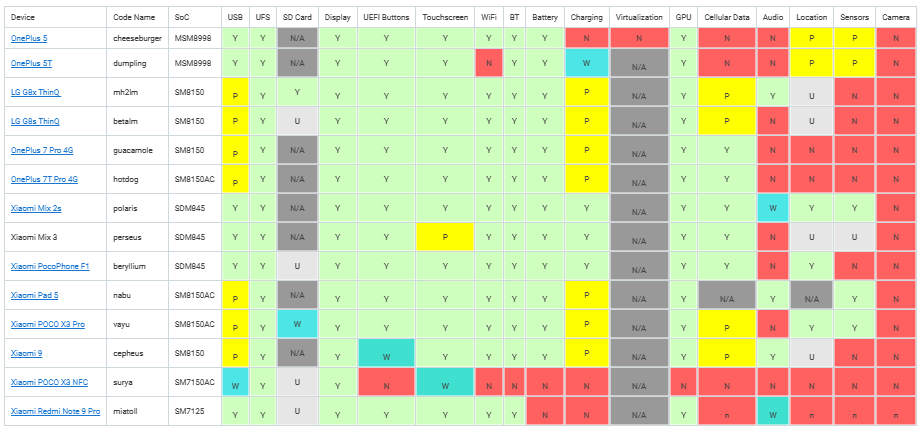
Glancing at the system matrix, to me the glaring hole is Charging. 3 systems outright support it, all of them from Xiaomi, the Xiaomi Mix 2s, Xiaomi Mix 3 & the Xiaomi PocoPhone F1. Looking around eBay to start this adventure I found a PocoPhone F1!
Getting the Phone
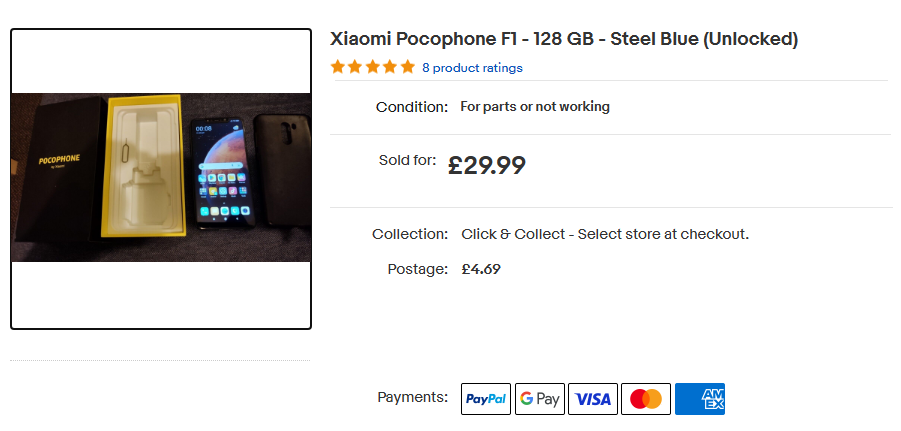
This seemed like a good start, 29.99, 128GB of flash storage, and I’d later learn 6GB of RAM. The first problem came from Xiaomi. Turns out that the phone was still locked, the seller had neglected to logout from his Xiaomi account. Even worse though he had forgotten his login and password. Calling Xiaomi support was basically worthless. Without unlocking the phone on a reset to root the phone lead me to this:
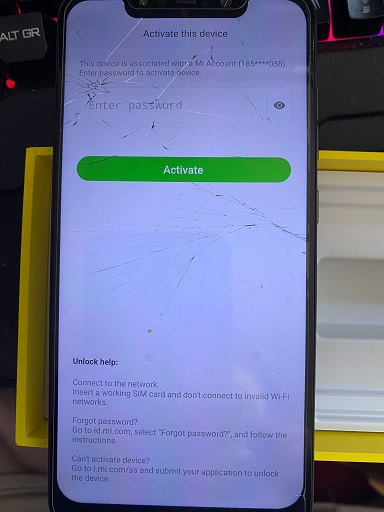
I got lucky however after talking to the seller, he agreed to go above and beyond and we were able to unlock the phone together. So everything went well. If you do buy one of these phones used, MAKE SURE TO CHECK THE XIOAMI login id! It has to be unlocked and blank so you can register it and get the unlock. It will require a valid email & phone number + sim for it to send/receive SMS codes.
Access to the site is very up & down, so I archived what I had downloaded to unlock the phone here. miflash_unlock_en_7.6.602.42.7z
I should add that we’ve cleared the first few hurdles of precuring the device and unlocking it. And I’m glossing over stuff. Getting to this point was not easy and took a week. The unlock process is not intuitive, and I’m sure many phones are sold out there that have their google access wiped, but have not been logged out all the way, or the flash erased. I can’t show you mine as I ended up erasing Android but be aware of this!
Getting ready for Windows
Basically on the Android side there is three main modes, the boot, the recovery and the ‘fastboot’ mode. Holding power & down brings you to fastboot, where using the fastboot tool you can load an image from your PC into ram and execute it. EDK2 UEFI firmware, is the first part or the renegade project you’ll encouter. It’s really powerful, allowing you to not only boot into Windows, but it also supports a linux disk target mode, allowing you to partition and access the flash directly from a PC. Naturally this is SUPER dangerous, and backup your modem files!
With the phone unlocked softbooting E2DK you can put it into a target disk mode, connect it to a pc and partition away!
The guide (section 1.2) advices pushing the disk tools to the phone booted up in twrp-3.7.0_9-0-beryllium.img. Honestly its easier to just partition it on your computer. HOWEVER if you were to use Windows, there is a slight issue:
The device may no longer be able to boot into fastboot mode
I ran into this issue and thought I had bricked my phone. I was actually in the middle of researching how to do a physical hard reset, and place it into EDL mode (taking it apart and finding which pads to short, when I found this section of the troubleshooting guide, where it’s the partition names. So instead, I ended up doing the partitioning on a Virtual Machine using VMware and Ubuntu.
(parted) print
print
Model: SAMSUNG KLUDG4U1EA-B0C1 (scsi)
Disk /dev/block/sda: 123GB
Sector size (logical/physical): 4096B/4096B
Partition Table: gpt
Disk Flags:

Number  Start   End     Size    File system  Name        Flags
 1      24.6kB  41.0kB  16.4kB               switch
 2      41.0kB  73.7kB  32.8kB               ssd
 3      73.7kB  524kB   451kB                bk01
 4      524kB   786kB   262kB                bk02
 5      786kB   1049kB  262kB                bk03
 6      1049kB  1573kB  524kB                keystore
 7      1573kB  2097kB  524kB                frp
 8      2097kB  4194kB  2097kB               bk04
 9      4194kB  8389kB  4194kB               misc
10      8389kB  16.8MB  8389kB               logfs
11      16.8MB  33.6MB  16.8MB               oops
12      33.6MB  50.3MB  16.8MB               devinfo
13      50.3MB  67.1MB  16.8MB               bk05
14      67.1MB  134MB   67.1MB  ext4         persist
15      134MB   201MB   67.1MB  ext4         persistbak
16      201MB   268MB   67.1MB               logdump
17      268MB   403MB   134MB                minidump
18      403MB   1275MB  872MB   ext4         cust
19      1275MB  1342MB  67.1MB               recovery
20      1342MB  1611MB  268MB   ext4         cache
21      1611MB  123GB   121GB                userdata
Before I did anything, this is what the phone partition table looked like. It’s an exceptional amount. The new parted v 3.0 that is recommended to use, doesn’t support the resize command so I had to manually do the numbers after destroying partition 21.
Originally, I had made a 32Gb partition to keep some Android functionality but somewhere it just stopped booting. But I didn’t care.
rm 21
mkpart userdata ext4 1611MB 32G
mkpart esp fat32 32G 32.5G
set 22 esp on
mkpart win ntfs 32.5GB 123G

21      1611MB  32.0GB  30.4GB  ext4         userdata
22      32.0GB  32.5GB  499MB   fat32        esp         boot, esp
23      32.5GB  123GB   90.5GB  ntfs         win         msftdata
Obviously dont follow this. I’m only providing output as an example.
If I were more patient, I guess I would have dd’d the entire phone to get a full entire backup. But I didn’t get this phone to run Android, so I really don’t care.
There is a LOT of disks being presented to Windows, in case you ever wondered how those 128GB flash devices get sold with only 114GB of user space.

And even that 112GB is actually usable!
Remember the system partition needs the boot,esp flags, and the windows partition is msftdata. Also make sure the partition names are either single words, or NO words. Spaces will kill the fastboot mode.
I put all the disks that are presented in offline mode, so I don’t get confused. Make sure you are going to mess with the right volumes when formatting after the partitioning. This is NOT for the novice, it would be easy to not only brick the phone but screw up your existing install. If you have physical disks attached you don’t absolutely need, remove them or put them offline to make sure you don’t screw up.
I used diskpart to select the appropriate volumes and format them.
select disk 8
select volume 5
format quick fs=fat32 label="System"
assign letter="S"
select volume 6
format quick fs=ntfs label="Windows"
assign letter="W"
This isn’t a guide, just a reflection of what I went through.
With the disk now formatted, it’s a matter of selecting an OS to install.
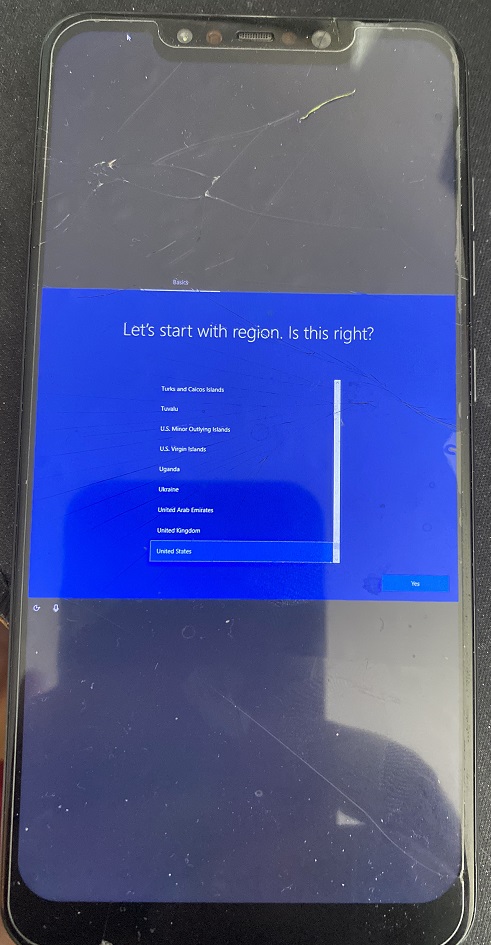
I had really bad luck picking random versions of Windows, so I looked until I could find a confirmed working version in this video, Rodando o Windows 10 ARM nativamente em um Dispositivo Android (Pocophone F1 + UEFI). Long story short, it’s Windows build 210521-1658 with version 0.4 of the bootloader. Long story short I messed with LOTS of Windows on ARM driver sets, before I finally had the brave idea to just load it with no drivers:
But that image is far too stale, and expires out very quickly, reducing any useful functionality once it’s connected to the internet. So it’s something that probably could be fixed, but it’s far easier to just grab an image that’s newer.
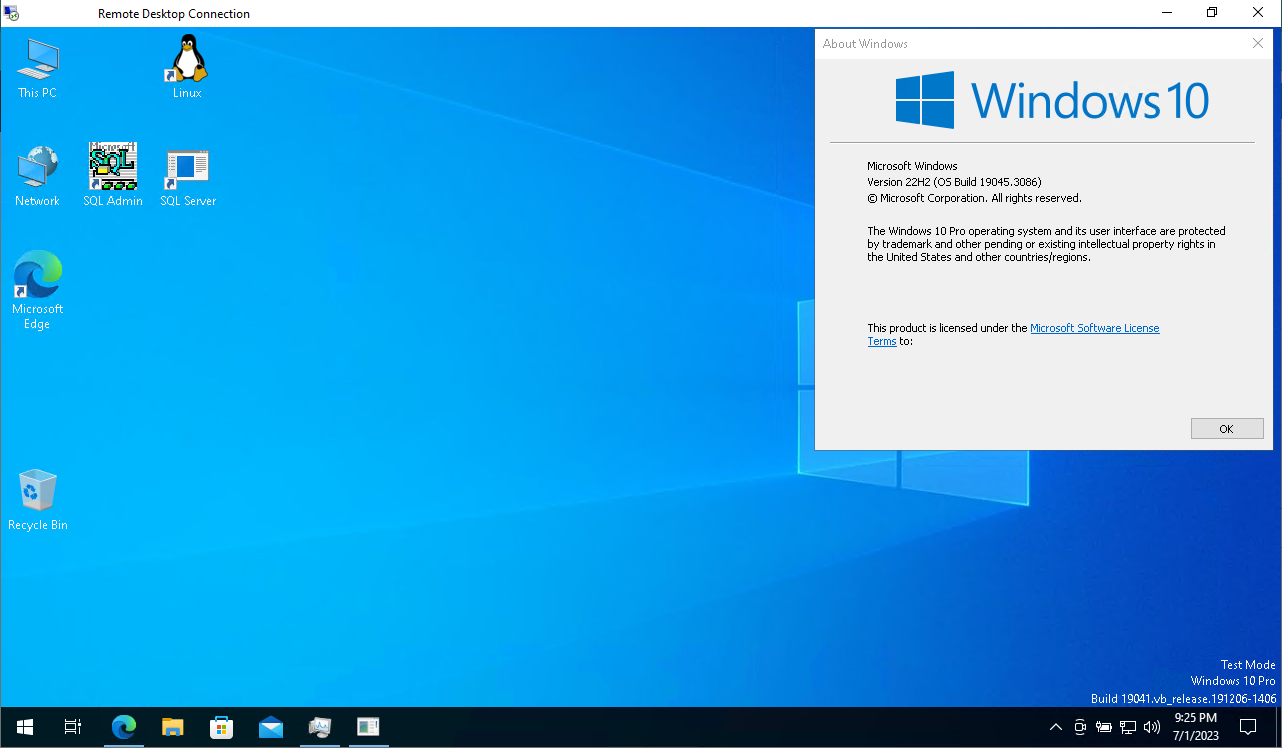
The x86_64 image I’m using now is 19045.3031, so I guessed to pick something comparable on ARM64. I used something called 19045.3031_arm64_en-us_professional, although it too was out of date, but Windows update brought it up to 22H2 19045.3086 . I had tried the downloader tool and apply all the updates offline, but I had issues. I suspect now in retrospect it was drivers.
Another thing I learned the hard way is that some of these images have multiple OS images installed. I guess it’s de-duplication, along with compression, but be sure to index the image first! I accidentally installed a Home version. Yuck.
dism /Get-ImageInfo /imagefile:install.wim

Index : 1
Name : Windows 10 Home
Description : Windows 10 Home
Size : 17,706,743,995 bytes

Index : 4
Name : Windows 10 Pro
Description : Windows 10 Pro
Size : 17,836,320,420 bytes
So just don’t go wildly apply image #1. I wasted too much time on that one.
But in the release I’m using it’s image #1. I checked. Trust me.
dism /apply-image /ImageFile:10.0.21390.1.co_release.210521-1658_arm64fre\install.wim /index:4 /ApplyDir:W:\The S volume needs to be populated with the UEFI boot files. I had foolishly thought the boot.wim file would include the boot files, but instead bcdboot can set it up based on the location of a Windows install.
bcdboot W:\Windows /s S: /f UEFIThe next thing to do is install the drivers.
I was lucky enough to get some insight into some driver combination to work, and I came up with this much:
minimal 2210.1-fix
USB beryllium v2.0rc2
FG beryllium v2.0rc2
The key of course is that there is a minimal set in 2210.1-fix that will bring the system up with working USB. The FG package brings in enough of the power management to know the battery status.
dism /Image:W: /Add-Driver /Driver:drivers /RecurseThe drivers are not signed, so that means we need to change a bunch of boot flags. I also turned on debugging so have Windows dump core files, so you can run analysts on them with Windgb.
S:
cd S:\EFI\Microsoft\Boot
bcdedit /store BCD /set "{default}" testsigning on
bcdedit /store BCD /set "{default}" nointegritychecks on
bcdedit /store BCD /set "{default}" recoveryenabled no
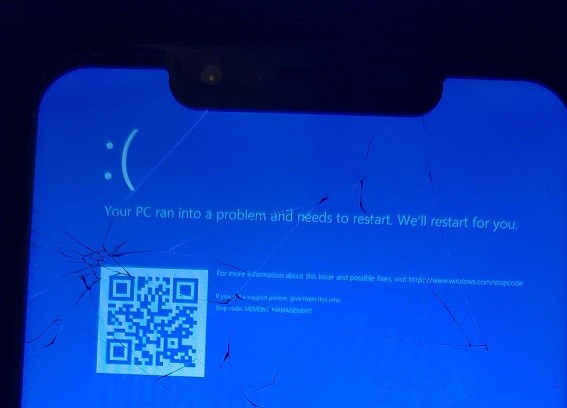
bcdedit /store BCD /set "{default}" debug onOf course the catch being that with no drivers loaded it’s in a super basic mode, with no USB, no touch screen, no power management, no wifi no nothing. So it’s a brick. But at least we’ve reproduced enough to show that you can boot Windows.
Sadly, loading all the drives from 2210.1-fix or beryllium v2.0rc2 lead to this:
Add in a much needed OTG adapter and a mouse or keyboard, and you can complete the installation.
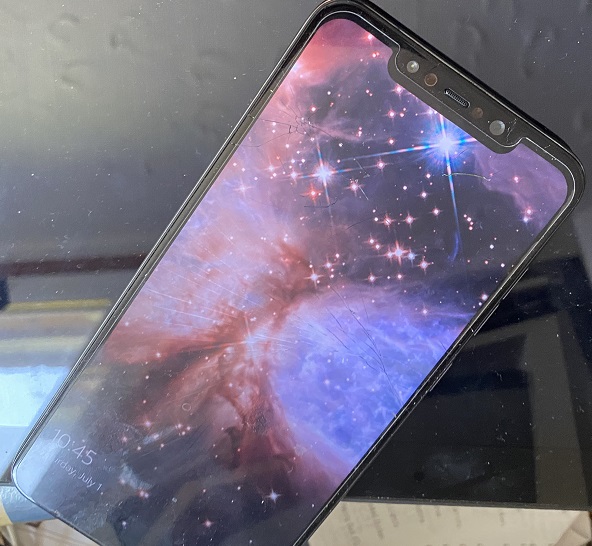
However, since I left off the majority of the device drivers as I didn’t want to spend forever trying to track it down, I used a random USB to Ethernet adapter and thankfully It just worked!
I added a fancy USB 3.0 ‘dock’ with USB-C connector that you can plug a charger into, so that not only can the phone stay connected to power, but there is room for the Ethernet. It also has HDMI, perhaps is the drivers were more stable, it could be a viable desktop? And I have what I wanted, which was a non Intel/AMD 64bit platform that is hopefully more reliable than the Alpha64 platform, and maybe something to do some kind of contrast of the past vs future
This was NOT a simple thing to go through. I would be extremely hesitant to advise other people to follow suit. But in the off chance anyone who wants to do it, might have a better idea of what is involved.
Read the Troubleshooting guide & the Installation guide. Keep notes! I would have absolutely given up, without keeping notes.
Even simple tracking of disasters like this at least helped me along:
210521-1658
10.0.21390.1.co_release.210521-1658_arm64fre
boot-beryllium Version 0.4.1.imgboot-beryllium-ebbg Release - 2210.1.imgboot-beryllium-ebbg Release - 2210.1.img
boot-beryllium-ebbg Release - 2210.1.img
boot-beryllium-ebbg Release - 2210.1.img
boot-beryllium-ebbg Release - 2210.1.imgno drivers
no drivers
v1.1.1


v1.1


FocalTechTouch v2.0rc1


v2.0rc1
INTERNAL_POWER_ERROR
installer


SYSTEM THREAD EXCEPTION NOT HANDLED


SYSTEM THREAD EXCEPTION NOT HANDLED

installer


SYSTEM THREAD EXCEPTION NOT HANDLED
Sorry the table doesn’t format well.
TL;DR don’t do it, unless you don’t mind spending too much time on this. Get a used Surface X instead.
Is unfortunate the Andrei’s project to run Windows ARM in the RockChip SoC (UEFI/ACPI Tables/Drivers) stagnated. Orange Pi’s are more powerful and easier to get than the RPi’s. Windows ARM would run nice on them.
My edk2 branch was a fork from Pete’s and I lost interest due to Pi 4 and ESXi-Arm Fling work.
Jared has https://github.com/jaredmcneill/quartz64_uefi
Windows 11 is already running on the Orange Pi 5. Here’s a video:
https://www.youtube.com/watch?v=8pMMGnQQg6Q
Pocophone F1 uses USB 2.0, so HDMI over USB 3.0 adapters or any type of DisplayPort adapter will never work sadly, Ethernet works just fine but runs at USB2 limits
You can use such adapter to charge the phone while running windows (if you installed properly all drivers via renegade tools, and I suggest you using their drivers on uupdump windows 11), but only with 9V+ chargers, 5V should be not support iirc
I tested all of this on a Xiaomi MI 8, same phone as pocophone but with OLED display
When I viewed the devices by connection it says it’s a v3 connection but who knows?
ill have to see i I can find the drivers on uupdump, is it windows 11 only?
no sorry I meant, if you have issues with drivers and windows, just follow renegade guide with uupdump images of win11 and their drivers
When I needed an arm64 NT system to test stuff, at first I used very slow rpi3, then eventually got a used Samsung Galaxy Book Go, which has been perfectly fine for testing purposes 🙂
“how those 128GB flash devices get sold with only 114GB of user space”
Windows displays disk sizes in binary gigabytes, whereas “128 GB of flash” is usually considered decimal. The screen capture you provided shows that only 2 GB is spent on the other partitions, not 14 as you try to imply.
there is the other ‘disks’ that I didn’t show where it all went.
Oh right, indeed the linux fdisk command shows the first disk is sized 123 GB, I take it that that is also in decimal gigabytes, so the 128 GB of flash is first divided into several logical disks, and 123 GB = 114.59 GiB quite exactly