Web Rendering Proxy (WRP) 4.5.2

(This is a guest post by Antoni Sawicki aka Tenox)

Pleased to announce WRP version 4.5.2. This is just a bug fix release however it also contains two frequently requested features:

UI customization via HTML template file. This has been requested by many users and it makes total sense. To use it download wrp.html from github, place in the same directory as wrp binary and edit to your liking. WRP will load built-in version if file is not present.

This should enable easy development of more modern UI for never browsers. Potentially with JS and CSS. Please send PR if you make something!

Second most frequently asked feature – re-capture (retake?) of a screenshot without page reload. For example if the page did not capture correctly or if something is changing on the page.

I have also updated Docker Hub and gcr.io repos.

Sun IPX using WRP at VCF West

As usual please test and report bugs!

The next update will focus on issues with page size, viewport and rendering full length pages (h=0) which is currently very broken.

[TUHS] 4.4BSD sparc, pmax binary recently compiled

Well this came as a bit of a surprise, but also a great thing!

 I compiled 4.4BSD to get pmax and sparc binary, from CSRG Archive CD-ROM #4
source code.

    http://www.netside.co.jp/~mochid/comp/bsd44-build/

  pmax:
    - Works on GXemul DECstaion(PMAX) emulation.
    - I used binutils 2.6 and gcc 2.7.2.3 taken from Gnu ftp site,
      as 4.4BSD src does not contain pmax support part in as, ld,
      gcc and gdb.
    - Lack of GDB. I got rid of compile errors of gdb 4.16, but that
      does not work yet.
    - gcc included can not deal c++ static constructor. So, contrib/groff
      can not be compiled. Instead, it uses old/{nroff,troff,eqn,tbl..}.

  sparc:
    - Works on sun4c. I use on SPARCstation 2, real hardware.
      TME sun4c emulation can boot to single user, but it locks up in
      middle of /etc/rc.
 
 CSRG Archive CD-ROM #4's source code (just after Lite2 release) seems
have differences from CSRG's binary distributions before (2 times),
e.g. mount systemcall is not compatible.

 I used NetBSD 1.0/sparc, NetBSD 1.1/pmax for 1st (slightly) cross
compiling. NetBSD 1.0/sparc boots and works well on TME emulator.
SunOS 4.1.4, Solaris7 works too, but this 4.4BSD binary doesn't..

-mochid

So this is a heck yes, let me boot this thing up! It’s been a while since I last messed with GXemul, but even this old version runs 4.4BSD!

And yeah it’ll boot up! Exciting.

As mentioned it’s based off the CD #4 from the CSRG set. Really if you are interested in old UNIX, be it BSD or AT&T get this set!

Back of the set aka contents

On the back you can see it’s the last source dump including all the SCCS tags. This plus the extra “historic content” is what you need! Maybe it’s the emulation, maybe it’s the last cut of 4.4 but mounting a CD-ROM just works. So nice. Although the source on the CD isn’t directly buildable. There is some issue with the MIPS locore which needs a patch from mochid, but with the fixes in place it’ll build and run!

Obviously the unanswered question is where is the i386. And that is probably the greatest 90’s software bungle that is either conspiracy to profit or just incredible lack of vision when it comes to platforms. It’s certainly easy to have an off version of reality in University, especially with nice OEM hardware grants to see the world in one light, Just as the Amiga/Atari home computer wars both ignored the vastly inferior PC for it’s laughable beeper, CP/M like OS and woefully inadequate CGA graphics. But the PC was modular and it was an open platform, the industry didn’t have to wait for IBM to make a 32bit PC, instead you had people adding 386DX processors on 286 motherboards complete with 80287 coprocessors, and custom memory controllers to retrofit the memory bus.

CSRG had TAHOE dreams, HP 680000 plans, then SPARC. All the while missing out on the unwashed masses with their 386 and 486 machines. I haven’t tried it, but I bet BSD/OS 1.1 will patch in pretty well for i386. And why would it? Because that was the ticket to the pre pre pre .com bubble of commodity minicomputer UNIX on the desktop. But that blasted 1-800-ITS-UNIX ruined it all, and this ‘hey guys’ project took the UNIX crown.

I’ve been playing with updating the GXemul ‘port’ I did along with integrating SLIRP so I can telnet it. The timing is very shakey and I’m not too happy with it. And I want to redo the disks and sources to be a cleaner ‘merge’ so it just ‘makes’ in the normal places like a native build. If I had crazy people money I’d want to port this to the Loongson-3A4000, but that’d be crazy, instead it’d be more worth my while to try to make an Amiga or Atari ST.

But what do I know, my cellphone runs Mach/BSD!

Netscape 3.02 aka hiding in plain site

Much to my surprise, along with a few other people the partial source code to Netscape 3 has been found. But it’s been there since 2011.

Normally I look for ‘source code’ although that terrible movie overlaps the name making it hard to find. So the phrase for the last decade turns out to be ‘source tree’

Netscape Communicator 3.0.2 Source Tree

So who knew!?

The SDK stuff is missing, and it looks like the Windows stuff is intermixed with the Unix.

There is some CVS tags, but not the history. Lots of the crypto has been deleted, and the SDK stuff is missing. Also no cooltalk. SUN Java is there oddly enough.

I have no idea if it’s buildable as it looks like its expecting a magical config regarding paths and tools, and a quick glance looks like it’ll need some time to massage.

Could this be the dawn of the ‘will it run NetScape 3’?

Windows Dev VM

(This is a guest post from Antoni Sawicki aka Tenox)

I have been living under a rock for several years now when it comes to Windows development. Recently wanting to do some maintenance on couple of my projects I needed to download Visual Studio and Windows SDK. Poking around the download page I have discovered that Microsoft now provides a fully pre-installed VMs with Visual Studio, SDK etc. for VMware, Hyper-V, VirtualBox and Parallels. That’s actually super cool and handy. Thank you Microsoft!

Looks like this has been available for 3 or 4 years now. Oh well.

Yedit – The missing edit.com replacement for modern Windows

(This is a guest post by Antoni Sawicki aka Tenox)

I previously lamented about lack of a small text editor for Windows text mode console. Something simple to just edit a text, configs, .ini, .reg or .cmd/bat files. Kind of like edit.com in MSDOS and Windows 3.x/9.x. Edit.com could even run under Windows NT up until XP inside NTVDM DOS emulator. I seen plenty of people use it this way. Sadly, instead of porting it to the modern Windows it was just whacked. While there are plenty of 3rd party editors to choose from none of them is perfect. They are either expensive, overly complicated, poorly ported from Unix, VMS or TOPS20, no longer maintained or require a steep learning curve for a casual Windows user.

My cries must have been heard in Redmond circles. Malcolm Smith aka malxau (author of Yori, a super awesome command line replacement for Windows) stepped in and made a brand new, text mode editor called Yedit. By default It comes as part of Yori installer however it’s easy to separate it to a stand alone exe.

Yedit on Windows NT

There really isn’t much to talk about Yori. It has no special features. It doesn’t try to be an IDE, word processor, hex editor or an operating system. It’s just a perfect replacement for edit.com. Thank you Malcolm! I really wish that Microsoft just put it in Windows 10 now.

Yedit on Windows 10

While checking out Yedit you should also give Yori a try. It’s really a fantastic CMD replacement shell.

Reverse-engineering QNX 1.2 to boot from HDD

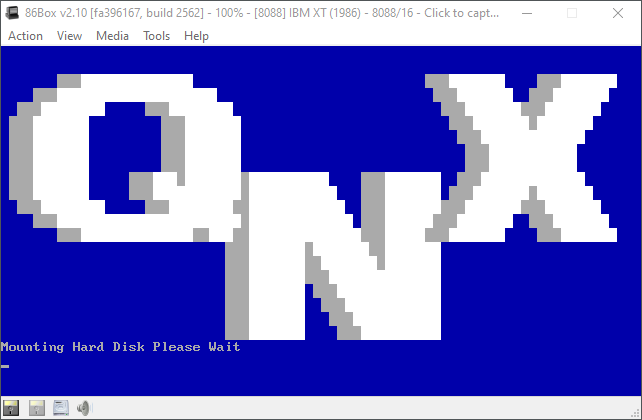
This is a guest post from Mihai Gaitos, hawk.ro. A winning entry for Virtualization Challenge IV – Act II – QNX 1.2 HDD Boot ($2000 prize).


Since a lot of people (especially Zir Blazer) tried to use the available QNX 1.2 / QNX 2 tools to install a HDD boot loader and load the existing kernel, I decided to take a different approach and build a new loader. At first I was under the impression that maybe a BIOS disk driver was already present in the kernel. After realizing that there was no HDD driver included, I decided to try reverse-engineering the relevant parts of QNX.

Starting from the start (boot sector) helped me extract the kernel from the boot diskette and analyze it just enough to validate that it’s the right thing and the assumed entry point is correct.

In order to make things easier (and because it was a fun project per se) I wrote a somewhat simple QNX filesystem access tool that enabled me to extract files from the diskette and HDD images.

Going for mount

Afterwards, my main activity was centered on mount. As opposed to typical Linux/Unix mount, here it also loads the HDD driver. After finding out the executable file format (ftp.qnx.com/usr/free2/technotes/qnx_load) I wrote another small tool to extract the code and data segments of QNX executables. Analyzing the disassembly, I have determined what operations mount performs in order to install the driver and mount a QNX partition. The main steps are:

  • load the driver file contents into malloc-ed buffer (inside the data segment of mount)
  • send a TA_ALLOC_SEG message to task in order to allocate a separate segment and copy driver there
  • build a DEFINE_DRIVER message using data from driver file and the allocated segment address and send the message to fsys (part of kernel, but separate task)
  • send a SET_ATTR message to fsys that has the side-effect of initializing the driver
  • use the driver to read first HDD sector (partition table)
  • send another SET_ATTR message to adjust disk size and offset to values read from partition

Knowing this gave me an idea to what my loader would need to do beside simply loading the kernel from HDD. However, this still depended on having an already running kernel to send messages to.

Back to kernel

The kernel is split into 5 parts:

  • task (task and memory management)
  • fsys (disk and filesystem)
  • dev (terminal devices)
  • idle (CPU arbiter)
  • shared (int 72 handler, mostly libc and other shared functions)

Description in parenthesis are my assumptions.

The copy protection routine (tries to read the last sector from diskette and if the read succeeds resets the computer) provides a good entry-point into the fsys part of the kernel. I assumed it can be replaced with some code to emulate what mount does. However, trying to allocate a segment (via TA_ALLOC_SEG message) hangs. I think this is causing a deadlock, since fsys initialization is called from task before it finished its initialization. Fortunatelly, while digging into this I noticed the header structure of the kernel, thus enabling me to increase its size in order to fit the xt driver at the end of fsys (it would have been slightly easier to put it at the end of shared, but that didn’t occur to me at the time).

Failing to use syscalls (DEFINE_DRIVER and SET_ATTR) meant I had to determine what those messages actually did. I disassembled fsys separately and proceeded to manually follow the code path in order to determine the effect each of those messages should have in the context of mounting a disk. Eventually it emerged that almost all of the data structures can be prefilled in the kernel image, leaving only the call to driver initializaion function.

I modified the kernel to add the xt driver at the end of fsys (modifying the header by hand), replaced the copy-protection routine with code to call its initialization, and indeed the harddrive was available from the start, without the need to run mount. I was still booting from diskette at this time but I was past the most difficult hurdle.

Finishing touches

Loading the kernel proved somewhat simple (I still have some knowledge about 16-bit assembly and real-mode BIOS) but the kernel “insisted” in trying to run /cmds/sh from floppy. At first I solved this by an ugly hack, modifying the command line string in kernel image from “/cmds/sh” to “3:/xi/sh” and “/config/sys.init” to “3:/xi/sys.init” (3: being the HDD identifier, similar to C: from DOS). The xi was needed in order to keep the same string length, or at least not making it larger since there was some other importand data just past this.

This mostly solved the challenge (there were some other minor mistakes and fixes), except I disliked that hack and went on to analyzing that first start of /cmds/sh, disassembling fopen (in shared) and finally finding the memory location where of the search system variable (somewhat similar to PATH). Modifying that variable eliminated the need for starting the first shell with “3:”.

Room for improvement

At present some parameters are hardcoded and the kernel is just placed at the end of the HDD, outside of QNX parition and its position and size is written in the boot sector (somewhat similar to the original QNX diskette approach). The partition size itself is hardcoded (by hand) in the kernel data structures instead of being read from the partition table on boot. Still, for something that is unlikely to ever run outside an emulator, I deem it good enough (for now).

Thanks

  • to Zir Blazer for putting a lot of effort into his approach and documenting each step
  • to Mitchell Schoenbrun for providing insight into QNX system philosophy
  • to forty for beating the first challenge and identifying the copy-protection routine address
  • and of course, to Tenox, Neozeed and Dan Dodge for the challenge. And for providing me with a great prize for 3 weeks of hard-working fun!

To access files, tools, bootable image and ready to run in your browser PCjs with QNX 1.2 go to Mihai’s site hawk.ro post.

Virtualization Challenge IV – Act II – QNX 1.2 HDD Boot ($2000 prize)

(This is a guest post by Antoni Sawicki aka Tenox)

A couple of months ago we hosted VIrtualization Challenge for QNX v1.2. I expected that the hard part would be to circumvent the copy protection and the rest would be easy. It turned out to be quite the opposite! The copy protection was worked around in no time by several people independently. What turned out to be impossible is to install the OS on a hard disk.

QNX 1.2 does have several drivers for different hdd controllers including BIOS mode. It has fdisk, can create partitions, install MBR, format fs, mount hard disk volumes… but it cannot install boot code. Apparently this functionality has been added only in QNX 2.x. After a long debate we settled for a solution where you boot kernel from a floppy disk and use the rest of the os from a hard disk. This was implemented by Forty who won the challenge which was outlined in this post.

In a rather unexpected turn of events Dan Dodge, co-creator and CEO of QNX Software Systems himself reached out to us and offered to extend the contest to finish the process properly. Dan is offering $2000 prize for making QNX 1.2 boot from hard disk without use of the boot floppy disk. I have confirmed the details in an email exchange.

Rules: As always the winner will be the first person who provides a working image in the comments. Any emulator/hypervisor is allowed. You can use boot loader from QNX 2.x, or write your own or anything else you come up with. There are some tips in Dan’s comment. Ask away for more details. The QNX repository is here. Good luck! 🙂

Update: The challenge has been completed! The winner is Mihai Gaitos and this is the winning entry also a post on this blog. I will work with Mihai to get a more detailed blog post of what has been done and Dan to hand out the $2000 prize. Congratulations!!!

Update: You can try QNX 1.2 straight in your browser with PCjs!

It’s that time of the year again, another blog migration.

Every time the yellow touches bottom it’s an outage

You’ve probably seen it, lots of outages lots of delay and well not a lot from me.

life has been incredibly busy as I thought I was out of the IT rat race, but things happened, and I’ve ended up staying in.

Failure is arriving!

so yes, once more again “docker” and k8 make everything easy to deploy but maintain and work, well that is another story. It turns out that Rancher OS k8’s will shut down once the disk hits 85% capacity.

Under pressure!

ok that sounds like a lot but on a 1tb volume that is 125GB?!!! No warning no, no nothing just ‘disk pressure’ on the console and that is it.

root@steady35:/opt/local-path-provisioner# df -h .
Filesystem Size Used Avail Use% Mounted on
/dev/sda1 873G 712G 115G 87% /opt

honestly WTF!

I like the ability to publish secrets and import and export settings between containers, but the incredible lack of logging is unreal. The k8 manifest for MySQL kept on failing on my server. I have no idea why.

zero logging info

I deploy the docker version directly, and if you can read this it’s working.

clearly I’m the old man out of touch.

but for a single node, UML is the way to go.

plus, you can use your entire disk.

so yeah, trying something new although I don’t think it’ll last all that long.

UnixWare 1.0 on 86Box

(This is a guest post by Antoni Sawicki aka Tenox)

I certainly can’t claim to be the first as this has already been done by our friends at OS/2 Museum. However with low vanilla VGA resolution and no networking the results were unsatisfactory. Having so much success with 86Box I decided to try to do a little better.

I bought my UnixWare 1.0 media kit years ago on eBay. Unlike the tape set owned by OS/2 Museum mine had CDROM as install media. Unfortunately despite many many tries with different types of cdrom/bus/ide/scsi card I could never get the OS to see it. The cdrom/iso image is just a typical set of sysv packages. As such I wanted to see if it would be possible to convert it to a set of floppy disk images and install this way. Attached the iso image in UnixWare 7.1.4 VM and did a pkgtrans like so:

pkgtrans -s cdrom1 diskette1

From there I created a bunch of floppy disk images, which I later used for installation. Thanks to Plamen I was also able to get TCP/IP disks which I added to the install set.

Update: thanks to ArtiomWin I also got a BusLogic HBA driver disk, which allowed me to see the cdrom attached over SCSI. As such I decided to remaster the original iso image with added TCP/IP set, Update package and bash+gzip. The iso image is here.

Upon first boot after install from CDROM you get prompted to choose a NIC driver:

Unfortunately none of them really worked in 86Box for some reason. They get detected and you can see the MAC Address but not much after that. 3C503 and NE2K freeze the system, WD works bit better but you can’t really communicate with anything. Maybe it’s just my PCap configuration.

After installation I mounted the cdrom again and added TCP/IP set:

mount -r -F cdfs /dev/cd0 /mnt
pkgadd -d /mnt tcpnfs
pkgadd -d /mnt update

cp bash gzip /bin

One of main issues bugging me was lack of proper resolution. UnixWare 1.0 has a high resolution mode for Tseng ET4000 card which is supported in 86Box. You can change the resolution using /usr/X/adm/setvgamode as root. It worked perfectly, except for fonts, which required some surgery in /usr/X/defaults/Xwinfont (remove everything after 75dpi font path). This is how it looks like fixed up:

UnixWare comes with Merge DOS emulator. It can even run graphical applications in windowed mode for CGA and HGC. VGA is only possible in full screen mode.

All this cool stuff before Linux was even born!

DOS Menu is invoked by Scroll Lock. You can switch consoles between text and X11 by pressing CTRL+ALT+SYSRQ and ‘p’. I have also added bash and gzip binaries.

The ready to run 86Box image is here. Virtual Box OVA here. Install media here. Login with user/user, root/root.

Have fun with Virtualization !