User Mode Linux

UML

UML

Well back in the day, before the hardware visualization craze of the 2000’s back in the dark days of 1999, there was UML, or better known as User Mode Linux.  Sadly the freshmeat announcement is all but lost, but sourceforge is still with us so we have the archives.

UML, simply put is a Linux kernel that has been modified to run in user space.  So to the OS, it is just another usermode program.  Because it runs in user space, there is no kernel dependencies, or special hardware required, as UML is just a user program.  Much in the way Qemu emulates a full machine, UML instead is the kernel process running with paravirtualized drivers so it should give overall a better/faster experience than hosting via Qemu.  Keeping in mind that VMware was a 1.0 launch product in may of 1999, and Bochs was back from 1994.

So what happened to UML?  The market was just too young to understand the power of hosted virtual machines, although there were some at the time.  Overall the market was in the idea of large servers that could ‘share’ thousands of websites, and most people didn’t either want to run root in their own little world, or didn’t even know there were other options besides getting an entire physical box.  I used to rent some UML VM out from a Canadian outfit back when I’d stream audio out on shoutcast, as I found my crappy connection at home couldn’t handle more than 5 listeners, but I could stream to the UML instance, and have it advertise out on shoutcast, and handle the 20-30 users I’d get back then.  Now that we live in the gated walled world of corporate hosting, I don’t think most people would even imagine going through the hell of building their own hosting infrastructure.

So it’s 2016, who cares today?

Well this… ‘friend’ of a ‘friend’ bought what they thought was a dedicated machine in a one year contract.  Except it turned out to be a KVM VM, with ‘dedicated’ processors to the instance.  Ouch.  They also got a bunch of ip addresses, but the idea of being able to run their web servers in VMs, along with an OpenVPN concentrator seemed to become an impossibility.  Obviously user mode Qemu is an option but it would be far too slow.  So I figured this would be a good time to use something from the past, UML.

So the ‘base’ host is running Debian 8.1.  So the first thing to do is to install the 2 neeed packages for networking, the bridge & uml utilities.

apt-get install bridge-utils uml-utilities
apt-get install libc6:i386 libncurses5:i386 libstdc++6:i386

And with that in place I want to run 32bit UML kernels, which means I need the 32bit ‘runtime’ so the Debian way to enable 32bit exe’s is:

dpkg –add-architecture i386
apt-get update
apt-get upgrade
apt-get install libc6:i386 libncurses5:i386 libstdc++6:i386

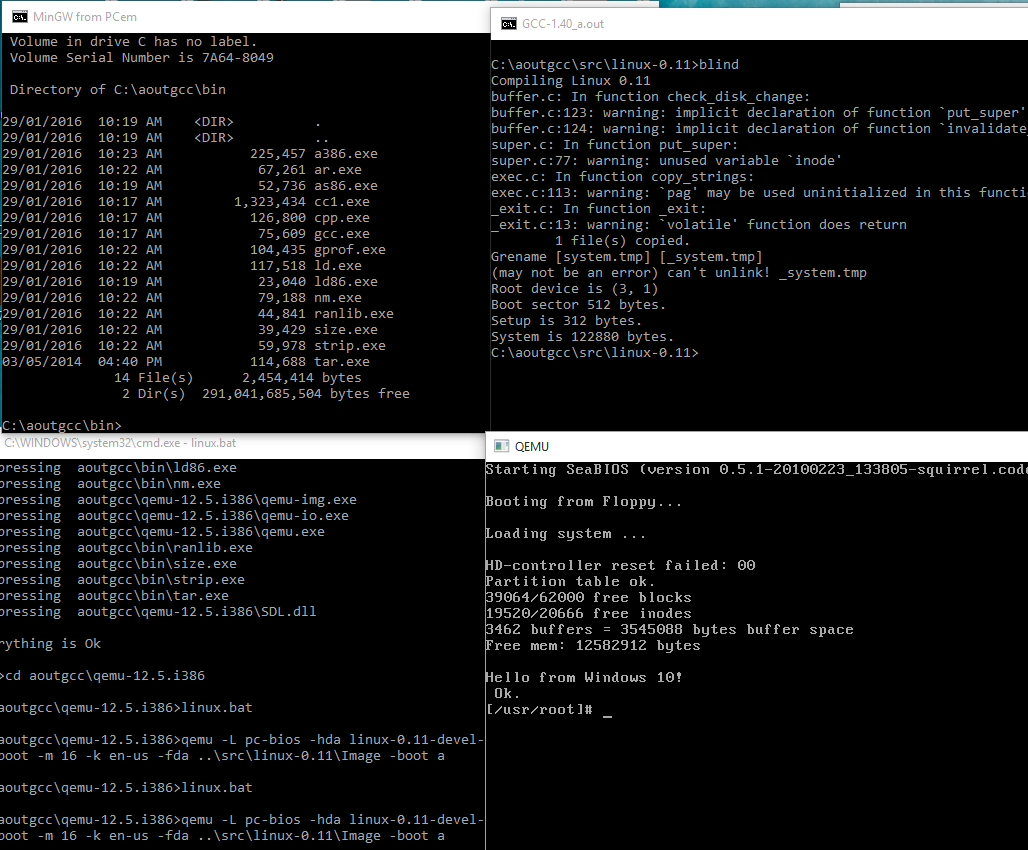
One thing to keep in mind about UML, or x86 Linux in general is that you cannot mix a 64bit kernel with a 32bit userland, the 64 bit kernel can run 32bit executables and libraries, but it really needs a full 64bit userland.  So from the UML page, to get going I went with the kernel linux-2.6.24-rc7.bz2 and an ancient copy of Debian 4.0 I found here.

For anyone interested in more ‘modern’ kernels and filesystems, be sure to check out uml.devloop.org.uk & fs.devloop.org.uk.

Ok, now we want to add a bridge interface for this type of setup.  The idea is that the UML’s will have ONLY an internal connection to the bridge, as the base machine owns all the physical addresses.

So it being Debian we modify the /etc/network/interfaces file to add:

auto br0
iface br0 inet static
address 10.13.0.1
netmask 255.255.255.0
network 10.13.0.0
broadcast 10.13.0.255
bridge_fd 9
bridge_hello 2
bridge_maxage 12
bridge_stp off
pre-up brctl addbr br0
post-down brctl delbr br0

The choice of 10.13.0.0/24 is 100% up to you.  You can use any RFC 1918 address without any issues.  Now I put this stuff in a script to fire up a UML host that will create my tap0 interface, bring it up, add it to the bridge, and fire up the UML.  On termination it’ll remove the tap from the bridge, and delete the interface.

tunctl -t tap0
ifconfig tap0 0.0.0.0 promisc up
brctl addif br0 tap0
./linux-2.6.24-rc7 ubda=test_fs eth0=tuntap,tap0 mem=512M
brctl delif br0 tap0
tunctl -d tap0

And once UML has booted up, a simple ifconfig can bring up the network, and I should be able to ping the bridge address

Debian GNU/Linux comes with ABSOLUTELY NO WARRANTY, to the extent
permitted by applicable law.
(none):~# ifconfig eth0 10.13.0.10 netmask 255.255.255.0
(none):~# ping 10.13.0.1
PING 10.13.0.1 (10.13.0.1) 56(84) bytes of data.
64 bytes from 10.13.0.1: icmp_seq=1 ttl=64 time=0.043 ms
64 bytes from 10.13.0.1: icmp_seq=2 ttl=64 time=0.067 ms

You get the idea.

Because I’m running some ancient debian root filesystem, I had to set the /etc/apt/sources to include the official archive to at least install things like ssh.

deb http://archive.debian.org/debian etch main

But that is pretty much that.

Now for the real fun part, putting it on the internet!  I’ve found that this is a simple way to redirect in port 80 on the registered address I want to use, and it allows the UML instance to NAT out the same address.

/sbin/iptables -t nat -A POSTROUTING -s 10.13.0.10/32 -o eth0 -j SNAT –to 1.2.3.4
/sbin/iptables -t nat -A PREROUTING -i eth0 -p tcp –dport 80 -d 1.2.3.4 -j DNAT –to 10.13.0.10:80
/sbin/iptables -t nat -A POSTROUTING -s 10.13.0.10/32 -o eth0:0 -j MASQUERADE

Remember that you’ll also need to enable ipv4 forwarding for this to work!  You’ll need to run:

sysctl -w net.ipv4.ip_forward=1

or add it to /etc/rc.local
And with all that done, the 32bit web server is now talking. It’s not what everyone was hoping for, but at least it’s a solution.

As an update, for those who don’t have the option of TUN/TAP bridging, there is always SLiRP, as covered here.

Updated build of Linux 0.11 on Windows 10

Building & Running Linux

Building & Running Linux

I’ve updated my project for compiling Linux 0.11 on Windows 10.  In this version it builds a lot better with TDM MinGW 5.1.0 + MSYS.

The big improvements is that you can compile Linux without the full MinGW/MSYS install by running the ‘blind’ script which will compile the kernel without make and friends.

The build process for the kernel works as well so now with the included Qemu 0.12.5, no need to link under Linux anymore.  I fixed up some of the build processes as I thought I’d re-build and some stuff bombed so it’s all fixed up.

For those interested, I just updated the original download here:

MinGW-aout-linux-011.7z

Mainframe (s390 Linux) Moon Buggy

Linux/s390

Linux/s390

For all you mainframe/Qemu fan’s I came across the ‘QEMU Advent Calendar‘, which includes Moon Buggy on s390!

Moon-buggy is an ascii art game styled after moon-patrol.

Since I do get people always requesting something to run on the Qemu s390 emulation, here you go!  And for Windows users, I packed it up somewhat to make it somewhat easy to run with the image files, emulator and ansicon as moon.7z .

Just unpack and run “run32.cmd” for the 32bit ansicon, or “run64.cmd” for the 64bit ansicon.

PHP 5.4 is now obsolete on Debian

While doing an update, I got this fun message:


php5 (5.4.45-0+deb7u2) wheezy-security; urgency=medium

* PHP 5.4 has reached end-of-life on 14 Sep 2015 and as a result there
will be no more new upstream releases. The security support of PHP
5.4 in Debian will be best effort only and you are strongly advised
to upgrade to latest stable Debian release that includes PHP 5.6 that
will reach end of security support on 28 Aug 2017.

-- OndÃ…ej Surý <[email protected]> Sun, 04 Oct 2015 17:05:37 +0200

Time to upgrade!

After a bit of digging around here is how I did it.  I’m moving from PHP 5.4 to PHP 5.6


# php --version
PHP 5.4.45-0+deb7u2 (cli) (built: Oct 17 2015 09:01:48)
Copyright (c) 1997-2014 The PHP Group
Zend Engine v2.4.0, Copyright (c) 1998-2014 Zend Technologies

Ok, so here is the version I’m starting with on Debian 7.9 (Wheezy). During this process, I’m using unsigned packages so get used to this fine message, and packages being held back, unless I manually install them:


Reading package lists... Done
W: GPG error: http://packages.dotdeb.org wheezy Release: The following signatures couldn't be verified because the public key is not available: NO_PUBKEY E9C74FEEA2098A6E
W: GPG error: http://packages.dotdeb.org wheezy-php56-zts Release: The following signatures couldn't be verified because the public key is not available: NO_PUBKEY E9C74FEEA2098A6E
Reading package lists... Done
Building dependency tree
Reading state information... Done
0 upgraded, 0 newly installed, 0 to remove and 0 not upgraded.

But if you can read this, then it worked!

First add these to the /etc/apt/sources.lst file:

deb http://packages.dotdeb.org wheezy all
deb-src http://packages.dotdeb.org wheezy all
deb http://packages.dotdeb.org wheezy-php56-zts all
deb-src http://packages.dotdeb.org wheezy-php56-zts all

Then we can run the usual apt-get update / apt-get upgrade shuffle.

On my first run I got this fun output:


The following packages have been kept back:
libapache2-mod-php5 libmysqlclient18 mysql-server php-pear php5 php5-cli
php5-common php5-gd php5-mysql
The following packages will be upgraded:
mysql-common
1 upgraded, 0 newly installed, 0 to remove and 9 not upgraded

So I went ahead and updated mysql-common.  And during that upgrade I got the new message:


WARNING: The following packages cannot be authenticated!
mysql-common
Install these packages without verification [y/N]? y

So yes these packages are all unsigned. 🙁

After this, I ran:


# apt-get install php5

And got the following scary looking output


The following extra packages will be installed:
libapache2-mod-php5 libt1-5 libvpx1 php5-cli php5-common php5-gd php5-mysql
Suggested packages:
php5-user-cache
Recommended packages:
php5-readline
The following NEW packages will be installed:
libt1-5 libvpx1
The following packages will be upgraded:
libapache2-mod-php5 php5 php5-cli php5-common php5-gd php5-mysql
6 upgraded, 2 newly installed, 0 to remove and 3 not upgraded.
Need to get 7,659 kB of archives.
After this operation, 5,220 kB of additional disk space will be used.
Do you want to continue [Y/n]? y
WARNING: The following packages cannot be authenticated!
php5-mysql php5-cli php5-gd libapache2-mod-php5 php5-common php5
Install these packages without verification [y/N]? y

And then finally, after another apt-get update / apt-get upgrade I finally get this output:


The following packages have been kept back:
libmysqlclient18 mysql-server
0 upgraded, 0 newly installed, 0 to remove and 2 not upgraded.

So just update the held back packages and get it over with.


apt-get install libmysqlclient18 mysql-server

Ugh, it isn’t pretty.  But now we are on the newer train of PHP!


# php --version
PHP 5.6.14-1~dotdeb+zts+7.1 (cli) (built: Oct 2 2015 03:39:20)
Copyright (c) 1997-2015 The PHP Group
Zend Engine v2.6.0, Copyright (c) 1998-2015 Zend Technologies
with Zend OPcache v7.0.6-dev, Copyright (c) 1999-2015, by Zend Technologies

Hopefully things continue to work.

Building Linux 0.11 on Windows 10

No really, it compiles! on Windows!

No really, it compiles! on Windows!

So continuing with the fun from yesterday, where I had managed to get gcc 1.40 running on Windows with MinGW, it was time to try to take the final leap and build Linux.

There wasn’t too much to massage on Linux, mostly Makefiles for the various tool name differences, and how to handle keyboard.S as the default setup for NTFS is case insensitivity. While I did get some old version of as16 and ld16 to build, I’m not sure if they are working correctly. Or it could be the ‘build’ tool. The downside is that the final ‘Image’ file produced doesn’t work (I should add that all issues have since been fixed, and it is now possible to cross compile a running kernel from Windows, and boot it with Qemu).

But copying the ‘system’ file that is compiled on Windows, to a Linux VM, and having it do the boot setup does work!

And it boots!

And it boots!

Very cool to say the least!

I almost wonder if MSVC 1.0 could build any of this. Then it could be possible to bootstrap Linux from Windows NT 3.1 … Although Windows 10 is good enough for me, right now.

And I got the DJGPP 1.0 gcc driver to work (soft of)!

C:\aoutgcc\test>gcc -v hello.c -o hello -I ../include-0.12 -L../lib
gcc version 1.40
cpp -v -I ../include-0.12 -undef -D__GNUC__ -Dunix -Di386 -D__unix__ -D__i386__ hello.c C:/Users/neozeed/AppData/Local/Temp/cca0_388.cpp
GNU CPP version 1.40
cc1 C:/Users/neozeed/AppData/Local/Temp/cca0_388.cpp -quiet -dumpbase hello.c -version -o C:/Users/neozeed/AppData/Local/Temp/cca0_388.s
GNU C version 1.40 (80386, BSD syntax) compiled by GNU C version 5.1.0.
default target switches: -m80387
a386 -o hello.o C:/Users/neozeed/AppData/Local/Temp/cca0_388.s
ld -o hello c:/aoutgcc/lib/crt0.o -L../lib hello.o c:/aoutgcc/lib/gnulib -lc c:/aoutgcc/lib/gnulib

Sorry that doesn’t format so well on a blog. But now I only have to force the include path, and the lib directory. At this point I’d call it ‘good enough’

I uploaded the archive MinGW-aout-linux-011.7z. If you want to compile Linux, you’ll need a MSYS from MinGW. Otherwise, this is only interesting to people who run Windows and want to play with Linux 0.11. Â I also included the Linux VM, and binaries for the tools. It’s not even 7MB. How is that for crazy small?

** EDIT

I got it all working now that I found all the portions to set to output as O_BINARY/wb that are needed on a Win32 host, so using MinGW I can build the as86/ld86/binutils/gcc and Linux 0.11!

My updated post is here.

Also I put all the source onto git, along with binaries up on sourceforge. It’s worth mentioning that since I wrote this article, I have gotten quite a number of older versions of Linux to build, along with simple kernel debugging with GDB. Kernels include:

Download Ancient Linux on Windows

Download Ancient Linux on Windows

Craziest cross compile yet!

Windows 10 to target Linux 0.11!

It works!

It works!

Sadly that ancient line program only runs ELF binaries, so that won’t work to test.

As I mentioned gcc doesn’t work. I need to tear more into DJGPP
to see how they did it or just use it’s gcc driver to run this.

In the test directory I’ve mimic’d what a Linux 0.11 install does when compiling
a single file into an exe.

simply run:

c_ hello

and it’ll compile hello.c into hello.

C:\aoutgcc>..\bin\cpp -v -I../include-0.12 -undef -D__GNUC__ -Dunix -Di386 -Dlinux -D__unix__ -D__i386__ -D__linux__ hello.c C:\Users\neozeed\AppData\Local\Temp\001.cpp
GNU CPP version 1.40

C:\aoutgcc>..\bin\cc1 C:\Users\neozeed\AppData\Local\Temp\001.cpp -quiet -dumpbase hello.c -version -o C:\Users\neozeed\AppData\Local\Temp\001.s
GNU C version 1.40 (80386, BSD syntax) compiled by GNU C version 5.1.0.
default target switches: -m80387

C:\aoutgcc>..\bin\a386 -o hello.o C:\Users\neozeed\AppData\Local\Temp\001.s

C:\aoutgcc>..\bin\ld -o hello ../lib/crt0.o hello.o ../lib/libc.a

Wasn’t that fun?

The ‘best’ way I can think of to test is to tar the exe like this:

C:\aoutgcc>..\bin\tar.exe hello.tar hello

And then run it with the Linux 0.11 on Qemu which can be found here:

qemu-12.5.i386.zip

qemu -L pc-bios -hda linux-0.11-devel-060625.qcow2 -no-reboot -m 16 -k en-us -fda hello.tar

Then once Linux boots, do this:

tar -xvf /dev/fd0
chmod +x hello
./hello

Fun?!

For anyone who wants to play at home, here is the complete sources, and binaries.

I accidentally upgraded vpsland to Debian 8

So yeah, dealing with Apache 2.4 vs 2.2 was… fun.  The security Order stuff is obsolete so that was fun editing all the virtual hosts.

The key parts being:

In this example, all requests are denied.

2.2 configuration:

Order deny,allow
Deny from all

2.4 configuration:

Require all denied

In this example, all requests are allowed.

2.2 configuration:

Order allow,deny
Allow from all

2.4 configuration:

Require all granted

In the following example, all hosts in the example.org domain are allowed access; all other hosts are denied access.

Boy was that fun!

Another bit of fallout was the hosts file.  I have spamd running and suddenly I was being bombarded with this message:

Jul 25 10:15:39 cheapvps spamc[683]: connect to spamd on ::1 failed, retrying (#1 of 3): Connection refused

Well it turns out after much digging around that Debian 8 is more IPv6 ready.  The hosts file from Debian 7 was something like this:

127.0.0.1 localhost
::1 localhost ip6-localhost ip6-loopback

And in 8, it changed to this:

fe00::0 ip6-localnet
ff00::0 ip6-mcastprefix
ff02::1 ip6-allnodes
ff02::2 ip6-allrouters
127.0.0.1 localhost.localdomain localhost
# Auto-generated hostname. Please do not remove this comment.
::1 localhost ip6-localhost ip6-loopback

Needless to say, having localhost point to ::1 made it dependant on all local daemons supporting IPv6, and spamd sadly is IPv4 only.  Luckily it’s a quick fix to remove localhost from ::1, which then let’s it work again with 127.0.0.1, and now it can connect over IPv4.

Well today (August 4th, 2015) there was a critical update to Apache.  And after updating I got this fine error:

# /etc/init.d/apache2 restart

[….] Restarting apache2 (via systemctl): apache2.serviceJob for apache2.service failed. See ‘systemctl status apache2.service’ and ‘journalctl -xn’ for details.

failed!

Great.  So what does the error actually say?

# systemctl status apache2.service
* apache2.service – LSB: Apache2 web server
Loaded: loaded (/etc/init.d/apache2)
Active: failed (Result: exit-code) since Tue 2015-08-04 13:52:13 HKT; 7s ago
Process: 6063 ExecStop=/etc/init.d/apache2 stop (code=exited, status=0/SUCCESS)
Process: 6427 ExecStart=/etc/init.d/apache2 start (code=exited, status=1/FAILURE)

systemd[1]: Starting LSB: Apache2 web server…
apache2[6427]: Starting web server: apache2 failed!
apache2[6427]: The apache2 configtest failed. …….
apache2[6427]: Output of config test was:
apache2[6427]: apache2: Syntax error on line 250 …y
apache2[6427]: Action ‘configtest’ failed.
apache2[6427]: The Apache error log may have more….
systemd[1]: apache2.service: control process exi…=1
systemd[1]: Failed to start LSB: Apache2 web server.
systemd[1]: Unit apache2.service entered failed …e.
Hint: Some lines were ellipsized, use -l to show in full.

Fantastic.

# apachectl configtest
apache2: Syntax error on line 250 of /etc/apache2/apache2.conf: Could not open configuration file /etc/apache2/mods-enabled/alias.load: No such file or directory
Action ‘configtest’ failed.
The Apache error log may have more information.

So, normally you’d check under modules-enabled, and link in the missing bits, right? Yeah except there is no MPM modules. Not anymore.  And yes I removed and re-installed the apache2-mpm-prefork module, to no avail.  So after much digging around it looks like the transition to 2.4 finally broke everything irrecoverably.  So I backed up the /etc/apache2 directory than ran the follwing:

apt-get purge apache2

Which then removes all the apache2 stuff from the system.  Then to finish it off, run a quick

rm -rf /etc/apache2

You did back it up, right?

now put it back in..

apt-get install apache2 libapache2-mod-php5

Now to re-enable the virtual sites.  For some reason they need to be enabled with a2ensite.  Except they don’t tell you that your sites now need to end in .conf in the /etc/apache2/sites-available (you did back it up right?)

Also if you run perl (src2html) be sure to run:

a2enmod cgi
service apache2 restart

Not to mention the joys of updating perl, and the cvsweb breaking, and I’m sure far more to break.  Oh well, at least it’ll be up to date.  That’s what I get for mixing ‘stable’ with ‘old stable’, when the local mirror out in the UK I was using moved up to 8.

Installing Debian 7 in KVM via the CLI (text mode)

So with my new disk, and my server back online, I went ahead and re-installed my web server VM, and the newer install from the netcd is graphical of all things.

xx

Debian’s graphical installer

Ugh.

If anyone cares, here is how I do this, the old cli way. I don’t like weird manager things, I’m capable of hitting flags myself:

kvm -m 640 -nographic -curses -hda blog.vmdk -cdrom /install/debian-7.8.0-i386-netinst.iso -boot d -vnc 10.12.0.1:23 -net nic,vlan=0,macaddr=52:54:00:11:11:23 -net tap,vlan=0,ifname=tap0,script=/etc/qemu-ifup

very simple, right?

So the ‘solution’ to this is quite simple hit escape a few times, and the screen will repaint, and you should get the grub boot prompt

gr

The text mode grub loader

So simply type in:

install vga=normal fb=none

And hit enter, and you should now be good to go!

Debian text mode installer

Debian text mode installer

I guess I can go over some quick guide to setting up the tun/tap bridging.  This section is to be added to /etc/network/interfaces

iface br0 inet static
address 10.12.0.1
netmask 255.255.255.0
network 10.12.0.0
broadcase 10.12.0.255
bridge_fd 9
bridge_hello 2
bridge_maxage 12
bridge_stp off
pre-up brctl addbr br0
post-down brctl delbr br0

And the qemu-ifup script:

# cat /etc/qemu-ifup
#!/bin/sh

echo “Executing /etc/qemu-ifup”
echo “Bringing up $1 for bridged mode…”
sudo /sbin/ifconfig $1 0.0.0.0 promisc up
echo “Adding $1 to br0…”
sudo /sbin/brctl addif br0 $1
sleep 2

thats about it.  Debian 8, was just released, and I suspect all of this will have changed.