Virtualizing Floppy Disk Drive – Part 1

(this is a guest post from Tenox)

I had a really bad weekend associated with floppy drive failures. Either all my floppy disks or all my drives decided to jump the ship. Nothing worked! Worse, I could not buy any “new” floppy disk anywhere. Office Depot still stocks floppies but not in stores and you have to order online and wait. Neither Halted nor Weirdstuff had them as well. Seriously?

A major disaster! Something had to be done to make it future proof. So I went to research floppy drive replacement solutions. And this is what I found. There are several Floppy Disk Emulators on the market.

Here is the list and a little bit of research on every one of them. They do have major differences to be aware of.

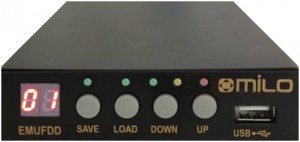
  • EMUFDD – The first one I found. Italian made, intended to be used in industrial machinery. The device is extremely compatible, customizable, feature rich and according to the company, individually installed in each deployment. I bears a lot of interesting features such as Network option. Apart from the high price the device is not intended to be used by hobbyists.

emufdd

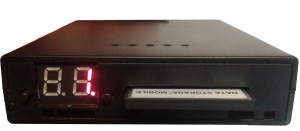
  • Gotek – This one is by an Indian company. Very cheap and you can find it everywhere. It costs about $25 on eBay including shipment. However a major warning: they work by dividing the SD card in to 100 partitions, each size of a single floppy disk and multiplexing them to emulate a floppy disk. Because the partitions are formated with FAT12 the device is not usable for anything else than MS-DOS and Windows. Apparently revision F is capable of storing a single “bootable” or non-MS-DOS disk image. Also they have separate models for 720k, 1.2MB and 1.44MB.  There is a whole army of Gotek clones.

  • IPCAS – This is another clone of Gotek, however worth separate mention and a warning, it costs $300 – ouch!

ipcas

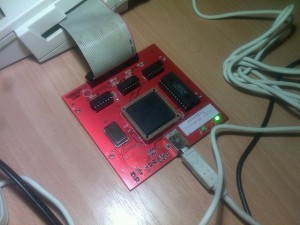
  • HxC – this one was found by claunia. As with most French stuff bit confusing because it has several web sites (one two three). The devices are manufactured in Poland by Lotharek. The price is around $150 and you can buy it on eBay. Feature wise may be the best of all, it definitely supports all the non-PC platforms and even very weird formats. The software naively supports conversion from the notorious IMD and TD0. For some people it will be appealing the HxC is an open source project and you can build it yourself. Certainly it helps to ensure longevity in case of the vendor going out of business. Definitely a winner here.

  • HxC USB Version – This is interesting variant that instead of SD card uses a wired USB connection to a host machine.  The main drawback is that it is read only. However you can’t beat it’s $70 price. For this I could probably refit few of my machines and use it for boot only.

hxcusbonly


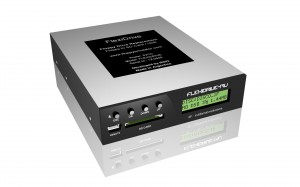
  • FlexiDrive – Made in Argentina. The manufacturer claims to support all floppy disk formats including 8″ disks. SD card or USB based. They are made for industrial machinery and customized firmware for different applications. Cost $385.

FlexiDriveMV-SD


  • DTX200 – from Datex a French company. These are also made for industrial machinery. They maintain a large database of emulated floppy drive types. Interestingly they have video of MicroVAX using their emulator, certainly interesting from retrocomputing point of view! They also make MFM 2 CF hard disk emulator. The price is $495.

dtx200


I have ordered two units for testing: HxC, SD revision F from eBay and Gotek Rev F from the manufacturer. I guess testing of the units will be subject of part 2 of this post. I’m planning to try to install some of the weirdest operating systems with wildest disk formats.

Also as a final note, for more modern computers with USB support there are some more mainstream options. I have used following two professionally:

  • Floppy Emulator in Pendrive / USB Stick. The best success I had so far was zMate pen drive from DaneElec which registers as a floppy drive with the system in addition to regular removable disks. I used it several times for booting, loading Windows storage drivers or saving BIOS diagnostic logs from servers without FDD.
  • Lantronix Spider, which allows you to mount a virtual floppy disk or cdrom image from the viewer machine or SMB share, just as you would using VMware or VirtualBox. Pretty cool.

Updates:

  • Mac Floppy Emu – is specifically designed for Macintosh. However currently it only support 800K. Very promising project and once they add 1.44MB support I will want to retrofit my Macs with this.
  • 1541 Ultimate – Floppy disk emulator for Commodore C64.

3 1/2″ disks vs the 5 1/4″ disks…

So I’ve been talking with Frank Sapone about recovering old data and how I’ve had the worst luck with old 3 1/2″ disks.  Even sealed stuff like the MS-DOS client components of SQL Server 4.21a which Microsoft chose not to put on the CD-ROM, but rather on floppy diskette … which are not readable.

What is surprising is that not only has he had the same luck with 10-15 year old 3 1/2″ disks, but with 26 year old 5 1/4″ disks is that he can read them fine.

That is right, 26 year old  disks work fine with a good Panisonic 5 1/4″ drive mechanism, including a box of random disks he bought on e-bay that went through the old fashioned metal scanners, that he thought at best was a bulk lot of junk, he could read 100% of them with no errors.

I can only wonder how many people are sitting on ‘good media’ still factory sealed to only find out they are completely worthless.

If you’ve got old stuff, you better read it NOW… Otherwise it’ll probably never work, esp if it is 3 1/2″.

Qemu disk image conversion

I see that there is some confusion over how to convert disk images from various popular emulators, and I thought I’d try to clear some of this up. Without a doubt, the best free tool available for this is qemu-img. And it’s free! Currently as I write this, that makes Qemu 0.14.0 the current version. I’ll cover the common ones that I use.

For the most part for Qemu I used the qcow2 format. Naturally you can use any of these formats in Qemu… While others are limited.

Converting from..

Virtual PC source image..
To convert to a qcow2:

qemu-img convert source.vhd -O qcow2 destination.qcow2

To convert to VMDK for VMWare:

qemu-img convert source.vhd -O vmdk destination.vmdk

And to convert to a raw image, suitable for BOCHS.

qemu-img convert source.vhd -O raw destination.raw

And of couese you can mix and match from there… Say take your qcow2 and convert it for VPC like this:

qemu-img convert source.qcow2 -O vpc destination.vpc

Or convert a Virtual PC/Virtual Server/Hyper-V vhd (as long as the hyper-v image is consolodated) and convert it to VMWare like this:

qemu-img convert source.vhd -O vmdk destination.vmdk

Note that these VMWare VMDK’s are not for ESX/ESXi, they use more of a raw partition set… But of course you can always convert them to RAW then dd them into the target partition… But I’ll leave that exercise to you. Honestly that vmware converter thing is much easier as it’ll inject the needed drivers.

Speaking of which, this only converts image formats, don’t forget about pre-loading the needed drivers!

I hope this helps out anyone trying to move disk images around.

back to fun with pread.c

Well I know this topic keeps comming up over & over that the pread.c that I had used to build my Xenix on Qemu is long lost.

Anyways someone else was asking me for it, and I stumbled accross this Microsoft Memo:

http://support.microsoft.com/kb/100027

which means the device name I was listing was wrong… I’m unsure if it means in 2003 it change from what it was since 1991….

Anyways here is my new ‘pread’.

#include <stdio.h>
#include <stdlib.h>

define BUFFSIZE 1024*1024
void main(void)
{
FILE *disk;
FILE *ofile;
int disknumber;
char fname[255];
char oname[255];
char *buffer;
int rc;
int pass;
buffer=(char)malloc(BUFFSIZE); if(buffer==(char)NULL)
{printf("\nError allocating buffer!!\n");return;}
printf("please tell me the disk NUMBER that you want to read\n");
printf("for \\.\PhysicalDrive1 just answer 1\n\n:");
memset(fname,0x0,sizeof(fname));
scanf("%d",&disknumber);
sprintf(fname,"\\.\PhysicalDrive%d",disknumber);
printf("reading the device %s\n",fname);
disk=fopen(fname,"rb");
memset(oname,0x0,sizeof(oname));
printf("\nWhat is the output file name?\n\n:");
scanf("%s",oname);
ofile=fopen(oname,"wb");
if(ofile==NULL){printf("\n\nERROR with %s\n",oname);return;}
if(disk==NULL){printf("\n\nERROR with disk %s\n",fname);return;}
rc=5;
pass = 0;
while(rc!=0)
{
memset(buffer,0x0,sizeof(buffer));
rc=fread(buffer,1,BUFFSIZE,disk);
printf("\r%d\t%d:Megabytes processed",rc,pass);
fwrite(buffer,1,rc,ofile);
pass++;
}
fclose(disk);
fclose(ofile);
printf("\n\n\nDone!%c",7);
}

Running Xenix on qemu

Neither Bochs nor Qemu can boot the Xenix floppy diskettes all the way. Virtual PC & VMWare seemed to have no luck when the kernel transitions to protected mode. While on the way to work I had an idea. What if you had an old hard disk and a machine capapble of installing? Simply imaging the hard disk may be enough, since after that point you don’t need any floppy disks!

So this is what I have to show for the work today:

Freaking awesome, if I do say so myself.

OK, now how to do it? First you need an existing system running Xenix. If you have any plans on migrating an existing installation take note! This will preserve your install, just don’t format! On the Xenix boot screen take note of the geometry of the disk. We will need the geometry for later. Although I did a test boot without it, its a good thing to preserve it.

For virgin users, you will need a small disk to install on. I had a 2.5 GB disk that was too big, and 132MB disk that worked fine. I used a dell pc with 2 ide controllers for this. The longest task honestly was installing Xenix. I think that ran about 20 minutes. Once I was done, shutdown xenix, and put the disk in a machine running Windows (Linux fans can put it in their box, and just dd the Xenix disk into an image). Us poor Windows users don’t have dd. Anyways take not of what disk # it is, as Windows of course will not assign it a drive letter since it does not understand Xenix’s filesystem.

As you can see it’s disk #2 in this computer. Ok now we need to read the disk and write it into a disk image. I couldn’t find a util offhand to do it, so I wrote one real quick. Here is the source code, you’ll need a C compiler on your PC to compile it. I guess I could ‘neaten it up’ some, but for now here you go:

Source code

Executable

Yes I know its horrible, and blogger does a wonderfull job of formatting my program. Anyways compile it & run it. Now you’ll have a disk image of your hard disk!

Now for the fun part, running Xenix! We simply specifiy the hard disk geometry that we got earlier, and pass it the disk image that we created! I’m using an Quantum Pro drive ELS with the following geometry:

919 Cylinders
16 heads
17 bytes/sector

That translates into the following command:

qemu -M isapc -m 16 -hda xenix386-2.3.4.disk -hdachs 919,16,17 -L .


Let the good times roll!

–Update from 2011!

It is *NOW* possible to install Xenix in Qemu 0.14.0. You can read more about it here.