Qemu 0.10.5 released!

Well qemu keeps on improving! Personally I like the new approach of more releases… the 0.10 road has been rocky for me with my old stuff at any rate…

Qemu 0.10.5 can be downloaded from here.

For windows users, you are going to have to build your own stuff, there doesn’t seem to be any provided binaries…….

back to fun with pread.c

Well I know this topic keeps comming up over & over that the pread.c that I had used to build my Xenix on Qemu is long lost.

Anyways someone else was asking me for it, and I stumbled accross this Microsoft Memo:

http://support.microsoft.com/kb/100027

which means the device name I was listing was wrong… I’m unsure if it means in 2003 it change from what it was since 1991….

Anyways here is my new ‘pread’.

#include <stdio.h>
#include <stdlib.h>

define BUFFSIZE 1024*1024
void main(void)
{
FILE *disk;
FILE *ofile;
int disknumber;
char fname[255];
char oname[255];
char *buffer;
int rc;
int pass;
buffer=(char)malloc(BUFFSIZE); if(buffer==(char)NULL)
{printf("\nError allocating buffer!!\n");return;}
printf("please tell me the disk NUMBER that you want to read\n");
printf("for \\.\PhysicalDrive1 just answer 1\n\n:");
memset(fname,0x0,sizeof(fname));
scanf("%d",&disknumber);
sprintf(fname,"\\.\PhysicalDrive%d",disknumber);
printf("reading the device %s\n",fname);
disk=fopen(fname,"rb");
memset(oname,0x0,sizeof(oname));
printf("\nWhat is the output file name?\n\n:");
scanf("%s",oname);
ofile=fopen(oname,"wb");
if(ofile==NULL){printf("\n\nERROR with %s\n",oname);return;}
if(disk==NULL){printf("\n\nERROR with disk %s\n",fname);return;}
rc=5;
pass = 0;
while(rc!=0)
{
memset(buffer,0x0,sizeof(buffer));
rc=fread(buffer,1,BUFFSIZE,disk);
printf("\r%d\t%d:Megabytes processed",rc,pass);
fwrite(buffer,1,rc,ofile);
pass++;
}
fclose(disk);
fclose(ofile);
printf("\n\n\nDone!%c",7);
}

New versions of Qemu!

While I’ve been playing with 386BSD, it seems a bunch of new versions of Qemu have been released. Sadly they all crash at the same point on 386BSD so it’s kind of moot. Also my OS/2 2.0 image doesn’t work on the new Qemu, it hangs at the switch to graphical mode…. So I suspect there will be more quick revisions to Qemu.

At any rate, they have added all kinds of features and stuff to it, I’d say check it out, but hold on tightly to older versions that you have working now…

You can find the source code to Qemu here.

The win32 binary is lagging, so you’ll have to build it yourself. I’ve been using my old MinGW environment that I had detailed it’s setup here.

The new Qemu works with GCC’s greater than version 3 which is a good thing for the many platforms with ONLY GCC 4.

OS/2 vs Windows 7

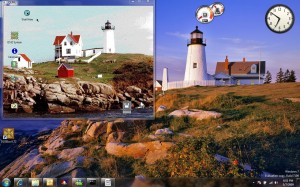
I installed the latest RC of Windows 7 x64 today, and while going thru the latest wall papers I saw one that looked surpisngly familiar…..

Then it hit me, this looks a LOT like the old light house from OS/2 2.0! To check I quickly installed a copy of OS/2 2.0 on Qemu 0.90 (which works on Vista, unlike 0.91).

Lighthouses into the new world...


While it may be the same place from a different angle, the similarity is kind of funny. At the time OS/2 2.0 was the new striking consumer 32bit OS, and here I am on the new striking consumer 64bit OS… with more or less the same wall paper from a different perspective.

The more things change, the more they stay the same!

Anonet revisited..

Well anonet moved client ports, and I was getting some questions about the whole thing. The client port has finally been well… finalized as far as I can tell. I don’t use it all that much but I figured that the ‘bar’ needed lowering for people curious about this anonet thing.

So what I’ve done for windows people is to setup an installable version of DSL linux that is just click and run that is configured for anonet. It’s got the DNS information all ready to go so you can run nirc and join the main irc server (don’t forget to edit the .nirc file if you so wish) and the dillo & firefox web browsers are also setup & working. However firefox is SLOW… But I figure this will allow people to easily see what’s what without installing any device drivers… And it’s more fun in a VM.

Currently I’m just sharing this in a torrent which you can download here:

Naturally you can use things like utorrent (http://utorrent.com/) to download it.

It’s all setup in a nsis script that I’ve been evolving from the BSD4.2 on windows thing.. so it’ll be straightforward to install & uninstall. Vista & Windows 7 users need to remember that the disk image will re-appear in their:

%userprofile%\AppData\Local\VirtualStore\Program Files\anonet-client\

or

%userprofile%\AppData\Local\VirtualStore\Program Files (x86)\anonet-client\

Directories… so remember to remove it.. I don’t know how to do that nicely offhand just yet.

Oh well you can leave me feedback public/private anonymously or whatever.

Fun with Qemu & Large Disks….

I was playing around with NeXTSTEP under a snapshot of qemu and I noticed that my arrow keys were not working correctly. After a few hours of digging about I found the fix was easy enough:
-k en-us
That’s it, just append that to your boot string, and away you go! Another annoyance has been my quest to install AROS onto a P4 computer.. I picked up a new 320GB IDE disk (WD Caviar Blue) .. which the BIOS & AROS promptly refused to acknowledge corectly. Everything was going to hell until I gave up and read the manual. Once again it was simple, there is a jumper setting for ‘older’ OS’s to see only 32gb, and naturally the BIOS is now happier. If only I could say the same of AROS…

Some fun networking with MS-DOS & Novell Netware.

Ok I wanted to do this eventually but now I’ve finally done it. I have constructed something a little complex but it works surprisingly well.

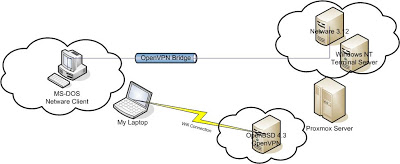
Let me draw a picture so it’ll be a little easier to follow:

proxmox Netware diagram

proxmox Netware diagram


All of the machines in clouds are virtual…

Ok I’m going to assume you can install & configure OpenVPN on your own. I did a really simple install on Proxmox VE, just be sure to use the e1000 network adapters. All the others gave me tones of errors with any sizable traffic. Also I should point out that I’m using OpenBSD 4.3 which is the latest as of today.

dev tun0
dev-type tap
ca /etc/openvpn/ca.crt
cert /etc/openvpn/server.crt
dh /etc/openvpn/dh1024.pem
key /etc/openvpn/server.key
server-bridge 192.168.6.33 255.255.255.224 192.168.6.50 192.168.6.62
push “route 192.168.6.0 255.255.255.0”
push “dhcp-option DNS 192.168.6.34”
client-to-client
duplicate-cn
keepalive 10 120
max-clients 100
persist-key
persist-tun
status /var/log/openvpn-status.log
verb 3
tun-mtu 1500
fragment 1300
mssfix
float

Again I just followed the example from the OpenVPN site to set this up. What makes this different though is the fact that I’m using this in a bridge mode. As you can see I have told OpenVPN that it is to use the tun0 interface as a ‘tap’ driver.

My hostname.tun0 is this:
Link0 up

Likewise the bridgename.bridge0 is:
add em1
add tun0
up

And finally for this example my bridgename.em1 is:
inet 192.168.6.33 255.255.255.224 NONE

So using this setup I have a ‘private’ 192.168.6.32/27 network in which I’ve got a few virtual machines running and space for my laptop to VPN into. Now one of the virtual servers on my Proxmox server is Windows NT 4.0 Terminal Server… Yeah I know I got it cheap on ebay, and I kind of like it. Anyways I’m running Qemu on it, which is running Netware 3.12. I installed the libpcap then I had to find out what my Ethernet devices are called. I used wireshark (it was ethereal) and it’s a cool program to have around. The last version to run under Windows NT 4.0 was 0.99.4 so that’s the one I used. Once I have done this I found my device and was able to setup a string for Qemu (which was \Device\NPF_RTL80291)

Here is what I’m using:

Qemu –had netware.disk –m 16 –M isapc –L pc-bios –net nic –net pcap,devicename=”\Device\NPF_RTL80291”

This sets up an ISA computer with 16 megaybtes of ram and a single ISA nic that will utilize libpcap to send out frames on the rtl80291 that’s being emulated to my NT terminal server by proxmox.

On the ‘client’ side of things, I’m running the 64 bit version of Vista. So I’ve installed the OpenVPN that not only has 64 bit device drivers, but has a nice little GUI to connect & disconnect from the networks. Here is the OpenVPN config that is on my laptop.

dev tap
ca ca.crt
cert client1.crt
key client1.key
client
proto udp
remote 192.168.1.75 1194
resolv-retry infinite
nobind
persist-key
persist-tun
;comp-lzo
mssfix
tun-mtu 1500
fragment 1300

Ok, so far so good. Now I do have Virtual PC 2007 on my laptop, and I have made sure that the “Virtual Machine Network Services” were bound to the “TAP-Win32 Adapter V9” interface.

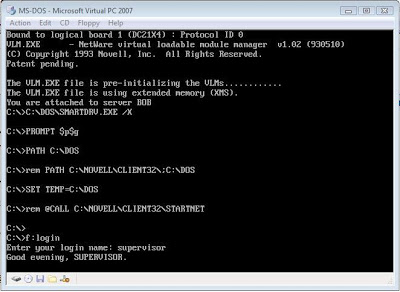
The it’s a simple matter of connecting to the VPN, then loading up the virtual PC with MS-DOS & the Novell Netware client.

Then you should be able to ‘bind’ to the server & login!

dos netware client

dos netware client

The ‘cool’ thing about this setup is that it will work over things like wifi, and easily allow you to add clients near & far. Oh and the best part for the wifi crowd is that it will use REAL encryption since WEP/WPA have all been shown to be useless. Oh yes, and it should allow you to host your DOOM, Quake 1, Rise of the Triad, Warcraft II, and Descent games…. Along with people playing at home! Using this you too can build your own IPX/Internet network!

I do hope this clears some of the uses & versility of Virtual servers, Qemu & Virtual Networking.

Netware 3.12 with Qemu

Ok I’m getting more requests on this which means I’ll finally do it.. I didn’t mean to put it off THIS long, honestly!

I have issues with Qemu 0.91 under Vista so this will all be with Qemu 0.90.

I have built a version with the libpcap compiled in, and placed a copy of the winpcap that I’m using in with this zip.

You can download the libpcap enable Qemu for Win32 right HERE.

I’m using the enclosed 1.cmd to run the thing, and I’ll go over more of it tomorrow.

Qemu 0.90 patched for NeXTSTEP 3.3 i386

Patches for Qemu 0.90 are available here:
Files needed to Build and patch Qemu 0.90 for NeXTSTEP on Windows : Free Download, Borrow, and Streaming : Internet Archive

The busmouse patch still survives here.
The win32 exe is here.

A PowerPC macosx 10.4 binary is available here:
http://www.vaxenrule.com/NextSTEP%2033/qemu-0.9.0-osx-10.4-PowerPC

This moves the SoundBlaster to IRQ 7, and incorporates a bus fix & busmouse addition. Remember to remove the parallel port for this to work correctly. Tested with NeXTSTEP 3.3

Why all the patches, you may ask? Well for some reason NeXTSTEP is unable to correctly drive the mouse in Qemu. Nobody has tracked it down, but I suspect it’s some weird issue with the BUS… Anyways I found this busmouse patch ages ago, and I’ve just been finagling it for ages so that it will keep on working. I know that there are a hand full of enthusiasts left, but I figure that for all interested they would appreciate this.

Linux the old

My first experience with Linux was with SLS, or Soft Land Systems. It was the first pre-packed Linux system for those of us who didn’t have a Minix system to cross build from. Although Taunenbaum saw this as a draw back, like Linus many of us had 386 computers, and wanted to exploit their power. Many of us were sickened by the shattered hope that was the 286, which provided protected mode, abet in 64k chunks. The 386 offered the holy grail, or a 4 gigabyte address space! No more offset games.

At the time the closest one could hope in terms of a personal Unix was SCO Xenix, which with the developer packages was prohibitively expensive, or Coherent. Coherent was a clean room re-implementation of Unix version 7 ( http://www.vaxenrule.com/sls%201.05.zip.torrent ).

I’m going to use Qemu, again because of it’s cross platform nature, and it’s ability to emulate the NE2000. One can only hope one day that VMWare or Virtual PC would allow some kind of interface for us to ‘hack’ emulated hardware into their infrastructure…..

Anyways first let’s create a 200mb disk

Qemu-image create –f qcow sls.disk 200M

Don’t laugh, 200mb back then was a ‘big deal’… Really. Mine was SCSI, and probably weighed some 7lb.

Unzip your sls distro somewhere accessible from your Qemu tree. I’m just going to stuff mine under a sls directory. During the install we will need a boot disk, simply copy any one of the files to ‘boot’. We’ll touch on it later. To boot from the floppy I’m going to issue:

qemu -L . -hda sls\sls.disk -m16 -net nic -net user -fda sls\a1.3 -boot a

At the LILO prompt simply press enter. Then you’ll be informed
Press to see SVGA-modes available, to continue….

Press space. Early Linux kernels had this annoying ‘feature’ compiled in.. I know, I think I’m the only person that doesn’t like custom fonts, nor do I like directory colors.

At the login prompt, login as root then run the fdisk command. The keystrokes for creating a primary Linux partition is as follows:
n
p
1
1
400

Now we are going to make a smallish swap partition.
n
p
2
401
406

Now we need to change its type to swap.
t
2
82

It’s just a byte flag, but each operating system selects a flag to identify itself to others, a marker of what is where. Before emulation on dual boot systems this was a “big deal”… However now dedicating a virtual machine to an entire OS takes out the complexity that plagued so many users so long ago….

Let’s save the changes type typing in ‘w’.

We are then told to reboot the system. Type in ‘sync’ a few times, then close qemu & restart it with the same flags.

Now we can login as ‘install’. We can use the color screen, so enter ‘y’. We are going to do the brave thing, and use floppy disk images. That’s option 1. The floppy images are 3 ½” so that’s option #2.

Now we need to identify the root & swap partitions. Select #1, then type in /dev/hda1. It will want to format it, so let it. Next select #2 for the swap, and type in /dev/hda2 .
Now we can select #7 to commence installation.

To get the full experience we are going to install the full thing… 100MB of it.. Option #4. We don’t want to be prompted we simply want everything that SLS has to offer, so answer ‘n’.

You will be prompted for a2-a4 Don’t forget in Qemu it’s ctrl-alt-2 for the runtime config, and you just issue:

change fda sls\a2

and so on for the rest of the disks. Then ctrl-alt-1 to go back to the main screen.

While this may seem tedious it’s better & faster than the real thing. Trust me!

Once X11 finishes unpacking, place in the boot disk, and let it write to it. Next feel free to preset the video mode to -1. We don’t have a modem, so you can answer no. Next we’ll allow the install to mark /dev/hda1 as the active partition. Just press enter for the question about dos partitions. Pick a snazzy hostname. The default softland works just fine. We have no patch disks, so you can just enter ‘n’ and press enter.

Phew we have just installed SLS! Press enter!

After that you can boot up into Linux 0.99.15g/SLS 1.0 . The best that 1994 has to offer.

Before we leave for now, lets get X-11 rolling. Login as root, no password, and then run syssetup. Choose 5,2,6,0. This configures the basic VGA server, a PS/2 mouse & exits the basic program. Running ‘startx’ Should get you into a really old X-11. No Gnome/KDE here! The mouse however acts erradictly. Ctrl-alt-backspace will bring you back to the prompt. I’ll see if I can figure this out later…

But for now that covers a basic install. Next up we’ll do some networking, and a game perhaps….