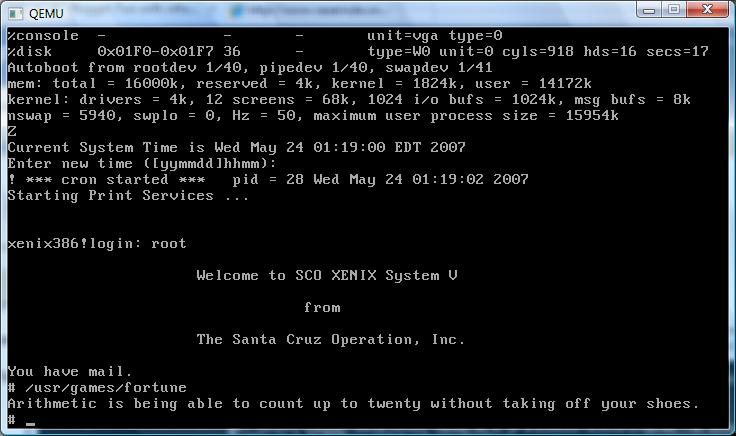
Neither Bochs nor Qemu can boot the Xenix floppy diskettes all the way. Virtual PC & VMWare seemed to have no luck when the kernel transitions to protected mode. While on the way to work I had an idea. What if you had an old hard disk and a machine capapble of installing? Simply imaging the hard disk may be enough, since after that point you don’t need any floppy disks!
So this is what I have to show for the work today:
Freaking awesome, if I do say so myself.
OK, now how to do it? First you need an existing system running Xenix. If you have any plans on migrating an existing installation take note! This will preserve your install, just don’t format! On the Xenix boot screen take note of the geometry of the disk. We will need the geometry for later. Although I did a test boot without it, its a good thing to preserve it.
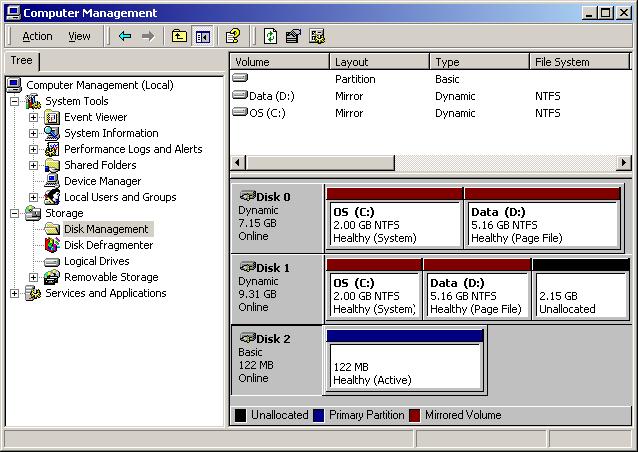
For virgin users, you will need a small disk to install on. I had a 2.5 GB disk that was too big, and 132MB disk that worked fine. I used a dell pc with 2 ide controllers for this. The longest task honestly was installing Xenix. I think that ran about 20 minutes. Once I was done, shutdown xenix, and put the disk in a machine running Windows (Linux fans can put it in their box, and just dd the Xenix disk into an image). Us poor Windows users don’t have dd. Anyways take not of what disk # it is, as Windows of course will not assign it a drive letter since it does not understand Xenix’s filesystem.
As you can see it’s disk #2 in this computer. Ok now we need to read the disk and write it into a disk image. I couldn’t find a util offhand to do it, so I wrote one real quick. Here is the source code, you’ll need a C compiler on your PC to compile it. I guess I could ‘neaten it up’ some, but for now here you go:
Yes I know its horrible, and blogger does a wonderfull job of formatting my program. Anyways compile it & run it. Now you’ll have a disk image of your hard disk!
Now for the fun part, running Xenix! We simply specifiy the hard disk geometry that we got earlier, and pass it the disk image that we created! I’m using an Quantum Pro drive ELS with the following geometry:
919 Cylinders
16 heads
17 bytes/sector
That translates into the following command:
qemu -M isapc -m 16 -hda xenix386-2.3.4.disk -hdachs 919,16,17 -L .
Let the good times roll!
–Update from 2011!
It is *NOW* possible to install Xenix in Qemu 0.14.0. You can read more about it here.


Great help! I am now able to run Xenix in qemu – thanks!
Have you had any luck with this method with os2 1.x? I have os2 1.2 running native on a 386 machine, but I would love to run it in qemu or bochs. Any suggestions?
geoffs. I’ve actually tried it with Microsoft OS/2 1.3 of all things. Qemu just traps while booting. I must say I’m disapointed.. I haven’t tried bochs yet though. I suspect it wouldn’t work though.
I think that the problem comes from the fact that OS/2 1.x was so tuned to take advantage of bugs in the 80286 setup, that emulators that really only worry about running Windows in standard mode just don’t cut it. I had read somewhere that 1.3 had the ability to use the 386’s method of switching from real to protected mode, and eliminated most of the issues associated with the keyboard controller resetting the CPU, however my copy still crashes. OS/2 2.0 seems to be as early as it gets.
@Neozeed.
I want to test it. But I can’t download you preader.exe programm.
Can you help me?
Regards
reini1976
This is very strange, but I noticed that the source is missing from both the blog, and my backup server.. like it never happened or something.
I recall it was pretty simple just reading bits from \\device\\harddisk\0 or something like that.
After more searching the device would be something like this:
\Device\HardDisk1
which would be your second hard disk. Simply just read & write some binary blocks out of it. I also recall that it was 512bytes short on the media read (I think its reserved or something) and you can just pad it….
Remember in C it would be “\\Device\\HardDisk1”.
Easy, right?
And where can I get xenix boot images?
I got mine from old companies, and of course Ebay… But it is getting harder & harder to find Xenix stuff.
If you have any legit claim to any version of Xenix and can prove it, I'm sure the news group people can find some disk images of what you need….
This is cool, I tried it with a xenix partition that I copied using dd within linux but the keyboard wont work when I boot it up. What version of qemu were you using ?
Xenix bootdisks can be downloaded from http://vetusware.com/ after registration(free).
I am currently using a snapshot of Qemu that I’ve enabled libpcap support in… I mostly use it for Netware 3.12 .
Anyways here is the command line that I’m currently using:
“qemu -L pc-bios -M isapc -hda xenix.disk -no-reboot -s
td-vga -k en-us”
This way when I ‘reboot’ it’ll just shutdown Qemu and I’ve had issues with the arrow keys under NeXTSTEP….
You may want to check out the following site for some pictures of Xenix memorabilia!
http://www.tenox.tc/tmp/ww/msxenix/pics/
I just downloaded Xenix 2.3.4 on qemu.
I get a message that CMOS does not have diskettes installed. Therefor I can´t use a:
Any idea how Ican fix this ? Thanks
Qemu's emulation isn't good enough in the floppy area.
I'd use the qemu-img tool from Qemu 0.10.15 or one of the 0.11 rc's to convert the hard disk image into something either VMWare or VirtualPC can use, as their floppy emulation will work.
Qemu 0.14.0 can no work with the floppy emulation!
17 bytes per sector? Surely you meant 17 sectors per track.
Nothing like a ten year old typo!