
I know this is a weird one. I got handed a backup of a broken VM and have to fix it. I was given a vma file which of course you basically need a Proxmox machine to use the vma command to unpack it.
Luckily you can happily install Proxmox into a VM that can’t properly run Proxmox, but it’ll give access to the utility to extract it.
It’s pretty self-explanatory other than the ‘tmp’ directory to extract to mustn’t exist. Weird.
vma extract vzdump-qemu-101-2024_10_07-12_26_33.vma tmpIn this case it extracted 2 raw files, and a config file.
disk-drive-sata0.raw
disk-drive-sata1.raw
qemu-server.conf
And looking at the config file we have:
boot: order=sata1;sata0;ide2;net0
cores: 4
cpu: x86-64-v2-AES
ide2: none,media=cdrom
memory: 8192
meta: creation-qemu=8.0.2,ctime=1691052188
name: KSA-ZABBIX-01
net0: virtio=C2:39:27:42:56:6B,bridge=vmbr0,firewall=1
numa: 0
onboot: 1
ostype: l26
sata0: local-lvm:vm-101-disk-0,size=500G
sata1: local-lvm:vm-101-disk-1,size=10G
scsihw: virtio-scsi-single
smbios1: uuid=6e0757ff-565e-429d-8f47-3b425b89253e
sockets: 2
vmgenid: 70b4cbfe-de9f-4690-b7a1-64e68f4c5c30
#qmdump#map:sata0:drive-sata0:local-lvm:raw:
#qmdump#map:sata1:drive-sata1:local-lvm:raw:
Ok the first thing is those raw files are ENORMOUS. Convert them to a better container, I went with vmdk because … reasons.
qemu-img convert -f raw -O vmdk disk-drive-sata0.raw disk-drive-sata0.vmdk
qemu-img convert -f raw -O vmdk disk-drive-sata1.raw disk-drive-sata1.vmdk
I then could copy the VMDK’s to my machine and then destroy the Proxmox VM.
Since I’m weird I’m going to do this on Windows, using the Win64 port of Qemu. Because, why not? Also, I’m going to setup a different NAT network, and some port redirect:
"\Program Files\qemu\qemu-system-x86_64.exe" -net none -serial none ^
        -m 8192 ^
        -device virtio-net-pci,mac=C2:39:27:42:56:6B,netdev=net0 ^
        -netdev user,id=net0,net=192.168.1.0/24,dhcpstart=192.168.1.10,hostfwd=tcp::8080-:80,hostfwd=tcp::8022-:22 ^
        -device ahci,id=ahci ^
        -drive id=disk,file=disk-drive-sata0.vmdk,if=none ^
        -device ide-hd,drive=disk,bus=ahci.0,bootindex=2 ^
        -drive id=disk2,file=disk-drive-sata1.vmdk,if=none ^
        -device ide-hd,drive=disk2,bus=ahci.1,bootindex=1 ^
        -boot order=c,menu=on ^
        -smp 2 ^
So, I managed to keep the virtio network device, bind it to a DHCP network of 192.168.1.0/24 with the first address starting at 192.168.1.10. I also redirect port 8080 to port 80, along with 8022 to 22, allowing basic HTTP & SSH access into the VM.
The weird requirement is the 2 SATA disks, where the 2nd disk is the bootable one. I don’t know why it was configured this way, but I just preserved it.
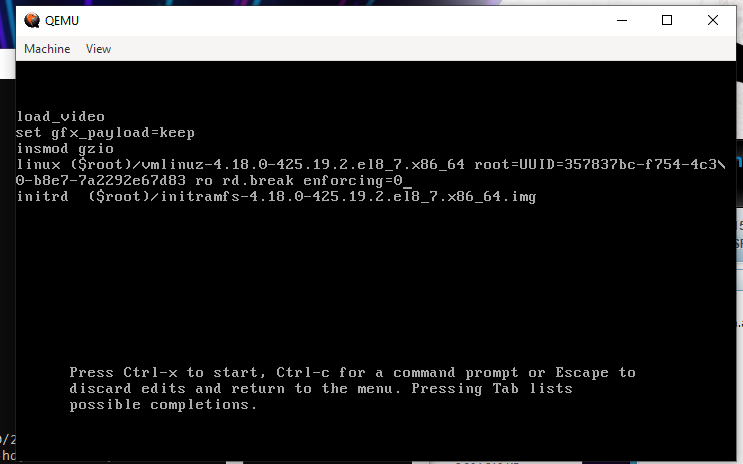
I had to reset the root password, so this was a bit weird as I had to clear so much nonsense of the boot setup, basically pruning everything after ro, to add “rd.break enforcing=0”
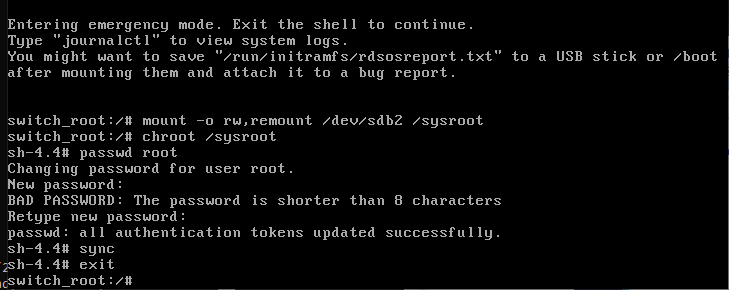
With that, it was a matter of mounting the /sysroot as readwrite, chrooting into it, and then setting the password. yay.
Now I can reboot the VM on my desktop and have it running on Qemu, where I could bring up the WebUI for the mystery product and have it all running as a tame user mode application.
Nice!
The CLI syntax is always evolving and getting complex but don’t give up hope!
Proxmox is based on qemu, and that “vma” is actually just a tar file which may or may not be compressed (with gzip, zstd etc).
If you actually import the vma into proxmox, you can also use “qm showcmd” and it will give you the full commandline it uses to start the vm, so those parameters can be directly applied to qemu.
The only difference between proxmox and regular qemu, is that proxmox by default leverages the hardware virtualization support provided by kvm.