Using expect with the F5

Now this one is a little weird.  While it is a *NIX box you can ssh into, the ‘command shell’ tmsh adds some bells and whistles to make it more ‘fun’ for interactive users.  Things like colour, and a pager.  Even worse is that it embeds a bunch of ANSI control sequences in there.

So instead of fighting with a lot of post scrubbing, I googled around, and found you can can invoke tmsh with the -e flag to remove a bunch of the ‘nice features’.  However the pager still embeds itself in the stream.  Apparently a bunch of people re-config the devices to the page length is insanely huge.  I don’t like the idea of making changes just to pull a config, or poke around in an automated fashion.

So luckily there is also the -c flag which let’s us submit a command and get back the results in a nice batch fashion.  And we don’t have to bang the space bar like a crazed lunatic.

#!/usr/local/bin/expect —
set MYUSER “root”
set MYPASS “g00Dp455w0rd#”

set HOST [lindex $argv 0];
set timeout 90
if {$argc!=1} {
puts “Usage is scritpname <ip address>\r”
exit 1
}

#
#
puts “Connecting to $HOST\r”
# turn off stdout
#log_user 0

spawn ssh $HOST -l $MYUSER
# Deal with hosts we’ve never talked to before
# or just logon
#
expect {
“*yes/no*” {send “yes\r” ; exp_continue }
“*assword:” {send “${MYPASS}\r” }
}
expect “*# “

send “tmsh -e -c \”show running-config\”\r”
expect “*(y/n)*”
send “y\r”

#Let’s get out of here
#send “quit\r”
expect “*~ #”
send “exit\r”
expect eof
exit 0

And that’s it!  This one is really simple, compared to the others.

Using expect with Cisco IOS

Following up my JunOS post, here is a handy script I cooked up to pull the configuration from a Cisco IOS device.  The one trip up for this stuff is sometimes you can logon to a cisco device, and you can be at the enabled state, you may have to enable,  and depending on how it’s configured you may have to use an enable password, which may be your password (again) or you may have to use a different password.

So yeah with a bunch of testing around this seems to work well enough for me.

#!/usr/local/bin/expect —
set MYUSER “my_user_name”
set MYPASS “my_password”
set ENPASS “my_enable_password”

set HOST [lindex $argv 0];
set timeout 90
if {$argc!=1} {
puts “Usage is scritpname <ip address>\r”
exit 1
}

#
#
puts “Connecting to $HOST\r”

spawn ssh $HOST -l $MYUSER

# Deal with hosts we’ve never talked to before
# or just logon
#
expect {
“*yes/no*” {send “yes\r” ; exp_continue }
“*assword:” {send “${MYPASS}\r” }
}
set ALREADY 0
expect {
“\r*>” {}
“\r*#” { set ALREADY 1}
“*enied” {exit 1}
“*assword” {exit 1}
}

if { $ALREADY < 1 } {

send “enable\r”
expect “*assword:” {
send “${MYPASS}\r”
expect {
“*enied” {
send “enable\r”
expect “*assword:”
send “${ENPASS}\r”
expect {
“*enied” {
exit 1}
“\r*#” {}
}
}
“\r*#” {}
}
}
}

send “show run\r”

expect {
“ore” {send ” “; exp_continue}
“\r*#” {}
}

#Let’s get out of here
send “q\r”
expect eof
exit 0


This is a little more cleaner than the prior JunOS one, as I’ll keep on improving it.

It works with ASA’s (tested 8.2)and IOS (tested 12.2)

Using expect with a JunOS device.

I’ll add more as I go along, but the first annoying thing was that there was no ‘central’ repository of configs.  Now call me old fashioned, but I liked the old days when telnet was scriptable and I could go and talk to my Cisco stuff.. but here we are in 2014, and I suppose I should break down and use that ‘expect’ package I’ve heard so much about.

So I have this Linux host that I want to talk to all these hosts.  The first problem is that it being a new host it hasn’t talked to anything so it doesn’t know the private keys.  Annoying.  The other thing is that some commands like to initiate a pager, which takes time to slap the space bar.  It’s much better to have the computer do it.

#!/usr/local/bin/expect —
set MYUSER “my_user_id”
set MYPASS “my_password”
set HOST [lindex $argv 0];
if {$argc!=1} {
puts “Usage is scritpname  <ip address>\r”
exit 1
}

puts “Connecting to $HOST\r”

spawn ssh $HOST -l $MYUSER
# Deal with hosts we’ve never talked to before
# or just login
#
expect {
“continue connecting (yes/no)?”
{send “yes\r”
expect “password:”
send “$MYPASS\r”
}
# We’ve been here before
“password:”
{send “$MYPASS\r”}
}
# Some commands run from configure, some don’t.
# It may be easier to just enter configure mode
expect “> ”
send “configure\r”
expect “# ”
#
# Pick a command to run
send “run show arp no-resolve\r”
#send “save terminal\r”
#send “run show lldp neighbors\r”
#
# Deal with paging. I don’t want to make any
# changes at *ALL* to the device, so instead
# I deal with the pager
#
expect {
“more” {send ” “; exp_continue}
“# ” {send “exit\r”}
}
# We are done, get out of here!
#
expect “>”
send “exit\r”

So in this shell example I’ve set it up to recognize that it’s never established before.  I know it’s messy that it has the password 2x I guess I could do variable substitution if I was more scripty but right now I just want to get some basic things in/out of the routers all the time, such as port status, MAC’s and I want it like yesterday.

The important part of the ‘more’ bypass is the exp_continue keyword.  Which took a lot of googling around because everyone “expects more”.  It’s kind of annoying when your keywords are common English words.

And as you can see, this is a good enough base for doing some more complicated things.  Of course I wouldn’t roll changes out automatically, but for the adventurous there you go.  It wouldn’t take much to adapt this for Cisco stuff, as the CLI operates more or less the same.

The real fun begins with parsing all this stuff.

Running Microsoft Exchange from home.

Well thanks to my latest outage, I’ve gone back from having an Exchange server in the “cloud” (well really a server I rented), to a Virtual Server at home.

First my ‘plan’ is to get a VPS that I can run OpenVPN on.  From there I’m going to build a VM at home that will also run OpenVPN, and it will connect to the VPS.  I will then setup routing, so that the Exchange server can then communicate with the VPS’s internal interface, and the VPS can communicate directly with the exchange server.  I’ll then configure postfix to store & forward email to the Exchange server.  This way if the link drops, the VPS will just spool the mail.  Finally I’ll setup SpamAssasin to filter out the SPAM.

First you will need to have a tun0 interface in your VPS.  Almost everyone supports this these days so it shouldn’t be too hard… If you cannot get a tun0 interface, perhaps ppp0 with pptp..?

I followed these instructions on setting up OpenVPN on Debian 6.  Now granted, I’m using Debian 7, but the instructions are pretty much the same.  Basically you have to setup a CA (Certificate Authority), and then you generate a Server certificate, and a client certificate.  For my needs, I’m going to issue single certificates for everything(one) that connects into my VPN.  I also have a network at home that I want routed to the VPS, so this is included (192.168.0.0/24).

A simple server.conf looks like this:

port 1194
proto udp
dev tun
ca ca.crt
cert server.crt
dh dh1024.pem
server 10.8.0.0 255.255.255.0
ifconfig-pool-persist ipp.txt
client-config-dir ccd
route 192.168.0.0 255.255.255.0
keepalive 10 120
comp-lzo
persist-key
persist-tun
status openvpn-status.log
verb 3

And a the client configuration I’m using is this:

client
dev tun
proto udp
remote MYHOST MYPORT
resolv-retry infinite
nobind
persist-key
persist-tun
ca ca.crt
cert hong-kong-home.crt
key hong-kong-home.key
ns-cert-type server
comp-lzo
verb 3

In the directory /etc/openvpn/ccd on the server, I have to ensure that I have a file called ‘homefw’ which is the common name of the client certificate.  It has to contain the following line to ensure that my home network is routed to the VPS.

iroute 192.168.0.0 255.255.255.0

Don’t forget to turn on ip forwarding on both the VPS, and the local ‘tunnel router’.  For Linux based stuff you need to make sure that “/proc/sys/net/ipv4/ip_forward ” is a 1.  You can just do a simple “echo 1 > /proc/sys/net/ipv4/ip_forward ” in “/etc/rc.local” or go through your distributions networking documentation to make sure you set it up ‘correctly’.

In OpenBSD I just simply uncomment the following line from /etc/sysctl.conf

net.inet.ip.forwarding=1 # 1=Permit forwarding (routing) of IPv4 packets

If you don’t have routing in place you’ll notice that you can only ping the tunnel interfaces, but not the IP’s on the LAN.  While this may be fine for a p2p or client setup it isn’t good enough if you want to route traffic.

I’m running VMWare ESXi 5 at home, and thankfully it does support Windows NT 4.0 Server out of the box.  I setup a Domain Controller running DNS & WINS.  The VMWare tools won’t work properly with some service pack (4 I think?) but I went all the way to 6, along with the rollup.  Until you load the service pack, the network adapter will *NOT* work.

I’m going with Exchange 5.5, so again I installed another NT 4.0 server, service packed it, and joined it with the domain controller.  Remember to install IIS, and the ASP update, as 5.5 OWA needs asp. Be sure to apply the latest service pack for Exchange, SP4 – in the case of Exchange 5.5 .

Now for routing I could go with dynamic routing, or static routing.  I chose static as I didn’t want to get too involved for this project, as I needed to get email flowing as quickly as possible.

route add 10.8.0.1 mask 255.255.255.255 192.168.0.49 -p

From Windows NT.

It is imperative no matter what version of Exchange you run, that you turn off the open relay “feature”.  A great step by step guide is available here on msexchange.org .

With the basic routing in place you should be able to talk to the Exchange servers’ SMTP engine.  You may want to setup either a local DNS and populate the VPS’s source address or put in some host entries for it.

# telnet 192.168.0.55 25
Trying 192.168.0.55…
Connected to 192.168.0.55.
Escape character is ‘^]’.
220 exchange.superglobalmegacorp.com ESMTP Server (Microsoft Exchange Internet Mail Service 5.5.2653.13) ready
HELO
250 OK

Now it would be insane to place an Exchange server directly onto the internet.  Plus when the VPN link is down, it’d be nice to have the VPS store email and forward it when it can.  So for this task I installed postfix.

For me the big changes in main.cf were:

mydestination = nodedeploy.superglobalmegacorp.com, localhost.superglobalmegacorp.com, , localhost
relayhost =
mynetworks = 127.0.0.0/8 [::ffff:127.0.0.0]/104 [::1]/128 10.8.0.0/24 192.168.0.0/24
mailbox_size_limit = 0
recipient_delimiter = +
inet_interfaces = all
relay_domains = superglobalmegacorp.com work.com
transport_maps = hash:/etc/postfix/transport
virtual_alias_domains = virtuallyfun.com
virtual_alias_maps = hash:/etc/postfix/virtual

This will permit my exchange server to relay out my VPS, and tell postfix that it’s OK to accept email for the various domains I have.

My transport database is very simple.  For the email accounts I’m using two domains, so I simply instruct postfix to forward emails destined to these domains to the exchange server

superglobalmegacorp.com smtp:192.168.0.55
work.com smtp:192.168.0.55

And for domains I couldn’t be bothered to create mailboxes for, instead I have their email setup to forward to an existing box using a virtual domain in the ‘virtual’ file.

[email protected] [email protected]
[email protected] [email protected]

Now due to the nature of postfix you need to generate database hashes for it to work, so my script to kick this off is:

postmap hash:/etc/postfix/transport
postmap /etc/postfix/virtual
newaliases
postfix reload

Which isn’t too involved once you get the bits in the right place.

Assuming you’ve got your MX records setup on the outside, with any luck you should start seeing some mail flow through.  If not telnet to port 25 and start talking to your mail server.

One problem I have is that superglobalmegacorp.com is an old domain, and it’s lapsed a few times to different idiots who not only added to the ridiculous spam lists I’m on, but also spammed from it as well.  So to deal with SPAM, I went ahead and installed spamassassin, as described in this page.

As mentioned adding the two lines to master.cf got it going

smtp inet n – – – – smtpd -o content_filter=spamassassin -o syslog_name=postfix/submission
spamassassin unix – n n – – pipe
user=spamd argv=/usr/bin/spamc -f -e /usr/sbin/sendmail -oi -f ${sender} ${recipient}

And I did change the spamassasin local.cf

use_razor2 1
use_dcc 1
use_pyzor 1

As I do get a lot of spam.

I don’t think most people will care, but this is more so for me keeping my notes straight.  So yeah I run Exchange 5.5 at home (which I got on ebay for $25!) with Outlook 2003 on Windows XP x64.  It works well enough for me.
Web Rendering Proxy

(note this is a guest post from Tenox)

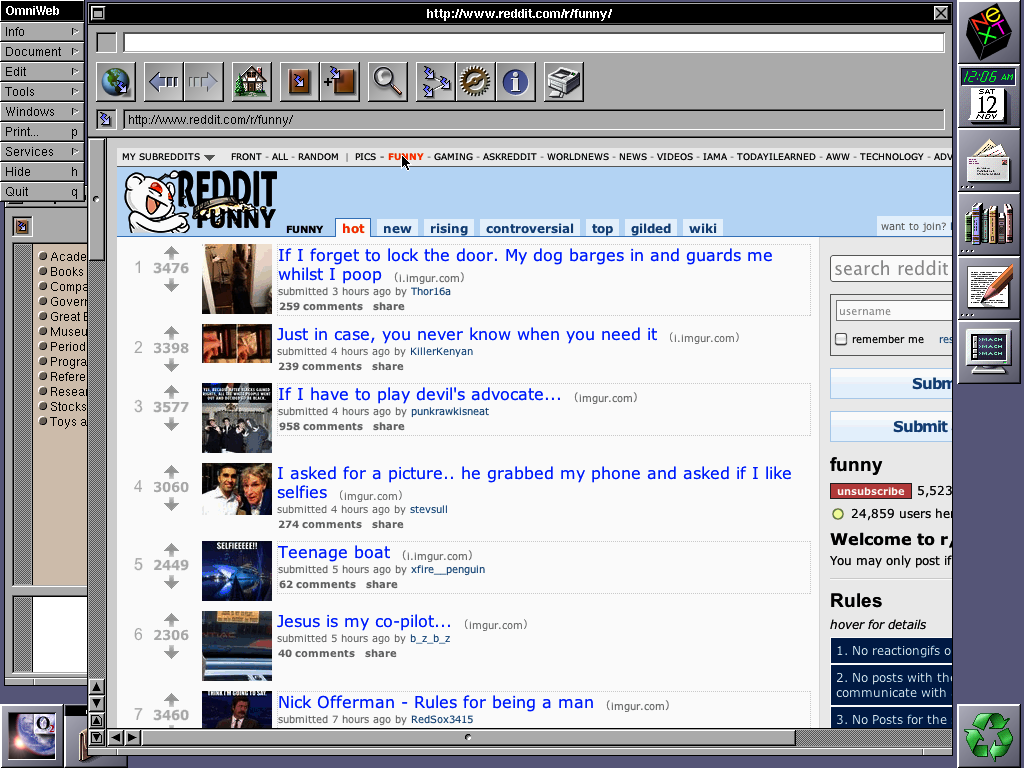
WRP is a HTTP proxy service that renders web pages in to GIF images associated with a clickable imagemap of the original web links. It basically allows to use historical and obsolete web browsers on the modern web.

See a gallery of today’s news sites. All links are clickable!

CNN via Internet Explorer 1.5

CNN via Internet Explorer 1.5


Reuters via IBM Web Explorer

Reuters via IBM Web Explorer


BBC News via Mac Mosaic

BBC News via Mac Mosaic


Reddit via NextStep OmniWeb

Reddit via NextStep OmniWeb


netscape3

Netscape 3.x visiting DNA Lounge


For more background information and screenshots you can see my previous post on the matter.

There are two versions. Cocoa-webkit for Mac OS X and QT-Webkit for Linux/BSD/etc. The script can be downloaded here.

Virtual Xenix & the internet

This is probably the most significant Xenix post I’ve made since the old days when I managed to get Xenix running in Qemu all those years ago.

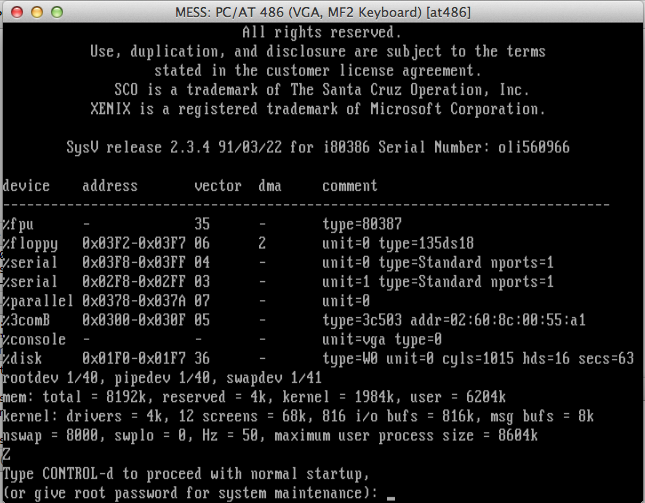
3com network card

3comB network card

What has long been a frustration with the beleaguered Xenix community is that although there was a TCP/IP package for Xenix (and a much required streams package…) it only worked with a handful of ethernet cards.  And all of them were early 3com’s.  While the world was using NE2000’s on just about everything, the most common ethernet board Xenix would talk to was the 3c503, which is getting harder and harder to find as the years go on by.

But right now none of this matters.

I was looking at this article on setting up Apollo Domain UNIX, on MESS.  And apparently it will do networking!  Which is cool, so I poke around MESS, and what do I see? 3c503.c. Could it be true?

Now I ended up having to download the source to mame 0.151 (mame0151s.zip) and building it on OS X.  Of course remembering to alter the makefile to include the ‘USE_NETWORK=1’ statement, and build for Mess.  And just as it looks like something out of SIMH, Mess makes use of libpcap which means that you are *unable* to send/receive on the host computer. (OS X & Win32 binaries).  And of course you’ll need a ROM & Xenix diskettes.

Installing Xenix is pretty straightforward as long as you know your system key, and how to navigate the mess UI without rebooting mess or exiting by mistake (scrolllock on the PC, function/Delete on OS X).

First create a hard disk, and as always it should be ~500MB max.

chdman.exe createhd -o xenix.chd -chs 1015,16,63
chdman – MAME Compressed Hunks of Data (CHD) manager 0.149u1 (Aug 10 2013)
Output CHD: xenix.chd
Compression: none
Cylinders: 1015
Heads: 16
Sectors: 63
Bytes/sector: 512
Sectors/hunk: 8
Logical size: 523,837,440

then with the disk in hand, I just setup a 486 like this:

./mess64 at486 -harddisk1 xenix.chd -isa2 3c503 -ramsize 8388608 -floppydisk1 xenix/n1.vfd

Naturally you’ll need to setup the CMOS, for your memory size, and the hard disk.  The BIOS I’m using didn’t autodetect the IDE drive, but it doesn’t matter as I know it’s characteristics as I created it.

From there Xenix was a pretty straight forward deal.  Mess has good floppy drive emulation so it just worked.  Adding TCP-IP was just as involved, and all went well.  When it came time to install TCP & the network driver, remember to use thinnet, as the thicknet transceiver isn’t connected (as it would seem).  The 3c503 is softset, so I went with IRQ 5, port 0x300, and thinnet, and it works fine for me!

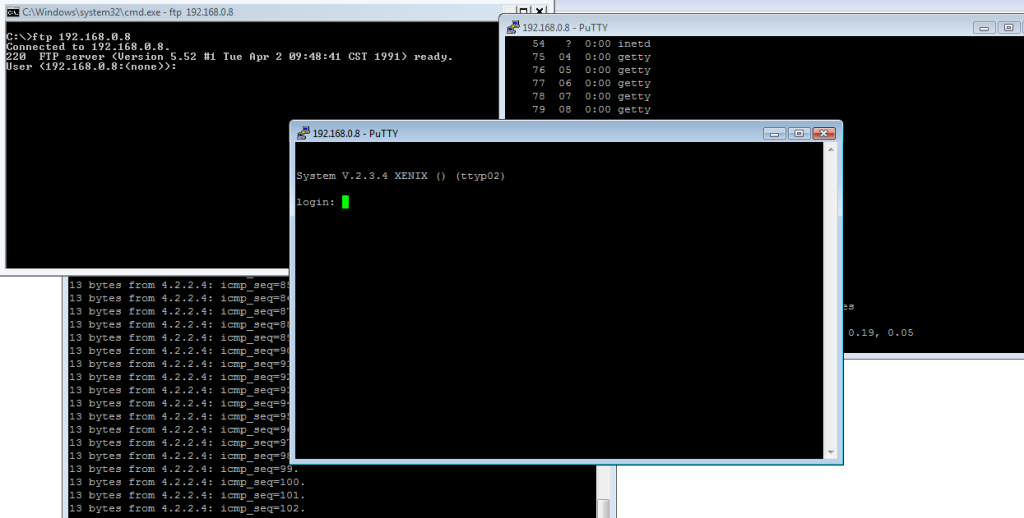
mess xenix networking

Xenix TCP/IP in action, inside of MESS!

Remember you will not be able to attach to it from your computer.  Instead you must attach from another computer.

Also MESS tries to emulate true to hardware so it’ll be just as slow on MESS as it was on the real hardware.  I suppose you could go with the at386 driver, but yeah it’ll be slow.  The current at586 driver has issues booting from the hard disk, and I didn’t mess with it too much as Xenix is known to have issues with some Pentium systems.

Although I think the next place for adventure is the emulated Adaptec 1542CF.

Doom IPX revisited

So, since I’ve been starting up my virtual network thing, I got distracted with this thread on reddit

Fun times ahead!

Fun times ahead!

, talking about the good old days of Doom.  Now Doom was revolutionary for the music, the sound effects, the 2.5D environment, the fast pace, the violence, the unlimited lives, dynamic lighting and of course LAN play.  Now what was cool is that it could easily run over IPX/SPX networks.  Although you did have to be on the same network it was very easy to setup, and get going. But as anyone can tell you, the moment you setup a four player deathmatch on a company LAN people would go nuts, as you would without a doubt bring the entire network to a halt.  Back when I used to play this we would just disconnect the 10base2 cable from the lab 486DX2/50 PC’s and just make our own four computer segment.  We did notice that if we had 3 four player games on the same network (afterhours!) that it was unplayable.  I never did have access to a sniffer back then, and when I got a corporate job, being caught with something like Doom was grounds for termination so I never did get to see what the big deal was.

So I figured I’d cook up a super quick lab to check it out.  This is my Dynagen configuration.  Sadly I do need a cisco router to preform the network capture, although I don’t need to configure it to see what is going on.

autostart = True

[localhost]

[[7200]]
image = ../C7200-JS.BIN
npe = npe-400
ram = 160
idlepc = 0x60529c84
disk0 = 0
mmap = False
ghostios = True

[[ROUTER corertr1]]
model = 7200
slot1 = PA-8E
F0/0 = coresw1 5

[[ethsw coresw1]]
1 = access 1 NIO_udp:41300:127.0.0.1:51300
2 = access 1 NIO_udp:41301:127.0.0.1:51301
3 = access 1 NIO_udp:41302:127.0.0.1:51302
4 = access 1 NIO_udp:41303:127.0.0.1:51303
5 = access 1

As you can see this is very simple, a switch with four ports setup for four virtual computers, and a fifth port for the router.  Next I run four instances of Qemu with a copy of Doom v1.1 shareware, and a IPX/SPX client.  I fire them up like this:

./qemu/qemu-system-i386 -cpu pentium -L ./qemu/pc-bios/ -m 16 -hda doom11-00.img -soundhw sb16,adlib -net nic,model=pcnet,macaddr=00:11:22:33:44:00 -net socket,udp=localhost:41300,localaddr=0.0.0.0:51300 &
#
./qemu/qemu-system-i386 -cpu pentium -L ./qemu/pc-bios/ -m 16 -hda doom11-01.img -soundhw sb16,adlib -net nic,model=pcnet,macaddr=00:11:22:33:44:01 -net socket,udp=localhost:41301,localaddr=0.0.0.0:51301 &
#
./qemu/qemu-system-i386 -cpu pentium -L ./qemu/pc-bios/ -m 16 -hda doom11-02.img -soundhw sb16,adlib -net nic,model=pcnet,macaddr=00:11:22:33:44:02 -net socket,udp=localhost:41302,localaddr=0.0.0.0:51302 &
#
./qemu/qemu-system-i386 -cpu pentium -L ./qemu/pc-bios/ -m 16 -hda doom11-03.img -soundhw sb16,adlib -net nic,model=pcnet,macaddr=00:11:22:33:44:03 -net socket,udp=localhost:41303,localaddr=0.0.0.0:51303 &

Again all very simple.

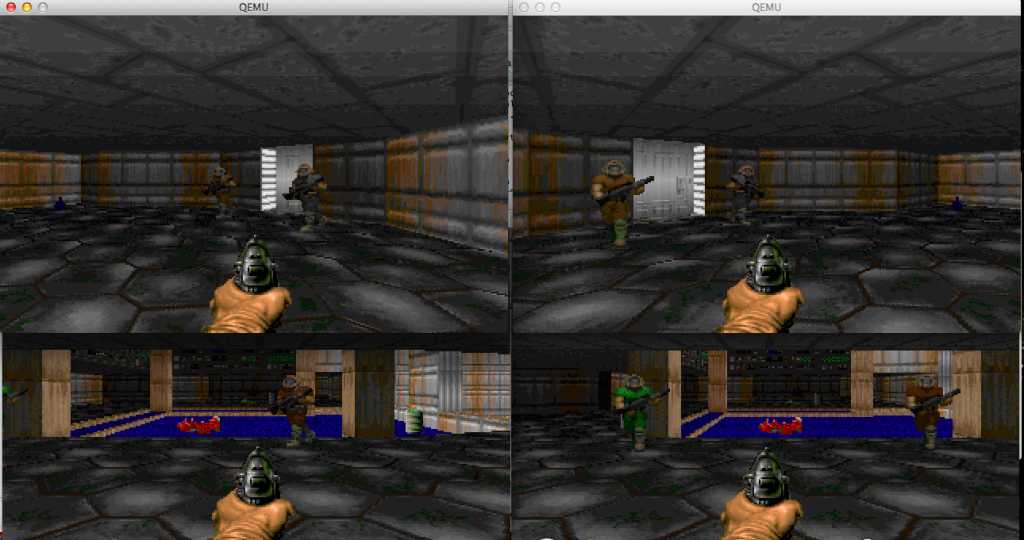
From there I configure each of the four VM’s for a four player game, start the game, then connect.

Loneliest deathmatch

Loneliest deathmatch

I only had the game running for a few seconds when I went to my Dynagen console, and setup a capture session:

=> capture corertr1 fa0/0 doom.cap
=>

As you can see very simple.  I walk the guys around a little bit, shoot someone, then just quit all the clients, and turn off the VM’s.  Then I end the capture

=> no capture corertr1 fa0/0
=>

And now I’m left with a 50MB file!

$ ls -alh *cap
-rw-r–r– 1 jsteve staff 50M 25 Oct 14:27 doom.cap

I’m shocked!  I wasn’t even running Doom that long!  A quick peek reveals why Doom was never popular on corporate networks.

14:25:57.464031 IPX 00000000.00:11:22:33:44:00.869c > 00000000.ff:ff:ff:ff:ff:ff.869c: ipx-#869c 444

14:27:28.996489 IPX 00000000.00:11:22:33:44:01.869c > 00000000.ff:ff:ff:ff:ff:ff.869c: ipx-#869c 444
14:27:28.997618 IPX 00000000.00:11:22:33:44:03.869c > 00000000.ff:ff:ff:ff:ff:ff.869c: ipx-#869c 444
14:27:29.019568 IPX 00000000.00:11:22:33:44:01.869c > 00000000.ff:ff:ff:ff:ff:ff.869c: ipx-#869c 444
14:27:29.026000 IPX 00000000.00:11:22:33:44:03.869c > 00000000.ff:ff:ff:ff:ff:ff.869c: ipx-#869c 444
14:27:29.026205 IPX 00000000.00:11:22:33:44:01.869c > 00000000.ff:ff:ff:ff:ff:ff.869c: ipx-#869c 444
14:27:29.054425 IPX 00000000.00:11:22:33:44:01.869c > 00000000.ff:ff:ff:ff:ff:ff.869c: ipx-#869c 444

If you see the destination it is ff:ff:ff:ff:ff:ff, a broadcast packet.  And I have 50MB of this in the span of a minute and a half!  Even worse, opening the packet stream most of it is empty packets!

14:26:22.806014 IPX 00000000.00:11:22:33:44:00.869c > 00000000.ff:ff:ff:ff:ff:ff.869c: ipx-#869c 444
0x0000: e0e0 03ff ff01 da00 0000 0000 00ff ffff …………….
0x0010: ffff ff86 9c00 0000 0000 1122 3344 0086 ………..”3D..
0x0020: 9c00 0000 0000 0000 0001 0000 0001 0000 …………….
0x0030: 0002 0000 0000 0000 0000 0065 0000 0000 ………..e….
0x0040: 0000 0000 0000 0000 0000 0000 0000 0000 …………….
0x0050: 0000 0000 0000 0000 0000 0000 0000 0000 …………….
0x0060: 0000 0000 0000 0000 0000 0000 0000 0000 …………….
0x0070: 0000 0000 0000 0000 0000 0000 0000 0000 …………….
0x0080: 0000 0000 0000 0000 0000 0000 0000 0000 …………….
0x0090: 0000 0000 0000 0000 0000 0000 0000 0000 …………….
0x00a0: 0000 0000 0000 0000 0000 0000 0000 0000 …………….
0x00b0: 0000 0000 0000 0000 0000 0000 0000 0000 …………….
0x00c0: 0000 0000 0000 0000 0000 0000 0000 0000 …………….
0x00d0: 0000 0000 0000 0000 0000 0000 0000 0000 …………….
0x00e0: 0000 0000 0000 0000 0000 0000 0000 0000 …………….
0x00f0: 0000 0000 0000 0000 0000 0000 0000 0000 …………….
0x0100: 0000 0000 0000 0000 0000 0000 0000 0000 …………….
0x0110: 0000 0000 0000 0000 0000 0000 0000 0000 …………….
0x0120: 0000 0000 0000 0000 0000 0000 0000 0000 …………….
0x0130: 0000 0000 0000 0000 0000 0000 0000 0000 …………….
0x0140: 0000 0000 0000 0000 0000 0000 0000 0000 …………….
0x0150: 0000 0000 0000 0000 0000 0000 0000 0000 …………….
0x0160: 0000 0000 0000 0000 0000 0000 0000 0000 …………….
0x0170: 0000 0000 0000 0000 0000 0000 0000 0000 …………….
0x0180: 0000 0000 0000 0000 0000 0000 0000 0000 …………….
0x0190: 0000 0000 0000 0000 0000 0000 0000 0000 …………….
0x01a0: 0000 0000 0000 0000 0000 0000 0000 0000 …………….
0x01b0: 0000 0000 0000 0000 0000 0000 0000 0000 …………….
0x01c0: 0000 0000 0000 0000 0000 0000 0000 0000 …………….
0x01d0: 0000 0000 0000 0000 0069 0000 00 ………i…

Needless to say this could have been optimized a little better.. but at the same time back in 1993 this was the coolest thing ever.  Even if it did have a reputation of destroying networks.

I can remember how loudly network people would complain about Doom, but it is kind of interesting to see it first hand how chatty it is. But at the same time, how exhilarating it was, for the first time we were playing against each other, not bots.

And speaking of this era, for those who may not have ever read about the rise & fall of iD, you may want to check out the book ‘Masters of Doom‘. Although the end is pretty much Old Man Murray. There is no mention of the soundcard disaster that was DMX, or anything about how deathmatch could crush a LAN. But I guess everything can’t be 100% for the time.

cisco router guide

So from the last article I thought I’d go over some basic stuff about cisco routers…

And expect more to change as I go through this some more.

So I thought I’d go through something incredibly elaborate

and for the fun of it.

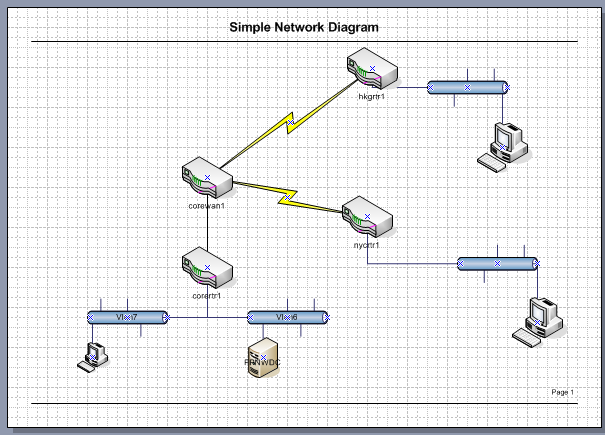
I’ve been playing with the latest release of dynamips (0.2.10), and very excitingly it can build for x86_64 OS X!  So I thought I’d build up a good sized network, much like what I first was exposed to when I started doing cisco networking back in the 1990’s.

Sadly I didn’t hold onto any IOS from back then, so I’m using something much newer, 12.2.  Back then I actually had some IGS stuff with version 9, and bunch of stuff on version 10 & 11.  For the most part I was lucky to use a 7513 as my wan core router, a 7200 for an access router, and 5500’s as my core route/switch fabric with ATM.  It was … very complicated for the day.

To get the ball rolling, I thought I would build out a core site, with a user & server VLAN (voip was a dream back then), and two sites connected via frame relay.  The protocols I most care about will be IPX/SPX and TCP/IP.  I was thinking of porting back the UDP patches for Qemu to version 0.90 so I could run Netware 3.12 in the mix, but honestly it is just easier to use the Netware file & print services for NT 4.0.

So along with the dynamips program, I’m using the obsolete (and easier to configure IMHO) dynagen program.

I’ve fed it a configuration like this:

autostart = False

[localhost]

[[7200]]
image = C7200-JS.BIN
npe = npe-400
ram = 160
idlepc = 0x60529c84
disk0 = 0
mmap = False
ghostios = True

[[ROUTER corertr1]]
model = 7200
slot1 = PA-8E
F0/0 = coresw1 1
E1/0 = coresw1 3
E1/1 = coresw1 8

[[ROUTER corewan1]]
model = 7200
slot1 = PA-8T
F0/0 = coresw1 2
s1/0 = F1 1
configuration = ”

[[ROUTER nycrtr1]]
model = 7200
slot1 = PA-4T+
f0/0 = nycsw1 1
s1/0 = F1 2
configuration = ”

[[ROUTER hkgrtr1]]
model = 7200
slot1 = PA-4T+
f0/0 = hkgsw1 1
s1/0 = F1 3
configuration = ”

#Frame relay switch
[[FRSW F1]]
1:102 = 2:201
1:103 = 3:301

#Core ethernet
#vlan 5 WAN
#vlan 6 server
# 4 FPNW-DC 138.1.1.10
#vlan 7 workstation
[[ethsw coresw1]]
1 = access 5
2 = access 5
3 = access 6
4 = access 6 NIO_udp:41300:127.0.0.1:51300
5 = access 6 NIO_udp:41301:127.0.0.1:51301
6 = access 6 NIO_udp:41302:127.0.0.1:51302
7 = access 6 NIO_udp:41303:127.0.0.1:51303
8 = access 7
9 = access 7 NIO_udp:41304:127.0.0.1:51304

[[ethsw nycsw1]]
1 = access 1
2 = access 1 NIO_udp:41305:127.0.0.1:51305

[[ethsw hkgsw1]]
1 = access 1
2 = access 1 NIO_udp:41306:127.0.0.1:51306

Screen Shot 2013-09-18 at 10.21.03 PM

Or something like this

Ok, now this may look complicated, but in all reality it really isn’t.  It is always a good thing to keep track of what network addresses you are going to use, so here is my chart:


Description IPX IP Mask
CORE
FA0/0 Wan Interconnect C0000001 138.1.0.5 255.255.255.0
Eth1/0 Server C0010001 138.1.1.1 255.255.255.0
Eth1/1 User C0010002 138.1.10.1 255.255.255.0
WAN
Fa0/0 Wan Interconnect C0000001 138.1.0.6 255.255.255.0
S1/0.102 New York PVC A0000001 135.0.0.5 255.255.255.252
S1/0.103 Hong Kong PVC A0000002 135.0.0.1 255.255.255.252
New York
Fa0/0 User C10000001 136.2.0.1 255.255.255.0
S1/0.201 Core PVC 201 A0000001 135.0.0.6 255.255.255.252
Hong Kong
Fa0/0 User C20000001 136.1.0.1 255.255.255.0
S1/0.301 Core PVC 301 A0000002 135.0.0.2 255.255.255.252

For simplicities sake for the routers & IOS I’m using 7200’s everywhere.  The 7200 is a good router with plenty of slots, so it fits my needs just fine.  I suppose I could track down a 2600 or 1700 IOS image, and use them for the access sites, but for now it doesn’t matter.  Mostly because of the ghostios image option where the same memory map can be shared between routers, and of course my Mac Pro has 16GB of RAM.

Now the exciting part of this configuration is that I can easily connect in Qemu 1.6.0 processes to this configuration, allowing me to test the network out in its entirety.  Even better thanks to it being UDP, I can reboot and restart the Qemu or router processes at will.

Naturally like any test scenario, I should spell out some goals, along with some applications that I hope to be able to run.  So to start, a simple setup with an NT 4.0 server with the FPNW services setup.  To run Qemu to attach to the first port on the server VLAN in the core switch I start Qemu like this:

./qemu/qemu-system-i386 -cpu pentium -L ./qemu/pc-bios/ -m 64 -hda FPNW-DC.vmdk -net nic,model=pcnet -net nic,model=ne2k_isa -net socket,udp=localhost:41300,localaddr=0.0.0.0:51300

And from there by changing the UDP numbers I can easily jump VLANs.  Fun.  The major thing is that each additional instance of Qemu will need a unique MAC address, so additional instances should be run like this…

./qemu/qemu-system-i386 -L ./qemu/pc-bios/ -m 16 -net nic,model=pcnet,macaddr=00:11:22:33:44:55 -net socket,udp=localhost:41304,localaddr=0.0.0.0:51304  -fda nwclient-pcnet.vfd

So maybe I should launch into some big diatribe on cisco routers, networking and the rest of the fun stuff.  And maybe I will.

I think the next article will be an anchor page for various topics of what I’m going to get into, and from there evolve my network from the mid 90’s before the internet craze into something far more modern.  And of course a page going over the scope of what I hope to create.

TTPod restricted ip address…

So my wife loves this Chinese application TTPod, which lets you listen to music.  And oh joy last night it suddenly stops working because of an error of “invalid ip address”.

Well it seems that the application will now only fully work in China.  Even though we are in a SAR (Hong Kong) it isn’t good enough it would seem.

I haven’t used Pandora in ages, and I thought I’d try that to get the same thing.

So for people who like this kind of thing, (esp my wife who just must have facebook while we are in China) I use OverPlay which has VPN endpoints in numerous countries, and supports things like OpenVPN & PPTP which is perfect for devices like iPhone & Android Phones.  So I can still get my BBC & CBC Fix, along with access to my Hulu subscription while abroad.

I swear that IP restrictions are so retarded, all they do is make you funnel traffic to get around them, and punish expats.