It’s been jumping numbers like crazy, and I’m still holding onto 0.9 because I’m weird. Anyways there is something amazing hiding in all those release notes and stuff:
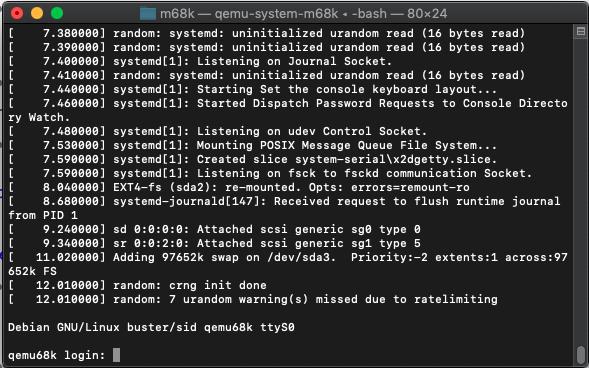
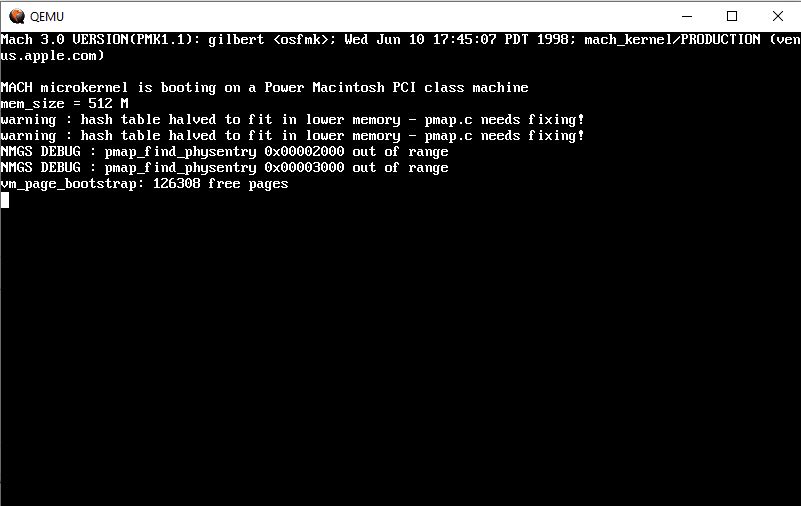
68040!
The m68k emulation is good enough to run Linux! Granted the target machine is the Macintosh 800, although the Mac ROM doesn’t boot enough to do anything Apple enough, using a serial console however does get us into the system. On my ancient Mac Pro I get emulation in the speed range of a 1Ghz G4!
Installation is a bit tricky as there is no true bootrom / boot process, so I had to load the installer with a dummy ‘raw’ disk, and tar the kernel & initrd to that raw disk so I could later extract it on the native OS to boot into the disk. I followed mostly the instructions here.
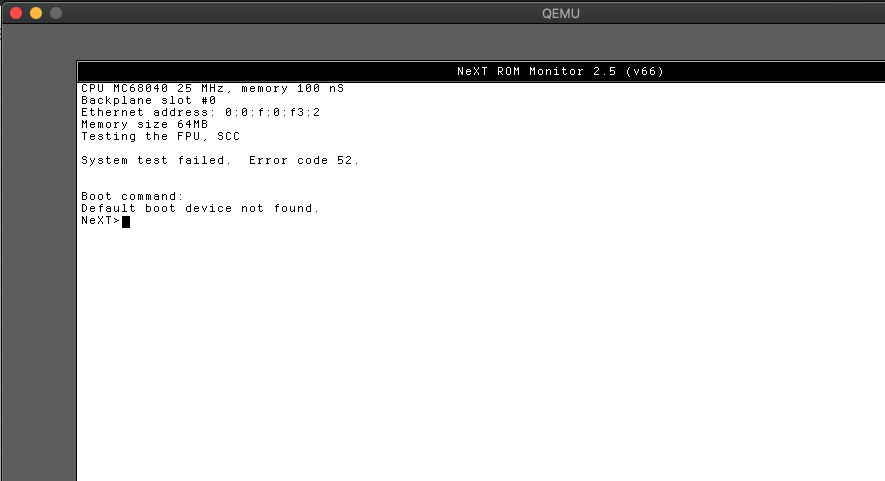
And what is that? NeXT CUBE emulation?
The peripherals are nowhere near complete enough to boot, HOWEVER it does boot the PROM, complete with keyboard support.
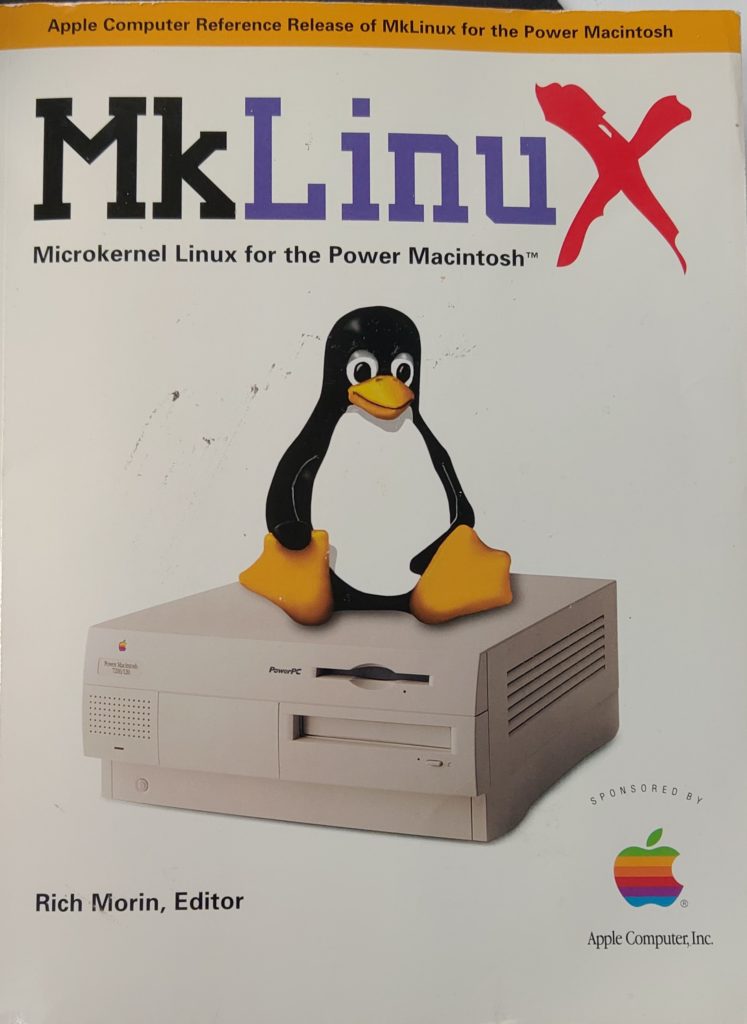
Or how I finally broke down and bought that MkLinux book after all these decades. When I did own a PowerPC Mac as my daily driver it was an iMac back in 1999 and I ran OS X Server. I later bought a G4 to only find out that OS X didn’t support the G4. Linux had issues too and I ended up running OpenBSD on the G4. Which was fun, although for the ‘work at home’ bit, I ended up needing Windows NT 4.0, so I ran that in OS 8 on SoftPC. Yay.
I didn’t have any luck with Linux on Power as MkLinux wanted the beige hardware, and by the time I felt like digging in again to Linux, OS X had finally been ported to the G4 Sawtooth’s so it really didn’t matter.
What secrets lie inside?
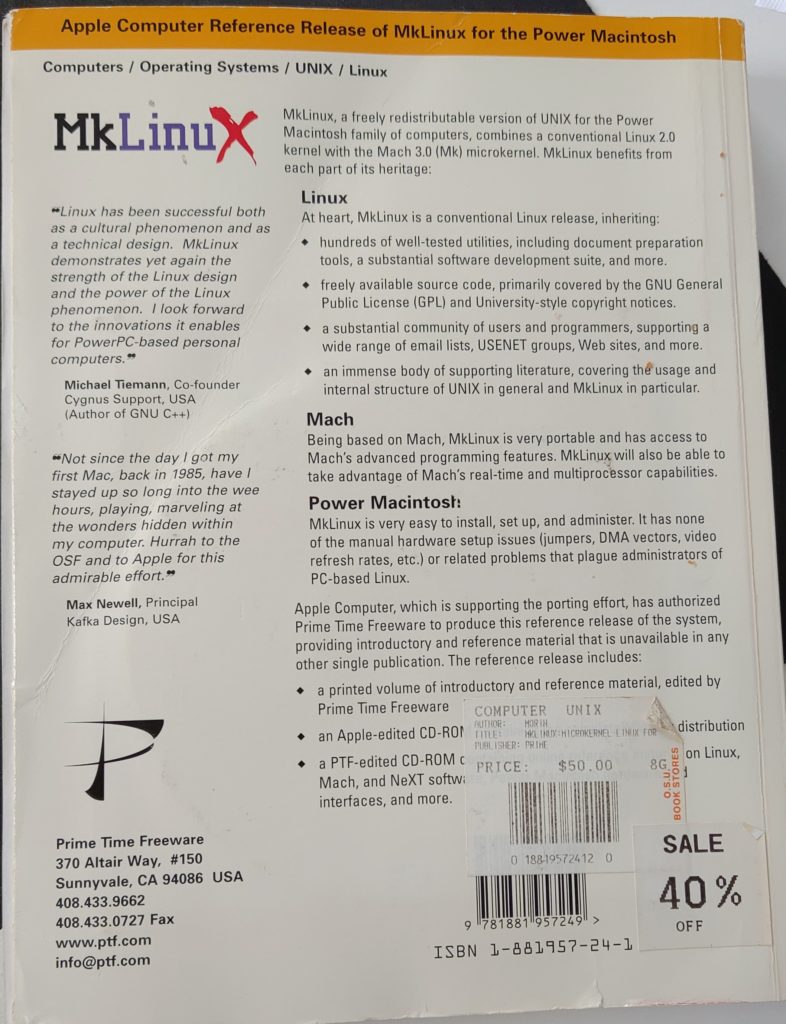
I’d seen this book in a store but it was pretty expensive, and geared to such a tiny market. Although Mach does compile on the i386, why they didn’t include it was well to push Mach/Linux as a platform well that’s beyond me. Then again looking at the stunning success of Darwin on i386/x86_64 I guess the reality is, why bother.
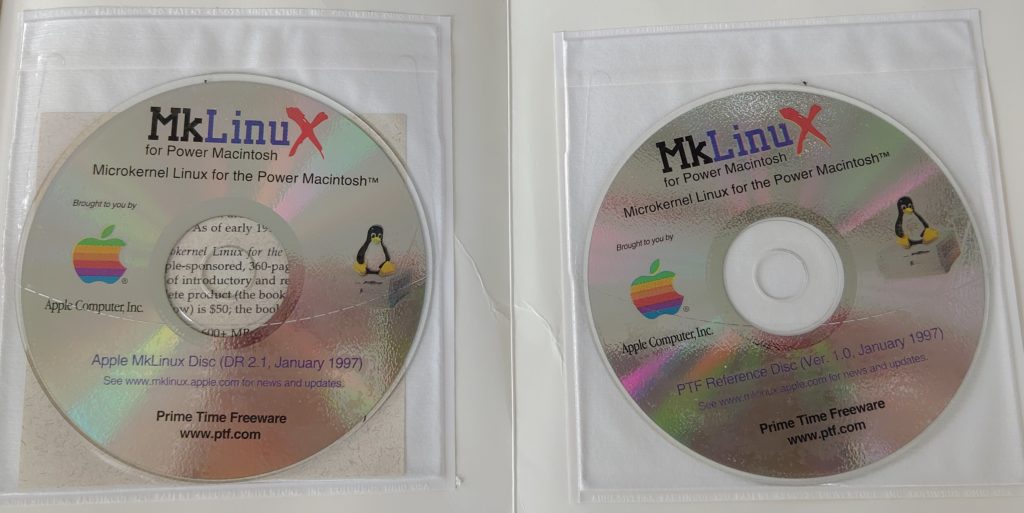
I ordered this on Ebay, for the usual $5 plus $10 to ship, and it just showed up today! What mysteries lie on the CD-ROMs? I know others have posted stuff, but I wanted to hold them in my hands myself.
Uh-oh
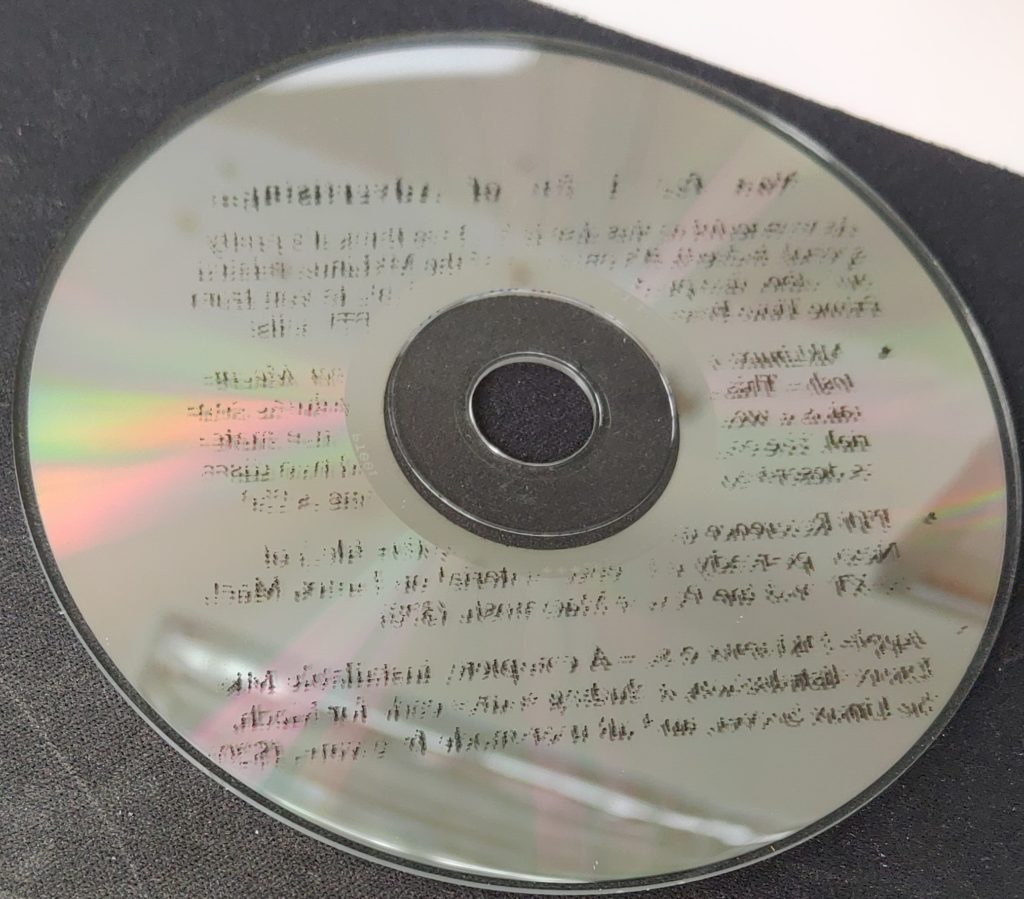
I didn’t know if the CD-ROM’s were included, and I first thought I got lucky: not only were they included, neither had been opened up before! These CD’s had been packed way like this for the last 22.5 years! Now for the bad part.
Ink transfer
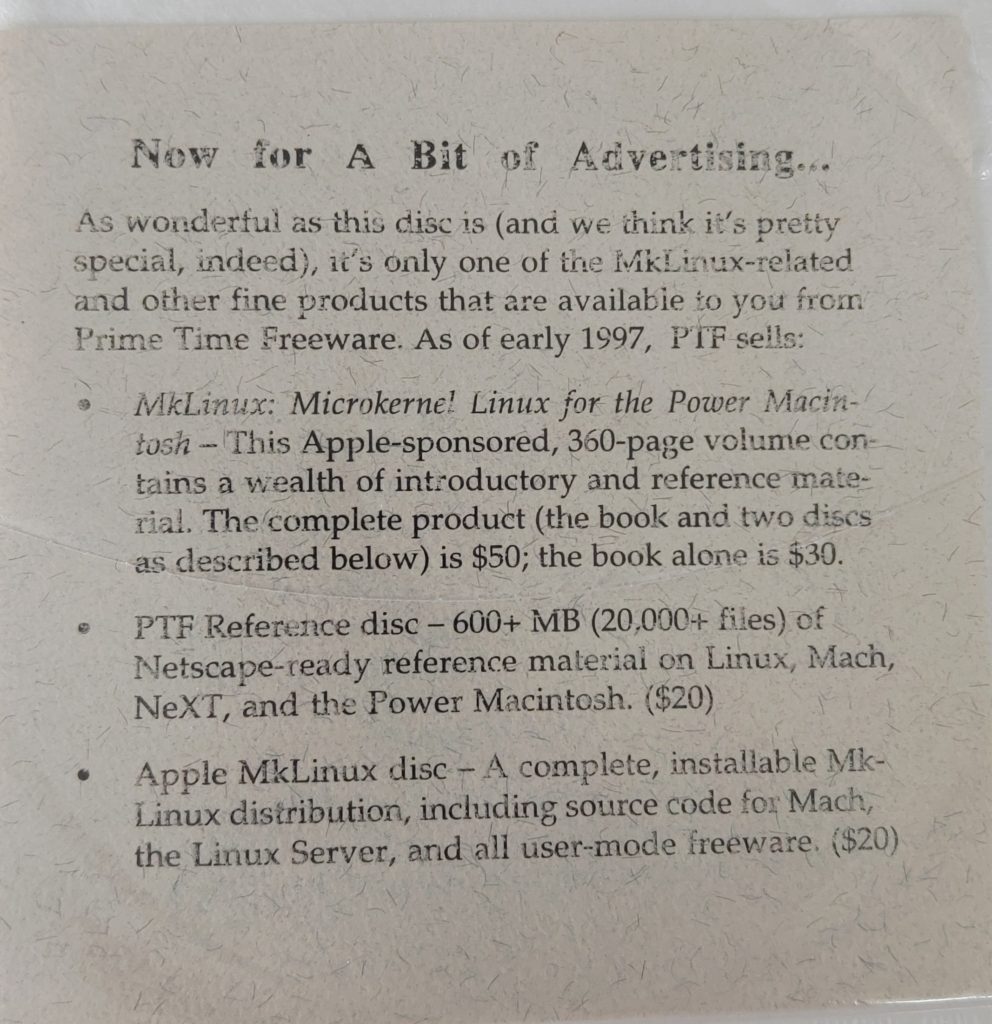
See that stupid leaflet in the back? Yeah well it turns out that it was a really stupid idea. No doubt this thing sat in the bottom of a stack for decades where the ink had been pressed for so long against the disk that it has transferred to the surface.
HOW ANNOYING.
Gag me with a spoon…
So yes, they actually advertise the book, namely the one that I had bought with some crap ink leaflet in the CD-ROM pouch and it’s transferred to the disc.
Sigh.
I tried rubbing alcohol but that had no effect. I tried rubbing with a credit card, and it got a little off, but I fear I’m just going to damage the surface more.
I can only imagine what other CD-ROM’s out there that haven’t been archived are sitting under hundreds or thousands of pounds of book weight having nonsense imprinted onto them.
At least the second CD-ROM doesn’t suffer this defect and I’ll be uploading it later.
No book review yet, I’m just sitting here with this impacted CD.
UPDATE
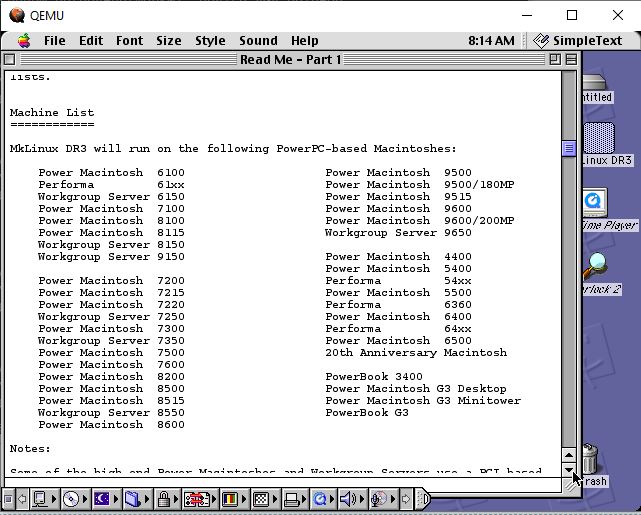
Thanks to Shawn Novak for uploading the R3 images so I can at least pull up the compatible machines:
The latest Qemu can pull it the image fine, however trying to boot up looks like the Mach kernel just isn’t compatible enough with the emulated Mac99 machine (which isn’t surprising).
I’ll need to mess with stuff to see if the G3beige can boot Linux on Qemu, and if the BootX (I think it’s bootx?) can load the mach kernel.
I’m using the Linux subystem on Windows, as it’s easier to build this Qemu tree from source. I’m using Debian, but these steps will work on other systems that use Debian as a base.
First thing first, you need to get your system with the needed pre-requisites to compile:
Now for me, GCC 7 didn’t build the source cleanly. I had to make a change to the file config-host.mak and remove all references to -Werror. Also I removed the sound hooks, as we won’t need them. remove the following lines:
CONFIG_AUDIO_DRIVERS=oss
CONFIG_AUDIO_OSS=m
Now you can build Qemu. it’ll happily build in parallel so feel free to build using the -j parameter with how many cores you have. I have 32, so I use
make -j32
Okay, all being well you now have a Qemu. Now following the steps from Artyom Tarasenko’s blog post, we can get started on the install!
First we create a 8GB disk
qemu-img create -f qcow2 aix-hdd.qcow2 8G
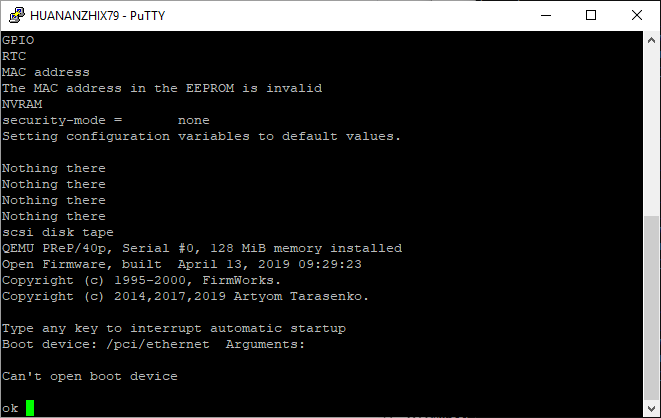
Next we need the custom BIOS with serial as the console.
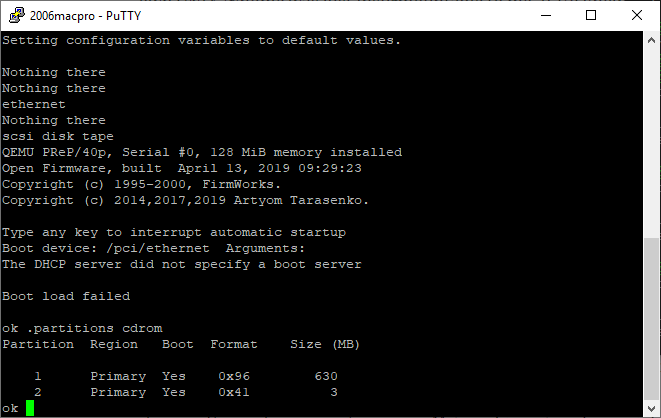
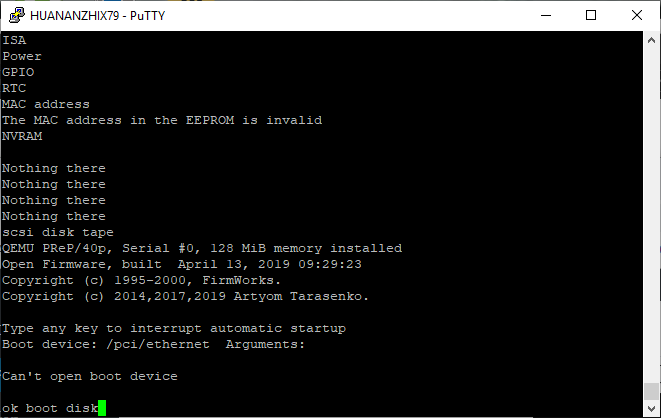
Now telnet to your localhost on port 4441 and you will see the console doing it’s BIOS initialize and eventually drop to the OK prompt.
One trick I’ve found is that from the Open Firmware prompt you can find out what partitions are recognized from the firmware. If it see’s partitions then there is some hope that the image you have is valid enough to boot. In the last few days I’ve found quite a few AIX images, which are lacking the partition table, and unable to boot.
.partitions cdrom
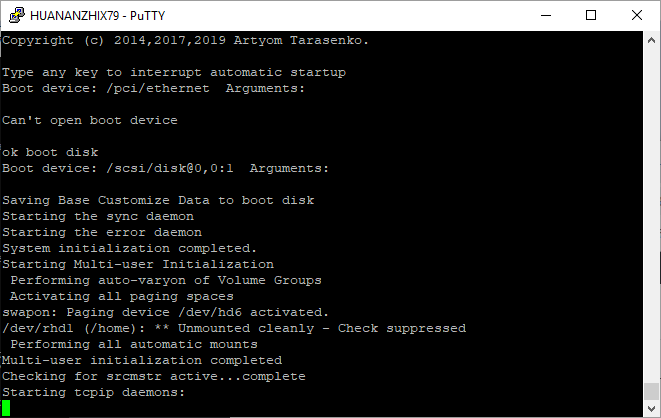
simply type in boot cdrom:2 to kick off the installer. It may take a minute or so for the installer to kick off.
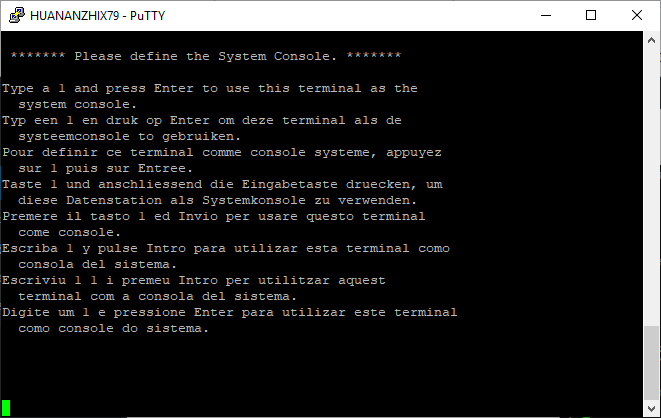
If all goes well, you’ll see the BIOS reload itself, then after a minute you’ll be prompted to press 1 to select the console
It doesn’t echo, don’t panic!
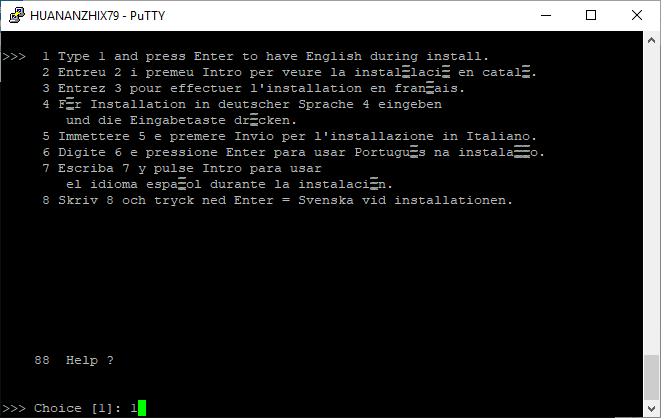
Next select your language. I’m doing English.
Next it’ll ask about installation type. Default ought to be fine.
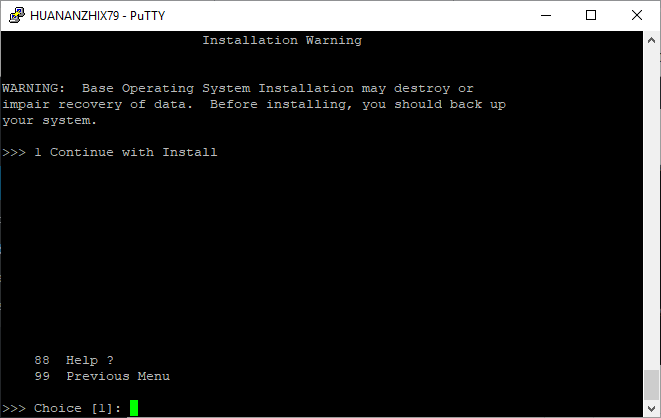
Because this will destroy the contents of the disk (which doesn’t matter as it’s blank) it’ll prompt for confirmation.
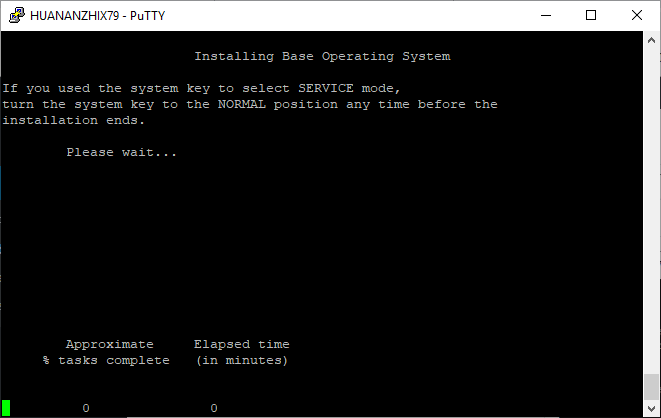
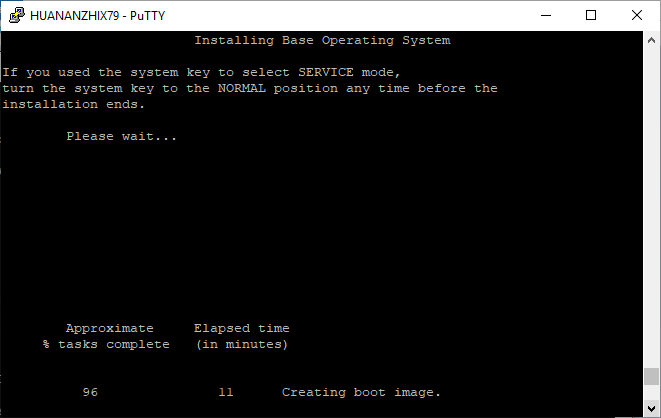
After this it’ll begin the installation. Depending on how fast your disk & CPU is this will take a while.
For me, the installation took about 11 minutes. This is using my Xeon E5-2667 v2. It took 17 minutes on my 2006 Mac Pro, with X5365’s it .
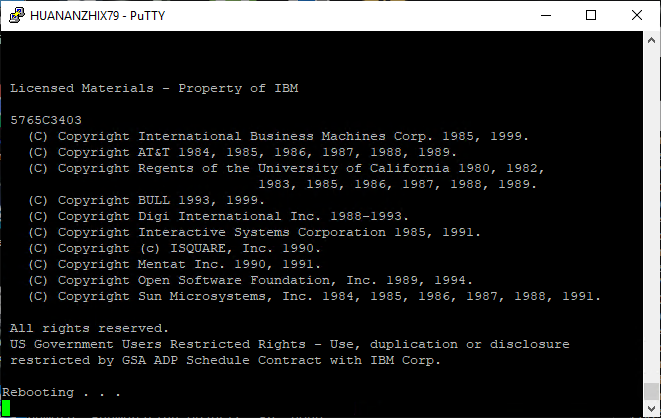
After it’s done, right around the 96% time it’ll reboot back to the BIOS
Once you are back at the OK prompt, you can now boot disk:
it’ll look like it’s hung for a minute, then it’ll start booting from disk!
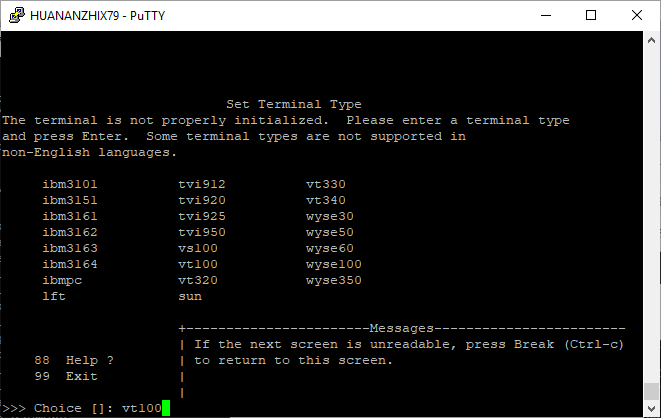
Once the OS is booted up, you select the terminal type. I’m using putty but I’ll select the vt100. Of note the function keys are selected by hitting escape and then the number key. So F3 is ESC 3.
I’m just going to finish the install, as we can always run smitty to mess with the system more, but right now I’m just interested in a base install of the BOS (Base Operating System, and IBM ISM).
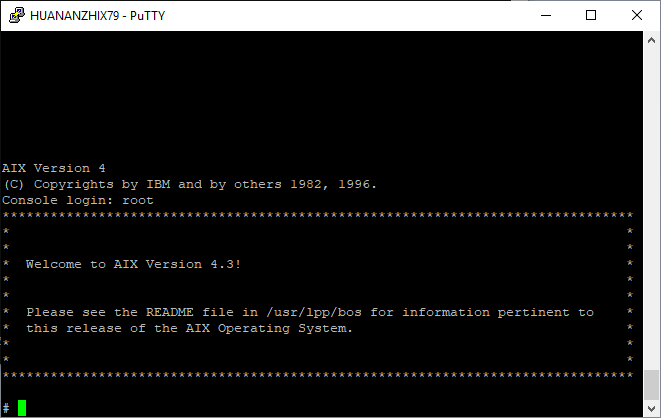
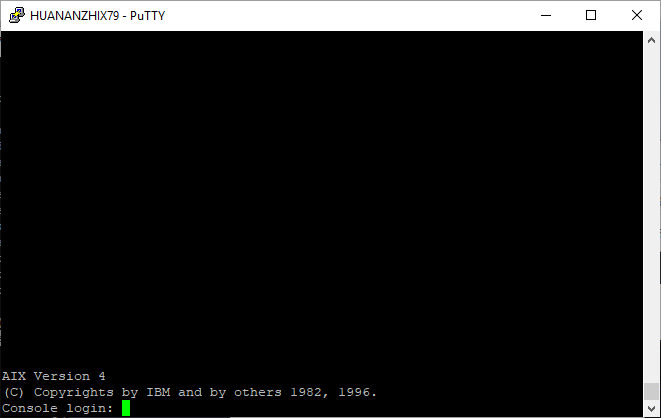
A few moments later, you’ll get dumped to the login prompt.
By default there is no password, so just login as root, and there you go, your very own virtual AIX 4.3 system.
# uname -a
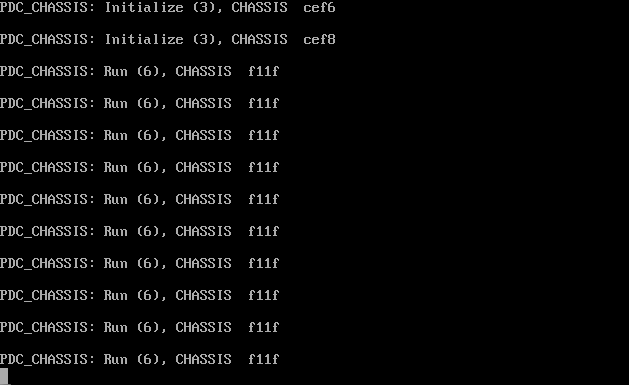
AIX localhost 3 4 000000004C00
So there you go! All thanks to Artyom’s hard work!
Yes, I know it’s kinda pointless as it’s horribly out of date, but I’m still having fun. Anyways now it’ll integrate with dynamips!
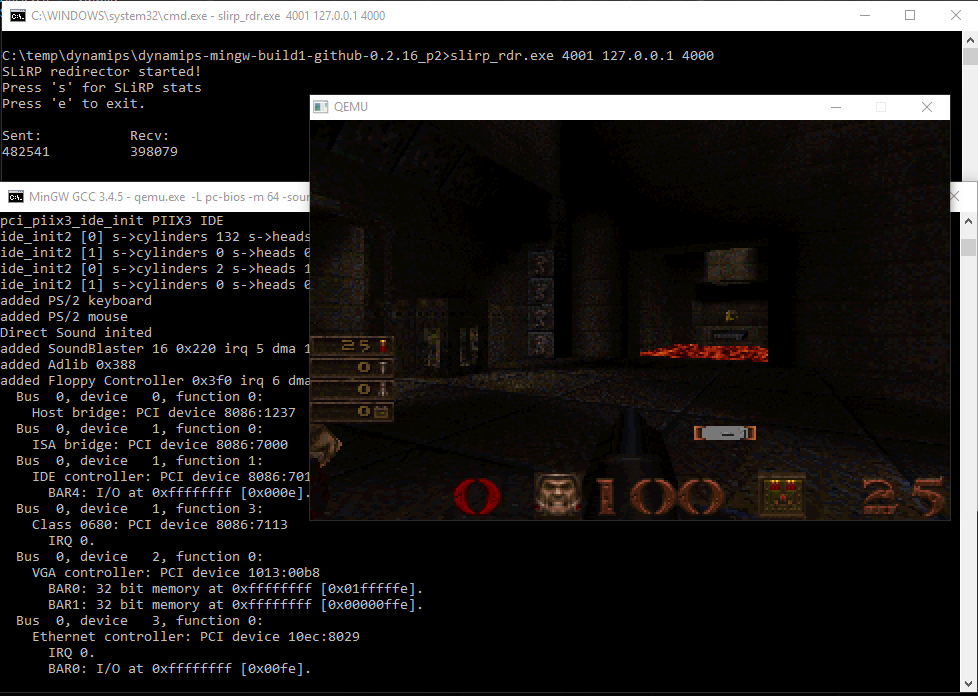
So yeah, in this example, instead of the usual “-net user” and the built in SLiRP stack, this uses UDP to talk to a stand-alone SLiRP stack. This will let you plug your Qemu into virtual Ethernet switches/hubs and interfaces of virtual routers. Even mixing and matching connections to different emulators that use UDP to exchange packets.
In this case I have a VMDK loaded with a NE2K-PCI driver, and QuakeWorld for MS-DOS. I also made the MPU401 external although it’s hanging on a secondary flag…
So after the last round, I went ahead and dug out my crap version, where I had just recently found a nice abs() fix for a FixedDiv issue that the old iD code suffers from, and re-built a version of DooM that both used the assembly fixed division, and another with the C version. To compile I used my old GCC 2.7.2.3 to build with the flags:
I thought this may be something cool, if not kind of pointless. Anyways the MPU401 UART can be run like a traditional serial port with an IRQ, in intelligent mode, or just as a ‘dumb’ device you can just bit bang to talk to MIDI devices. So while playing with DOSBox I thought it’d be fun to take it’s emulation and plug it into Qemu.
And this is the end result.
It’s far from perfect, when it works it does tend to work well, although it fails to work with things like Return to Zork, but it does work with DMX’s sound code in DooM and the MPU401 driver for Windows 3.1
While doing this I was originally struggling with mapping the IO ports. Qemu has some functions to map in the memory model to assign a function that will trap read/write space. In this case base is 0x330 the base of the MPU401 device.
I was thinking that the port 0x331 needed to be mapped in the same way, but it turns out after looking through more of the source, it’s actually a word aligned access. So in that case you can use a switch to see which port is actually being accessed.
And from there it’s a matter of mapping the DOSBox MPU code, along with the Windows interface code. Since I’m not using intelligent or IRQ mode, I just amputated the code where applicable.
If anyone wants to look at what I did to merge into anything else (and probably do a better job!) it’s on sourceforge as mpu401.c.
better performance than v2, sure, but for interactive stuff.. not so much.
So what is really going on here? Why is 0.90 so much faster when it comes to doom, and how is it possible that it’s the slowest in raw CPU performance. And fastest at IO? It appears that the crux of the issue is simply how it handles its IO, heavily favoring device performance VS CPU.
I’ll have to follow up with more builds and reading release notes to see what changed between releases. And what was it exactly that broke between gcc 3 and 4, and why the rip had to be.
I still like 0.90, if anything for it’s ability to run NeXTSTEP and NetWare.
Every day there will be a ‘tiny’ OS to run on Qemu!
The QEMU Advent Calendar 2018 features a QEMU disk image each day of December until Christmas. Each day a new package becomes available for download.
Every download contains a little ‘run’ shell script that starts the QEMU emulator with the recommended parameters for the disk image. Disk images are either contained directly in the download or are downloaded by the ‘run’ script (you need to have installed ‘curl’ or ‘wget’ in that case).
The disk images contain interesting operating systems and software that run under the QEMU emulator. Some of them are well-known or not-so-well-known operating systems, old and new, others are custom demos and neat algorithms.
The ‘run’ scripts (and disk images if included in the download) were created by volunteers from the QEMU community to showcase cool software that QEMU can run.
I found this one recently… So the first thing is you need Qemu 0.10 or higher (probably not a problem), as it’ll save in ppm format no issues. Then the fun expect program (Yay Linux subsystem), and of course Imagemagik.
Run Qemu so you can telnet to the command monitor:
I’ve worked on machines with HP-UX, but never owned one. Well Qemu now has system emulation thanks to Richard Henderson! You can find information over at:
Being the unfair person I am, I thought I’d try NeXTSTEP to see how far it gets.
Processor   Speed            State           Coprocessor State  Cache Size
---------  --------   ---------------------  -----------------  ----------
0      250 MHz    Active                 Functional            0 KB

Available memory: 512 MB
Good memory required: 16 MB

Primary boot path: FWSCSI.6.0
Alternate boot path: LAN.0.0.0.0.0.0
Console path: SERIAL_1.9600.8.none
Keyboard path: PS2

Available boot devices:
1. DVD/CD [lsi 00:00.0 2:0 Drive QEMU QEMU CD-ROM 2.5+]
2. lsi 00:00.0 0:0 Drive QEMU QEMU HARDDISK 2.5+

Booting from lsi 00:00.0 0:0 Drive QEMU QEMU HARDDISK 2.5+

Booting...
Boot IO Dependent Code (IODC) revision 153

HARD Booted.
Can't determine I/O subsystem type

NEXTSTEP boot v3.3.4.17
524288 memory

NEXTSTEP will start up in 10 seconds, or you can:
Type -v and press Return to start up NEXTSTEP with diagnostic messages
Type ? and press Return to learn about advanced startup options
Type any other character to stop NEXTSTEP from starting up automatically

boot:
And amazingly the bootloader works, although that is about it. Trying to boot up OpenBSD gets about this far:
I found on Windows though that the Debian 8 CD’s work the best, as the earlier ones lock up after loading a kernel, and the later one doesn’t fully initialize. I’ve been using this one: debian-8.0-hppa-NETINST-1.iso Serial console interaction is the way to go, so I ran Qemu like this:
So this way I can get get the install kicked off. Although I should probably have just downloaded debian-8.0-hppa-CD-1.iso
Linux on HPPA
Otherwise, yeah, it’s Linux, on HPPA
And for anyone who is interested, the only version of HP-UX I have hanging around, HP-UX 10.20 [HP9000 S700] gives me the following:
HP-UX 10.20 on Qemu
Manage Consent
To provide the best experiences, we use technologies like cookies to store and/or access device information. Consenting to these technologies will allow us to process data such as browsing behavior or unique IDs on this site. Not consenting or withdrawing consent, may adversely affect certain features and functions.
Functional
Always active
The technical storage or access is strictly necessary for the legitimate purpose of enabling the use of a specific service explicitly requested by the subscriber or user, or for the sole purpose of carrying out the transmission of a communication over an electronic communications network.
Preferences
The technical storage or access is necessary for the legitimate purpose of storing preferences that are not requested by the subscriber or user.
Statistics
The technical storage or access that is used exclusively for statistical purposes.The technical storage or access that is used exclusively for anonymous statistical purposes. Without a subpoena, voluntary compliance on the part of your Internet Service Provider, or additional records from a third party, information stored or retrieved for this purpose alone cannot usually be used to identify you.
Marketing
The technical storage or access is required to create user profiles to send advertising, or to track the user on a website or across several websites for similar marketing purposes.