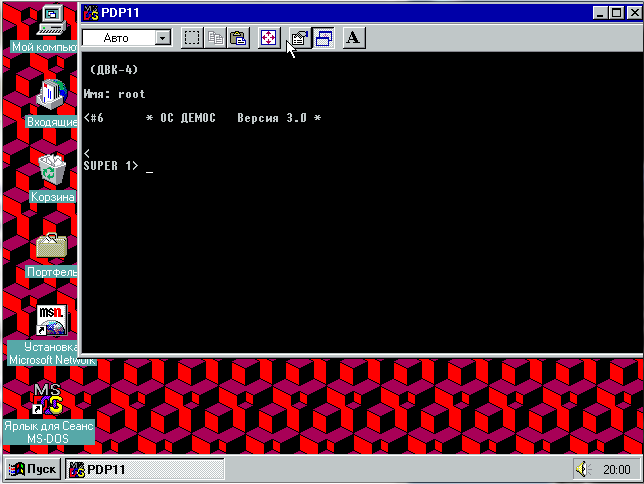
While looking around again for more DEMOS stuff (not to be confused with ‘demo’ argh!) I found Serge Vakulenko’s ready to run DEMOS 3.0 for the PDP-11/SIMH package! And I think this is the corresponding source code. More information can be found on what I think is Serge’s blog.
Now on to running it.
The good news is that I only needed msvcrt.dll from Visual C++ 4.0 to get it to run under Windows 95.. The ‘bad’ news well for me is that I couldn’t think of a good telnet to do Cyrillic/KOI8-R properly. I’ll admit it’s probably me not knowing how to do it correctly. At the same time, I figured the ‘easy’ way out is to just install some Russian version of Windows. Naturally there is the ‘dual keyboard’ layout thing in Windows, which if you can’t read the default language… well. it’s too intimidating. But with enough mousing around I pulled the Russian keyboard out and it seems to operate fine.
There is of course some information here, but the mechanical translation is rought.. The wiki page still talks of 68020 and VAX ports of Demos (among others) I wonder if they’ll ever surface?
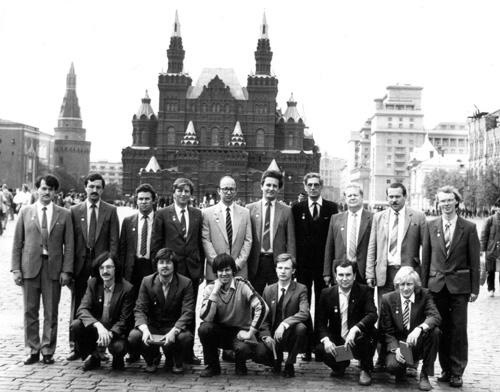
The DEMOS team.
I’ve even found comprehensive documentation for both Ð”ÐµÐ¼Ð¾Ñ and Xenix of all things here.
And to round things off, here is a mechanical translation (thanks google!) of the readme….
1. SETTING THE OPERATING SYSTEM DEMOS
====================================This section describes the procedures to be you-
satisfied, as when you first install the system, and in the case
“Complete destruction” of the root file system or replacement
hard disk is described by the root file system and non-
which directories.The process of preparing the system for operation can be separated by
pour into the following stages:
– The primary installation (or recovery) system
distribution set to floppy disks (FDD);
– Loading system and checking its integrity;
– Set up the system files.
If “partial destruction of the” filesystems recom-
is to try to restore the integrity of the program fsck
(See Annex 2).1.1. Initial installation of the system
===========================
For the initial installation of the system must:
– Tumbler “NETWORK” to include personal computers;
– Insert a floppy disk with the number 0 (the starting disk) in the
top device (null);
– Received an invitation to “@”, press (b), and then
in response to an invitation, “$” (dollar) to introduce “MY0” (or “MY” and
press (VC));
– After a while the screen will receive invitations
of “BOOT :…”; in response to it, you must press
(VC);
– The query “installing DEMOS requires erasing infor-
tion on the hard disk … “to answer” Y “(YES) and on-
press key (VC); cancel mistyped character (up to
pressing (VC)) may be using the (BZ);
– On request “Enter the time …” necessary to introduce 10
digits and press (VC); time is given as follows-
Thus:
ggmmddchchmm,
where he – the last two digits of the year (eg, 90);
mm – month number (from 01 to 12);
dd – day of the month;
hh – hour (00 to 23);
mm – minute (00 to 59);
– The query “capacity hard disk drive …”
must enter the number – the number of drive type and press
key (VC); type of drive is defined as follows:1. 5 MB 153 cylinder / 0-152 / – Set Database RUBIN impossible
2. 10 MB 306 Cylinders / 0-305 / – Set the database RUBIN impossible
3. 10 MB 306 Cylinders / 0-305 / – Set the database RUBIN possible
4. 20 MB 612 Cylinders / 0-611 / – Set the database RUBIN possible– More on request “format the hard drive?” necessary-
necessary to introduce a “Y”, if you want to reformat the drive or
enter “N”, if not required;
– After loading the mini systems on the hard drive would you-
given a message to her perevyzova from this disc;
after a while you will be prompted “@”;
– In response to this invitation must type “B”, and
then, in response to an invitation, “$” (dollar) to introduce “DW0” (or
“DW” and press (VC));
– After a while the screen will receive invitations
of “BOOT :…”; in response to it, you must press
(VC);
– After the system is triggered, it will ask for a floppy disk from the N1
basic set, it must be inserted into any drive
on floppy disks, enter the number of drive and press
key (VC);
– After reading the floppy disk system will ask the following;
necessary to remove the floppy disk with the number 1 from the drive
and insert a floppy disk with the number 2, then number 3 and
so on;
– After the floppy will be read by all base
set, the system will automatically reboot and check the File
lovuyu system on your hard drive (this can happen
Re-Boot);
– After rebooting the system will prompt “Name:”;
enter the name of the root user to perform
administrative functions in the DEMOS.If you are logged on for the first time after the initially-
initial installation or complete restoration, it is necessary-
necessary to do the following:
– Set a password for the root user command
passwd;
– Duplicate the distribution set GMD.To copy a floppy disk you can use cpfd
(See 4.6.2).
Before turning off the PC user must perform
command:
/ Etc / reboot-h (sure!)Diskette distribution set should be pasted
markers of protection record. This is to ensure that due
equipment malfunction or careless use is not
destroy information on floppy disks.
During the boot from the floppy disk with the number 0, it
should be without a marker.1.2. Download and check the integrity of the system
=======================================
To load the operating system must DEMOS:
– Turn the power on the PC;
– Received an invitation to “@”, press (b), and then
in response to an invitation, “$” (dollar) to introduce “DW0” (or “DW” and
press (VC));
– After a while the screen will receive invitations
of “BOOT :…”; in response to it, you must press
(VC);
– On request “Enter the time …” necessary to introduce 10
digits and press (VC);
– Further to the request “Check for file system?” need-
Dimo press (VC) (if you want to check file
system), or enter “N” and press (VC) (if not the friction
buetsya check file system);
– After checking the file systems will receive invitations
of “Name:”, enter the name under which the user
registered in the system after its processing realized
login.Example Remark and e. When checking file systems
may happen to re-reboot.If the answer to the query “Name:” enter “user”, a Loss-
zoydet login PRACTICE (system description PRACTICE
See Section 3 “Guidebook”).After completion of the work in the system, on invitation of the
solution to enter commands to type “/ etc / reboot-h”; after
how the system responds “SYNCING DISKS … DONE”, can be switched off-
chit powered PC.2. ADVANCED FEATURES DEMOS OS Version 3.0
===========================================
1.
Generating core demos contains the following items change
towards increased efficiency and optimality of the kernel:a). A new, fastest, and very bright
in the hard disk drive such as “Winchester”, re-
presses of the program is configured rwset.b). Adjusted and optimized driver floppy
disc.c). A new superuniversalny printer driver
supporting the work of printers such as:
EPSON FX-800, EPSON LX-800, SM 6302, DZM-180, SM 6315,
SM 6900, ROBOTRON SM 6329, D100, D100M, etc.
full ob_eme their functionality
and taking into account the errors in the ROM EPSON FX-800. Modes of Operation
driver software is configured lpset.
For details, see READ_LP file in the root directory.d). This version of the kernel supports the controller KTSGD
as with ROM KR18101RE2-181 on the board KTSGD and with ROM
KR18101RE2-182, operating in 8-bit character mode.
(Note that the kernel version 2.0 is not capable of work-
a thief with KTSGD on ROM KR18101RE2-182). However, the supplied
graphic protocol / etc / graf, is loaded into RAM KTSGD
and designed for ROM KR18101RE2-181 will not be over-
gruzhatsya in ROM KR18101RE2-182. Currently,
developed a new graphics protocol
latest ROM.In order to save memory parameters changed
The kernel configuration:e). Number of I / O buffer.
f). Number of processes in the system.
g). Number of concurrently executable programs.
h). Number of file descriptors.
i). Number of simultaneously open files.
j). “Trapped” statistics on I / O buffer, the sub-
pumping at boot time, for the teams.k). Reduced the number of overlay core demos.
l). And other stuff …
2.
Fix bug in the loader boot, which allowed
work on different types of hard drives.3.
Fix bug in intermediate loaders
rwuboot, fduboot.4.
The new version 4.1 of multiscreen editor red
contains the following changes and additions:a). (PF1) (i) (VC) set / reset insert mode.
b). (PF1) (b) (VC) set the 132 characters on the screen.
c). (PF1) (l) (VC) set the 80 characters on the screen.
d). (PF1) (g) (VC) set the drawing symbols
pseudographics. Press the (F4) (F5), (F6) (F8)
You can “draw” and “erase” vertical and horizontal
tal solid lines.e). (PF1) (^ 0) set / reset mode drawing / erasing pseudographics.
f). (PF1) (n) (VC) Exit from the pseudo-graphic.
g). (F1) move the cursor on the word forward.
h). (PF4) move the cursor to end of line.
i). (F5) delete word to the right of the cursor.
j). (PF1) (2) (right arrow) move the cursor
in the right extreme position of the current window.k). (PF1) (2) (left arrow) move the cursor
in the leftmost position of the current window.l). (PF1) (2) (up arrow) move the cursor
the upper extreme position of the current window.m). (PF1) (2) (Down Arrow) move the cursor
the lower extreme position of the current window.n). (PF1) (octal) (2) (^ 0) input specials. characters
where the number has three digits.o). Optimized output to the screen with
use shortcuts (F7) (PF1) (F7), (2) (F7) (PF1) (2) (F7)p). Undo the (FI), as the tab back
5.
Corrected program graf (file etc / graf).
Graphics protocol can now be downloaded as
in compatibility mode (VT52), and in the extended
pulsed mode (VT100) displeya.V file etc / termcap include
Chen esc-sequence installation of roll band from 2
at 22 lines screen, which improves the visibility of pa-
Editor’s red boots, and other minor changes.6.
Make a convenient initial installation of OS DEMOS on your hard drive
(See above point 1), taking into account their different types and database RUBIN.7.
Minor changes to the index.html file etc / rc
(Associated with the programs of fsck, mount).8.
Graphics library libgraph.a is
directory usr / lib and a functional analogue of graphite
cally Library Company “Borland International”. The file
READ_GRAF describes the graphics functions.* * * * *
9.
Opint program determines the optimal interleaving of sec-
tori, surfaces, cylinders and formats vinchester.Kontrol-
Noe testing after formatting the hard drive with an optimal
interleaving shows that the efficiency of working with hard drive
increased on average by 25-30%. opint program should be run
from floppy disks (the OS is loaded at the same time as floppy disks of numbers under-
rum 0). opint program has the following items keys:Usage: opint {-i [N] |-f [-q] [-bN] [-lN] [-sN] [-cN]} [-r]
-I [N] to calculate the optimal interleaving factor of
Sector / surfaces / and the cylinders. N-number
working cylinder, the cylinder is also used N-1
(Default N == 152)-F format the hard drive
-R does not store information on your hard drive (in the informal
matted hard drive, this key is mandatory!)-Q no questions asked
-BN set the start formatting with the N-cylinder
inclusive (the default cylinder N == 0);
this cylinder (and previous) is used in
as working to find the optimal Interlachen
Ving by a key-b0, or any absence
exists at all, then the worker becomes a 152 cylinder.-LN set end of formatting to N-cylinder
inclusive (default to the cylinder N == 152)-SN set interleaving factor N by sektoram/po-
surfaces, (default N == best)-CN set interleaving factor N in the cylinders
(Default N == best)10.
Rwset program is used to adjust operating modes
hard disk drive and has the keys:Usage: rwset [-cN] [[-] w]
-CN – enable precompensation to the N-cylinder
w – include checking account
-W – disable checking account11.
Lpset program is used to adjust operating modes
printer driver. All inforamatsiya Printing
contained in a file READ_LP.* * * * * * *
3. OPERATING SYSTEM DEMOS/306
==============================DEMOS/306 operating system designed for installation and
operation on a single hard disk drive (“HDD”, 20MB) with
operating system RT-11. Hard disk capacity of 20MB
between the two operating systems is as follows:RT-11: from 0 to 305 cylinder (10Mb)
DEMOS: from 306 to 611 cylinders (10Mb)Initially (power-on) are loaded OS RT-11,
and hard disk drive must be configured to work with
10 MB free disk space (the cylinder to 305 inclusive).
After downloading the RT-11 operating system called DEMOS/306 team DEMOS.Initial OS installation DEMOS/306 from installing OS DEMOS different
only a single boot floppy N0; the other five disks
distribution N1-N5 are identical for both operating systems.User tired of two-wheeled scooter RT-11
pressing five keys is transplanted into a strategic
Bomber DEMOS/306!OS DEMOS/306 – THIS IS A BREAKTHROUGH IN THE FUTURE!
OS DEMOS/306 – just fantastic!POSTCRYPTUM 1.
————– The directory / TEST contains kontolno-demonstration
tional tasks and tests that are run co-
executing / TEST / main.POSTCRYPTUM 2.
————– In the supplied distribution into a directory bin /,
usr / bin /, etc / contains utilities and files
(In particular:c7t10 nroff autoconfig termcap
chgrp pp clri timstat
chown pstat cron ttys
dump restor dostat utpm
dumpdir rline getty wall
edit rmail graf
egrep setcolor group
false smbl group.std
fgrep startcode init
gets starttext iostat
login su lp_daemon
lpf tfd0 mknod
lpset wermit psdatabase
lx accton savecore
mix admclean shutdownand others …), which are not descriptions of documents
orientation, because description on the tools and files that need-
dimye system administrator or system programming
Misty and not directly related to the work of Paul
transducer outside the scope of this documentation, I have-
ing goal is to give the most relevant information for the user-
converter. Descriptions can be found in various literature
on UNIX operating systems as Most utilities and service
Files are generally accepted in the family of UNIX names.
On the other hand, not all utilities (in particular:ardos from mkmf splineg
banner hier mm strings
blank hostname prmail sum
checkobj ident rab unifdef
ckdir indent rcs units
colcrt install rcsdiff uptime
ctags last rcsintro uucpc
cxref lastcomm rcsmerge uuxc
ddutok lex rev whoami
error lint rlog badsect
expand look script ncheck
fold merge spelland others … ) Described in the documentation contained
in the distribution, because documents constitutes a
taking into account further developments.POSTCRYPTUM 3.
————– The distribution is not included and are available
otdelno:a). DBMS “RUBIN”. / With complete documentation /
b). Integrated envelope “Demos Commander” –
analogue of the “Norton Commander”.POSTCRYPTUM 4.
————– On a version 3.0 OS DEMOS worked:Yudin, KE
Sudakov AV
Ryzhonkov KS
Bragin, DN~~~~~~~~~~~~~~~~~~~~~~~~~~~~~~~~~~~~~~~~~~~~~~~~~~ ~~~~~~~~
Copyright 1991 by Research Institute “Scientific Centre”,
lab 462 / 2. All rights reserved.PHONE: 536-56-42.
~~~~~~~~~~~~~~~~~~~~~~~~~~~~~~~~~~~~~~~~~~~~~~~~~~ ~~~~~~~~
Moscow, Zelenograd, Research Science Center (lab.462 / 2)Phone: 536-56-42.
~~~~~~~~~~~~~~~~~~~~~~~~~~~~~~~~~~~~~~~~~~~~~~~~~~ ~~~~~~~~

